


Curious what the experience would be like to trade in Javascript for C# on the front end? You are about to find out!
好奇在前端使用Java进行C#交易会带来什么样的体验? 您即将发现!
For many years, Javascript (and it’s child frameworks) have had their run of the DOM (Document Object Model) in a browser, and it took having that scripting knowledge to really manipulate client-side UI. About 2 years ago, all of that changed with the introduction of Web Assembly - which allows compiled languages to be interpreted client-side and is fully supported across all browsers now. Microsoft’s answer to this was the creation of Blazor. Allowing C# developers to build their entire stack in .NET, including UI, was an exciting proposition. For some time Blazor has been in preview but is now included as a general release on September 23rd, 2019 along with the next iteration of .NET Core - version 3.0.
多年以来,Javascript(及其子框架)在浏览器中运行了DOM (文档对象模型),并且掌握了脚本知识才能真正操作客户端UI。 大约2年前,所有这些都随着Web Assembly的引入而发生了变化-Web Assembly允许在客户端解释已编译的语言,并且现在所有浏览器都完全支持它。 微软对此的回答是Blazor的创立。 允许C#开发人员在.NET(包括UI)中构建其整个堆栈是一个令人兴奋的主张。 一段时间以来,Blazor一直处于预览阶段,但现在已作为一般发布与2019年9月23日的下一个版本的.NET Core 3.0版一起发布。
In order to build with Blazor and ASP.NET Core 3.0, you need the following prerequisites installed and ready to go:
为了使用Blazor和ASP.NET Core 3.0进行构建,您需要安装以下先决条件并可以使用:
- Visual Studio 2019, Visual Studio 2019 for Mac (see the comparison here) or Visual Studio Code (we will be using VS Code for the samples in this article since it runs on everything including Linux) Visual Studio 2019 , Visual Studio 2019 for Mac (请参阅此处的比较)或Visual Studio Code (本文中的示例将使用VS Code,因为它可以在包括Linux在内的所有设备上运行)
- .NET Core 3.0 SDK .NET Core 3.0 SDK
- C# Intellisense extension (if using VS Code) C#Intellisense扩展 (如果使用VS Code)
- An Okta Developer Account (free forever, to handle your OAuth needs) Okta开发者帐户 (永久免费,可满足您的OAuth需求)
使用ASP.NET Core 3.0 + Blazor构建基本网站 ( Build a Basic Website with ASP.NET Core 3.0 + Blazor )
Now that you have your dev environment handy, let’s get familiar with what a basic website walkthrough would be like. There are two ways you can utilize this technology: client-side or server-side Blazor. For this example, the server-side option is the best choice for stability, as client-side Blazor is still new and working on the final release. Stay tuned for that implementation!
现在您已经可以轻松使用开发环境,让我们熟悉基本的网站介绍。 您可以通过两种方式使用此技术: 客户端或服务器端Blazor 。 在此示例中,服务器端选项是稳定性的最佳选择,因为客户端Blazor仍然是新的,并且正在开发最终版本。 请继续关注该实现!
First, you’ll need to create a Blazor project. To get the latest Blazor project templates to work with Visual Studio or VS Code, simply install them from the command line/terminal from your base repo directory:
首先,您需要创建一个Blazor项目。 要使最新的Blazor项目模板可与Visual Studio或VS Code一起使用,只需从基本repo目录的命令行/终端安装它们即可:
dotnet new -i Microsoft.AspNetCore.Blazor.Templates::3.0.0-preview9.19424.4Visual Studio (16.3 or later) will detect that the templates have been installed and surface them to you without the need for any additional extensions. Now it’s time to scaffold your new project. From your parent directory of code repositories, execute the following command:
Visual Studio(16.3或更高版本)将检测到模板已安装,并在不需要任何其他扩展的情况下将它们呈现给您。 现在是时候搭建您的新项目了。 在代码存储库的父目录中,执行以下命令:
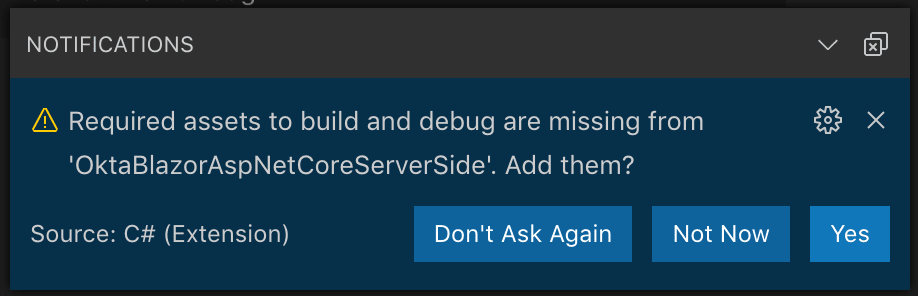
dotnet new blazorserver -o OktaBlazorAspNetCoreServerSideOnce it’s been run, open up the OktaBlazorAspNetCoreServerSide folder in Visual Studio Code. Once loaded, if you look in the bottom right-hand corner of the IDE you will see a permission request to add assets to the build. Select Yes.
运行它之后,在Visual Studio Code中打开OktaBlazorAspNetCoreServerSide文件夹。 加载后,如果您查看IDE的右下角,将看到一个许可请求,用于向构建中添加资产。 选择是 。
Now that everything has been loaded up, return to your command line/terminal and run the project.
现在,所有内容都已加载完毕,返回到命令行/终端并运行项目。
dotnet runLaunch your browser of choice and navigate to https://localhost:5001. You should see a templated website.
启动您选择的浏览器并导航到https://localhost:5001 。 您应该看到一个模板化的网站。

为Blazor Web App添加用户身份验证 ( Add User Authentication your Blazor Web App )
ASP.NET Core 3.0 has brought along with it some hefty changes to the libraries and dependencies from previous versions of .NET Core. To get started with using an external OAuth provider, like Okta, there is a NuGet package you need to add to the project. Fire up your command line/terminal window in VS Code and add the Okta .NET SDK:
ASP.NET Core 3.0带来了对库和.NET Core早期版本中的依赖项的一些重大更改。 要开始使用外部的OAuth提供程序(如Okta),您需要将NuGet程序包添加到项目中。 在VS Code中启动命令行/终端窗口,然后添加Okta .NET SDK :
dotnet add package Okta.Sdk --version 1.4.0In 3.0, ASP.NET Core ships as part of the .NET Core shared framework. The metapackage that was used for 2.x apps is no longer used. The first line of your project file that references the Web SDK is what pulls in the shared assemblies for ASP.NET Core.
在3.0中,ASP.NET Core是.NET Core共享框架的一部分。 不再使用用于2.x应用程序的metapackage 。 引用Web SDK的项目文件的第一行是ASP.NET Core共享程序集中的内容。
For user authentication with OAuth, there is an additional layer of information you will use, called Open ID Connect (OIDC). While much of handling authentication is baked into the new 3.0 framework, OIDC is not included, so you’ll need to add a quick reference to that.
对于使用OAuth的用户身份验证,您将使用附加的信息层,称为Open ID Connect(OIDC)。 虽然很多新的3.0框架都处理了身份验证,但OIDC并未包含在内,因此您需要添加对此的快速参考。
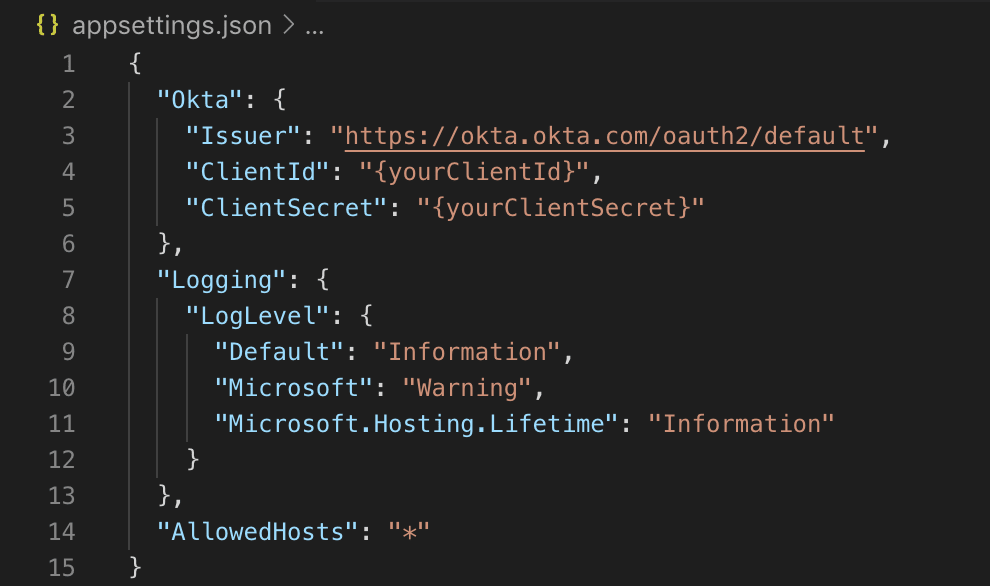
dotnet add package Microsoft.AspNetCore.Authentication.OpenIdConnect --version 3.0.0-preview9.19424.4Authentication works by redirecting users to the Okta website, where they will log in with their credentials, and then be returned to your site via the URL you will configure in the next section. Add the following code to the very top of your appsettings.json file, inside of the first brackets, and separate it from the rest of the settings by adding a comma after it.
身份验证的工作原理是将用户重定向到Okta网站,他们将使用其凭据登录,然后通过您将在下一部分中配置的URL返回到您的站点。 将以下代码添加到您的appsettings.json文件的最顶部,在第一个方括号内,并通过在其后面添加逗号将其与其余设置分开。
"Okta": {
    "Issuer": "https://okta.okta.com/oauth2/default",
    "ClientId": "{yourClientId}",
    "ClientSecret": "{yourClientSecret}"
  }
Your file should look like this:
您的文件应如下所示:
Just to make sure everything still can run, go ahead and execute dotnet run again.
为了确保一切仍然可以运行,请继续并再次执行dotnet run 。
设置您的Okta帐户以处理ASP.NET Core 3.0 Blazor App ( Set Up Your Okta Account to handle the ASP.NET Core 3.0 Blazor App )
Execute the following steps to configure Okta so that users can register themselves for an account.
执行以下步骤来配置Okta,以便用户可以注册自己的帐户。
- From the Administrative Dashboard, hover over Users and click Registration 在管理控制台中,将鼠标悬停在“用户”上,然后单击“ 注册”
- Click Enable Registration 单击启用注册
- Save the changes 保存更改
Once you have access to your account you can proceed to the Dashboard using a link like the one below: https://okta.okta.com/admin/dashboard
访问帐户后,您可以使用类似于以下链接的链接进入仪表板: https://okta.okta.com/admin/dashboard : https://okta.okta.com/admin/dashboard
On the Dashboard, click Applications in the main menu and on the Application screen, click Add Application. Then select Web and click Next.
在中心内,点击主菜单中的应用程序和应用程序屏幕上,单击添加应用程序 。 然后选择Web并单击Next 。
On the Create New Application screen, set the following values:
在“ 创建新应用程序”屏幕上,设置以下值:
Name: OktaBlazorAspNetCoreServerSide
名称:OktaBlazorAspNetCoreServerSide
Base URIs:
https://localhost:5001/基本URI:
https://localhost:5001/Login redirect URIs:
https://localhost:5001/authorization-code/callback登录重定向URI:
https://localhost:5001/authorization-code/callback
Click Done, then click Edit next to General Settings on your newly created Okta app. Edit the following values: Logout redirect URIs: https://localhost:5001/signout-callback-oidc Initiate login URI: https://localhost:5001/authorization-code/callback
单击“完成” ,然后在新创建的Okta应用程序上的“常规设置”旁边单击“ 编辑 ”。 编辑以下值:注销重定向URI: https://localhost:5001/signout-callback-oidc启动登录URI: https://localhost:5001/authorization-code/callback

Once you’ve saved those values, scroll down and take note of the ClientID and ClientSecret.
保存这些值后,向下滚动并记下ClientID和ClientSecret 。
ClientId refers to the client ID of the Okta application ClientSecret refers to the client secret of the Okta application Issuer will need the text {yourOktaDomain} replaced with your Okta domain, found at the top-right of the Dashboard page.
ClientId指Okta应用程序的客户端ID ClientSecret指Okta应用程序的客户端密钥发行者需要将文本{ yourOktaDomain }替换为您的Okta域,该域位于“仪表板”页面的右上角。
You will use your Okta account settings to update those values in the appsettings.json file in your project. For an even more secure way to store those values, check out this post if you are using Azure to host your .NET Core app.
您将使用Okta帐户设置来更新项目中appsettings.json文件中的那些值。 如果您使用Azure托管.NET Core应用程序,则可以使用一种更安全的方式来存储这些值,请查阅这篇文章 。
配置您的Blazor应用以使用Okta作为外部身份验证提供程序 ( Configure Your Blazor App to use Okta as the External Auth Provider )
Great! Now that Okta has been configured and is ready to go, there are a few changes that need to be made to the application startup.
大! 既然Okta已经配置好并且可以使用了,则需要对应用程序启动进行一些更改。
Add these using statements to your Startup.cs file:
将这些using语句添加到您的Startup.cs文件中:
using Microsoft.AspNetCore.Authentication.OpenIdConnect;
using Microsoft.AspNetCore.Authentication.Cookies;
using Microsoft.IdentityModel.Tokens;
Replace all the code in the ConfigureServices method with the code below.
用下面的代码替换ConfigureServices方法中的所有代码。
public void ConfigureServices(IServiceCollection services)
{
    services.AddRazorPages();
    services.AddServerSideBlazor();
    services.AddSingleton<WeatherForecastService>();
    services.AddAuthorizationCore();
    services.AddAuthentication(sharedOptions =>
    {
        sharedOptions.DefaultAuthenticateScheme = CookieAuthenticationDefaults.AuthenticationScheme;
        sharedOptions.DefaultSignInScheme = CookieAuthenticationDefaults.AuthenticationScheme;
        sharedOptions.DefaultChallengeScheme = OpenIdConnectDefaults.AuthenticationScheme;
    })
    .AddCookie()
    .AddOpenIdConnect(options =>
    {
        options.ClientId = Configuration["okta:ClientId"];
        options.ClientSecret = Configuration["okta:ClientSecret"];
        options.Authority = Configuration["okta:Issuer"];
        options.CallbackPath = "/authorization-code/callback";
        options.ResponseType = "code";
        options.SaveTokens = true;
        options.UseTokenLifetime = false;
        options.GetClaimsFromUserInfoEndpoint = true;
        options.Scope.Add("openid");
        options.Scope.Add("profile");
        options.TokenValidationParameters = new TokenValidationParameters
        {
            NameClaimType = "name"
        };
    });
}
ASP.NET Core 3.0 has new options to configure the services in this file. UseAuthorization has been newly added to 3.0 project templates.
ASP.NET Core 3.0具有用于在此文件中配置服务的新选项。 UseAuthorization已新添加到3.0项目模板中。
In the Configure() method of your Startup.cs file add this line just before the app.UseEndpoints() method:
在Startup.cs文件的Configure()方法中,在app.UseEndpoints()方法之前添加以下行:
app.UseAuthentication();
app.UseAuthorization();
In this example, you'll see there's a new UseEndpoints method in Startup.cs. This is what enables the new endpoint routing system in ASP.NET Core. All 3.0 project templates use that now. Think of this as a more performant routing system.
在此示例中,您将看到Startup.cs有一个新的UseEndpoints方法。 这就是在ASP.NET Core中启用新的终结点路由系统的原因。 所有3.0项目模板现在都使用该模板。 可以将其视为性能更高的路由系统。
NOTE: In the context of Blazor apps, endpoint routing is the more holistic way of handling redirects. This is covered here in depth. Also, see this documentation to learn more about it. Endpoint routing shipped in ASP.NET Core 2.2, but it didn't become the default in the templates until 3.0.
注意:在Blazor应用程序的上下文中,端点路由是处理重定向的更全面的方法。 这在这里进行了深入介绍。 另外,请参阅此文档以了解更多信息。 端点路由是ASP.NET Core 2.2附带的,但是直到3.0才在模板中成为默认路由。
将用户登录名添加到Blazor Web App用户界面 ( Add User Login to your Blazor Web App UI )
Time to add some user personalization to this app! Open Shared/MainLayout.razor and add the following HTML right before the About link.
是时候为该应用添加一些用户个性化了! 打开Shared/MainLayout.razor并在About链接之前添加以下HTML。
<AuthorizeView>
<Authorized>
            <a href="Identity/Account/Manage">Hello, @context.User.Identity.Name!</a>
            <a href="Identity/Account/LogOut">Log out</a>
    </Authorized>
    <NotAuthorized>
            <a href="Identity/Account/Register">Register</a>
            <a href="Identity/Account/Login">Log in</a>
    </NotAuthorized>
</AuthorizeView>
Using <AuthorizeView> is the easiest way to access authentication data, and is useful when you need to display a user’s name. The <AuthorizeView> component exposes a context variable of type AuthenticationState. In order to add this state to our app, open App.razor and wrap the HTML you see with <CascadingAuthenticationState> tags at the parent level. It should look like this:
使用<AuthorizeView>是访问身份验证数据的最简单方法,并且在需要显示用户名时很有用。 <AuthorizeView>组件公开一个AuthenticationState类型的上下文变量。 为了将此状态添加到我们的应用程序,请打开App 。 剃须并在父级使用<CascadingAuthenticationState>标签包装您看到HTML。 它看起来应该像这样:
<CascadingAuthenticationState>
    <Router AppAssembly="@typeof(Program).Assembly">
        ...
    </Router>
</CascadingAuthenticationState>
测试Okta注册和登录Blazor应用程序 ( Test Okta Registration and Login for Your Blazor App )
That’s it! To test it out, go back to the command line/terminal and execute dotnet run.
而已! 要对其进行测试,请返回命令行/终端并执行dotnet run 。
Then navigate to http://localhost:5001 in your browser. Click Login and you should be redirected to the Okta Sign-In Page.
然后在浏览器中导航到http:// localhost:5001 。 单击登录 ,您应该被重定向到Okta登录页面。

Because you configured your Okta org for self-registration, there should be an option at the bottom of the widget to allow users to register for a new account.
因为您已将Okta组织配置为自我注册,所以小部件底部应有一个选项,允许用户注册新帐户。

Now you have a website with a working login and user registration form. Your website also allows users to recover lost passwords. By repeating these steps you can create a network of tools that your users can access all with the same login.
现在,您的网站上有有效的登录名和用户注册表。 您的网站还允许用户恢复丢失的密码。 通过重复这些步骤,您可以创建一个工具网络,您的用户可以使用同一登录名访问所有工具。
All of that and not one line of Javascript. The future is looking bright for C#, give it a go with Blazor!
所有这些,而不是一行Javascript 。 C#的前景一片光明,请与Blazor一起努力!
了解有关ASP.NET Core,Blazor和身份验证的更多信息 ( Learn More about ASP.NET Core, Blazor and Authentication )
Like what you learned today? Here are some other resources that will help learn more about adding secure authentication and user management in your .NET Core projects:
就像你今天学到的一样? 以下是一些其他资源,它们将帮助您了解有关在.NET Core项目中添加安全身份验证和用户管理的更多信息:
- 5 Minute Serverless Functions Without an IDE 5分钟无服务器无IDE功能
- Get Started with Blazor and Web Assembly Blazor和Web组装入门
- Create Login and Registration in Your ASP.NET Core App 在ASP.NET Core应用中创建登录和注册
- Build Secure Microservices with AWS Lambda and ASP.NET Core 使用AWS Lambda和ASP.NET Core构建安全的微服务
- Build a CRUD App with ASP.NET Core and Typescript 使用ASP.NET Core和Typescript构建CRUD应用
- Build a GraphQL API with ASP.NET Core 使用ASP.NET Core构建GraphQL API


 266
266


 被折叠的 条评论
为什么被折叠?
被折叠的 条评论
为什么被折叠?
 到【灌水乐园】发言


