


构建angular组件库
Code reuse can be significant in any software project. By reusing code, developers can drastically cut development and maintenance time for software projects. This is the reason that every framework for developing software has a way to encapsulate functionality and reuse it. Whether it's classes in C# and Java or modules in JavaScript, it's a safe bet that you've considered extracting some piece of functionality to reuse it somewhere else. The only place that has never had a good story for reusing code is in HTML. Until now.
在任何软件项目中,代码重用都非常重要。 通过重用代码,开发人员可以大大减少软件项目的开发和维护时间。 这就是每个开发软件的框架都可以封装功能并重用它的原因。 无论是C#和Java中的类,还是JavaScript中的模块,您都可以考虑提取一些功能以在其他地方重用,这是一个安全的选择。 从来没有一个很好的故事来重用代码的地方是HTML。 到现在。
Projects like Stencil from the Ionic team, SkateJS, and now Angular Elements are making it easier than ever for developers to create components in the frameworks that they love and export them as Web Components so that they can use them in projects that may or may not be written in those frameworks. In this tutorial, I'll show you how to create your first Angular Element and how to use it in a plain old HTML page!
Ionic团队的Stencil , SkateJS和现在的Angular Elements等项目使开发人员比以往任何时候都更容易在他们喜欢的框架中创建组件并将其导出为Web组件,以便他们可以在可能会或可能不会在项目中使用它们在这些框架中编写。 在本教程中,我将向您展示如何创建第一个Angular元素,以及如何在普通的旧HTML页面中使用它!
Angular Elements入门需要具备的条件 ( What You'll Need to Get Started with Angular Elements )
You'll need just a few things installed to get started with Angular Elements:
您只需要安装几件事即可开始使用Angular Elements:
- Angular CLI (version 6.0.8 at the time of this article) Angular CLI(本文时的版本6.0.8)
- NPM (I'm using version 6.2.0) NPM(我使用的是6.2.0版)
- Node (I'm on version 10.8.0) 节点(我的版本为10.8.0)
While it's not necessary, I'm using Visual Studio Code. It's super lightweight and works on all platforms.
虽然没有必要,但我使用的是Visual Studio Code。 它超级轻巧,可在所有平台上使用。
开始您的Angular项目 ( Start Your Angular Project )
Start up a new Angular project using the Angular CLI:
使用Angular CLI启动一个新的Angular项目:
ng new login-elementYou may notice that the generated project has quite a few vulnerabilities in the dependencies. You can fix all of them with
npm audit fix --forcefrom inside thelogin-elementdirectory. I had no issues once this I did this, but double-check by running the project once you've fixed the vulnerabilities to check for yourself.您可能会注意到,生成的项目在依赖项中有很多漏洞。 您可以从
login-element目录中使用npm audit fix --force修复所有npm audit fix --force。 一旦执行此操作,我就没有问题,但是一旦修复漏洞以自己检查,就可以通过运行项目进行仔细检查。
Once the Angular CLI has finished generating the new project and installing the dependencies, change into the login-element directory, and add @angular/elements to the package with the ng add command:
Angular CLI完成生成新项目并安装依赖项后,更改为login-element目录,并使用ng add命令将@angular/elements添加到包中:
ng add @angular/elements --project=login-elementThis command will add the @angular/elements packages and everything it needs to make web components including document-register-element, which is a lightweight version of the W3C Custom Elements specification. There is a problem with this package, however. The version installed at the time of writing is version 1.11.0, which I was unable to get working in Chrome 68. After some digging around in the GitHub repos for Angular elements, the suggestion that worked for me was to back the version of the Document Register Element package down to version 1.8.1 as it has better support across the browsers that support Custom Elements. The easiest way is to edit your package.json file and change the dependency document-register-element from ^1.7.2 to 1.8.1 and then re-run the npm install command. Remember, this is early days for Angular Elements, and the kinks are still being worked out.
此命令将添加@angular/elements软件包以及制作Web组件所需的所有内容,包括document-register-element ,这是W3C Custom Elements规范的轻量级版本。 但是,此软件包有问题。 在撰写本文时,安装的版本是1.11.0,我无法在Chrome 68中使用。在Angular元素的GitHub存储库中进行了一些挖掘之后,对我有用的建议是支持该版本。文档注册元素软件包的最低版本为1.8.1,因为它在支持自定义元素的浏览器中具有更好的支持。 最简单的方法是编辑package.json文件,并将依赖项document-register-element从^1.7.2更改为1.8.1 ,然后重新运行npm install命令。 请记住,这对于Angular Elements来说还处于初期,并且仍在研究中。
为什么选择Okta进行身份验证? ( Why Okta for Authentication? )
Authentication is something almost every web application needs these days. It's also one of those things that can be a real pain for developers. Not just the login screen, but an identity provider to handle creating and managing users. Since you'll be creating a reusable login component, you'll need to set up the identity service to handle user login and management. Okta is an excellent choice here as it will make creating, managing, and authorizing users a cinch.
身份验证是当今几乎每个Web应用程序都需要的东西。 对于开发人员来说,这也是其中之一。 不仅是登录屏幕,还包括身份提供者来处理创建和管理用户。 由于将创建可重用的登录组件,因此需要设置身份服务来处理用户登录和管理。 Okta在这里是一个很好的选择,因为它将使创建,管理和授权用户变得轻松。
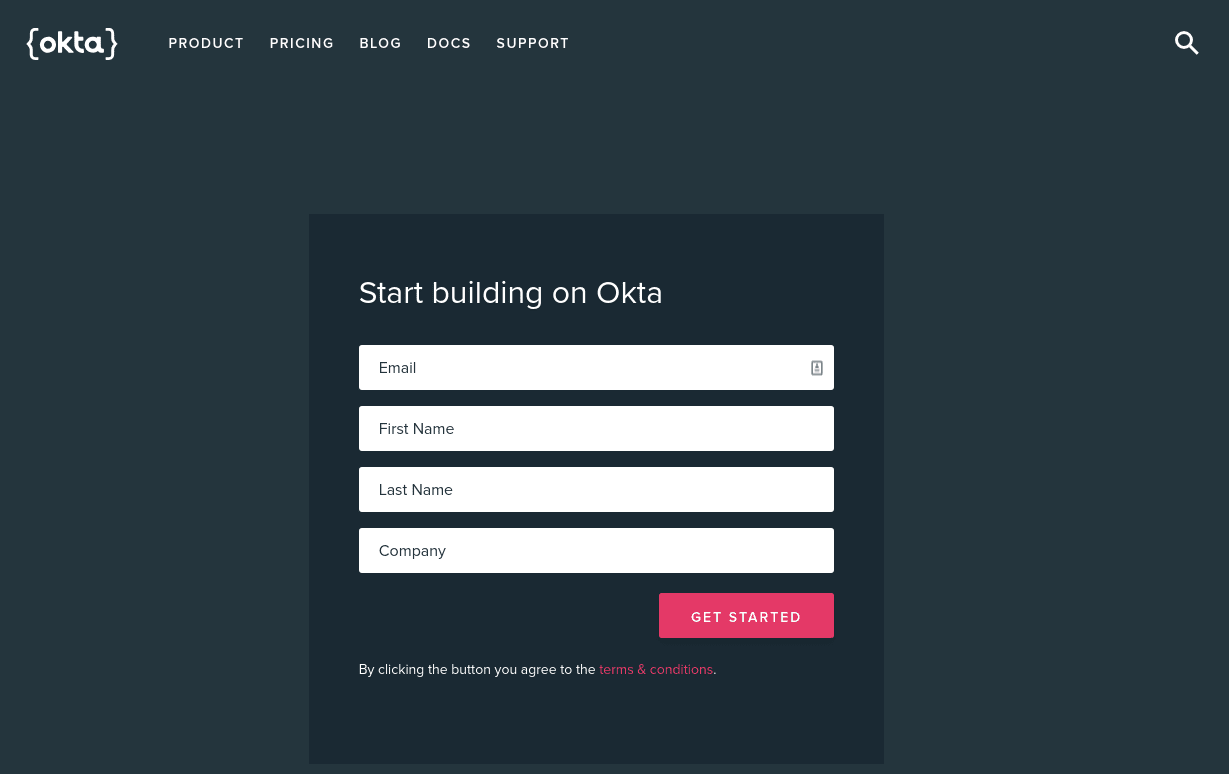
You can sign up a free forever developer account, and you're good to go!
您可以注册一个永久的免费开发者帐户,一切顺利!
创建Okta应用程序 ( Create an Okta Application )
To get started, you'll need to create an OpenID Connect application in Okta.
首先,您需要在Okta中创建一个OpenID Connect应用程序。
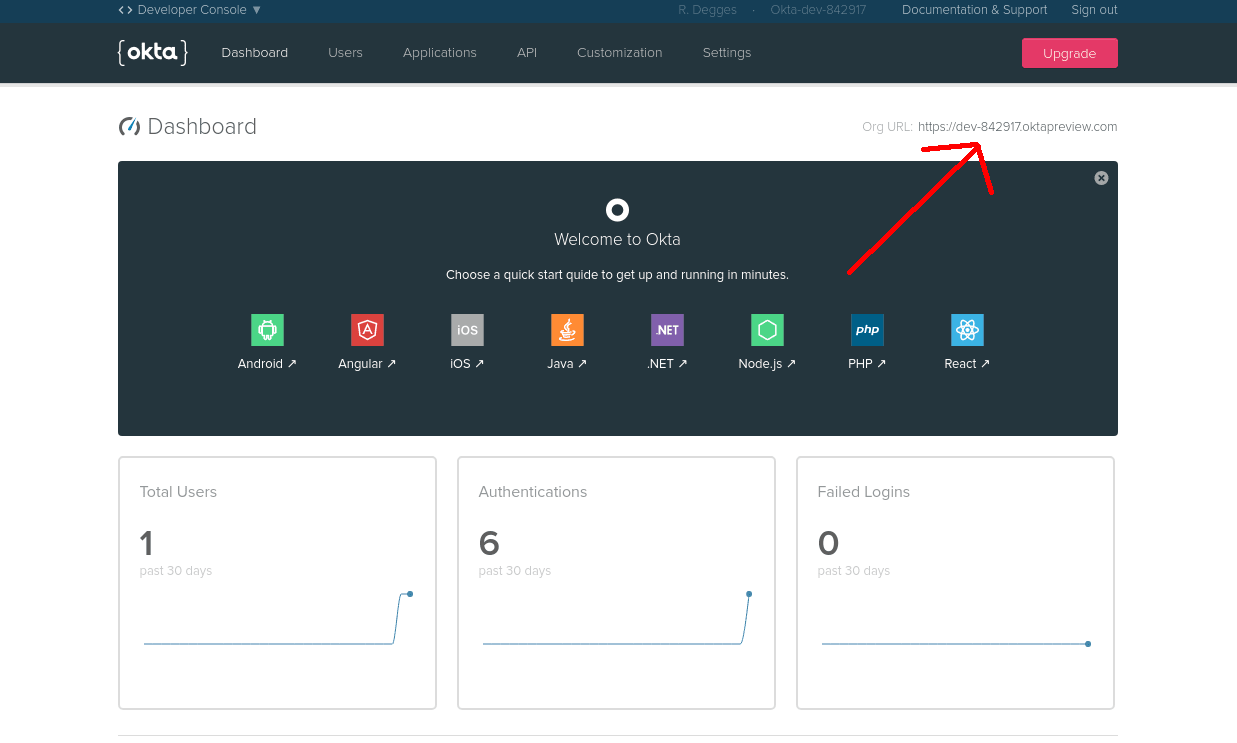
Once you've logged in and landed on the dashboard page, copy down the Org URL pictured below. You will need this later.
登录并进入仪表板页面后,请复制下图所示的组织URL。 稍后您将需要此。
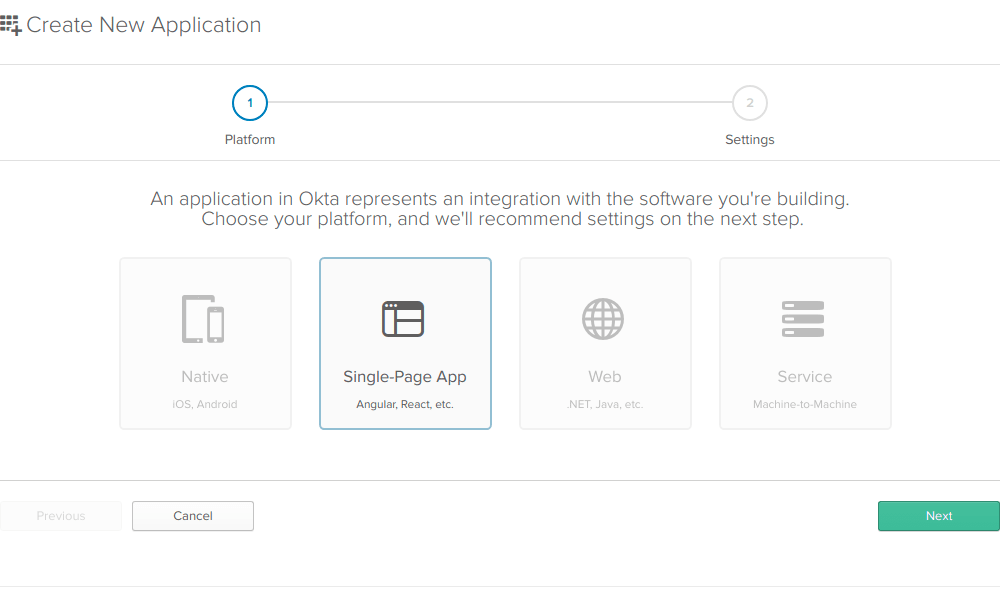
Then create a new application by browsing to the Applications tab and clicking Add Application, and from the first page of the wizard choose Single-Page App.
然后,通过浏览至“ 应用程序”选项卡并单击“ 添加应用程序”来创建一个新应用程序 ,然后从向导的第一页中选择“ 单页应用程序” 。
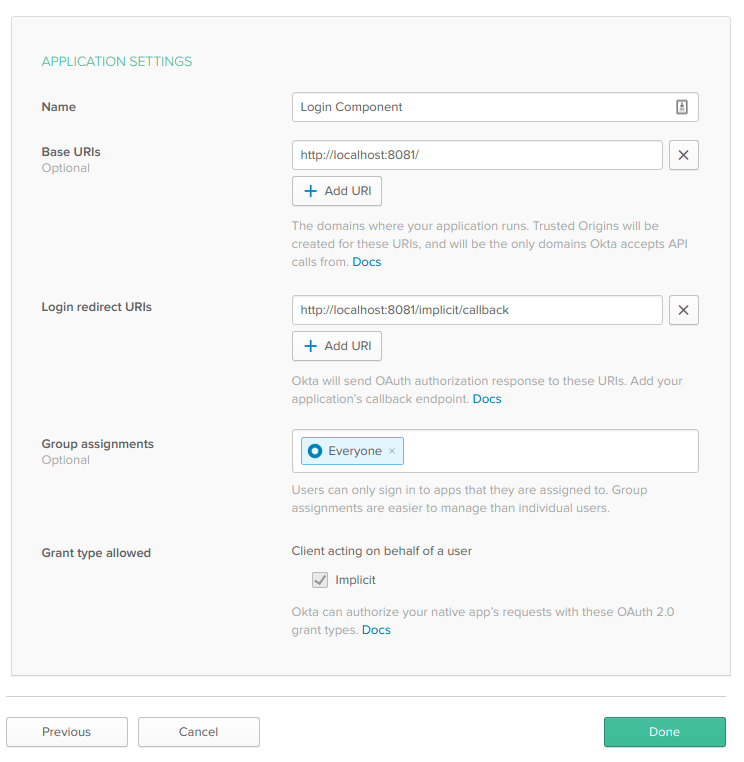
On the settings page, enter the following values:
在设置页面上,输入以下值:
- Name: Login Component 名称:登录组件
- Base URIs: http://localhost:8081 基本URI: http:// localhost:8081
- Login redirect URIs: http://localhost:8081/implicit/callback 登录重定向URI: http:// localhost:8081 / implicit / callback
You can leave the other values unchanged, and click Done.
您可以保留其他值不变,然后单击完成 。
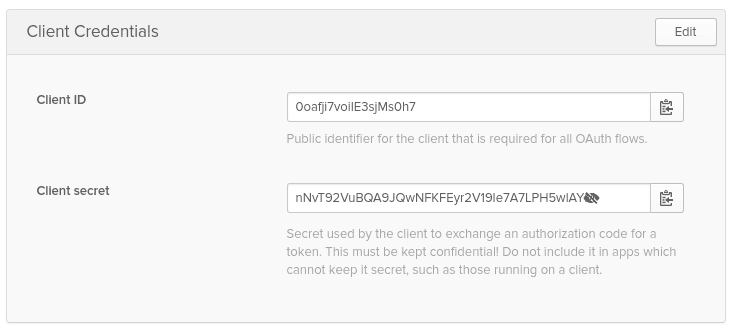
Now that your application has been created copy down the Client ID value on the following page, you'll need them soon.
既然已经创建了应用程序,请复制下一页上的Client ID值,您很快就会需要它们。
Lastly, you'll need to bring in the @okta/okta-auth-js package to do the actual logging into Okta.
最后,您需要引入@okta/okta-auth-js软件包以实际登录Okta。
npm install @okta/okta-auth-js --saveNow, you're ready to start creating your component!
现在,您就可以开始创建组件了!
创建您的角度元素 ( Create Your Angular Element )
For ease of use, you'll use the app.component.ts file to create the login component. The selector won't matter because when you set up the component to be exported, you'll assign a selector then.
为了易于使用,您将使用app.component.ts文件创建登录组件。 选择器无关紧要,因为当您设置要导出的组件时,您将随后分配一个选择器。
Your app.component.ts should look like:
您的app.component.ts应该如下所示:
import { Component, Input, ViewEncapsulation, OnInit } from '@angular/core';
import * as OktaAuth from '@okta/okta-auth-js';

@Component({
  selector: 'login-element',
  templateUrl: './app.component.html',
  styleUrls: ['./app.component.css'],
  encapsulation: ViewEncapsulation.Native
})
export class AppComponent implements OnInit {
  @Input()
  companyName = 'ACME Corporation';

  @Input()
  oktaUrl: string;

  @Input()
  clientId: string;

  authClient: any;
  isAuthenticated: boolean;
  username: string;
  password: string;
  token: any;

  ngOnInit() {
    console.log(this.companyName, this.oktaUrl, this.clientId);
    this.authClient = new OktaAuth({
      url: this.oktaUrl,
      issuer: `${this.oktaUrl}/oauth2/default`,
      redirectUri: `http://localhost:${window.location.port}/implicit/callback`,
      clientId: this.clientId
    });

    this.token = this.authClient.tokenManager.get('idToken');
    if (this.token) {
      this.isAuthenticated = true;
      this.username = this.token.claims.email;
    } else {
      this.isAuthenticated = false;
    }
  }

  async login(username, password) {
    let signInResponse: any;

    try {
      signInResponse = await this.authClient.signIn({ username, password });
      if (signInResponse.status === 'SUCCESS') {
        this.token = await this.authClient.token.getWithoutPrompt({
          sessionToken: signInResponse.sessionToken,
          responseType: 'id_token',
          scopes: ['openid', 'email', 'profile']
        });
        if (this.token) {
          this.authClient.tokenManager.add('idToken', this.token);
          this.isAuthenticated = true;
          this.username = this.token.claims.email;
        }
      } else {
        throw `transaction status ${
          signInResponse.status
        } could not be handled.`;
      }
    } catch (error) {
      console.log(error);
    }
  }
}
There is a lot to discuss here. First, you've set the encapsulation for the component to ViewEncapsulation.Native. This will ensure your component uses the native Shadow DOM. You've also imported Okta's JavaScript dependency.
这里有很多讨论。 首先,将组件的封装设置为ViewEncapsulation.Native 。 这将确保您的组件使用本机的Shadow DOM 。 您还导入了OktaJavaScript依赖项。
Next, there are three @Input's here. The companyName is merely for display, but the oktaUrl and clientId will be needed for the login component to work. Making these inputs means that users of the component, can set these values to their own Okta Org Url and set their ClientId. Also, in the ngOnInit lifecycle method you check to see if the user has already logged in. This will get the user's token from the tokenManager and set the component to display the welcome message instead of the login form if the user is already logged in when loading the page. This code will also handle a page refresh.
接下来,这里有三个@Input 。 companyName仅用于显示,但需要oktaUrl和clientId才能使登录组件正常工作。 进行这些输入意味着该组件的用户可以将这些值设置为自己的Okta Org Url并设置其ClientId。 另外,在ngOnInit生命周期方法中,您检查用户是否已经登录。这将从tokenManager获取用户的令牌,并将组件设置为显示欢迎消息,而不是登录表单(如果用户已登录)。加载页面。 此代码还将处理页面刷新。
Lastly, the login() method. This uses the Okta authClient object to sign into Okta, and then get an id_token with the user's email and profile once you've gotten a session token from Okta with a username and password. Both of these return promises that you're awaiting to make things a little more readable.
最后, login()方法。 它使用Okta authClient对象登录Okta,然后在从Okta获得具有用户名和密码的会话令牌后,使用用户的电子邮件和个人资料获取id_token 。 这两种返回保证都在await您使事情更具可读性。
Next, you'll need the actual HTML elements for the component. Replace what's in the app.component.html file with the following:
接下来,您将需要该组件的实际HTML元素。 将app.component.html文件中的内容替换为以下内容:
<section class="login-form">
  <h1>{{companyName}} Login</h1>
  <div *ngIf="!isAuthenticated">
    <input type="email" #username name="username" id="username" placeholder="username">
    <input type="password" #password name="password" id="password" placeholder="password">
    <button (click)="login(username.value, password.value)">Login</button>
  </div>
  <div class="greeting" *ngIf="isAuthenticated">
    Welcome {{username}}!
  </div>
</section>
The above code is very straightforward if you've done much Angular at all. It is just displaying the login form if the user is not logged in and a welcome message if they are. The login form's button calls the login() method with the username and password entered.
如果您已经做了很多Angular,上面的代码将非常简单。 如果用户未登录,则仅显示登录表单,如果用户未登录,则显示欢迎消息。 登录表单的按钮使用输入的用户名和密码来调用login()方法。
Add a little styling to make it less boring:
添加一些样式以使其更无聊:
.login-form {
  border: solid 1px #666;
  padding: 1rem;
  border-radius: 0.5rem;
  width: 25%;
  margin: auto;
}

input,
button {
  display: block;
  padding: 0.25rem;
  border-radius: 0.25rem;
  width: 95%;
  margin: 0.5rem;
}

.greeting {
  font-weight: bold;
  font-style: italic;
  font-size: 1.25rem;
}
Now you've got a component. All you need to do is to tell Angular that it is an Angular Element, and package it up so you can send it to all your friends!
现在您有了一个组件。 您需要做的就是告诉Angular这是一个Angular元素,并将其打包以便可以将其发送给所有朋友!
使零部件成为角度元素 ( Make the Component an Angular Element )
To make sure Angular knows this is meant to be a reusable Angular Element component, you'll need to make some changes to the app.module.ts file:
为确保Angular知道这意味着它是可重用的Angular Element组件,您需要对app.module.ts文件进行一些更改:
import { BrowserModule } from '@angular/platform-browser';
import { NgModule, Injector } from '@angular/core';
import { createCustomElement } from '@angular/elements';

import { AppComponent } from './app.component';

@NgModule({
  declarations: [AppComponent],
  imports: [BrowserModule],
  providers: [],
  entryComponents: [AppComponent]
})
export class AppModule {
  constructor(private injector: Injector) {
    const el = createCustomElement(AppComponent, { injector });
    customElements.define('login-element', el);
  }
  ngDoBootstrap() {}
}
The first thing you might notice about the new module code is that it adds an entryComponents array to the @NgModule declaration. This tells Angular that rather than bootstrapping an Angular application from AppComponent, you're going to compile it and package it up to use as a Web Component. Also, the AppModule now has a constructor to set up the createCustomElement() function that takes the AppComponent and the injector. The injector will be used to create new instances of the component that live independent of one another. Then you define the custom element and the selector login-element that will be defined for its use in other applications. The last ngDoBootstrap() method circumvents the natural bootstrapping of the element since it won't be a regular Angular application.
您可能会注意到的关于新模块代码的第一件事是,它向@NgModule声明添加了entryComponents数组。 这告诉Angular,而不是从AppComponent引导Angular应用程序,您将对其进行编译并将其打包以用作Web组件。 而且, AppModule现在具有构造函数,用于设置使用AppComponent和注入器的createCustomElement()函数。 注入器将用于创建组件的新实例,这些实例彼此独立存在。 然后,定义定制元素和选择器login-element ,这些login-element将定义为在其他应用程序中使用。 最后一个ngDoBootstrap()方法规避了元素的自然引导,因为它不是常规的Angular应用程序。
打包您的角度元素 ( Package Your Angular Element )
Now you're ready to package this thing up! There are several ways to do it, but here you'll use a couple of simple node packages and create a Node script to package everything into one file. By default, the Angular CLI will create four files. To see them, try running:
现在,您可以打包了! 有几种方法可以做到这一点,但是在这里,您将使用几个简单的节点包并创建一个Node脚本以将所有内容打包到一个文件中。 默认情况下,Angular CLI将创建四个文件。 要查看它们,请尝试运行:
ng build --prodYou'll see a new dist folder with four JavaScript files in it. They'll have hashes in the names, and be a little harder to work with than is practical for distributing to people to use in their applications. To avoid all this, install a couple of npm packages to help out:
您会看到一个新的dist文件夹,其中包含四个JavaScript文件。 它们的名称中会有散列,并且与分发给人们以在其应用程序中使用的实际情况相比,使用起来有些困难。 为避免所有这些情况,请安装几个npm软件包以提供帮助:
npm install --save-dev concat fs-extraThen create a file in the root of the project called build-elements.js that you'll use in your npm scripts to pull all these into one file:
然后在项目的根目录中创建一个名为build-elements.js ,您将在npm脚本中使用该文件将所有这些文件提取到一个文件中:
const fs = require('fs-extra');
const concat = require('concat');

(async function build() {
  const files = [
    './dist/air/runtime.js',
    './dist/air/polyfills.js',
    './dist/air/scripts.js',
    './dist/air/main.js'
  ];

  await fs.ensureDir('elements');
  await concat(files, 'elements/login-element.js');
})();
Now, to make sure it will run and find each of these files, add a new script to your package.json file. I added mine right after the generated build script:
现在,要确保它可以运行并找到每个文件,请将新脚本添加到package.json文件中。 我在生成的build脚本之后添加了我的:
"build:elements": "ng build --prod --output-hashing none && node build-elements.js",This will run that ng build --prod with output hashing turned off so that the files won't be named main.0476473b3749bc74928d.js, but rather just main.js, making it easy for the build-elements.js script to find and concatenate them.
这将在关闭输出哈希的情况下运行ng build --prod ,从而不会将文件命名为main.0476473b3749bc74928d.js ,而仅命名为main.js ,使build-elements.js脚本易于查找和连接它们。
Build it now by running:
现在运行以下命令来构建它:
npm run build:elementsYou will see a new folder called elements in your root folder with one file: login-element.js which you can easily use anywhere.
您将在根文件夹中看到一个名为elements的新文件夹,其中只有一个文件: login-element.js ,可在任何地方轻松使用。
使用您的角度元素 ( Use Your Angular Element )
In the new elements folder create an Index.html file and add the following contents, replacing the attribute values with your specific values:
在new elements文件夹中,创建一个Index.html文件并添加以下内容,用您的特定值替换属性值:
<!DOCTYPE html>
<html lang="en">

<head>
  <meta charset="UTF-8">
  <meta name="viewport" content="width=device-width, initial-scale=1.0">
  <meta http-equiv="X-UA-Compatible" content="ie=edge">
  <title>Document</title>
  <base href="/">
</head>

<body>

  <login-element company-name="{yourCompanyName}" okta-url="https://{yourOktaDomain}" client-id="{yourClientId}"></login-element>

  <script type="text/javascript" src="login-element.js"></script>

</body>

</html>
You can quickly run this by using a simple local HTTP server. `http-server is a simple package that serves any folder it is run in as a web folder. Install it with:
您可以使用简单的本地HTTP服务器来快速运行此服务器。 `http-server是一个简单的程序包,可提供作为Web文件夹运行的任何文件夹。 通过以下方式安装:
npm install -g http-serverThen run the HTTP server from inside the elements folder.
然后从elements文件夹中运行HTTP服务器。
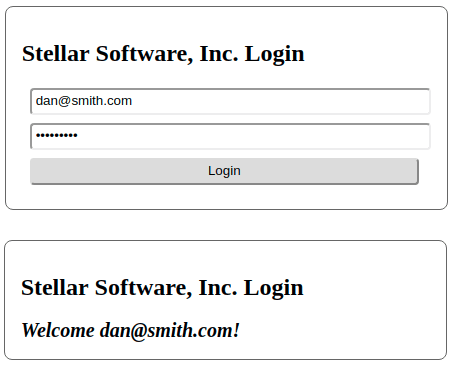
http-serverWhen you open http://localhost:8081, you will see the login component displayed. You can log in with your Okta user credentials and watch the component change to show your username in the welcome message.
当您打开http://localhost:8081 ,您将看到显示的登录组件。 您可以使用Okta用户凭据登录,并观看组件更改以在欢迎消息中显示您的用户名。
Now you have a single file that you can distribute and reuse to add an Okta login to any web application that needs it. Whether that app is written in Angular, React, Vue, or just plain old HTML and JavaScript.
现在,您只有一个文件,可以分发和重复使用该文件,以将Okta登录名添加到需要它的任何Web应用程序中。 无论该应用程序是用Angular,React,Vue还是纯旧HTML和JavaScript编写的。
用Angular做更多 ( Do Even More with Angular )
Check out more tutorials on Angular:
查看有关Angular的更多教程:
- Matt Raible has a post describing what's new in Angular 6 Matt Raible的帖子描述了Angular 6的新功能
- I recently wrote a post on Upgrading your ASP.NET Core Angular template to Angular 6 我最近写了一篇有关将ASP.NET Core Angular模板升级到Angular 6的文章
- Ibrahim shows how to build a basic CRUD app with Angular and ASP.NET Framework 4.x 易卜拉欣展示了如何使用Angular和ASP.NET Framework 4.x构建基本的CRUD应用程序
- Braden Kelley created a CRUD-y SPA with Node and Angular Braden Kelley 使用Node和Angular创建了CRUD-y SPA
- Matt Raible also makes it easy with Spring Boot and Angular Matt Raible还可以轻松使用Spring Boot和Angular
If you have any questions, please don’t hesitate to leave a comment below, or ask us on our Okta Developer Forums. Don't forget to follow us on Twitter @OktaDev, on Facebook and on YouTube!
如有任何疑问,请随时在下面发表评论,或在我们的Okta开发者论坛上向我们提问。 不要忘记在Twitter @ OktaDev , Facebook和YouTube上关注我们!
翻译自: https://scotch.io/tutorials/build-a-reusable-component-with-angular-elements
构建angular组件库


 1421
1421

 被折叠的 条评论
为什么被折叠?
被折叠的 条评论
为什么被折叠?
 到【灌水乐园】发言


