


python get 请求
In many web apps, it's normal to connect to various third-party services by using APIs. When you use these APIs you can get access to data like weather information, sports scores, movie listings, tweets, search engine results, and pictures. You can also use APIs to add functionality to your app. Examples of these are payments, scheduling, emails, translations, maps, and file transfers. If you were to create any of those on your own it would take a ton of time, but with APIs, it can take only minutes to connect to one and access its features and data.
在许多Web应用程序中,通常使用API连接到各种第三方服务。 使用这些API时,您可以访问天气信息,体育比分,电影列表,推文,搜索引擎结果和图片等数据。 您还可以使用API向您的应用添加功能。 这些示例包括付款,计划,电子邮件,翻译,地图和文件传输。 如果您要自己创建任何一个,则将花费大量时间,但是使用API,只需几分钟即可连接到一个并访问其功能和数据。
In this article, I'm going to talk about the Python Requests library, which allows you to send HTTP requests in Python.
在本文中,我将讨论Python请求库,该库允许您使用Python发送HTTP请求。
And since using an API is simply sending HTTP requests and receiving responses, Requests allows you to use APIs in Python. I'll demonstrate the use of a language translation API here so you can see an example of how it works so you can potentially use it in your own apps.
并且由于使用API只是发送HTTP请求和接收响应,因此Requests允许您在Python中使用API。 我将在此处演示语言翻译API的用法,以便您看到其工作方式的示例,以便有可能在自己的应用中使用它。
HTTP请求快速概述 ( Quick Overview of HTTP Requests )
HTTP requests are how the web works. Every time you navigate to a web page, your browser makes multiple requests to the web page's server. The server then responds with all the data necessary to render the page, and your browser then actually renders the page so you can see it.
HTTP请求是网络的工作方式。 每次导航到网页时,浏览器都会向该网页的服务器发出多个请求。 然后,服务器将提供呈现页面所需的所有数据进行响应,然后您的浏览器将实际呈现该页面,以便您可以看到它。
The generic process is this: a client (like a browser or Python script using Requests) will send some data to a URL, and then the server located at the URL will read the data, decide what to do with it, and return a response to the client. Finally, the client can decide what to do with the data in the response.
通用过程是这样的:客户端(例如使用Requests的浏览器或Python脚本)将向URL发送一些数据,然后位于URL的服务器将读取数据,决定如何处理并返回响应给客户。 最后,客户端可以决定如何处理响应中的数据。
Part of the data the client sends in a request is the request method. Some common request methods are GET, POST, and PUT. GET requests are normally for reading data only without making a change to something, while POST and PUT requests generally are for modifying data on the server. So for example, the Stripe API allows you to use POST requests to create a new charge so a user can purchase something from your app.
客户端在请求中发送的部分数据是请求方法。 一些常见的请求方法是GET,POST和PUT。 GET请求通常仅用于读取数据而不进行任何更改,而POST和PUT请求通常用于修改服务器上的数据。 因此,例如,Stripe API允许您使用POST请求创建新的费用,以便用户可以从您的应用程序中购买商品。
This article will cover GET requests only because we won't be modifying any data on a server.
本文仅介绍GET请求,因为我们不会在服务器上修改任何数据。
When sending a request from a Python script or inside a web app, you, the developer, gets to decide what gets sent in each request and what to do with the response. So let's explore that by first sending a request to Scotch.io and then by using a language translation API.
从Python脚本或网络应用程序发送请求时,开发人员可以决定在每个请求中发送了什么以及如何处理响应。 因此,让我们通过首先向Scotch.io发送请求,然后使用语言翻译API来进行探索。
安装Python请求 ( Install Python Requests )
Before we can do anything, we need to install the library. So let's go ahead and install requests using pip. It's a good idea to create a virtual environment first if you don't already have one.
在做任何事情之前,我们需要安装该库。 因此,让我们继续使用pip安装请求。 如果您还没有虚拟环境,那么最好先创建一个虚拟环境。
pipinstall requests我们的第一个要求 ( Our First Request )
To start, let's use Requests for something simple: requesting the Scotch.io site. Create a file called script.py and add the following code to it. In this article, we won't have much code to work with, so when something changes you can just update the existing code instead of adding new lines.
首先,让我们使用Requests做一些简单的事情:请求Scotch.io网站。 创建一个名为script.py的文件,并向其中添加以下代码。 在本文中,我们没有太多代码可以使用,因此,当发生更改时,您可以更新现有代码,而不必添加新行。
import requests

res = requests.get('https://scotch.io')

print(res)
So all this code is doing is sending a GET request to Scotch.io. This is the same type of request your browser sent to view this page, but the only difference is that Requests can't actually render the HTML, so instead you will just get the raw HTML and the other response information.
因此,所有这些代码所做的就是向scotch.io发送GET请求。 这是您的浏览器发送来查看此页面的请求的相同类型,但唯一的区别是请求实际上无法呈现HTML,因此您只会获取原始HTML和其他响应信息。
We're using the .get() function here, but Requests allows you to use other functions like .post() and .put() to send those requests as well.
我们在这里使用.get()函数,但是Requests允许您使用其他函数(例如.post()和.put())发送这些请求。
You can run it by executing the script.py file.
您可以通过执行script.py文件来运行它。
python script.pyAnd here's what you get in return:
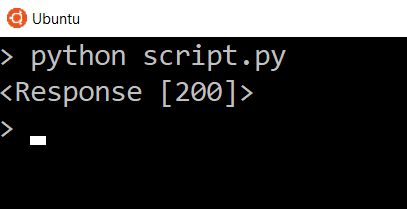
这是您得到的回报:
状态码 ( Status Codes )
The first thing we can do is check the status code. HTTP codes range from the 1XX to 5XX. Common status codes that you have probably seen are 200, 404, and 500.
我们可以做的第一件事是检查状态码。 HTTP代码的范围从1XX到5XX。 您可能已经看到的常见状态码是200、404和500。
Here's a quick overview of what each status code means:
以下是每个状态代码含义的快速概述:
- 1XX - Information 1XX-信息
- 2XX - Success 2XX-成功
- 3XX - Redirect 3XX-重定向
- 4XX - Client Error (you messed up) 4XX-客户端错误(您搞砸了)
- 5XX - Server Error (they messed up) 5XX-服务器错误(它们搞砸了)
Generally, what you're looking for when you perform your own requests are status codes in the 200s.
通常,执行自己的请求时要查找的是200年代的状态码。
Requests recognizes that 4XX and 5XX status codes are errors, so if those status codes get returned, the response object from the request evaluates to False.
请求识别出4XX和5XX状态码是错误,因此,如果返回了这些状态码,则请求中的响应对象将评估为False。
You can test if a request responded successfully by simply checking the response for truth. For example:
您可以通过简单地检查响应是否为真来测试请求是否成功响应。 例如:
if res:
    print('Response OK')
else:
    print('Response Failed')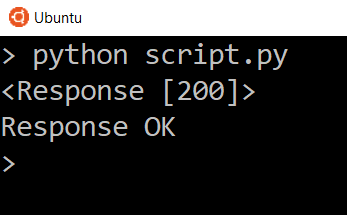
The message "Response Failed" will only appear if a 400 or 500 status code returns. Try changing the URL to some nonsense to see the response fail with a 404.
仅当返回400或500状态代码时,才会出现消息“响应失败”。 尝试将URL更改为一些废话,以查看响应失败并显示404。
You can take a look at the status code directly by doing:
您可以直接通过以下方式查看状态代码:
print(res.status_code)This will show you the status code directly so you can check the number yourself.
这将直接向您显示状态代码,以便您自己检查号码。

标头 ( Headers )
Another thing you can get from the response are the headers. You can take a look at them by using the headers dictionary on the response object.
您可以从响应中获得的另一件事是标题。 您可以使用响应对象上的标头字典来查看它们。
print(res.headers) Headers are sent along with the request and returned in the response. Headers are used so both the client and the server know how to interpret the data that is being sent and received in the response/response.
We see the various headers that are returned. A lot of times you won't need to use the header information directly, but it's there if you need it.
我们看到返回的各种标题。 很多时候,您不需要直接使用标头信息,但是如果需要,它就在那儿。
The content type is usually the one you may need because it reveals the format of the data, for example HTML, JSON, PDF, text, etc. But the content type is normally handled by Requests so you can easily access the data that gets returned.
内容类型通常是您可能需要的一种,因为它可以显示数据的格式,例如HTML,JSON,PDF,文本等。但是内容类型通常由Requests处理,因此您可以轻松地访问返回的数据。
回应文字 ( Response Text )
And finally, if we take a look at res.text (this works for textual data, like a HTML page like we are viewing) we can see all the HTML needed to build the home page of Scotch. It won't be rendered, but we see that it looks like it belongs to Scotch. If you saved this to a file and opened it, you would see something that resembled the Scotch site. In a real situation, multiple requests are made for a single web page to load things like images, scripts and stylesheets, so if you save only the HTML to a file, it won't look anything like what the Scotch.io page looks like in your browser because only a single request was performed to get the HTML data.
最后,如果我们看一下res.text(它适用于文本数据,就像我们正在查看HTML页面一样),我们可以看到构建Scotch主页所需的所有HTML。 它不会被渲染,但是我们看到它看起来像属于Scotch。 如果将其保存到文件中并打开它,将会看到类似于Scotch网站的内容。 在实际情况下,对于单个网页会发出多个请求以加载诸如图像,脚本和样式表之类的内容,因此,如果仅将HTML保存到文件中,则它看起来就不会像Scotch.io页面那样在浏览器中显示,因为仅执行了一个请求来获取HTML数据。
print(res.text)
使用翻译API ( Using the Translate API )
So now let's move on to something more interesting. We'll use the Yandex Translate API to perform a request to translate some text to a different language.
现在,让我们继续进行一些更有趣的事情。 我们将使用Yandex Translate API来执行将某些文本翻译为其他语言的请求。
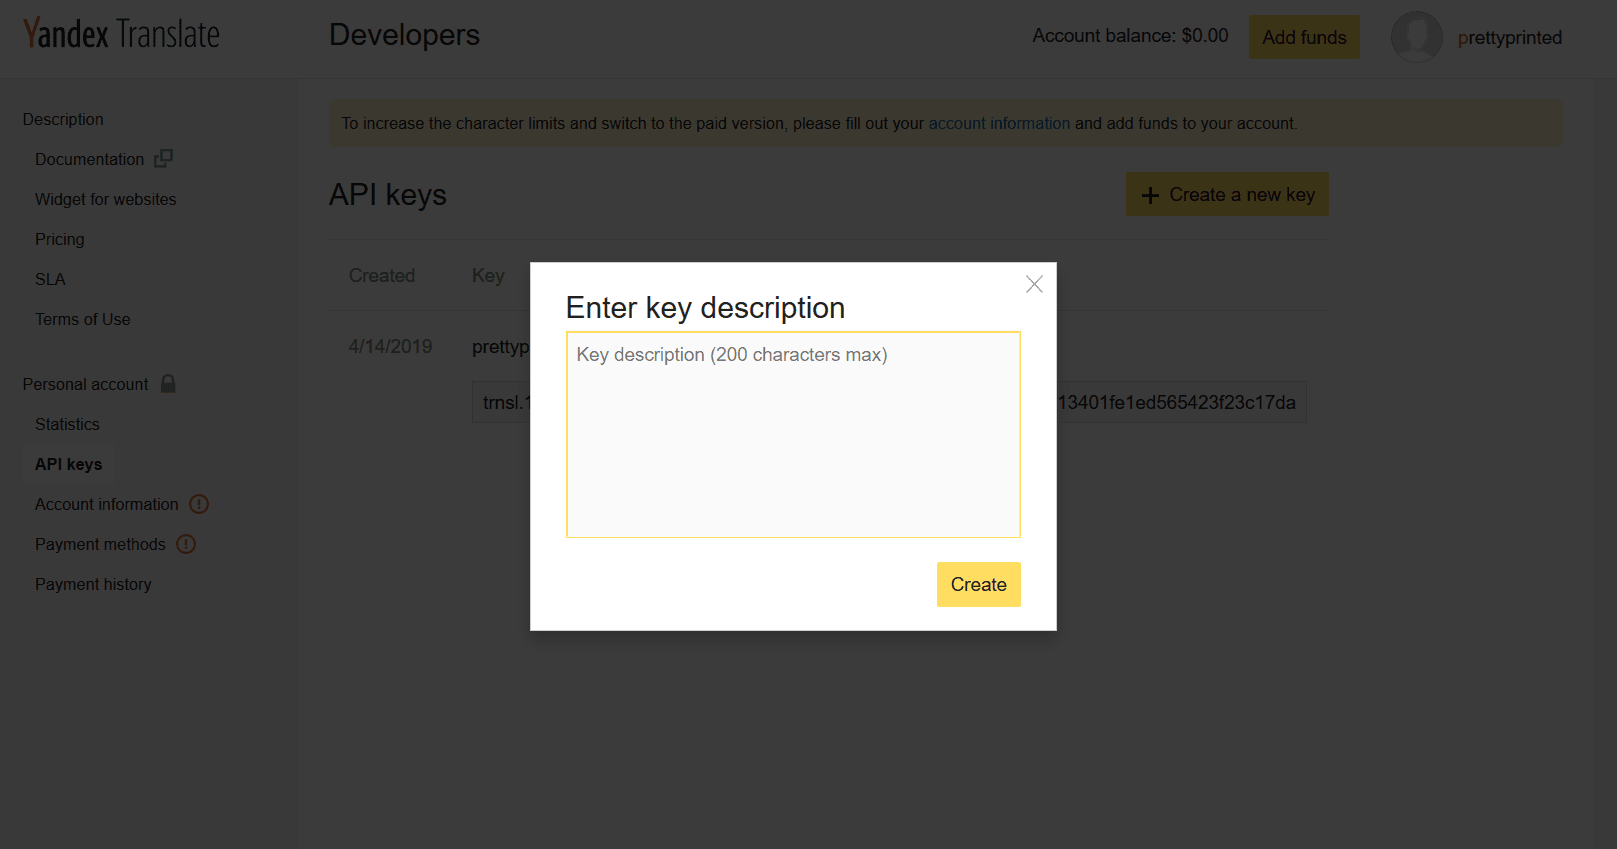
To use the API, first you need to sign up. After you sign up, go to the Translate API and create an API key. Once you have the API key, add it to your file as a constant. Here's the link where you can do all those things: https://tech.yandex.com/translate/
要使用API,首先需要注册。 注册后,转到Translate API并创建一个API密钥。 获得API密钥后,将其作为常量添加到文件中。 您可以在此处执行所有这些操作的链接: https : //tech.yandex.com/translate/
API_KEY= 'your yandex api key'The reason why we need an API key is so Yandex can authenticate us every time we want to use their API. The API key is probably the simplest form of authentication, because it's simply added on to the end of the request URL when being sent.
之所以需要API密钥,是因为Yandex可以在每次我们想要使用其API时对我们进行身份验证。 API密钥可能是最简单的身份验证形式,因为它在发送时被简单地添加到请求URL的末尾。
To know which URL we need to send to use the API, we can look at the documentation for Yandex here: https://tech.yandex.com/translate/doc/dg/reference/translate-docpage/
要知道使用该API我们需要发送哪个URL,我们可以在此处查看Yandex的文档: https : //tech.yandex.com/translate/doc/dg/reference/translate-docpage/
If we look there, we'll see all the information needed to use their Translate API to translate text.
如果我们在那里查看,我们将看到使用其Translate API转换文本所需的所有信息。
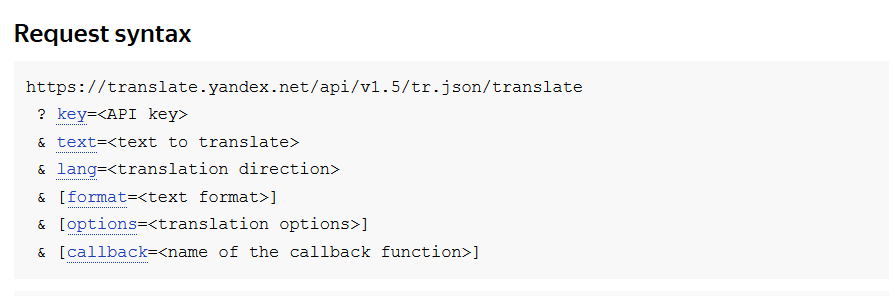
API documentation can be difficult to read at times, but in this case it's simple. When we see a URL with ampersands (&), question marks (?), and equals signs (=), you can be sure that the URL is for GET requests. Those symbols specify the parameters that go along with the URL.
API文档有时可能很难阅读,但是在这种情况下很简单。 当我们看到带有&符号,问号(?)和等号(=)的URL时,可以确定该URL适用于GET请求。 这些符号指定了URL附带的参数。
Normally things in square brackets ([]) will be optional. In this case, format, options, and callback are optional, while the key, text, and lang are required for the request.
通常,方括号([])中的内容是可选的。 在这种情况下,格式,选项和回调是可选的,而键,文本和lang是请求所必需的。
And of course it's easy to see the URL. So let's add some code to send to that URL. You can replace the first request we created with this:
当然,很容易看到URL。 因此,让我们添加一些代码以发送到该URL。 您可以用以下内容替换我们创建的第一个请求:
url= 'https://translate.yandex.net/api/v1.5/tr.json/translate'
res = requests.get(url)
There are two ways we can add the parameters. We can either append it to the end of the URL directly, or we can have Requests do it for us. Having Requests do it for us is much easier.
我们可以通过两种方式添加参数。 我们可以将其直接附加到URL的末尾,也可以让Requests为我们完成。 有请求为我们完成它要容易得多。
To do that, we can create a dictionary for our parameters. The three items we need are the key, the text, and the language.
为此,我们可以为我们的参数创建一个字典。 我们需要的三个项目是键,文本和语言。
Let's create the dictionary using the API key, 'Hello' for the text, and 'en-es' as the lang, which means we want to translate from English to Spanish.
让我们使用API密钥创建字典,“ Hello”作为文本,“ en-es”作为lang,这意味着我们要从英语翻译为西班牙语。
If you need to know any other language codes, you can look here: https://en.wikipedia.org/wiki/List\_of\_ISO\_639-1\_codes You are looking for the 639-1 column.
如果您需要知道任何其他语言代码,则可以在这里查看: https ://en.wikipedia.org/wiki/List\_of\_ISO\_639-1\_codes您正在寻找639-1列。
We create a params dictionary by using the dict() function and passing in the keys and values we want in our dictionary.
我们通过使用dict()函数并在字典中传入想要的键和值来创建params字典。
params= dict(key=API_KEY, text='Hello', lang='en-es')Now we take the parameters dictionary and pass it to the .get() function.
现在,我们使用参数字典并将其传递给.get()函数。
res= requests.get(url, params=params)When we pass the parameters this way, Requests will go ahead and add the parameters to the URL for us.
当我们以这种方式传递参数时,请求将继续进行,并将参数添加到我们的URL中。
Now let's add a print statement for the response text and view what gets returned in the response.
现在让我们为响应文本添加打印语句,并查看响应中返回的内容。
print(res.text)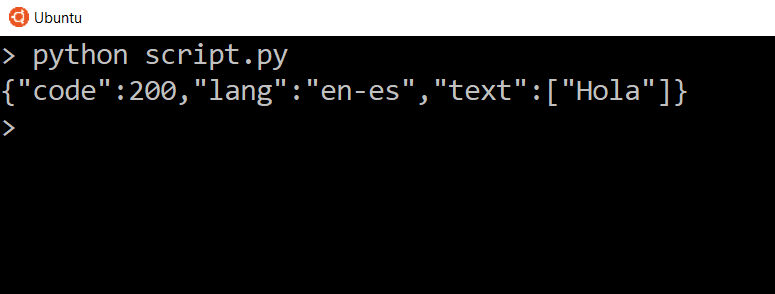
We see three things. We see the status code, which is exactly the same status code of the response itself, we see the language that we specified, and we see the translated text inside of the list. So you should see 'Hola' for the translated text.
我们看到三件事。 我们看到状态码,它与响应本身的状态码完全相同,我们看到指定的语言,并且看到列表内的翻译文本。 因此,您应该在翻译后的文字中看到“ Hola”。
Try again with en-fr as the language code, and you should see 'Boujour' in the response now.
再次尝试使用en-fr作为语言代码,现在您应该在响应中看到“ Boujour”。
params= dict(key=API_KEY, text='Hello', lang='en-fr') Let's take a look at the headers for this particular response.
print(res.headers) Obviously the headers should be different because we're communicating with a different server, but in this case the content type is application/json instead of text/html. What this means that the data can be interpreted as JSON.
When application/json is the content type of the response, we are able to have Requests convert the response to a dictionary and list so we can access the data easier.
当application / json是响应的内容类型时,我们可以让Requests将响应转换为字典和列表,以便我们可以更轻松地访问数据。
To have the data parsed as JSON, we use the .json() method on the response object.
为了将数据解析为JSON,我们在响应对象上使用.json()方法。
If you print it, you'll see that the data looks the same, but the format is slightly different.
如果进行打印,则会看到数据看起来相同,但格式略有不同。
json= res.json()
print(json)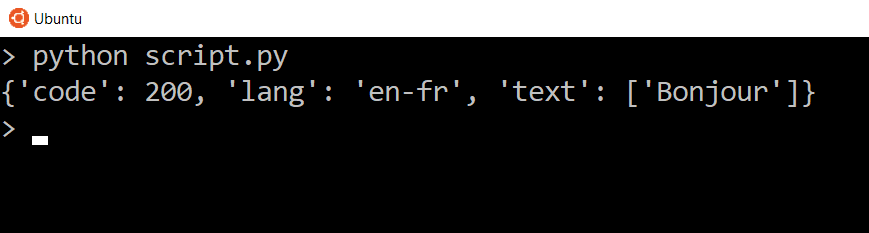 The reason why it's different is because it's no longer plain text that you get from res.text. This time it's a printed version of a dictionary.
Let's say we want to access the text. Since this is now a dictionary, we can use the text key.
假设我们要访问文本。 由于这现在是字典,因此我们可以使用文本键。
print(json['text'])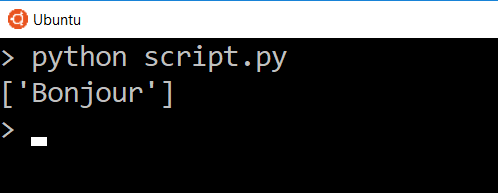 And now we only see the data for that one key. In this case we are looking at a list of one item, so if we wanted to get that text in the list directly, we can access it by the index.
print(json['text'][0])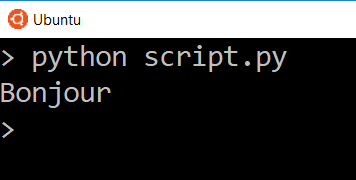 And now the only thing we see is the translated word.
So of course if we change things in our parameters, we'll get different results. Let's change the text to be translated from Hello to Goodbye, change the target language back to Spanish, and send the request again.
因此,当然,如果我们更改参数中的内容,则会得到不同的结果。 让我们将要翻译的文本从“ Hello”更改为“ Goodbye”,将目标语言更改回西班牙语,然后再次发送请求。
params= dict(key=API_KEY, text='Goodbye', lang='en-es') Try translating longer text in different languages and see what responses the API gives you.
翻译API错误案例 ( Translate API Error Cases )
Finally, we'll take a look at an error case. Everything doesn't always work, so we need to know when that happens.
最后,我们来看一个错误情况。 并非总是一切都正常,因此我们需要知道何时发生。
Try changing your API KEY by removing one character. When you do this your API key will no longer by valid. Then try sending a request.
尝试通过删除一个字符来更改您的API密钥。 执行此操作时,您的API密钥将不再有效。 然后尝试发送请求。
If you take a look at the status code, this is what you get:
如果您查看状态码,则将获得以下信息:
print(res.status_code)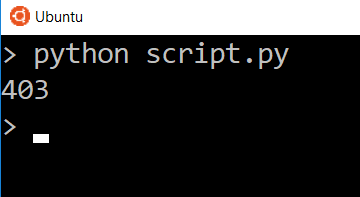 So when you are using the API, you'll want to check if things are successful or not so you can handle the error cases according to the needs of your app.
结论 ( Conclusion )
Here's what we learned:
这是我们学到的:
- How HTTP requests work HTTP请求如何工作
- The various status codes possible in a response 响应中可能的各种状态代码
- How to send requests and receive responses using the Python Requests library 如何使用Python Requests库发送请求和接收响应
- How to use a language translation API to translate text 如何使用语言翻译API来翻译文本
- How to convert application/json content responses to dictionariesThat covers the basics of Requests in Python. Of course you can do so much more, but what I talked about in this article is the foundation of most requests. Things may change slightly depending on the circumstances, but the basic ideas will remain the same. 如何将应用程序/ json内容响应转换为字典这涵盖了Python中的Requests基础。 当然,您可以做更多的事情,但是我在本文中所讨论的是大多数请求的基础。 视情况而定,情况可能会稍有变化,但基本思想将保持不变。
If you want to do more, check out https://apilist.fun/ to see different APIs that are available, and try to use them with Python Requests.
如果您想做更多事情,请查看https://apilist.fun/以查看可用的其他API,然后尝试将它们与Python Requests一起使用。
翻译自: https://scotch.io/tutorials/getting-started-with-python-requests-get-requests
python get 请求


 3万+
3万+

 被折叠的 条评论
为什么被折叠?
被折叠的 条评论
为什么被折叠?
 到【灌水乐园】发言


