


Did you make any resolutions this year? One resolution I seem to make every year is to lose weight and exercise. Sometimes I even stick to it.
你今年有什么决议吗? 我似乎每年要做出的一项决议是减肥和运动。 有时我什至坚持。
A good way I have found to keep on track with any resolution is to record progress. There's something about visualizing progress that helps me stay motivated.
我发现与任何解决方案保持一致的一个好方法是记录进度。 可视化进度可以帮助我保持动力。
In this tutorial, you are going to create a modern Node.js application to keep track of weight measurements. We’ll use technologies like PostgreSQL, a new and exciting Postgres client for Node.js, hapi, Vue.js, and Okta to secure the API and provide account registration and login!
在本教程中,您将创建一个现代的Node.js应用程序以跟踪重量测量。 我们将使用PostgreSQL之类的技术,这是一个令人兴奋的Node.js,hapi,Vue.js和Okta的新型Postgres客户端,可确保API的安全并提供帐户注册和登录!

Before we begin, let's first check some requirements.
在开始之前,我们先检查一些要求。
- Node.js version 12.x or higher. Node.js版本12.x或更高版本。
- A PostgreSQL database. If you don't already have PostgreSQL, you can install it using Docker. More details on this later in the tutorial! PostgreSQL数据库 。 如果您还没有PostgreSQL,则可以使用Docker安装它。 在本教程后面的内容中将对此有更多详细信息!
- A free Okta developer account for account registration, login, and security. 一个免费的Okta开发人员帐户,用于帐户注册,登录和安全。
创建您的Node.js项目 ( Create Your Node.js Project )
Let's dive straight into creating the Node.js project. Open your terminal or command prompt, change to the folder where you store projects, and create a new folder for this project.
让我们直接研究创建Node.js项目。 打开终端或命令提示符,转到存储项目的文件夹,然后为此项目创建一个新文件夹。
mkdir node-weight-tracker
cd node-weight-tracker
Next, use npm to initialize the project's package.json file.
接下来,使用npm初始化项目的package.json文件。
npm init -yIn this tutorial, you will use hapi, an excellent application framework that supports all the latest features of Node.js and the JavaScript language. Here is an overview of the modules you will use in this project.
在本教程中,您将使用hapi ,它是一个出色的应用程序框架,支持Node.js和JavaScript语言的所有最新功能。 这是您将在本项目中使用的模块的概述。
| Module | Description |
|---|---|
hapi | A web application framework for Node.js |
bell | A hapi plugin to support third-party logins |
boom | A hapi plugin for HTTP errors |
cookie | A hapi plugin for cookie-based authentication |
inert | A hapi plugin for serving static files |
joi | A hapi plugin for validating request and response data |
vision | A hapi plugin for rendering server-side HTML templates |
dotenv | A module to manage configuration using environment variables |
ejs | A template engine based on JavaScript |
postgres | A PostgreSQL client |
nodemon | A developer utility that monitors file changes and automatically restarts the Node.js application (not to be used in production) |
| 模组 | 描述 |
|---|---|
hapi | Node.js的Web应用程序框架 |
bell | 一个支持第三方登录的hapi插件 |
boom | 一个用于HTTP错误的hapi插件 |
cookie | 一个基于cookie的身份验证的hapi插件 |
inert | 用于提供静态文件的hapi插件 |
joi | 一个hapi插件,用于验证请求和响应数据 |
vision | 用于渲染服务器端HTML模板的hapi插件 |
dotenv | 使用环境变量管理配置的模块 |
ejs | 基于JavaScript的模板引擎 |
postgres | PostgreSQL客户端 |
nodemon | 一个开发人员实用程序,它监视文件更改并自动重启Node.js应用程序(不用于生产环境) |
Install the project dependencies using the following npm commands.
使用以下npm命令安装项目依赖项。
npm install @hapi/hapi@19 @hapi/bell@12 @hapi/boom@9 @hapi/cookie@11 @hapi/inert@6 @hapi/joi@17 @hapi/vision@6 dotenv@8 ejs@3 postgres@1

npm install --save-dev nodemon@2
Note: To ensure compatibility, the previous commands install specific versions available at the time of this writing.
注意:为了确保兼容性,在撰写本文时,先前的命令将安装可用的特定版本。
Now open the project in your editor of choice.
现在,在您选择的编辑器中打开项目。
If you don't already have a favorite code editor, I recommend installing Visual Studio Code. VS Code has exceptional support for JavaScript and Node.js, such as smart code completion and debugging. There's also a vast library of free extensions contributed by the community.
如果您还没有喜欢的代码编辑器,建议安装Visual Studio Code 。 VS Code对JavaScript和Node.js具有出色的支持,例如智能代码完成和调试。 还有一个由社区提供的庞大的免费扩展库。
Create a new file named .env in the root of the project and add the following configuration.
在项目的根目录中创建一个名为.env的新文件,并添加以下配置。
# Host configuration
PORT=8080
HOST=localhost
Next, create a folder in the project named src. In the src folder, create folders named assets, plugins, routes, and templates. We will use each of these folders in the future to organize code. Your project should currently look something like the following.
接下来,在名为src的项目中创建一个文件夹。 在src文件夹中,创建名为assets , plugins , routes和templates文件夹。 将来,我们将使用每个文件夹来组织代码。 您的项目当前应类似于以下内容。
> node_modules
> src
   > assets
   > plugins
   > routes
   > templates
.env
package-lock.json
package.json
使用hapi创建“ Hello World” Web应用程序 (Create a "Hello World" Web App With hapi)
In the src folder, create a new file named index.js, and add the following code to this file.
在src文件夹中,创建一个名为index.js的新文件,并将以下代码添加到该文件中。
"use strict";

const dotenv = require( "dotenv" );
const Hapi = require( "@hapi/hapi" );

const routes = require( "./routes" );

const createServer = async () => {
  const server = Hapi.server( {
    port: process.env.PORT || 8080,
    host: process.env.HOST || "localhost"
  } );

  server.route( routes );

  return server;
};

const init = async () => {
  dotenv.config();
  const server = await createServer();
  await server.start();
  console.log( "Server running on %s", server.info.uri );
};

process.on( "unhandledRejection", ( err ) => {
  console.log( err );
  process.exit( 1 );
} );

init();
In the previous code, the init() function uses dotenv to read in the .env configuration file, creates the web server, starts the server, and outputs the address of the web server. The createServer() function creates an instance of the hapi server based on the port and host environment variables, which are configured in the .env file. It then registers the routes defined in the routes module.
在前面的代码中, init()函数使用dotenv读取.env配置文件,创建Web服务器,启动服务器,并输出Web服务器的地址。 createServer()函数根据在.env文件中配置的port和host环境变量创建hapi服务器的实例。 然后,它注册在routes模块中定义的routes 。
There's also an event handler for unhandledRejection in case an exception occurs anywhere in the application that doesn't have error handling, which outputs the error and shuts down the server.
还有一个用于unhandledRejection的事件处理程序,以防在应用程序中任何没有错误处理的地方发生异常,这会输出错误并关闭服务器。
Next, you need to define at least one route for the routes module. Create a new file in the src/routes folder named index.js. Add the following code to this file.
接下来,您需要为routes模块定义至少一条路由。 在src/routes文件夹中创建一个名为index.js的新文件。 将以下代码添加到该文件。
"use strict";

const home = {
  method: "GET",
  path: "/",
  handler: ( request, h ) => {
    return "hello world!";
  }
};

module.exports = [ home ];
The previous code defines one route, home, which returns the text "hello world!" The module exports an array of routes (you will be adding more routes to this module later).
前面的代码定义了一条路线home ,该路线返回文本“ hello world!”。 该模块将导出一组路由(您稍后将向该模块添加更多路由)。
Open the package.json file and find the scripts section. Add the following script to this section.
打开package.json文件并找到scripts部分。 将以下脚本添加到此部分。
"dev": "nodemon --watch src -e ejs,js src/index.js",Now, go to the command line and type the following command to start the development web server.
现在,转到命令行并键入以下命令以启动开发Web服务器。
npm run devOpen your browser and navigate to http://localhost:8080. You should see your "hello world!" message.
打开浏览器并导航到http://localhost:8080 。 您应该看到自己的“ hello world!” 信息。
Go back to the src/routes/index.js file and make a change to the "hello world!" message and save the file. You should see nodemon automatically detect the change and restart the server. Refresh the browser and you should see the change reflected. You are on your way to developing a happy little web application!
返回src/routes/index.js文件,并更改为“ hello world!”。 消息并保存文件。 您应该看到nodemon自动检测到更改并重新启动服务器。 刷新浏览器,您应该会看到更改。 您正在开发一个快乐的小型Web应用程序!
使用Docker创建PostgreSQL服务器 ( Create a PostgreSQL Server with Docker )
Note: If you already have an instance of PostgreSQL you can work with, great! You can skip ahead to the next section.
注意:如果您已经拥有PostgreSQL实例,那么可以使用,太好了! 您可以跳到下一部分。
We are going to use PostgreSQL to store weight measurements. However, installing server software like PostgreSQL on a development machine is no trivial task. That's where a container system like Docker can make development so much easier! If you don't already have Docker installed, follow the install guide and then come back.
我们将使用PostgreSQL存储重量测量值。 但是,在开发计算机上安装诸如PostgreSQL之类的服务器软件并非易事。 这就是像Docker这样的容器系统可以使开发变得如此容易的地方! 如果您尚未安装Docker,请遵循安装指南 ,然后再回来。
With Docker installed, run the following command to download the latest PostgreSQL container.
安装Docker后,运行以下命令以下载最新的PostgreSQL容器。
docker pull postgres:latestNext, create an instance of a PostgreSQL database server. Feel free to change the administrator password value.
接下来,创建PostgreSQL数据库服务器的实例。 随时更改管理员密码值。
docker run -d --name measurements -p 5432:5432 -e'POSTGRES_PASSWORD=p@ssw0rd42' postgresHere is a quick explanation of the previous Docker command line arguments.
这是以前的Docker命令行参数的快速说明。
| Argument | Description |
|---|---|
-d | This launches the container in daemon mode, so it runs in the background. |
--name | This gives your Docker container a friendly name. |
-p | This maps a TCP port on the host (your computer) to a port in the container. By default, PostgreSQL uses port 5432 for connections. |
-e | This sets an environment variable in the container. |
postgres | This final argument tells Docker to use the postgres image. |
| 论据 | 描述 |
|---|---|
-d | 这将以守护程序模式启动容器,因此它将在后台运行。 |
--name | 这为您的Docker容器提供了一个友好的名称。 |
-p | 这会将主机(您的计算机)上的TCP端口映射到容器中的端口。 默认情况下,PostgreSQL使用端口5432进行连接。 |
-e | 这将在容器中设置环境变量。 |
postgres | 最后一个参数告诉Docker使用postgres映像。 |
Note: If you restart your computer, you may need to restart the Docker container. You can do that from the command line using the following command: docker start measurements.
注意:如果重新启动计算机,则可能需要重新启动Docker容器。 您可以使用以下命令从命令行执行此操作:docker start measurement。
添加PostgreSQL配置 ( Add PostgreSQL Configuration )
Add the following settings to the end of the .env file.
将以下设置添加到.env文件的末尾。
# Postgres configuration
PGHOST=localhost
PGUSERNAME=postgres
PGDATABASE=postgres
PGPASSWORD=p@ssw0rd42
PGPORT=5432
Note: If you changed the database administrator password, or you have different credentials for an existing server, be sure to update the values to match your specific environment.
注意:如果您更改了数据库管理员密码,或者对于现有服务器具有不同的凭据,请确保更新值以匹配您的特定环境。
添加PostgreSQL数据库构建脚本 ( Add a PostgreSQL Database Build Script )
To use a new database, you need a way to create tables, add initial data, and so forth. One way to do that is to create a script. Here you'll use Node.js to execute a build script that will add the schema needed for the application.
要使用新数据库,您需要一种创建表,添加初始数据等的方法。 一种方法是创建脚本。 在这里,您将使用Node.js执行构建脚本,该脚本将添加应用程序所需的架构。
Create a folder in the root of the project named tools. In this folder, create a new file named initdb.js and add the following code.
在项目的根目录中创建一个名为tools的文件夹。 在此文件夹中,创建一个名为initdb.js的新文件,并添加以下代码。
"use strict";

const dotenv = require( "dotenv" );
const postgres = require( "postgres" );

const init = async () => {
  // read environment variables
  dotenv.config();

  try {
    // connect to the local database server
    const sql = postgres();

    console.log( "dropping table, if exists..." );
    await sql`DROP TABLE IF EXISTS measurements`;

    console.log( "creating table..." );
    await sql`CREATE TABLE IF NOT EXISTS measurements (
      id INT NOT NULL PRIMARY KEY GENERATED ALWAYS AS IDENTITY
      , user_id varchar(50) NOT NULL
      , measure_date date NOT NULL
      , weight numeric(5,1) NOT NULL
    )`;

    await sql.end();
  } catch ( err ) {
    console.log( err );
    throw err;
  }
};

init().then( () => {
  console.log( "finished" );
} ).catch( () => {
  console.log( "finished with errors" );
} );
Next, update the scripts section in the package.json file to include the following command.
接下来,更新package.json文件中的scripts部分,以包含以下命令。
"initdb": "node tools/initdb.js",Now, you can run the build script at the command line with the following command.
现在,您可以使用以下命令在命令行中运行构建脚本。
npm run initdbYou should see the message finished at the console. A new table named measurements is in your database! Any time you want to reset your database, just rerun the script.
您应该在控制台上看到finished的消息。 数据库中将有一个名为measurements的新表! 每当您想重置数据库时,只需重新运行脚本即可。
向Node和hapi添加身份验证 ( Add Authentication to Node and hapi )
When building an application like this weight tracker, you will probably want your data kept private and safe. It would be nice to share this application with others so they can take advantage of it, too. However, to build user registration and login (authentication) from scratch is no trivial task. There are registration, login, and password reset forms, email verification steps, encrypting passwords, and the list goes on and on. Oh, and how about keeping up with all the latest attacks and keeping your data secure? Yikes!
在构建类似体重跟踪器的应用程序时,您可能希望数据保持私密性和安全性。 与其他人共享此应用程序会很不错,这样他们也可以利用它。 但是,从头开始构建用户注册和登录(身份验证)并非易事。 有注册,登录和密码重设表格,电子邮件验证步骤,加密密码,并且列表不胜枚举。 哦,如何跟上所有最新攻击并确保数据安全? kes!
The good news is Okta makes all of this a breeze! To begin, go to developer.okta.com and create a free developer account.
好消息是Okta使这一切变得轻而易举! 首先,请访问developer.okta.com并创建一个免费的开发人员帐户。

After you create your account, click the Applications link at the top, and then click Add Application.
创建帐户后,点击顶部的应用程序链接,然后点击添加应用程序 。

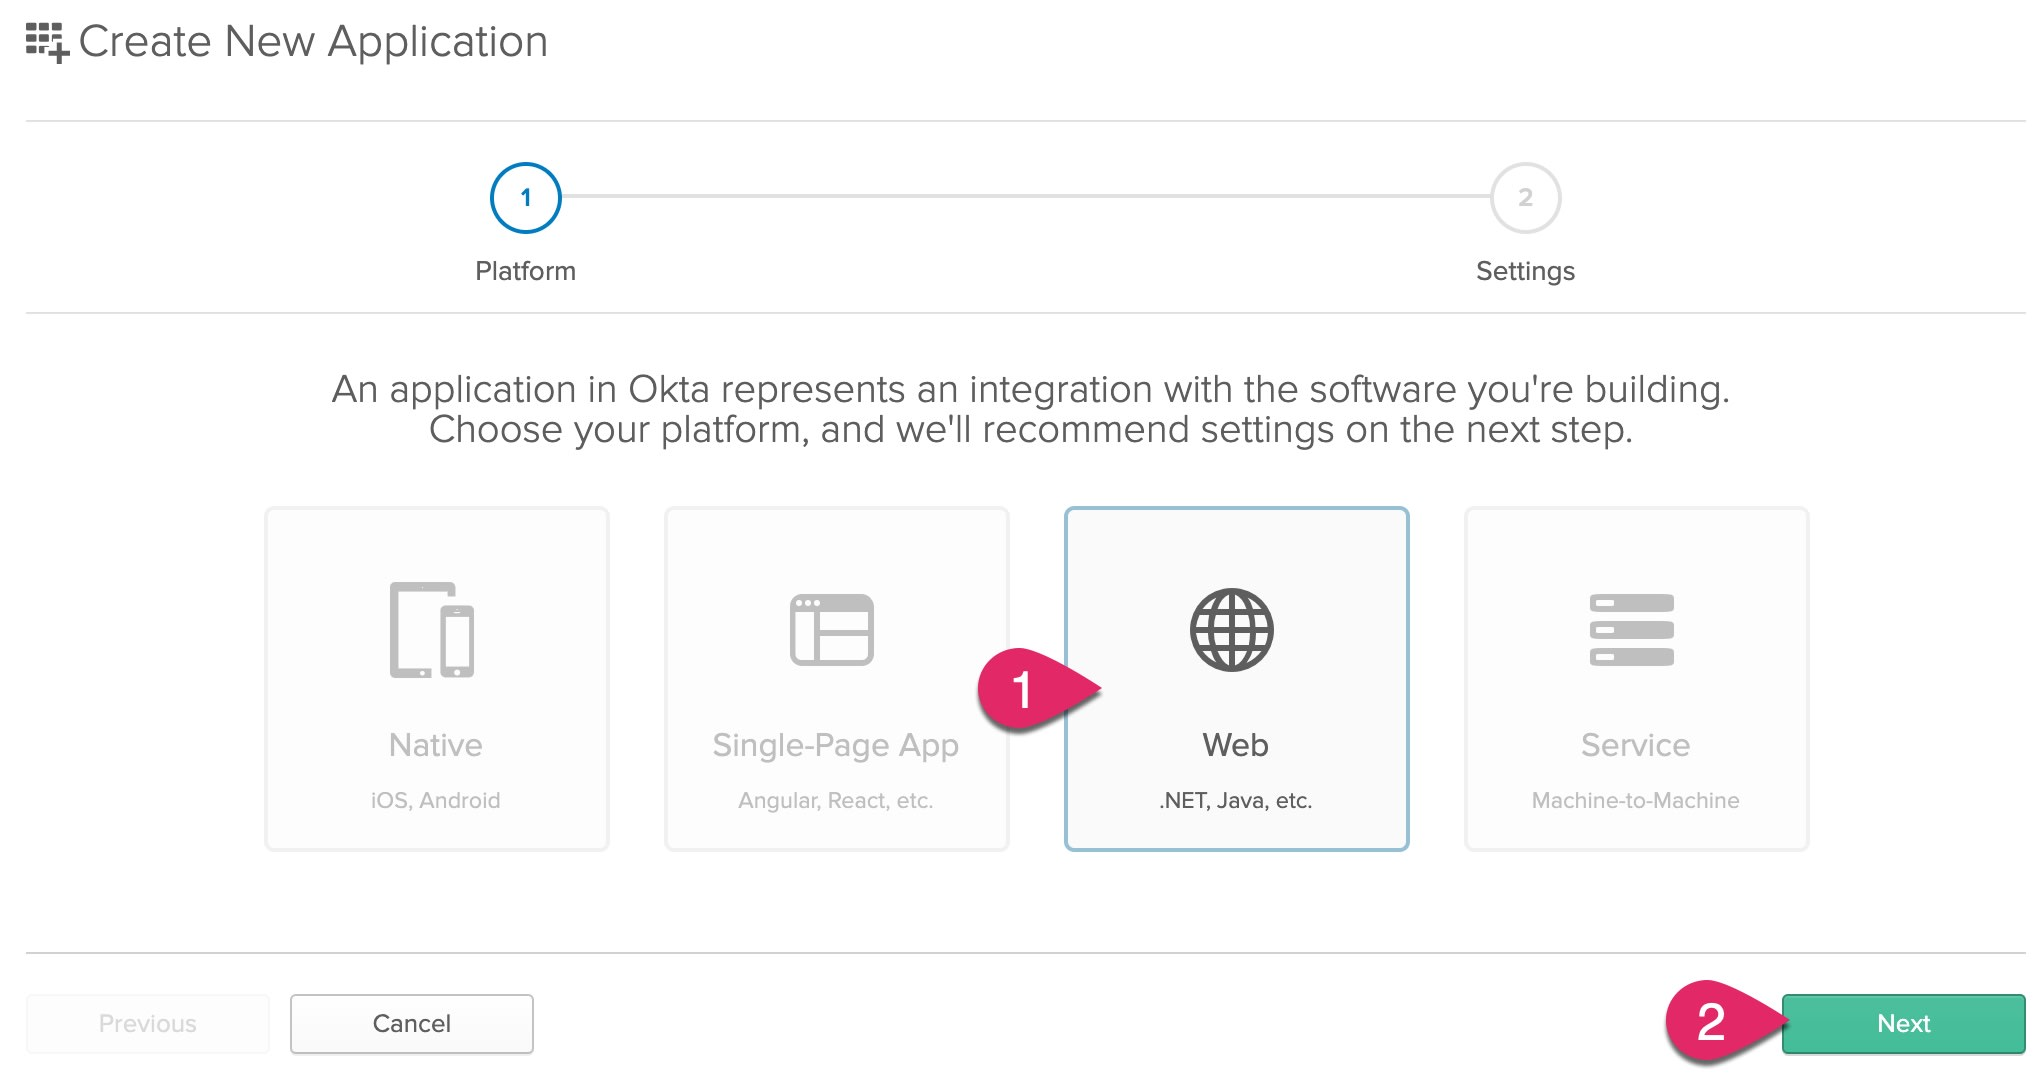
Next, choose to create a Web Application and click Next.
接下来,选择创建一个Web应用程序 ,然后单击Next 。
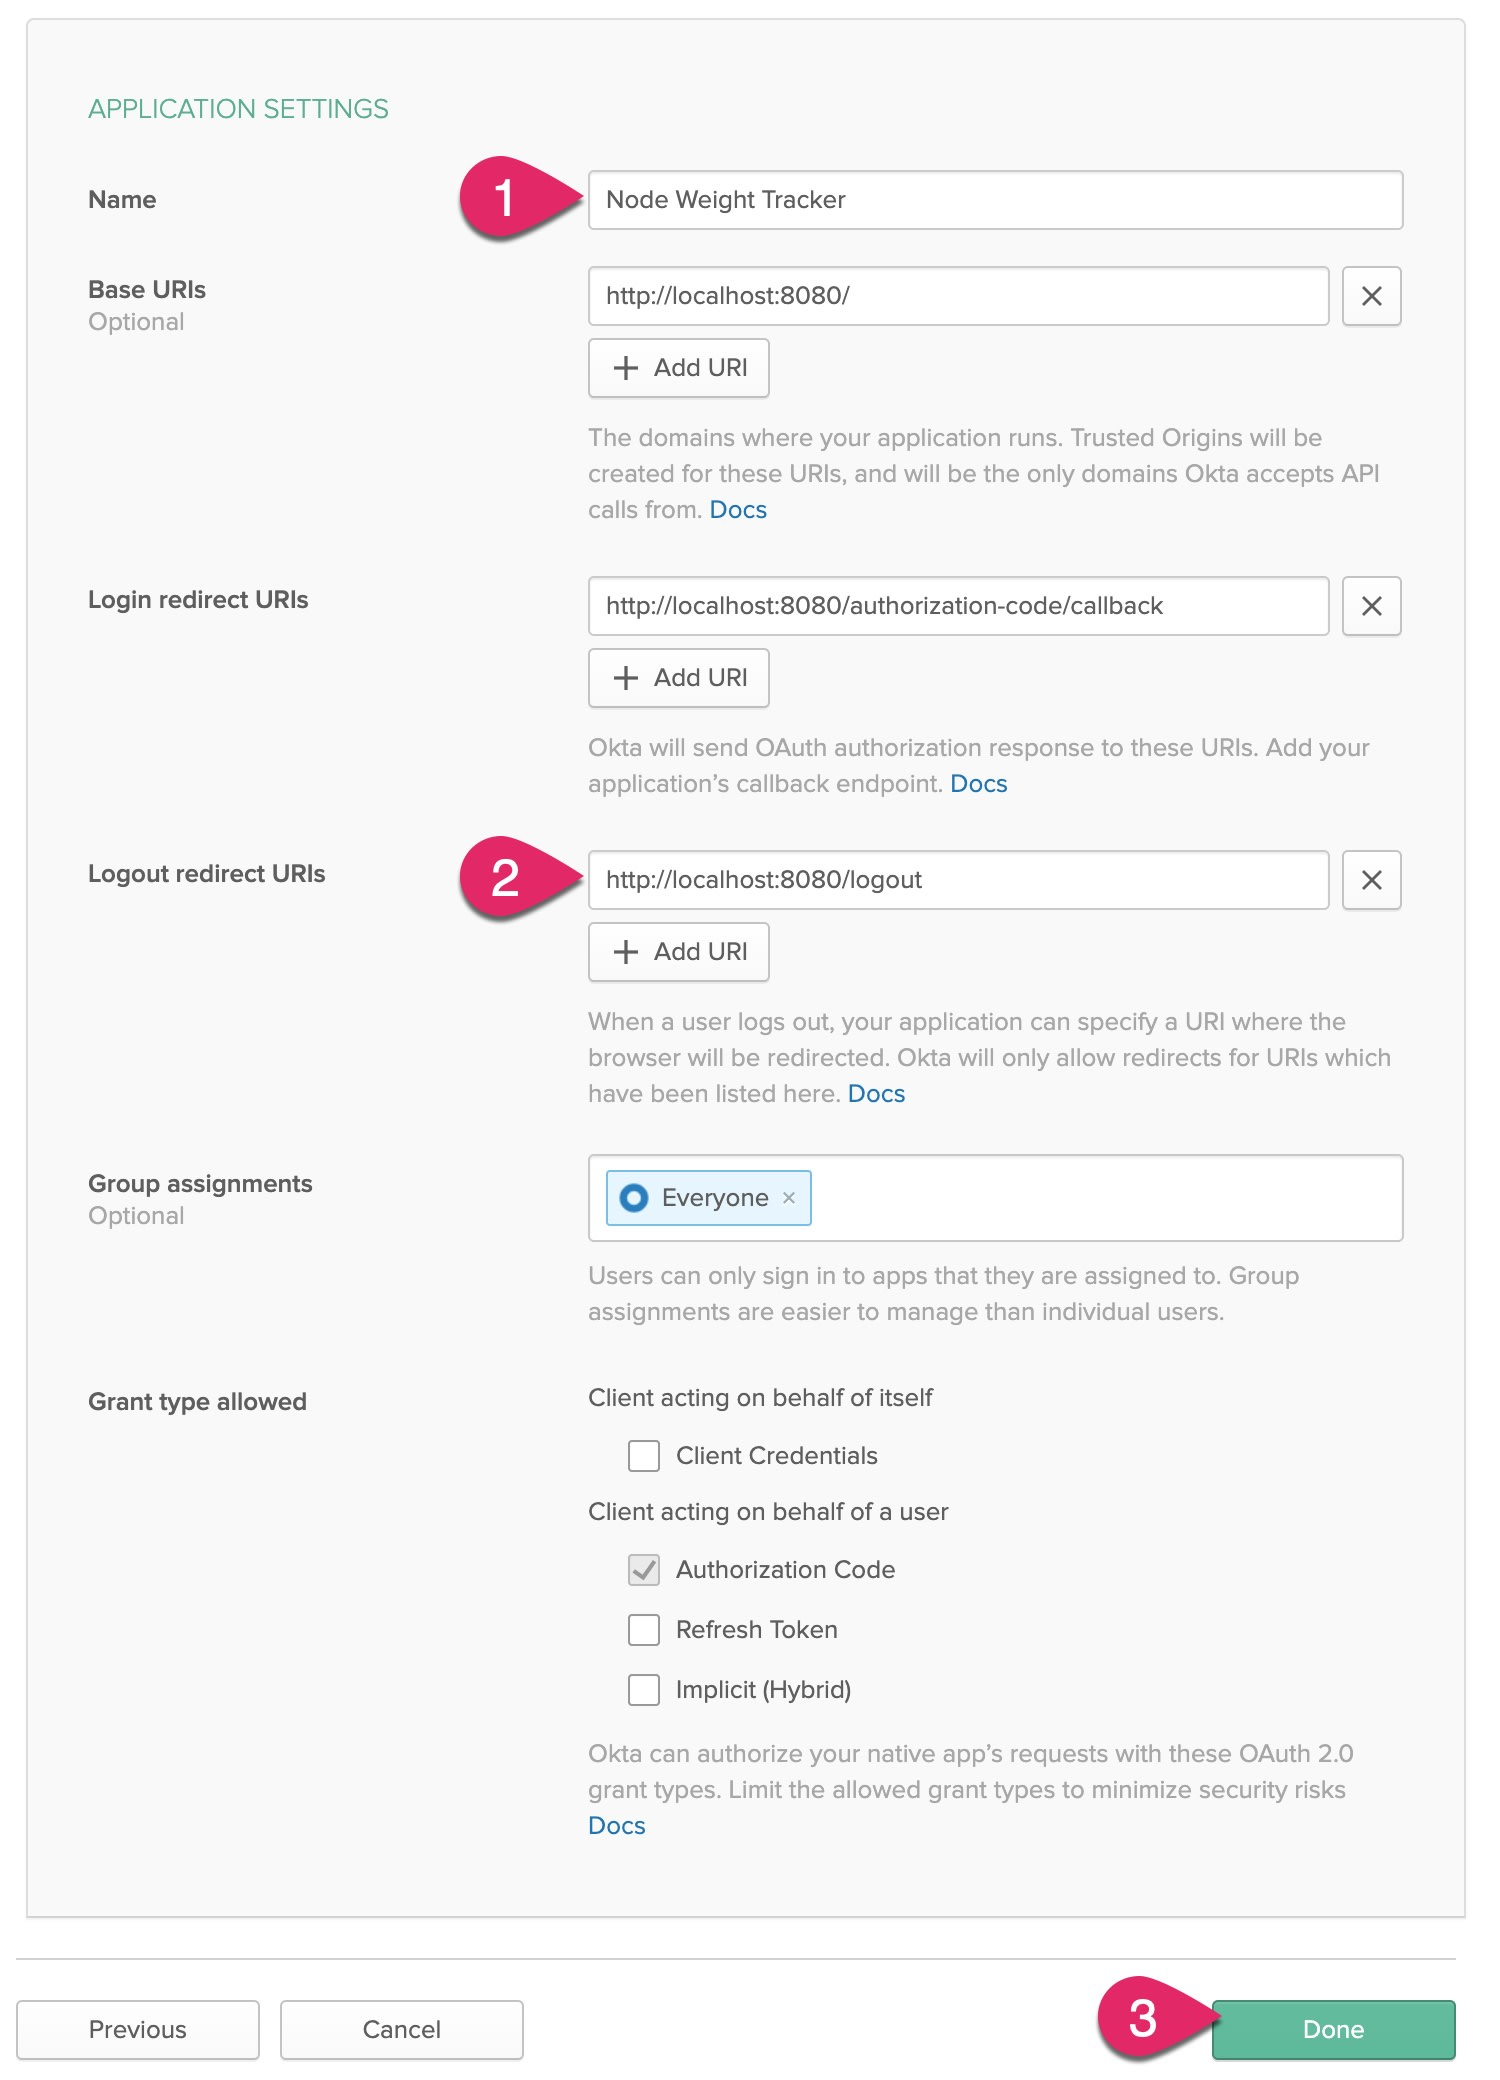
Enter a name for your application, such as Node Weight Tracker. Update the Logout redirect URIs to http://localhost:8080/logout. Then, click Done to finish creating the application.
输入您的应用程序的名称,例如Node Weight Tracker 。 将注销重定向URI更新为http://localhost:8080/logout 。 然后,单击“完成”以完成应用程序的创建。
Copy the following configuration to your .env file.
将以下配置复制到您的.env文件。
HOST_URL=http://localhost:8080
COOKIE_ENCRYPT_PWD=superAwesomePasswordStringThatIsAtLeast32CharactersLong!
NODE_ENV=development

# Okta configuration
OKTA_ORG_URL=https://{yourOrgUrl}
OKTA_CLIENT_ID={yourClientId}
OKTA_CLIENT_SECRET={yourClientSecret}
In the Okta application console, click on your new application's General tab, and find near the bottom of the page a section titled "Client Credentials." Copy the Client ID and Client secret values and paste them into your .env file to replace {yourClientId} and {yourClientSecret}, respectively.
在Okta应用程序控制台中,单击新应用程序的“ 常规”选项卡,然后在页面底部附近找到标题为“客户端凭据”的部分。 复制Client ID和Client secret值,然后将其粘贴到您的.env文件中,分别替换{yourClientId}和{yourClientSecret} 。

Click on the Dashboard link at the top. Find your Org URL to the right of the page. Copy this URL and paste it into your .env file to replace {yourOrgUrl}.
单击顶部的仪表板链接。 在页面右侧找到您的组织网址 。 复制此URL并将其粘贴到您的.env文件中,以替换{yourOrgUrl} 。

启用自助服务注册 (Enable Self-Service Registration)
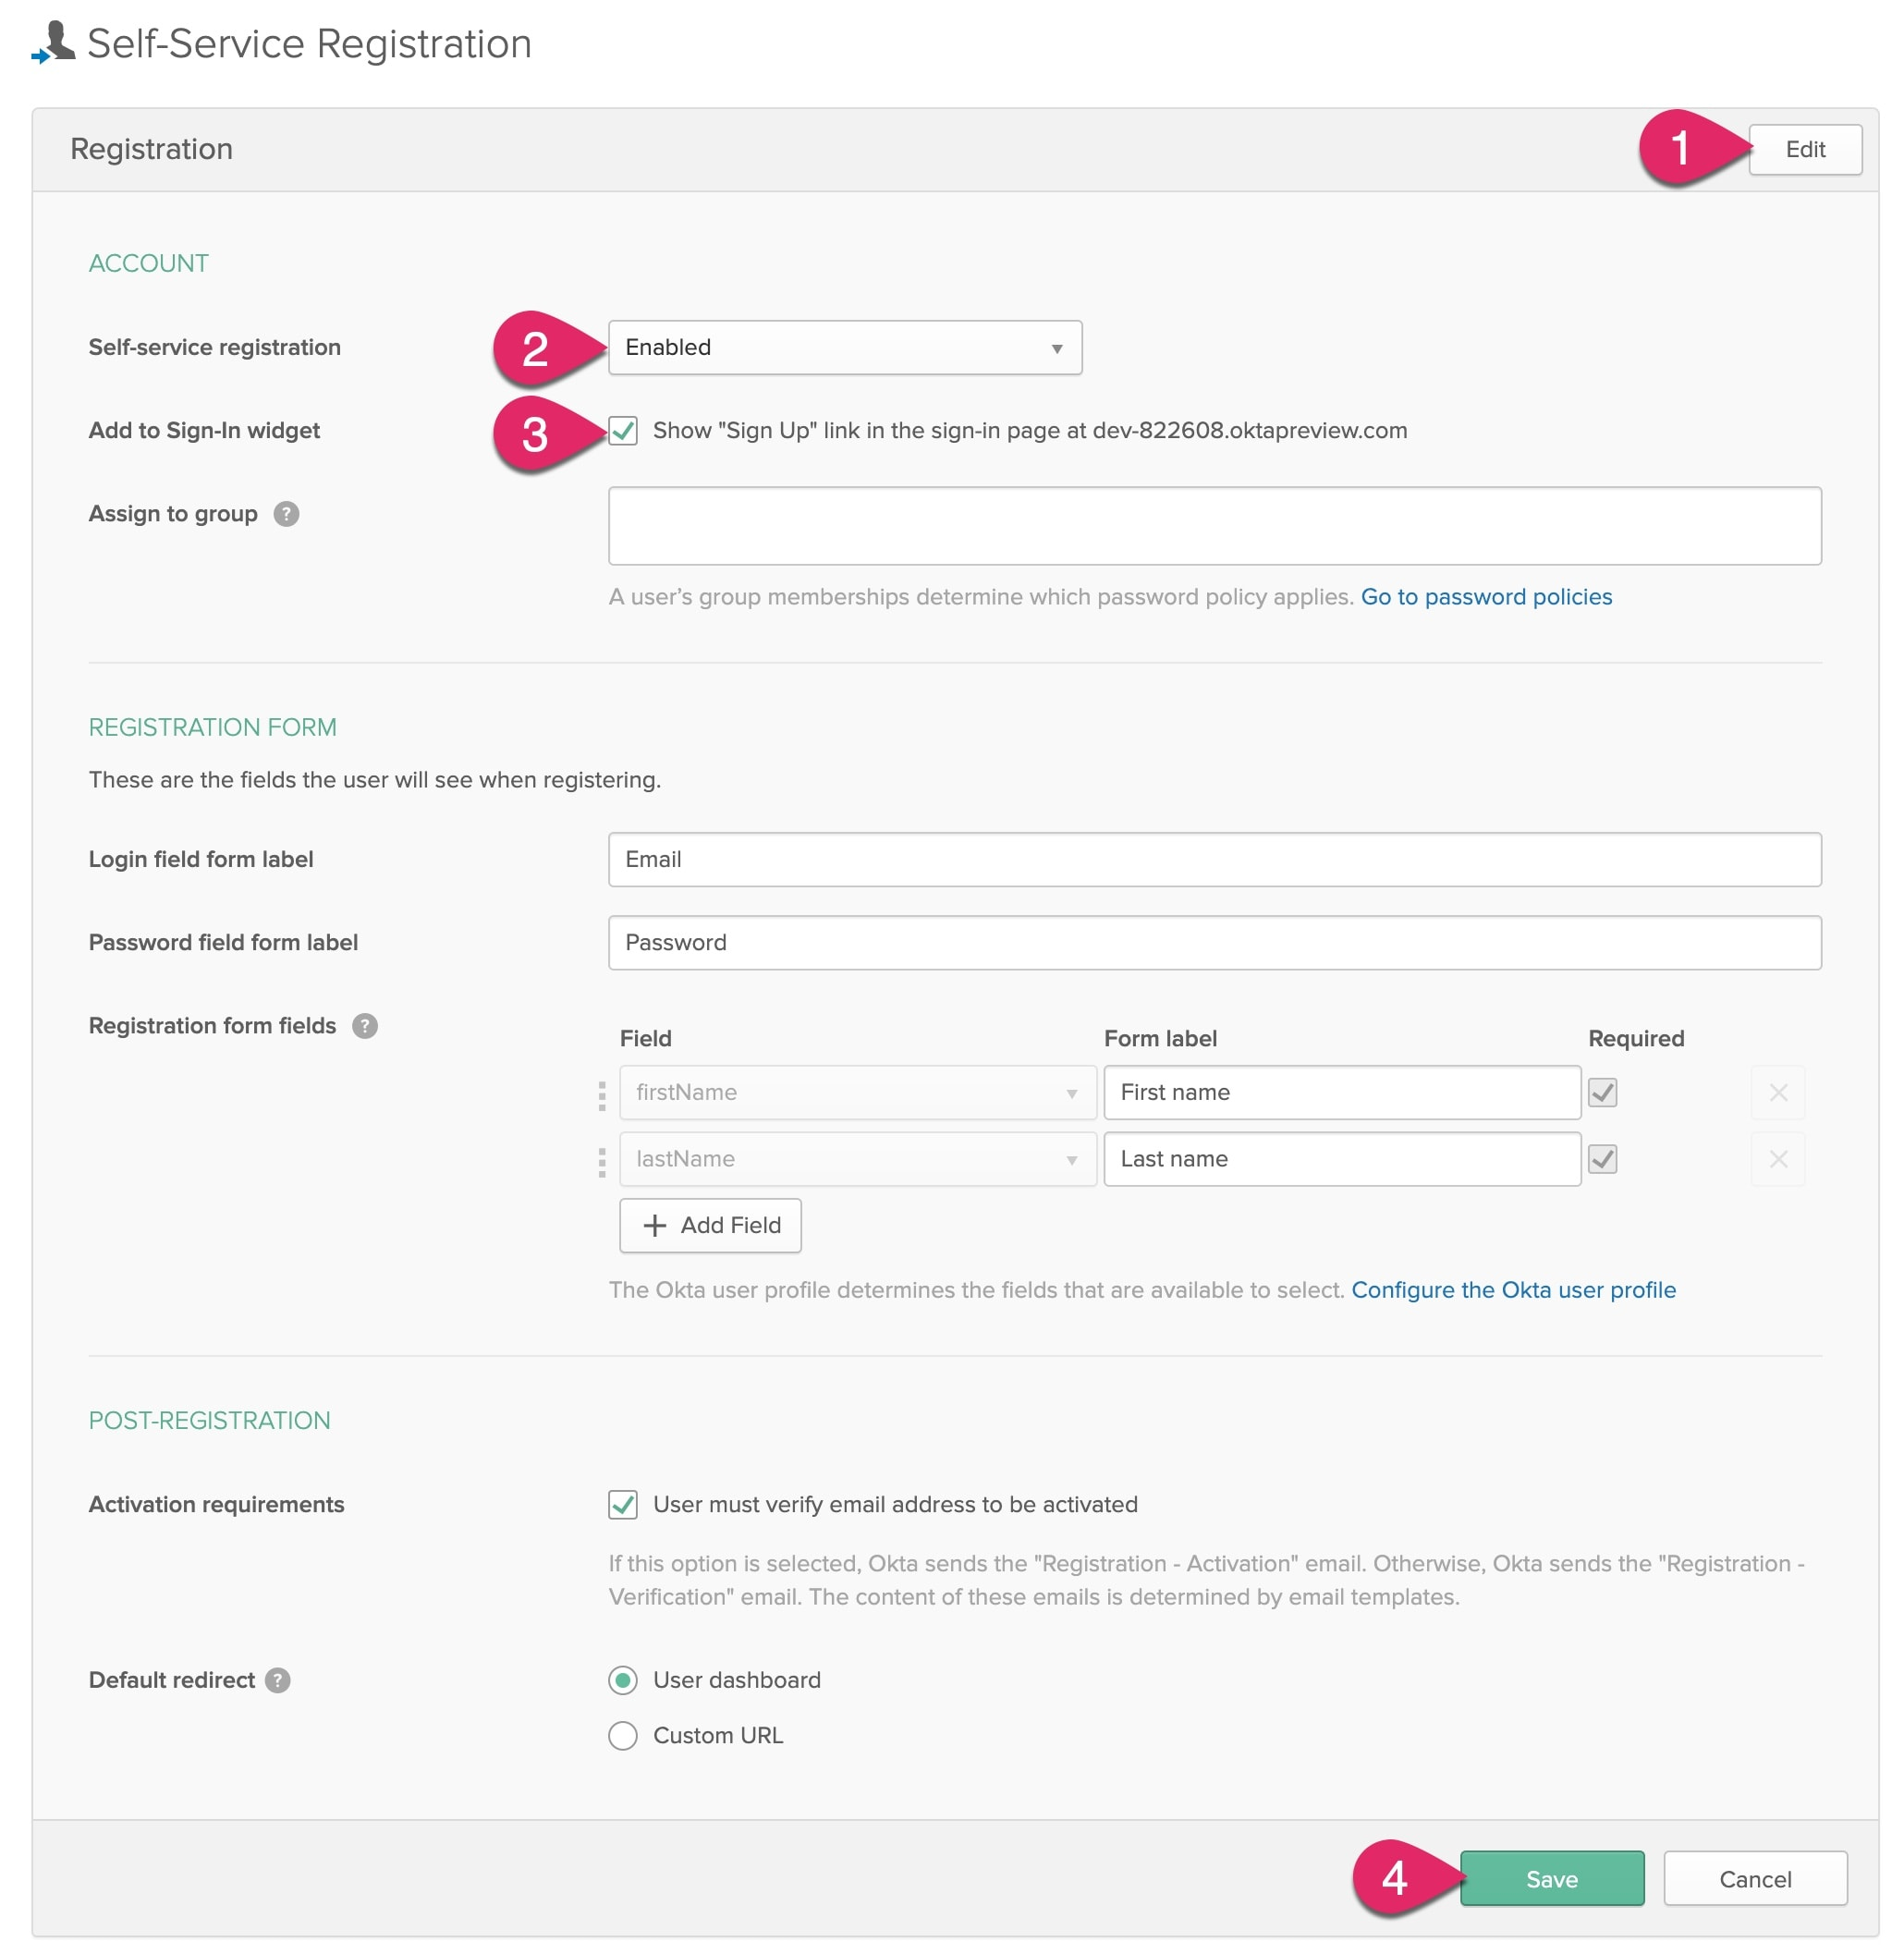
To allow other people to sign up for an account in your application, you need to enable the self-service registration feature. Click on the Users menu and select Registration.
要允许其他人在您的应用程序中注册帐户,您需要启用自助服务注册功能。 单击用户菜单,然后选择注册 。

Next, click the Edit button. Change Self-service registration to Enabled. Make sure the Show "Sign Up" link" is checked.
接下来,单击“ 编辑”按钮。 将自助服务注册更改为已启用 。 确保选中“显示“注册”链接” 。
Finally, click the Save button at the bottom of the form.
最后,单击表单底部的“ 保存”按钮。
保护您的Node.js应用程序 ( Secure Your Node.js Application )
Now that you have an Okta account and application, it's time to configure the hapi application to verify only authenticated users can access protected resources. If not, the app will prompt them to login using Okta.
现在您已经有了Okta帐户和应用程序,是时候配置hapi应用程序以验证只有经过身份验证的用户才能访问受保护的资源。 如果没有,该应用程序将提示他们使用Okta登录。
Under src/plugins, create a new file named auth.js. Copy the following code into this file.
在src/plugins ,创建一个名为auth.js的新文件。 将以下代码复制到该文件中。
"use strict";

const bell = require( "@hapi/bell" );
const cookie = require( "@hapi/cookie" );

const isSecure = process.env.NODE_ENV === "production";

module.exports = {
  name: "auth",
  version: "1.0.0",
  register: async server => {

    await server.register( [ cookie, bell ] );

    // configure cookie authorization strategy
    server.auth.strategy( "session", "cookie", {
      cookie: {
        name: "okta-oauth",
        path: "/",
        password: process.env.COOKIE_ENCRYPT_PWD,
        isSecure // Should be set to true (which is the default) in production
      },
      redirectTo: "/authorization-code/callback", // If there is no session, redirect here
    } );

    // configure okta oauth strategy
    server.auth.strategy( "okta", "bell", {
      provider: "okta",
      config: { uri: process.env.OKTA_ORG_URL },
      password: process.env.COOKIE_ENCRYPT_PWD,
      isSecure,
      location: process.env.HOST_URL,
      clientId: process.env.OKTA_CLIENT_ID,
      clientSecret: process.env.OKTA_CLIENT_SECRET
    } );

    // set the default authorization strategy for all routes
    server.auth.default( "session" );

    // Hook into onPreResponse event to add authentication info to every view
    server.ext( "onPreResponse", ( request, h ) => {
      if ( request.response.variety === "view" ) {
        const auth = request.auth.isAuthenticated ? {
          isAuthenticated: true,
          isAnonymous: false,
          email: request.auth.artifacts.profile.email,
          firstName: request.auth.artifacts.profile.firstName,
          lastName: request.auth.artifacts.profile.lastName
        } : {
          isAuthenticated: false,
          isAnonymous: true,
          email: "",
          firstName: "",
          lastName: ""
        };
        request.response.source.context.auth = auth;
      }
      return h.continue;
    } );
  }
};
Now add a new file to src/plugins named index.js and paste the following code.
现在,将一个名为index.js的新文件添加到src/plugins并粘贴以下代码。
"use strict";

const Inert = require( "@hapi/inert" );
const Vision = require( "@hapi/vision" );
const ejs = require( "ejs" );

const auth = require( "./auth" );

module.exports = {
  register: async server => {
    await server.register( [ Inert, Vision, auth ] );

    // configure view templates
    server.views( {
      engines: { ejs },
      relativeTo: __dirname,
      path: "../templates",
      layout: true
    } );
  }
};
In addition to registering the new auth plugin, this code also configures the ejs, inert, and vision plugins to render HTML content. Let's set up a few EJS templates.
除了注册新的auth插件外,此代码还配置ejs , inert和vision插件以呈现HTML内容。 让我们设置一些EJS模板。
Next, update src/index.js to import the new plugins module and call the plugins.register() function.
接下来,更新src/index.js以导入新的plugins模块并调用plugins.register()函数。
"use strict";

const dotenv = require( "dotenv" );
const Hapi = require( "@hapi/hapi" );

const plugins = require( "./plugins" );
const routes = require( "./routes" );

const createServer = async () => {
  const server = Hapi.server( {
    port: process.env.PORT || 8080,
    host: process.env.HOST || "localhost"
  } );

  await plugins.register( server );

  server.route( routes );

  return server;
};

const init = async () => {
  dotenv.config();
  const server = await createServer();
  await server.start();
  console.log( "Server running on %s", server.info.uri );
};

process.on( "unhandledRejection", ( err ) => {
  console.log( err );
  process.exit( 1 );
} );

init();
添加HTML模板 (Add HTML Templates)
In the src/templates folder, create a new file named layout.ejs. The layout is the main template all views will use. Paste the following markup into layout.ejs.
在src/templates文件夹中,创建一个名为layout.ejs的新文件。 布局是所有视图将使用的主要模板。 将以下标记粘贴到layout.ejs 。
<!DOCTYPE html>
<html>

<head>
  <meta charset="utf-8">
  <meta name="viewport" content="width=device-width, initial-scale=1">
  <title><%= title %></title>
  <link rel="stylesheet" href="https://cdn.jsdelivr.net/npm/bulma@0.8.0/css/bulma.min.css">
  <link rel="stylesheet" href="/assets/css/site.css">
  <script src="https://cdn.jsdelivr.net/npm/vue@2.6.11"></script>
  <script defer src="https://use.fontawesome.com/releases/v5.3.1/js/all.js"></script>
  <script src="/assets/js/site.js"></script>
</head>

<body>
  <%- include( "includes/navigation" ); %>
  <section class="section">
    <div class="container">
      <%- content %>
    </div>
  </section>
</body>

</html>
You might notice there's an include in this template for navigation. The next step is to create a navigation template to render for every page. In the src/templates folder, create a new folder named includes. In the includes folder, create a file named navigation.ejs and paste in the following markup.
您可能会注意到此模板中include用于导航的内容。 下一步是创建要为每个页面呈现的导航模板。 在src/templates文件夹中,创建一个名为includes的新文件夹。 在includes文件夹中,创建一个名为navigation.ejs文件,然后粘贴以下标记。
<nav class="navbar" role="navigation" aria-label="main navigation">
  <div class="navbar-brand">
    <a class="navbar-item navbar-logo" href="/">
      Weight Tracker
    </a>

    <a role="button" class="navbar-burger burger" aria-label="menu" aria-expanded="false"
      data-target="navbarBasicExample">
      <span aria-hidden="true"></span>
      <span aria-hidden="true"></span>
      <span aria-hidden="true"></span>
    </a>
  </div>

  <div id="navbarBasicExample" class="navbar-menu">
    <div class="navbar-start">
      <a class="navbar-item" href="/">
        Home
      </a>

      <a class="navbar-item" href="/list">
        Progress
      </a>
      <a class="navbar-item" href="/add">
        Add Measurement
      </a>

    </div>
  </div>

  <div class="navbar-end">
    <% if ( auth.isAuthenticated ) { %>
      <div class="navbar-item">Welcome, <%= auth.firstName %>!</div>
    <% } %>
    <div class="navbar-item">
      <div class="buttons">
        <% if (!auth.isAuthenticated) { %>
        <a href="/login" class="button is-primary">
          <strong>Log in</strong>
        </a>
        <% } else { %>
        <a href="/logout" class="button is-light">
          <strong>Log Out</strong>
        </a>
        <% } %>
      </div>
    </div>
  </div>
  </div>
</nav>
As you can see, there are some conditional statements in the template based on whether or not the current user is authenticated. If the user is not authenticated, a Login button is displayed. If a user is currently logged in, a welcome message and a Logout button are displayed.
如您所见,模板中有一些条件语句,取决于当前用户是否已通过身份验证。 如果用户未通过身份验证,则会显示“ 登录”按钮。 如果用户当前已登录,则会显示欢迎消息和注销按钮。
Next, you will add an EJS template for the home page. In the templates folder, create a new file named index.ejs and paste in the following markup.
接下来,您将为主页添加一个EJS模板。 在templates文件夹中,创建一个名为index.ejs的新文件,并粘贴以下标记。
<h1 class="title">Node.js Weight Tracker</h1>

<p>Welcome to the <b>Node.js Weight Tracker</b> sample project!</p>

<% if ( auth.isAnonymous ) { %>
  <p><a href="/login">Click here</a> to login or create an account.</p>
<% } %>

<% if ( auth.isAuthenticated ) { %>
  <p><a href="/add">Add</a> a weight measurement or <a href="/list">view</a> your progress.</p>
<% } %>
While you're adding templates, go ahead and add a template for a custom 404 (Not Found) response. Create a 404.ejs file in the templates folder and paste in the following markup.
添加模板时,请继续并为自定义404(未找到)响应添加模板。 在templates文件夹中创建404.ejs文件,然后粘贴以下标记。
<h1 class="title">Oh no!</h1>

<p>That page was not found!</p>
配置公共和安全路由 (Configure Public and Secure Routes)
Now you need to update the routes to return the home page view and configure which routes require authentication. In the src/routes folder, create a new file named auth.js and paste the following code.
现在,您需要更新路由以返回主页视图,并配置需要认证的路由。 在src/routes文件夹中,创建一个名为auth.js的新文件,并粘贴以下代码。
"use strict";

const boom = require( "@hapi/boom" );

const login = {
  method: "GET",
  path: "/login",
  options: {
    handler: request => {
      if ( !request.auth.isAuthenticated ) {
        return `Authentication failed due to: ${ request.auth.error.message }`;
      }
    }
  }
};

const oAuthCallback = {
  method: "GET",
  path: "/authorization-code/callback",
  handler: ( request, h ) => {
    if ( !request.auth.isAuthenticated ) {
      throw boom.unauthorized( `Authentication failed: ${ request.auth.error.message }` );
    }
    // save the credentials to the session cookie
    request.cookieAuth.set( request.auth.credentials );
    return h.redirect( "/" );
  },
  options: {
    auth: "okta"
  }
};

const logout = {
  method: "GET",
  path: "/logout",
  handler: ( request, h ) => {
    try {
      if ( request.auth.isAuthenticated ) {
        // clear the local session
        request.cookieAuth.clear();
      }

      return h.redirect( "/" );
    } catch ( err ) {
      request.log( [ "error", "logout" ], err );
    }
  },
  options: {
    auth: {
      mode: "try"
    }
  }
};

module.exports = [
  login,
  oAuthCallback,
  logout
];
The previous code defines three new routes. The /login route by default requires authentication because it was defined in the src/plugins/auth.js module with the statement server.auth.default( "session" );. Any request to /login while the user is not logged in will result in being redirected to the /authorization-code/callback route.
先前的代码定义了三个新路线。 默认情况下, /login路由需要身份验证,因为它是在src/plugins/auth.js模块中使用语句server.auth.default( "session" ); 。 在用户未登录时对/login任何请求都将导致重定向到/authorization-code/callback路由。
The /authorization-code/callback route is configured to use the "okta" authentication strategy. Any request to this route while the user is not logged in will result in being redirected to the Okta login (which includes a link to sign up for an account). After successfully logging into Okta, the user will be redirected back to this route. The user's credentials are saved in the session cookie and the user is redirected back to the home page.
/authorization-code/callback路由配置为使用“ okta”身份验证策略。 在用户未登录时对此路由的任何请求都将导致重定向到Okta登录名(其中包括用于注册帐户的链接)。 成功登录Okta后,用户将被重定向回该路由。 用户的凭据将保存在会话cookie中,并且用户将被重定向回首页。
The /logout route clears the session cookie and redirects the user back to the home page.
/logout路由清除会话cookie,并将用户重定向回首页。
Next, update src/routes/index.js with the following code.
接下来,使用以下代码更新src/routes/index.js 。
"use strict";

const path = require( "path" );

const auth = require( "./auth" );

const home = {
  method: "GET",
  path: "/",
  options: {
    auth: {
      mode: "try"
    },
    handler: ( request, h ) => {
      return h.view( "index", { title: "Home" } );
    }
  }
};

const staticAssets = {
  method: "GET",
  path: "/assets/{param_}",
  handler: {
    directory:{
      path: path.join( __dirname, "..", "assets" )
    }
  },
  options: { auth: false }
};

const error404 = {
  method: "_",
  path: "/{any*}",
  handler: function ( request, h ) {
    return h.view( "404", { title: "Not Found" } ).code( 404 );
  },
  options: { auth: false }
};

module.exports = [
  home,
  staticAssets,
  error404
].concat( auth );
The previous code updates the home page route with an auth mode try. The try mode checks to see if the user is authenticated, but doesn't require authentication. The code also imports the authentication routes, and sets up routes for static assets and the custom 404 page.
前面的代码使用auth模式try更新主页路由。 try模式检查用户是否已通过身份验证,但不需要身份验证。 该代码还将导入身份验证路由,并为静态资产和自定义404页面设置路由。
添加静态资产 (Add Static Assets)
Speaking of static assets, add a new folder to src/assets named css. In the css folder, create a new file named site.css and paste the following code.
说到静态资产,请向src/assets添加一个名为css的新文件夹。 在css文件夹中,创建一个名为site.css的新文件,然后粘贴以下代码。
.navbar-logo {
  font-weight: bold;
  font-size: 1.2em;
}
Add a new folder to src/assets named js. In the js folder, create a new file named site.js and paste the following code.
将一个新文件夹添加到名为js src/assets 。 在js文件夹中,创建一个名为site.js的新文件,然后粘贴以下代码。
"use strict";

document.addEventListener( "DOMContentLoaded", () => {

  // Get all "navbar-burger" elements
  const $navbarBurgers = Array.prototype.slice.call( document.querySelectorAll( ".navbar-burger" ), 0 );

  // Check if there are any navbar burgers
  if ( $navbarBurgers.length > 0 ) {

    // Add a click event on each of them
    $navbarBurgers.forEach( el => {
      el.addEventListener( "click", () => {

        // Get the target from the "data-target" attribute
        const target = el.dataset.target;
        const $target = document.getElementById( target );

        // Toggle the "is-active" class on both the "navbar-burger" and the "navbar-menu"
        el.classList.toggle( "is-active" );
        $target.classList.toggle( "is-active" );

      } );
    } );
  }
} );
This client-side JavaScript is to enable a better navigation experience for mobile and tablet browsers.
此客户端JavaScript可以为移动和平板电脑浏览器提供更好的导航体验。
测试登录 (Test Login)
You are now ready to test authentication! If the application is not already running, start it by using the following command.
您现在可以测试身份验证了! 如果该应用程序尚未运行,请使用以下命令启动它。
npm run devNavigate to http://localhost:8080 and try clicking on the Log in button. You should be authenticated and redirected back to the home page, which now displays the welcome message and Logout button.
导航到http://localhost:8080并尝试单击“ 登录”按钮。 您应该经过身份验证并重定向回主页,该主页现在显示欢迎消息和注销按钮。
Note: To ensure you see the entire login experience, I recommend opening a different browser or using an incognito/private browser window.
注意:为确保您看到完整的登录体验,建议您打开其他浏览器或使用隐身/专用浏览器窗口。
使用PostgreSQL创建安全的API ( Create a Secure API with PostgreSQL )
Now that authentication is working, you can focus on building a secure API the application can use to create, retrieve, update, and delete (CRUD) weight measurements. Basic CRUD operations are found in nearly every application that collects and stores data.
现在,身份验证已经可以正常工作,您可以集中精力构建一个安全的API,应用程序可以使用它来创建,检索,更新和删除(CRUD)重量测量。 在几乎每个收集和存储数据的应用程序中都可以找到基本的CRUD操作。
The first step is to create a new hapi plugin to provide every route easy access to the PostgreSQL client. In the src/plugins folder, create a new file named sql.js and add the following code.
第一步是创建一个新的hapi插件,以使每条路由都易于访问PostgreSQL客户端。 在src/plugins文件夹中,创建一个名为sql.js的新文件,并添加以下代码。
"use strict";

const postgres = require( "postgres" );

module.exports = {
  name: "sql",
  version: "1.0.0",
  register: async server => {

    // create the sql client
    const sql = postgres();

    // add to the request toolkit e.g. h.sql
    server.decorate( "toolkit", "sql", sql );
  }
};
The sql plugin creates one instance of the PostgreSQL client for the entire application and adds it to hapi's response toolkit. The response toolkit is the h argument you may have noticed passed to every route handler. Using the server.decorate() function in the plugin means you can now access the SQL client from any route using h.sql!
sql插件为整个应用程序创建一个PostgreSQL客户端实例,并将其添加到hapi的响应工具包中。 响应工具包是您可能已经注意到的传递给每个路由处理程序的h参数。 在插件中使用server.decorate()函数意味着您现在可以使用h.sql从任何路由访问SQL客户端!
Next, update the src/plugins/index.js module to include the new sql plugin.
接下来,更新src/plugins/index.js模块以包括新的sql插件。
"use strict";

const Inert = require( "@hapi/inert" );
const Vision = require( "@hapi/vision" );
const ejs = require( "ejs" );

const auth = require( "./auth" );
const sql = require( "./sql" );

module.exports = {
  register: async server => {
    await server.register( [ Inert, Vision, auth, sql ] );

    // configure view templates
    server.views( {
      engines: { ejs },
      relativeTo: __dirname,
      path: "../templates",
      layout: true
    } );
  }
};
Under the src/routes folder, create a new folder named api. Inside the api folder, create a new file named index.js and paste the following code into this file.
在src/routes文件夹下,创建一个名为api的新文件夹。 在api文件夹中,创建一个名为index.js的新文件,并将以下代码粘贴到该文件中。
"use strict";

const boom = require( "@hapi/boom" );
const joi = require( "@hapi/joi" );

// add a new measurement for the current user
const addMeasurementForCurrentUser = {
  method: "POST",
  path: "/api/measurements",
  handler: async ( request, h ) => {
    try {
      if ( !request.auth.isAuthenticated ) {
        return boom.unauthorized();
      }
      const userId = request.auth.credentials.profile.id;
      const { measureDate, weight } = request.payload;
      const res = await h.sql`INSERT INTO measurements
        ( user_id, measure_date, weight )
        VALUES
        ( ${ userId }, ${ measureDate }, ${ weight } )

        RETURNING
            id
            , measure_date AS "measureDate"
            , weight`;
      return res.count > 0 ? res[0] : boom.badRequest();
    } catch ( err ) {
      console.log( err );
      return boom.serverUnavailable();
    }
  },
  options: {
    auth: { mode: "try" },
    validate: {
      payload: joi.object( {
        measureDate: joi.date(),
        weight: joi.number()
      } )
    }
  }
};

// retrieve all measurements for the current user
const allMeasurementsForCurrentUser = {
  method: "GET",
  path: "/api/measurements",
  handler: async ( request, h ) => {
    try {
      if ( !request.auth.isAuthenticated ) {
        return boom.unauthorized();
      }
      const userId = request.auth.credentials.profile.id;
      const measurements = await h.sql`SELECT
            id
            , measure_date AS "measureDate"
            , weight
        FROM  measurements
        WHERE user_id = ${ userId }
        ORDER BY
            measure_date`;
      return measurements;
    } catch ( err ) {
      console.log( err );
      return boom.serverUnavailable();
    }
  },
  options: {
    auth: { mode: "try" }
  }
};

// delete a measurement for the current user by id
const deleteMeasurementForCurrentUserById = {
  method: "DELETE",
  path: "/api/measurements/{id}",
  handler: async ( request, h ) => {
    try {
      if ( !request.auth.isAuthenticated ) {
        return boom.unauthorized();
      }
      const userId = request.auth.credentials.profile.id;
      const id = request.params.id;
      const res = await h.sql`DELETE
        FROM  measurements
        WHERE id = ${ id }
            AND user_id = ${ userId }`;
      return res.count > 0 ? h.response().code( 204 ) : boom.notFound();
    }
    catch( err ) {
      console.log( err );
      return boom.serverUnavailable();
    }
  },
  options: {
    auth: { mode: "try" },
    validate: {
      params: joi.object( {
        id: joi.number().integer()
      } )
    }
  }
};

// get one measurement for the current user by id
const getMeasurementForCurrentUserById = {
  method: "GET",
  path: "/api/measurements/{id}",
  handler: async ( request, h ) => {
    try {
      if ( !request.auth.isAuthenticated ) {
        return boom.unauthorized();
      }
      const userId = request.auth.credentials.profile.id;
      const id = request.params.id;
      const res = await h.sql`SELECT
            id
            , measure_date AS "measureDate"
            , weight
        FROM  measurements
        WHERE user_id = ${ userId }
            AND id = ${ id }`;
      return res.count > 0 ? res[0] : boom.notFound();
    } catch ( err ) {
      console.log( err );
      return boom.serverUnavailable();
    }
  },
  options: {
    auth: { mode: "try" },
    validate: {
      params: joi.object( {
        id: joi.number().integer().message( "id parameter must be number" )
      } )
    }
  }
};

// update a measurement for the current user by id
const updateMeasurementForCurrentUserById = {
  method: "PUT",
  path: "/api/measurements/{id}",
  handler: async ( request, h ) => {
    try {
      if ( !request.auth.isAuthenticated ) {
        return boom.unauthorized();
      }
      const userId = request.auth.credentials.profile.id;
      const id = request.params.id;
      const { measureDate, weight } = request.payload;
      const res = await h.sql`UPDATE measurements
        SET measure_date = ${ measureDate }
            , weight = ${ weight }
        WHERE id = ${ id }
        AND user_id = ${ userId }

        RETURNING
        id
        , measure_date AS "measureDate"
        , weight`;
      return res.count > 0 ? res[0] : boom.notFound();
    }
    catch( err ) {
      console.log( err );
      return boom.serverUnavailable();
    }
  },
  options: {
    auth: { mode: "try" },
    validate: {
      params: joi.object( {
        id: joi.number().integer()
      } ),
      payload: joi.object( {
        measureDate: joi.date(),
        weight: joi.number()
      } )
    }
  }
};

module.exports = [
  addMeasurementForCurrentUser,
  allMeasurementsForCurrentUser,
  deleteMeasurementForCurrentUserById,
  getMeasurementForCurrentUserById,
  updateMeasurementForCurrentUserById
];
For each of the API routes, the auth mode is set to try. Then for each route, the code first checks to see if the user is authenticated. If not, the handler immediately returns a "401 (unauthorized)" error.
对于每个API路由,将auth模式设置为try 。 然后,对于每条路由,代码首先检查用户是否已通过身份验证。 如果不是,则处理程序立即返回“ 401(未授权)”错误。
Some of the routes accept a parameter as part of the path (e.g. getMeasurementForCurrentUserById()) or values as a payload (e.g. addMeasurementForCurrentUser()). These routes use joi to validate all required values and values are the correct types.
一些路由接受参数作为路径的一部分(例如getMeasurementForCurrentUserById() )或值作为有效载荷(例如addMeasurementForCurrentUser() )。 这些路由使用joi验证所有必需的值,并且值是正确的类型。
The postgres client is used for each of these routes to execute SQL statements. These statements are expressed as JavaScript template literals. The currently authenticated user id is used with every statement to ensure no data is leaked between accounts. The SQL client returns data as JSON, which hapi transparently returns to the browser or whatever HTTP client is requesting the API.
这些路由中的每一个都使用postgres客户端来执行SQL语句。 这些语句表示为JavaScript模板文字。 当前验证的用户id与每个语句一起使用,以确保帐户之间没有数据泄漏。 SQL客户端以JSON形式返回数据,透明地将其返回到浏览器或任何请求HTTP API的HTTP客户端。
Does something look fishy with those SQL statements built with JavaScript template literals? No need to worry! SQL parameters are automatically inferred by the postgres client to prevent SQL injection attacks.
使用JavaScript模板文字建立SQL语句看起来有些混乱吗? 不用担心! Postgres客户端会自动推断SQL参数,以防止SQL注入攻击。
创建用于添加度量和跟踪进度的视图 ( Create Views for Adding Measurements and Tracking Progress )
Now that the application has an API for weight measurements, the final step is to create the user interface. To make the UI a little more dynamic as well as easier to program, you will use the Vue.js framework. You may have noticed there is already a reference for this framework in the layout.ejs template. How to use Vue.js is out of the scope of this tutorial, but hopefully, you will be able to follow how the code works.
现在,该应用程序具有用于体重测量的API,最后一步是创建用户界面。 为了使UI更加动态并易于编程,您将使用Vue.js框架。 您可能已经注意到, layout.ejs模板中已经有此框架的参考。 如何使用Vue.js超出了本教程的范围,但是希望您能够了解代码的工作原理。
Go to the src/templates folder, create a new file named add.ejs, and add the following markup and client-side code.
转到src/templates文件夹,创建一个名为add.ejs的新文件,并添加以下标记和客户端代码。
<div id="app">
  <h1 class="title">Add Measurement</h1>
  <form @submit.prevent="addWeight">
    <fieldset :disabled="disabled">
      <div class="field">
        <label class="label">Date</label>
        <div class="control">
          <input class="input" type="date" placeholder="Text input" v-model.trim="measureDate">
        </div>
      </div>

      <div class="field">
        <label class="label">Weight</label>
        <div class="control">
          <input class="input" type="number" step="0.1" min="0" max="2000" placeholder="Your weight"
            v-model.number="weight">
        </div>
      </div>

      <div class="field is-grouped">
        <div class="control">
          <input type="submit" class="button is-link" value="Submit">
        </div>
        <div class="control">
          <button class="button is-link is-light">Cancel</button>
        </div>
      </div>
    </fieldset>
  </form>
  <div class="section">
    <div v-if="message" class="notification is-success" v-text="message"></div>
    <div v-if="errorMessage" class="notification is-danger" v-text="errorMessage"></div>
  </div>
</div>

<script>
  const app = new Vue({
    el: "#app",
    data() {
      return {
        measureDate: this.formatDate(new Date()),
        weight: undefined,
        disabled: false,
        message: "",
        errorMessage: ""
      }
    },
    methods: {
      addWeight: async function (e) {
        // disable form while submitting to API
        this.disabled = true;
        this.message = "";
        this.errorMessage = "";
        const response = await fetch("/api/measurements", {
          method: "POST",
          credentials: "same-origin",
          headers: {
            "Content-Type": "application/json"
          },
          body: JSON.stringify({
            measureDate: this.measureDate,
            weight: this.weight
          })
        });
        if (response.status === 200) {
          this.weight = undefined;
          this.message = "Weight measurement added!";
          // clear message after 2 seconds
          setTimeout(() => this.message = "", 2000);
        } else {
          const json = await response.json();
          this.errorMessage = `There was an error. ${json.error} - ${json.message}`;
        }
        this.disabled = false;
      },
      formatDate: function (dt) {
        const offset = dt.getTimezoneOffset();
        const date = new Date(dt.getTime() - (offset _ 60 _ 1000));
        return date.toISOString().split("T")[0];
      }
    }
  });
</script>
The add.ejs view displays a form with input fields for a date and a measurement, and a button to record the measurement. When a user clicks the Submit button, the addWeight() method is called. The addWeight() method uses the browser's fetch API to post the form data as JSON to the application's /api/measurements API route. If successful, a message is briefly displayed to let the user know the measurement was recorded. If an error occurs, an error message is displayed and the user can correct any issue and try submitting the form again.
add.ejs视图显示一个表单,其中包含日期和度量值的输入字段,以及记录度量值的按钮。 当用户单击Submit按钮时,将addWeight()方法。 addWeight()方法使用浏览器的fetch API将表单数据作为JSON发布到应用程序的/api/measurements API路由。 如果成功,将短暂显示一条消息,让用户知道测量值已记录。 如果发生错误,则会显示一条错误消息,并且用户可以更正任何问题并尝试再次提交表单。
In the src/templates folder, create a new file named list.ejs, and add the following markup and client-side code.
在src/templates文件夹中,创建一个名为list.ejs的新文件,并添加以下标记和客户端代码。
<script src="https://unpkg.com/chart.js@2.8.0/dist/Chart.bundle.js"></script>
<script src="https://unpkg.com/vue-chartkick@0.5.1"></script>
<div id="app">
  <h1 class="title">Measurements</h1>
  <div class="section" v-if="errorMessage">
    <div class="notification is-danger" v-text="errorMessage"></div>
  </div>
  <div v-if="fetching">Getting your measurements...</div>
  <div v-if="hasData">
    <line-chart :data="chartData" :min="chartMinimum"></line-chart>
    <table class="table is-striped is-narrow">
      <thead>
        <tr>
          <th>Date</th>
          <th>Weight</th>
          <th></th>
        </tr>
      </thead>
      <tbody>
        <tr v-for="m in measurements">
          <td v-text="m.measureDate"></td>
          <td v-text="m.weight"></td>
          <td><button class="button is-danger is-light is-small" @click="remove(m)">Delete</button></td>
        </tr>
      </tbody>
    </table>
  </div>
  <div v-if="noData">No measurements to display</div>
</div>

<script>
  Vue.use(Chartkick.use(Chart));
  const app = new Vue({
    el: "#app",
    computed: {
      noData: function () {
        return this.measurements.length === 0;
      },
      hasData: function () {
        return this.measurements.length > 0;
      },
      chartData: function () {
        // maps the data returned from the API into a format the chart component understands
        const data = {};
        this.measurements.forEach(m => data[m.measureDate] = m.weight);
        return data;
      },
      chartMinimum: function () {
        // Min value is the lowest measurement down to the nearest multiple of 10
        return Math.floor(this.measurements.reduce((prev, current) => {
          return prev.weight < current.weight ? prev.weight : current.weight;
        }, 0) / 10) _ 10;
      }
    },
    data() {
      return {
        measurements: _[_],
        fetching: false,
        errorMessage: ""
      }
    },
    mounted() {
      this.fetchMeasurements();
    },
    methods: {
      fetchMeasurements: async function () {
        this.measurements = _[_];
        this.fetching = true;
        this.errorMessage = "";

        const response = await fetch("/api/measurements", {
          method: "GET",
          credentials: "same-origin"
        });

        this.fetching = false;

        if (response.status === 200) {
          const json = await response.json();
          const now = new Date();
          const offset = now.getTimezoneOffset();
          this.measurements = json.map(m => {
            const dt = new Date(m.measureDate);
            const dt2 = new Date(dt.getTime() + (offset _ 60 * 1000));
            return {
              id: m.id,
              measureDate: dt2.toLocaleDateString(undefined, "short"),
              weight: m.weight
            }
          });
        } else {
          const json = await response.json();
          this.errorMessage = `There was an error. ${json.error} - ${json.message}`;
        }
      },
      remove: async function (m) {
        if (confirm(`Are you sure you want to delete ${m.measureDate} - ${m.weight}?`)) {
          const response = await fetch(`/api/measurements/${m.id}`, {
            method: "DELETE",
            credentials: "same-origin"
          });
          if (response.status === 204) {
            this.fetchMeasurements();
          } else {
            const json = await response.json();
            this.errorMessage = `There was an error. ${json.error} - ${json.message}`;
          }
        }
      }
    }
  });
</script>
When the list.ejs view first loads, a "Getting your measurements..." message is displayed. As soon as the Vue component finishes initializing (mounts), it uses the browser's fetch API to retrieve all the measurements for the current user. A little bit of work is done to format the measurement dates into a friendly format. The Vue component then renders the measurement data as a line chart and table.
首次加载list.ejs视图时,将显示“正在获取测量...”消息。 Vue组件完成初始化(挂载)后,将使用浏览器的fetch API检索当前用户的所有度量。 完成了一些工作,以将测量日期格式化为友好格式。 然后,Vue组件将测量数据呈现为折线图和表格。
Each measurement listed in the table includes a Delete button. The user may click on this button to remove a measurement. The remove() method first prompts the user to confirm deleting the measurement, calls the API to delete the measurement, and refreshes the list of measurements.
表格中列出的每个测量都包括一个“ 删除”按钮。 用户可以单击此按钮删除测量。 remove()方法首先提示用户确认删除度量,调用API删除度量,并刷新度量列表。
The last step is to update the routes! In the src/routes folder, create a new file named measurements.js and add the following code to this file.
最后一步是更新路线! 在src/routes文件夹中,创建一个名为measurements.js的新文件,并将以下代码添加到该文件中。
"use strict";

const addMeasurements = {
  method: "GET",
  path: "/add",
  handler: ( request, h ) => {
    return h.view( "add", { title: "Add Measurement" } );
  }
};

const listMeasurements = {
  method: "GET",
  path: "/list",
  handler: ( request, h ) => {
    return h.view( "list", { title: "Measurements" } );
  }
};

module.exports = [
  addMeasurements,
  listMeasurements
];
Now update the src/routes/index.js file to include the api and measurements modules.
现在,更新src/routes/index.js文件,使其包含api和measurements模块。
"use strict";

const path = require( "path" );

const auth = require( "./auth" );
const api = require( "./api" );
const measurements = require( "./measurements" );

const home = {
  method: "GET",
  path: "/",
  options: {
    auth: {
      mode: "try"
    },
    handler: ( request, h ) => {
      return h.view( "index", { title: "Home" } );
    }
  }
};

const staticAssets = {
  method: "GET",
  path: "/assets/{param_}",
  handler: {
    directory:{
      path: path.join( __dirname, "..", "assets" )
    }
  },
  options: { auth: false }
};

const error404 = {
  method: "_",
  path: "/{any*}",
  handler: function ( request, h ) {
    return h.view( "404", { title: "Not Found" } ).code( 404 );
  },
  options: { auth: false }
};

module.exports = [
  home,
  staticAssets,
  error404
].concat( api, auth, measurements );
You are now ready to test your weight tracker app! You should be able to add measurements and track your progress.
您现在可以测试体重跟踪器应用了! 您应该能够添加度量并跟踪进度。
了解有关构建安全Node.js应用程序的更多信息 ( Learn More About Building Secure Node.js Apps )
The entire source code for this project is available at github.com/reverentgeek/node-weight-tracker. I believe this project would be a great foundation for many types of Web applications built using Node.js.
该项目的完整源代码可在github.com/reverentgeek/node-weight-tracker上找到 。 我相信该项目将为使用Node.js构建的许多类型的Web应用程序奠定良好的基础。
Note: When deploying the application to a production environment, you must create a new .env file or use real environment variables to configure the application. Values such as the PostgreSQL connection information, HOST_URL, COOKIE_ENCRYPT_PWD, and NODE_ENV configuration must be updated to reflect the new environment.
注意:将应用程序部署到生产环境时,必须创建一个新的.env文件或使用实际环境变量来配置该应用程序。 必须更新诸如PostgreSQL连接信息,HOST_URL,COOKIE_ENCRYPT_PWD和NODE_ENV配置之类的值以反映新环境。
If you liked this post, you may also enjoy some of my other posts related to Node.js and security on the Okta developer blog!
如果您喜欢这篇文章,还可以在Okta开发者博客上享受我与Node.js和安全相关的其他一些文章!
- Use TypeScript to Build a Node API with Express 使用TypeScript通过Express构建Node API
- Build a Secure Node.js App with SQL Server 使用SQL Server构建安全的Node.js应用
- Add Authentication and Personalization to VuePress 向VuePress添加身份验证和个性化
- Build a Command Line Application with Node.js 使用Node.js构建命令行应用程序
- Top 10 Visual Studio Code Extensions for Node.js 用于Node.js的十大Visual Studio代码扩展
- An Illustrated Guide to OAuth and OpenID Connect OAuth和OpenID Connect图解指南
翻译自: https://scotch.io/tutorials/build-a-weight-tracker-app-with-nodejs-and-postgresql


 6万+
6万+

 被折叠的 条评论
为什么被折叠?
被折叠的 条评论
为什么被折叠?
 到【灌水乐园】发言


