


Code without tests is broken as designed. — Jacob Kaplan-Moss
没有测试的代码将按设计破坏。 —雅各布·卡普兰·莫斯
In software development, testing is paramount. So why should I do it, you ask?
在软件开发中,测试至关重要。 那么,为什么要这样做呢?
- Tests have a short feedback loop, enabling you and your team to learn faster and adjust 测试的反馈周期很短,使您和您的团队可以更快地学习和调整
- Less time is spent debugging, allowing you to spend more time writing code 调试花费的时间更少,从而使您可以花费更多的时间编写代码
- Tests act as documentation for your code! 测试充当代码的文档!
- They improve code quality while reducing bugs 它们提高了代码质量,同时减少了错误
- After refactoring code, your tests will tell you whether the change has broken previously working code, and... 重构代码后,您的测试将告诉您更改是否破坏了以前的工作代码,并...
- *Tests can prevent your hair line from receding! * * 测试可以防止发际线后退! *
The best way to do code testing is by using Test-Driven Development (TDD).
进行代码测试的最佳方法是使用测试驱动开发(TDD)。
This is how it works:
它是这样工作的:
- Write a test. – The test will flesh out some functionality in your app 编写测试。 –测试将充实您应用中的某些功能
- Then, run the test – The test should fail, since there's no code to make it pass. 然后,运行测试 –测试应该失败,因为没有代码可以通过。
- Write the code – To make the test pass 编写代码 –通过测试
- Run the test – If it passes, you are confident that the code you've written meets the test requirements 运行测试 –如果通过,则您确信所编写的代码符合测试要求
- Refactor code – Remove duplication, prune large objects and make the code more readable. Re-run the tests every time you refactor the code 重构代码 –删除重复项,修剪大对象并使代码更具可读性。 每次重构代码时都重新运行测试
- Repeat – That's it! 重复 –就这样!
Being a fan of best practices, we are going to use TDD to create a bucketlist API. The API will have CRUD (Create, Read, Update, Delete) and authentication capabilities. Let's get to it then!
作为最佳做法的拥护者,我们将使用TDD创建存储区API。 该API将具有CRUD(创建,读取,更新,删除)和身份验证功能。 那我们开始吧!
遗愿清单 ( A Bucketlist )
The aim of this article is to help you learn awesome stuff while creating new things. We'll be creating a bucket list API. If you haven't heard about the term bucket list, it is a list of all the goals you want to achieve, dreams you want to fulfill and life experiences you desire to experience before you die (or hit the bucket). This API should therefore help us to create and manage our bucketlists.
本文的目的是帮助您在创建新事物的同时学习一些很棒的东西。 我们将创建一个存储区列表API。 如果您还没有听说过“ 桶清单 ”一词,那么它就是您想要实现的所有目标,想要实现的梦想以及在死(或撞到桶)之前想要经历的生活经历的列表。 因此,该API应该可以帮助我们创建和管理存储桶列表。
To be on the same page, the API should have the ability to:
要在同一页面上,API应该具有以下能力:
- Create a Bucketlist 创建一个Bucketlist
- Retrieve a Bucketlist 检索遗愿清单
- Update it 更新它
- And, Delete one's bucketlist 而且,删除一个人的遗愿清单
Other complementary functionalities that will come later will be:
其他补充功能将在以后发布:
- Authentication of API Users API用户身份验证
- Searching Bucketlists 搜索遗愿清单
- Adding bucketlist items into a bucketlist 将存储桶列表项添加到存储桶列表
- Pagination 分页
Django的Python新手? (New to Python, Django?)
If you haven't done any Django, Check out Building your first django application. It's an excellent resource for beginners.
如果您还没有完成Django,请查看构建第一个django应用程序 。 对于初学者来说,这是一个极好的资源。
Now that we know about a bucketlist, here's a bit about the tools we'll use to create it's app.
现在我们了解了一个存储桶列表,下面是一些我们将用来创建其应用程序的工具。
Django Rest框架 ( Django Rest Framework )
 Django Rest Framework (or simply DRF) is a powerful module for building web APIs. It's very easy to build model-backed APIs that have authentication policies and are browsable.
为什么选择DRF? (Why DRF?)
- Authentication – From basic and session-based authentication to token-based and Oauth2 capabilities, DRF is king. 身份验证 –从基本的基于会话的身份验证到基于令牌的Oauth2功能,DRF是最重要的。
- Serialization – It supports both ORM and Non-ORM data sources and seemlessly integrates with your database. 序列化 –它支持ORM和非ORM数据源,并且似乎与数据库集成在一起。
- Great Documentation – If you get stuck somewhere, you can refer to it's vast online documentation and great community support 优质的文档 -如果您遇到困难,可以参考它的大量在线文档和社区大力支持
- Heroku, Mozilla, Red Hat, and Eventbrite are among the top companies using DRF in their APIs. Heroku,Mozilla,Red Hat和Eventbrite是在其API中使用DRF的顶级公司。
要求 (Requirements)
For DRF to work, you must have:
为了使DRF正常工作,您必须具有:
- Python Python
- Django Django的
Create and cd into your project folder. You can call the folder anything you like.
创建并进入您的项目文件夹。 您可以根据需要调用该文件夹。
mkdir projects && $_Then, create a virtual environment to isolate our code from the rest of the system.
然后,创建一个虚拟环境以将我们的代码与系统其余部分隔离。
virtualenv -p /usr/local/bin/python3 venvThe -p switch tells virtualenv the path to the python version you want to use. Ensure that you put the correct python installation path after the -p switch. venv is your environment. Even though you can name your environment anything, it's considered best practice to simply name it venv or env.
-p开关告诉virtualenv您要使用的python版本的路径。 确保在-p开关后放置正确的python安装路径。 venv是您的环境。 即使您可以为环境命名,也可以简单地将其命名为venv或env被认为是最佳实践。
Activate your virtual environment by doing this:
通过执行以下操作激活您的虚拟环境:
source venv/bin/activateYou will see a prompt with the environment name. i.e (venv). It means the environment is now active. Now we're ready to install our requirements inside our environment.
您将看到带有环境名称的提示。 即(venv) 。 这意味着环境现在处于活动状态。 现在,我们准备将需求安装到我们的环境中。
Inside the projects folder, install Django using pip
在项目文件夹中,使用pip安装Django
$ pipinstall Django If you lack pip in your system, simply do:
如果您的系统缺少点子,只需执行以下操作:
sudo easy_install pipSince we need to keep track of our requirements, we'll create a requirements.txt file.
由于我们需要跟踪需求,因此我们将创建一个requirements.txt文件。
touch requirements.txtAnd add the installed requirements into the text file using pip freeze
并使用pip freeze将已安装的需求添加到文本文件中
pip freeze> requirements.txtThen finally, create a django project.
最后,创建一个django项目。
django-admin startproject djangorestWe should now have a folder with the name djangorest created. Feel free to give it any other name. The folder structure should look like this:
现在,我们应该创建一个名为djangorest的文件夹。 随时给它起任何其他名字。 文件夹结构应如下所示:
djangorest
├─djangorest
│   ├── __init__.py
│   ├── settings.py
│   ├── urls.py
│   └── wsgi.py
└── manage.py
集成DRF (Integrating DRF)
Using pip, install DRF
使用pip安装DRF
pipinstall djangorestframeworkFor our app to use DRF, we'll have to add rest_framework into our settings.py. Let's go right ahead and do that.
为了使我们的应用程序使用DRF,我们必须将rest_framework添加到我们的settings.py 。 让我们继续前进。
# /djangorest/djangorest/settings.py
...

# Application definition

INSTALLED_APPS = [
    'django.contrib.admin',
    'django.contrib.auth',
    'django.contrib.contenttypes',
    'django.contrib.sessions',
    'django.contrib.messages',
    'django.contrib.staticfiles', # Ensure a comma ends this line
    'rest_framework', # Add this line
]
创建Rest API应用 ( Creating the Rest API app )
In Django, we can create multiple apps that integrate to form one application. An app in django is simply a python package with a bunch of files including the __init__.py file.
在Django中,我们可以创建集成为一个应用程序的多个应用程序。 django中的应用程序只是一个python软件包,带有一堆文件,包括__init__.py文件。
First, cd into the djangorest directory on your terminal. We do this so that we can access the manage.py file. Then create the app as follows:
首先,在终端上的cd进入djangorest目录。 我们这样做是为了可以访问manage.py文件。 然后按如下所示创建应用程序:
python3 manage.py startapp apiThe startapp command creates a new app. Our app is called api. It will hold our API logic. So far, you should have a folder named api alongside the djangorest app.
startapp命令创建一个新应用。 我们的应用程序称为api 。 它将保留我们的API逻辑。 到目前为止,在djangorest应用程序旁边应该有一个名为api的文件夹。
To integrate our api app with the djangorest main app, we'll have to add it to our djangorest settings.py. Let's go right ahead and do that.
要将api应用程序与djangorest主应用程序集成,我们必须将其添加到djangorest settings.py 。 让我们继续前进。
...

# Application definition

INSTALLED_APPS = [
    'django.contrib.admin',
    'django.contrib.auth',
    'django.contrib.contenttypes',
    'django.contrib.sessions',
    'django.contrib.messages',
    'django.contrib.staticfiles',
    'rest_framework',
    'api', # Add this line
]
让编码开始 ( Let The Coding Begin )
首先,我们进行测试! (First, we test!)
We'd want to create the models first. But we have no tests written. We'll therefore write some tests in the tests.py folder of our api app.
我们想先创建模型。 但是我们没有书面测试。 因此,我们将在api应用程序的tests.py文件夹中编写一些测试。
# /api/tests.py

from django.test import TestCase
from .models import Bucketlist


class ModelTestCase(TestCase):
    """This class defines the test suite for the bucketlist model."""

    def setUp(self):
        """Define the test client and other test variables."""
        self.bucketlist_name = "Write world class code"
        self.bucketlist = Bucketlist(name=self.bucketlist_name)

    def test_model_can_create_a_bucketlist(self):
        """Test the bucketlist model can create a bucketlist."""
        old_count = Bucketlist.objects.count()
        self.bucketlist.save()
        new_count = Bucketlist.objects.count()
        self.assertNotEqual(old_count, new_count)
The code above imports the test case from django.test. The test case has a single test which tests whether the model can create a bucketlist with a name.
上面的代码从django.test导入测试用例。 测试用例有一个测试,测试该模型是否可以创建带有名称的存储桶列表。
然后,我们定义我们的模型 (Then, we define our models)
We need to create a blank model class. This is done in our models.py
我们需要创建一个空白模型类。 这是在我们的models.py
# /api/models.py

from django.db import models


class Bucketlist(models.Model):
    pass
Running the test is super easy with django. We'll use the test command as follows:
使用django进行测试非常容易。 我们将使用test命令,如下所示:
python3 manage.pytestYou should see a bunch of errors all over the screen. Don't worry about it. It's because we haven't written our model fields and updated our database yet. Django uses SQlite as it's default database so we'll use it for now. Also, we don't have to write a single SQL statement when creating the models. Django handles all that for us. In the models.py we'll define fields that will represent the table fields in our database.
您应该在屏幕上看到一堆错误。 不用担心 这是因为我们尚未编写模型字段并更新数据库。 Django使用SQlite作为默认数据库,因此我们现在将使用它。 同样,在创建模型时,我们不必编写单个SQL语句。 Django为我们处理了所有这一切。 在models.py我们将定义表示数据库中表字段的字段。
# api/models.py

from django.db import models


class Bucketlist(models.Model):
    """This class represents the bucketlist model."""
    name = models.CharField(max_length=255, blank=False, unique=True)
    date_created = models.DateTimeField(auto_now_add=True)
    date_modified = models.DateTimeField(auto_now=True)

    def __str__(self):
        """Return a human readable representation of the model instance."""
        return "{}".format(self.name)
我们迁移! (We migrate!)
Migrations are Django’s way of propagating changes you make to your models (like adding a field, deleting a model, etc.) into your database schema. Now that we have a rich model in place, we need to tell the database to create the relevant schema. In your console, run this:
迁移是Django将您对模型所做的更改(例如添加字段,删除模型等)传播到数据库模式的一种方法。 现在我们已经有了一个丰富的模型,我们需要告诉数据库创建相关的架构。 在您的控制台中,运行以下命令:
python3 manage.py makemigrationsThis creates a new migration based on the changes we've made to our model. Then, apply the migrations to your db by doing this:
根据我们对模型所做的更改,这将创建一个新的迁移。 然后,通过执行以下操作将迁移应用于数据库:
python3 manage.py migrateWhen you run the tests, you should see something like this:
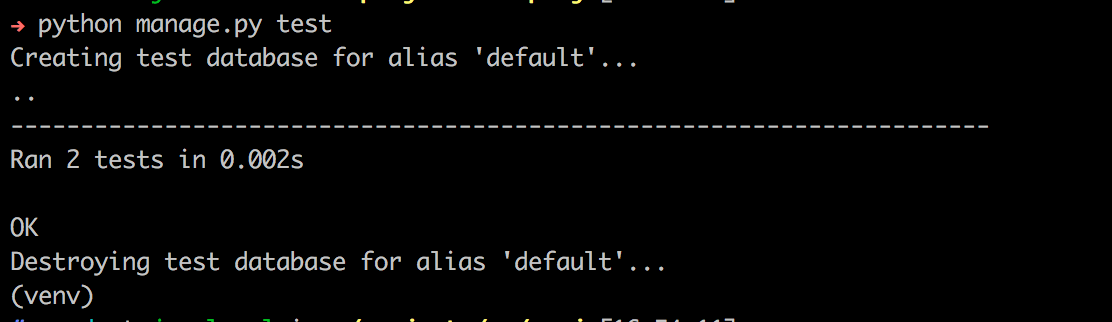
运行测试时,您应该会看到类似以下内容的信息:
The test have passed! This means that we can proceed to write the serializers for our app
测试通过了! 这意味着我们可以继续为我们的应用编写序列化程序
序列化器 ( Serializers )
Serializers serialize and deserialize data. So what's all this about, you ask? Serializing is changing the data from complex querysets from the DB to a form of data we can understand, like JSON or XML. Deserializing is reverting this process after validating the data we want to save to the DB.
序列化器对数据进行序列化和反序列化。 那么,这是怎么一回事呢? 序列化正在将数据从数据库中的复杂查询集更改为一种我们可以理解的数据形式,例如JSON或XML。 在验证我们要保存到数据库的数据之后,反序列化将还原此过程。
型号序列化器很棒! (Model Serializers are awesome!)
The ModelSerializer class lets you automatically create a Serializer class with fields that correspond to the Model fields. This reduces our lines of code significantly. Create a file called serializers.py inside the api directory. Let's write some code in it:
通过ModelSerializer类,您可以自动创建带有与Model字段相对应的字段的Serializer类。 这大大减少了我们的代码行。 在api目录中创建一个名为serializers.py的文件。 让我们在其中编写一些代码:
# api/serializers.py

from rest_framework import serializers
from .models import Bucketlist


class BucketlistSerializer(serializers.ModelSerializer):
    """Serializer to map the Model instance into JSON format."""

    class Meta:
        """Meta class to map serializer's fields with the model fields."""
        model = Bucketlist
        fields = ('id', 'name', 'date_created', 'date_modified')
        read_only_fields = ('date_created', 'date_modified')
观看次数 ( Views )
We'll first write the view's tests. Writing tests seems daunting at first. However, it's easy to know what to test when you know what to implement. In our situation, we want to create views that will handle the following:
我们将首先编写视图的测试。 起初编写测试似乎令人生畏。 但是,当您知道要实现什么时,很容易知道要测试什么。 在我们的情况下,我们想创建将处理以下内容的视图:
- Create a bucketlist – Handle POST request 创建一个存储桶列表–处理POST请求
- Read a bucketlist(s) – Handle GET request 阅读存储桶列表–处理GET请求
- Update a bucketlist – Handle PUT request 更新存储区列表-处理PUT请求
- Delete a bucketlist – Handle DELETE request 删除存储区列表–处理DELETE请求
Basing on the above functionality, we know what to test. We'll use them as a guide. Let's take the first case. If we want to test whether the API will create a bucketlist successfully, we'll write the following code in tests.py:
基于以上功能,我们知道要测试什么。 我们将使用它们作为指导。 让我们来考虑第一种情况。 如果我们要测试API是否会成功创建tests.py ,我们将在tests.py编写以下代码:
# api/tests.py

# Add these imports at the top
from rest_framework.test import APIClient
from rest_framework import status
from django.core.urlresolvers import reverse

# Define this after the ModelTestCase
class ViewTestCase(TestCase):
    """Test suite for the api views."""

    def setUp(self):
        """Define the test client and other test variables."""
        self.client = APIClient()
        self.bucketlist_data = {'name': 'Go to Ibiza'}
        self.response = self.client.post(
            reverse('create'),
            self.bucketlist_data,
            format="json")

    def test_api_can_create_a_bucketlist(self):
        """Test the api has bucket creation capability."""
        self.assertEqual(self.response.status_code, status.HTTP_201_CREATED)
This test fails when we run it. This is ok. It happens so because we haven't implemented the views and urls for handling the POST request.
当我们运行它时,该测试将失败。 还行吧。 发生这种情况是因为我们尚未实现用于处理POST请求的视图和URL。
Let's go ahead and implement them! On views.py, write the following code:
让我们继续实施它们! 在views.py ,编写以下代码:
# api/views.py

from rest_framework import generics
from .serializers import BucketlistSerializer
from .models import Bucketlist


class CreateView(generics.ListCreateAPIView):
    """This class defines the create behavior of our rest api."""
    queryset = Bucketlist.objects.all()
    serializer_class = BucketlistSerializer

    def perform_create(self, serializer):
        """Save the post data when creating a new bucketlist."""
        serializer.save()
The ListCreateAPIView is a generic view which provides
GET(list all) andPOSTmethod handlersListCreateAPIView是一个通用视图,它提供
GET(全部列出)和POST方法处理程序
Notice we specifed the queryset and serializer_class attributes. We also declare a perform_create method that aids in saving a new bucketlist once posted.
注意,我们指定了queryset和serializer_class属性。 我们还声明了perform_create方法,该方法有助于在发布后保存新的存储桶列表。
处理URL ( Handling Urls )
For it to be complete, we'll specify URLs as endpoints for consuming our API. Think of URLs as an interface to the outside world. If someone wants to interact with our web API, they'll have to use our URL.
为了使其完整,我们将指定URL作为使用我们的API的端点。 将URL视为与外界的接口。 如果有人想与我们的Web API交互,则必须使用我们的URL。
Create a urls.py file on the api directory. This is where we define our url patterns.
在api目录上创建一个urls.py文件。 这是我们定义网址格式的地方。
# api/urls.py

from django.conf.urls import url, include
from rest_framework.urlpatterns import format_suffix_patterns
from .views import CreateView

urlpatterns = {
    url(r'^bucketlists/$', CreateView.as_view(), name="create"),
}

urlpatterns = format_suffix_patterns(urlpatterns)
The format_suffix_pattern allows us to specify the data format (raw json or even html) when we use the URLs. It appends the format to be used to every URL in the pattern.
format_suffix_pattern允许我们在使用URL时指定数据格式(原始json甚至是html)。 它将要使用的格式附加到模式中的每个URL。
Finally we add a url to the main app's urls.py file so that it points to our API app. We will have to include the api.urls we just declared above into the main app urlpatterns. Go to the djangorest folder and add the following to the urls.py:
最后,我们在主应用程序的urls.py文件中添加一个url,使其指向我们的API应用程序。 我们必须将上面刚刚声明的api.urls包含在主应用程序urlpatterns 。 转到djangorest文件夹,然后将以下内容添加到urls.py :
# djangorest/urls.py
# This is the main urls.py. It should'nt be mistaken for the urls.py in the api directory

from django.conf.urls import url, include

urlpatterns = [
    url(r'^admin/', admin.site.urls),
    url(r'^', include('api.urls')) # Add this line
]
让我们开始吧! ( Let's Run! )
We'll run our server the django way with the runserver command:
我们将使用runserver命令以django方式运行服务器:
python3 manage.py runserverYou should see this output on your console
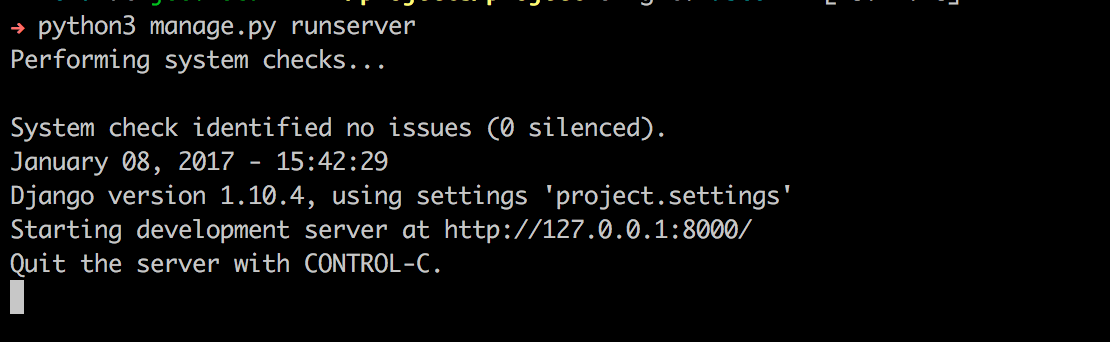 That means everything is running smoothly.
您应该在控制台上看到此输出
Enter the server specified URL (http://127.0.0.1:8000/bucketlists) in your browser. And viola – It works!
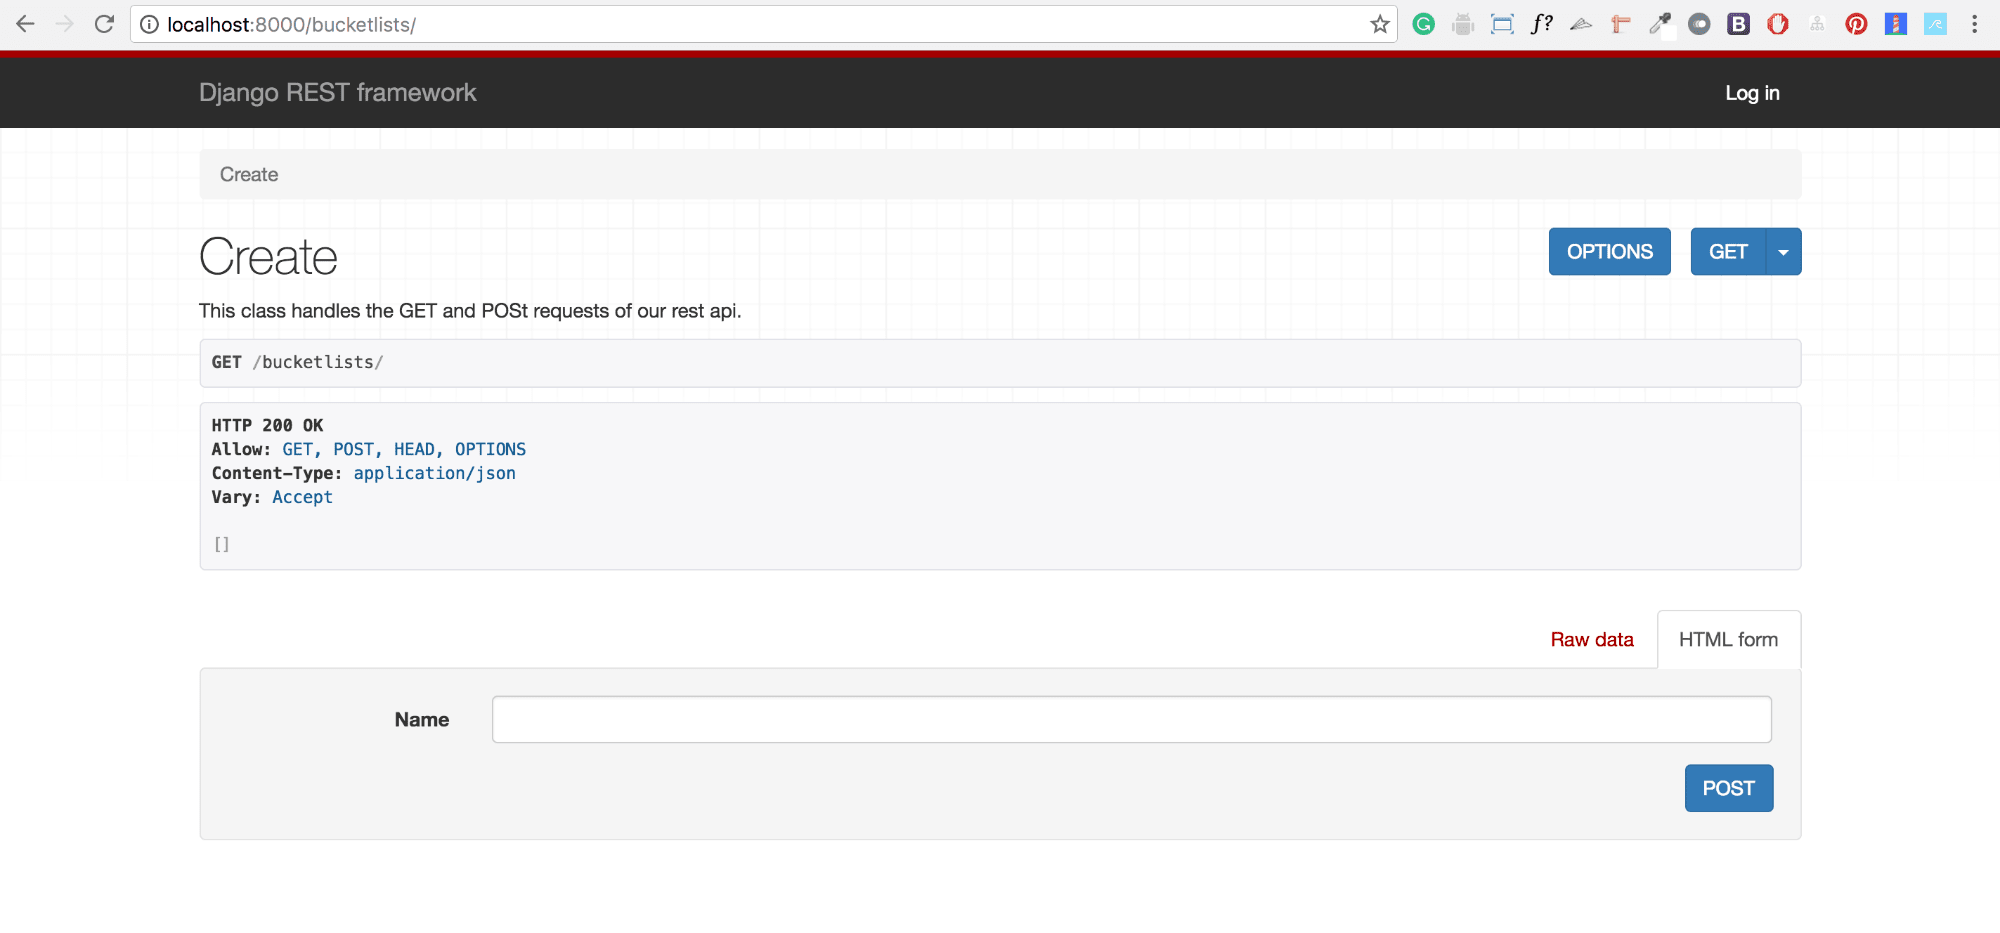 Go ahead and write a bucketlist and click the post button to confirm whether our API works. You should see something like this:
在浏览器中输入服务器指定的URL( http://127.0.0.1:8000/bucketlists )。 和中提琴–它有效!
继续写一个存储桶列表,然后单击发布按钮以确认我们的API是否有效。 您应该会看到以下内容:
读取,更新和删除 ( Reading, Updating and Deletion )
编写测试 (Writing the tests)
We'll write three more tests to cater for GET, PUT and DELETE requests. We'll wrap them as follows:
我们将再编写三个测试来满足GET , PUT和DELETE请求。 我们将它们包装如下:
# api/tests.py

    def test_api_can_get_a_bucketlist(self):
        """Test the api can get a given bucketlist."""
        bucketlist = Bucketlist.objects.get()
        response = self.client.get(
            reverse('details',
            kwargs={'pk': bucketlist.id}), format="json")

        self.assertEqual(response.status_code, status.HTTP_200_OK)
        self.assertContains(response, bucketlist)

    def test_api_can_update_bucketlist(self):
        """Test the api can update a given bucketlist."""
        change_bucketlist = {'name': 'Something new'}
        res = self.client.put(
            reverse('details', kwargs={'pk': bucketlist.id}),
            change_bucketlist, format='json'
        )
        self.assertEqual(res.status_code, status.HTTP_200_OK)

    def test_api_can_delete_bucketlist(self):
        """Test the api can delete a bucketlist."""
        bucketlist = Bucketlist.objects.get()
        response = self.client.delete(
            reverse('details', kwargs={'pk': bucketlist.id}),
            format='json',
            follow=True)

        self.assertEquals(response.status_code, status.HTTP_204_NO_CONTENT)
If we run these tests, they should fail. Let's fix that. It's time we complete the api with a PUT and DELETE method handlers. We'll define a view class for this. On the views.py file, add the following code:
如果我们运行这些测试,它们将失败。 让我们修复它。 是时候使用PUT和DELETE方法处理程序来完成api了。 我们将为此定义一个视图类。 在views.py文件上,添加以下代码:
# api/views.py

class DetailsView(generics.RetrieveUpdateDestroyAPIView):
    """This class handles the http GET, PUT and DELETE requests."""

    queryset = Bucketlist.objects.all()
    serializer_class = BucketlistSerializer
RetrieveUpdateDestroyAPIView is a generic view that provides
GET(one),PUT,PATCHandDELETEmethod handlers.RetrieveUpdateDestroyAPIView是一个通用视图,提供
GET(一个),PUT,PATCH和DELETE方法处理程序。
Finally, we create this new url to be associated with our DetailsView.
最后,我们创建这个新的URL以与我们的DetailsView关联。
# api/urls.py

from .views import DetailsView

url(r'^bucketlists/(?P<pk>[0-9]+)/$',
        DetailsView.as_view(), name="details"),
结语 ( Wrapping it up )
Enter the specified URL (http://127.0.0.1:8000/bucketlists/1/) in your browser. And voila! – It works! You can now edit the existing bucketlist.

在浏览器中输入指定的URL( http://127.0.0.1:8000/bucketlists/1/ )。 瞧! - 有用! 现在,您可以编辑现有的存储区列表。
结论 ( Conclusion )
Phew! Congratulations for making it to the end of this article – You are awesome!
! 恭喜您完成本文结尾–太棒了!
In Part 2 of the Series, we'll delve into adding users, integrating authorization and authentication, documenting the API and adding more refined tests. Want to dig deeper? Feel free to read more of DRF's Official Documentation.
在本系列的第2部分中,我们将深入研究添加用户,集成授权和身份验证,记录API以及添加更多完善的测试。 想更深入地挖掘吗? 随时阅读DRF的官方文档 。
And if you're new to Django, I find Django For Beginners Excellent.
而且,如果您是Django的新手 ,我会觉得Django For入门级优秀。
翻译自: https://scotch.io/tutorials/build-a-rest-api-with-django-a-test-driven-approach-part-1


 452
452

 被折叠的 条评论
为什么被折叠?
被折叠的 条评论
为什么被折叠?
 到【灌水乐园】发言


