


 这篇博客介绍了如何利用Okta AppAuth SDK将OpenID Connect整合到iOS应用中,实现用户认证。文章详细阐述了从创建Okta开发者账号、安装SDK、配置iOS应用、处理应用间通信,到用户登录和信息请求的步骤,旨在帮助开发者在短短20分钟内完成iOS应用的认证功能集成。
本机搭建auth2
What does it take to build a successful mobile application in today’s ever-changing market? There are (what seems like an infinite) number of design, build, and test cycles performed, just to release your app into the hands of a user.
在当今瞬息万变的市场中构建成功的移动应用程序需要做什么? 只是为了将您的应用发布到用户手中,执行了(似乎是无限的)许多设计,构建和测试周期。
In essence:
在本质上:
while Users.love != true {
    Product.design()
    Product.rebuild()
  }
Once completed, the real challenge begins – retaining those users. Mostly that means getting users to log in to your app easily, and then never have to do it again. With Okta, you can effortlessly integrate authentication into your iOS application with the Okta AppAuth SDK.
一旦完成,真正的挑战就开始了–留住那些用户。 通常,这意味着让用户轻松登录您的应用程序,然后再也不必再次登录。 使用Okta,您可以使用Okta AppAuth SDK轻松地将身份验证集成到iOS应用程序中。
This post will show you how to add OpenID Connect for user Authentication into your native iOS application, using Swift.
这篇文章将向您展示如何使用Swift将OpenID Connect for User Authentication添加到您的本机iOS应用程序中。
This post also assumes you have the latest version of XCode, along with Swift 3.x+.
这篇文章还假设您拥有最新版本的XCode以及Swift 3.x +。
- Create a new Xcode project 创建一个新的Xcode项目
- Sign-up for a free Okta Developer Edition account 注册一个免费的Okta Developer Edition帐户
- Log in to your Okta account and select Applications > Add Application > Native 登录到您的Okta帐户,然后选择“ 应用程序”>“添加应用程序”>“本机”
- Update the Grant type allowed to include Refresh Token 更新允许的类型以包括刷新令牌
- Click Done 点击完成
- Copy the Login redirect URI and Client ID, as you will need to insert these into your native app configuration 复制登录重定向URI和客户端ID ,因为您需要将其插入到本机应用程序配置中
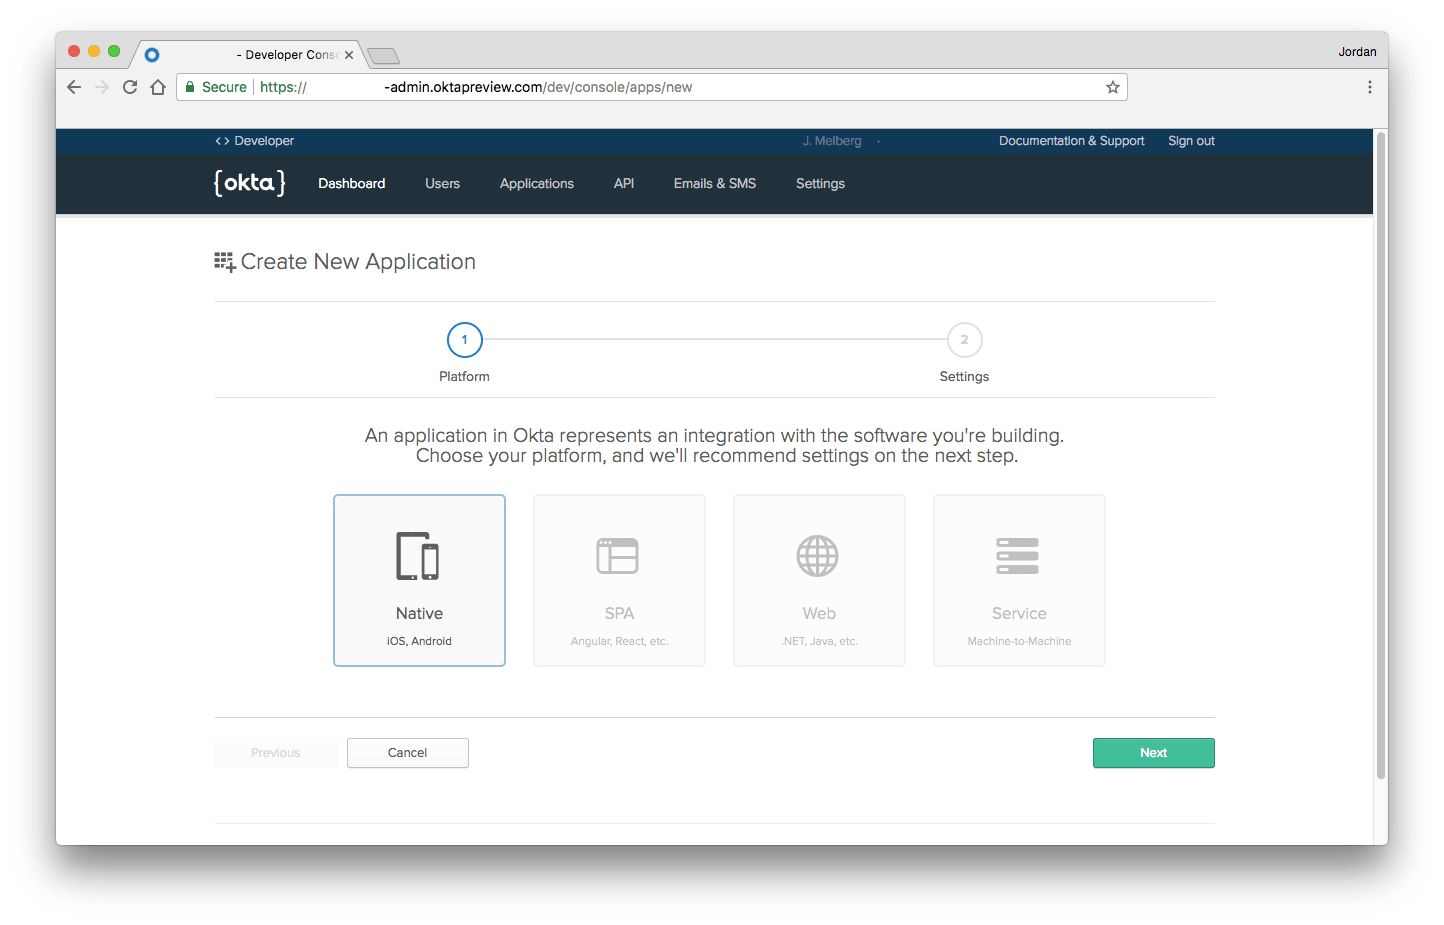
Okta开发人员控制台应用程序向导
安装Okta AppAuth SDK ( Install the Okta AppAuth SDK )
The Okta AppAuth SDK is available through Cocoapods. For instructions on installing Cocoapods, see their getting started guide.
Okta AppAuth SDK可通过Cocoapods获得 。 有关安装Cocoapods的说明 ,请参阅其入门指南 。
From a terminal window, navigate into your iOS application's directory to create a Podfile, where 'MyApp' is the name of your new Xcode project.
在终端窗口中,导航到iOS应用程序的目录以创建Podfile ,其中'MyApp'是新Xcode项目的名称。
platform:ios, '9.0'
use_frameworks!

target 'MyApp' do
  pod 'OktaAuth', '~> 0.1'
end
Next, install the SDK by running pod install. You should see the following message appear once the installation is completed:
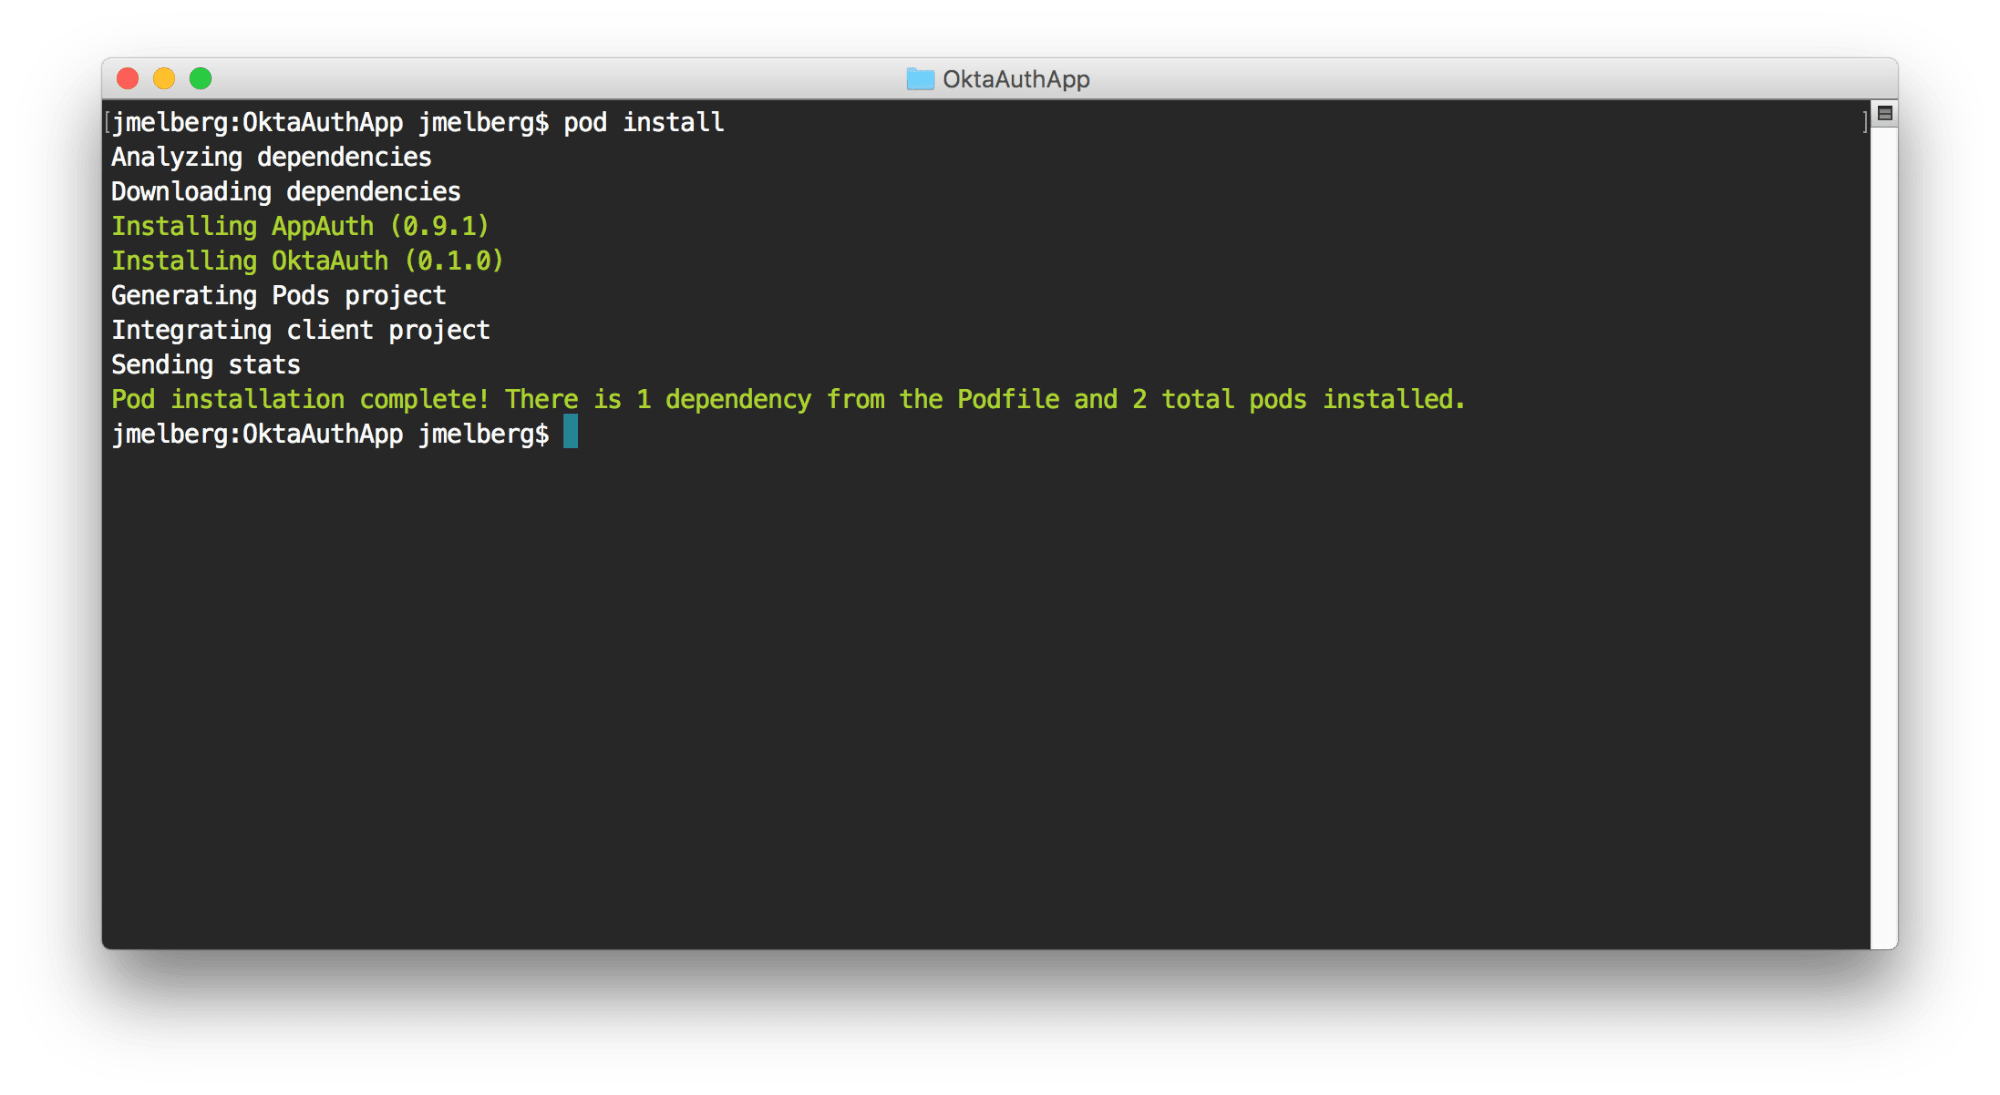
接下来,通过运行pod install SDK。 安装完成后,您应该看到以下消息出现:
Open up the newly generated .xcworkspace file by running the following in your terminal:
通过在终端中运行以下命令来打开新生成的.xcworkspace文件:
# Replace 'MyApp' with the name of your iOS application
open MyApp.xcworkspace/
配置您的iOS应用 ( Configure your iOS App )
The SDK uses a Property List (.plist) file to bootstrap the login flow. We will need to create an Okta.plist file in your application's bundle, using your newly created Okta application's attributes:
SDK使用属性列表 ( .plist )文件来引导登录流程。 我们将需要使用您新创建的Okta应用程序的属性在您的应用程序包中创建Okta.plist文件:
<?xml version="1.0" encoding="UTF-8"?>
<!DOCTYPE plist PUBLIC "-//Apple//DTD PLIST 1.0//EN" "http://www.apple.com/DTDs/PropertyList-1.0.dtd">
<plist version="1.0">
<dict>
    <key>issuer</key>
    <string>https://{yourOktaOrg}.oktapreview.com/oauth2/default</string>
    <key>clientId</key>
    <string>{clientIdValue}</string>
    <key>redirectUri</key>
    <string>{redirectUrlValue}</string>
        <key>scopes</key>
    <array>
        <string>offline_access</string>
        <string>openid</string>
        <string>profile</string>
    </array>
</dict>
</plist>
OpenID Connect术语 (OpenID Connect Terminology)
| Setting | Value | Description |
|---|---|---|
issuer | https://{yourOktaOrg}.oktapreview.com/oauth2/default | Your organization's URL, appended with your default authorization server. |
clientId | 0oac123.. | Client ID copied from the Client Credentials section on your Okta Application's page. |
redirectUri | com.oktapreview.{yourOktaOrg}:/callback | Login redirect URI copied from the General Settings section on your Okta Application's page. |
scopes | offline_access, openid, and profile | Enables your application to receive basic user information via an ID Token. |
| 设置 | 值 | 描述 |
|---|---|---|
issuer | https:// {yourOktaOrg} .oktapreview.com / oauth2 / default | 您组织的URL,并附有default授权服务器。 |
clientId | 0oac123.. | 从Okta应用程序页面上的“ 客户端凭据”部分复制的客户端ID。 |
redirectUri | com.oktapreview.{yourOktaOrg}:/callback | 从Okta应用程序页面的“ 常规设置”部分复制的登录重定向URI。 |
scopes | offline_access , openid和profile | 使您的应用程序可以通过ID令牌接收基本用户信息。 |
更新专用URI方案 (Update the Private-use URI Scheme)
To allow apps to communicate with one another on an iOS device, we need to register a URI Scheme.
为了允许应用在iOS设备上相互通信,我们需要注册URI Scheme 。
The easiest way to set this up is to navigate to the Info tab under your Application's target. Specify a URL Scheme to be your redirectUri, excluding the path.
进行此设置的最简单方法是导航到应用程序目标下的“ 信息”选项卡。 将URL方案指定为您的redirectUri ,不包括路径。

添加用户身份验证 ( Add User Authentication )
First, we need to handle the inter-app communication between the device's native browser and your application. Open AppDelegate.swift and add the following:
首先,我们需要处理设备的本机浏览器与您的应用程序之间的应用程序间通信。 打开AppDelegate.swift并添加以下内容:
// AppDelegate.swift
import OktaAuth

func application(_ app: UIApplication, open url: URL, options: [UIApplicationOpenURLOptionsKey : Any]) -> Bool {
    return OktaAuth.resume(url, options: options)
}
Next, lets add the login code! You can trigger a login event a number of ways. For this article, we will simply add the login action to run during our initial viewDidLoad. Open your ViewController.swift file and add the following to start the auth flow:
接下来,让我们添加登录代码! 您可以通过多种方式触发登录事件。 对于本文,我们将仅添加登录操作以在初始viewDidLoad期间运行。 打开您的ViewController.swift文件,并添加以下内容以启动身份验证流程:
import OktaAuth

class ViewController: UIViewController {
    override func viewDidLoad() {
        super.viewDidLoad()
        OktaAuth
            .login()
            .start(self) { response, error in
                if error != nil { print(error!) }

                // Success
                if let tokenResponse = response {
                    OktaAuth.tokens?.set(value: tokenResponse.accessToken!, forKey: "accessToken")
                    OktaAuth.tokens?.set(value: tokenResponse.idToken!, forKey: "idToken")
                    print("Success! Received accessToken: \(tokenResponse.accessToken!)")
                    print("Success! Received idToken: \(tokenResponse.idToken!)")
                }
        }
    }
发生了什么? (What's Happening?)
Once your application loads, it will trigger the OktaAuth.login() event. Best current practice for native applications suggest initiating the login flow via an in-app browser, instead of an embeddable WebView.
应用程序加载后,它将触发OktaAuth.login()事件。 当前本机应用程序的最佳实践建议通过应用程序内浏览器而不是可嵌入的WebView来启动登录流程。
After the user authenticates using the Okta Sign-In Page, some magic happens behind the scenes. Primarily, handling the Authorization Code Flow with Proof Key for Code Exchange (PKCE). This handshake is abstracted from us by the Okta AppAuth SDK, and allows us to securely receive the requested tokens.
用户使用Okta登录页面进行身份验证后,幕后发生了一些魔术。 首先, 使用代码交换证明密钥(PKCE)处理授权代码流 。 Okta AppAuth SDK从我们那里抽象了这个握手,它使我们能够安全地接收所请求的令牌。
If there is a successful login event, our application is bounced back to the main page, where we store the accessToken and the idToken to the device's Keychain to ensure the tokens are encrypted.
如果成功登录,我们的应用程序将退回到主页,在该页面中,将accessToken和idToken存储到设备的钥匙串中,以确保令牌已加密。
Now, let's see it in action!
现在,让我们看看它的实际效果!
在模拟器中运行您的应用 ( Run your App in the Simulator )
To build and run your iOS application, use the Xcode Simulator.
要构建和运行iOS应用程序,请使用Xcode Simulator 。
- Click the ▶️ button on the top-left of your editor. 单击编辑器左上方的▶️按钮。
- Alternatively, select Run under the Product toolbar to launch the default simulator. 或者,选择“ 产品”工具栏下的“运行”以启动默认模拟器。
In a few moments, you should see the Okta Login Page.
稍后,您应该会看到Okta登录页面。
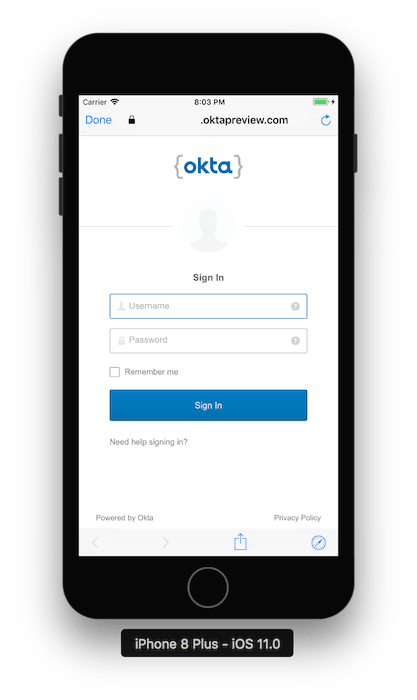
Enter your username and password, then click Sign In. Upon successful authentication, you'll be redirected back to your application. Check your debugger to see the following message:
输入您的用户名和密码 ,然后单击“ 登录” 。 身份验证成功后,您将被重定向回您的应用程序。 检查调试器以查看以下消息:
Success! Received idToken:
eyJhbGciOiJSUzI1NiIsImtpZCI6IkdOMlBlRU5seEFISGNjLVJmM0pXcktodGFrT3...
Success! Received accessToken:
eyJhbGc...
Copy the idToken response and paste it into jsonwebtoken.io to see the information contained within the identity token!
复制idToken响应并将其粘贴到jsonwebtoken.io中,以查看身份令牌中包含的信息!
索取用户信息 ( Request User Information )
Courtesy of the OpenID Connect API, we have access to a protected userinfo endpoint. During our initial authentication request, we received an accessToken and an idToken, where an idToken is a Json Web Token (JWT) that represents an authenticated user. The accessToken is usually an opaque token used specifically for calling and protected API endpoints.
由OpenID Connect API提供,我们可以访问受保护的userinfo端点。 在最初的身份验证请求期间,我们收到了accessToken和idToken ,其中idToken是代表已验证用户的Json Web令牌(JWT)。 accessToken通常是不透明的令牌,专门用于调用和受保护的API端点。
Using the newly minted accessToken, lets request more information about the user by calling the userinfo() method:
使用新accessToken ,可以通过调用userinfo()方法来请求有关用户的更多信息:
OktaAuth
    .login()
    .start(self) { response, error in
        if error != nil { print(error!) }

        // Success
        if let tokenResponse = response {
            OktaAuth.tokens?.set(value: tokenResponse.accessToken!, forKey: "accessToken")
            OktaAuth.tokens?.set(value: tokenResponse.idToken!, forKey: "idToken")

            OktaAuth.userinfo() { response, error in
                if error != nil { print("Error: \(error!)") }

                if let userinfo = response {
                    userinfo.forEach { print("\($0): \($1)") }
                }
            }
        }
}
▶️ the application again to see what was returned!
▶️再次申请,看看返回了什么!
下一步是什么 ( What's Next )
Now that you have additional user information, you can store the user's email address, profile image, and more into your application - or use it for personalization. Using Okta's Universal Directory, you can modify user attributes by navigating to Applications in your Okta Developer Console. Select your new native application, then click on the Assignments tab.
现在,您有了其他用户信息,您可以将用户的电子邮件地址,个人资料图像等存储到您的应用程序中,或用于个性化。 使用Okta的通用目录 ,可以通过在Okta开发人员控制台中导航到“ 应用程序”来修改用户属性。 选择新的本机应用程序,然后单击“ 分配”选项卡。
Edit the user's profile directly by selecting the pencil icon, which will display a modal similar to:
通过选择铅笔图标直接编辑用户的个人资料,该图标将显示类似于以下内容的模式:

▶️ the application one last time to see your updated user!
▶️上一次应用程序查看您的更新用户!
picture: https://avatars3.githubusercontent.com/u/7400479?v=3&s=400
family_name: Melberg
name: Jordan Melberg
updated_at: 1506444347
email: jordan.melberg@okta.com
sub: 00u...
zoneinfo: America/Los_Angeles
given_name: Jordan
preferred_username: jordan.melberg@okta.com
locale: en-US
email_verified: 1
You did it! You've successfully added Authentication into your mobile app with as little as 20 lines of code!
你做到了! 您仅需20行代码就已成功将身份验证添加到您的移动应用程序中!
If you liked what you saw here, check out the Okta Developer Blog for tons more like it.
如果您喜欢在这里看到的内容,请查看Okta开发者博客,以获取更多类似内容。
翻译自: https://scotch.io/tutorials/add-auth-to-your-native-ios-app-in-20-minutes
本机搭建auth2


 802
802

 被折叠的 条评论
为什么被折叠?
被折叠的 条评论
为什么被折叠?
 到【灌水乐园】发言


