


 本文介绍了Postman作为一个强大的API测试工具,不仅可以快速测试API响应,还可以创建集合、分享、编写JavaScript测试。文章详细讲解了Postman的安装、收藏、环境变量、Newman CLI的使用,以及如何通过编写测试来验证API响应。最后,通过Newman在命令行运行测试,实现自动化测试。
postman api测试
Software testing is a common practice these days in many organisations, and for even individual developers. Googling around, you'll find a number of types of software tests that exist to help with this.
如今,软件测试在许多组织中乃至个人开发人员中都是一种普遍的做法。 到处搜寻,您会发现许多软件测试可以帮助您。

Postman is a good tool which we mostly use to quickly test APIs to see the result returned by them, but it's actually way more powerful than that.
Postman是一个很好的工具,我们主要用于快速测试API以查看它们返回的结果,但实际上,它的功能要强大得多。
邮递员功能 (Postman Features)
To mention a few of the features it comes with:-
提及它附带的一些功能:-
- You can simply test any API and see the response immediately. 您可以简单地测试任何API并立即查看响应 。
- You can create a collection of API endpoints and call them whenever you want to see the responses. 您可以创建API端点的集合,并在需要查看响应时调用它们。
- You can share these collections, when you are logged in with team members. 与团队成员登录后,您可以共享这些集合。
- You can use Postman's CLI client, Newman, to write Postman tests with JavaScript. 您可以使用Postman的CLI客户端Newman来使用JavaScript编写Postman测试。
- You can write tests in JavaScript to test the response that comes when a Postman request is made. 您可以使用JavaScript编写测试,以测试发出Postman请求时出现的响应。
- Finally, once you have all these endpoints created, you can export a JSON file, both for the endpoint tests and the environment variables, which again can be used by Postman as a source of for the tests. 最后,一旦创建了所有这些端点,就可以导出一个JSON文件,用于端点测试和环境变量,Postman可以再次将其用作测试的源。
We are going to look at all these feature, some are intuitive, some not so much unless you've been using Postman for a while.
我们将研究所有这些功能,有些是直观的,有些则不是很多,除非您已经使用Postman一段时间了。
Since Postman is a tool, we can test APIs written in any language, we'll do our tests with the open Github API.
由于Postman是一种工具,因此我们可以测试以任何语言编写的API,因此我们将使用开放的Github API进行测试。
安装与设定 ( Installation and Setup )
If you have Postman already installed, you can skip to the next section.
如果已经安装了Postman,则可以跳到下一部分。
If not, make sure you have Google Chrome installed, then head over to the Chrome Store and search for Postman
 Install it by clicking the
如果没有,请确保已安装Google Chrome,然后转到Chrome商店并搜索Postman 添加到Chrome”按钮进行安装,然后它将转到“ 启动应用”或将您带到“ Google Chrome应用”页面。 您可以使用任一选项打开它。
NOTE: Google will be phasing out Chrome apps on the Chrome Web Store by 2018. So it's encouraged to install the native Postman for your platform. Visit the Postman site and get your platform download.
 You can then look it up in your installed apps and open it.
注意: Google将在2018年之前逐步淘汰Chrome网上应用店中的Chrome应用。因此,建议您为自己的平台安装本地Postman。 访问Postman网站并下载平台。
You can choose to Sign Up if you want, this is important especially for saving your API collections and accessing them anytime on any machine, but for this article, we can skip this. There's a button for that towards the bottom when you first launch the app.

您可以根据需要选择“ 注册” ,这对于保存API集合并在任何计算机上随时访问它们非常重要,但是对于本文,我们可以跳过。 首次启动应用程序时,该按钮底部会显示一个按钮。
邮差收藏 ( Postman Collections )
There's a Collections tab on the top left of Postman, with an example POSTMAN Echo collection. You can open and inspect it.
 From the above screen shot, I've selected one of the API requests from the collection, and navigated to it's test tab.
在Postman的左上方有一个Collections选项卡,其中有一个POSTMAN Echo集合示例。 您可以打开并检查它。
The code you see there starting with tests["response code is 401"] = responseCode.code === 401; is just JavaScript, and this is actually how we are going to write our tests for the Github API I had mentioned earlier.
您在此处看到的代码以tests["response code is 401"] = responseCode.code === 401; 只是JavaScript,实际上这就是我们要为前面提到的Github API编写测试的方式。
You can open the other API requests in the POSTMAN Echo collection to have a feel of how requests are made.
您可以在POSTMAN Echo集合中打开其他API请求,以了解如何进行请求。
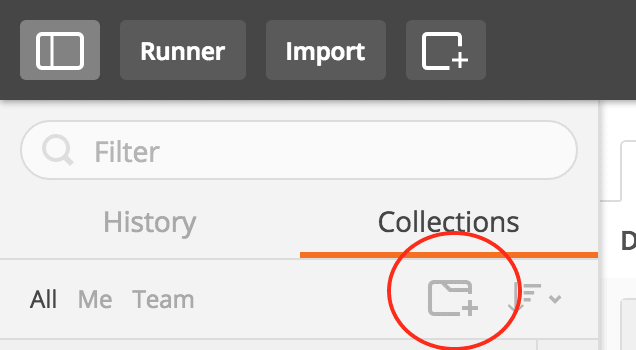
So let's start by making our own collection, and call it Github API. Click on the Add Collection button on the top left of Postman
 You will be prompted to give details about the collection, I've added a name
因此,让我们开始制作自己的集合,并将其称为Github API 。 单击邮递员左上角的添加收藏夹按钮
系统将提示您提供有关集合的详细信息,我添加了名称
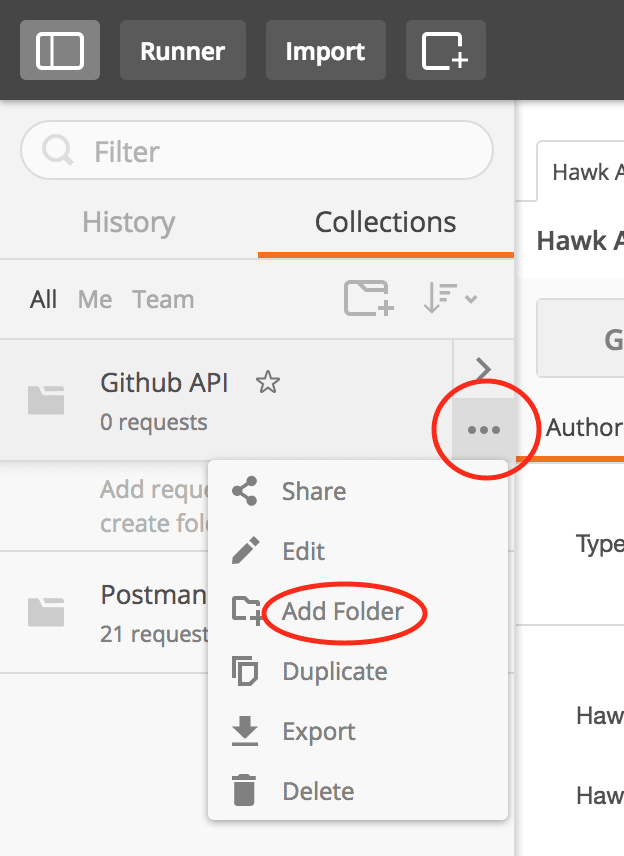
We'll then add a folder to the collection. Folders are a great way of separating different parts of your API workflow.
 I called the folder
然后,我们将一个文件夹添加到集合中。 文件夹是分隔API工作流不同部分的好方法。
我调用了文件夹
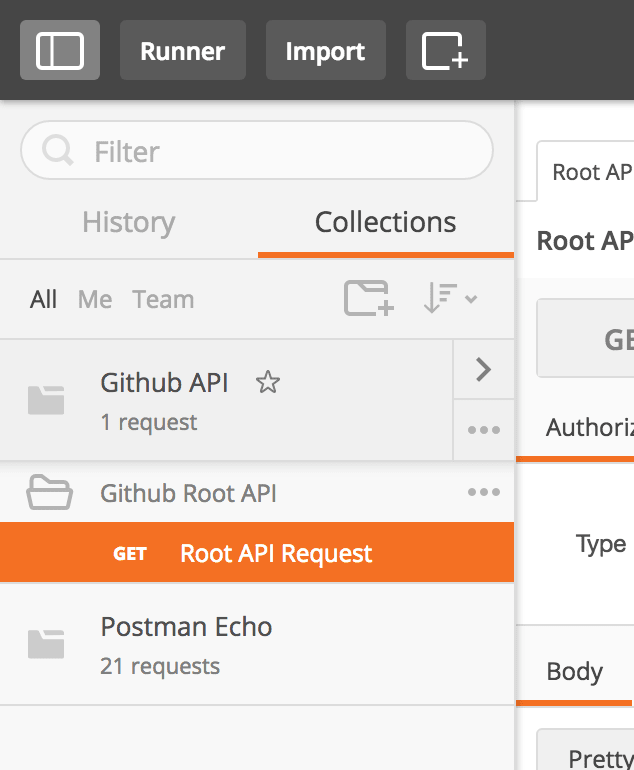
Now that we have the folder, the next task is to add an API call that is related to the Github API root to that folder. That API call is to https://api.github.com/.
现在我们有了该文件夹,下一个任务是将与Github API根相关的API调用添加到该文件夹。 该API调用是https://api.github.com/ 。
If you still have one of POSTMAN Echo collections open, you can close it the same way you close tabs in a browser, or just click on the plus button to add a new tab on the right pane where we make requests. Type in or paste in https://api.github.com/ and press Send to see the response.
 Once you get the response, you can click on the arrow next to the the save button on the far right, and select
 Whenever you click on this request from the collection, it will open in the center pane.
如果您仍然有一个POSTMAN Echo集合处于打开状态,则可以用与关闭浏览器中的选项卡相同的方式关闭它,或者只需单击加号按钮即可在我们提出请求的右侧窗格中添加一个新的选项卡。 输入或粘贴https://api.github.com/ ,然后按发送以查看响应。 另存为 ,将显示一个弹出窗口,询问将API调用保存在何处。
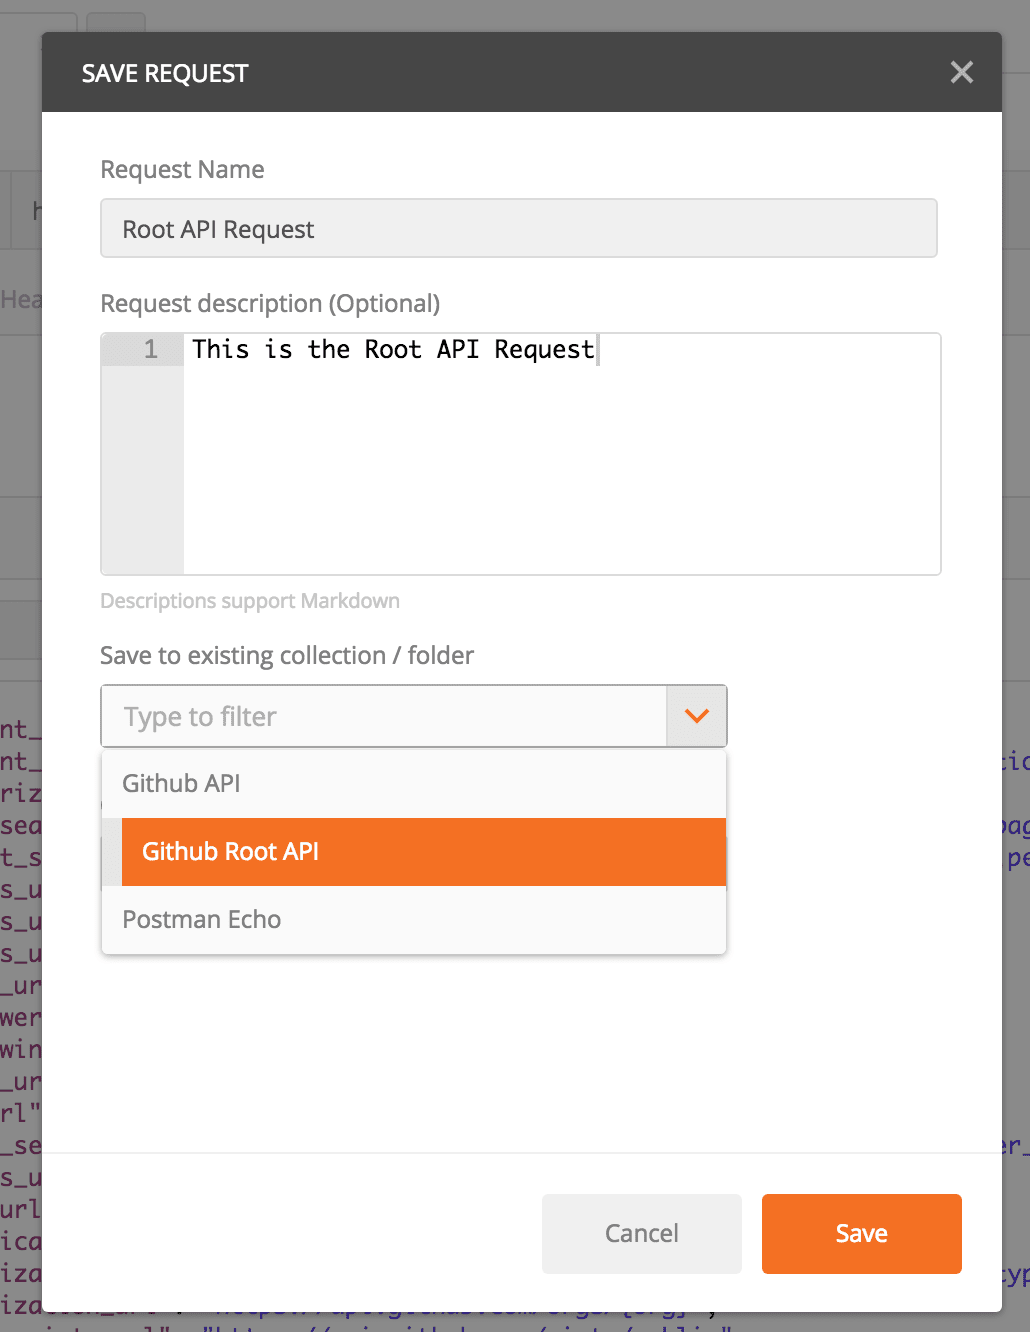 输入名称,它可以是请求URL,也可以是诸如
让我们写第一个测试 ( Let's Write the First Test )
We've seen that the Root API Request request has a JSON response, which is usually the case for most APIs. The response has properties such as current_user_url, emails_url, followers_url and following_url to pick a few.
我们已经看到, Root API Request请求具有JSON响应,大多数API通常都是这种情况。 响应具有current_user_url,emails_url,followers_url和following_url等属性以供选择。
The current_user_url has a value of https://api.github.com/user. Say we want to write a test for this.
current_user_url的值为https://api.github.com/user 。 假设我们要为此编写测试。
Click on the Root API Request and click on the test tab in the section just below where the URL is put.
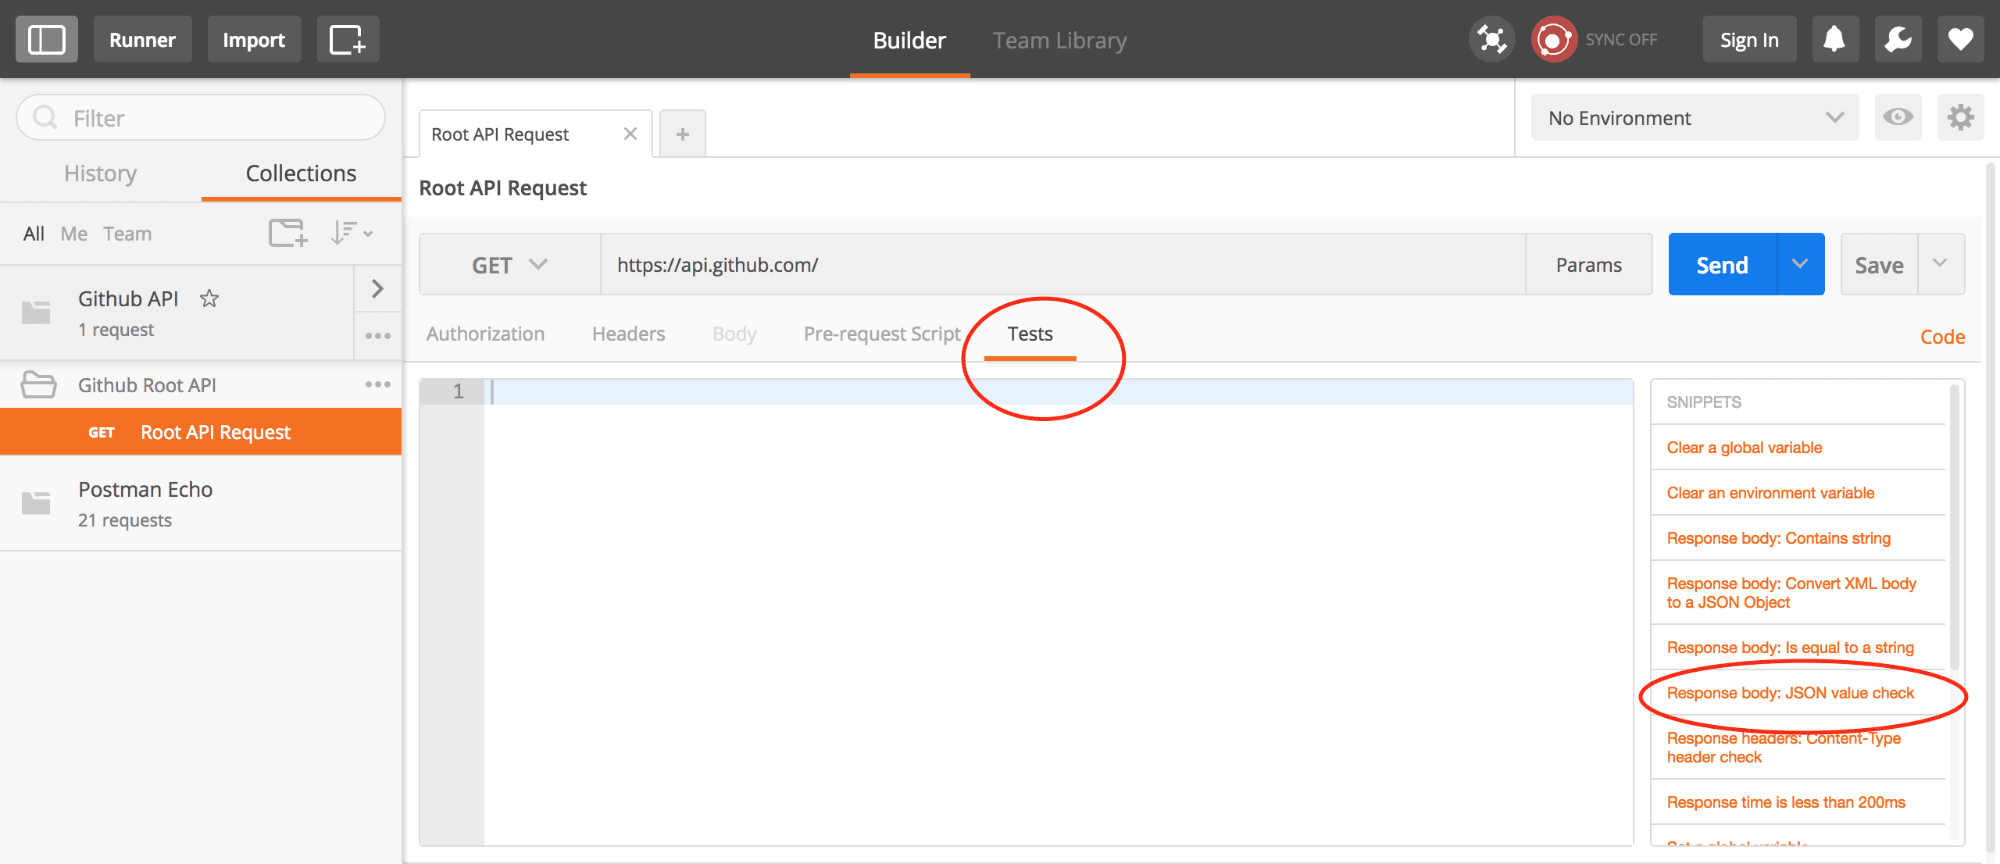
单击“ Root API请求” ,然后单击放置URL的下面部分中的“测试”选项卡。
You'll notice on the right pane, we have some snippets which Postman creates when you click so that you don't have to write a lot of code. I've annotated the relevant one for this test, which is Response Body: JSON value check. Clicking on it produces the following snippet.
您会在右侧窗格中注意到,我们有一些Postman在您单击时创建的摘要,因此您无需编写大量代码。 我已经为该测试添加了相关的注释,即Response Body:JSON value check 。 单击它会生成以下代码段。
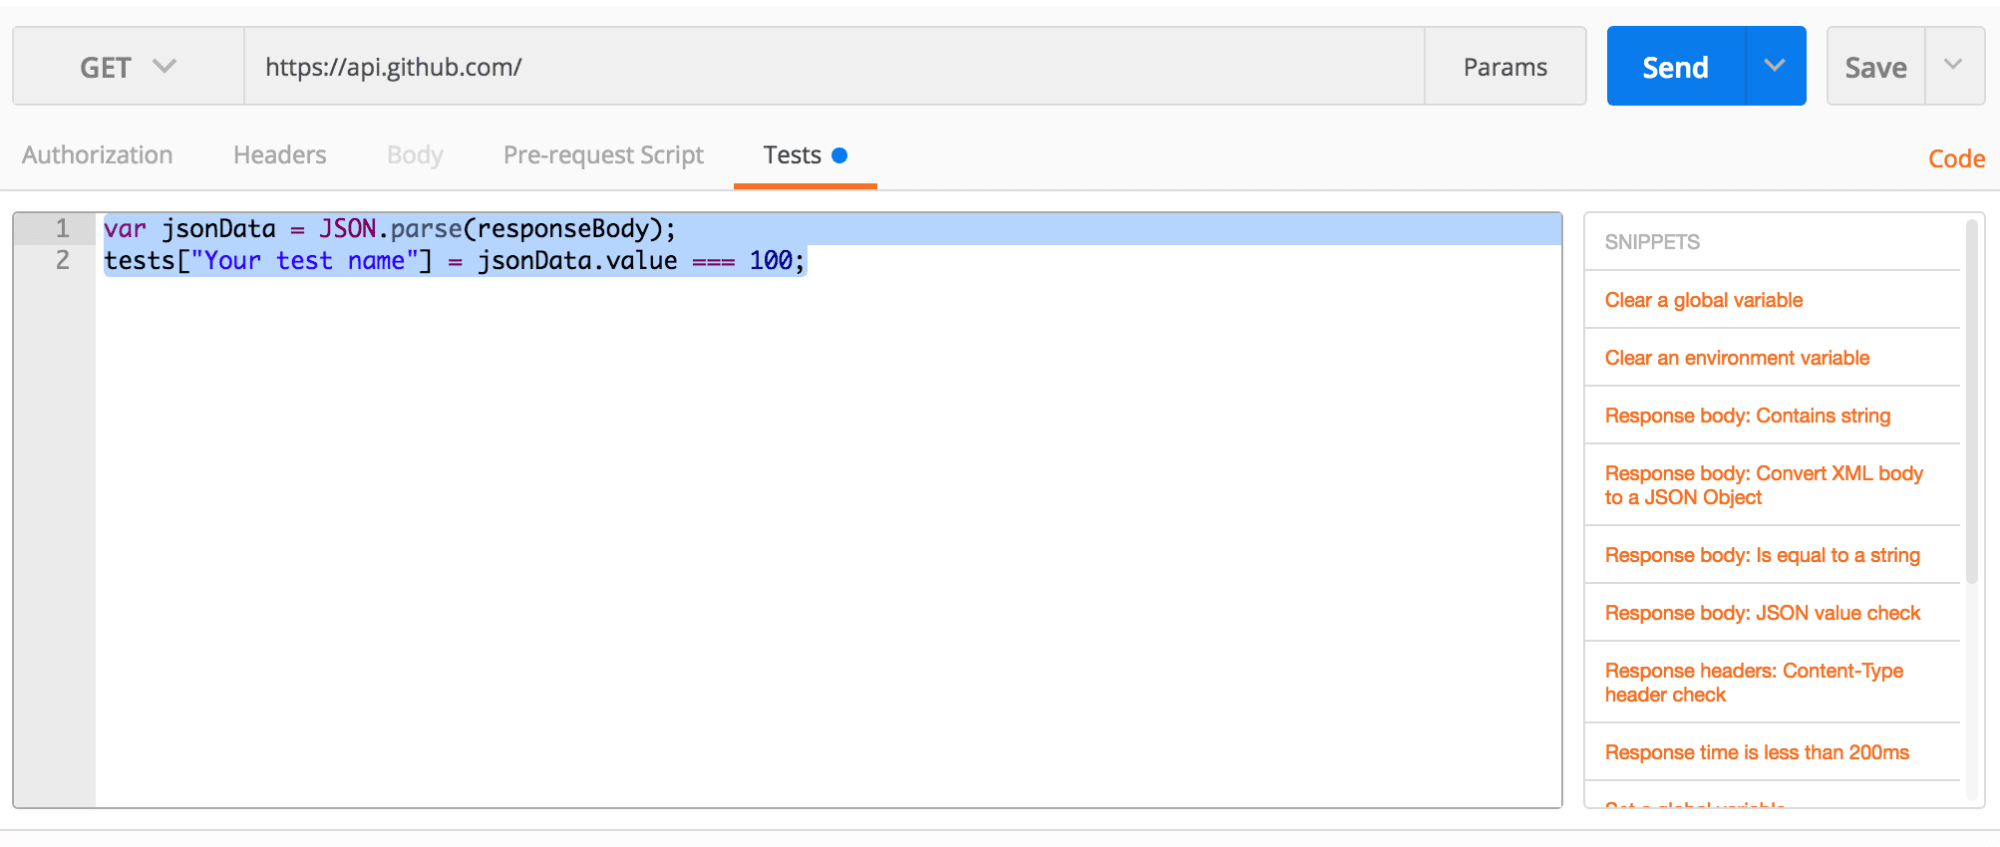
var jsonData = JSON.parse(responseBody);
tests["Your test name"] = jsonData.value === 100;
From above, we can tell that Postman stores the response in an object called responseBody, and we can use this to assert values.
从上面可以看出,Postman将响应存储在名为responseBody的对象中,并且可以使用它来声明值。
Postman has another global variable object called tests, which is an object you can use to name your tests, and equate it to a boolean expressions. If the boolean expression returns true, then the test passes.
邮递员还有一个称为测试的全局变量对象,该对象可用于命名测试并将其等同于布尔表达式。 如果布尔表达式返回true ,则测试通过。
tests['some random test'] = x === yIf you click on Send to make the request, you will see a one of the tests failing.

如果单击“ 发送”进行请求,您将看到其中一项测试失败。
Edit the snippet to make it relevant to our test.

编辑代码段以使其与我们的测试相关。
var jsonData = JSON.parse(responseBody);
var usersURL = "https://api.github.com/user"
tests["Gets the correct users url"] = jsonData.current_user_url === usersURL;
Clicking on send, you'll see the test passing.
 .
.
单击发送,您将看到测试通过。
Let's modify the test further to test some of the properties we want to check.

让我们进一步修改测试以测试我们要检查的某些属性。
const jsonData = JSON.parse(responseBody);
const usersURL = "https://api.github.com/user"
const emailsURL = "https://api.github.com/user/emails"
const followersURL = "https://api.github.com/user/followers"
const followingURL = "https://api.github.com/user/following{/target}"

let {current_user_url, emails_url, followers_url, following_url} = jsonData

// Tests go here
tests["Gets the correct users url"] = current_user_url === usersURL;
tests["Gets the correct emails url"] = emails_url === emailsURL;
tests["Gets the correct followers url"] = followers_url === followersURL;
tests["Gets the correct following url"] = following_url === followingURL;
This is just JavaScript. To spice it up, we've used Destructuring Assignment in ES2015, to declare the jsonResponse variables we're interested in.
这只是JavaScript。 为了解决问题,我们在ES2015中使用了Destructuring Assignment来声明我们感兴趣的jsonResponse变量。
Clicking on Send should return success, and the tests passing.
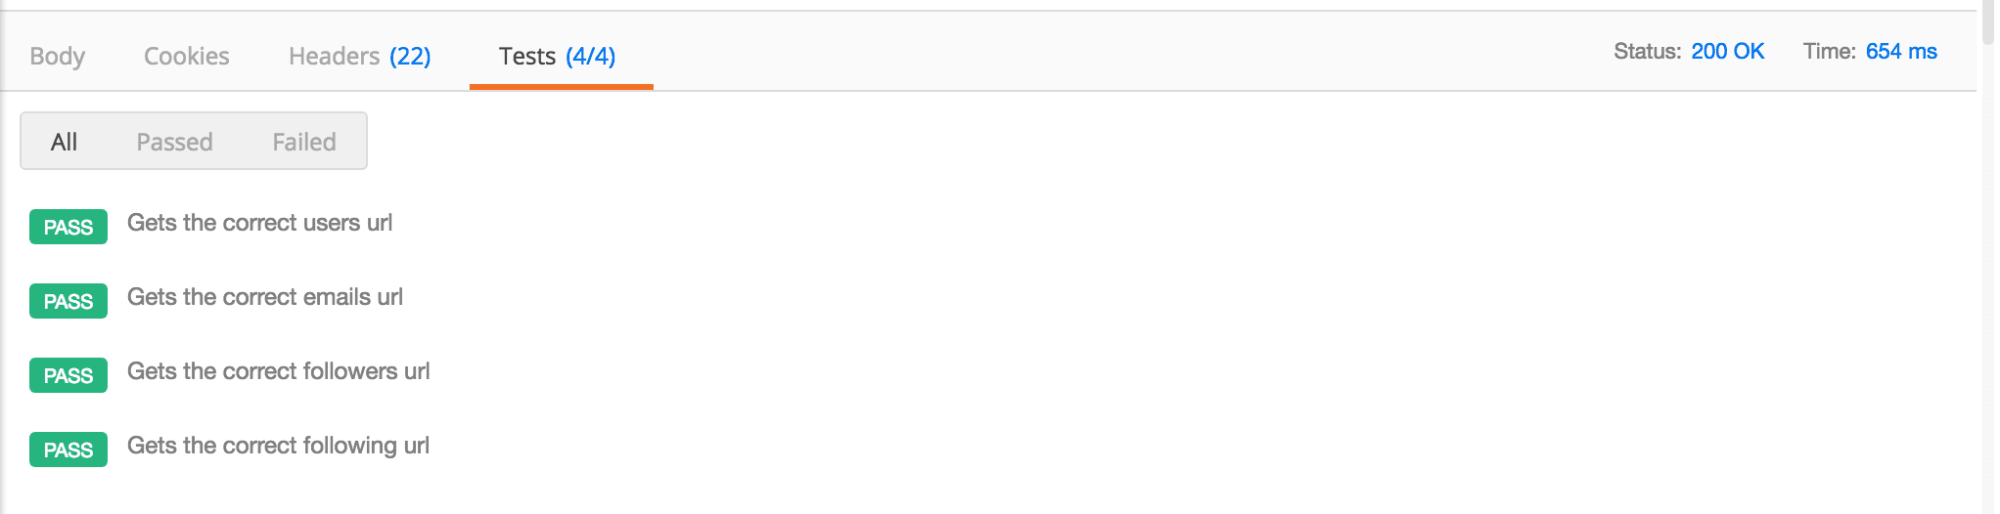
单击发送应该返回成功,并且测试通过。
Remember to click on Save, so that your test is saved to the request created in the collection.
请记住单击“ 保存” ,以便将测试保存到集合中创建的请求中。
环境变量 ( Environment Variables )
Most of the time while writing tests, we usually do not want to go around editing values that we either send as query or post parameters. That way, for instance, if we have ten requests which all send the username scotch-io, we need to create a variable for this so that we can change it once.
在大多数情况下,编写测试时,我们通常不希望编辑作为查询或后置参数发送的值。 这样,例如,如果我们有十个都发送用户名scotch-io请求,则需要为此创建一个变量,以便可以对其进行一次更改。
Let's create another request called User Details Request, which will make a request with a username. Following the same procedure we did for the Root API Request, create a folder called Github User Details, and add the request inside it. Make the GET request to https://api.github.com/users/scotch-io
 Now, we want to take make both
https://api.github.com/users/ and
scotch-io environment variables. To do this click on the top right gear icon, then select
Manage Environments
Manage Environments tab click on
Add.
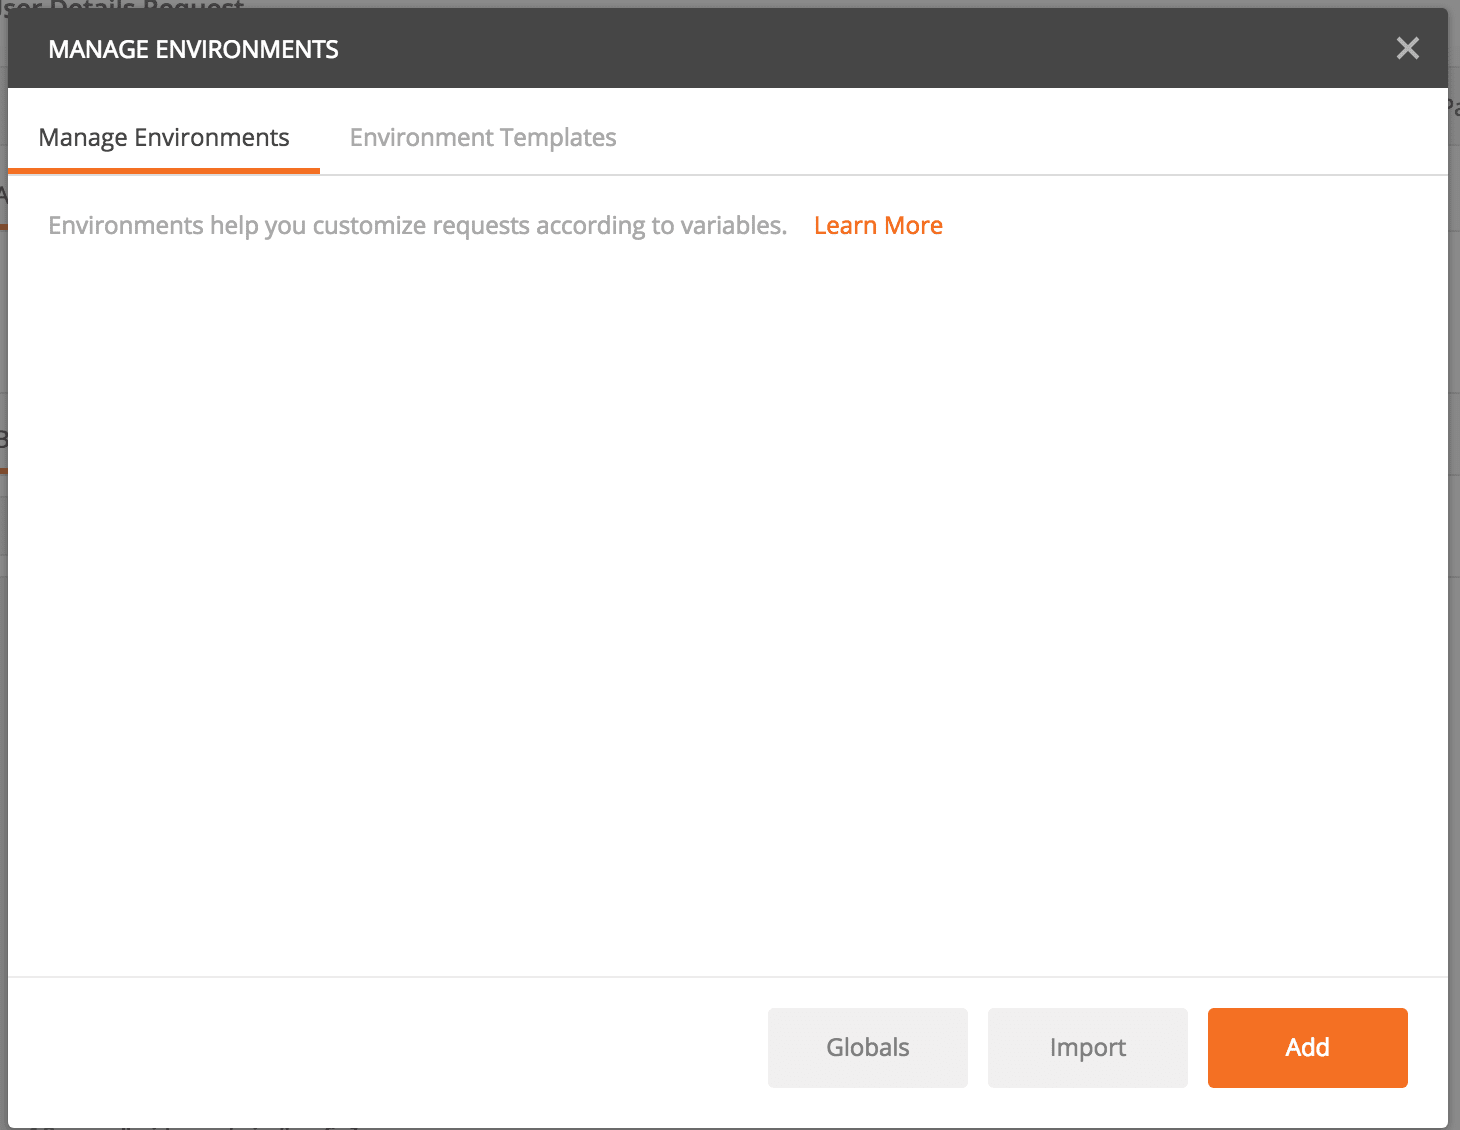 Give your environment a name. I gave it the name
USERS_URL and
USERNAME.
让我们创建另一个名为User Details Request的请求 ,该请求将使用用户名发出请求。 按照我们针对Root API Request所做的相同过程,创建一个名为Github User Details的文件夹,并将请求添加到其中。 向https://api.github.com/users/scotch-io发出GET请求
现在,我们要同时使用
https://api.github.com/users/和
scotch-io环境变量。 为此,请单击右上角的齿轮图标,然后选择“
管理环境”
管理环境”选项卡下,单击“
添加” 。
给您的环境起个名字。 我给它起了名字
USERS_URL和
USERNAME 。
Once you are done, click on the Add button and close the dialog. Next, select the environment you just created from the top right drop down.
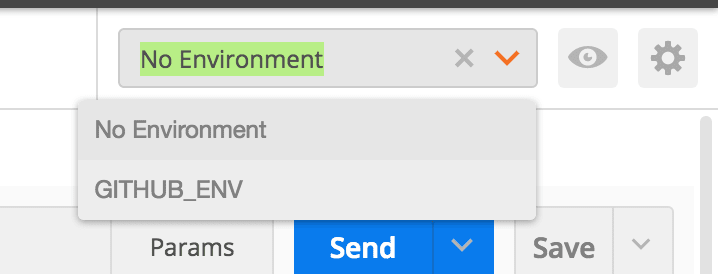 Once selected, you can confirm the values by clicking on the eye-like icon, just before the settings/gear icon.
完成后,单击“ 添加”按钮并关闭对话框。 接下来,从右上角的下拉菜单中选择刚刚创建的环境。
选择之后,您可以通过单击设置/齿轮图标之前的类似眼睛的图标来确认值。
NOTE: Make sure the USERS_URL doesn't have an extra slash / at the end. (I made that mistake). You can click on the eye icon, and click on edit to change it.
注意:确保USERS_URL没有多余的斜杠/ 。 (我犯了那个错误)。 您可以单击眼睛图标,然后单击编辑进行更改。
Now go back to the GET request, and replace the values with angular-like or laravel-blade like template strings, {{USERS_URL}}/{{USERNAME}}.
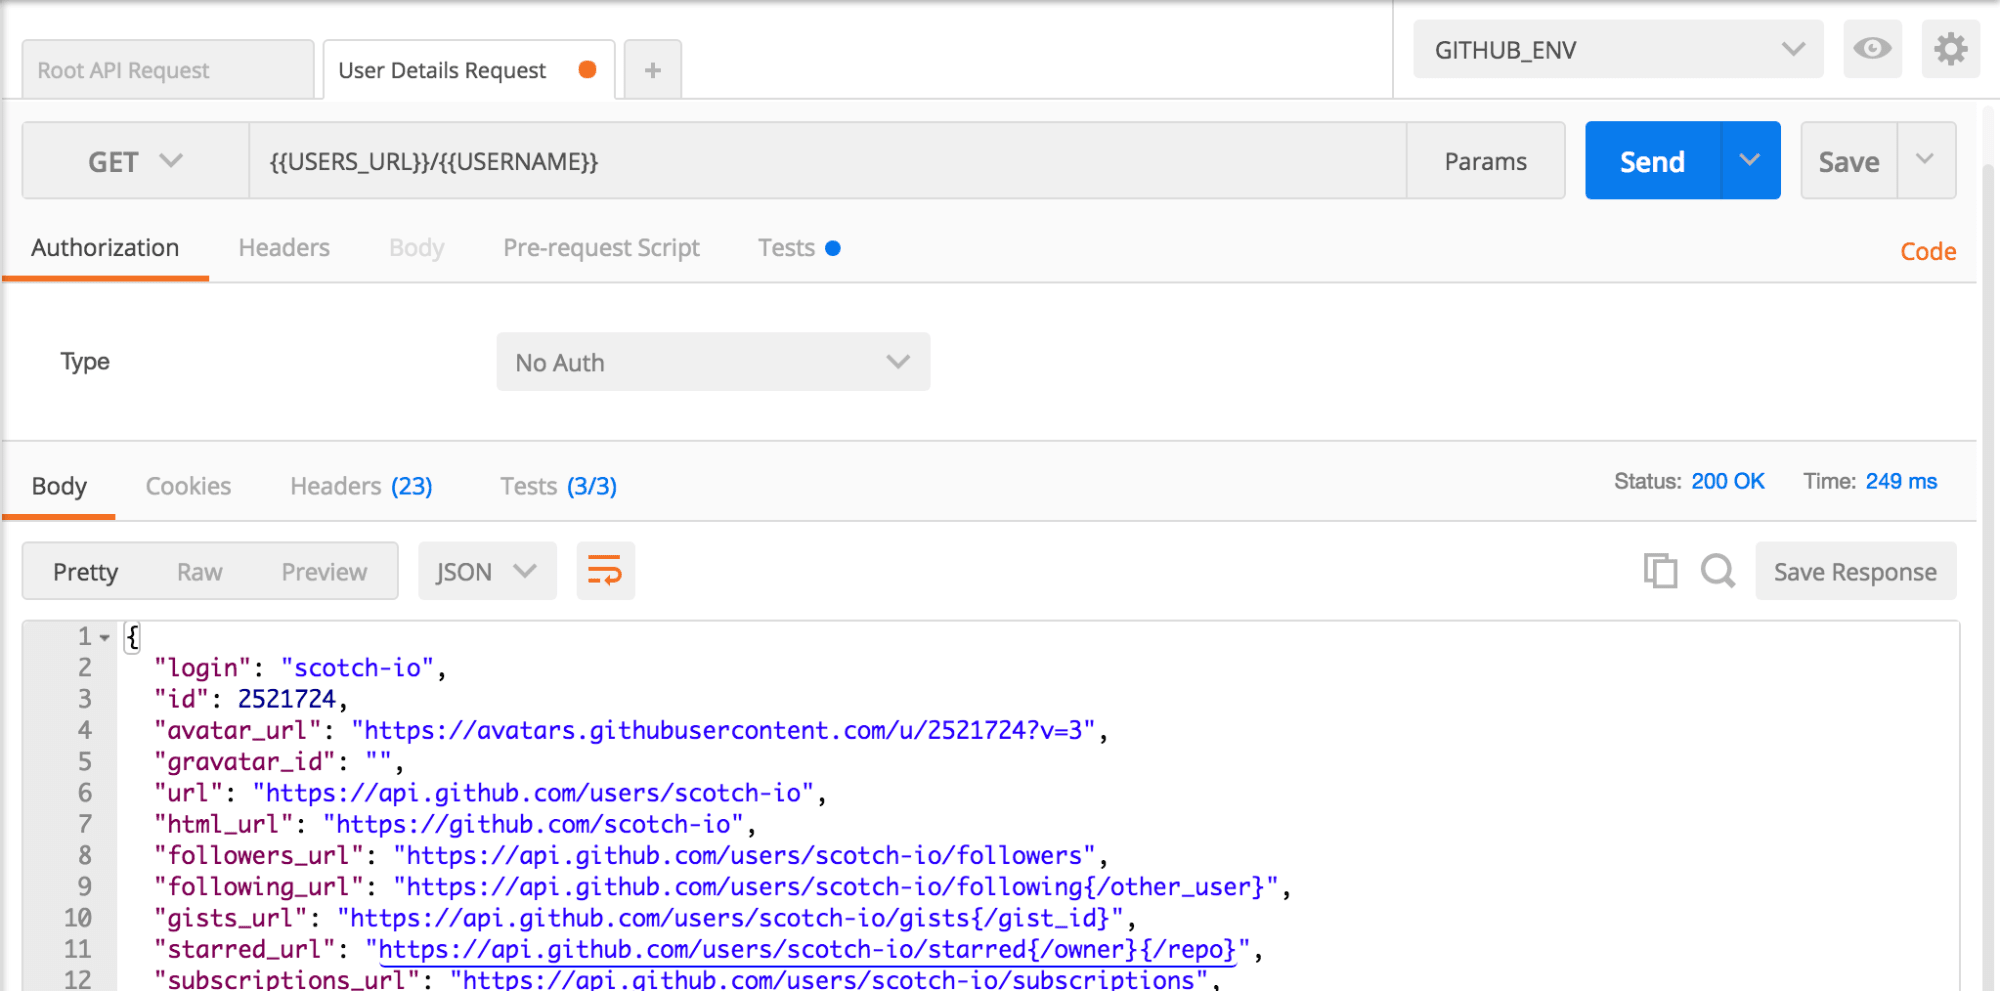
现在返回GET请求,并用模板字符串{{USERS_URL}}/{{USERNAME}}替换成类似angular或laravel-blade的值。
In a nutshell, that's how environment variables are added and used in Postman. You can use the same two calibraces syntax to add query parameters and post parameters.
简而言之,这就是在Postman中添加和使用环境变量的方式。 您可以使用相同的两个校准语法添加查询参数和发布参数。
As an example, if the above request took query parameters, we'd have something similar to this, {{USERS_URL}}/{{USERNAME}}?query={{SOME_QUERY}}

例如,如果上述请求使用了查询参数,我们将有类似的内容, {{USERS_URL}}/{{USERNAME}}?query={{SOME_QUERY}}
Let's add two tests to wrap up this request.
让我们添加两个测试来包装此请求。
const jsonData = JSON.parse(responseBody);

const { login } = jsonData;

tests["Gets the correct username"] = login === "scotch-io";

tests["Status code is 200"] = responseCode.code === 200;

tests["Content-Type is present"] = postman.getResponseHeader("Content-Type");
I've used
responseCode.code and
postman.getResponseHeader which are global variables and methods which come with Postman. You can read more about them
here
responseCode.code和postman.getResponseHeader ,它们是Postman postman.getResponseHeader的全局变量和方法。 您可以在这里阅读更多有关它们的信息
To get a bit fancy, you can use a test, to set an environment variable. If you look at the snippets provided when you go to the tests tab in the request area, you'll see a set environment variable snippet which looks like this postman.setEnvironmentVariable("variable_key", "variable_value");.
为了一点点花哨,您可以使用测试来设置环境变量。 如果您查看在请求区域中的“测试”选项卡时提供的代码段 ,则会看到一个设置的环境变量代码段 ,看起来像这样的postman.setEnvironmentVariable("variable_key", "variable_value"); 。
We could therefore set an environment variable, and then use it in subsequent requests. A good example for this is getting an authentication token and using it as a header or query parameter for subsequent requests.
因此,我们可以设置一个环境变量,然后在后续请求中使用它。 一个很好的例子是获取身份验证令牌,并将其用作后续请求的标头或查询参数。
纽曼CLI ( Newman CLI )
Once you've set up all your collections and written tests for them, it may be tedious to go through them one by one, clicking send to see if a given collection test passes.
设置好所有集合并为它们编写测试后,一一遍遍它们,单击发送以查看给定的集合测试是否通过可能会很麻烦。
This is where Newman comes in.
这就是纽曼进来的地方。
Newman is a command-line collection runner for postman
纽曼是邮递员的命令行收集运行程序
All you need to do is export your collection and the environment variables, then use Newman to run the tests from your terminal.
您需要做的就是导出集合和环境变量,然后使用Newman从终端运行测试。
NOTE: Make sure you've clicked on Save to save your collection first before exporting.
注意 :确保在导出之前先单击“ 保存”以保存您的收藏集。
So the first step is to export your collection and environment variables. Click on the Menu icon for Github API collection, and select export
 Select version 2, and click on
因此,第一步是导出集合和环境变量。 单击“菜单”图标以获取Github API集合,然后选择“导出”
选择版本2,然后单击“
Next, click on the settings/gear icon and select Manage Enironments again, then click on the download icon to download the GITHUB_ENV environment
 Save the file in the same directory as the collection.
接下来,单击设置/齿轮图标,然后再次选择管理附件 ,然后单击下载图标以下载GITHUB_ENV环境
Install Newman CLI globally, then navigate to the where you saved the collection.
全局安装Newman CLI,然后导航到保存集合的位置。
npm install -g newman
cd postman
Using Newman is quite straight foreward, and the documentation is extensive. You can even require it as a Node.js module and run the tests there. We'll however use the CLI.
使用Newman非常直接,而且文档也很丰富。 您甚至可以将其作为Node.js模块并在其中运行测试。 但是,我们将使用CLI。
Once you are in the directory, run newman run <collection_name.json>, replacing the collection_name with the name you used to save the collection.
进入目录后,运行newman run <collection_name.json> ,将collection_name替换为用于保存集合的名称。
newman run Github\ API.postman_collection.jsonThe result for this is
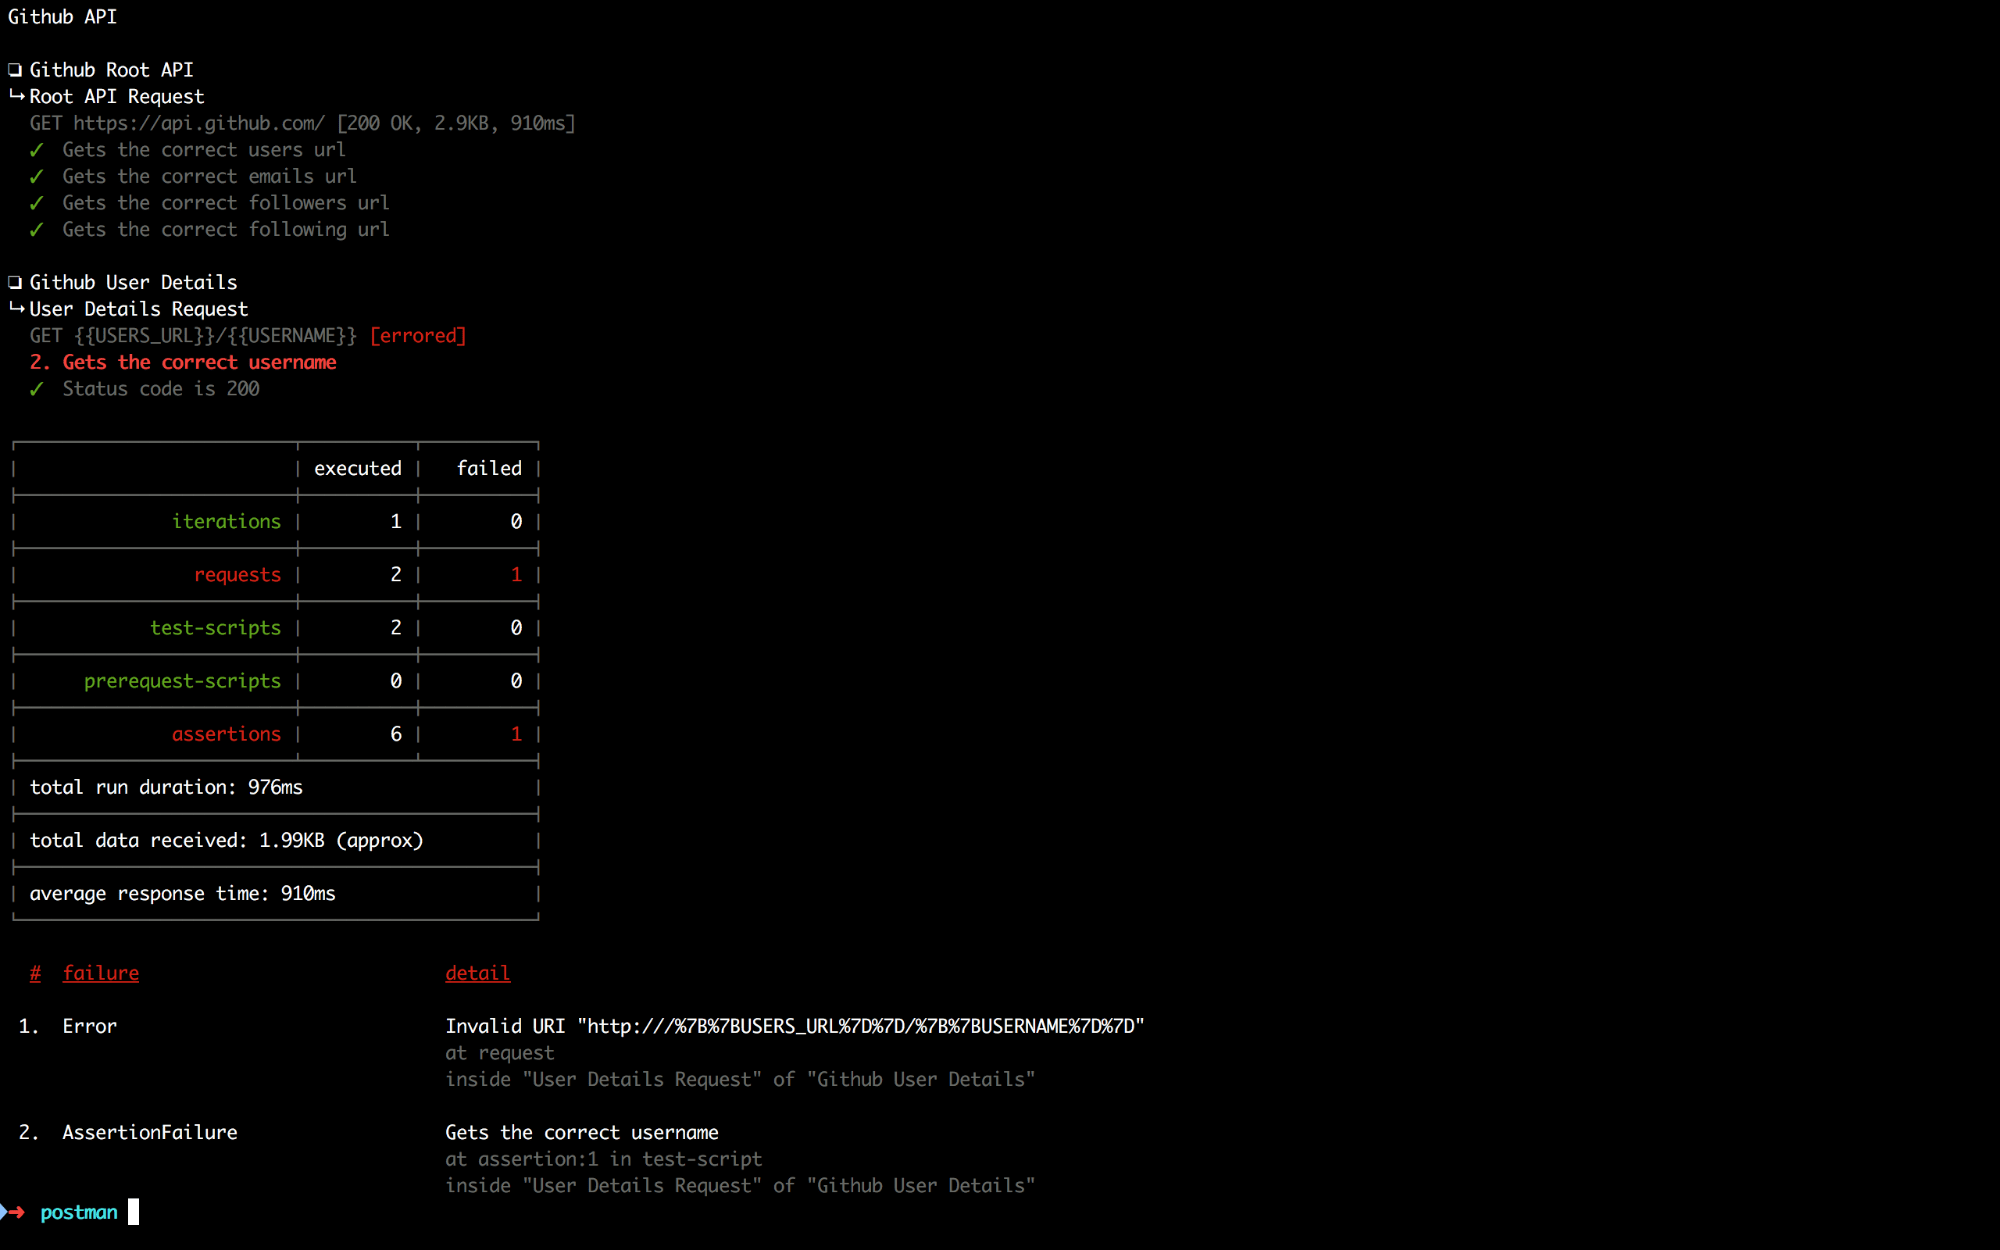 We can see the second API test
Invalid URI "http:///%7B%7BUSERS_URL%7D%7D/%7B%7BUSERNAME%7D%7D".
结果是 Github用户详细信息”失败,并且在底部有一条错误消息“ Invalid URI "http:///%7B%7BUSERS_URL%7D%7D/%7B%7BUSERNAME%7D%7D" 。
This is because we did not specify the environment file. To fix it, simply add the -e flag which stands for the environment and add the environment file.
这是因为我们没有指定环境文件。 要解决此问题,只需添加代表environment的-e标志并添加环境文件。
newman run Github\ API.postman_collection.json -e GITHUB_ENV.postman_environment.json
结论 ( Conclusion )
Postman and Newman can be used for a number of test cases, including creating usage scenarios for your API. You can create a scenario that involves a user registering, logging in and calling different endpoints by using a straight foreward user interface. These collections can then be exported and shared with team members. If you create a team account, you can just publish them to your team mates.
Postman和Newman可用于许多测试用例,包括为您的API创建使用场景。 您可以创建一个方案,该方案涉及使用简单的前向用户界面来注册,登录和调用不同端点的用户。 然后可以将这些集合导出并与团队成员共享。 如果创建团队帐户,则可以将其发布给队友。
Happy Testing!
测试愉快!
翻译自: https://scotch.io/tutorials/write-api-tests-with-postman-and-newman
postman api测试


 2262
2262

 被折叠的 条评论
为什么被折叠?
被折叠的 条评论
为什么被折叠?
 到【灌水乐园】发言


