


构建meteor应用程序
Meteor is an open source, fullstack javascript platform. This allows you to develop in one language. It has some really cool perks the best of which is;
Meteor是一个开源的全栈javascript平台。 这使您可以使用一种语言进行开发。 它有一些非常酷的特权,其中最好的是;
- It provides complete reactivity; this means your UI reflects the actual state of the world with little development effort 它提供完全的React性; 这意味着您的UI只需很少的开发工作即可反映世界的实际状态
- The server sends actual data not HTML, and then the client renders it 服务器发送实际数据而不是HTML,然后客户端呈现它
Meteor supported Blaze for its view layers but after Meteor 1.2 it supported other JS frameworks i.e Angular and React.
Meteor支持Blaze用于其视图层,但在Meteor 1.2之后,它支持其他JS框架,例如Angular和React。
In this article, I'll be showing off how Meteor and React play together. The point of this article is to get you interested in trying out these two technologies together and build something worthwhile in the future using them.
在本文中,我将展示Meteor和React如何一起玩。 本文的目的是使您有兴趣一起尝试这两种技术,并在将来使用它们构建有价值的东西。
We will be creating an Events App, that encompasses the basic CRUD (Create, Read, Update, Delete) functions.
我们将创建一个事件应用程序,其中包含基本的CRUD(创建,读取,更新,删除)功能。
先决条件 ( Pre-requisites )
We require to have meteor running on our machines.
我们需要在我们的机器上运行meteor 。
Windows: Install chocolatey and run the following command
Windows:安装Chocolatey并运行以下命令
> choco install meteorOS X || Linux:
OS X || Linux :
> curl https://install.meteor.com/ | shSome basic knowledge on meteor and react will also go a long way. But have no fear, you can still follow along even if you are a newbie. I share some resources in the tutorial that will help ramp up.
关于流星和React的一些基本知识也将大有帮助。 但是不要担心,即使您是新手,也可以继续学习。 我在本教程中分享了一些资源,可以帮助您提高学习速度。
建立 ( Setup )
Its really easy to setup Meteor projects. All we need to do is:
设置Meteor项目真的很容易。 我们需要做的是:
> meteor create events-syncVoilà we get our project all set up. There are a couple of files in the folder. Let's do a quick run through to know what each is.
瞧,我们的项目都准备好了。 文件夹中有几个文件。 让我们快速浏览一下每个是什么。
client
    main.js         // entry point on the client side
    main.html      // HTML that defines our template files
    main.css      // where we define our styles
server
    main.js      // entry point on the server side
package.json        // npm packages are stored in here
package-lock.json  // lock file for npm packages
.meteor           // meteor files
.gitignore       // git ignore stuff
To run the project we'll run these commands:
要运行项目,我们将运行以下命令:
> cd events-sync
> meteor
Then we can see our app running on the browser by running http://localhost:3000.
然后,我们可以通过运行http://localhost:3000看到我们的应用程序在浏览器上运行。
添加React组件 ( Adding in React Components )
We need to add in some npm packages for react.
我们需要添加一些npm包来进行React。
> meteor npm install --save react react-domReplace the contents of /clients/main.html with this piece of code:
用以下代码替换/clients/main.html的内容:
<head>
  <link rel="stylesheet href="https://maxcdn.bootstrapcdn.com/bootstrap/4.0.0-beta.3/css/bootstrap.min.css" integrity="sha384-Zug+QiDoJOrZ5t4lssLdxGhVrurbmBWopoEl+M6BdEfwnCJZtKxi1KgxUyJq13dy" crossorigin="anonymous">
  <title>Event Sync</title>
</head>
<body>
  <div id="app"> </div>
</body>
Then we replace /clients/main.js
然后我们替换/clients/main.js
import React from 'react';
import ReactDOM from 'react-dom';
import { Meteor } from 'meteor/meteor';

import App from '../imports/ui/App.js';

Meteor.startup(() => {
  ReactDOM.render(<App />, document.getElementById('app'));
});
We'll add in a folder /imports/ui to the root of our project folder, where our React code will live in. We are using the app structure recommended by Meteor. The gist is, everything outside the /imports folder is loaded automatically on startup. Files inside the imports folder are lazy loaded. Only loaded when they are explicitly imported in another file. Find more literature on this here.
我们将文件夹/imports/ui到项目文件夹的根目录中,React代码将/imports/ui在该目录中。我们正在使用Meteor推荐的应用程序结构。 要点是, /imports文件夹之外的所有内容都会在启动时自动加载。 导入文件夹中的文件是延迟加载的。 仅在将它们明确导入另一个文件中时加载。 在这里找到更多关于此的文献。
So inside /imports/ui we can add a file, App.js
因此,在/imports/ui我们可以添加一个文件App.js
import React, { Component } from 'react';

class Todo extends Component {
  render() {
    return (
      <div>
        Hello World
      </div>
    );
  }
}

export default Todo;
If we go to our browser now we should see Hello World printed on our screens. Just like that we have our first piece of React successfully rendering with Meteor.
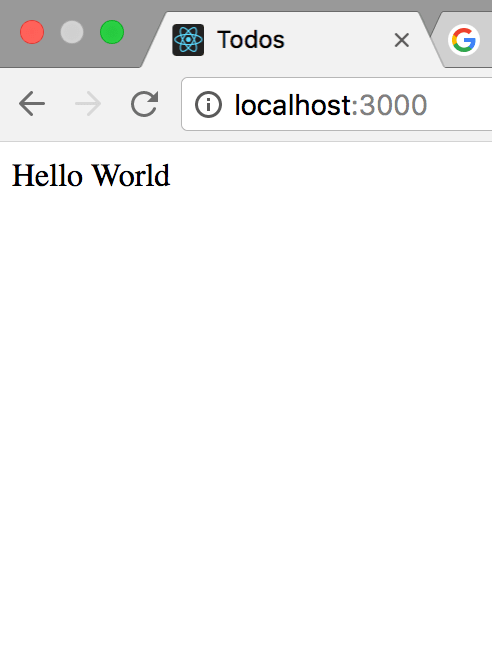
如果现在转到浏览器,我们应该会在屏幕上看到Hello World 。 就像这样,我们已经有了Meteor成功渲染了我们的第一篇React。
活动应用 ( Event App )
Now that we have the most basic parts of the project up and running. Let's get into creating the event app.
现在,我们已经启动并运行了项目的最基本部分。 让我们开始创建事件应用程序。
We want our users to be able to:
我们希望我们的用户能够:
- Create an event 建立活动
- View these events 查看这些事件
- Delete events 删除活动
- Edit/Update event details 编辑/更新活动详细信息
Lets start by creating events.
让我们从创建事件开始。
建立活动 (Creating Events)
React组件 (React Components)
We'll create a form for entering new events into our app. Let's create a new file inside /imports/ui called AddEvent.js.
我们将创建一个表单,用于将新事件输入到我们的应用中。 让我们在/imports/ui创建一个名为AddEvent.js的新文件。
> cd imports/ui
> touch AddEvent.js
import React, { Component } from 'react';
class AddEvent extends Component {
constructor(props) {
super(props);
this.state = {
title: "",
description: "",
date: ""
}
}
handleChange = (event) => {
const field = event.target.name;
// we use square braces around the key `field` coz its a variable (we are setting state with a dynamic key name)
this.setState({
[field]: event.target.value
})
}
handleSubmit = (event) => {
event.preventDefault();
// TODO: Create backend Meteor methods to save created events
alert("Will be Saved in a little bit :)")
}
render() {
return (
<div>
<div className="text-center">
<h4>Event Sync</h4>
</div>
<hr />
<div className="jumbotron" style={{ margin: "0 500px" }}>
<form onSubmit={this.handleSubmit}>
<div className="form-group">
<label>Title:</label>
<input
type="text"
className="form-control"
placeholder="Enter event title"
name="title"
value={this.state.title}
onChange={this.handleChange}
/>
</div>
<div className="form-group">
<label>Description:</label>
<input
type="text"
className="form-control"
placeholder="Enter event description"
name="description"
value={this.state.description}
onChange={this.handleChange}
/>
</div>
<div className="form-group">
<label>Event Date:</label>
<input
type="text"
className="form-control"
placeholder="Enter date in the format mm.dd.yyyy"
name="date"
value={this.state.date}
onChange={this.handleChange}
/>
</div>
<button type="submit" className="btn btn-primary">Add Event</button>
</form>
</div>
</div>
);
}
}
export default AddEvent;Note: We are using bootstrap, you might have noticed that already, and some inline styling. Bootstrap works because we added the bootstrap link tags into our /client/main.html file during our setup.
注意:我们正在使用引导程序,您可能已经注意到了,还有一些内联样式。 引导程序之所以有效,是因为我们在设置过程中将引导程序link标记添加到了/client/main.html文件中。
We have our AddEvent component. It is a simple form with three input fields and a submit button. On change of the input fields we save the text into the components state. On submit (when we click the button Add Event) we get an alert on the browser. We need to figure out a way to persist data in order to save the events we create, lets switch gears and delve back into Meteor.
我们有AddEvent组件。 这是一个简单的表单,具有三个输入字段和一个提交按钮。 在更改输入字段时,我们将文本保存为components状态。 在提交时(当我们单击按钮Add Event ),我们在浏览器上收到警报。 我们需要找到一种持久化数据的方法,以保存我们创建的事件,让我们切换齿轮并深入研究Meteor。
流星集合 (Meteor Collections)
In Meteor, we access MongoDB through collections i.e we persist our data using collections. The cool thing about Meteor is that we have access to these collections both in the server and the client. Which essentially means less server side code is needed to access our data from the client. Yay, us!!
在Meteor中,我们通过collections访问MongoDB,即,我们使用集合来持久化数据。 关于Meteor的最酷的事情是,我们可以在服务器和客户端中访问这些集合。 从本质上讲,这意味着需要更少的服务器端代码才能从客户端访问我们的数据。 是的,我们!
Server-side collections: they create a collection within MongoDB and an interface that is used to communicate with the server
服务器 端集合:它们在MongoDB和一个用于与服务器通信的接口中创建一个集合
Client-side collections: do not have a direct connection to the DB. A collection on the client side is a cache of the database. When accessing data on the client side we can assume that the client has an up-to-date copy of the the full MongoDB collection.
客户 端集合:没有与数据库的直接连接。 客户端的集合是数据库的缓存。 在客户端访问数据时,我们可以假定客户端具有完整的MongoDB集合的最新副本。
If you want to read up more on how collections work you can have a look here.
如果您想了解有关集合工作原理的更多信息,可以在这里查看 。
Now that we have some understanding on how collections work lets define our collections.
现在,我们对集合的工作方式有了一些了解,现在可以定义我们的集合。
We'll create a new folder in the imports folder /imports/api and call this file events.js.
我们将在imports文件夹/imports/api创建一个新文件夹,并将其命名为events.js 。
import { Mongo } from 'meteor/mongo';

// Creates a new Mongo collections and exports it
export const Events = new Mongo.Collection('events');
We then need to import our collection into our server. So inside /server/main.js add this line:
然后,我们需要将集合导入到服务器中。 因此,在/server/main.js内部添加以下行:
import '../imports/api/events.js';从集合中获取数据到React组件中 (Getting data from a collection into a React component)
To get data into a React component we need to install a package that will allow us to take Meteor's reactive data and feed it into a React component. There are a lot of cool npm packages out there, honorable mention to react-komposer. Find a really cool article on how to set it up here. We'll use an Atmosphere package for this article react-meteor-data.
为了将数据获取到React组件中,我们需要安装一个软件包,该软件包将允许我们获取Meteor的React性数据并将其输入到React组件中。 有很多很酷的npm软件包,值得一提的是react-komposer 。 找到关于如何设置了一个很酷的文章在这里 。 我们将在本文中使用Atmosphere包react-meteor-data 。
Note: I picked this package mainly because it was the most recently updated package on github. Feel free to experiment with others and add comments on how your experience using them was.
注意:我之所以选择此软件包,主要是因为它是github上最新更新的软件包。 随时尝试与他人合作,并添加关于您使用他们的经历的评论。
> meteor add react-meteor-dataWe then use a HOC (Higher Order Component), withTracker, to wrap our component.
然后,我们使用HOC (高阶组件) withTracker来包装我们的组件。
Lets replace our /imports/ui/App.js file with this:
让我们用/imports/ui/App.js代码替换我们的/imports/ui/App.js文件:
import React, { Component } from 'react';
import AddEvent from './AddEvent';
// we import withTracker and Events into our app file
import { withTracker } from 'meteor/react-meteor-data';
import { Events } from "../api/events";

// Create a new React Component `EventApp`
class EventApp extends Component {
  render() {
    return (
      <div>
        <AddEvent />
        {/_
          we have the pre tags to view contents of db just for verification
        _/}
        <pre>DB Stuff: {JSON.stringify(this.props, null, ' ')} </pre>
      </div>
    );
  }
}

// Wrap `EventApp` with the HOC withTracker and call the new component we get `App`
const App = withTracker(() => {
  return {
    events: Events.find({}). fetch()
  }
})(EventApp);

// export the component `App`
export default App;
Feeling overwhelmed yet? Not to worry we'll go over what happens, keeping it short and as simple as possible.
感觉不知所措了吗? 不用担心,我们将仔细研究会发生的事情,并使其尽可能简短。
Higher Order Components: are basically functions that take components and return new components. This is very useful coz you can do some cool stuff like:
高阶组件:基本上是接受组件并返回新组件的函数。 这非常有用,因为您可以做一些很酷的事情,例如:
- Render highjacking 渲染劫机
- Code reuse 代码重用
- State manipulation 状态操纵
- Props manipulation (just highlighting some use cases of HOCs don't get too caught up in this) 道具操作(仅强调一些HOC的用例,不要太着急于此)
So what withTracker does is; it takes the component you pass in it, in our case EventApp, and returns a new component that passes down events as a prop. This new component is what we have instantiated as App.
所以withTracker是; 它接受您传入的组件(在我们的示例中为EventApp ,并返回一个新组件,该组件将向下传递events作为道具。 这个新组件就是我们实例化为App 。
Long story short: we have two components App and EventApp, App is the parent component to EventApp. The App component reads data from our collection and returns it as a variable events. App passes down events to EventApp as a prop. Every time the database contents change events gets new data and the EventApp component re-renders. Therefore, we get data from our Meteor collection into our React components in a reactive way.
长话短说:我们有两个组件App和EventApp , App是父组件EventApp 。 App组件从我们的集合中读取数据,并将其作为可变events返回。 App将events作为道具传递给EventApp 。 每当数据库内容更改events获取新数据时, EventApp组件就会重新呈现。 因此,我们以React方式将数据从Meteor集合中获取到React组件中。
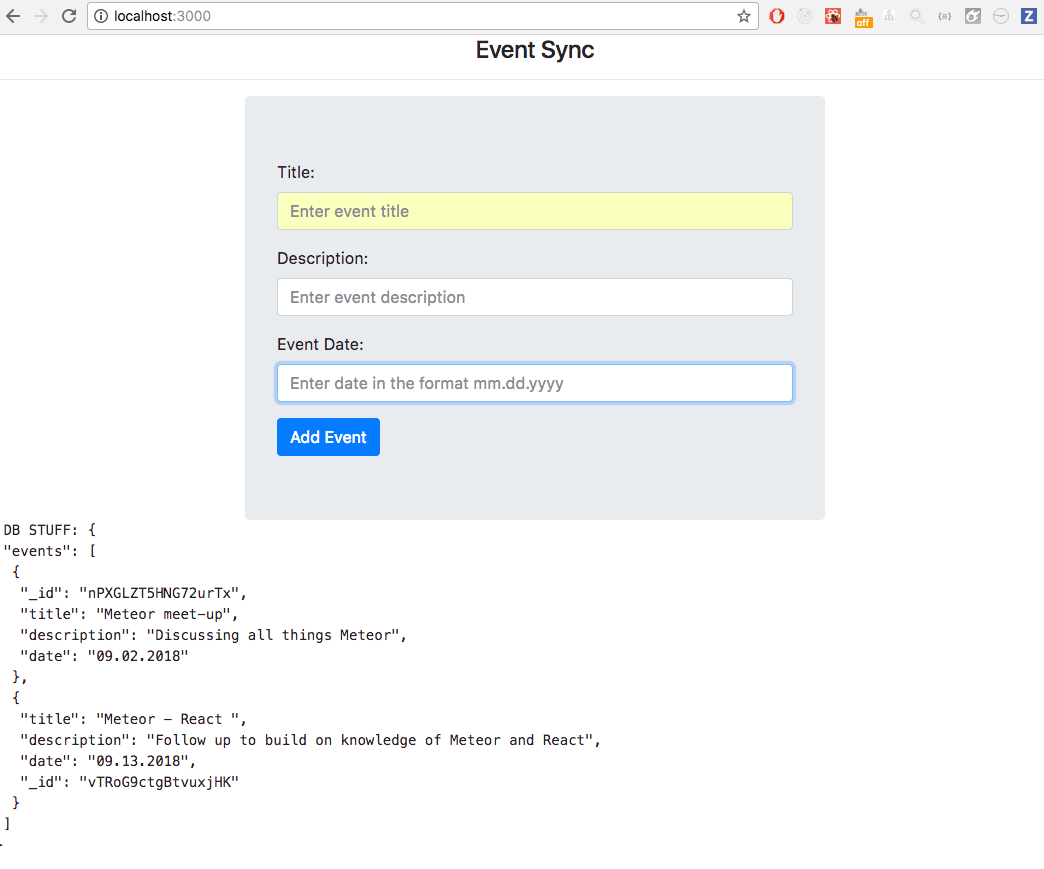
Phew! Thats that. Let's test our code out. Switch to the browser on localhost:3000 and you'll see that events is currently an empty array.

! 就是这样。 让我们测试一下我们的代码。 切换到localhost:3000上的浏览器,您将看到事件当前是一个空数组。
Let's manually add something in our db.
让我们在数据库中手动添加一些内容。
> meteor mongometeor mongo command will open a console. In that console type in:
meteor mongo命令将打开一个控制台。 在该控制台中输入:
> db.events.insert({ title: "Hello world!", description: "", date: new Date() });If you check your web browser events is now populated with the new entry. Amazing right, basically we didn't need to write a whole lot of code on the server to get this data. You can keep playing with the database to experience the reactivity Meteor allows us. Any change to the db is automatically populated on the client.
如果您检查Web浏览器events则现在将使用新条目填充events 。 太棒了,基本上,我们不需要在服务器上编写大量代码即可获取此数据。 您可以继续使用数据库,体验Meteor允许我们的React性。 对数据库的任何更改都会自动填充到客户端上。
Lets add this functionality onto our submit button. Inside imports/ui/AddEvent.js add the following code.
让我们将此功能添加到我们的提交按钮上。 在imports/ui/AddEvent.js内部添加以下代码。
import React, { Component } from 'react';
// import Events collection
import { Events } from "../api/events";

class AddEvent extends Component {
  ...

  handleSubmit = (event) => {
      // prevents page from refreshing onSubmit
      event.preventDefault();

      const { title, description, date } = this.state;

      // TODO: Create backend Meteor methods to save created events
      // alert("Will be Saved in a little bit :)")

      // add method `insert` to db
      Events.insert({
        title,
        description,
        date
      });

      // clears input fields onSubmit
      this.setState({
        title: "",
        description: "",
        date: ""
      })
    }

  render() {
    ...
  }
}

export default AddEvent;
Now when we fill in the form we created and hit the Add Event button we actually add data into our db and see it displayed in our pre tags under the form.
现在,当我们填写创建的表单并单击“ Add Event按钮时,我们实际上将数据添加到了数据库中,并看到该数据显示在表单下的预标签中。
显示事件 (Displaying Events)
Now that we have persisted our data lets display it on our page. This calls for a new file, /imports/ui/ListEvents.js.
既然我们已经保留了数据,就可以将其显示在页面上。 这需要一个新文件/imports/ui/ListEvents.js 。
import React, { Component } from 'react';

class ListEvents extends Component {
  render() {
    return (
      <div>
        {this.props.events.length ? this.props.events.map((event) => (
          <div className="list-group" key={event._id} style={{ margin: "20px 100px" }}>
            <div className="list-group-item list-group-item-action flex-column align-items-start">
              <div className="d-flex w-100 justify-content-between">
                <h5 className="mb-1">{event.title}</h5>
                <small>{event.date}</small>
              </div>
              <p className="mb-1">{event.description}</p>
            </div>
          </div>
        )) : <div className="no-events">OOOPSY: NO EVENTS REGISTERED</div>}
      </div>
    );
  }
}

export default ListEvents;
Then we import this in our /imports/ui/App.js file.
然后,将其导入到/imports/ui/App.js文件中。
import React, { Component } from 'react';
...
// Add ListEvents
import ListEvents from './ListEvents';

class EventApp extends Component {
  render() {
    return (
      <div>
        <AddEvent />
        {/_
          we have the pre tags to view contents of db just for verification
          <pre> DB STUFF: {JSON.stringify(this.props, null, ' ')} </pre>
        _/}

        {/_
          pass in props into the component (this is where _**`events`**_ live in)
        _/}
        <ListEvents {...this.props}/>
      </div>
    );
  }
}

...

export default App;
If jump back to our browser you will now see a list of the events printed under your Add Event form. Try adding some more events and notice that they reactively show up on your page.
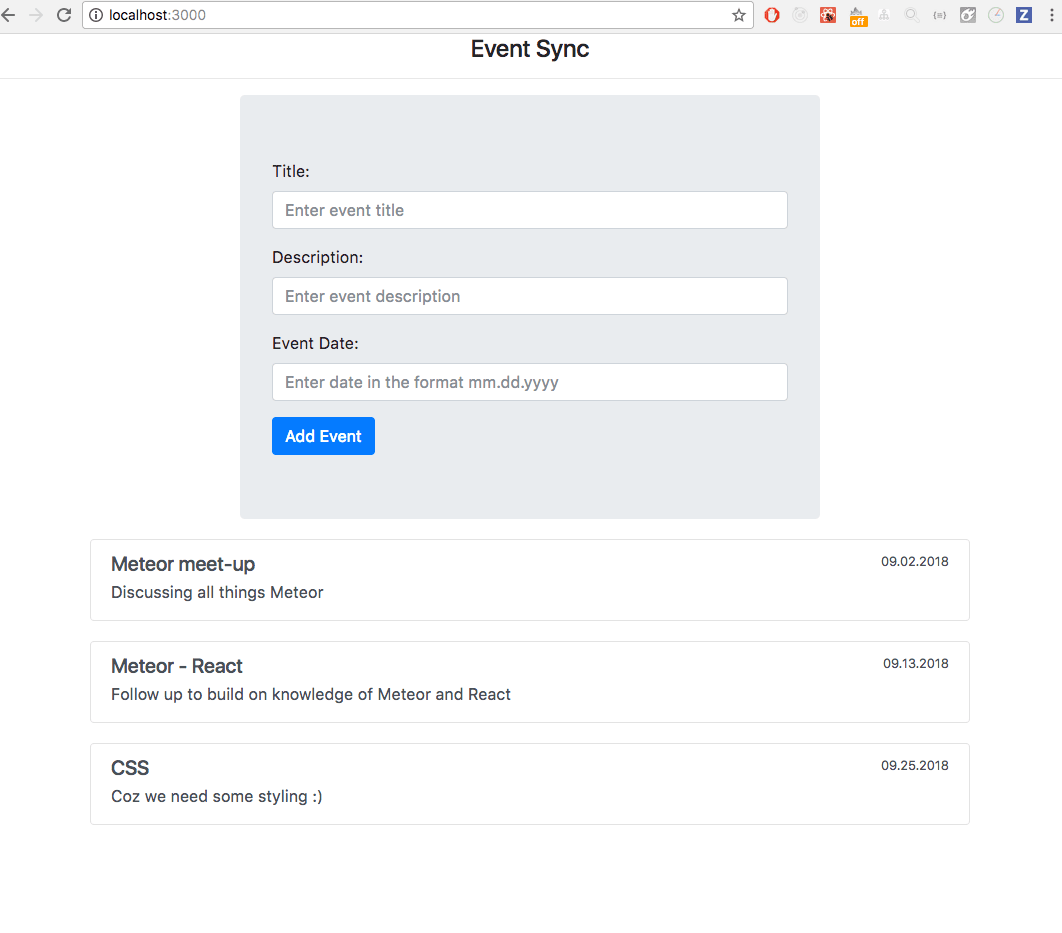
如果跳回到我们的浏览器,您现在将在“ Add Event表单下看到打印的事件列表。 尝试添加更多事件,并注意它们会React性地显示在您的页面上。
更新和删除事件 (Updating and Deleting Events)
Given the knowledge we now have I think deleting and updating events will be easy all you need is to add some buttons and add some db methods on your components and thats it. You can try writing out these components and methods by yourself if you get stuck have a look at the complete app in the repo here. Feel free to ask questions down on the comments and/or on twitter.
有了我们现在所掌握的知识,我认为删除和更新事件将很容易,您所需要做的就是在组件上添加一些按钮并添加一些db方法,仅此而已。 如果您遇到困难,可以尝试自己编写这些组件和方法,在此处查看回购中的完整应用程序。 随意在评论和/或Twitter上提问。
代码重构和优化 (Code Refactor and Optimization)
With the code we have running now we see that every time events change on the database we re-render the EventApp component. This means both the AddEvent and ListEvents components re-render (and potentially every other component we render on EventApp). This right now isn't such a big deal coz we are running a tiny app. We however, need to keep in mind that our apps should run optimally for better performance.
使用我们现在运行的代码,我们看到每次事件在数据库上更改时,我们都会重新呈现EventApp组件。 这意味着AddEvent和ListEvents组件都将重新呈现(以及可能在EventApp呈现的每个其他组件)。 现在这不是什么大问题,因为我们正在运行一个微型应用程序。 但是,我们需要记住,我们的应用程序应以最佳状态运行以提高性能。
All we need to re-render at the moment on change of the database fetch is the ListEvents component. As its the only component using the events props at the moment. This means we can move the withTracker HOC into the ListEvents component and have the app working as before but more optimally.
在更改数据库访ListEvents我们需要重新渲染的只是ListEvents组件。 作为其使用事件道具的唯一组件。 这意味着我们可以将withTracker HOC移到ListEvents组件中,并使该应用程序像以前一样工作,但效果更好。
So, let's do this:
因此,让我们这样做:
In /imports/ui/ListEvents.js we add this:
在/imports/ui/ListEvents.js我们添加以下内容:
import React, { Component } from 'react';
// import necessary files
import { withTracker } from 'meteor/react-meteor-data';
import { Events } from "../api/events";

class ListEvents extends Component {
  render() {
    return (
      ...
    );
  }
}

// add `withTracker` HOC and pass in `ListEvents` and export the new component
export default withTracker(() => {
  return {
    events: Events.find({}). fetch()
  }
})(ListEvents);
Remove the tracker from /imports/ui/App.js
从/imports/ui/App.js删除跟踪器
import React, { Component } from 'react';
import AddEvent from './AddEvent';
import ListEvents from "./ListEvents";

class App extends Component {
  render() {
    return (
      <div>
        <AddEvent />
        <ListEvents />
      </div>
    );
  }
}

// export the component `App`
export default App;
That's it!! We now have a simple Event App that works optimally.
而已!! 现在,我们有一个简单的Event App,它可以最佳工作。
用React替换Blaze模板 ( Replacing Blaze templates with React )
Some times you may already have a whole Meteor project running built with Blaze templates and all you want to migrate your app to React.
有时您可能已经运行了一个完整的由Blaze模板构建的Meteor项目,并且您想将所有应用程序迁移到React。
You can add in your React Components into Blaze easily by adding react-template-helper.
您可以通过添加react-template-helper轻松地将React组件添加到Blaze中。
在Blaze中显示React (Displaying React in Blaze)
First run:
第一次运行:
> meteor add react-template-helperThen on your template you can add in you React Component:
然后可以在模板上添加React Component:
<template name="events">
    <div>Hello</div>
    <div>{{> React component=AddEvent }}</div>
  </template>
Lastly, you need to pass in the component into the template using a helper:
最后,您需要使用助手将组件传递到模板中:
import { Template } from 'meteor/templating';
  import './events.html';
  import AddEvent from './AddEvent.js';

  Template.events.helpers({
    AddEvent() {
      return AddEvent;
    }
  })
传递道具和/或回调: (Passing in props and/or callbacks:)
import { Template } from 'meteor/templating';
  import './events.html';
  import { Events } from '../api/events.js';
  import AddEvent from './AddEvent.js';
  import ListEvents from './ListEvents.js';

  Template.events.helpers({
    ...
    ListEvents() {
      return ListEvents
    }

    events() {
      return Events.find({}).fetch();
    }

    onClick() {
      const instance = Template.instance();
      return () => {
        instance.hasBeenClicked.set(true)
      }
    }
})<template name="events">
<div>Hello</div>
<div>{{> React component=AddEvent }}</div>
<div>{{> React component=ListEvents events=events onClick=onClick }}</div>
</template>Those are the basic additions you need to have your React components up and running in Blaze.
这些是在Blaze中启动和运行React组件所需的基本补充。
结论 ( Conclusion )
There we have it, a working Event App using Meteor and React. This tutorial encompasses just the basics on set-up and how to get React up and running with Meteor; there are a whole lot you can achieve using Meteor and React. I hope that this article has spiked some interest in learning more and delving deeper into this world.
有了它,一个使用Meteor和React的活动Event App。 本教程仅包含有关设置的基础知识,以及如何使用Meteor启动和运行React的基础知识。 使用Meteor和React可以实现很多功能。 我希望这篇文章引起了人们对更多学习和深入研究这个世界的兴趣。
There are some great open-source projects that use Meteor and React that you can contribute to and learn from. Find the link to an example repo here.
有一些很棒的使用Meteor和React的开源项目,您可以为它们做贡献并从中学习。 在此处找到示例仓库的链接。
Feel free to post questions and suggestions on the comment section!!
随时在评论部分发表问题和建议!
翻译自: https://scotch.io/tutorials/building-an-events-app-with-meteor-and-react
构建meteor应用程序


 1279
1279

 被折叠的 条评论
为什么被折叠?
被折叠的 条评论
为什么被折叠?
 到【灌水乐园】发言


