


angular2 表单验证
Angular 2.0 final was made official just a few days ago and there’s never been a better time to dive in. In the last few weeks, we saw some pretty radical changes to the framework with:
几天前Angular 2.0 final正式发布了,再没有比这更好的时间了。在过去的几周中,我们看到了一些相当大的框架更改:
- the addition of the Ahead-of-Time (AoT) compiler 提前 (AoT)编译器的添加
- introduction of the @NgModule decorator @NgModule装饰器的介绍
- a new Forms Module 一个新的表单模块
In this tutorial we are going to look at what’s changed with forms and more importantly how to handle form validation the right way with Angular 2.
在本教程中,我们将研究表单的变化,更重要的是如何使用Angular 2以正确的方式处理表单验证。
Forms bring life to our applications. It’s how we capture user input and make our applications useful. For a long time, forms have been difficult to get right. Angular 1.x made it a little easier, but came with its own set of issues and challenges, and some features like sane validation didn’t come until the framework was well into it’s 5th year.
表格使我们的应用程序栩栩如生。 这是我们捕获用户输入并使我们的应用程序有用的方式。 长期以来,表格很难正确处理。 Angular 1.x使其变得更容易一些,但同时也带来了一系列问题和挑战,并且直到框架进入第5年时,才出现了诸如合理验证之类的功能。
Angular 2.x aims to make the creation and validation of forms simple, intuitive, and manageable. Pretty ambitious goals, but with the breadth of knowledge the team has from building Angular 1.x, I think Angular 2 forms can live up to these expectations. Before we dive into writing code, let’s learn a bit about Angular 2 Forms.
Angular 2.x旨在使表单的创建和验证变得简单,直观和可管理。 相当雄心勃勃的目标,但是由于团队具有构建Angular 1.x的丰富知识,我认为Angular 2形式可以实现这些期望。 在开始编写代码之前,让我们学习一些有关Angular 2 Forms的知识。
Angular 2表单-新增功能,更改内容 ( Angular 2 Forms - What’s New, What’s Changed )
Angular 2.x forms can be written in two ways.
Angular 2.x表单可以两种方式编写。
模板驱动形式 (Template Driven Forms)
Template driven forms, as the name suggests, are forms built entirely in your UI. This is the typical way we built forms in the past and is useful for building very simple forms in Angular 2.
顾名思义,模板驱动表单是完全在用户界面中构建的表单。 这是我们过去构建表单的典型方式,对于在Angular 2中构建非常简单的表单很有用。
模型驱动(React式)表格 (Model Driven (Reactive) Forms)
Model driven or reactive forms, while similar to template driven forms, add an additional layer of complexity and functionality by having you to declare the model of the form in your component class.
模型驱动或React式表单与模板驱动的表单相似,但通过让您在组件类中声明表单的模型,又增加了一层复杂性和功能。
This additional functionality allows for greater control over your forms as well as making it easier to unit test your application. We’ll take a look at some of these features in this tutorial.
此附加功能使您可以更好地控制表单,并使其更易于对应用程序进行单元测试 。 我们将在本教程中了解其中一些功能。
设置我们的应用程序 ( Setting Up Our Application )
We will write multiple different forms in this tutorial, with varying levels of complexity. To get started let’s setup our application. If you would like to just follow along, you can get all the code we are going to write from this Github repo.
在本教程中,我们将编写多种不同形式的表格,复杂程度各不相同。 首先,让我们设置我们的应用程序。 如果您只想继续学习,可以从Github存储库中获取我们要编写的所有代码。
We will setup our application with the Angular CLI. If you don’t already have the CLI installed, run
我们将使用Angular CLI设置应用程序。 如果尚未安装CLI,请运行
npm install -g angular-cliMake sure you have the latest version of the CLI, which at the time of this post is beta-15.
确保您具有最新版本的CLI,在发布本文时,它是beta-15。
With the CLI installed, create a new directory called ng2forms and in this directory run:
安装CLI后,创建一个名为ng2forms的新目录,并在此目录中运行:
ng initThe ng init command will bootstrap our application, download all the external dependencies we’ll need, configure webpack, and basically do all of the setup work for us. Once the ng init has completed the setup process, navigate to localhost:4200 and you will see a message saying “app works!”.
ng init命令将引导我们的应用程序,下载我们需要的所有外部依赖项,配置webpack,并基本上为我们完成所有设置工作。 ng init完成设置过程后,导航至localhost:4200 ,您将看到一条消息,提示“应用程序正常!”。
简单的形式 (Simple Form)
Next, let’s scaffold out the different forms we’ll be writing. We’ll start off by writing a very simple form to familiarize ourselves with the syntax. In your src/app directory, create a new component called app.simpleform.ts. In this file, we’ll scaffold out the most basic component:
接下来,让我们搭建出将要编写的不同形式。 我们将从编写一个非常简单的形式开始以熟悉语法。 在src/app目录中,创建一个名为app.simpleform.ts的新组件。 在此文件中,我们将搭建最基本的组件:
// We’ll import our dependencies
import { Component } from '@angular/core';

@Component({
  selector: 'simple-form',
  // We’ll inline the template of our form
  template : `
    <h1>Simple Form</h1>
  `
})
export class SimpleFormComponent {
}
模型驱动(React式)表格 (Model-Driven (Reactive) Form)
For our next component, we will build a reactive or model driven form. Create a new component titled app.complexform.ts. We’ll just scaffold it out for now with:
对于下一个组件,我们将构建一个React式或模型驱动的表单。 创建一个名为app.complexform.ts的新组件。 现在,我们将通过以下方式将其搭建起来:
import { Component } from '@angular/core';

@Component({
  selector: 'complex-form',
  // For this form, we’ll write our UI in a separate file
  templateUrl : './app.complexform.html'
})
export class ComplexFormComponent {
}
This form uses an external template for the UI, so we’ll also need to create an app.complexform.html file. Go ahead and create this file. Inside this file, just add a placeholder message for now.
此表单使用用于UI的外部模板,因此我们还需要创建一个app.complexform.html文件。 继续创建该文件。 在此文件中,现在只需添加一个占位符消息。
验证表格 (Validated Form)
Finally, for our third form, we’ll do some fun stuff with validation. It’s only fitting to call this component app.formvalidations.ts, so do that, and again we’ll just scaffold the component with:
最后,对于第三种形式,我们将通过验证做一些有趣的事情。 将该组件app.formvalidations.ts ,这样做,然后我们再次使用以下方法来app.formvalidations.ts该组件:
import { Component } from '@angular/core';

@Component({
  selector: 'form-validation',
  template : `
    <h1>Form Validation</h1>
  `
})
export class FormValidationComponent {
}
在应用程序中包含我们的表格 (Including Our Forms in the App)
Now that we have our components in place, let’s include them in our root @NgModule so that we can use them in our application. Open the app.module.ts file and make the following edits.
现在我们已经有了组件,现在将它们包含在根@NgModule中,以便可以在应用程序中使用它们。 打开app.module.ts文件并进行以下编辑。
import { BrowserModule } from '@angular/platform-browser';
import { NgModule } from '@angular/core';
// By default, the app generated by ng init will include the FormsModule, here we’re requiring the ReactiveFormsModule as well
import { FormsModule, ReactiveFormsModule } from '@angular/forms';
import { HttpModule } from '@angular/http';

import { AppComponent } from './app.component';
// Include the three components we created
import { SimpleFormComponent } from './app.simpleform';
import { ComplexFormComponent } from './app.complexform';
import { FormValidationComponent } from './app.formvalidation';

@NgModule({
  declarations: [
    AppComponent,
    // Declare the three components as part of the root NgModule
    SimpleFormComponent,
    ComplexFormComponent,
    FormValidationComponent,
  ],
  imports: [
    BrowserModule,
    FormsModule,
    // Including the ReactiveFormsModule in our application
    ReactiveFormsModule,
    HttpModule
  ],
  providers: [],
  bootstrap: [AppComponent]
})
export class AppModule { }
Finally, let’s go ahead and open the app.component.html file. This is our root component view and since we’ve declared our form components in the root module, we can use these components here without having to import them in the app.component.ts file. Let’s open up the file and include our three form components.
最后,让我们继续打开app.component.html文件。 这是我们的根组件视图,并且由于我们已经在根模块中声明了表单组件,因此我们可以在此处使用这些组件,而不必将其导入到app.component.ts文件中。 让我们打开文件并包含我们的三个表单组件。
<div class="container">
  <div class="row">
    <div class="col-sm-6 col-sm-offset-3">
      <simple-form></simple-form>
    </div>
  </div>
  <div class="row">
    <div class="col-sm-6 col-sm-offset-3">
      <complex-form></complex-form>
    </div>
  </div>
  <div class="row">
    <div class="col-sm-6 col-sm-offset-3">
      <form-validation></form-validation>
    </div>
  </div>
</div>
You’ve probably noticed the Bootstrap classes, so to conclude our setup let’s just include the Bootstrap 3 library in our application. In your index.html file simply include the following in the <head> of the document:
您可能已经注意到了Bootstrap类,所以要结束我们的设置,我们只需在应用程序中包含Bootstrap 3库即可。 在index.html文件中,只需在文档的<head>中包含以下内容:
<link href="https://maxcdn.bootstrapcdn.com/bootstrap/3.3.7/css/bootstrap.min.css" rel="stylesheet">
Our setup is complete. Navigate to localhost:4200 and you should see the three components displayed. For now you’re only going to see the scaffolded message you added. Now we’re ready for the fun to begin.
我们的设置完成。 导航到localhost:4200 ,您应该看到显示的三个组件。 目前,您仅会看到添加的支架信息。 现在我们准备好开始有趣了。
简单的形式 ( Simple Form )
We are ready to write our first Angular 2 form. If you’ve done any development with Angular 2 prior to RC5, you may remember how tedious it was to deal with all of the imports. Luckily, the NgModule we worked with earlier has, for the most part, taken care of this. In the imports key, we imported the FormsModule which gave us access to the majority of the forms APIs so we can just dive in and write our code.
我们准备编写我们的第一个Angular 2表单。 如果您在RC5之前用Angular 2做过任何开发,您可能还记得处理所有导入内容是多么乏味。 幸运的是,我们之前使用的NgModule在很大程度上已经解决了这一问题。 在imports键中,我们导入了FormsModule ,它使我们能够访问大多数表单API,因此我们可以FormsModule研究并编写代码。
For our simple form, we are going to create a components that captures the users first and last name, their gender, and finally a list of activities they would like to do. This data will be for an upcoming company trip and will help the event organizers plan the right activities.
对于我们的简单表单,我们将创建一个组件来捕获用户的名字和姓氏,他们的性别,最后是他们想要做的活动的列表。 这些数据将用于即将到来的公司旅行,并将帮助活动组织者计划正确的活动。
Let’s go ahead and build our simple form. We’ll explain everything line by line. Open the app.simpleform.ts file and add the following:
让我们继续构建简单的表单。 我们将逐行解释所有内容。 打开app.simpleform.ts文件并添加以下内容:
import { Component } from '@angular/core';

@Component({
  selector: 'simple-form',
  template : `
  <div class="jumbotron">
    <h2>Template Driven Form</h2>
     <!-- Here we are declaring a local variable called “form” and setting it to an instance of ngForm. This is very important. Now our local form variable becomes of type FormGroup allowing us access to the FormGroup API’s on this local variable. We use this in the ngSubmit event where we send the value of the form via form.value -->
    <form #form="ngForm" (ngSubmit)="submitForm(form.value)">
      <div class="form-group">
        <label>First Name:</label>
        <!-- Since we are working with template driven forms, we can use the ngModel directive to capture the values of our forms. One thing to note if you are coming from Angular 1.x. Using ngModel as shown below creates a one-way data binding, so once we hit submit the data is only sent to the controller. If we wanted to use two-way data binding, we would have to wrap the ngModel in [()] and assign an attribute to it. Also the name of the field corresponds to the name attribute so our first input will be firstName. -->
        <input type="text" class="form-control" placeholder="John" name="firstName" ngModel required>
      </div>
      <div class="form-group">
        <label>Last Name</label>
        <input type="text" class="form-control" placeholder="Doe" name="lastName" ngModel required>
      </div>
      <div class="form-group">
        <label>Gender</label>
      </div>
      <!-- Radio and checkboxes work much the same way -->
      <div class="radio">
        <label>
          <input type="radio" name="gender" value="Male" ngModel>
          Male
        </label>
      </div>
      <div class="radio">
        <label>
          <input type="radio" name="gender" value="Female" ngModel>
          Female
        </label>
      </div>
      <div class="form-group">
        <label>Activities</label>
      </div>
      <label class="checkbox-inline">
        <input type="checkbox" value="hiking" name="hiking" ngModel> Hiking
      </label>
      <label class="checkbox-inline">
        <input type="checkbox" value="swimming" name="swimming" ngModel> Swimming
      </label>
      <label class="checkbox-inline">
        <input type="checkbox" value="running" name="running" ngModel> Running
      </label>
      <div class="form-group">
        <button type="submit" class="btn btn-default">Submit</button>
      </div>
    </form>
  </div>
  `
})
export class SimpleFormComponent {
  // Here we are implementing the submitForm function. All we are doing for right now is spitting out the details of the form to our console.
  submitForm(form: any): void{
    console.log('Form Data: ');
    console.log(form);
  }
}
We’ve just written our first Angular 2 form. Head over to localhost:4200 to see the results. If all went well, you should be able to fill out the fields and hit the submit field. Notice that we set a required flag on the first name and last name attributes. You will need to enter values here to be able to submit the form. Pretty easy right? If you are writing simple Angular 2 forms, this approach may be suitable. For advanced functionality though, you will want to leverage Angular 2’s reactive forms. Let’s take a look at how those work next.
我们刚刚编写了第一个Angular 2表单。 转到localhost:4200查看结果。 如果一切顺利,您应该可以填写字段并单击提交字段。 注意,我们在名字和姓氏属性上设置了required标志。 您将需要在此处输入值才能提交表单。 很容易吧? 如果您正在编写简单的Angular 2表单,则此方法可能适用。 但是对于高级功能,您将需要利用Angular 2的React形式。 让我们看看它们接下来如何工作。
模型驱动(React式)表格 ( Model Driven (Reactive) Forms )
Reactive forms in Angular 2 allow for much greater control over form inputs, errors, and validations. With reactive forms, we can define our form model programmatically and ensure that inputs adhere to the constraints we place on the form. Reactive forms let us dynamically create a form inside our Angular class. The best way to explain how this works, is to write some code, so let’s do that.
Angular 2中的React式表单允许对表单输入,错误和验证进行更大的控制。 使用React式表单,我们可以以编程方式定义表单模型,并确保输入符合我们对表单施加的约束。 React性表单使我们可以在Angular类中动态创建表单。 解释这是如何工作的最好方法是编写一些代码,让我们开始吧。
We will recreate the form we made with the template driven approach, but this time we’ll make use of Angular 2’s reactive forms. Let’s first open up the app.complexform.ts file and add the following:
我们将重新创建使用模板驱动方法制作的表单,但是这次我们将使用Angular 2的React形式。 首先,打开app.complexform.ts文件并添加以下内容:
import { Component } from '@angular/core';
// We will need to import a couple of specific API’s for dealing with reactive forms
import { FormBuilder, FormGroup } from '@angular/forms';

@Component({
  selector: 'complex-form',
  templateUrl : './app.complexform.html'
})
export class ComplexFormComponent {
  // The FormGroup object as you may remember from the simple form example exposes various API’s for dealing with forms. Here we are creating a new object and setting its type to FormGroup
  complexForm : FormGroup;

  // We are passing an instance of the FormBuilder to our constructor
  constructor(fb: FormBuilder){
    // Here we are using the FormBuilder to build out our form.
    this.complexForm = fb.group({
      // We can set default values by passing in the corresponding value or leave blank if we wish to not set the value. For our example, we’ll default the gender to female.
      'firstName' : '',
      'lastName': '',
      'gender' : 'Female',
      'hiking' : false,
      'running' : false,
      'swimming' : false
    })
  }

  // Again we’ll implement our form submit function that will just console.log the results of our form
  submitForm(value: any):void{
    console.log('Reactive Form Data: ')
    console.log(value);
  }
}
Our complexForm object now knows its boundaries and constraints. The complexForm object has six different fields. We haven’t added validation to these fields in this example. When we go to build the UI for this form, we’ll only be able to add the six fields that we declared or else Angular will complain. Let’s build the UI next and see how it differs from the template driven approach. Open the app.complexform.html file and add the following:
现在,我们的complexForm对象知道了其边界和约束。 complexForm对象具有六个不同的字段。 在此示例中,我们没有向这些字段添加验证。 当我们为该表单构建UI时,我们只能添加声明的六个字段,否则Angular会抱怨。 接下来让我们构建UI,看看它与模板驱动方法有何不同。 打开app.complexform.html文件并添加以下内容:
<div class="jumbotron">
    <h2>Data Driven (Reactive) Form</h2>
    <!-- Right of the bat, we no longer declare a local variable but use the formGroup directive and set it the complexForm object we defined in the constructor. Throughout the form, we will reference the complexForm root object as can be seen in the submitForm function.-->
    <form [formGroup]="complexForm" (ngSubmit)="submitForm(complexForm.value)">
      <div class="form-group">
        <label>First Name:</label>
        <!-- Rather than set an ngModel, we use the formControl directive to sync our input to the complexForm object. Notice that we are also setting the attribute we wish the corresponding input to sync with. We no longer need the name attribute, but can optionally add it. -->
        <input class="form-control" type="text" placeholder="John" [formControl]="complexForm.controls['firstName']">
      </div>
      <div class="form-group">
        <label>Last Name</label>
        <input class="form-control" type="text" placeholder="Doe" [formControl]="complexForm.controls['lastName']">
      </div>
      <div class="form-group">
        <label>Gender</label>
      </div>
      <div class="radio">
        <label>
          <input type="radio" name="gender" value="Male" [formControl]="complexForm.controls['gender']">
          Male
        </label>
      </div>
      <div class="radio">
        <label>
          <!-- This works the same way for radio and checkboxes as can be seen below -->
          <input type="radio" name="gender" value="Female" [formControl]="complexForm.controls['gender']">
          Female
        </label>
      </div>
      <div class="form-group">
        <label>Activities</label>
      </div>
      <label class="checkbox-inline">
        <input type="checkbox" value="hiking" name="hiking" [formControl]="complexForm.controls['hiking']"> Hiking
      </label>
      <label class="checkbox-inline">
        <input type="checkbox" value="swimming" name="swimming" [formControl]="complexForm.controls['swimming']"> Swimming
      </label>
      <label class="checkbox-inline">
        <input type="checkbox" value="running" name="running" [formControl]="complexForm.controls['running']"> Running
      </label>
      <div class="form-group">
        <button type="submit" class="btn btn-default">Submit</button>
      </div>
    </form>
  </div>
As you can see the reactive forms approach requires a bit more work. The syntax is slightly different, but I would argue that it’s a lot more expressive and easier to understand where and how everything fits in. To see this form in action, head over to localhost:4200 and refresh the page. The form will behave the same as the template driven example above.
如您所见,响应式表单方法需要更多的工作。 语法略有不同,但是我认为它更具表现力,并且更容易理解所有内容的位置和方式。要查看这种形式的实际效果,请转到localhost:4200并刷新页面。 该表单的行为与上面的模板驱动示例相同。

Now that we understand a bit about the different ways to build Angular 2 forms, let’s take a look at form validation.
现在,我们对构建Angular 2表单的不同方法有所了解,让我们看一下表单验证。
Angular 2表单验证 ( Angular 2 Form Validation )
Form validation has traditionally been very challenging to get right. It’s still a wild west when it comes to form validation with certain browsers supporting native HTML5 validators, different frameworks and libraries handling validation different ways, and finally getting the user experience right can often be a challenging act.
表单验证传统上一直很难做到正确。 当使用支持本机HTML5验证器的某些浏览器,不同的框架和以不同方式处理验证的库进行表单验证时,这仍然是一个狂野的西部,最终获得正确的用户体验通常可能是一个挑战性的举动。
Angular 2 supports validation for both it’s template driven and model driven approaches to forms. The model driven approach gives much greater control when it comes to validation, so we’ll use that approach. You can learn how to do template driven validation from the official Angular 2 docs.
Angular 2支持对其模板驱动和模型驱动的表单验证。 在验证方面,模型驱动方法提供了更大的控制权,因此我们将使用该方法。 您可以从Angular 2官方文档中了解如何进行模板驱动的验证。
Let’s add validation to the form we’ve been using so far. Open the app.formvalidation.ts file. We’ll combine our logic and template and do everything in the .ts file so that it’s easier to follow along. Our initial app.formvalidation.ts file will look like:
让我们向到目前为止一直使用的表单添加验证。 打开app.formvalidation.ts文件。 我们将逻辑和模板结合在一起,并在.ts文件中执行所有操作,以便更轻松地进行操作。 我们的初始app.formvalidation.ts文件如下所示:
import { Component } from '@angular/core';
import { FormGroup, FormBuilder } from '@angular/forms';

@Component({
  selector: 'form-validation',
  template : `
  <div class="jumbotron">
    <h2>Form w/ Validations</h2>
    <form [formGroup]="complexForm" (ngSubmit)="submitForm(complexForm.value)">
      <div class="form-group">
        <label>First Name:</label>
        <input class="form-control" type="text" placeholder="John" [formControl]="complexForm.controls['firstName']">
      </div>
      <div class="form-group">
        <label>Last Name</label>
        <input class="form-control" type="text" placeholder="Doe" [formControl]="complexForm.controls['lastName']">
      </div>
      <div class="form-group">
        <label>Gender</label>
      </div>
      <div class="radio">
        <label>
          <input type="radio" name="gender" value="Male" [formControl]="complexForm.controls['gender']">
          Male
        </label>
      </div>
      <div class="radio">
        <label>
          <input type="radio" name="gender" value="Female" [formControl]="complexForm.controls['gender']">
          Female
        </label>
      </div>
      <div class="form-group">
        <label>Activities</label>
      </div>
      <label class="checkbox-inline">
        <input type="checkbox" value="hiking" name="hiking" [formControl]="complexForm.controls['hiking']"> Hiking
      </label>
      <label class="checkbox-inline">
        <input type="checkbox" value="swimming" name="swimming" [formControl]="complexForm.controls['swimming']"> Swimming
      </label>
      <label class="checkbox-inline">
        <input type="checkbox" value="running" name="running" [formControl]="complexForm.controls['running']"> Running
      </label>
      <div class="form-group">
        <button type="submit" class="btn btn-default">Submit</button>
      </div>
    </form>
  </div>
  `
})
export class FormValidationComponent {
  complexForm : FormGroup;

  constructor(fb: FormBuilder){
    this.complexForm = fb.group({
      'firstName' : “”,
      'lastName': “”,
      'gender' : “Female”,
      'hiking' : false,
      'running' : false,
      'swimming' : false
    })
  }

  submitForm(value: any){
    console.log(value);
  }
}
Next, we are going to programmatically add validators to our form. To do this we’ll need to import the Angular validators from the forms package. Our imports will then look like this:
接下来,我们将以编程方式将验证器添加到表单中。 为此,我们需要从表格包中导入Angular验证器。 我们的进口将如下所示:
import { Component } from '@angular/core';
import { FormGroup, FormBuilder, Validators } from '@angular/forms';
Now we can use the prebuilt Angular validators in our form. Let’s see how we can add validations to our form.
现在我们可以在表单中使用预先构建的Angular验证器。 让我们看看如何向表单添加验证。
...
constructor(fb: FormBuilder){
    this.complexForm = fb.group({
      // To add a validator, we must first convert the string value into an array. The first item in the array is the default value if any, then the next item in the array is the validator. Here we are adding a required validator meaning that the firstName attribute must have a value in it.
      'firstName' : [null, Validators.required],
      // We can use more than one validator per field. If we want to use more than one validator we have to wrap our array of validators with a Validators.compose function. Here we are using a required, minimum length and maximum length validator.
      'lastName': [null, Validators.compose([Validators.required, Validators.minLength(5), Validators.maxLength(10)])],
      'gender' : [null, Validators.required],
      'hiking' : false,
      'running' :false,
      'swimming' :false
    })
...
If we look at our form now, we won’t notice a difference. We can still hit the submit button and the form will submit. We’ll have to add some additional markup in our template to make the validator do what we want. An easy win is to disable the submit button if the form is not valid.
如果现在查看表单,我们不会发现任何区别。 我们仍然可以点击“提交”按钮,表格将提交。 我们必须在模板中添加一些其他标记,以使验证器执行我们想要的操作。 一个简单的方法是,如果表单无效,则禁用提交按钮。
<button type="submit" class="btn btn-primary" [disabled]="!complexForm.valid">Submit</button>If we look at the form now, we’ll see the form is disabled. Notice how we are able to use the disabled API and aren’t required to use any specific Angular 2 conventions. We can make the from valid by adding a first name, a last name that is between 5 and 10 characters, and selecting a gender. If we do this, the submit button will no longer be disabled and we will be able to submit the form.
如果现在查看表单,我们将看到该表单已禁用。 请注意,我们如何使用disabled API,并且不需要使用任何特定的Angular 2约定。 我们可以通过添加名字,介于5和10个字符之间的姓氏并选择性别来使from生效。 如果这样做,提交按钮将不再被禁用,我们将能够提交表单。
This works, but is not a great user experience. The user has no indication which form field is invalid or what to do to make it valid. Let’s add some additional markup in our view to tell the user which field is invalid. We’ll start by marking an invalid field a different color.
这可行,但不是很好的用户体验。 用户没有指示哪个表单字段无效或如何使其有效。 让我们在视图中添加一些额外的标记,以告诉用户哪个字段无效。 我们将从将无效字段标记为其他颜色开始。
…<div class="form-group" [ngClass]="{'has-error':!complexForm.controls['firstName'].valid}">
        <label>First Name:</label>
        <input class="form-control" type="text" placeholder="John" [formControl]="complexForm.controls['firstName']">
      </div>
      <!-- We are using the ngClass directive to conditionally add a class to our div if the form is invalid -->
      <div class="form-group" [ngClass]="{'has-error':!complexForm.controls['lastName'].valid}">
        <label>Last Name</label>
        <input class="form-control" type="text" placeholder="Doe" [formControl]="complexForm.controls['lastName']">
      </div>
      <div class="form-group" [ngClass]="{'has-error':!complexForm.controls['gender'].valid}">
        <label>Gender</label>
        <!-- Here we are using the ngIf directive to display an error message if the user has not selected a gender since we can’t color the radio buttons. -->
        <div class="alert alert-danger" *ngIf="!complexForm.controls['gender'].valid">You must select a gender.</div>
      </div>
      <div class="radio">
        <label>
          <input type="radio" name="gender" value="Male" [formControl]="complexForm.controls['gender']">
          Male
        </label>
      </div>
      <div class="radio">
        <label>
          <input type="radio" name="gender" value="Female" [formControl]="complexForm.controls['gender']">
          Female
        </label>
      </div>

...
This is a little bit better. The user now has some context to let them know what is wrong. As soon as they meet the criteria for making the input field valid, the error goes away. The problem we are having now is that the error messages are displayed all the time. This is not ideal. We don’t want the user seeing a bunch of error messages before they’ve even had a chance to start completing the form.
这样好一点了。 用户现在具有一些上下文,可以让他们知道出了什么问题。 只要它们满足使输入字段有效的标准,错误就会消失。 我们现在遇到的问题是错误消息一直显示。 这是不理想的。 我们不希望用户在有机会开始填写表格之前就看到一堆错误消息。
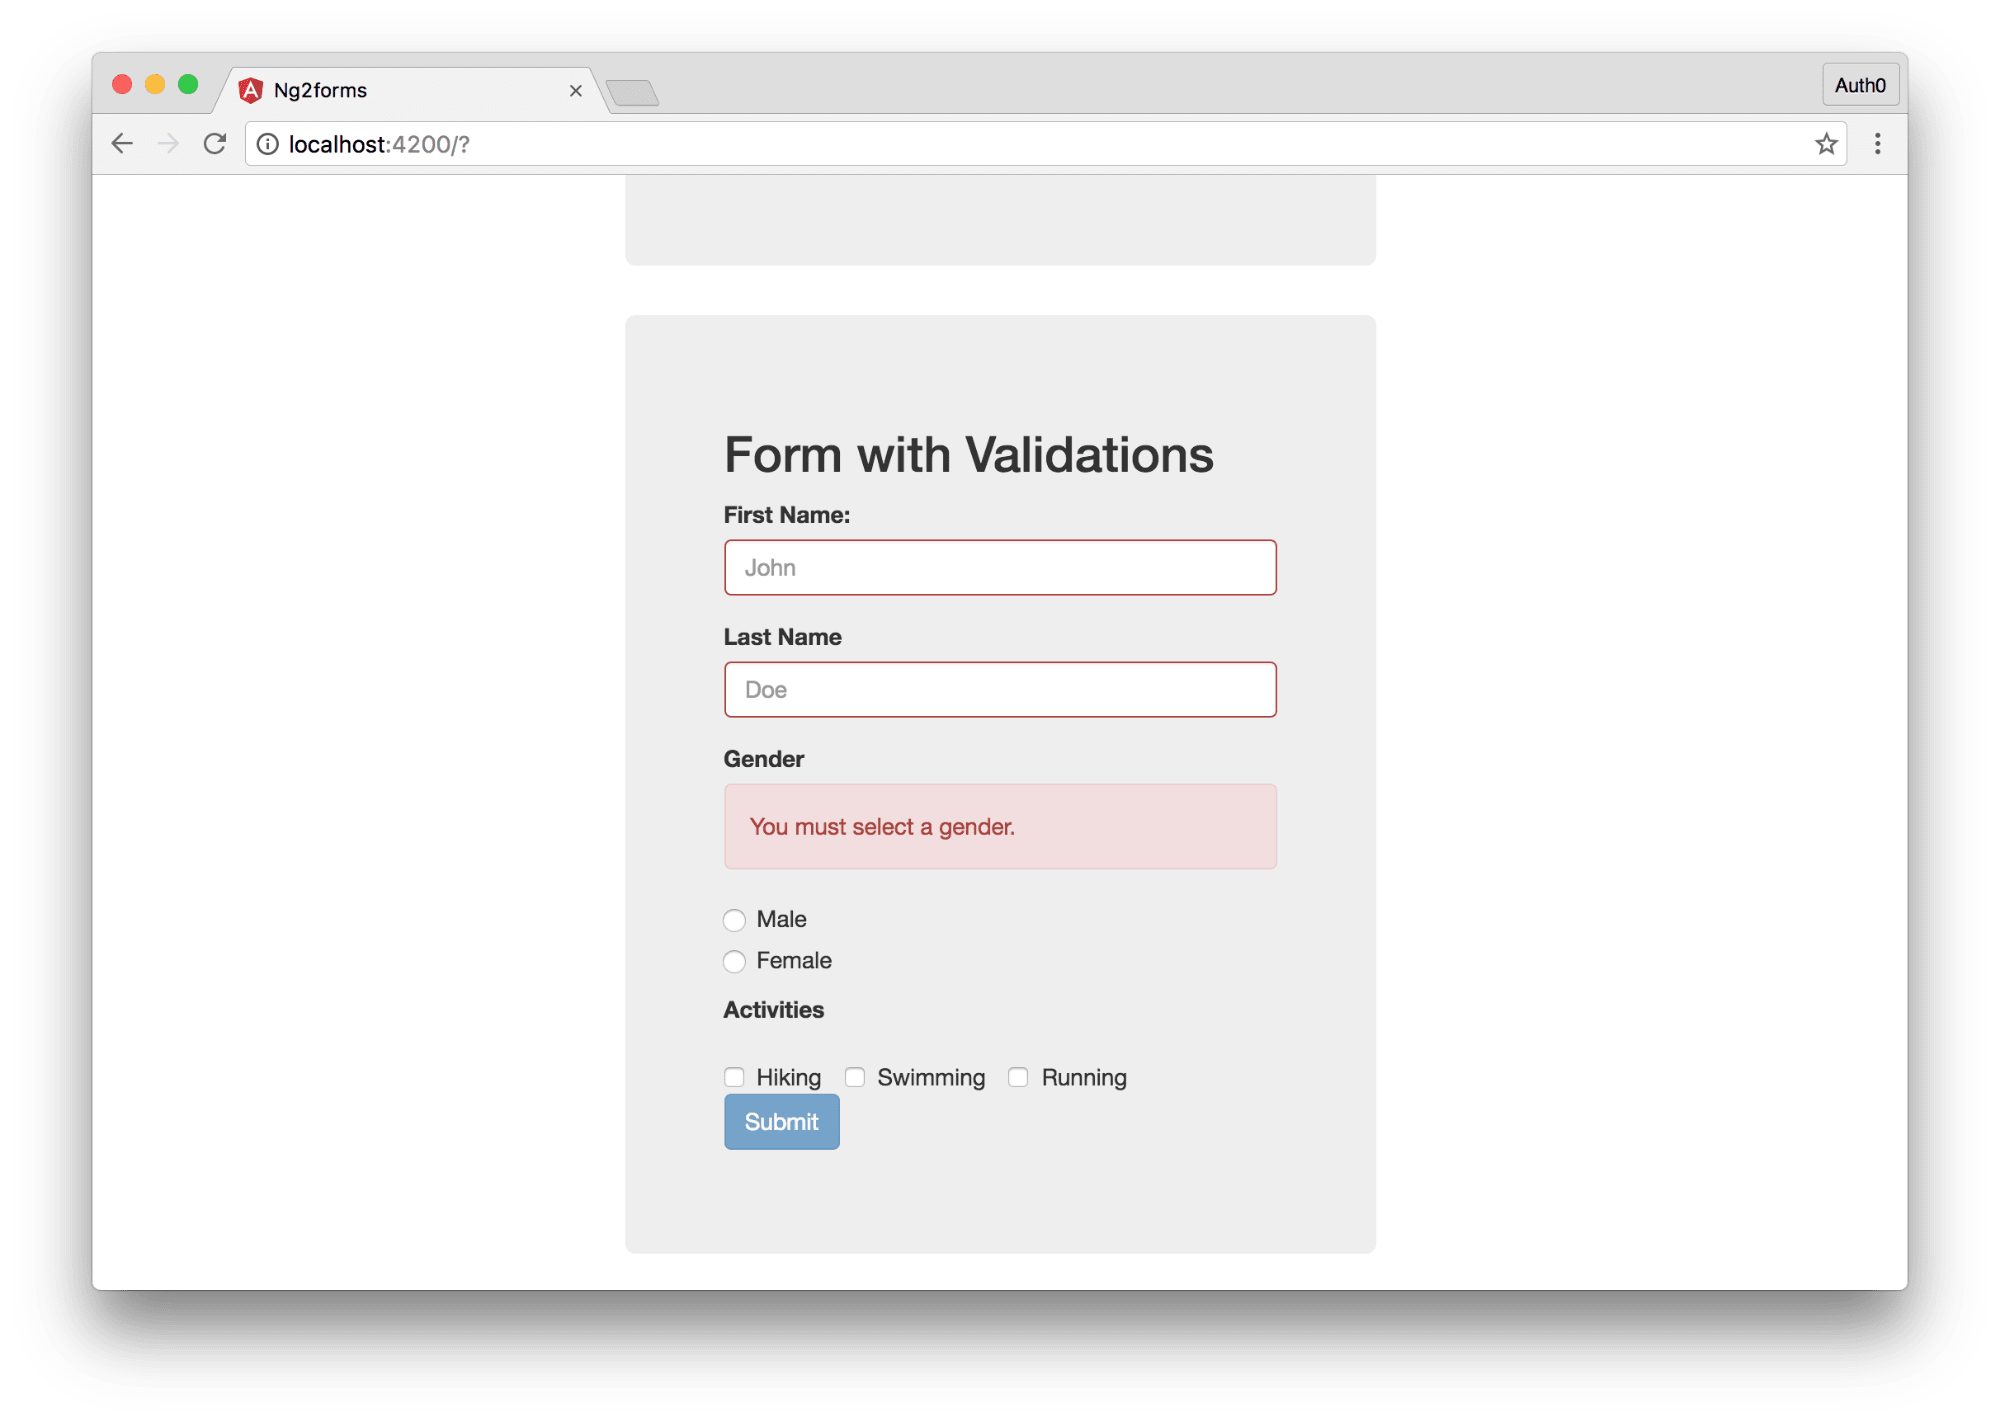
If you’ve worked with Angular 1.x, you may remember the various attributes that each form element gets such as pristine, touched, etc. based on the state of the form. We get those same exact attributes for our Angular 2 forms. We can defer the error handling from displaying until the user has at least had some interaction with the form. Let’s see how we can do this. As we won’t need to make any TypeScript changes, we’ll just show the UI template portion of the component.
如果您使用过Angular 1.x,您可能会记得每个表单元素根据表单状态获得的各种属性,例如pristine , touched等。 我们为Angular 2表单获得了相同的属性。 我们可以将错误处理从显示开始推迟到用户至少与表单进行某种交互为止。 让我们看看如何做到这一点。 由于我们不需要进行任何TypeScript更改,因此我们仅显示组件的UI模板部分。
<div class="jumbotron">
    <h2>Form with Validations</h2>
    <form [formGroup]="complexForm" (ngSubmit)="submitForm(complexForm.value)">
      <!-- We add an additional check to see if the user has at least clicked on the form field before displaying the error -->
      <div class="form-group" [ngClass]="{'has-error':!complexForm.controls['firstName'].valid && complexForm.controls['firstName'].touched}">
        <label>First Name:</label>
        <input class="form-control" type="text" placeholder="John" [formControl]="complexForm.controls['firstName']">
      </div>
      <div class="form-group" [ngClass]="{'has-error':!complexForm.controls['lastName'].valid && complexForm.controls['lastName'].touched}">
        <label>Last Name</label>
        <input class="form-control" type="text" placeholder="Doe" [formControl]="complexForm.controls['lastName']">
      </div>
      <div class="form-group">
        <label>Gender</label>
        <div class="alert alert-danger" *ngIf="!complexForm.controls['gender'].valid && complexForm.controls['gender'].touched">You must select a gender.</div>
      </div>
      <div class="radio">
        <label>
          <input type="radio" name="gender" value="Male" [formControl]="complexForm.controls['gender']">
          Male
        </label>
      </div>
      <div class="radio">
        <label>
          <input type="radio" name="gender" value="Female" [formControl]="complexForm.controls['gender']">
          Female
        </label>
      </div>
      <div class="form-group">
        <label>Activities</label>
      </div>
      <label class="checkbox-inline">
        <input type="checkbox" value="hiking" name="hiking" [formControl]="complexForm.controls['hiking']"> Hiking
      </label>
      <label class="checkbox-inline">
        <input type="checkbox" value="swimming" name="swimming" [formControl]="complexForm.controls['swimming']"> Swimming
      </label>
      <label class="checkbox-inline">
        <input type="checkbox" value="running" name="running" [formControl]="complexForm.controls['running']"> Running
      </label>
      <div class="form-group">
        <button type="submit" class="btn btn-primary" [disabled]="!complexForm.valid">Submit</button>
      </div>
    </form>
  </div>
Finally, let’s add some more context to our errors. We will display a message for each error. This will let the user know exactly what the problem is. Angular 2 gives us an easy way to know which validation has failed. Let’s see how this works. We’ll just show the UI template code here as we won’t be needed any additional TypeScript changes.
最后,让我们为错误添加更多的上下文。 我们将为每个错误显示一条消息。 这将使用户确切知道问题所在。 Angular 2为我们提供了一种简单的方法来知道哪个验证失败了。 让我们看看它是如何工作的。 我们将仅在此处显示UI模板代码,因为不需要任何其他TypeScript更改。
<div class="jumbotron">
    <h2>Form with Validations</h2>
    <form [formGroup]="complexForm" (ngSubmit)="submitForm(complexForm.value)">
      <div class="form-group" [ngClass]="{'has-error':!complexForm.controls['firstName'].valid && complexForm.controls['firstName'].touched}">
        <label>First Name:</label>
        <input class="form-control" type="text" placeholder="John" [formControl]="complexForm.controls['firstName']">
        <!-- The hasError method will tell us if a particular error exists -->
        <div *ngIf="complexForm.controls['firstName'].hasError('required') && complexForm.controls['firstName'].touched" class="alert alert-danger">You must include a first name.</div>
      </div>
      <div class="form-group" [ngClass]="{'has-error':!complexForm.controls['lastName'].valid && complexForm.controls['lastName'].touched}">
        <label>Last Name</label>
        <input class="form-control" type="text" placeholder="Doe" [formControl]="complexForm.controls['lastName']">
        <!-- The hasError method can work with the built in validators but custom validators as well -->
        <div *ngIf="complexForm.controls['lastName'].hasError('required') && complexForm.controls['lastName'].touched" class="alert alert-danger">You must include a last name.</div>
        <div *ngIf="complexForm.controls['lastName'].hasError('minlength') && complexForm.controls['lastName'].touched" class="alert alert-danger">Your last name must be at least 5 characters long.</div>
        <div *ngIf="complexForm.controls['lastName'].hasError('maxlength') && complexForm.controls['lastName'].touched" class="alert alert-danger">Your last name cannot exceed 10 characters.</div>
      </div>
      <div class="form-group">
        <label>Gender</label>
        <div class="alert alert-danger" *ngIf="!complexForm.controls['gender'].valid && complexForm.controls['gender'].touched">You must select a gender.</div>
      </div>
      <div class="radio">
        <label>
          <input type="radio" name="gender" value="Male" [formControl]="complexForm.controls['gender']">
          Male
        </label>
      </div>
      <div class="radio">
        <label>
          <input type="radio" name="gender" value="Female" [formControl]="complexForm.controls['gender']">
          Female
        </label>
      </div>
      <div class="form-group">
        <label>Activities</label>
      </div>
      <label class="checkbox-inline">
        <input type="checkbox" value="hiking" name="hiking" [formControl]="complexForm.controls['hiking']"> Hiking
      </label>
      <label class="checkbox-inline">
        <input type="checkbox" value="swimming" name="swimming" [formControl]="complexForm.controls['swimming']"> Swimming
      </label>
      <label class="checkbox-inline">
        <input type="checkbox" value="running" name="running" [formControl]="complexForm.controls['running']"> Running
      </label>
      <div class="form-group">
        <button type="submit" class="btn btn-primary" [disabled]="!complexForm.valid">Submit</button>
      </div>
    </form>
  </div>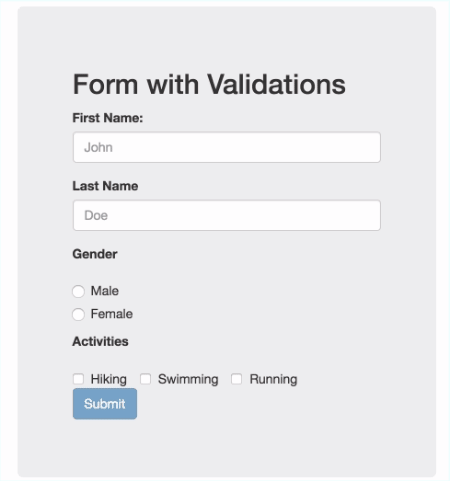
Our form is looking good now. We have pretty sophisticated validation in place. The user will always have context for what is causing the error and know the steps to take to correct it. This was just one way to handle validation. There are many others, but I think we covered the main methods of how validation in Angular 2 works so now you can explore and see what works best for your use cases.
我们的表格现在看起来不错。 我们已经进行了相当复杂的验证。 用户将始终具有导致错误的原因的上下文,并知道要纠正该错误的步骤。 这只是处理验证的一种方法。 还有很多其他方法,但是我认为我们涵盖了Angular 2中验证工作原理的主要方法,因此现在您可以探索并查看哪种方法最适合您的用例。
Angular 2 also has a pretty great infrastructure in place for creating your own validators. We won’t do that in this tutorial, but we will cover it in a future post. Angular 2 comes with a pretty good list of validators including: required, minimum length, maximum length, null and pattern validator which allows you to define any regular expression to match the input against.
Angular 2也拥有相当不错的基础架构来创建您自己的验证器。 在本教程中,我们不会这样做,但是我们将在以后的文章中介绍。 Angular 2附带了一个很好的验证器列表,包括:必需,最小长度,最大长度,空值和模式验证器,它使您可以定义任何正则表达式来匹配输入。
旁白:构建与Auth0 API交互的Angular 2表单 ( Aside: Building an Angular 2 Form to Interact with the Auth0 API )

So far the forms we’ve written have been fairly static. We didn’t do anything with the input other than log it to the console. To close out this tutorial, let’s write a dynamic login form. Rather than building a backend server to handle the authentication, we’ll use the Auth0 API to authenticate a user. Sign up for a free Auth0 account to get started.
到目前为止,我们编写的表格是相当静态的。 除了将输入记录到控制台外,我们对输入没有任何处理。 要结束本教程,让我们编写一个动态登录表单。 与构建后端服务器来处理身份验证不同,我们将使用Auth0 API来对用户进行身份验证。 注册免费的Auth0帐户即可开始使用。
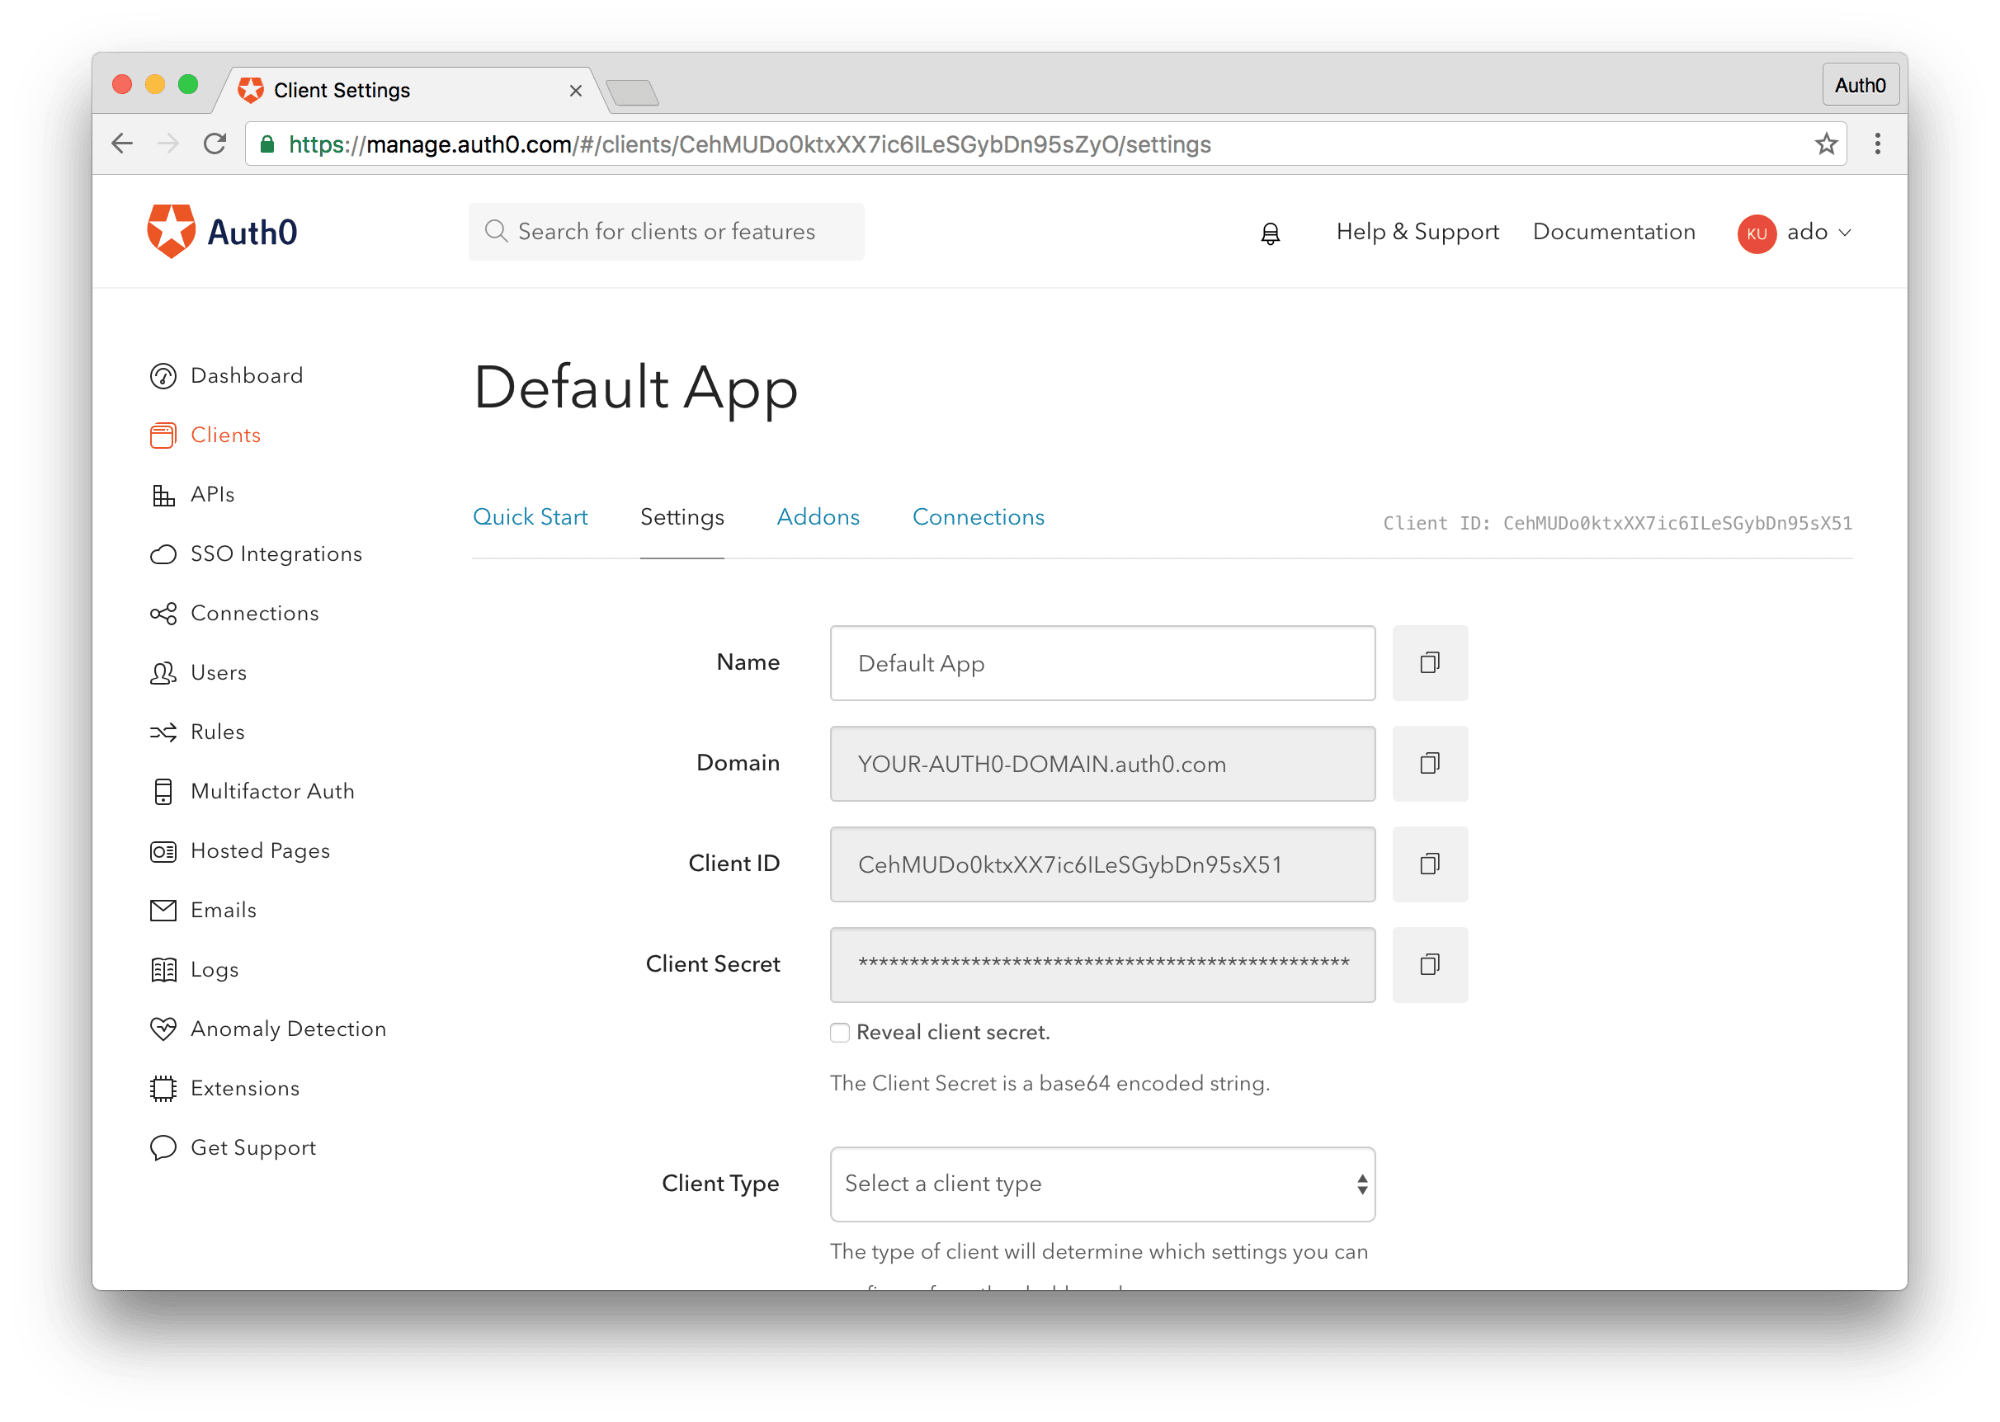
Once you have your Auth0 account created, login to the management dashboard and get your Client Id. This is all we’ll need for now. Let’s go ahead and create a new component called app.login.ts. We’ll scaffold this component as follows:
创建Auth0帐户后,登录到管理信息中心并获取您的客户ID。 这就是我们现在所需要的。 让我们继续创建一个名为app.login.ts的新组件。 我们将对该组件进行如下脚手架:
import { Component } from '@angular/core';
import { FormGroup, FormBuilder, Validators } from '@angular/forms';
import {Http, Response, Request, RequestMethod} from '@angular/http';

@Component({
  selector: 'login-form',
  template : ``
})
export class LoginComponent {
}
Next, let’s include our newly created component in our root module so that we can use this component throughout our application.
接下来,让我们在根模块中包含新创建的组件,以便我们可以在整个应用程序中使用该组件。
import { BrowserModule } from '@angular/platform-browser';
import { NgModule } from '@angular/core';
import { FormsModule, ReactiveFormsModule } from '@angular/forms';
import { HttpModule } from '@angular/http';

import { AppComponent } from './app.component';
import { SimpleFormComponent } from './app.simpleform';
import { ComplexFormComponent } from './app.complexform';
import { FormValidationComponent } from './app.formvalidation';
// Add the login component
import { LoginComponent } from './app.login'

@NgModule({
  declarations: [
    AppComponent,
    SimpleFormComponent,
    ComplexFormComponent,
    FormValidationComponent,
    // Add it to our declarations so that we can use this component in our app.
    LoginComponent
  ],
  imports: [
    BrowserModule,
    FormsModule,
    ReactiveFormsModule,
    HttpModule
  ],
  providers: [],
  bootstrap: [AppComponent]
})
export class AppModule { }
Finally, we’ll add our login component to our root component view. Open the app.component.html file and make the following edits:
最后,我们将登录组件添加到我们的根组件视图中。 打开app.component.html文件并进行以下编辑:
<div class="container">
  <div class="row">
    <div class="col-sm-6 col-sm-offset-3">
      <simple-form></simple-form>
    </div>
  </div>
  <div class="row">
    <div class="col-sm-6 col-sm-offset-3">
      <complex-form></complex-form>
    </div>
  </div>
  <div class="row">
    <div class="col-sm-6 col-sm-offset-3">
      <form-validation></form-validation>
    </div>
  </div>
  <!-- Add the new login form component -->
  <div class="row">
    <div class="col-sm-6 col-sm-offset-3">
      <login-form></login-form>
    </div>
  </div>
</div>
Now we’re ready to implement our login form. Let’s open the app.login.ts file. We’ll inline our template again. Let’s examine the code line by line and explain how we are going to do this.
现在,我们准备实施登录表单。 让我们打开app.login.ts文件。 我们将再次内联模板。 让我们逐行检查代码,并说明我们将如何做。
import { Component } from '@angular/core';
import { FormGroup, FormBuilder, Validators } from '@angular/forms';
// We are going to be making a call to an external API and we’ll use the Angular HTTP library to accomplish this. Here we are importing the API’s we’ll need to work with.
import {Http, Response, Request, RequestMethod} from '@angular/http';

@Component({
  selector: 'login-form',
  template : `
  <!-- We’ll display the login form only if the user is not logged in -->
  <div class="jumbotron" *ngIf="!authenticated">
    <h2>Login Form</h2>
    <!-- We are going to build a reactive form and use many of the concepts we learend in the previous section in regards to validation. -->
    <form [formGroup]="loginForm" (ngSubmit)="submitForm(loginForm.value)">
      <div class="form-group" [ngClass]="{'has-error':!loginForm.controls['email'].valid && loginForm.controls['email'].touched}">
        <label>Email:</label>
        <input class="form-control" type="text" placeholder="John@doe.com" [formControl]="loginForm.controls['email']">
        <div *ngIf="loginForm.controls['email'].hasError('required') && loginForm.controls['email'].touched" class="alert alert-danger">You must add an email.</div>
      </div>
      <div class="form-group" [ngClass]="{'has-error':!loginForm.controls['password'].valid && loginForm.controls['password'].touched}">
        <label>Password:</label>
        <input class="form-control" type="password" placeholder="Password" [formControl]="loginForm.controls['password']">
        <div *ngIf="loginForm.controls['password'].hasError('required') && loginForm.controls['password'].touched" class="alert alert-danger">You must add a password.</div>
      </div>
      <div class="form-group">
        <button type="submit" class="btn btn-primary" [disabled]="!loginForm.valid">Submit</button>
      </div>
    </form>
  </div>
  <!-- If the user is authenticated we’ll display their profile picture and email as well as provide a way to logout -->
  <div class="jumbotron text-center" *ngIf="authenticated">
    <img src="{{profile.picture}}" />
    <h2>Welcome, {{profile.email}}</h2>
    <a (click)="logout()">Logout</a>
  </div>
  `
})
export class LoginComponent {
  // We are going to declare our variables here. We’ll have a loginForm that will represent our reactive form, an authenticated boolean that will be true or false based on the users auth status and finally a profile object that will hold the user data.
  loginForm : FormGroup;
  authenticated: boolean
  profile : Object;

  constructor(fb: FormBuilder, public http: Http){
    // We’ll check if the user is logged in once this component is loaded. We’ll do this by checking if a jwt key value pair exists in local storage.
    if(localStorage.getItem('jwt')){
      this.authenticated = true;
      // If the jwt key value exists, we’ll know the user is logged in, so we’ll get their profile.
      this.profile = JSON.parse(localStorage.getItem('profile'));
    }
    // For our form, we’ll just have two fields and we’ll require both of them to be filled out before the form can be submitted
    this.loginForm = fb.group({
      'email' : [null, Validators.required],
      'password': [null, Validators.required],
    })
  }

  submitForm(value: any){
    // Once the form is submitted and we get the users email and password we’ll format our request based on the Auth0 API.
    let form = {
      'client_id' : 'YOUR-AUTH0-CLIENTID',
      'username' : value.email,
      'password' : value.password,
      'connection' : 'Username-Password-Authentication',
      'grant_type' : 'password',
      'scope' : 'openid name email'
    }
    // Once we have our data formed, we’ll send the request using the Angular 2 HTTP library.
    this.http.post('https://YOUR-AUTH0-DOMAIN.auth0.com/oauth/ro', form).subscribe(
      (res:any)=>{
        // We’ll subscribe to the request and capture the response
        let data = res.json();
        // If we get an id_token, we’ll know the request is successful so we’ll store the token in localStorage. We won’t handle the error use case for this tutorial.
        if(data.id_token){
          localStorage.setItem('jwt', data.id_token);
          // Finally, we’ll call our getUserInfo function which will get the user details from Auth0
          this.getUserInfo(data);
        }
      }
    )
  }

  // Here we are similarly calling the Auth0 API, this time the /tokeninfo endpoint which will return the users data we requested. All we’ll need to pass to the request is our JSON Web Token.
  getUserInfo(data: any){
    let form = {
      'id_token' : data.id_token
    }
    this.http.post('https://reviewgen.auth0.com/tokeninfo', form).subscribe(
      (res:any)=>{
        let data = res.json();
        this.profile = data;
        localStorage.setItem('profile', JSON.stringify(data));
        this.authenticated = true;
        // We’ll use the reset() method to reset the form. So if a user logs out they will need to enter their credentials again. If we did not do this, the previous values would still be displayed.
        this.loginForm.reset();
      }
    )
  }

  // We’ll implement a logout function that removes the jwt and user profile from localStorage and sets the authenticated boolean to false which will cause the component to display the login form.
  logout(){
    localStorage.removeItem('jwt');
    localStorage.removeItem('profile');
    this.authenticated = false;
  }
}
Our login form is ready to be tested. Navigate to localhost:4200 and you should see the newly created login form. You’ll need to have an Auth0 user account created before you can login. You can create an account from your Auth0 Dashboard in the Users section and then test this functionality.
我们的登录表单已准备好进行测试。 导航到localhost:4200 ,您应该看到新创建的登录表单。 您需要先创建Auth0用户帐户,然后才能登录。 您可以从“ 用户”部分的Auth0信息中心创建一个帐户,然后测试此功能。

Writing your own authentication mechanism is no easy task. We only added the ability to login, and even that was pretty incomplete. The Auth0 Lock widget can handle all things auth for us including sign in, sign up, social connections, enterprise federation, multifactor authentication and much more. We can integrate Lock with our Angular 2 applications using the angular2-jwt library.
编写自己的身份验证机制并非易事。 我们仅添加了登录功能,甚至还很不完整。 Auth0 Lock小部件可以为我们处理所有身份验证,包括登录,注册,社交关系,企业联合身份验证 , 多因素身份验证等等。 我们可以使用angular2-jwt库将Lock与Angular 2应用程序集成。
放在一起 ( Putting It All Together )
Today we looked at how Angular 2 helps us create and validate forms. We looked at the different ways users can create forms and the benefits of each. Validation can be a daunting task, but Angular 2 comes with a lot of helpers right out of the gate which help a great deal. Finally, we added some actual functionality to our forms, by calling the Auth0 API and showing how you can make HTTP requests with Angular 2 forms. If you would like to see the completed demo, you can get it from Github, and if you want to implement it yourself, be sure to sign up for a free Auth0 account.
今天,我们研究了Angular 2如何帮助我们创建和验证表单。 我们研究了用户创建表单的不同方式以及每种表单的优势。 验证可能是一项艰巨的任务,但是Angular 2附带了很多帮助者,它们可以提供很多帮助。 最后,我们通过调用Auth0 API并展示了如何使用Angular 2表单发出HTTP请求,为表单添加了一些实际功能。 如果您想观看完整的演示,可以从Github上获得,如果您想自己实现,请确保注册一个免费的Auth0帐户 。
angular2 表单验证


 5189
5189

 被折叠的 条评论
为什么被折叠?
被折叠的 条评论
为什么被折叠?
 到【灌水乐园】发言


