


Even though an exponential amount of online tools keep popping up, WordPress remains a domineering web behemoth. More than 25% of active sites run on the famous CMS. Quite a chunk of the whole world wide web.
尽管数量不断增长的在线工具不断涌现,但WordPress仍然是霸气的网络庞然大物。 超过25%的活动站点都在著名的CMS上运行。 整个互联网中有很大一部分。
On the other hand, with the rise of vertical, third party solutions, we see developers adopting more and more a modular approach in their workflow.
另一方面,随着垂直,第三方解决方案的兴起,我们看到开发人员在其工作流程中越来越采用模块化方法 。
Many front-end developers I've met and talked to enjoy working with a lean, quick e-commerce solution like Snipcart. But, they also want to give more autonomy in familiar CMS to their merchant clients. Since many of them use WordPress, I thought I'd write this article to provide them with a useful resource.
我遇到并聊天的许多前端开发人员都喜欢使用Snipcart这样的精简,快速的电子商务解决方案。 但是,他们还希望在熟悉的CMS中为其商户客户提供更多的自治权。 由于其中许多人使用WordPress,因此我想写这篇文章来为他们提供有用的资源。
This is a full technical tutorial on how to completely integrate Snipcart's shopping cart platform with WordPress.
这是有关如何将Snipcart的购物车平台与WordPress完全集成的完整技术教程 。
Contents of the post:
帖子内容:
- How to create and manage Snipcart products & inventory directly within WordPress' CMS 如何直接在WordPress的CMS中创建和管理Snipcart产品和库存
- How to display Snipcart dashboard data directly within WordPress' CMS 如何直接在WordPress CMS中显示Snipcart仪表板数据
- How to manage Snipcart orders directly within WordPress' CMS 如何直接在WordPress的CMS中管理Snipcart订单
- All relevant code snippets to clarify development steps 所有相关代码段以阐明开发步骤
- A complete associated repo for code demo 完整的相关代码回购库
- A live website demo 现场网站演示
前提条件 ( Preconditions )
For this post, we assume the following:
对于本文,我们假设以下内容:
- You have a functional installation of WordPress 4.5.x 您已经安装了功能强大的WordPress 4.5.x
- You're comfortable with PHP and WordPress development 您对PHP和WordPress开发感到满意
- You have a GitHub account to access the entirety of the demo code 您有一个GitHub帐户可以访问整个演示代码
- You have a PHP version compiled with Curl 您有使用Curl编译PHP版本
第1步-安装所需的插件 ( Step 1 - Install the required plugins )
The two main plugins we'll need for this integration are Custom Post Type UI & Advanced Custom Fields.
我们需要进行此集成的两个主要插件是Custom Post Type UI和Advanced Custom Fields 。
We'll use the former to create—you guessed it—custom post types and the latter to speed up custom field creation.
我们将使用前者来创建(您猜对了)自定义帖子类型,而后者则用于加快自定义字段的创建。
So go ahead and install both plugins.
因此,继续安装两个插件。
Depending on your needs, you might want to do this step manually, with code instead of plugins
根据您的需要,您可能希望使用代码而不是插件手动执行此步骤
Start by creating a custom post type "product" using cpt-ui
首先使用cpt-ui创建自定义帖子类型“产品”

Now add custom fields: Custom fields -> Add new field group -> Add the following:
现在添加自定义字段:自定义字段->添加新字段组->添加以下内容:
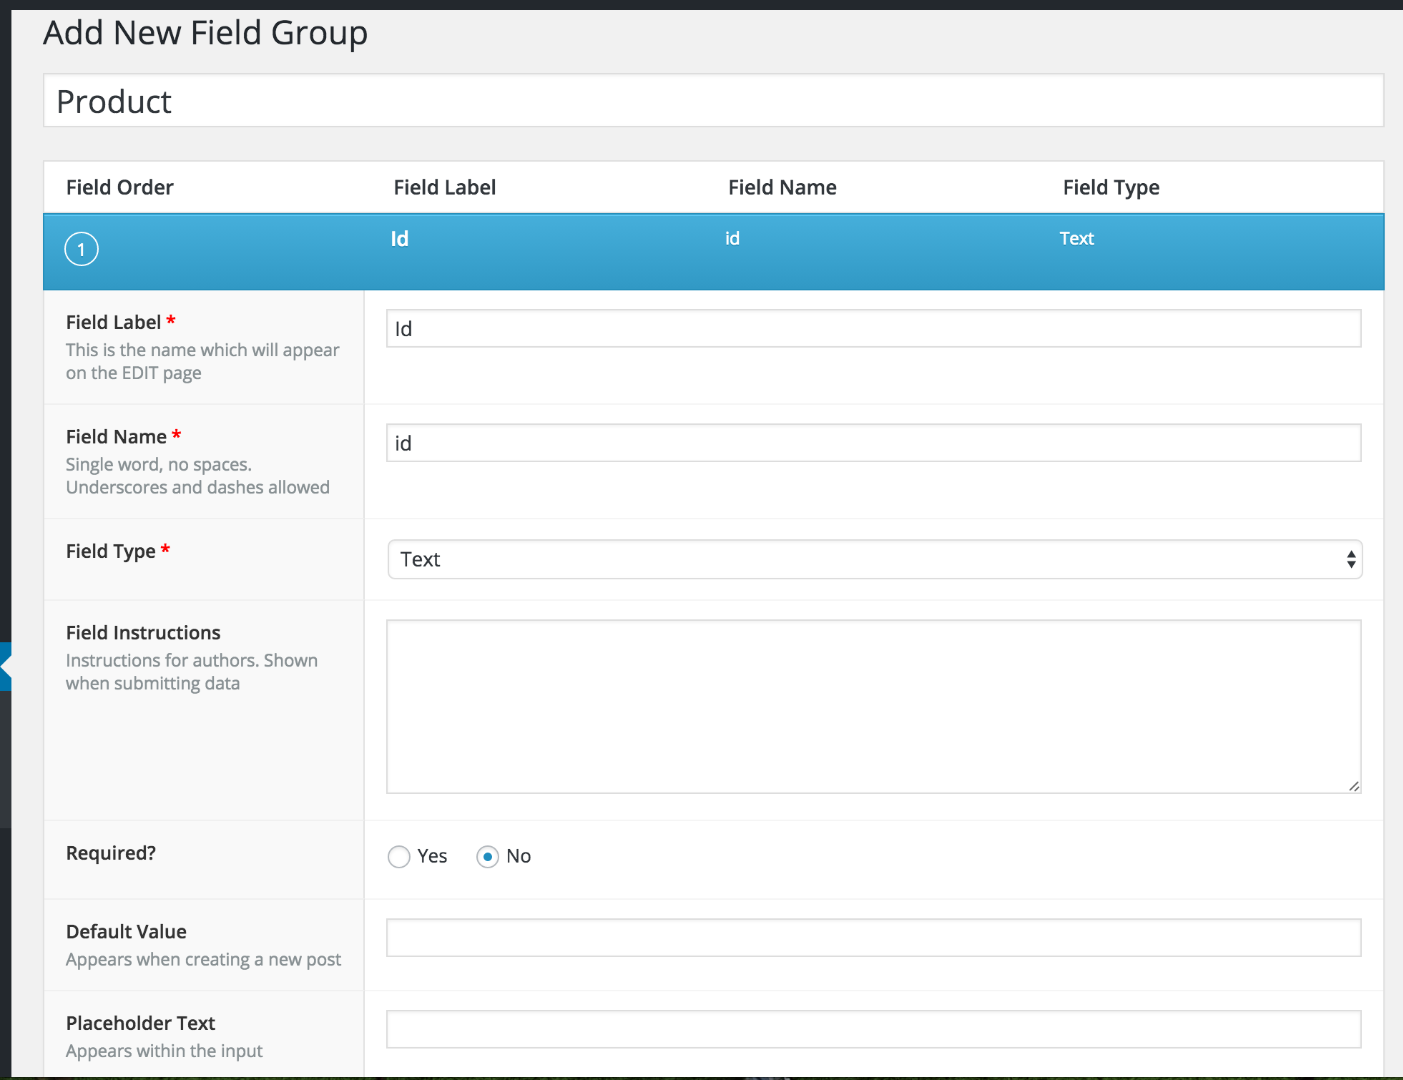
- Id (text) ID(文字)
- Price (number) 价格(数量)
- Inventory (number) (You can put an inventory value if you want) 库存(数量)(如果需要,可以放置库存值)
Make sure to set Show this field group if Post Type is equal to product:
如果“过帐类型”等于product,请确保设置“ 显示此字段组” :

Publish it and voilà, you can now add a few products!
发布它, 瞧 ,你现在可以添加一些产品!
第2步-在主题中显示产品 ( Step 2 - Show products in the theme )
It's time to create a theme template to display products on our site. For this demo, we'll use a child theme of Twenty Sixteen. You can find more details about child themes in the WordPress doc.
现在是时候创建主题模板以在我们的网站上显示产品了。 在此演示中,我们将使用“二十一岁的孩子”主题。 您可以在WordPress文档中找到有关子主题的更多详细信息。
First, create a folder with your theme name in wp-content/themes. Then, add a file style.css to declare our theme as a child of Twenty Sixteen.
首先,在wp-content / themes中使用您的主题名称创建一个文件夹。 然后,添加文件style.css,以将我们的主题声明为“二十十六岁”的孩子。
/*
 Theme Name:   Snipcart Theme
 Description:  Snipcart custom theme
 Author:       Yanick Ouellet
 Author URI:   http://snipcart.com
 Template:     twentysixteen
 Version:      1.0.0
*/
We also need to enqueue the Twenty Sixteen stylesheet. Let's do it in a new function.php file:
我们还需要加入“二十十六”样式表。 让我们在一个新的function.php文件中进行操作:
add_action( 'wp_enqueue_scripts', 'snipcart_enqueue_styles' );
function snipcart_enqueue_styles() {
    wp_enqueue_style( 'parent-style', get_template_directory_uri() . '/style.css' );
}
Have a look at your site. Nothing changed? Good! Now, we'll create a custom template for product display: single-product.php. We'll use single.php from Twenty Sixteen and customize it. Mainly, we need to add price and inventory information:
看一下您的网站。 没有改变? 好! 现在,我们将为产品显示创建一个自定义模板: single-product.php 。 我们将使用二十十六岁的single.php并对其进行自定义。 主要,我们需要添加价格和库存信息:
<div>
    price: <strong><?php echo get_post_meta($id, 'price')[0]; ?>$</strong> <br />
    inventory: <strong><?php echo get_post_meta($id, 'inventory')[0]; ?> left</strong>
</div>
To retrieve our customs fields, we use get_post_meta($id, 'field_name')[0]. The Advanced Custom Fields plugin stores it as an array, and the value is at index 0.
要检索我们的海关字段,我们使用get_post_meta($id, 'field_name')[0] 。 Advanced Custom Fields插件将其存储为数组,值位于索引0。
See the complete code for this step here: Step 2.2 - Customize product detail page
请在此处查看此步骤的完整代码: 步骤2.2-自定义产品详细信息页面
Go ahead and refresh any product page. You should now see inventory and price displayed.
继续并刷新任何产品页面。 您现在应该看到显示的库存和价格。
What comes next is listing all of our products. Create a custom template to do that: product-list.php. Once again, we will customize a Twenty Sixteen template.
接下来是列出我们所有的产品。 为此创建一个自定义模板: product-list.php 。 再次,我们将自定义二十一模板。
Here's the full code for this step: Step 2.3 - Add product list template
这是此步骤的完整代码: 步骤2.3-添加产品列表模板
A few things to note here:
这里需要注意的几件事:
- Don't forget to declare it as a template:
/* Template Name: Product list */不要忘记将其声明为模板:/* Template Name: Product list */ - Query all products
query_posts(array('post_type' => 'product'));查询所有产品query_posts(array('post_type' => 'product')); - For the demo, we won't bother with pagination 对于演示,我们不会打扰分页
Now, create a page using this template:
现在,使用此模板创建一个页面:
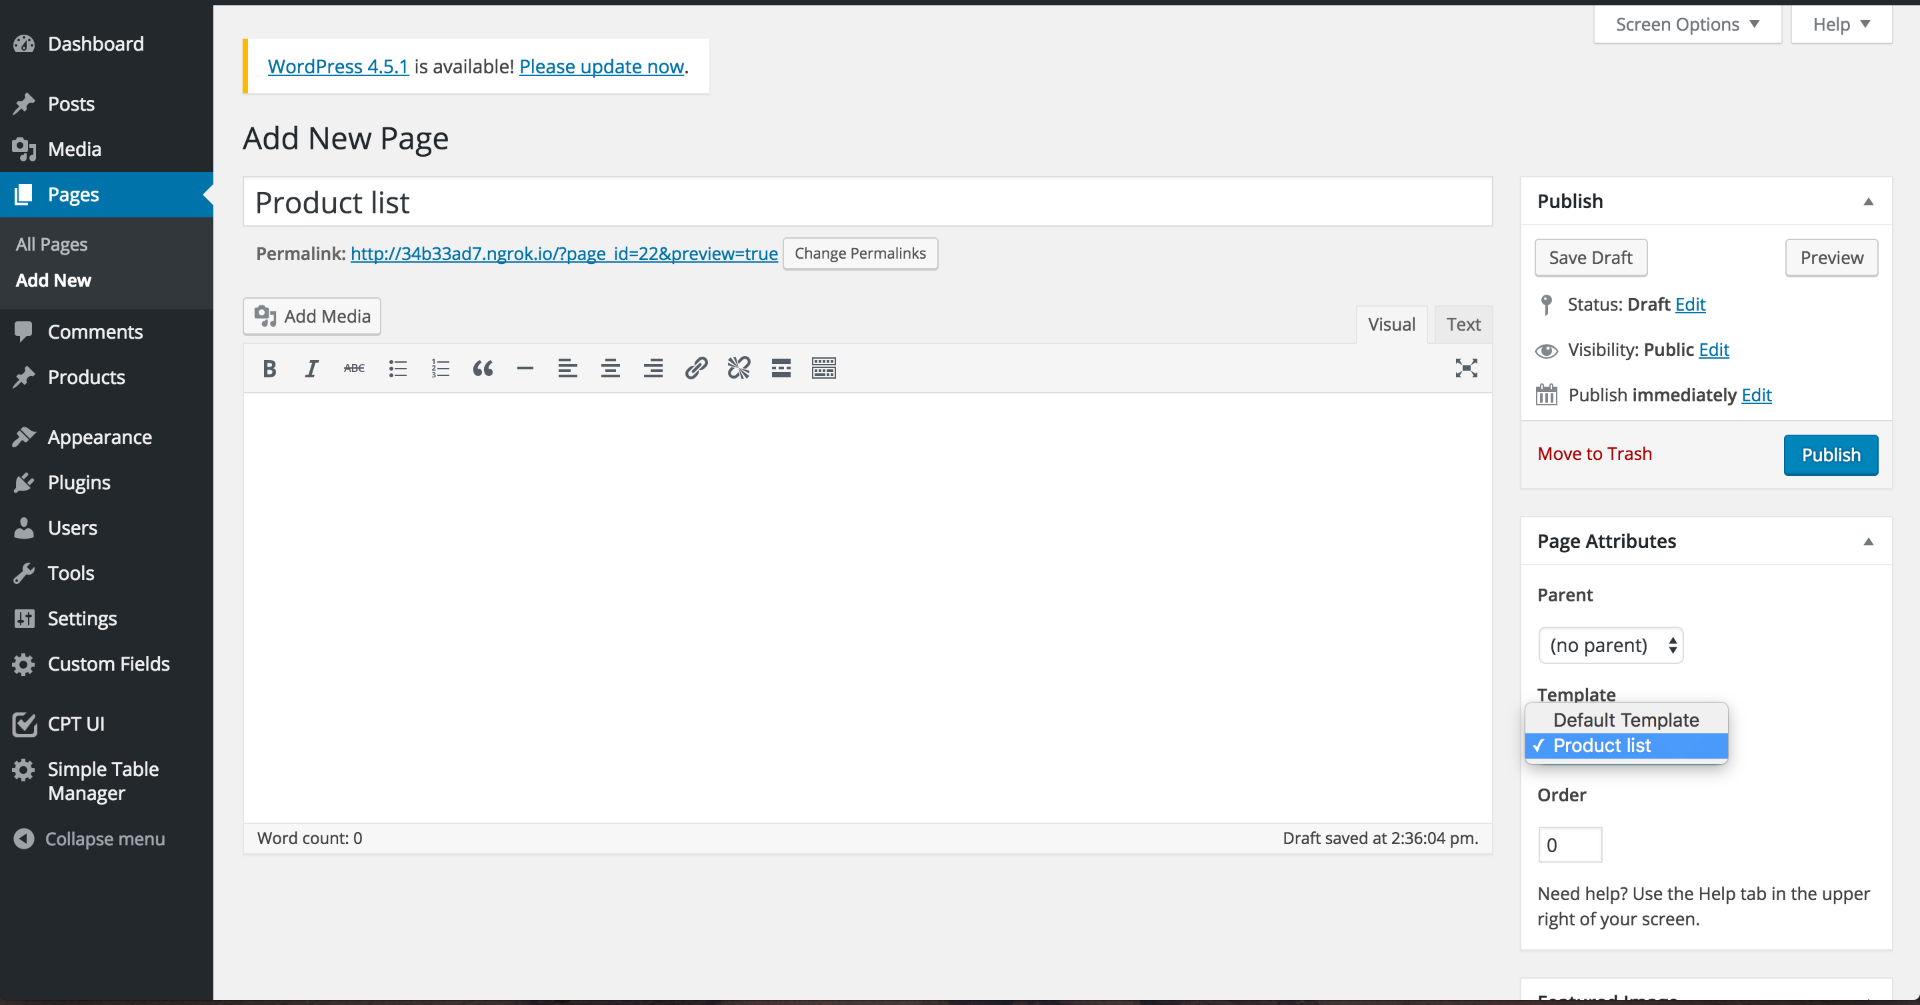
And set it as your home page (Appearance -> Customize -> Static Front Page):
并将其设置为您的主页(外观->自定义->静态首页):

步骤3-整合Snipcart的购物车 ( Step 3 - Integrate Snipcart's shopping cart )
First, we need to load the Snipcart style. We will enqueue it just after the Twenty Sixteen style:
首先,我们需要加载Snipcart样式。 我们将在二十一十六风格之后入队:
function snipcart_enqueue_styles() {
    wp_enqueue_style( 'parent-style', get_template_directory_uri() . '/style.css' );
    wp_enqueue_style( 'snipcart-style', 'https://cdn.snipcart.com/themes/2.0/base/snipcart.min.css');
}
We also need to load Snipcart's scripts. Since we need to add a data-api-key attribute to the src tag, we can't use wp_enqueue_script. Instead, we will copy the Twenty Sixteen footer.php and add <script src="https://cdn.snipcart.com/scripts/2.0/snipcart.js" data-api-key="YOU-PUBLIC_KEY" id="snipcart"></script> just before the closing body tag.
我们还需要加载Snipcart的脚本。 由于我们需要在src标签中添加data-api-key属性,因此不能使用wp_enqueue_script 。 相反,我们将复制二十一岁的footer.php并添加<script src="https://cdn.snipcart.com/scripts/2.0/snipcart.js" data-api-key="YOU-PUBLIC_KEY" id="snipcart"></script>就在结束body标签之前。
See the complete code for this step here: Step 3.1 - Load Snipcart script and stylesheet
请在此处查看此步骤的完整代码: 步骤3.1-加载Snipcart脚本和样式表
Next, let's add the buy button to product detail:
接下来,让我们在产品详细信息中添加“购买”按钮:
<button
    class="snipcart-add-item"
    data-item-id="<?php echo get_post_meta($id, 'id')[0]; ?>"
    data-item-name="<?php echo get_the_title(); ?>"
    data-item-price="<?php echo get_post_meta($id, 'price')[0]; ?>"
    data-item-max-quantity="<?php echo get_post_meta($id, 'inventory')[0]; ?>"
    data-item-url="<?php echo get_the_permalink(); ?>"
    data-item-image="<?php echo wp_get_attachment_image_src(get_post_thumbnail_id($id), 'single-post-thumbnail')[0]?>"
>
    Buy
</button>
Full code for this step: Step 3.2 - Add Snipcart buy button
此步骤的完整代码: 步骤3.2-添加Snipcart购买按钮
第4步-使用Webhooks更新库存 ( Step 4 - Update inventory with webhooks )
For easier e-commerce operations management, let's decrease products inventory using Snipcart webhooks. To do so, we will register a webhook in Snipcart's merchant dashboard to call our WordPress site when an order is completed.
为了简化电子商务运营管理,让我们使用Snipcart webhooks减少产品库存。 为此,我们将在Snipcart的商家信息中心中注册一个Webhook,以便在订单完成后调用我们的WordPress网站。
We will use admin-ajax.php to handle webhooks.
我们将使用admin-ajax.php处理webhooks。
Go ahead and register a webhook to http://yoursite.com/wp-admin/admin-ajax.php?action=snipcart_endpoint
继续并注册一个Webhook到http://yoursite.com/wp-admin/admin-ajax.php?action=snipcart_endpoint
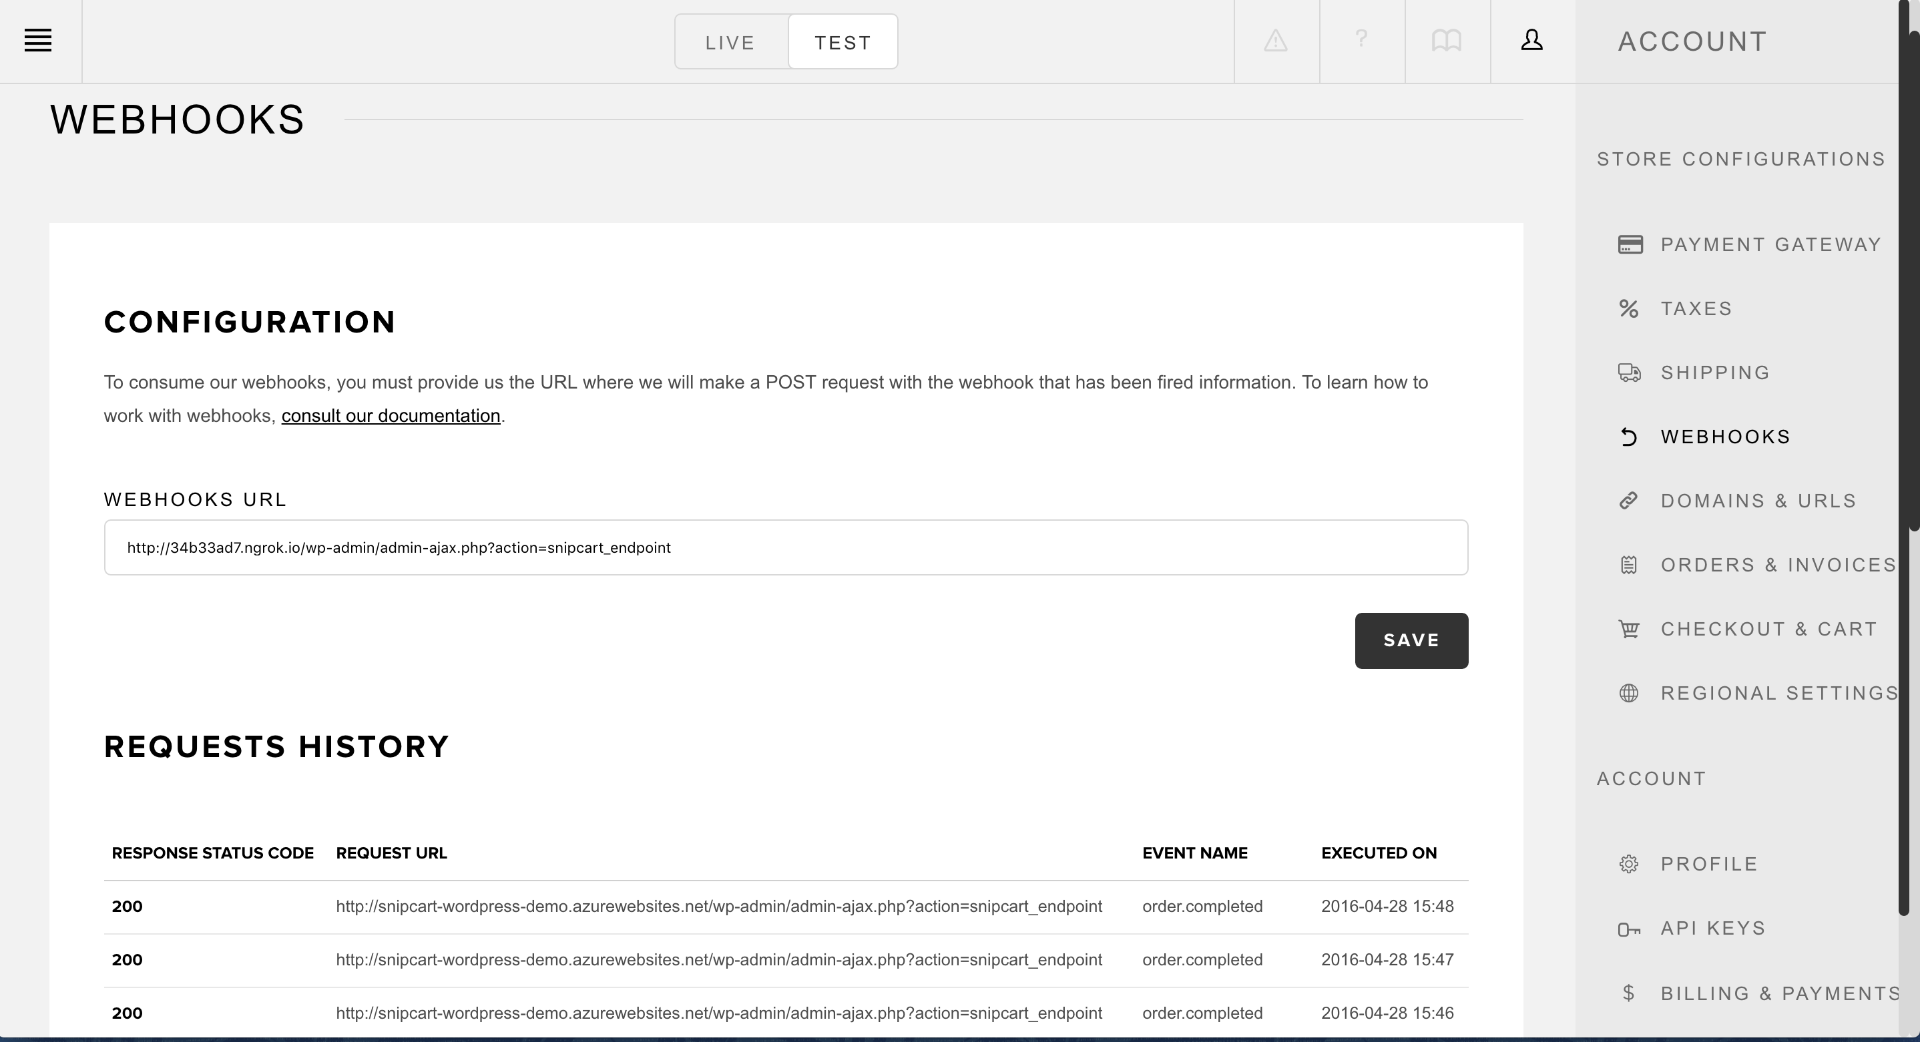
Note that, as seen in the screenshot, I use ngrok to develop with Snipcart locally and allow it to access my website over the web.
请注意,如屏幕截图所示,我使用ngrok在本地与Snipcart进行开发,并允许其通过Web访问我的网站。
Now, in functions.php, we need to add an endpoint to admin-ajax.php?action=snicart_endpoint:
现在,在functions.php ,我们需要向admin-ajax.php?action=snicart_endpoint添加一个端点:
add_action('wp_ajax_nopriv_snipcart_endpoint', 'snipcart_endpoint');
function snipcart_endpoint() {
    $json = file_get_contents('php://input');
    $body = json_decode($json, true);

    if (is_null($body) or !isset($body['eventName'])) {
        header('HTTP/1.1 400 Bad Request');
        wp_die();
    }

    switch ($body['eventName']) {
    case 'order.completed':
        foreach($body['content']['items'] as $item) {
            handle_item($item);
        }
        break;
    }

    wp_die();
}
For each item in a completed order, we call a handle_item to process it and decrease inventory for that item.
对于已完成订单中的每个项目,我们调用handle_item进行处理并减少该项目的库存。
So let's define handle_item:
因此,让我们定义handle_item :
function handle_item($item) {
    global $wpdb;

    $id = $wpdb->get_var( $wpdb->prepare(
        "
        SELECT post_id
        FROM $wpdb->postmeta
        WHERE meta_value = %s AND meta_key = 'id'
    ", $item['id']
    ) );

    $qte = get_post_meta($id, 'inventory')[0];
    update_post_meta($id, 'inventory', $qte - $item['quantity']);
}
With the Snipcart product ID (a product custom field), we can query the WordPress post ID of the product. Then, we get the current item inventory and decrease it by the quantity registered in the order.
使用Snipcart产品ID(产品自定义字段),我们可以查询产品的WordPress帖子ID。 然后,我们获得当前的物料库存,并将其减少订单中登记的数量。
Now, if you buy a product, it should decrease the quantity!
现在,如果您购买产品,它应该减少数量!
See full code for this step here: Step 4.1 - Decrease inventory on Snipcart webhook
在此处查看此步骤的完整代码: 步骤4.1-减少Snipcart Webhook上的库存
But we've got ourselves a little problem here: everybody can call the endpoint URL and trigger the quantity decrease.
但是我们在这里遇到了一个小问题:每个人都可以调用端点URL并触发数量减少。
So we will validate that the caller is Snipcart with a handshake, as described in the doc section here.
因此,我们将验证呼叫者是握手的Snipcart,如此处的doc部分所述。
Before doing that, we will define a generic function to call the Snipcart API:
在此之前,我们将定义一个通用函数来调用Snipcart API:
function call_snipcart_api($url, $method = "GET", $post_data = null) {
    $url = 'https://app.snipcart.com/api' . $url;

    $query = curl_init();


    $headers = array();
    $headers[] = 'Content-type: application/json';
    if ($post_data)
        $headers[] = 'Content-Length: ' . strlen($post_data);
    $headers[] = 'Accept: application/json';

    $secret = file_get_contents(get_stylesheet_directory() . "/secret.txt");
    $secret = str_replace("\n", "", $secret);
    $secret = str_replace("\r", "", $secret);
    $headers[] = 'Authorization: Basic '.base64_encode($secret . ":");
    $options = array(
        CURLOPT_RETURNTRANSFER => 1,
        CURLOPT_URL => $url,
        CURLOPT_HTTPHEADER => $headers,
        CURLOPT_SSL_VERIFYHOST => 0,
        CURLOPT_SSL_VERIFYPEER => 0
    );

    if ($post_data) {
        $options[CURLOPT_CUSTOMREQUEST] = $method;
        $options[CURLOPT_POSTFIELDS] = $post_data;
    }

    curl_setopt_array($query, $options);
    $resp = curl_exec($query);
    curl_close($query);

    return json_decode($resp);
}
Few things to note here:
这里要注意的几件事:
- The function can handle
GET,POSTandPUTcalls. 该函数可以处理GET,POST和PUT调用。 - We need to set
Authorization: Basic SNIPCART_SECRET_KEY:header to allow Snipcart to recognize us. Since we do not want the secret key to be versioned, we put it in asecret.txt(gitignored) file at the root of the theme. 我们需要设置Authorization: Basic SNIPCART_SECRET_KEY:标头,以允许Snipcart识别我们。 由于我们不希望对密钥进行版本控制,因此我们将其放入主题根目录的secret.txt(gitignored)文件中。 - This function use
php_curl, so your PHP version needs to be compiled with Curl. 此函数使用php_curl,因此您PHP版本需要使用Curl进行编译。
Now, we need to verify that Snipcart really sent a webhook before processing it. At the beginning of snipcart_endpoint, add:
现在,我们需要在处理之前验证Snipcart是否确实发送了Webhook。 在snipcart_endpoint的开头,添加:
$token = $_SERVER["HTTP_X_SNIPCART_REQUESTTOKEN"];
$resp = call_snipcart_api('/requestvalidation/' . $token);

if (strpos($resp->resource, 'wp-admin/admin-ajax.php?action=snipcart_endpoint') === false) {
   echo "Caller is not snipcart";
   wp_die();
}
Only webhooks from Snipcart will now be handled!
现在只处理来自Snipcart的webhooks!
See full code for this step: Step 4.2 - Handle webhooks only from Snipcart
查看此步骤的完整代码: 步骤4.2-仅处理来自Snipcart的webhooks
第5步-将Snipcart数据添加到WordPress管理员 ( Step 5 - Add Snipcart data to WordPress admin )
Next up on the menu: we add a Snipcart page directly in WordPress' CMS. :)
接下来在菜单上:我们直接在WordPress的CMS中添加了一个Snipcart页面。 :)
Start by registering a menu page in the admin:
首先在管理员中注册菜单页面:
add_action( 'admin_menu', 'register_custom_menu_page' );
function register_custom_menu_page() {
    add_menu_page('snipcart', 'Snipcart', 'manage_options', 'snipcart', 'snipcart_dashboard', '', 6);
}
And let's call Snipcart /api/orders endpoint and display orders in our new admin page:
让我们调用Snipcart / api / orders端点并在新的管理页面中显示订单:
function snipcart_dashboard() {
    $resp = call_snipcart_api('/orders');
    $statuses = array("Processed", "Disputed", "Shipped", "Delivered", "Pending", "Cancelled");

    echo "<table class='snip-table'>";

    echo "<tr>
            <th>Invoice number</th>
            <th>Payment method</th>
            <th>Email</th>
            <th>Total</th>
            <th>Date</th>
            <th>Order status</th>
            <th>Update status</th>
            <th>Items</th>
          </tr>";

    foreach ($resp->items as $order) {
        echo "<tr>";
        echo "<td>";
        echo "<a target='_blank' href='https://app.snipcart.com/dashboard/orders/$order->token'>";
        echo $order->invoiceNumber. "</a></td>";
        echo "<td>" . $order->paymentMethod. "</td>";
        echo "<td>" . $order->email . "</td>";
        echo "<td>" . $order->finalGrandTotal. "$</td>";
        $date = new DateTime($order->creationDate);
        $outputDate = date_format($date, 'Y-m-d H:i');
        echo "<td>" . $outputDate. "</td>";
        echo "<td>" . $order->status. "</td>";
        echo "<td><select class='order-status-select' data-token='$order->token'>";

        foreach ($statuses as $status) {
            echo "<option value='$status' ";
            if ($status == $order->status) echo "selected='selected'";
            echo ">$status</option>";
        }

        echo "</select>";

        echo "<td>";
        foreach ($order->items as $item) {
            echo $item->name . "<br/>";
        }

        echo "</tr>";
    }

    echo "</table>";

    echo "<script src='". get_stylesheet_directory_uri() . '/js/admin.js' . "' />";
}
We used the call_snipcart_api function defined earlier to get all orders and display them in a table. To keep things simple, we used echo to render the table, but on a real website, you could make it cleaner!
我们使用了call_snipcart_api定义的call_snipcart_api函数来获取所有订单并将它们显示在表格中。 为了简单起见,我们使用echo来渲染表格,但是在真实的网站上,您可以使其更整洁!
We iterate over the order list returned by Snipcart, which is converted from JSON to PHP objects in call_snipcart_api. You can view all available fields in the API doc.
我们遍历Snipcart返回的订单列表,该列表从JSON转换为call_snipcart_api PHP对象。 您可以在API文档中查看所有可用字段。
Note that we include a JavaScript file at the end of the page. We will come back on that later.
请注意,我们在页面末尾包含一个JavaScript文件。 我们稍后再讨论。
If you go to the Snipcart page in the admin, you should now have the order list!
如果您进入管理员的Snipcart页面,现在应该有了订单列表!
See full code for this step: Step 5.1 - Display order list in Wordpress admin
查看此步骤的完整代码: 步骤5.1-在Wordpress管理中显示订单列表
Let's style our data a bit, shall we?
让我们对数据进行一些样式设置,对吗?
Add the following css file : css/admin.css
添加以下CSS文件: css/admin.css
.snip-table td, .snip-table th{
    padding: 10px;
    background-color: white;
}
Then, enqueue it:
然后,将其入队:
add_action( 'admin_enqueue_scripts', 'snipcart_enqueue_admin_script' );
function snipcart_enqueue_admin_script( $hook ) {
    wp_register_style('snipcart_admin_style',
                        get_stylesheet_directory_uri() . '/css/admin.css', false, '1.0.0');
    wp_enqueue_style('snipcart_admin_style');
}
Full code for this step: Step 5.2 - Add custom css to style order list
此步骤的完整代码: 步骤5.2-将自定义CSS添加到样式顺序列表

Notice the order status dropdown? We will add some JS to detect the change and call an admin-ajax.php action which will call Snipcart's API to update the status.
注意到订单状态下拉列表? 我们将添加一些JS来检测更改,并调用admin-ajax.php操作,该操作将调用Snipcart的API来更新状态。
First, add the admin-ajax.php action:
首先,添加admin-ajax.php操作:
add_action('wp_ajax_snipcart_update_status', 'snipcart_update_status');
function snipcart_update_status() {
    if (!isset($_POST['token']) || !isset($_POST['value'])) {
        header('HTTP/1.1 400 Bad Request');
        echo "Bad request";
        wp_die();
    }

    $url = "/orders/" . $_POST['token'];
    $result = call_snipcart_api($url, "PUT", json_encode(array(
        "status" => $_POST['value']
    )));

    if ($result->status !== $_POST['value']) {
        header('HTTP/1.1 500 Internal Server Error');
        echo "Error while communicating with Snipcart";
    }

    wp_die();
}
Provided we receive the order token and new status value by post, this action will call Snipcart's API via PUT and update the order. More on the order endpoint here.
如果我们通过邮寄收到订单令牌和新状态值,则此操作将通过PUT调用Snipcart的API并更新订单。 更多关于订购端点的信息 。
Note: we used orders for this exemple, but there's a bunch of other things you can do with the API! :)
注意:我们以订单为例,但您可以使用API进行其他操作! :)
Now, add the JavaScript part: js/admin.js:
现在,添加JavaScript部分: js/admin.js :
(function($){
    $(document).ready(function() {
        $('.order-status-select').change(function(elem) {
            var select = $(elem.target);
            $.post('/wp-admin/admin-ajax.php', {
                action: 'snipcart_update_status',
                token: select.data('token'),
                value: select.val()
            }, function() {
                alert('Status updated!');
                location.reload();
            })
                .fail(function(data) {
                    alert('Error: ' + data.responseText);
                });
        });
    });
}(jQuery));
This way, we simply listen for changes on the dropdown and call, via ajax, the action defined earlier. On success we display an alert and reload the page. Of course, it should be handled more gracefully in a real website.
这样,我们只需侦听下拉列表中的更改,然后通过ajax调用之前定义的操作即可。 成功后,我们将显示警报并重新加载页面。 当然,应该在真实的网站中更优雅地处理它。
See full code for this step: Step 5.3 - Update order status via WordPress admin
查看此步骤的完整代码: 步骤5.3-通过WordPress管理员更新订单状态
第6步-快速编辑库存 ( Step 6 - Quick edit of inventory )
Now, we will add a way to quickly edit the inventory of a product within the WP product list. For more info here, see the Wordpress doc
现在,我们将添加一种方法来快速编辑WP产品列表中的产品库存。 有关更多信息, 请参见Wordpress文档
First, add an inventory custom columns to the product list in the admin:
首先,在管理员的产品列表中添加一个库存自定义列:
add_filter( 'manage_product_posts_columns', 'manage_product_posts_columns' );
function manage_product_posts_columns( $columns ) {
    $columns['inventory'] = esc_html__( 'Inventory');

    return $columns;
}
add_action( 'manage_posts_custom_column' , 'display_product_inventory', 10, 2 );
function display_product_inventory( $column, $post_id ) {
    if ($column == 'inventory'){
        echo '<span>', get_post_meta($post_id, 'inventory')[0], '</span>';
    }
}
Then, add a field in the quickedit box:
然后,在快速编辑框中添加一个字段:
add_filter( 'quick_edit_custom_box', 'snipcart_quick_edit_box');
function snipcart_quick_edit_box($column_name) {
    if ($column_name !== 'inventory') return;

    ?><fieldset class="inline-edit-col-right inline-edit-book">
                  <div class="inline-edit-col column-<?php echo $column_name; ?>">
                  <label class="inline-edit-group">
                  <span class="title">Inventory</span><input name="inventory" />
                  </label>
                  </div>
    </fieldset>
}
We need to save the value when the post is saved, so:
保存帖子后,我们需要保存值,因此:
add_action('save_post', 'save_inventory');
function save_inventory($id) {
    if ("product" !== $_POST['post_type']) return;

    if (isset($_POST['inventory'])) {
        update_post_meta($id, 'inventory', $_POST['inventory']);
    }
}
Finally, we need to add some JS to populate the quickedit box. Register the JS in snipcart_enqueue_admin_script:
最后,我们需要添加一些JS来填充quickedit框。 在snipcart_enqueue_admin_script注册JS:
if ( 'edit.php' === $hook && isset( $_GET['post_type'] ) && 'product' === $_GET['post_type'] ) {

        wp_enqueue_script( 'snipcart_quick_edit',
                            get_stylesheet_directory_uri() . '/js/quickedit.js',
                            false, null, true );
    }
Create the js/quickedit.js file:
创建js/quickedit.js文件:
(function($) {
  var $wp_inline_edit = inlineEditPost.edit;

  inlineEditPost.edit = function(id) {
    $wp_inline_edit.apply(this, arguments);
    var $post_id = 0;
    if (typeof(id) == 'object') {
          $post_id = parseInt(this.getId(id));
    }

    if ($post_id > 0) {
      var $edit_row = $('#edit-' + $post_id);
      var $post_row = $('#post-' + $post_id);

      var $quantity = $('.column-inventory', $post_row).text();

      $(':input[name="inventory"]', $edit_row).val($quantity);
        }
  };
})(jQuery);
Now, you can quick edit the inventory directly in your product listing!
现在,您可以直接在产品列表中快速编辑库存!
See full code for this step here: Step 6 - Add quickedit box
在此处查看此步骤的完整代码: 步骤6-添加quickedit框
查看现场演示和完整的GH回购! ( Check out the live demo & full GH repo! )
Product listing, buy buttons, inventory decrease, cart summary... it's all there, all live. Buy a few dummy t-shirts and have a look for yourself!
产品清单,购买按钮,库存减少,购物车摘要...全部在那里,全部实时显示。 买一些虚拟的T恤,看看自己!
I shared a public repo in case you want to analyze or copy the code for this integration! Enjoy. :)
如果您想分析或复制此集成的代码,我共享了一个公共仓库! 请享用。 :)
Also, I've recently stumbled on a pretty awesome hosting solution for WordPress sites: SpudPress. They offer blazing fast, cheap & secure static hosting for WP sites. So make sure you check 'em out!
另外,我最近偶然发现了一个非常棒的WordPress网站托管解决方案: SpudPress 。 他们为WP网站提供了快速,廉价和安全的静态托管 。 因此,请确保您将它们签出!
结论 ( Conclusion )
If you made it this far: congrats! I'm aware this full integration can seem like a lot of work. But if you get comfortable with WP & Snipcart, you should be able to pull it off in a day of focused coding.
如果您已经做到了:恭喜! 我知道这种完全集成似乎需要大量工作。 但是,如果您对WP&Snipcart感到满意,那么您应该能够在专注于编码的一天将其付诸实践。
Following these steps will result in a solid e-commerce set up. You'll end up with a deep shopping cart integration that provides more autonomy to your merchants.
执行以下步骤将建立可靠的电子商务。 最后,您将获得深度的购物车集成,从而为商家提供更多的自治权。
Of course, I'd love to know your thoughts about the whole thing. So if you have questions, suggestions, feedback: hit the comments! And don't hesitate to share the post on Twitter if you found it valuable. :)
当然,我很想知道您对整件事的看法。 因此,如果您有任何问题,建议或反馈,请点击评论! 如果发现有价值,请立即在Twitter上分享该帖子。 :)
翻译自: https://scotch.io/tutorials/full-e-commerce-integration-of-snipcart-with-wordpress


 被折叠的 条评论
为什么被折叠?
被折叠的 条评论
为什么被折叠?
 到【灌水乐园】发言


