


vue 构建单页应用
Part1 of this tutorial dealt with the basics of building a single page application, with page linking automatically done by Vue. In this tutorial, you will learn how to:
本教程的第1 部分介绍了构建单页应用程序的基础知识,以及由Vue自动完成的页面链接。 在本教程中,您将学习如何:
- pass parameters alongside the routes, and 在路线旁边传递参数,以及
- use route guards to protect routes and block off non-authenticated users from visiting the site. 使用路由防护器来保护路由,并阻止未经身份验证的用户访问该站点。
Starting off from the end of the last tutorial, head over to the GitHub repository to clone and continue with the application.
从上一教程的结尾开始,转到GitHub存储库以克隆并继续该应用程序。
你会建造什么? ( What will you build? )
You are going to build on the existing project done in Part 1, add navigation guards and a route to pass parameters.
您将在第1部分中完成的现有项目的基础上,添加导航保护和传递参数的路线。
Here is a pictorial view of what we will be building.

这是我们将要构建的图形视图。
将参数传递给路线 ( Passing parameters to routes )
In Vue, parameters can be passed to a route by simply putting the : attribute before the parameter name. This is somewhat similar to the routing mechanism in Laravel. If you are familiar with Laravel, the {} annotation is used to specify a route.
在Vue中,只需将:属性放在参数名称之前,就可以将参数传递到路由。 这有点类似于Laravel中的路由机制。 如果您熟悉Laravel,则{}批注用于指定路线。
Look at the example below, taken from the Vue router documentation.
看下面的例子,摘自Vue路由器文档。
{ path: '/user/:id', component: User } From the example, it can be said that the route will give the result of /users/2 , or any integer in place of 2. Whatever content the parameter holds will be referred to as the “id”, which can be accessed using $route.params.id in the User component, which was declared as its component. Let’s begin!
从该示例可以说,该路由将给出/users/2的结果,或代替/users/2任何整数。无论该参数包含什么内容,都将称为“ id”,可以使用$route.params.id进行访问。 User组件中的$route.params.id ,已声明为其组件。 让我们开始!
创建参数路径 (Creating the parameter route)
Create a new component in the src\components folder called Param.vue , and copy the following contents into it:
在src\components文件夹中创建一个名为Param.vue的新组件,并将以下内容复制到其中:
//src\components\Param.vue
export default {
    name: 'Param',
    data () {
        return {
        UserInput :''
        }

    },
    methods:{
        GoToRoute : function(){
        this.$router.push({ name: 'Paramdetails', params: { id: this.UserInput }})
        }
    }
}
In the above piece of code, a param component was defined, which is the template that holds a text box and a button.
在上面的代码中,定义了一个param组件,这是一个包含文本框和按钮的模板。
Now, go to the main.js file, import the Param component, as well as create a path that handles the route.
现在,转到main.js文件,导入Param组件,并创建一个处理路线的路径。
Just above the Const routes block of code, add the following import:
在Const routes代码块上方,添加以下导入:
//main.js
import Param from './components/Param
After doing the above and importing the param component, replace the routes block with this:
完成上述操作并导入了param组件后,请用以下命令替换routes块:
//main.js
//define your routes
const routes = [
//route for the home route of the webpage
{ path: '/', component: Hello },
//route for the about route of the webpage
{ path: '/about', component: About },
//route for the param route of the webpage
{ path: '/param', component: Param }
]
Notice that in the above piece of code, the only difference that occurred was the addition of the param route. However, there is one more step to go so that the route can be shown with the about and home links.
注意,在上面的代码段中,发生的唯一区别是添加了param路由。 然而,有一个步骤去,这样的路线可以与显示about与home的联系。
Use the router link tag in our App.vue file, and add the following line of code, just after the “about” link:
使用我们App.vue文件中的router链接标签,并在“ about”链接之后添加以下代码行:
<!--src\components\App.vue-->
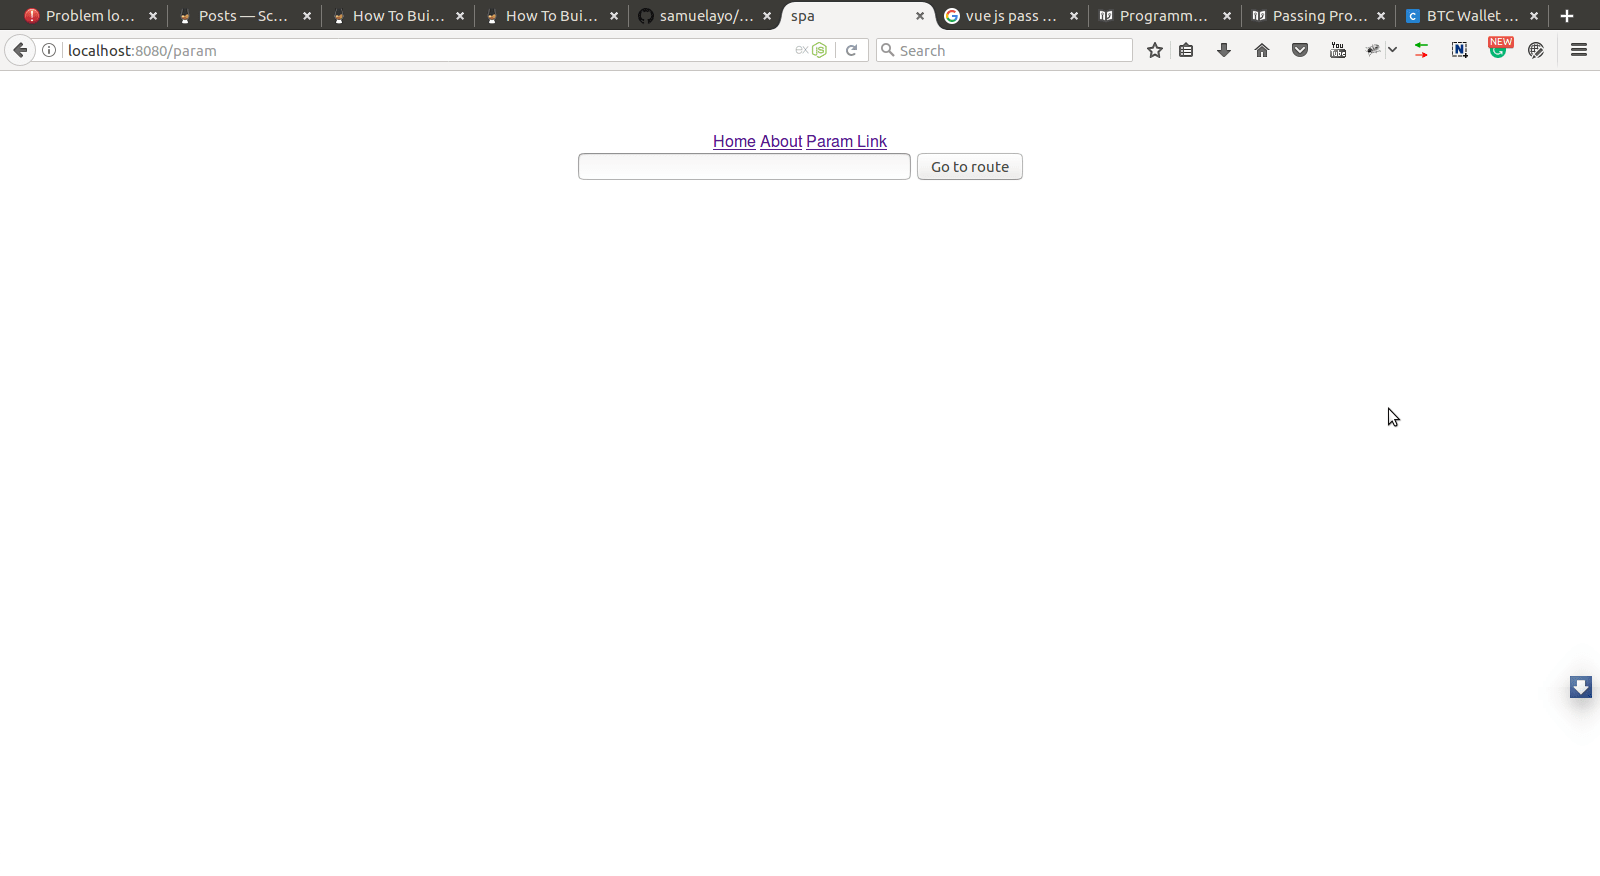
<router-link v-bind:to="'/param'">Param Link</router-link>Take a look at the homepage, it should look like this:
看一下主页,它应该如下所示:

Notice that the param link is just after the “about” link. Click on the param link, and you should see the following:
请注意, param link位于“ about”链接之后。 单击参数链接,您应该看到以下内容:
Open up the developer's tool in the console. If you click on the button, you will likely encounter this error.
在控制台中打开开发人员的工具。 如果单击该按钮,则可能会遇到此错误。
[vue-router] Route with name 'Paramdetails' does not existThis is because, in the code above, the method attached to the button triggers this:
这是因为在上面的代码中,按钮上附加的方法触发了此操作:
this.$router.push({ name: 'Paramdetails', params: { id: this.UserInput }}), which has not defined any route called paramdetails that accepts parameters.
this.$router.push({ name: 'Paramdetails', params: { id: this.UserInput }}) ,它没有定义任何称为paramdetails接受参数的路由。
The next step is to create the component that handles the route. Create a new file in src/components called paramedetails.vue, and paste the following contents into it.
下一步是创建处理路线的组件。 在src/components创建一个名为paramedetails.vue的新文件,并将以下内容粘贴到其中。
<!--src/components/paramdetails.vue-->
    The paremeter value that was passed to me is: {{ $route.params.id }}

    export default {
    name: 'paramdetails'
    }
This creates a component that holds a span element, which also prints out the parameter that was passed to it. For this to work, add this new component to the routes.
这将创建一个包含span元素的组件,该元素还将打印出传递给它的参数。 为此,请将这个新组件添加到路由中。
Just above the Const routes block of code, add the following import:
在Const routes代码块上方,添加以下导入:
//main.js
//import paramdetails component
import paramdetails from './components/paramdetails'
After doing the above, and importing the paramdetails component, replace the routes block with this:
完成上述操作后,导入paramdetails组件,用以下paramdetails替换routes块:
//main.js
   //define your routes
    const routes = [
    //route for the home route of the web page
    { path: '/', component: Hello },
    //route for the about route of the web page
    { path: '/about', component: About },
    //route for the param route of the web page
    { path: '/param', component: Param },
    //route for the paramdetails passing in params
    { path: '/Paramdetails/:id', component: paramdetails, name: 'Paramdetails' }
    ]
Notice that the last route has two new adjustments, which was not visible in other routes. The first adjustment is the : id, which is the placeholder for the routes you are passing in. The second adjustment is the name object in the route object.
请注意,最后一条路线有两个新的调整,在其他路线中不可见。 第一个调整是: id ,它是您传入的路由的占位符。第二个调整是在路由对象中的name对象。
To understand the name property in the object, know that just like any other router, the Vue router contains the concept of naming routes. Instead of remembering the full URL of the new route, the shorter way of calling routes is by naming the routes. Also, take a look back at the GoToRoute method in the param component, you will see that the router object is being pushed, which identifies the route by name.
要了解对象中的name属性,请知道与其他路由器一样,Vue路由器也包含命名路由的概念。 代替记住新路由的完整URL,调用路由的较短方法是命名路由。 另外,回顾一下param组件中的GoToRoute方法,您将看到正在推送路由器对象,该对象通过名称标识路由。
Now, click on the param link link, and type in 52 in the text box, for example. Then click the go to route button, and you should see a page like this:
现在,单击param link ,然后在文本框中输入52。 然后单击go to route按钮,您应该看到如下页面:

That is it! You have just passed in your first route to the component. Super easy, isn't it?
这就对了! 您刚刚进入了通往组件的第一条路线。 超级容易,不是吗?
使用路由卫士 ( Using route guards )
A route guard is a watcher that watches for changes in the routes and performs some actions, either before the route is transitioned into the next one, or after the route has been transitioned. Route guards can be used to protect routes against non-authenticated users from visiting the site. Vue router has global guards, per-route guards, as well as component guards.
路由守卫是一种观察者,负责监视路由中的更改并执行某些操作,既可以在路由转换到下一条之前,也可以在路由转换之后执行。 路由保护器可用于保护路由,防止未经身份验证的用户访问该站点。 Vue路由器具有全局防护,按路由防护以及组件防护。
There are two major global routes produced by Vue router namely: beforeEach and afterEach guards. As the name implies, the “beforeEach” is performed before a new route is transitioned, as opposed to the “afterEach” guard.
Vue路由器产生两条主要的全局路由,分别是beforeEach和afterEach警卫。 顾名思义,“ beforeEach”是在转换新路由之前执行的,与“ afterEach”后卫相反。
Per-routes guards can be added to the route object of the particular route to be guarded as a callback, while the “in-component” guards are defined in the components that handle those routes. For the purpose of this tutorial, stick to the “beforeEach” global route.
可以将每个路由保护措施添加到要保护的特定路由的路由对象中,作为回调,而“组件内”保护措施在处理这些路由的组件中定义。 就本教程而言,请遵循“ beforeEach”全局路线。
Open the main.js file, and immediately after the routes constant, add the following:
打开main.js文件,并在路由常量之后立即添加以下内容:
//main.js
//place the router guard
router.beforeEach((to, from, next) => {
    //check if the path user is going to is our param path
    if(to.path == '/param'){
        //check if the user item is already set
        if(localStorage.getItem('user')==undefined){
            //prompt for username
            var user = prompt('please enter your username');
            //prompt for password
            var pass = prompt('please enter your password');
            //check if th username and password given equals our preset details
            if (user == 'username' && pass == 'password'){
            //set the user item
            localStorage.setItem('user', user);
            //move to the route
            next();
            }else{
            //alert the username and pass is wrong
            alert('Wrong username and password, you do not have permission to access that route');
            //return, do not move to the route
            return;
            }

        }

    }

    next()
})
The “router.beforeEach” function was called and it takes three arguments that are passed to it by the Vue router. The to parameter refers to the object of the path to be accessed, while the from parameter refers to the object of the previous path.
调用了“ router.beforeEach”函数,该函数接受Vue路由器传递给它的三个参数。 to参数是指要访问的路径的对象,而from参数是指先前路径的对象。
Check if the “to.path” is /param, which is the path for the route to be protected. If the path corresponds to the one to be protected, check the “localStorage” data holding the user details to see if it is defined. If the “localStorage” data is not defined, prompt for the username and password, and create the “localStorage” data. If it is defined, the function continues and the route is visible to the user.
检查“ to.path”是否为/param ,这是要保护的路由的路径。 如果该路径与要保护的路径相对应,请检查包含用户详细信息的“ localStorage”数据以查看是否已定义。 如果未定义“ localStorage”数据,则提示输入用户名和密码,然后创建“ localStorage”数据。 如果已定义,该功能将继续并且该路线对用户可见。
Note: The next function must be called so that the router can process the user to the next page. If the function isn't called, a blank screen could come up. In this tutorial, a raw string of username and password was used for the authentication details. However, a lot more can be done, such as requesting user authentication via a server.
注意:必须调用下一个功能,以便路由器可以将用户处理到下一页。 如果未调用该函数,则可能会出现空白屏幕。 在本教程中, username和password的原始字符串用于身份验证详细信息。 但是,可以做更多的事情,例如通过服务器请求用户身份验证。
结论 ( Conclusion )
You should now be able to pass parameters to routes, know what named routes are, and how to create them. Also, the types of route guards, as well as an implementation for the “beforeEach” route guard was explained.
现在,您应该能够将参数传递给路由,知道什么是命名路由,以及如何创建它们。 此外,还说明了路由防护的类型以及“ beforeEach”路由防护的实现。
Now, you should be able to create a single page application, register routes, pass in parameters to the routes, as well as guarding the routes. On these premises, you can begin to build awesome single page applications.
现在,您应该能够创建一个单页应用程序,注册路由,将参数传递给路由以及保护路由。 在这些前提下,您可以开始构建出色的单页应用程序。
翻译自: https://scotch.io/tutorials/how-to-build-a-simple-single-page-application-using-vue-2-part-2
vue 构建单页应用


 776
776

 被折叠的 条评论
为什么被折叠?
被折叠的 条评论
为什么被折叠?
 到【灌水乐园】发言


