


In part 1 of this series, we learnt how to create a RESTful API the TDD way. We covered writing tests and learnt a lot about Flask.
在本系列的第1部分中,我们学习了如何以TDD方式创建RESTful API。 我们涵盖了写作测试,并从中学到了很多关于Flask的知识。
In this part of the series, we'll learn how to authenticate and authorize users in our API. If you haven't read part 1, please do because this tutorial will build up on it. In this tutorial, we'll talk about securing our API with token-based authentication and user authorization. We will integrate users into the API we built in part 1.
在本系列的这一部分中,我们将学习如何在我们的API中对用户进行身份验证和授权。 如果您尚未阅读第1部分,请这样做,因为本教程将以此为基础。 在本教程中,我们将讨论通过基于令牌的身份验证和用户授权来保护我们的API。 我们将把用户集成到我们在第1部分中构建的API中。
In order to get started, ensure your virtual environment is activated.
为了开始,请确保您的虚拟环境已激活。
用户模型 ( The User Model )
We intend to allow bucketlists to be owned by users. For now, anyone can manipulate a bucketlist even if they did not create it. We've got to fix this security hole. How do we keep track of users, you ask? We define a model.
我们打算允许用户拥有存储桶列表。 目前,任何人都可以操纵存储区列表,即使他们没有创建它。 我们必须修复此安全漏洞。 您问我们如何跟踪用户? 我们定义一个模型。
# app/models.py

from app import db
from flask_bcrypt import Bcrypt

class User(db.Model):
    """This class defines the users table """

    __tablename__ = 'users'

    # Define the columns of the users table, starting with the primary key
    id = db.Column(db.Integer, primary_key=True)
    email = db.Column(db.String(256), nullable=False, unique=True)
    password = db.Column(db.String(256), nullable=False)
    bucketlists = db.relationship(
        'Bucketlist', order_by='Bucketlist.id', cascade="all, delete-orphan")

    def __init__(self, email, password):
        """Initialize the user with an email and a password."""
        self.email = email
        self.password = Bcrypt().generate_password_hash(password).decode()

    def password_is_valid(self, password):
        """
        Checks the password against it's hash to validates the user's password
        """
        return Bcrypt().check_password_hash(self.password, password)

    def save(self):
        """Save a user to the database.
        This includes creating a new user and editing one.
        """
        db.session.add(self)
        db.session.commit()


class Bucketlist(db.Model):
    """This class defines the bucketlist table."""

    __tablename__ = 'bucketlists'

    # define the columns of the table, starting with its primary key
    id = db.Column(db.Integer, primary_key=True)
    name = db.Column(db.String(255))
    date_created = db.Column(db.DateTime, default=db.func.current_timestamp())
    date_modified = db.Column(
        db.DateTime, default=db.func.current_timestamp(),
        onupdate=db.func.current_timestamp())
    created_by = db.Column(db.Integer, db.ForeignKey(User.id))

    def __init__(self, name, created_by):
        """Initialize the bucketlist with a name and its creator."""
        self.name = name
        self.created_by = created_by

    def save(self):
        """Save a bucketlist.
        This applies for both creating a new bucketlist
        and updating an existing onupdate
        """
        db.session.add(self)
        db.session.commit()

    @staticmethod
    def get_all(user_id):
        """This method gets all the bucketlists for a given user."""
        return Bucketlist.query.filter_by(created_by=user_id)

    def delete(self):
        """Deletes a given bucketlist."""
        db.session.delete(self)
        db.session.commit()

    def __repr__(self):
        """Return a representation of a bucketlist instance."""
        return "<Bucketlist: {}>".format(self.name)
Here's what we've done:
这是我们所做的:
- We imported Flask-Bcrypt extension to help us in hashing our passwords. You should never store passwords in plaintext. 我们导入了Flask-Bcrypt扩展名,以帮助我们哈希密码。 永远不要以明文形式存储密码。
- We created a User model that represents the users table. It contains the email and password fields to capture the user's credentials. 我们创建了一个表示用户表的User模型 。 它包含用于捕获用户凭据的电子邮件和密码字段。
- Since a user can own many bucketlists, we defined a
One-to-Manyrelationship between the two tables. We defined this relationship by adding the db.relationship() function on the User table (parent table) 由于用户可以拥有许多存储桶列表,因此我们在两个表之间定义了One-to-Many关系。 我们通过在User表(父表)上添加db.relationship()函数来定义此关系。 - We added a foreign key on the child table (Bucketlist) referencing the User table. The foreign key has some arguments. The
cascade="all, delete-orphan"will delete all bucketlists when a referenced user is deleted. 我们在子表(Bucketlist)上添加了引用User表的外键。 外键有一些参数。 当删除引用的用户时cascade="all, delete-orphan"将删除所有存储桶列表。 - We hash the password by using
generate_password_hash(pasword). This will make our users password be secure from dictionary and brute force attacks. 我们通过使用generate_password_hash(pasword)对密码进行哈希处理。 这将使我们的用户密码免受字典和蛮力攻击。 - We refactored the
get_all()method to get all the bucketlists for a given user. 我们重构了get_all()方法以获得给定用户的所有get_all()列表。
Don't forget to install Flask-Bcrypt
不要忘记安装Flask-Bcrypt
(venv)$ pip install flask-bcrypt迁移他们 (Migrate them)
Migrate the changes we've just made to the db we initially created in part 1 of the series.
迁移我们刚刚对本系列第一部分中最初创建的数据库所做的更改。
(venv)$    python manage.py db migrate
(venv)$    python manage.py db upgrade
Now we have a user table to keep track of registered users.
现在,我们有一个用户表来跟踪注册用户。
自动化测试 ( Automate Tests )
Our app will have many tests from now on. It's best practice to have a test folder that will houses all our tests. We'll create a folder called tests. Inside this folder, we'll move our test_bucketlists.py file into it. Our directory structure should now look like this:
从现在开始,我们的应用程序将进行许多测试。 最好的做法是拥有一个包含所有测试的测试文件夹。 我们将创建一个名为tests的文件夹。 在此文件夹中,我们将把test_bucketlists.py文件移到其中。 现在,我们的目录结构应如下所示:
├── bucketlist
    ├── app
    │   ├── __init__.py
    │   └── models.py
    ├── instance
    │   ├── __init__.py
    │   └── config.py
    ├── manage.py
    ├── requirements.txt
    ├── run.py
    ├── tests
    │   └── test_bucketlist.py
Also, we'll edit the manage.py as follows:
另外,我们将按以下方式编辑manage.py :
import os
import unittest
# class for handling a set of commands
from flask_script import Manager
from flask_migrate import Migrate, MigrateCommand
from app import db, create_app

# initialize the app with all its configurations
app = create_app(config_name=os.getenv('APP_SETTINGS'))
migrate = Migrate(app, db)
# create an instance of class that will handle our commands
manager = Manager(app)

# Define the migration command to always be preceded by the word "db"
# Example usage: python manage.py db init
manager.add_command('db', MigrateCommand)


# define our command for testing called "test"
# Usage: python manage.py test
@manager.command
def test():
    """Runs the unit tests without test coverage."""
    tests = unittest.TestLoader().discover('./tests', pattern='test*.py')
    result = unittest.TextTestRunner(verbosity=2).run(tests)
    if result.wasSuccessful():
        return 0
    return 1


if __name__ == '__main__':
    manager.run()
The decorator on top of test() allows us to define a command called test. Inside the function, we load the tests from the tests folder using the TestLoader() class and then run them with TextTestRunner.run(). If it's successful, we exit gracefully with a return 0.
在test()顶部的装饰器允许我们定义一个称为test的命令。 在函数内部,我们使用TestLoader()类从tests文件夹中加载测试,然后使用TextTestRunner.run()运行它们。 如果成功,我们以return 0正常退出。
Let's test it out on our terminal.
让我们在终端上对其进行测试。
(venv)$ python manage.py testThe tests should fail. This is because we've not modified our code to work with the new changes in the model. From now on, we'll use this command to run our tests.
测试应该失败 。 这是因为我们尚未修改代码以使用模型中的新更改。 从现在开始,我们将使用此命令来运行测试。
基于令牌的身份验证 ( Token-based authentication )
Token-based authentication is a security technique that authenticates users who attempt to login to a server using a security token provided by the server. Without the token, a user won't be granted access to restricted resources. You can find more intricate details about token based authentication here
基于令牌的身份验证是一种安全技术,可使用服务器提供的安全令牌对尝试登录服务器的用户进行身份验证。 没有令牌,将不会授予用户访问受限资源的权限。 您可以在此处找到有关基于令牌的身份验证的更多详细信息
For us to implement this authentication, we'll use a Python package called PyJWT. PyJWT allows us to encode and decode JSON Web Tokens (JWT). That being said, let's install it:
为了实现此身份验证,我们将使用一个称为PyJWT的Python包。 PyJWT允许我们编码和解码JSON Web令牌(JWT)。 话虽如此,让我们安装它:
(venv)$ pip install PyJWT保护请求 ( Securing Requests )
For our users to authenticate, the access token is going to be placed in the Authorization HTTP header in all our bucketlist requests.
为了使我们的用户进行身份验证,访问令牌将放置在我们所有存储桶列表请求中的“ 授权HTTP”标头中。
Here's how the header looks like:
标头的外观如下:
Authorization: "Bearer <The-access-token-is-here>"We'll put the word Bearer before the token and separate them with a space character. Don't forget the space in between the Bearer and the token.
我们将在标记前加上Bearer一词,并用空格分隔。 不要忘记Bearer和代币之间的空间。
编码和解码令牌 (Encode and Decode the Token)
We need to create a way to encode the token before it's sent to the user. We also need to have a way to decode the token when the user sends it via the Authorization header.
我们需要创建一种在令牌发送给用户之前对令牌进行编码的方法。 当用户通过Authorization标头发送令牌时,我们还需要一种解码令牌的方法。
In our model.py we'll create a function inside our User model to generate the token and another one to decode it. Let's add the following code:
在我们的model.py中,我们将在User model创建一个函数以生成令牌,并创建另一个函数以对其进行解码。 让我们添加以下代码:
# /app/models.py

## previous  imports ###
import jwt
from datetime import datetime, timedelta

class User(db.Model):
    """Maps to users table """

    __tablename__ = 'users'

    ###########################################
    ## Existing code for defining table columns is here  ##
    ###########################################

    def __init__(self, email, password):
        #### INIT CODE LIES HERE ###################
        ###########################################

    def password_is_valid(self, password):
        ##### PASSWORD CHECK CODE LIES HERE ####
        ###########################################

    def save(self):
        ######### CODE FOR SAVING USER LIES HERE ##
        ############################################

    def generate_token(self, user_id):
        """ Generates the access token"""

        try:
            # set up a payload with an expiration time
            payload = {
                'exp': datetime.utcnow() + timedelta(minutes=5),
                'iat': datetime.utcnow(),
                'sub': user_id
            }
            # create the byte string token using the payload and the SECRET key
            jwt_string = jwt.encode(
                payload,
                current_app.config.get('SECRET'),
                algorithm='HS256'
            )
            return jwt_string

        except Exception as e:
            # return an error in string format if an exception occurs
            return str(e)

    @staticmethod
    def decode_token(token):
        """Decodes the access token from the Authorization header."""
        try:
            # try to decode the token using our SECRET variable
            payload = jwt.decode(token, current_app.config.get('SECRET'))
            return payload['sub']
        except jwt.ExpiredSignatureError:
            # the token is expired, return an error string
            return "Expired token. Please login to get a new token"
        except jwt.InvalidTokenError:
            # the token is invalid, return an error string
            return "Invalid token. Please register or login"
The generate_token() takes in a user ID as an argument, uses jwt to create a token using the secret key, and makes it time-based by defining its expiration time. The token is valid for 5 minutes as specified in the timedelta. You can set it to your liking.
generate_token()以用户ID作为参数,使用jwt通过私钥创建令牌,并通过定义其到期时间使其基于时间。 令牌在时间增量中指定的5分钟内有效。 您可以根据自己的喜好设置它。
The decode_token() takes in a token as an argument and checks whether the token is valid. If it is, it returns the user ID as the payload. It returns an error messsage if the token is expired or invalid.
decode_token()接受令牌作为参数,并检查令牌是否有效。 如果是,它将返回用户ID作为有效负载。 如果令牌已过期或无效,它将返回错误消息。
Don't forget to import jwt and the datetime above.
不要忘记导入上面的jwt和datetime。
Auth蓝图 ( The Auth Blueprint )
Our app is growing bigger. We'll have to organize it into components. Flask uses the concept of *Blueprints * to make application components.
我们的应用程序越来越大。 我们必须将其组织成组件。 Flask使用* 蓝图*的概念来制作应用程序组件。
Blueprints are simply a set of operations that can be registered on a given app. Think of it as an extension of the app that can address a specific functionality.
蓝图只是一组可以在给定应用程序上注册的操作。 可以将其视为可以解决特定功能的应用程序扩展。
We'll create an authentication blueprint. This blueprint will focus on handling user registration and logins.
我们将创建一个认证蓝图。 该蓝图将重点处理用户注册和登录。
Inside our /app directory create a folder and call it auth. Our auth folder should contain:
在我们的/ app目录中,创建一个文件夹,并将其命名为auth 。 我们的auth文件夹应包含:
- __init__.py file __init__.py文件
- views.py file views.py文件
In our auth/__init__.py file, initialize a blueprint.
在我们的auth/__init__.py文件中,初始化一个蓝图。
# auth/__init__.py

from flask import Blueprint

# This instance of a Blueprint that represents the authentication blueprint
auth_blueprint = Blueprint('auth', __name__)

from . import views
Then import the blueprint and register it at the bottom of the app/__init__.py, just before the return app line.
然后导入蓝图,并将其注册在app/__init__.py的底部,就在return app行之前。
# app/__init__.py

# imports lie here

def create_app(config_name):
    #####################################################
    ### Existing code for intializing the app with its configurations  ###
    #####################################################

    @app.route('/bucketlists/<int:id>', methods=['GET', 'PUT', 'DELETE'])
    def bucketlist_manipulation(id, **kwargs):
           #########################################################
        ### Existing code for creating, updating and deleting a bucketlist #####
        #########################################################
        ...

    # import the authentication blueprint and register it on the app
    from .auth import auth_blueprint
    app.register_blueprint(auth_blueprint)

    return app
先测试,再实施 ( Test First, Implement Later )
Testing should never be an afterthought. It should always come first. We're going to add a new test file that will house all our tests for the authentication blueprint. It'll test whether our API can handle user registration, user login and access-token generation.
测试绝不是事后的想法。 它应该永远是第一位的。 我们将添加一个新的测试文件,其中将包含我们用于身份验证蓝图的所有测试。 它将测试我们的API是否可以处理用户注册,用户登录和访问令牌生成。
In our tests directory, create a file naming it test_auth.py. Write the following code in it:
在我们的测试目录中,创建一个文件名为test_auth.py 。 在其中编写以下代码:
# /tests/test_auth.py

import unittest
import json
from app import create_app, db


class AuthTestCase(unittest.TestCase):
    """Test case for the authentication blueprint."""

    def setUp(self):
        """Set up test variables."""
        self.app = create_app(config_name="testing")
        # initialize the test client
        self.client = self.app.test_client
        # This is the user test json data with a predefined email and password
        self.user_data = {
            'email': 'test@example.com',
            'password': 'test_password'
        }

        with self.app.app_context():
            # create all tables
            db.session.close()
            db.drop_all()
            db.create_all()

    def test_registration(self):
        """Test user registration works correcty."""
        res = self.client().post('/auth/register', data=self.user_data)
        # get the results returned in json format
        result = json.loads(res.data.decode())
        # assert that the request contains a success message and a 201 status code
        self.assertEqual(result['message'], "You registered successfully.")
        self.assertEqual(res.status_code, 201)

    def test_already_registered_user(self):
        """Test that a user cannot be registered twice."""
        res = self.client().post('/auth/register', data=self.user_data)
        self.assertEqual(res.status_code, 201)
        second_res = self.client().post('/auth/register', data=self.user_data)
        self.assertEqual(second_res.status_code, 202)
        # get the results returned in json format
        result = json.loads(second_res.data.decode())
        self.assertEqual(
            result['message'], "User already exists. Please login.")
We've initialized our test with a test client for making requests to our API and some test data. The first test function test_registration() sends a post request to /auth/register and tests the response it gets. It ensures that the status code is 201, meaning we've successfully created a user. The second test function tests whether the API can only register a user once. Having duplicates in the database is bad for business.
我们已经使用测试客户端初始化了测试,以向我们的API和一些测试数据发出请求。 第一个测试函数test_registration()将发布请求发送到/auth/register并测试它获得的响应。 它确保状态代码为201,这意味着我们已经成功创建了一个用户。 第二个测试功能测试API是否只能注册一次用户。 数据库中有重复项对业务不利。
Now let's run the tests using python manage.py test. The tests should fail.
现在让我们使用python manage.py test运行python manage.py test 。 测试应该失败。
----------------------------------------------------------------------
raise JSONDecodeError("Expecting value", s, err.value) from None
json.decoder.JSONDecodeError: Expecting value: line 1 column 1 (char 0)
用户注册视图 ( User Registration View )
The reason our tests fail is simply because we lack the functionality they need to test. Let's implement something that'll make these two tests to pass.
测试失败的原因仅仅是因为我们缺少测试所需的功能。 让我们实现一些使这两个测试通过的方法。
Open up the views.py file and add the following code:
打开views.py文件并添加以下代码:
# /app/auth/views.py

from . import auth_blueprint

from flask.views import MethodView
from flask import make_response, request, jsonify
from app.models import User


class RegistrationView(MethodView):
    """This class registers a new user."""

    def post(self):
        """Handle POST request for this view. Url ---> /auth/register"""

        # Query to see if the user already exists
        user = User.query.filter_by(email=request.data['email']).first()

        if not user:
            # There is no user so we'll try to register them
            try:
                post_data = request.data
                # Register the user
                email = post_data['email']
                password = post_data['password']
                user = User(email=email, password=password)
                user.save()

                response = {
                    'message': 'You registered successfully. Please log in.'
                }
                # return a response notifying the user that they registered successfully
                return make_response(jsonify(response)), 201
            except Exception as e:
                # An error occured, therefore return a string message containing the error
                response = {
                    'message': str(e)
                }
                return make_response(jsonify(response)), 401
        else:
            # There is an existing user. We don't want to register users twice
            # Return a message to the user telling them that they they already exist
            response = {
                'message': 'User already exists. Please login.'
            }

            return make_response(jsonify(response)), 202


registration_view = RegistrationView.as_view('register_view')
# Define the rule for the registration url --->  /auth/register
# Then add the rule to the blueprint
auth_blueprint.add_url_rule(
    '/auth/register',
    view_func=registration_view,
    methods=['POST'])
Here's what we have added:
这是我们添加的内容:
- We imported our blueprint together with Flask's
make_response(for returning our response) andjsonify(for encoding our data in JSON and adding aapplication/jsonheader to the response) 我们将蓝图与Flask的make_response(用于返回响应)和jsonify(用于将数据编码为JSON并在响应中添加application/json标头)一起导入 - We've defined a class-based view to handle registration by dispatching a
POSTrequest to ourpost()method. 我们已经定义了一个基于类的视图 ,通过向我们的post()方法调度一个POST请求来处理注册。 - Inside our
post()method, we check if the user exists in our database. If they don't, we create a new user and return a message to them notifying their successful registration. If the user exists they are reminded to login. 在post()方法内部,我们检查用户是否存在于我们的数据库中。 如果没有,我们将创建一个新用户并向他们返回一条消息,通知其成功注册。 如果用户存在,则提示他们登录。 - Lastly, we used
as_view()method to make our class-based view callable so that it can take a request and return a response. We then defined the url for registering a user as/auth/register. 最后,我们使用as_view()方法使基于类的视图可调用,以便它可以接受请求并返回响应。 然后,我们定义用于将用户注册为/auth/register的url。
Let's run our tests once more. Only the AuthTestCase tests should pass. The bucketlist tests still fail because we haven`t modified the __init__.py code.
让我们再次运行测试。 仅AuthTestCase测试应通过。 遗漏清单测试仍然失败,因为我们尚未修改__init__.py代码。
test_already_registered_user(test_auth.AuthTestCase)
Test that a user cannot be registered twice. ... ok
test_registration (test_auth.AuthTestCase)
Test user registration works correcty. ... ok

Bucketlist failed tests fall here
----------------------------------------------------------------------

(venv)
使用邮递员[/ auth / register] (Using Postman [ /auth/register ])
We'll test our registration functionality by making a request using Postman. But before we make the requests, ensure the API is up and running.
我们将通过使用Postman发出请求来测试我们的注册功能。 但是在发出请求之前,请确保API已启动并正在运行。
(venv) $ python run.py development

 * Running on http://127.0.0.1:5000/ (Press CTRL+C to quit)
 * Restarting with stat
 * Debugger is active!
 * Debugger PIN: 225-021-817
Now you can make a POST request to localhost:5000/auth/register. Specify an email and a password of your choice to represent the user we are registering. Click send.

现在您可以向localhost:5000/auth/register发出POST请求。 指定您选择的电子邮件和密码来代表我们正在注册的用户。 点击发送。
用户登录 ( User Login )
A user will have to login to gain access to our API. Currently, we are lacking this login functionality. Let's start with some tests. We'll add two more tests at the bottom of our test_auth.py as follows:
用户必须登录才能访问我们的API。 当前,我们缺少此登录功能。 让我们从一些测试开始。 我们将在test_auth.py的底部添加另外两个测试,如下所示:
# tests/test_auth.py
class AuthTestCase(unittest.TestCase):
    """Test case for the authentication blueprint."""

    def setUp(self):
        #### EXISTING CODE FOR SETUP LIES HERE ####

    def test_registration(self):
        #### EXISTING TEST CODE LIES HERE ####

    def test_already_registered_user(self):
        ### EXISTING TEST CODE LIES HERE #####

    def test_user_login(self):
        """Test registered user can login."""
        res = self.client().post('/auth/register', data=self.user_data)
        self.assertEqual(res.status_code, 201)
        login_res = self.client().post('/auth/login', data=self.user_data)

        # get the results in json format
        result = json.loads(login_res.data.decode())
        # Test that the response contains success message
        self.assertEqual(result['message'], "You logged in successfully.")
        # Assert that the status code is equal to 200
        self.assertEqual(login_res.status_code, 200)
        self.assertTrue(result['access_token'])

    def test_non_registered_user_login(self):
        """Test non registered users cannot login."""
        # define a dictionary to represent an unregistered user
        not_a_user = {
            'email': 'not_a_user@example.com',
            'password': 'nope'
        }
        # send a POST request to /auth/login with the data above
        res = self.client().post('/auth/login', data=not_a_user)
        # get the result in json
        result = json.loads(res.data.decode())

        # assert that this response must contain an error message
        # and an error status code 401(Unauthorized)
        self.assertEqual(res.status_code, 401)
        self.assertEqual(
            result['message'], "Invalid email or password, Please try again")
The test_user_login() function tests whether our API can successfully login a registered user. It also tests for the access token.
test_user_login()函数测试我们的API是否可以成功登录注册用户。 它还测试访问令牌。
The other test function test_non_registered_user_login() tests whether our API can restrict signing in to only registered users.
另一个测试功能test_non_registered_user_login()测试我们的API是否可以将登录限制为仅注册用户。
登录视图 ( Login View )
Again, we'll make the tests pass by implementing its functionality. Let's create the login view.
同样,我们将通过实现其功能来使测试通过。 让我们创建登录视图。
from . import auth_blueprint

from flask.views import MethodView
from flask import Blueprint, make_response, request, jsonify
from app.models import User


class RegistrationView(MethodView):
    """This class-based view registers a new user."""
    #### EXISTING REGISTRATION CODE HERE ####
    ##########################################


class LoginView(MethodView):
    """This class-based view handles user login and access token generation."""

    def post(self):
        """Handle POST request for this view. Url ---> /auth/login"""
        try:
            # Get the user object using their email (unique to every user)
            user = User.query.filter_by(email=request.data['email']).first()

            # Try to authenticate the found user using their password
            if user and user.password_is_valid(request.data['password']):
                # Generate the access token. This will be used as the authorization header
                access_token = user.generate_token(user.id)
                if access_token:
                    response = {
                        'message': 'You logged in successfully.',
                        'access_token': access_token.decode()
                    }
                    return make_response(jsonify(response)), 200
            else:
                # User does not exist. Therefore, we return an error message
                response = {
                    'message': 'Invalid email or password, Please try again'
                }
                return make_response(jsonify(response)), 401

        except Exception as e:
            # Create a response containing an string error message
            response = {
                'message': str(e)
            }
            # Return a server error using the HTTP Error Code 500 (Internal Server Error)
            return make_response(jsonify(response)), 500

# Define the API resource
registration_view = RegistrationView.as_view('registration_view')
login_view = LoginView.as_view('login_view')

# Define the rule for the registration url --->  /auth/register
# Then add the rule to the blueprint
auth_blueprint.add_url_rule(
    '/auth/register',
    view_func=registration_view,
    methods=['POST'])

# Define the rule for the registration url --->  /auth/login
# Then add the rule to the blueprint
auth_blueprint.add_url_rule(
    '/auth/login',
    view_func=login_view,
    methods=['POST']
)
Here, we've defined a class-based view just like we did on the registration section. It dispatches the POST request to the post() method as well. This is to capture the user credentials(email, password) when they login. It checks whether the password given is valid, generates an access token for the user and returns a response containing the token. We've also handled exceptions gracefully so that if one occurs, our API will continue running and won't crush. Finally, we defined a url for the login route.
在这里,我们定义了一个基于类的视图,就像在注册部分所做的那样。 它将POST请求也分派到post()方法。 这是为了在用户登录时捕获用户凭据(电子邮件,密码)。 它检查给出的密码是否有效,为用户生成访问令牌并返回包含该令牌的响应。 我们还优雅地处理了异常,因此,如果发生异常,我们的API将继续运行并且不会崩溃。 最后,我们为登录路由定义了一个URL。
登录邮递员[/ auth / login] (Logging in on Postman [ /auth/login ])
Make a POST request. Input the email and password we specified for the user during registration. Click send. You should get an access token in the JSON response.

发出POST请求。 输入我们在注册过程中为用户指定的电子邮件和密码。 点击发送。 您应该在JSON响应中获得访问令牌。
运行测试 (Running the tests)
If you run the tests, you will notice that the login tests pass, but the bucketlist one still fail. It's time to refactor this tests.
如果运行测试,您会注意到登录测试通过,但存储桶列表仍然失败。 现在该重构该测试了。
重构遗愿清单测试 ( Refactor Bucketlist Tests )
First, we'll create two helper functions for registering and signing in our test user.
首先,我们将创建两个帮助程序功能,用于注册和登录测试用户。
# tests/test_bucketlist.py
class BucketlistTestCase(unittest.TestCase):
    """This class represents the bucketlist test case"""

    def setUp(self):
        """Set up test variables."""
     #### SETUP VARIABLES ARE HERE #####
     ####################################

    def register_user(self, email="user@test.com", password="test1234"):
        """This helper method helps register a test user."""
        user_data = {
            'email': email,
            'password': password
        }
        return self.client().post('/auth/register', data=user_data)

    def login_user(self, email="user@test.com", password="test1234"):
        """This helper method helps log in a test user."""
        user_data = {
            'email': email,
            'password': password
        }
        return self.client().post('/auth/login', data=user_data)

    ############################################
    ##### ALL OUR TESTS METHODS LIE HERE #######

# Make the tests conveniently executable
if __name__ == "__main__":
    unittest.main()
We do this so that when we want to register or login a test user (which is in all the tests), we don't have to repeat ourselves. We'll simply call the function and we are set.
我们这样做是为了当我们想要注册或登录测试用户(在所有测试中)时,我们不必重复自己。 我们只需要调用该函数就可以了。
Next, we'll define a way to get the access token and add it to the Authorization header in all our client requests. Here's a code snippet of the how were going to do it.
接下来,我们将定义一种获取访问令牌并将其添加到我们所有客户端请求中的Authorization标头中的方法。 这是如何执行的代码段。
def test_bucketlist_creation(self):
        """Test the API can create a bucketlist (POST request)"""
        # register a test user, then log them in
        self.register_user():
        result = self.login_user()
        # obtain the access token
        access_token = json.loads(result.data.decode())['access_token']

        # ensure the request has an authorization header set with the access token in it
        res = self.client().post(
            '/bucketlists/',
            headers=dict(Authorization="Bearer " + access_token),
            data=self.bucketlist)
We can now go ahead and refactor the whole test_bucketlist.py file. After refactoring all our request, we should have something like this:
现在,我们可以继续重构整个test_bucketlist.py文件。 重构所有请求后,我们应该有以下内容:
import unittest
import os
import json
from app import create_app, db


class BucketlistTestCase(unittest.TestCase):
    """This class represents the bucketlist test case"""

    def setUp(self):
        """Define test variables and initialize app."""
        self.app = create_app(config_name="testing")
        self.client = self.app.test_client
        self.bucketlist = {'name': 'Go to Borabora for vacay'}

        # binds the app to the current context
        with self.app.app_context():
            # create all tables
            db.session.close()
            db.drop_all()
            db.create_all()

    def register_user(self, email="user@test.com", password="test1234"):
        user_data = {
            'email': email,
            'password': password
        }
        return self.client().post('/auth/register', data=user_data)

    def login_user(self, email="user@test.com", password="test1234"):
        user_data = {
            'email': email,
            'password': password
        }
        return self.client().post('/auth/login', data=user_data)

    def test_bucketlist_creation(self):
        """Test API can create a bucketlist (POST request)"""
        self.register_user()
        result = self.login_user()
        access_token = json.loads(result.data.decode())['access_token']

        # create a bucketlist by making a POST request
        res = self.client().post(
            '/bucketlists/',
            headers=dict(Authorization="Bearer " + access_token),
            data=self.bucketlist)
        self.assertEqual(res.status_code, 201)
        self.assertIn('Go to Borabora', str(res.data))

    def test_api_can_get_all_bucketlists(self):
        """Test API can get a bucketlist (GET request)."""
        self.register_user()
        result = self.login_user()
        access_token = json.loads(result.data.decode())['access_token']

        # create a bucketlist by making a POST request
        res = self.client().post(
            '/bucketlists/',
            headers=dict(Authorization="Bearer " + access_token),
            data=self.bucketlist)
        self.assertEqual(res.status_code, 201)

        # get all the bucketlists that belong to the test user by making a GET request
        res = self.client().get(
            '/bucketlists/',
            headers=dict(Authorization="Bearer " + access_token),
        )
        self.assertEqual(res.status_code, 200)
        self.assertIn('Go to Borabora', str(res.data))

    def test_api_can_get_bucketlist_by_id(self):
        """Test API can get a single bucketlist by using it's id."""
        self.register_user()
        result = self.login_user()
        access_token = json.loads(result.data.decode())['access_token']

        rv = self.client().post(
            '/bucketlists/',
            headers=dict(Authorization="Bearer " + access_token),
            data=self.bucketlist)

        # assert that the bucketlist is created
        self.assertEqual(rv.status_code, 201)
        # get the response data in json format
        results = json.loads(rv.data.decode())

        result = self.client().get(
            '/bucketlists/{}'.format(results['id']),
            headers=dict(Authorization="Bearer " + access_token))
        # assert that the bucketlist is actually returned given its ID
        self.assertEqual(result.status_code, 200)
        self.assertIn('Go to Borabora', str(result.data))

    def test_bucketlist_can_be_edited(self):
        """Test API can edit an existing bucketlist. (PUT request)"""
        self.register_user()
        result = self.login_user()
        access_token = json.loads(result.data.decode())['access_token']

        # first, we create a bucketlist by making a POST request
        rv = self.client().post(
            '/bucketlists/',
            headers=dict(Authorization="Bearer " + access_token),
            data={'name': 'Eat, pray and love'})
        self.assertEqual(rv.status_code, 201)
        # get the json with the bucketlist
        results = json.loads(rv.data.decode())

        # then, we edit the created bucketlist by making a PUT request
        rv = self.client().put(
            '/bucketlists/{}'.format(results['id']),
            headers=dict(Authorization="Bearer " + access_token),
            data={
                "name": "Dont just eat, but also pray and love :-)"
            })
        self.assertEqual(rv.status_code, 200)

        # finally, we get the edited bucketlist to see if it is actually edited.
        results = self.client().get(
            '/bucketlists/{}'.format(results['id']),
            headers=dict(Authorization="Bearer " + access_token))
        self.assertIn('Dont just eat', str(results.data))

    def test_bucketlist_deletion(self):
        """Test API can delete an existing bucketlist. (DELETE request)."""
        self.register_user()
        result = self.login_user()
        access_token = json.loads(result.data.decode())['access_token']

        rv = self.client().post(
            '/bucketlists/',
            headers=dict(Authorization="Bearer " + access_token),
            data={'name': 'Eat, pray and love'})
        self.assertEqual(rv.status_code, 201)
        # get the bucketlist in json
        results = json.loads(rv.data.decode())

        # delete the bucketlist we just created
        res = self.client().delete(
            '/bucketlists/{}'.format(results['id']),
            headers=dict(Authorization="Bearer " + access_token),)
        self.assertEqual(res.status_code, 200)

        # Test to see if it exists, should return a 404
        result = self.client().get(
            '/bucketlists/1',
            headers=dict(Authorization="Bearer " + access_token))
        self.assertEqual(result.status_code, 404)


# Make the tests conveniently executable
if __name__ == "__main__":
    unittest.main()
重构GET(all)和POST功能 ( Refactor GET(all) and POST functionality )
We'll refactor the methods that handle the HTTP requests for bucketlist creation and getting all the bucketlists. Open up /app/__init__.py file and edit as follows:
我们将重构处理HTTP请求的方法,以创建桶列表并获取所有桶列表。 打开/app/__init__.py文件并进行如下编辑:
# /app/__init__.py

## imports ##
from flask import request, jsonify, abort, make_response

def create_app(config_name):
    from models import Bucketlist, User

    ###########################################
    ### EXISTING APP CONFIG CODE LIES HERE ###
    ###########################################

    @app.route('/bucketlists/', methods=['POST', 'GET'])
    def bucketlists():
        # Get the access token from the header
        auth_header = request.headers.get('Authorization')
        access_token = auth_header.split(" ")[1]

        if access_token:
         # Attempt to decode the token and get the User ID
            user_id = User.decode_token(access_token)
            if not isinstance(user_id, str):
                # Go ahead and handle the request, the user is authenticated

                if request.method == "POST":
                    name = str(request.data.get('name', ''))
                    if name:
                        bucketlist = Bucketlist(name=name, created_by=user_id)
                        bucketlist.save()
                        response = jsonify({
                            'id': bucketlist.id,
                            'name': bucketlist.name,
                            'date_created': bucketlist.date_created,
                            'date_modified': bucketlist.date_modified,
                            'created_by': user_id
                        })

                        return make_response(response), 201

                else:
                    # GET all the bucketlists created by this user
                    bucketlists = Bucketlist.query.filter_by(created_by=user_id)
                    results = []

                    for bucketlist in bucketlists:
                        obj = {
                            'id': bucketlist.id,
                            'name': bucketlist.name,
                            'date_created': bucketlist.date_created,
                            'date_modified': bucketlist.date_modified,
                            'created_by': bucketlist.created_by
                        }
                        results.append(obj)

                    return make_response(jsonify(results)), 200
            else:
                # user is not legit, so the payload is an error message
                message = user_id
                response = {
                    'message': message
                }
                return make_response(jsonify(response)), 401
We first added two imports: the User model and the make_response from Flask. In the bucketlist function, we check for the authorization header from the request and extract the access token. Then, we decoded the token using User.decode_token(token) to give us the payload. The payload is expected to be a user ID if the token is valid and not expired. If the token is not valid or expired, the payload will be an error message as a string.
我们首先添加了两个导入:Flask中的User模型和make_response 。 在bucketlist函数中,我们从请求中检查授权标头,然后提取访问令牌。 然后,我们使用User.decode_token(token)对令牌进行解码,以提供有效载荷。 如果令牌有效且未过期,则有效负载应为用户ID。 如果令牌无效或已过期,则有效负载将是一条错误消息(字符串形式)。
在邮递员上测试 ( Test it on Postman )
创建一两桶清单 (Create a bucketlist or two)
Copy the token and paste it to the header section, creating an Authorization header. Don't forget to put the word Bearer before the token with a space separating them like this:
复制令牌并将其粘贴到标头部分,以创建授权标头。 不要忘记在令牌前加上Bearer一词,并用空格将它们隔开,如下所示:
Authorization: "Bearer dfg32r22349r40eiwoijr232394029wfopi23r2.2342..."
Authorization: "Bearer dfg32r22349r40eiwoijr232394029wfopi23r2.2342..."
Make a POST request to localhost:5000/bucketlists/, specifying the name of the bucketlist. Click send.
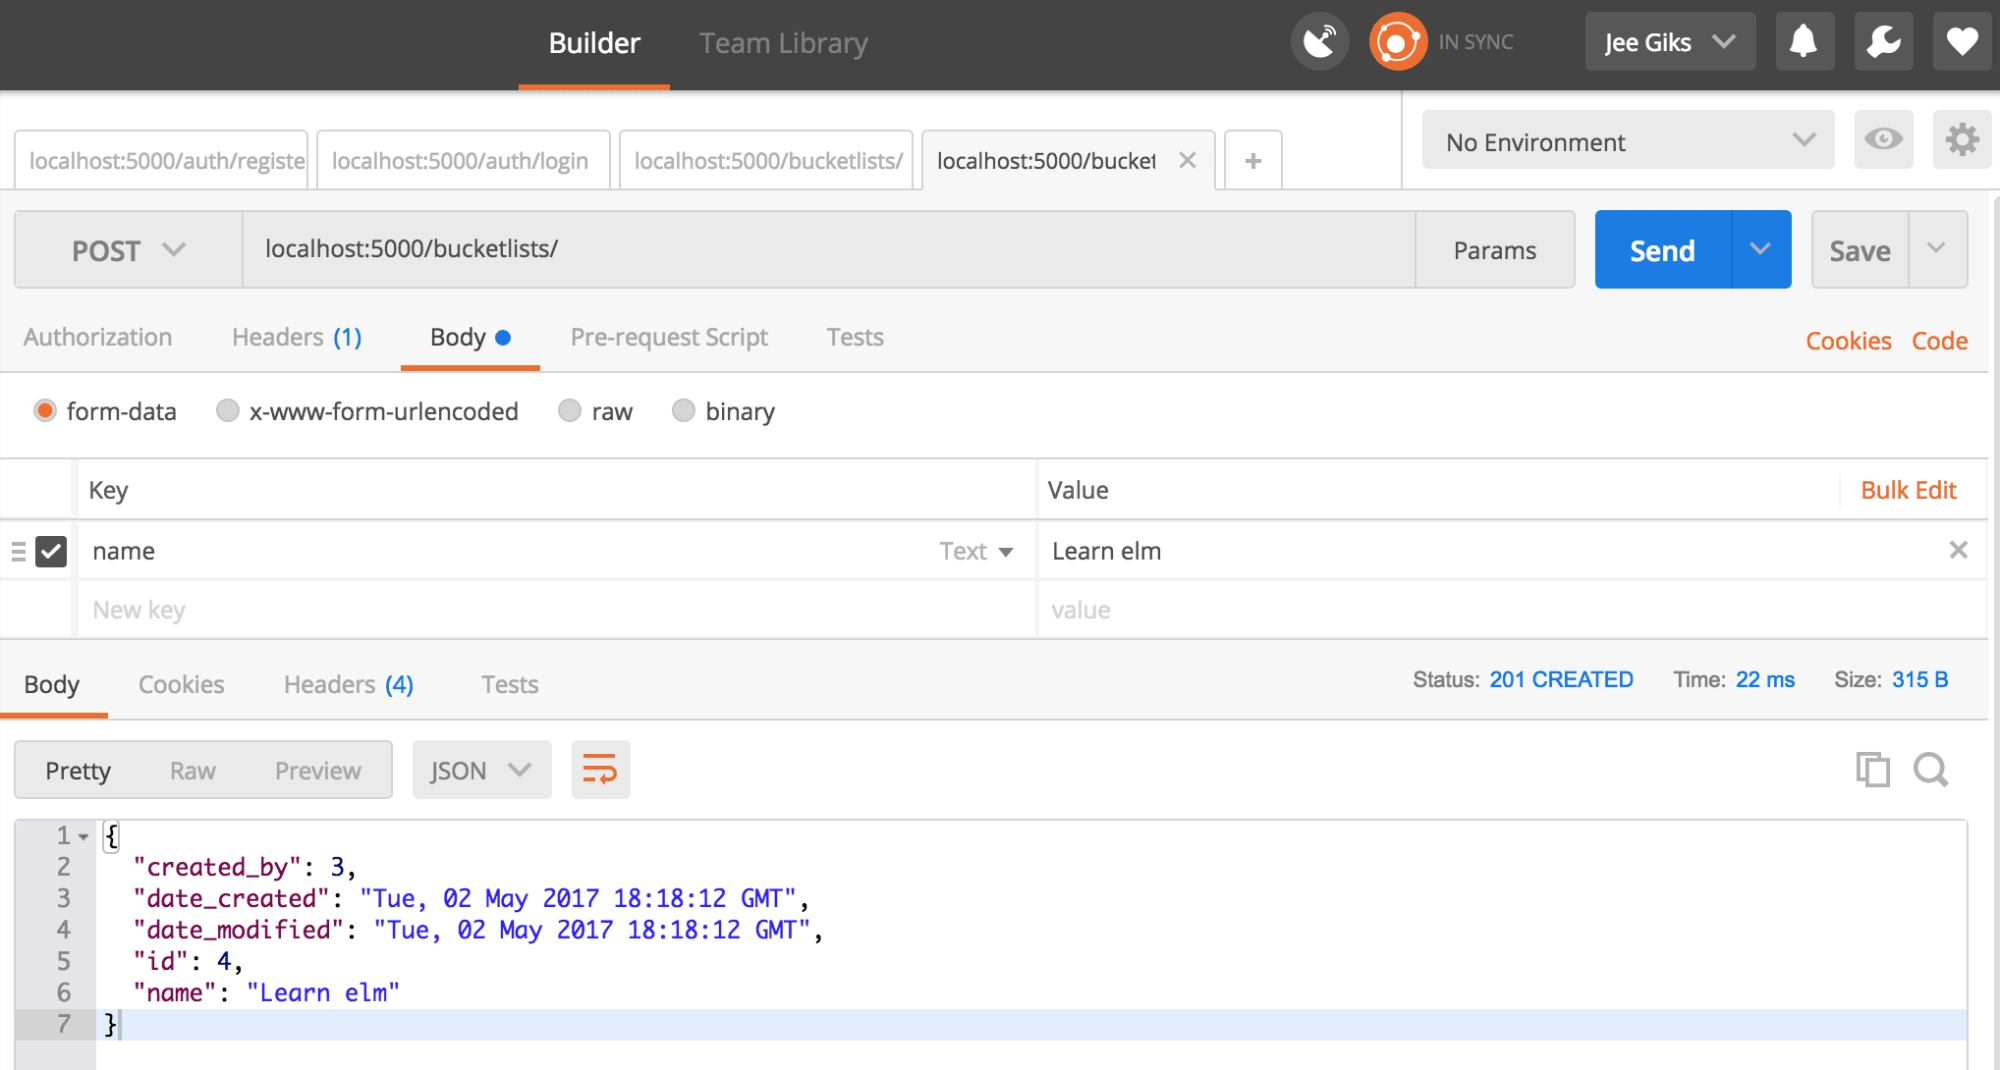
向localhost:5000/bucketlists/发出POST请求,并指定存储区列表的名称。 点击发送。
获取给定用户的所有存储桶列表 (Get all bucketlists for a given user)
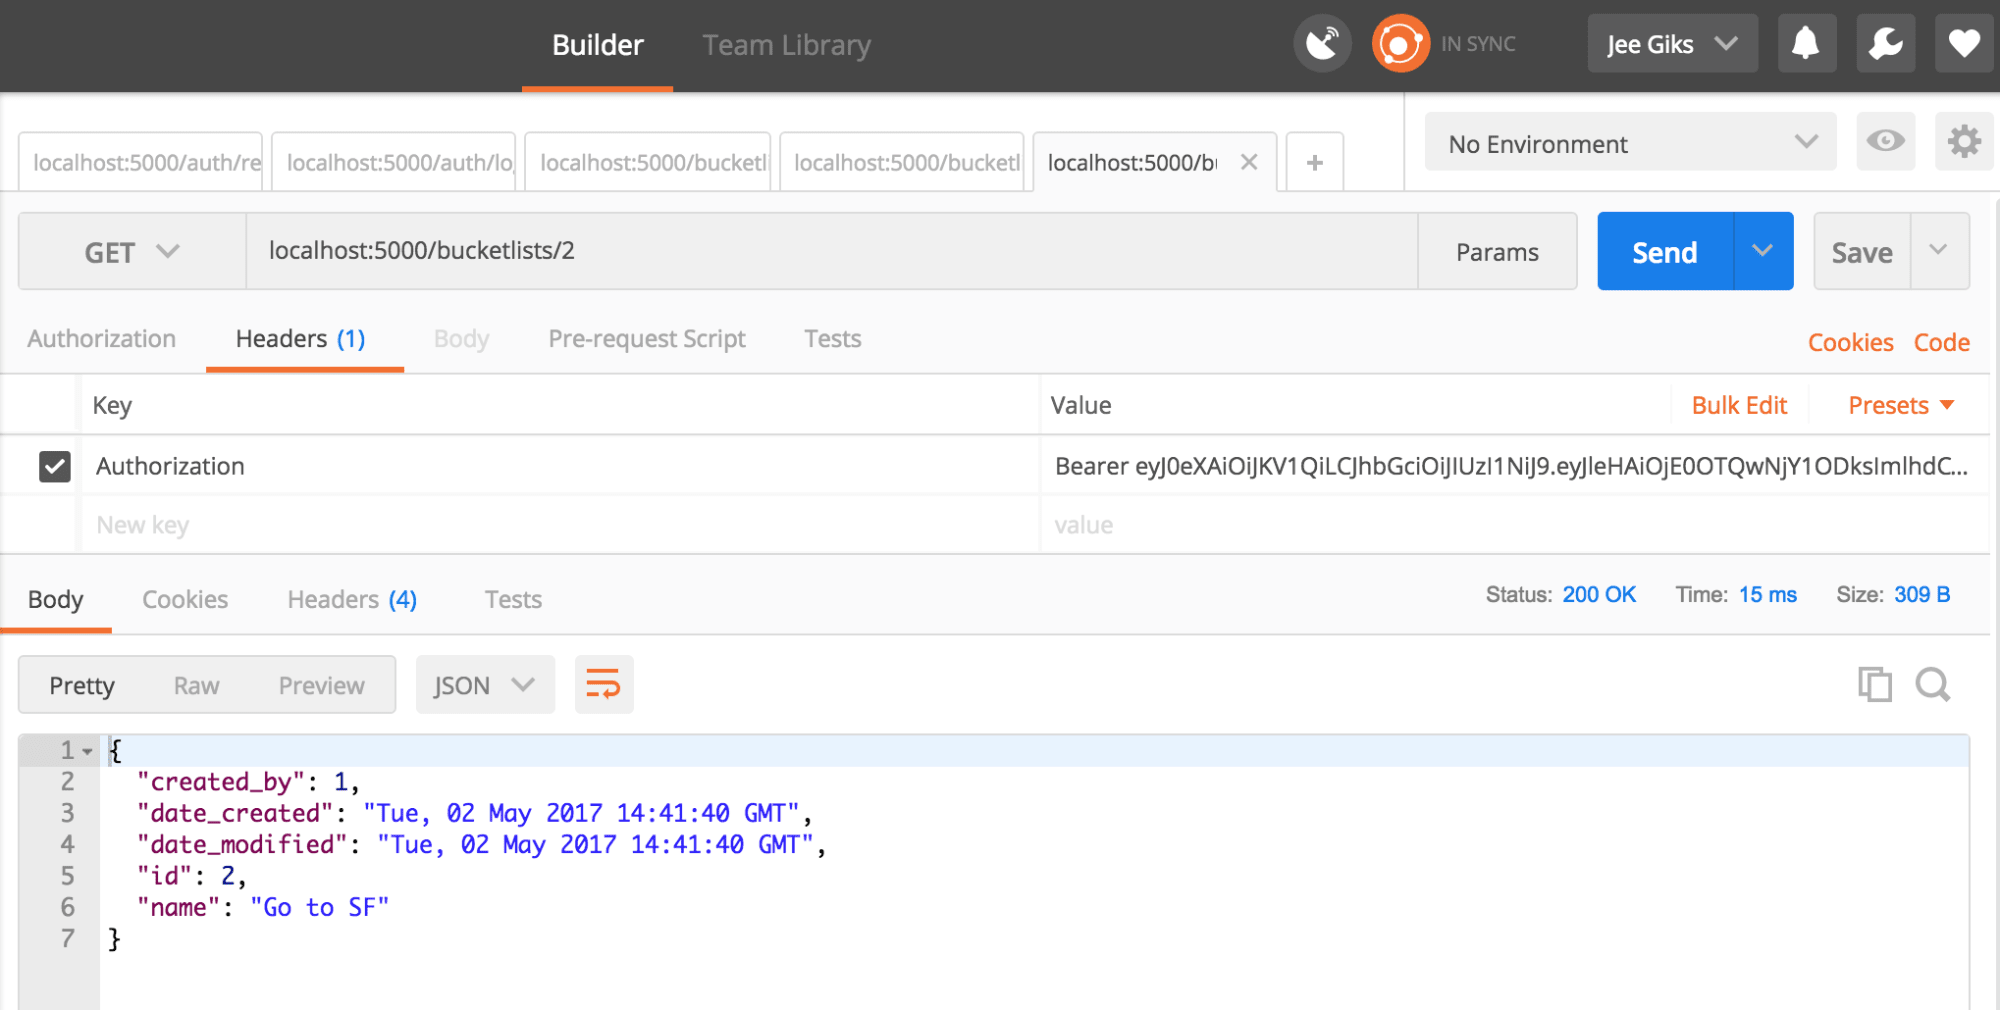
Ensure you've set the Authorization header just as we did for the POST request.
确保像我们对POST请求所做的那样设置Authorization标头。
Make a GET request to localhost:5000/bucketlists/ and retrieve all the bucketlists our user just created.

向localhost:5000/bucketlists/发出GET请求,并检索我们用户刚刚创建的所有存储桶列表。
最后,重构GET(one),PUT和DELETE功能 ( Finally, Refactor GET(one), PUT and DELETE functionality )
We'll refactor the PUT and DELETE functionality the same way we tackled the GET and POST.
我们将采用处理GET和POST的相同方式来重构PUT和DELETE功能。
# /app/__init__.py

## imports ##
from flask import request, jsonify, abort, make_response

def create_app(config_name):
    from models import Bucketlist, User

    ############################################################
    ### Existing code for initializing the app with its configurations lies here ###
    ############################################################

    @app.route('/bucketlists/', methods=['POST', 'GET'])
    def bucketlists():
        #### CODE FOR  GET and POST LIES HERE#####
        ###############################

    @app.route('/bucketlists/<int:id>', methods=['GET', 'PUT', 'DELETE'])
    def bucketlist_manipulation(id, **kwargs):
        # get the access token from the authorization header
        auth_header = request.headers.get('Authorization')
        access_token = auth_header.split(" ")[1]

        if access_token:
            # Get the user id related to this access token
            user_id = User.decode_token(access_token)

            if not isinstance(user_id, str):
                # If the id is not a string(error), we have a user id
                # Get the bucketlist with the id specified from the URL (<int:id>)
                bucketlist = Bucketlist.query.filter_by(id=id).first()
                if not bucketlist:
                    # There is no bucketlist with this ID for this User, so
                    # Raise an HTTPException with a 404 not found status code
                    abort(404)

                if request.method == "DELETE":
                    # delete the bucketlist using our delete method
                    bucketlist.delete()
                    return {
                        "message": "bucketlist {} deleted".format(bucketlist.id)
                    }, 200

                elif request.method == 'PUT':
                    # Obtain the new name of the bucketlist from the request data
                    name = str(request.data.get('name', ''))

                    bucketlist.name = name
                    bucketlist.save()

                    response = {
                        'id': bucketlist.id,
                        'name': bucketlist.name,
                        'date_created': bucketlist.date_created,
                        'date_modified': bucketlist.date_modified,
                        'created_by': bucketlist.created_by
                    }
                    return make_response(jsonify(response)), 200
                else:
                    # Handle GET request, sending back the bucketlist to the user
                    response = {
                        'id': bucketlist.id,
                        'name': bucketlist.name,
                        'date_created': bucketlist.date_created,
                        'date_modified': bucketlist.date_modified,
                        'created_by': bucketlist.created_by
                    }
                    return make_response(jsonify(response)), 200
            else:
                # user is not legit, so the payload is an error message
                message = user_id
                response = {
                    'message': message
                }
                # return an error response, telling the user he is Unauthorized
                return make_response(jsonify(response)), 401

    # import the authentication blueprint and register it on the app
    from .auth import auth_blueprint
    app.register_blueprint(auth_blueprint)

    return app
Running python manage.py test should now yield passing tests.
现在运行python manage.py test应该会产生通过测试。
test_already_registered_user(test_auth.AuthTestCase)
Test that a user cannot be registered twice. ... ok
test_non_registered_user_login (test_auth.AuthTestCase)
Test non registered users cannot login. ... ok
test_registration (test_auth.AuthTestCase)
Test user registration works correcty. ... ok
test_user_login (test_auth.AuthTestCase)
Test registered user can login. ... ok
test_api_can_get_all_bucketlists (test_bucketlist.BucketlistTestCase)
Test API can get a bucketlist (GET request). ... ok
test_api_can_get_bucketlist_by_id (test_bucketlist.BucketlistTestCase)
Test API can get a single bucketlist by using it's id. ... ok
test_bucketlist_can_be_edited (test_bucketlist.BucketlistTestCase)
Test API can edit an existing bucketlist. (PUT request) ... ok
test_bucketlist_creation (test_bucketlist.BucketlistTestCase)
Test API can create a bucketlist (POST request) ... ok
test_bucketlist_deletion (test_bucketlist.BucketlistTestCase)
Test API can delete an existing bucketlist. (DELETE request). ... ok

----------------------------------------------------------------------
Ran 9 tests in 1.579s

OK
(venv)
Now let's test to see if it works on Postman. Fire up the API using python run.py development
现在,让我们测试一下它是否适用于Postman。 使用python run.py development启动API
Make a GET request for a single bucketlist to localhost:5000/bucketlists/2
向localhost:5000/bucketlists/2发出单个bucketlist的GET请求localhost:5000/bucketlists/2
Feel free to play around with the PUT and DELETE functionality.
随意使用PUT和DELETE功能。
结论 ( Conclusion )
We've covered quite a lot on securing our API. We went through defining a user model and integrating users into our API. We also covered token-based authentication and used an authentication blueprint to implement it.
我们已经介绍了很多有关保护API的内容。 我们经历了定义用户模型并将用户集成到我们的API中的过程。 我们还介绍了基于令牌的身份验证,并使用了身份验证蓝图来实现它。
Even though our main focus is to write the code, we should not let testing be an afterthought. For us to improve on code quality, there has to be tests. Testing is the secret to increasing the agility of your product development. In everything project you do, put TTD first.
即使我们的主要重点是编写代码,我们也不应该让测试成为事后的想法。 为了提高代码质量,必须进行测试。 测试是提高产品开发敏捷性的秘诀。 在您所做的所有项目中,都将TTD放在首位。
If you've coded this to the end, you are awesome!
如果您已将此代码编码到最后,那就太棒了!
Feel free to recommend this to friends and colleagues.
随时向朋友和同事推荐。
翻译自: https://scotch.io/tutorials/build-a-restful-api-with-flask-the-tdd-way-part-2


 348
348

 被折叠的 条评论
为什么被折叠?
被折叠的 条评论
为什么被折叠?
 到【灌水乐园】发言


