


我们将要建设的 ( What We'll Be Building )

- Validate required, unique in the database, and matching form fields 验证所需的,在数据库中唯一的和匹配的表单字段
- Use Laravel to show errors 使用Laravel显示错误
- Use Laravel to show old inputs so a user doesn't have to retype inputs 使用Laravel显示旧的输入,因此用户不必重新输入
- Create custom error messages 创建自定义错误消息
数据库和模型 ( Database and Models )
一旦完成所有Laravel的设置,让我们转到命令行并创建迁移,以便创建数据库表。 我们将需要这样做,以便我们可以进行验证以确保输入的电子邮件在数据库中是唯一的。 我们不希望多个用户使用相同的电子邮件吗?移民 ( Migration )
进入命令行并输入$ php artisan migrate:make create_ducks_table --create=ducks<?php
// app/database/migrations/####_##_##_######_create_ducks_table.php
use Illuminate\Database\Schema\Blueprint;
use Illuminate\Database\Migrations\Migration;
class CreateDucksTable extends Migration {
/**
* Run the migrations.
*
* @return void
*/
public function up()
{
Schema::create('ducks', function(Blueprint $table)
{
$table->increments('id');
$table->string('name');
$table->string('email');
$table->string('password');
$table->timestamps();
});
}
}app/config/local/database.php or
app/config/local/database.php或
app/config/database.php and then let's run our migration:
app/config/database.php ,然后让我们运行迁移:
$ php artisan migrate模型 ( Model )
我们将创建Eloquent模型,以便可以将鸭子保存到数据库中。 这也是我们将能够进行测试以确保新鸭子/用户在数据库中具有唯一电子邮件的方式。 在app/models/Duck.php.
app/models/Duck.php创建模型。
<?php
// app/models/Duck.php

class Duck extends Eloquent {

    protected $fillable = array('name', 'email', 'password');

}设置路线 ( Setting Up Our Routes )
我们将在Laravel提供的app/routes.php file that Laravel provides. We'll be handling the
app/routes.php routes.php文件中处理应用程序的路由。 我们将在此处处理用于显示表单的
GET for showing the form and the
GET和用于处理表单的
POST for processing the form here.
POST 。
<?php
// app/routes.php

// route to show the duck form
Route::get('ducks', function()
{
    return View::make('duck-form');
});

// route to process the ducks form
Route::post('ducks', function()
{

    // process the form here

});http://example.com/ducks and then we'll also be POSTing to the same URL. With our routes ready, let's create the
http://example.com/ducks进行访问,然后我们也将发布到相同的URL。 准备好路线后,让我们创建要显示给用户的
duck-form that we are displaying to our user.
鸭子形 。
Further Reading:
进一步阅读:
Simple and Easy Laravel Routing
简单的Laravel路由
建立我们的观点 ( Creating Our View )
该视图文件将位于app/views/duck-form.blade.php and we'll use Laravel's Blade to handle our views. For more information on Blade, here's a
app/views/duck-form.blade.php ,我们将使用Laravel的Blade处理我们的视图。 有关Blade的更多信息,请参见Blade的
starter Blade article. Here's that view file. We'll use
入门文章 。 这是该视图文件。 我们将使用
Bootstrap to make our views look good and then we'll start our validation.
Bootstrap使视图看起来不错,然后开始验证。
<!-- app/views/duck-form.blade.php -->
<!doctype html>
<html>
<head>
    <title>Laravel Form Validation!</title>

    <!-- load bootstrap -->
    <link rel="stylesheet" href="//maxcdn.bootstrapcdn.com/bootstrap/3.2.0/css/bootstrap.min.css">
    <style>
        body    { padding-bottom:40px; padding-top:40px; }
    </style>
</head>
<body class="container">

<div class="row">
    <div class="col-sm-8 col-sm-offset-2">

        <div class="page-header">
            <h1><span class="glyphicon glyphicon-flash"></span> Ducks Fly!</h1>
        </div>

        <!-- FORM STARTS HERE -->
        <form method="POST" action="/ducks" novalidate>

            <div class="form-group">
                <label for="name">Name</label>
                <input type="text" id="name" class="form-control" name="name" placeholder="Somebody Important">
            </div>

            <div class="form-group">
                <label for="email">Email</label>
                <input type="email" id="email" class="form-control" name="email" placeholder="super@cool.com">
            </div>

            <div class="form-group">
                <label for="password">Password</label>
                <input type="password" id="password" class="form-control" name="password">
            </div>

            <div class="form-group">
                <label for="password_confirm">Confirm Password</label>
                <input type="password" id="password_confirm" class="form-control" name="password_confirm">
            </div>

            <button type="submit" class="btn btn-success">Go Ducks Go!</button>

        </form>

    </div>
</div>

</body>
</html>
验证我们的表格 ( Validating Our Form )
现在我们有了自己的看法,我们将进行所有需要的验证。 由于我们已经准备好表单的action="/ducks" ready to go, our form will send a
action="/ducks" ,因此我们的表单会将
POST request to
POST请求发送到
http://example.com/ducks and then we handle that in the route we made earlier in
http://example.com/ducks ,然后按照我们先前在
app/routes.php.
app / routes.php中创建的路由进行处理。
基本表格验证 ( Basic Form Validation )
现在让我们在该routes.php file. We're going to create our rules, run the validation on the form inputs, and handle the error messages from there.
routes.php文件中开始验证。 我们将创建规则,在表单输入上运行验证,并从那里处理错误消息。
建立规则 ( Creating Rules )
让我们创建这些规则:<?php
// app/routes.php
...
// route to process the ducks form
Route::post('ducks', function()
{
// process the form here
// create the validation rules ------------------------
$rules = array(
'name' => 'required', // just a normal required validation
'email' => 'required|email|unique:ducks', // required and must be unique in the ducks table
'password' => 'required',
'password_confirm' => 'required|same:password' // required and has to match the password field
);
// do the validation ----------------------------------
// validate against the inputs from our form
$validator = Validator::make(Input::all(), $rules);
// check if the validator failed -----------------------
if ($validator->fails()) {
// get the error messages from the validator
$messages = $validator->messages();
// redirect our user back to the form with the errors from the validator
return Redirect::to('ducks')
->withErrors($validator);
} else {
// validation successful ---------------------------
// our duck has passed all tests!
// let him enter the database
// create the data for our duck
$duck = new Duck;
$duck->name = Input::get('name');
$duck->email = Input::get('email');
$duck->password = Hash::make(Input::get('password'));
// save our duck
$duck->save();
// redirect ----------------------------------------
// redirect our user back to the form so they can do it all over again
return Redirect::to('ducks');
}
});
...- A required name 必填名称
- A required email that has to be in email form 必需的电子邮件,必须采用电子邮件形式
- An email that has to be unique in the database 在数据库中必须唯一的电子邮件
- A required password 必需的密码
- A password_confirm field that needs to match password 需要与密码匹配的password_confirm字段
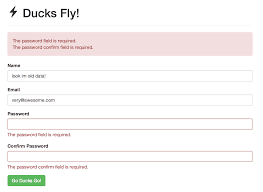
在视图中显示错误 ( Showing Errors In the View )
假设我们的用户未通过验证。 我们想展示我们视图中的所有消息。 我们要做的就是进入我们的视图并将其添加。转储所有错误消息 ( Dumping Out All Error Messages )
<!-- app/views/duck-form.blade.php -->
...
<div class="row">
    <div class="col-sm-8 col-sm-offset-2">

        <div class="page-header">
            <h1><span class="glyphicon glyphicon-flash"></span> Ducks Fly!</h1>
        </div>

        @if ($errors->has())
        <div class="alert alert-danger">
            @foreach ($errors->all() as $error)
                {{ $error }}<br>
            @endforeach
        </div>
        @endif

        <!-- FORM STARTS HERE -->
        <form method="POST" action="/ducks" novalidate>
...
手动选择错误消息 ( Hand-Picking Error Messages )
我们可以在Laravel中执行此操作,并且可以使用以下命令找出单个错误:// select the first error that corresponds to the name field
{{ $errors->first('name') }}has-error) so that Bootstrap will turn our inputs red.
has-error ),以便Bootstrap将我们的输入变为红色。
<!-- app/views/duck-form.blade.php -->
...
<!-- FORM STARTS HERE -->
<form method="POST" action="/ducks" novalidate>

    <div class="form-group @if ($errors->has('name')) has-error @endif">
        <label for="name">Name</label>
        <input type="text" id="name" class="form-control" name="name" placeholder="Somebody Awesome">
        @if ($errors->has('name')) <p class="help-block">{{ $errors->first('name') }}</p> @endif
    </div>

    <div class="form-group @if ($errors->has('email')) has-error @endif">
        <label for="email">Email</label>
        <input type="text" id="email" class="form-control" name="email" placeholder="super&64;cool.com">
        @if ($errors->has('email')) <p class="help-block">{{ $errors->first('email') }}</p> @endif
    </div>

    <div class="form-group @if ($errors->has('password')) has-error @endif">
        <label for="password">Password</label>
        <input type="password" id="password" class="form-control" name="password">
        @if ($errors->has('password')) <p class="help-block">{{ $errors->first('password') }}</p> @endif
    </div>

    <div class="form-group @if ($errors->has('password_confirm')) has-error @endif">
        <label for="password_confirm">Confirm Password</label>
        <input type="password" id="password_confirm" class="form-control" name="password_confirm">
        @if ($errors->has('password_confirm')) <p class="help-block">{{ $errors->first('password_confirm') }}</p> @endif
    </div>

    <button type="submit" class="btn btn-success">Go Ducks Go!</button>

</form>
...
在视图中显示旧输入 ( Showing Old Inputs In the View )
既然可以解决我们的错误,我们的用户将发现这些消息很有帮助。 他们还希望知道的另一件事是,他们可能希望拥有他们提供的输入来仍然填充表格。 我们不希望用户因为两个密码字段不匹配而再次输入他们的姓名并再次发送电子邮件。 我们必须在后端的表单验证中添加一些内容,然后将信息添加到视图文件中。// app/routes.php
...
// check if the validator failed -----------------------
if ($validator->fails()) {
// redirect our user back with error messages
$messages = $validator->messages();
// also redirect them back with old inputs so they dont have to fill out the form again
// but we wont redirect them with the password they entered
return Redirect::to('ducks')
->withErrors($validator)
->withInput(Input::except('password', 'password_confirm'));
} else {
...password and
password和
password_confirm fields. This way they won't have to enter their name and email again. Now, we have to populate our form with the data that comes back. We'll use our
password_confirm字段除外)将用户重定向回表单。 这样,他们将无需再次输入名称和电子邮件。 现在,我们必须使用返回的数据填充表单。 我们将使用
input field's
input字段的
value attribute and the way we get old input data from Laravel is to use:
value属性,并使用从Laravel获取旧输入数据的方式:
{{ Input::old('name') }}<!-- app/views/duck-form.blade.php -->
...
<!-- FORM STARTS HERE -->
<form method="POST" action="/ducks" novalidate>
<div class="form-group @if ($errors->has('name')) has-error @endif">
<label for="name">Name</label>
<input type="text" id="name" class="form-control" name="name" placeholder="Somebody Awesome" value="{{ Input::old('name') }}">
@if ($errors->has('name')) <p class="help-block">{{ $errors->first('name') }}</p> @endif
</div>
<div class="form-group @if ($errors->has('email')) has-error @endif">
<label for="email">Email</label>
<input type="text" id="email" class="form-control" name="email" placeholder="super&64;cool.com" value="{{ Input::old('email') }}">
@if ($errors->has('email')) <p class="help-block">{{ $errors->first('email') }}</p> @endif
</div>
...
自定义错误消息 ( Custom Error Messages )
今天,我们在Laravel表单验证中要处理的最后一件事是创建自定义错误消息。 有时候,默认设置对于我们的耀斑和爵士乐来说还不够有趣。 为此,我们要做的就是创建自定义消息,并将其传递到$validator in our
routes.php文件中的
routes.php file. Let's change the messages for our
$validator中。 让我们更改
required and
required字段和
same fields.
same字段的消息。
// app/routes.php

// route to process the ducks form
Route::post('ducks', function()
{

    // create the validation rules ------------------------
    $rules = array(
        'name'             => 'required',                       // just a normal required validation
        'email'            => 'required|email|unique:ducks',    // required and must be unique in the ducks table
        'password'         => 'required',
        'password_confirm' => 'required|same:password'          // required and has to match the password field
    );

    // create custom validation messages ------------------
    $messages = array(
        'required' => 'The :attribute is really really really important.',
        'same'  => 'The :others must match.'
    );

    // do the validation ----------------------------------
    // validate against the inputs from our form
    $validator = Validator::make(Input::all(), $rules, $messages);

    // check if the validator failed -----------------------
    if ($validator->fails()) {
:attribute and
:attribute和
:other fillers to fill that space with the field name.
:other填充符以字段名称填充该空间,从而创建自己的消息。
Model Level Rules
Another way to set rules for attributes is to do it in your models. This is a great way to do this since all the rules are attached to the model. This way, no matter where you have to validate, you can always reference back to the model. Let's look at how we can do this. In your model, let's create the same rules we created ealier:<?php
// app/models/Duck.php
class Duck extends Eloquent {
protected $fillable = array('name', 'email', 'password');
public static $rules = array(
'name' => 'required', // just a normal required validation
'email' => 'required|email|unique:ducks', // required and must be unique in the ducks table
'password' => 'required',
'password_confirm' => 'required|same:password' // required and has to match the password field
);
}ModelName::$rules.
$adminRules and
$userRules and access them directly. Thanks to
longshot for pointing out this great Jeffrey Way tip.
模型级别规则
设置属性规则的另一种方法是在模型中完成。 这是执行此操作的好方法,因为所有规则都已附加到模型。 这样,无论您在何处进行验证,都可以始终参考模型。 让我们看看如何做到这一点。 在您的模型中,让我们创建与创建更加相同的规则:<?php
// app/models/Duck.php
class Duck extends Eloquent {
protected $fillable = array('name', 'email', 'password');
public static $rules = array(
'name' => 'required', // just a normal required validation
'email' => 'required|email|unique:ducks', // required and must be unique in the ducks table
'password' => 'required',
'password_confirm' => 'required|same:password' // required and has to match the password field
);
}ModelName::$rules传递这些
ModelName::$rules 。
$adminRules和
$userRules并直接访问它们。 感谢
longshot指出了这个很棒的Jeffrey Way技巧。


 639
639

 被折叠的 条评论
为什么被折叠?
被折叠的 条评论
为什么被折叠?
 到【灌水乐园】发言


