


nl-mean程序下载
介绍 (Introduction)
As someone who has trudged through many tutorials on the MEAN development stack, I’ve built many demo applications using some variation of localhost. Yet, when time came for me to move onto real-world deployments, I had a much tougher time finding guides straightforward enough to follow.
作为一个在MEAN开发堆栈上苦苦研究许多教程的人,我已经使用localhost一些变体构建了许多演示应用程序。 然而,当时间来了,我移动到实际部署中,我有一个困难得多的时间找到导游直截了当足够跟随。
In an effort to help future versions of myself, I’ll be releasing a two-part tutorial that demonstrates the process of deploying a MEAN application live onto Amazon’s EC2.
为了帮助自己的未来版本,我将发布一个分为两部分的教程,演示如何将MEAN应用程序实时部署到Amazon EC2上的过程。
- Part I: Getting Started and Deploying your Initial Application 第一部分:入门和部署初始应用程序
- Part II: Utilizing your EC2 Instance of Mongodb 第二部分:利用您的Mongodb EC2实例
In this first part, we’ll be taking an existing MEAN application and deploying it onto an EC2 instance with its own live URL.
在第一部分中,我们将采用现有的MEAN应用程序,并将其部署到具有自己的实时URL的EC2实例上。
设置您的初始代码 (Setting up your initial code)
For this tutorial, we’ll be using the Node and Angular To-Do App that Chris created in an earlier guide. (If you’re not familiar with the MEAN stack, I’d highly recommend you check out his tutorial. It’s one of the best free MEAN guides out there).
在本教程中,我们将使用克里斯在较早的指南中创建的Node and Angular To-Do App 。 (如果您不熟悉MEAN堆栈,强烈建议您阅读他的教程 。它是那里最好的免费 MEAN指南之一)。
To begin, let’s create a forked copy of his code in Github. We’re forking the code as opposed to cloning it, because we’ll need our own repo to commit changes into for later steps.
首先,让我们在Github中创建他的代码的分叉副本。 我们要分叉代码而不是克隆代码,因为我们需要自己的存储库才能将更改提交到以后的步骤中。

Now clone your forked repo into a local directory and run npm install to download all of the necessary dependencies.
现在,将您的分叉存储库克隆到本地目录中,然后运行npm install来下载所有必需的依赖项。
git clone https://github.com/afhaque/node-todo.git
cd node-todo
npm install
Let’s run a quick test to make sure things are working correctly, by running node server.js. Open your browser and navigate to http://localhost:8080. If all goes well you should see the familiar "I'm a Todo-aholic" screen.
让我们通过运行node server.js来进行快速测试,以确保一切正常。 打开浏览器并导航到http:// localhost:8080 。 如果一切顺利,您应该会看到熟悉的“我是Todo-aholic”屏幕。

Woo hoo! Now onto EC2 Deployment.
呜呜! 现在进入EC2部署。
AWS和EC2快速入门 (A quick primer on AWS and EC2)
Before we begin, I think its worth having a quick primer on Amazon Web Services (AWS) and Amazon Elastic Compute Cloud (EC2). AWS is a collection of remote computing services, or web services, offered by Amazon to handle tasks related to cloud computing, storage, databases, networks, deployments, and analytics. The list of services included in AWS is incredibly vast and targets wide range of broad to extremely specific purposes.
在开始之前,我认为有必要快速入门Amazon Web Services(AWS)和Amazon Elastic Compute Cloud(EC2) 。 AWS是Amazon提供的用于处理与云计算,存储,数据库,网络,部署和分析有关的任务的一组远程计算服务或Web服务 。 AWS中包含的服务列表 非常庞大,并且针对从广泛到极端特定目的的广泛范围。
For today’s tutorial, we’ll be focused entirely on Amazon EC2, the most widely used of the AWS offerings. EC2 provides a low-cost computing service for handling computational tasks. In our case, we’ll be using EC2 to run the server which will host our web application.
在今天的教程中,我们将完全专注于AWS EC产品中使用最广泛的Amazon EC2。 EC2提供了一种用于处理计算任务的低成本计算服务。 在本例中,我们将使用EC2运行将托管我们的Web应用程序的服务器。
EC2入门 (Getting Started with EC2)
The first step in our deployment is to create an account with AWS. Just follow the steps on the screen to complete the process. All new AWS users are automatically placed in the free usage tier, which grants, among other features, 750 hrs/month of free Amazon EC2 micro access – plenty of room for experimentation. As you are creating your account, be sure to choose the Basic (Free) option.
部署的第一步是使用AWS创建一个帐户 。 只需按照屏幕上的步骤完成操作即可。 所有新的AWS用户都将自动置于免费使用级别 ,该级别除其他功能外,还提供每月750个小时的每月免费Amazon EC2微访问权限-有足够的试验空间。 创建帐户时,请确保选择基本(免费)选项。
Once registered, click “Sign In to the Console” and you’ll be taken to the AWS home screen. The console provides links to all of the AWS offerings available to you. For our deployment, we’ll be heading to the EC2 dashboard.
注册后,单击“登录到控制台”,您将转到AWS主屏幕。 该控制台提供了指向您可用的所有AWS产品的链接。 对于我们的部署,我们将前往EC2仪表板。

Before we start launching our EC2 instance, our first step is to create an EC2 Key Pair. Key Pairs refer to the public and private keys used to encrypt and decrypt login information. Amazon requires that you use a key pair with every EC2 instance, so we’ll need to create one before proceeding. To do this, let’s navigate to the menu option titled “Key Pairs” and click “Create Key Pair”.
在开始启动EC2实例之前,我们的第一步是创建一个EC2密钥对 。 密钥对是指用于加密和解密登录信息的公用密钥和专用密钥。 Amazon要求您对每个EC2实例都使用一个密钥对,因此我们需要先创建一个密钥对。 为此,我们导航至标题为“ Key Pairs”的菜单选项,然后单击“ Create Key Pair”。
Name your key pair in the pop-up that appears. Immediately after, a .pem file with the same name will download to your system. Don’t lose this file! It’s only generated once and you’ll need it to access your EC2 instance. (During development, I like to keep this file handy by placing it in a resources folder of the app I am working in.)
在出现的弹出窗口中命名您的密钥对。 之后,具有相同名称的.pem文件将立即下载到您的系统。 不要丢失此文件! 它仅生成一次,您将需要它来访问EC2实例。 (在开发过程中,我喜欢通过将文件放在我正在使用的应用程序的资源文件夹中来保持此文件的方便。)
node-todo
    | app
    | config
    | node_modules
    | public
    | resources
        | todoaholic.pem
启动我们的EC2实例 (Launching our EC2 Instance)
Now that you have a key pair in hand, head back to the main AWS console, and go to the AWS Marketplace. The Marketplace includes a variety of pre-configured images for quickly deploying software and operating systems onto EC2.
现在您已经有了密钥对,回到主AWS控制台,然后转到AWS Marketplace 。 该市场包含各种预先配置的映像,用于将软件和操作系统快速部署到EC2上。
In our case, we’ll be using a Bitnami MEAN image from BitRock. Search for this in the marketplace and open up the one titled: “MEAN Powered by Bitnami”.
在本例中,我们将使用BitRock提供的Bitnami MEAN图像 。 在市场中搜索此商品,然后打开标题为“由Bitnami供电的MEAN”的商品。

At this point, let me take a moment to say, I have a lot of mixed feelings about the Bitnami MEAN Stack for EC2. On the one hand, it’s free and offers a lot of convenience when it comes to initial setup. All the necessary MEAN components (MongoDB and Node) are pre-installed upon launch. On the other hand, the Bitnami documentation is extremely poor. My hope is this guide will help you take advantage of its convenience, while addressing its poor documentation.
在这一点上,让我花点时间说一下,我对Bitnami MEAN Stack for EC2感到很困惑。 一方面,它是免费的,并且在初始设置方面提供了很多便利。 启动时会预安装所有必需的MEAN组件(MongoDB和Node)。 另一方面,Bitnami文档非常差。 我希望本指南将帮助您利用其便利性,同时解决其糟糕的文档。
From the Bitnami MEAN screen, click the continue button. You can keep the region set to US East (N. Virginia). Next you’ll be shown a number of options regarding version, region, security groups, and more. The only thing to change is the EC2 Instance Type. In order for you to avoid any charges, select t2.micro. (As a new user, you have 750 hours of no-cost EC2 micro usage).
在Bitnami MEAN屏幕上,单击继续按钮。 您可以将区域设置为美国东部(弗吉尼亚北部)。 接下来,将为您显示有关版本,区域,安全组等的许多选项。 唯一要更改的是EC2实例类型。 为了避免产生任何费用,请选择t2.micro 。 (作为新用户,您可以免费使用750小时EC2 micro)。
Also, note on the bottom how the Key Pair you created earlier has been pre-selected for you.
此外,请注意底部如何为您预先选择先前创建的密钥对。

Now, click: “Accept Terms & Launch with 1-Click”. You will then receive a notification telling you that your EC2 instance is being deployed.
现在,单击:“接受条款并一键启动”。 然后,您将收到一条通知,通知您正在部署EC2实例。
From here, navigate back to the Amazon Web Services Console and open up the EC2 dashboard again. What you’ll see on this screen is that you now have 1 Running Instance (server), 1 Volume (storage), 1 Key Pair (encryption), and 2 Security Groups (security) under your resources.
从这里,导航回到Amazon Web Services控制台并再次打开EC2仪表板。 在此屏幕上看到的是,您的资源下现在有1个运行实例(服务器),1个卷(存储),1个密钥对(加密)和2个安全组(安全性)。
Click the link on “1 Running Instance” and you’ll be taken to your newly created server with the Bitnami MEAN image. Wait a few moments for the instance to complete its initialization. You will know its ready when the Status Checks change from “Initializing” to “2/2 checks”.
单击“ 1个运行实例”上的链接,您将进入带有Bitnami MEAN映像的新创建的服务器。 请稍等片刻,以完成实例的初始化。 当状态检查从“正在初始化”更改为“ 2/2检查”时,您将知道其已准备就绪。
连接到您的EC2实例 (Connecting to your EC2 Instance)
Now, this next step is very important. So read closely. As part of the Bitnami MEAN installation, your instance comes pre-configured with an initial MongoDB admin username and password. The initial username is always root, but a unique password is created upon first launch of an instance. To obtain your password, right-click on the row of your EC2 instance and navigate to Instance Settings -> Get System Log.
现在,下一步非常重要。 因此,请仔细阅读。 作为Bitnami MEAN安装的一部分,您的实例已预先配置了初始的MongoDB管理员用户名和密码。 初始用户名始终为root ,但是在首次启动实例时会创建一个唯一密码。 要获取密码,请右键单击EC2实例的行,然后导航至“实例设置”->“获取系统日志”。
Scroll through the System Log to the very end. You should see a bright box with the words: Setting Bitnami application password to followed by a password. This is your initial MongoDB admin password. Copy it and paste it somewhere safe. And again, don’t lose this password either! You will only be shown it once, and you will need this in order to access your EC2 instance of MongoDB.
滚动浏览系统日志到最后。 您应该看到一个带有以下文字的明亮框: Setting Bitnami application password to后跟一个密码。 这是您的初始MongoDB管理员密码。 复制并将其粘贴到安全的地方。 同样,也不要丢失此密码! 您只会看到它一次,并且需要此才能访问您的MongoDB EC2实例。

Okay! We’re making great progress. The next item of business is connecting to our EC2 instance via SSH. As a windows user, I like to use PuTTY for this. Download this program if you don’t already have an SSH client handy. (Note: I also like to keep the PuTTY .exe file in the resources folder of my application for convenience as well. You’ll be using it fairly frequently).
好的! 我们正在进步。 下一项业务是通过SSH连接到我们的EC2实例。 作为Windows用户,我喜欢为此使用PuTTY 。 如果您还没有SSH客户端,请下载此程序。 (注意:为了方便起见,我也喜欢将PuTTY .exe文件保留在应用程序的resources文件夹中。您会经常使用它)。
Once installed, navigate back to your AWS Console and to your running EC2 instance. From this screen look at the description section associated with your EC2 instance. Note the Public DNS. This represents the URL where your application will sit and the hostname you will be connecting to. You’ll be using this Host Name along with the .pem security key you downloaded earlier to connect to your EC2 instance.
安装后,导航回到您的AWS控制台和正在运行的EC2实例。 在此屏幕上,查看与您的EC2实例关联的描述部分。 注意公共DNS 。 这代表您的应用程序所在的URL以及您将连接到的主机名。 您将使用此主机名以及之前下载的.pem安全密钥来连接到EC2实例。
But before we can proceed with our connection, you will need to convert your .pem file into a .ppk file that PuTTY can recognize. For this you will need the program PuTTYgen. Go ahead and download the program now.
但是在继续进行连接之前,您需要将.pem文件转换为PuTTY可以识别的.ppk文件。 为此,您将需要程序PuTTYgen 。 继续并立即下载程序。
After its ready, load your existing .pem security file into PuTTYgen. Remember to switch the file types to all “All Files .” when browsing for your key. Once its loaded, click “Save Private Key” and re-save your file as a PuTTY Private Key file (.ppk).
准备就绪后,将您现有的.pem安全文件加载到PuTTYgen中。 记住将文件类型切换为“所有文件” 。 ”以浏览您的密钥。 加载后,单击“保存私钥”,然后将文件重新保存为PuTTY私钥文件(.ppk)。

Still with me? Great! Because we’re finally ready to connect to our EC2 instance.
还在我这儿? 大! 因为我们终于准备好连接到我们的EC2实例。
Open up PuTTY and enter the Public DNS you noted earlier as the Host Name. Set the Port for 22. Finally, look through the category menu for the SSH -> Auth page. Where it says: “Private Key for Authentication” upload the .ppk file we generated earlier.
打开PuTTY,然后输入您之前记下的公共DNS作为主机名。 将端口设置为22。最后,浏览SSH-> Auth页面的类别菜单。 上面写着:“用于身份验证的私钥”上载我们先前生成的.ppk文件。

Click "Open" and a terminal will pop-up. If this is the first time you’ve accessed this specific host, a warning will appear informing you that the server's host key is not cached in the registry. Just hit “Yes” to instruct it to continue. You’ll then be greeted by a screen saying: “login as”. Enter bitnamiand you should see a few lines welcoming you to the system.
单击“打开”,将弹出一个终端。 如果这是您第一次访问此特定主机,则会出现警告,通知您server's host key is not cached in the registry 。 只需单击“是”即可指示它继续。 屏幕上会显示“登录为”的字样。 输入bitnami ,您应该会看到几行欢迎您使用系统。

Huzzah! Connection successful :-)
晕! 连接成功:-)
拉文件 (Pulling Files)
Alright now that our system is setup and configured, it’s time to start deploying our code.
现在我们的系统已经设置和配置好了,是时候开始部署我们的代码了。
First, let’s get familiar with what we have installed. In the SSH terminal, type ls to see the directories. As you can see, we have three folders, one for apps one for htdocs and one for stack. Let’s look into the stack folder.
首先,让我们熟悉已安装的内容。 在SSH终端中,键入ls以查看目录。 如您所见,我们有三个文件夹,一个用于apps一个用于htdocs ,一个用于stack 。 让我们看一下堆栈文件夹。
You’ll see a variety of directories including ones for apache2, mongodb, nodejs, php, python, and sqlite. By using the Bitnami image, we’ve saved ourselves the trouble of having to install each of these ourselves. Yay, convenience!
您将看到各种各样的目录,包括apache2 , mongodb , nodejs , php , python和sqlite 。 通过使用Bitnami映像,我们避免了必须自己安装每个映像的麻烦。 是的,方便!
But let’s not celebrate too much yet. There’s still a lot more to be done. Let’s begin by cloning our node-todo git repository onto the server. (Always remember to include sudo!)
但是,让我们不要过分庆祝。 还有很多事情要做。 让我们首先将node-todo git存储库克隆到服务器上。 (始终记住要包含sudo!)
cd
cd apps
sudo git clone https://github.com/scotch-io/node-todo.git {USE YOUR LINK}
cd node-todo
To confirm things worked out, do a quick ls to check that the node-todo folder was created. cd into that folder and again check the contents with ls.
要确认已解决问题,请快速执行ls以检查是否已创建node-todo文件夹。 cd进入那个文件夹,然后再次使用ls检查内容。

Looking good! Next step, let’s download and install all of our npm dependencies.
看起来不错! 下一步,让我们下载并安装所有npm依赖项。
sudo npm installOkay! deep breath Let’s see if we can run our server.js file using node.
好的! 深呼吸让我们看看是否可以使用node运行我们的server.js文件。
node server.js
Ugh. Guess not. So, what’s going on here?
啊。 可能不会。 那么,这是怎么回事?
设置安全访问 (Setting Security Access)
Well. As you may remember from testing local applications in the past, whenever we build MEAN applications we designate a specific port to which the server refers. (Think localhost:3000, localhost:8080, etc). This doesn’t require configuring when you’re running locally, but now that we’re in the real-world, our ports aren’t just open by default. This means since our application is looking to use port 8080, we need to make sure that port 8080 is accessible for use. We need to configure these settings in AWS.
好。 您可能从过去测试本地应用程序时还记得,每当我们构建MEAN应用程序时,我们都会指定服务器引用的特定端口。 (请考虑localhost:3000 , localhost:8080等)。 当您在本地运行时,这不需要配置,但是既然我们已经处于现实世界中,则默认情况下我们的端口不只是打开的。 这意味着,由于我们的应用程序希望使用端口8080,因此我们需要确保可以访问端口8080。 我们需要在AWS中配置这些设置。
Open up your web browser and navigate back to the AWS EC2 Dashboard. Then, using the menu on the left, open up the Security Groups panel. Click on the row associated with our MEAN application. (It will have a Group name like: “MEAN powered by Bitnami”). Beneath our row is a set of Inbound and Outbound rules specifying which ports are accessible for the application and by the outside world.
打开您的Web浏览器,然后导航回到AWS EC2仪表板。 然后,使用左侧的菜单打开“安全组”面板。 单击与我们的MEAN应用程序关联的行。 (它将具有一个组名称,例如:“由Bitnami支持的MEAN”)。 在我们的行下面是一组入站和出站规则,这些规则指定应用程序和外部世界可以访问哪些端口。

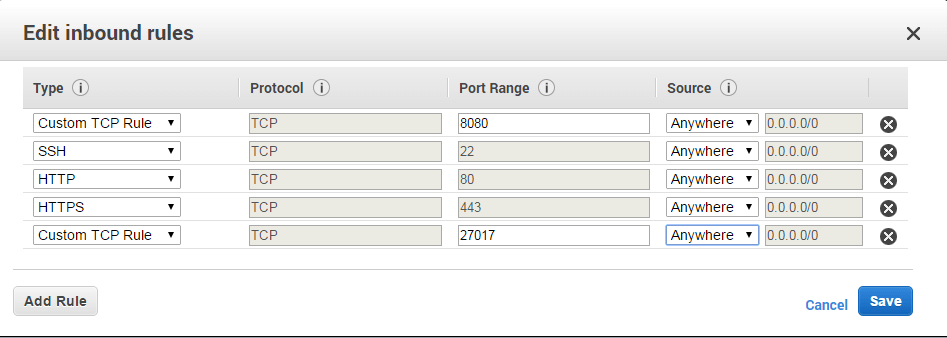
We need to create a custom inbound TCP rule that makes port 8080 accessible. Set the Protocol to TCP, the Port Range to 8080, and the source 0.0.0.0/0 (anywhere). Additionally, we’ll do the same for port 27017, which will be used by MongoDB.
我们需要创建一个自定义的入站TCP规则,使端口8080可以访问。 将“协议”设置为“ TCP”,将“端口范围”设置为8080,并将源设置为0.0.0.0/0(任意位置)。 此外,我们将对端口27017进行相同的操作,MongoDB将使用该端口。
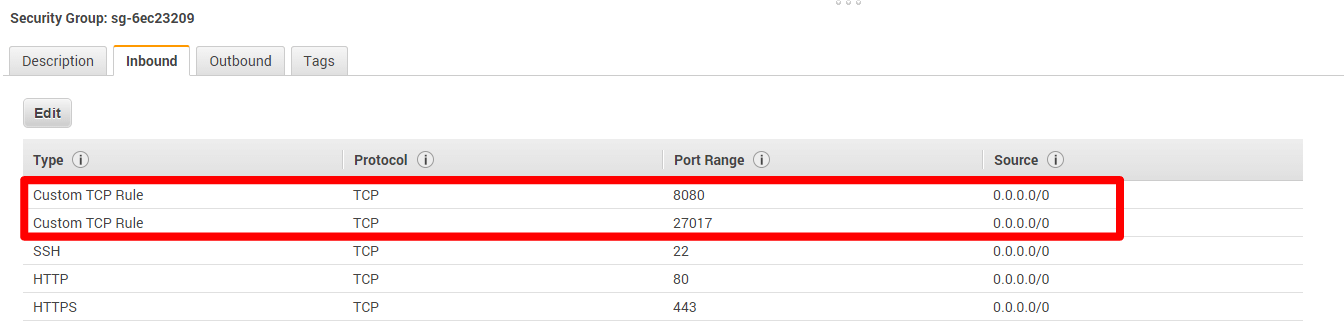
Once you’ve added this new rule, refresh the security group using the menu button at the top right.
添加此新规则后,请使用右上角的菜单按钮刷新安全组。
Now, let’s close out the PuTTY connection previously opened and reconnect using the same DNS name, port, and .ppk file that you used earlier.
现在,让我们关闭先前打开的PuTTY连接,并使用与之前使用的相同的DNS名称,端口和.ppk文件重新连接。
发射时间! (Launch Time!)
Okay. Round 2. Let’s try launching our server.js file again.
好的。 第2轮。让我们尝试再次启动我们的server.js文件。
node server.jsNo errors. That’s a good sign.
没有错误。 这是一个好兆头。

But there’s only one way to see if our application is actually working. It’s time to check things in our browser.
但是,只有一种方法可以查看我们的应用程序是否确实在工作。 现在该在我们的浏览器中检查内容了。
But what’s the URL? Good question! It’s just going to be the complete DNS Hostname followed by the port.
但是,URL是什么? 好问题! 这将是完整的DNS主机名,后跟端口。
<DNS Hostname>:<Port Number>In my case this means: http://ec2-52-0-14-185.compute-1.amazonaws.com:8080/
就我而言,这意味着: http : //ec2-52-0-14-185.compute-1.amazonaws.com : 8080/
Open up your browser and give it a go.
打开浏览器,然后尝试一下。
And if you do, you’ll hopefully see our friendly To-Do list right before your eyes. (Relish this moment. It may be one of the few times you can take pride looking at a to-do-list).
如果您愿意,可以希望在您眼前看到我们友好的待办事项清单。 (这一刻很高兴。这可能是您为待办事项清单感到自豪的几次机会之一)。

“Okay! Mission accomplished!”
“好的! 任务完成!”
Not quite. As of now, the moment we close out PuTTY, our application dies with it. Conceivably, we could keep our PuTTY window open forever, but that sort of defeats the purpose of having our application on a server.
不完全的。 到目前为止,关闭PuTTY的那一刻,我们的应用程序随之死亡。 可以想象,我们可以永远打开PuTTY窗口,但是这种做法违背了将应用程序放在服务器上的目的。
So instead, we’re going to utilize the node package forever.js. Forever is a simple tool that ensures a given script runs continuously (i.e. forever). To install it, let’s first stop our existing application with ctrl+c.
因此,相反,我们将使用forever.js的节点包。 永远是一个简单的工具,可确保给定脚本连续运行(即永远)。 要安装它,让我们首先使用ctrl+c停止现有应用程序。
Then we’ll run:
然后我们将运行:
sudo npm install forever -gAnd finally, to launch our application continuously, we wil enter
最后,要持续启动我们的应用程序,我们将输入
forever start server.jsYou will get a short message saying Forever processing file: server.js and you should be good to go. The best way to test that things after that is to simply close out your instance of PuTTY and give your application another try in browser.
您会收到一条简短的消息,说“ Forever processing file: server.js ,您应该一切顺利。 测试之后的最好方法是简单地关闭您的PuTTY实例,并在浏览器中再次尝试您的应用程序。
If all went well, you should once again see your familiar Todo-aholic screen.
如果一切顺利,您应该再次看到熟悉的Todo-aholic屏幕。
Yay! Congratulations! You now have a live deployment of your first MEAN application!
好极了! 恭喜你! 现在,您可以第一个MEAN应用程序进行实时部署!
利用MongoDB的EC2实例(第2部分) (Utilizing EC2 Instance of MongoDB (Part 2))
Now, at this point, you have fully deployed a MEAN application to EC2.
现在,此时,您已将MEAN应用程序完全部署到EC2。
But as some of you may have picked up, we never even touched MongoDB in EC2. We never specified the MongoDB URL in our MEAN application, and we never used that funny green password I told you to not lose.
但是,正如你们中的一些人可能选择的那样,我们甚至从未接触过EC2中的MongoDB。 我们从未在MEAN应用程序中指定过MongoDB URL,也从未使用过我告诉过您的有趣的绿色密码。
Yet, still our application worked wonderfully. Why is that?
但是,我们的应用程序仍然运行良好。 这是为什么?
Well, in the original MEAN application developed by Chris, we make use of an external instance of MongoDB – specifically one sourced from Modulus.io. In this case, Modulus is providing our application with a Database-as-a-Service (DaaS). There are other companies out there that offer similar services (MongoLab and Compose.io for instance). All-in-all these services are pretty great. They offer you a quick, reliable instance of MongoDB, fantastic GUIs for administering your data, and a free sandbox instances to play around with. For many purposes, this is exactly what you need.
好吧,在克里斯开发的原始MEAN应用程序中,我们利用了MongoDB的外部实例,特别是一个源自Modulus.io的实例 。 在这种情况下,Modulus为我们的应用程序提供了数据库即服务(DaaS)。 还有其他提供类似服务的公司(例如MongoLab和Compose.io )。 所有这些服务都很棒。 它们为您提供了一个快速,可靠的MongoDB实例,出色的用于管理数据的GUI,以及一个免费的沙盒实例。 在许多方面,这正是您所需要的。
That said, if you are looking to retain greater control of your MongoDB database, you may be inclined to use your own MongoDB instance in EC2. As an added advantage, utilizing your own MongoDB instance in EC2 can be significantly cheaper in the long-run. As an example, an M1 Cluster with 40 GB of storage would cost you about $180 per month using MongoLab. In contrast, a similarly structured MongoDB instance in EC2 would cost only $36 per month, if you set it up yourself. You wouldn’t have the nifty GUIs or the dedicated support, but hey – it’s always good to know your options.
就是说,如果您希望保留对MongoDB数据库的更大控制权,则可能倾向于在EC2中使用自己的MongoDB实例。 从长远来看,在EC2中利用您自己的MongoDB实例的另一个好处是可以大大降低成本。 例如,使用MongoLab,一个拥有40 GB存储空间的M1集群每月将花费您大约180美元 。 相反,如果您自行设置,则EC2中结构类似的MongoDB实例每月只需花费$ 36 。 您将没有漂亮的GUI或专门的支持,但是,嘿–了解您的选择总是很高兴的。
In the next part of our tutorial, we’ll be working through the process of migrating from the current DaaS to our own EC2 instance of MongoDB. Stay tuned!
在本教程的下一部分中 ,我们将完成从当前DaaS迁移到我们自己的MongoDB EC2实例的过程。 敬请关注!
p.s. Don’t lose your password. It’s never coming back! :-)
ps不要忘记密码。 它永远不会回来! :-)
翻译自: https://scotch.io/tutorials/deploying-a-mean-app-to-amazon-ec2-part-1
nl-mean程序下载


 被折叠的 条评论
为什么被折叠?
被折叠的 条评论
为什么被折叠?
 到【灌水乐园】发言


