


java怎么自动生成统计图

It’s important to check various log data and statistics on your server every day, but it grows to be tedious. Wouldn’t it be nice to receive a single email with all the highlights each day, so you don’t even need to get on the server to check for problems? This guide will show you how to configure automated emails on Linux and Windows.
每天都要检查服务器上的各种日志数据和统计数据,这一点很重要,但是它变得很繁琐。 每天收到一封包含所有重点内容的电子邮件会不会很好,所以您甚至不需要上服务器检查问题吗? 本指南将向您展示如何在Linux和Windows上配置自动电子邮件。
We will be specifically covering this for Ubuntu and Windows 8.1, with Gmail being used as the email server that mail is sent from. If you have another version of Linux or Windows, or prefer to use some other email service, the instructions here should be easily adaptable.
我们将特别针对Ubuntu和Windows 8.1进行介绍,其中Gmail被用作发送邮件的电子邮件服务器。 如果您使用的是其他版本的Linux或Windows,或者更喜欢使用其他电子邮件服务,则此处的说明应易于修改。
Linux中的自动电子邮件 (Automated Emails in Linux)
We’re going to use two different packages to accomplish this, ssmtp and mailutils, so install both of them with the following command:
我们将使用ssmtp和mailutils这两个不同的软件包来完成此操作,因此请使用以下命令安装它们:
$ sudo apt-get install ssmtp mailutils
$ sudo apt-get install ssmtp mailutils
Once those are installed, we need to make some changes to the SSMTP configuration file:
安装这些文件后,我们需要对SSMTP配置文件进行一些更改:
$ sudo vi /etc/ssmtp/ssmtp.conf
$ sudo vi /etc/ssmtp/ssmtp.conf
Edit the file with these changes (it’s safe to just erase all the text in the file and copy/paste these settings, if you’d like):
进行以下更改来编辑文件(如果需要,可以删除文件中的所有文本并复制/粘贴这些设置,这是安全的):
# This address will receive the emails, so enter your own email here if you want to receive them.
# This address will receive the emails, so enter your own email here if you want to receive them.
root=username@gmail.com
root=username@gmail.com
# Specify the email server here (leave as is if you’re using Gmail).
# Specify the email server here (leave as is if you're using Gmail).
mailhub=smtp.gmail.com:587
mailhub=smtp.gmail.com:587
# The domain name that the mail will come from.
# The domain name that the mail will come from.
rewriteDomain=gmail.com
rewriteDomain=gmail.com
# The email address that these emails should be from.
# The email address that these emails should be from.
hostname=username@gmail.com
hostname=username@gmail.com
# SSL/TLS settings, required for Gmail and most other mail servers.
# SSL/TLS settings, required for Gmail and most other mail servers.
UseTLS=Yes
UseTLS=Yes
UseSTARTTLS=Yes
UseSTARTTLS=Yes
# The username and password to your Gmail account.
# The username and password to your Gmail account.
AuthUser=username
AuthUser=username
AuthPass=password
AuthPass=password
# Allow the ability to specify a from address different than the one above.
# Allow the ability to specify a from address different than the one above.
FromLineOverride=yes
FromLineOverride=yes
When you’re done editing the file, you’ll want to change the permissions since your Gmail password is stored in plaintext.
完成文件编辑后,由于您的Gmail密码以纯文本格式存储,因此您将需要更改权限。
$ sudo chmod 640 /etc/ssmtp/ssmtp.conf
$ sudo chmod 640 /etc/ssmtp/ssmtp.conf
$ sudo chown username.username /etc/ssmtp/ssmtp.conf
$ sudo chown username.username /etc/ssmtp/ssmtp.conf
It’s always more secure to make root the owner of the file, but then we would have to use the sudo command in our script and it would prompt us for a password, thereby defeating the purpose of automating this whole process.
以root身份成为文件的所有者总是更安全,但是随后我们将不得不在脚本中使用sudo命令,这将提示我们输入密码,从而破坏了使整个过程自动化的目的。
If you’re using a shared server and are worried about your password being stored in plaintext and readable by root, create a throwaway Gmail account or use an email server that doesn’t require any type of authentication in the first place.
如果您使用的是共享服务器,并且担心密码以明文形式存储并可由root读取,请创建一个一次性的Gmail帐户或使用不需要任何身份验证的电子邮件服务器。
To make sure everything is configured correctly, let’s try a test email:
为确保所有配置均正确,让我们尝试测试电子邮件:
$ echo "Testing" | mail -s "Testing mail setup" username@gmail.com
$ echo "Testing" | mail -s "Testing mail setup" username@gmail.com
“Testing” will be in the body of the email and the subject will be “Testing mail setup.” Check your email to make sure you received it.
“测试”将显示在电子邮件的正文中,主题将是“测试邮件设置”。 检查您的电子邮件以确保已收到。
为电子邮件编写脚本 (Writing a Script for the Emails)
Now that we’re able to send emails from the command line, let’s write a script that will send us some basic information about our system.
现在我们已经能够从命令行发送电子邮件了,让我们编写一个脚本,该脚本将向我们发送有关系统的一些基本信息。
#!/bin/bash
#!/bin/bash
# Check hard drive space
# Check hard drive space
echo "Hard drive space:" > /home/geek/email.txt
echo "Hard drive space:" > /home/geek/email.txt
df -h >> /home/geek/email.txt
df -h >> /home/geek/email.txt
# List the users that are logged in
# List the users that are logged in
echo "Users currently logged in:" >> /home/geek/email.txt
echo "Users currently logged in:" >> /home/geek/email.txt
who >> /home/geek/email.txt
who >> /home/geek/email.txt
# List currently running processes
# List currently running processes
echo "Running processes:" >> /home/geek/email.txt
echo "Running processes:" >> /home/geek/email.txt
ps -e >> /home/geek/email.txt
ps -e >> /home/geek/email.txt
# Send the email
# Send the email
cat /home/geek/email.txt | mail -s "Daily server information" username@gmail.com
cat /home/geek/email.txt | mail -s "Daily server information" username@gmail.com
# Delete the file we created
# Delete the file we created
rm /home/geek/email.txt
rm /home/geek/email.txt
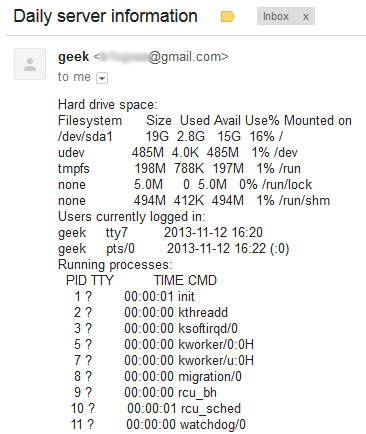
Obviously you can get a lot more in-depth with your script and even make the formatting a little nicer, but this is what the output looks like in our email:
显然,您可以对脚本进行更深入的了解,甚至可以使格式化更好一些,但这就是我们的电子邮件中的输出内容:
Now that the script is written and tested, we can use cron to automatically execute it at the same time every day. In this example, we will configure the email to be sent at 2:00 AM every morning, so we can go through the data later that day.
现在已经编写并测试了脚本,我们可以使用cron在每天的同一时间自动执行它。 在此示例中,我们将电子邮件配置为每天早上2:00 AM发送,因此我们可以在当天晚些时候浏览数据。
$ crontab -e
$ crontab -e
For 2:00 AM emails, add:
对于2:00 AM电子邮件,请添加:
0 2 * * * /home/geek/script.sh
0 2 * * * /home/geek/script.sh
We’ve written an entire article on crontab files if you need more help with this part.
如果您需要有关这部分的更多帮助,我们已经在crontab文件上写了整篇文章。
Windows中的自动电子邮件 (Automated Emails in Windows)
Sending emails at the command line is possible through PowerShell, but we’ve found that implementing this functionality is a lot easier with third party apps, especially when using Gmail. SendEmail is a free program available for Windows that makes integration with Windows Task Scheduler and Gmail a breeze. Click the link above to download the latest copy, and make sure you grab the TLS-supported version.
通过PowerShell可以在命令行中发送电子邮件,但是我们发现,使用第三方应用程序实现此功能要容易得多,尤其是在使用Gmail时。 SendEmail是可用于Windows的免费程序,可轻松与Windows Task Scheduler和Gmail集成。 单击上面的链接以下载最新副本,并确保获取支持TLS的版本。
Once you’ve downloaded SendEmail, extract the zip file and put the contents somewhere that you can store them for as long as you plan to send automated emails. In this example, we’re just going to store the program in C:\SendEmail
下载SendEmail后,解压缩该zip文件并将其内容放置在可以存储它们的地方,只要您打算发送自动电子邮件即可。 在此示例中,我们将程序存储在C:\ SendEmail中
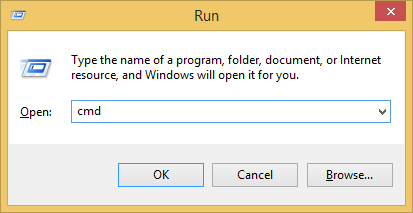
Let’s test out SendEmail to get a quick feel for how it works. Open a command prompt by typing cmd into the Start or Run (Ctrl+R) menu.
让我们测试一下SendEmail,以快速了解它的工作方式。 在“开始”或“运行”(Ctrl + R)菜单中键入cmd,以打开命令提示符。
With the command prompt open, use the change directory command to navigate to where you stored the SendEmail files.
打开命令提示符后,使用change directory命令导航到存储SendEmail文件的位置。
cd C:\SendEmail
cd C:\SendEmail
Now we can try sending a test email with the following command:
现在,我们可以尝试使用以下命令发送测试电子邮件:
sendEmail -f username@gmail.com -t username@gmail.com -s smtp.gmail.com:587 -xu username -xp password -u "Test email subject" -m "This is a test email."
sendEmail -f username@gmail.com -t username@gmail.com -s smtp.gmail.com:587 -xu username -xp password -u "Test email subject" -m "This is a test email."
Obviously, replace “username” and “password” with your account credentials before executing the command.
显然,在执行命令之前,请用您的帐户凭据替换“用户名”和“密码”。
Here’s what the command above actually does:
这是上面的命令实际执行的操作:
sendEmail executes the program.
sendEmail执行程序。
-f – from address
-f –来自地址
-t – to address
-t –地址
-s – SMTP server
-s – SMTP服务器
-xu – account username
-xu –帐户用户名
-xp – account password
-xp –帐户密码
-u – email subject
-u –电子邮件主题
-m – email body text
-m –电子邮件正文
Check your inbox to make sure you received the test email, and then we can move on to writing a script that will send us server information.
检查您的收件箱以确保您收到测试电子邮件,然后我们可以继续编写脚本以向我们发送服务器信息。
为电子邮件编写脚本 (Writing a Script for the Emails)
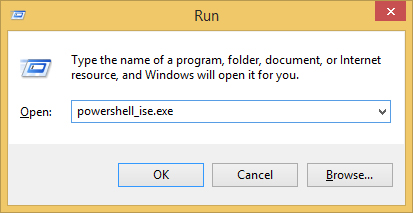
To get the most out of our script, we’re going to write it for PowerShell. Open up Windows PowerShell ISE by typing powershell_ise.exe into a Run prompt (Ctrl+R).
为了充分利用脚本,我们将为PowerShell编写脚本。 通过在运行提示(Ctrl + R)中键入powershell_ise.exe来打开Windows PowerShell ISE。
On the right side of the PowerShell ISE window, you can list every command that PowerShell is capable of executing. This should give you a good start on generating the types of information that you need reported. In your script, you can also call on third party programs to output information as well (i.e. SendEmail is a third party app but PowerShell and cmd can use it to accomplish tasks they normally can’t).
在PowerShell ISE窗口的右侧,您可以列出PowerShell能够执行的每个命令。 这应该为您生成所需报告的信息类型提供一个良好的开端。 在脚本中,您还可以调用第三方程序来输出信息(例如,SendEmail是第三方应用程序,但PowerShell和cmd可以使用它来完成通常无法执行的任务)。

For our example script, we will check the current disk usage of the C drive, show the currently running processes, and show all files that are currently being shared out over the network.
对于我们的示例脚本,我们将检查C驱动器的当前磁盘使用情况,显示当前正在运行的进程,并显示当前正在通过网络共享的所有文件。
# Check hard drive space
# Check hard drive space
echo "C: Drive Usage:" > C:\SendEmail\info.txt
echo "C: Drive Usage:" > C:\SendEmail\info.txt
Get-WmiObject win32_LogicalDisk -Filter "DeviceID='C:'" | Select-Object Size,FreeSpace >> C:\SendEmail\info.txt
Get-WmiObject win32_LogicalDisk -Filter "DeviceID='C:'" | Select-Object Size,FreeSpace >> C:\SendEmail\info.txt
# List currently running processes
# List currently running processes
echo "Running processes:" >> C:\SendEmail\info.txt
echo "Running processes:" >> C:\SendEmail\info.txt
get-process >> C:\SendEmail\info.txt
get-process >> C:\SendEmail\info.txt
# List the files/folders currently being shared
# List the files/folders currently being shared
echo "SMB shares:" >> C:\SendEmail\info.txt
echo "SMB shares:" >> C:\SendEmail\info.txt
get-smbshare >> C:\SendEmail\info.txt
get-smbshare >> C:\SendEmail\info.txt
# Send the email
# Send the email
type C:\SendEmail\info.txt | C:\SendEmail\sendEmail -f username@gmail.com -t username@gmail.com -s smtp.gmail.com:587 -xu username -xp password -u "Daily server info"
type C:\SendEmail\info.txt | C:\SendEmail\sendEmail -f username@gmail.com -t username@gmail.com -s smtp.gmail.com:587 -xu username -xp password -u "Daily server info"
# Delete the file we made
# Delete the file we made
rm C:\SendEmail\info.txt
rm C:\SendEmail\info.txt
In this script, various information is outputted to C:\SendEmail\info.txt, and then the text in that document is emailed to us before it gets deleted. Save your script with a ps1 file extension (PowerShell file).
在此脚本中,各种信息将输出到C:\ SendEmail \ info.txt,然后将该文档中的文本通过电子邮件发送给我们,然后再将其删除。 使用ps1文件扩展名(PowerShell文件)保存脚本。
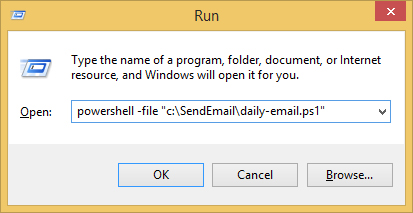
With your script finished, run a quick test from a Run prompt to make sure it’s working properly.
完成脚本后,从“运行”提示运行快速测试以确保其正常运行。
Just use the powershell command with a -file argument and specify the path to your script.
只需将powershell命令与-file参数一起使用并指定脚本的路径即可。
powershell -file "c:\SendEmail\daily-email.ps1"
powershell -file "c:\SendEmail\daily-email.ps1"
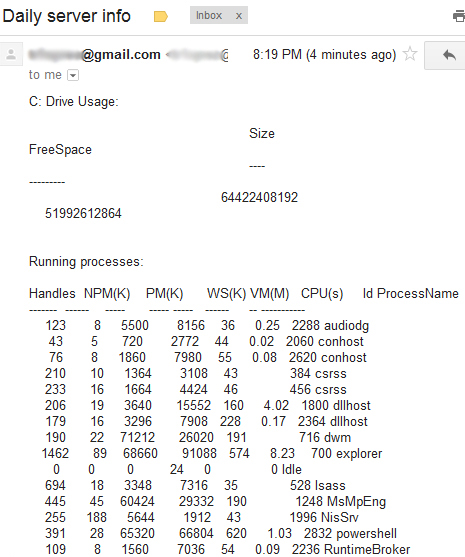
Check your inbox to make sure you received the email – if not, look over your script for syntax errors. Here’s what the generated email from our example script looks like:
检查收件箱以确保您已收到电子邮件-如果未收到,请查看脚本中的语法错误。 这是从我们的示例脚本生成的电子邮件的样子:
You can play around with the formatting (such as echoing empty lines between text) to make it display nicer on your device, or better yet you can use a third party program that will output the needed info in a more readable format than Windows does (the scripting process will still be the same).
您可以尝试使用格式设置(例如在文本之间回显空白行)以使其在设备上更好地显示,或者更好的是,您可以使用第三方程序以比Windows更易读的格式输出所需的信息(脚本编写过程将仍然相同)。
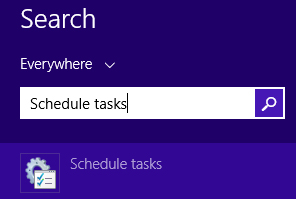
Once you’ve worked out the kinks in your script, you can use Windows Task Scheduler to automate it. Open Windows Task Scheduler via the Start menu.
解决了脚本中的问题后,就可以使用Windows Task Scheduler将其自动化。 通过“开始”菜单打开Windows Task Scheduler。
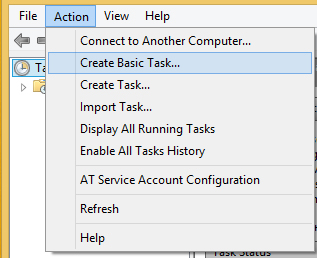
With the Task Scheduler open, select Action > Create Basic Task.
在任务计划程序打开的情况下,选择操作>创建基本任务。
Name this task something like “Daily email script” and click next. On the next screen, select the frequency with which you’d like your email script to run, probably daily. Then, choose the time you’d like the script to run, and hit next.
将该任务命名为“每日电子邮件脚本”,然后单击“下一步”。 在下一个屏幕上,选择您可能希望每天运行电子邮件脚本的频率。 然后,选择您希望脚本运行的时间,然后单击下一步。
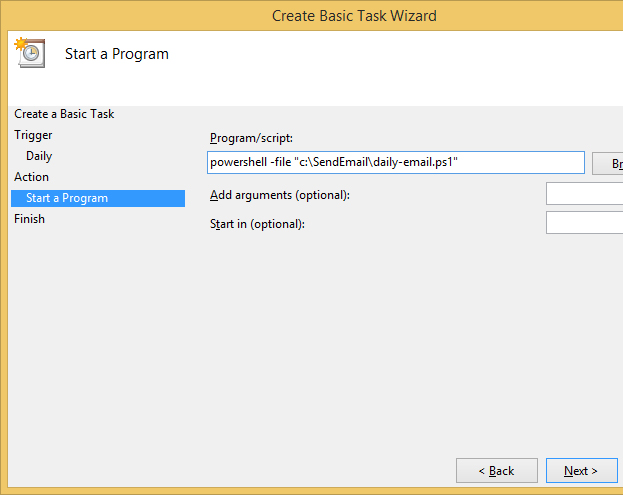
Now you should be on the “Action” part of the wizard, select “Start a Program” and enter the same text that we entered into the Run prompt earlier to test our script.
现在,您应该在向导的“操作”部分,选择“启动程序”,然后输入我们之前在“运行”提示中输入的相同文本来测试脚本。
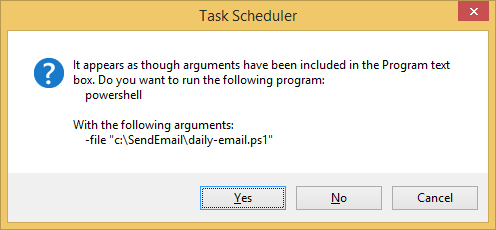
Hit next and then hit Yes on this window:
单击下一步,然后在此窗口上单击是:
Click Finish on the last menu, and you’re done scheduling your automatic emails.
单击最后一个菜单上的“完成”,就可以完成对自动电子邮件的计划了。
翻译自: https://www.howtogeek.com/175830/how-to-automatically-generate-and-email-computer-statistics/
java怎么自动生成统计图


 5421
5421


 被折叠的 条评论
为什么被折叠?
被折叠的 条评论
为什么被折叠?
 到【灌水乐园】发言


