


 本文介绍了如何使用MySQL数据库在多个Kodi设备之间实现媒体库同步,确保不同房间的设备都能共享观看历史记录和状态。通过安装MySQL服务器、设置用户、备份Kodi库以及配置所有Kodi设备连接到MySQL服务器,实现了Kodi的跨设备同步。按照指南步骤操作,即使在不同电视上,观看记录也会保持一致。

emby kodi 同步

Kodi is still one of the most powerful media center applications around, and it works on everything from powerful media PCs to small Raspberry Pis. But if you have multiple TVs in your house, wouldn’t it be nice if they all stayed in sync?
Kodi仍然是周围功能最强大的媒体中心应用程序之一,它可用于从强大的媒体PC到小型Raspberry Pi的所有内容。 但是,如果您家中有多台电视,如果它们都保持同步,那不是很好吗?
By default, if you have multiple Kodi machines, they won’t recognize each other. Episodes you watched on one TV won’t show as “watched” on another. Wouldn’t it be nice, though, if your bedroom Kodi box knew what you watched in the living room, and vice-versa? Would it be nice if you could stop watching a movie in the living room, and resume watching right where you left off somewhere else in the house?
默认情况下,如果您有多台Kodi机器,它们将不会彼此识别。 您在一台电视上观看的剧集不会在另一台电视上显示为“观看”。 但是,如果您的卧室Kodi盒子知道您在客厅观看的内容,反之亦然,这不是很好吗? 如果您可以停止在客厅里看电影,然后继续在房子其他地方停下来观看,那会很好吗?
Well, it’s possible—it just takes a bit of setup. Here’s how to do it.
好吧,这是可能的,只需要进行一些设置即可。 这是操作方法。
你需要什么 (What You’ll Need)
The core of the synchronization magic we’re about to undertake is a MySQL database. Don’t panic if you’ve never used one before! It does require a little technical know-how, but we’re here to guide you every step of the way. If you follow along closely, you shouldn’t have any problems.
我们将要进行的同步魔术的核心是MySQL数据库。 如果您以前从未使用过,请不要惊慌! 它确实需要一些技术知识,但是我们在这里为您提供指导。 如果您密切关注,您应该不会有任何问题。
What we’re going to do is install a free version of MySQL server, then instruct all your Kodi machines to use a database on that server as its library (instead of a separate database on each individual computer). From that point forward, when Kodi checks to see if you’ve seen a specific TV show episode or movie, paused media, or set a bookmark, it won’t just be answering for the specific media center you’re standing in front of, but for all media centers in the house.
我们要做的是安装一个免费版本MySQL服务器,然后指示所有Kodi计算机将该服务器上的数据库用作其库(而不是每台单独计算机上的单独数据库)。 从那时起,当Kodi检查您是否看过特定的电视节目剧集或电影,暂停的媒体或设置书签时,它不仅会回答您所站在的特定媒体中心的问题, ,但适用于公司内部的所有媒体中心。
For this project, you’ll need the following:
对于此项目,您需要以下内容:
More than one media center with Kodi installed (they’ll all need to be the same base version of Kodi—we’ll be using v17 “Krypton” in this guide).
多个安装了Kodi的媒体中心(它们都必须是相同的Kodi基本版本-本指南中将使用v17“ Krypton”)。
A free copy of MySQL Community Server—the Kodi wiki recommends grabbing version 5.5 instead of the newer 5.7, so that’s what we’ll be using for this tutorial.
MySQL Community Server 的免费副本-Kodi Wiki建议使用5.5版而不是较新的5.7版,因此我们将在本教程中使用它。
- An always-on or nearly-always-on computer to run the MySQL server on. 始终在线或几乎始终在线的计算机,以在其上运行MySQL服务器。
You can install the MySQL server on any computer that will be consistently on while you’re using the media centers. In our case, we’re going to install MySQL on the same always-on home server that we store our movies and TV shows on—that way, any time the media is available to Kodi, so is the database.
您可以将MySQL服务器安装在使用媒体中心时始终打开的任何计算机上。 就我们而言,我们将在存储电影和电视节目的同一永远在线家庭服务器上安装MySQL,这样,只要媒体可用于Kodi,数据库就可以。
第一步:安装MySQL服务器 (Step One: Install the MySQL Server)
For this tutorial, we’ll be installing MySQL on a media server running Windows 10. Our installation instructions should match for any version of Windows. For other operating systems, please consult the MySQL 5.5 Manual.
对于本教程,我们将在运行Windows 10的媒体服务器上安装MySQL。我们的安装说明应与任何版本的Windows相匹配。 对于其他操作系统,请查阅MySQL 5.5手册 。
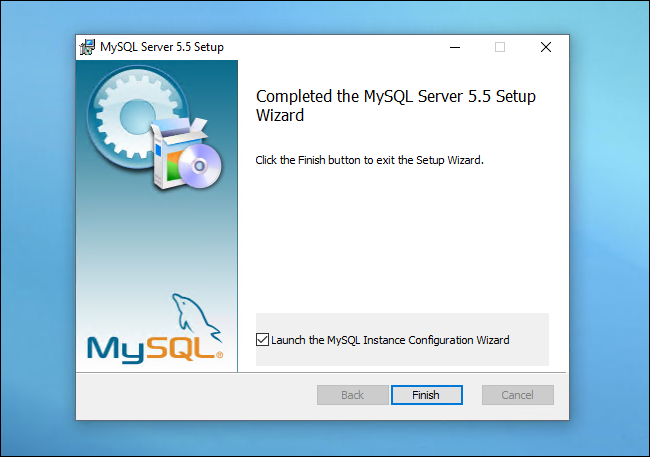
The installation of MySQL is straightforward. Simply download the server installation app and run it. Accept the license agreement and the “Typical” installation. When it’s finished, make sure “Launch the MySQL Instance Configuration Wizard” is checked, and click Finish.
MySQL的安装非常简单。 只需下载服务器安装应用程序并运行它。 接受许可协议和“典型”安装。 完成后,确保选中“启动MySQL实例配置向导”,然后单击“完成”。
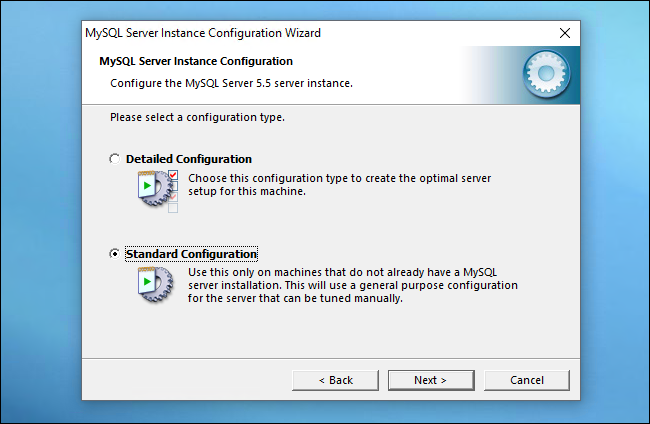
The MySQL configuration wizard will launch and present you with the option to select between Detailed and Standard Configuration. Select Standard Configuration and click Next.
MySQL配置向导将启动,并为您提供在“详细配置”和“标准配置”之间进行选择的选项。 选择标准配置,然后单击下一步。
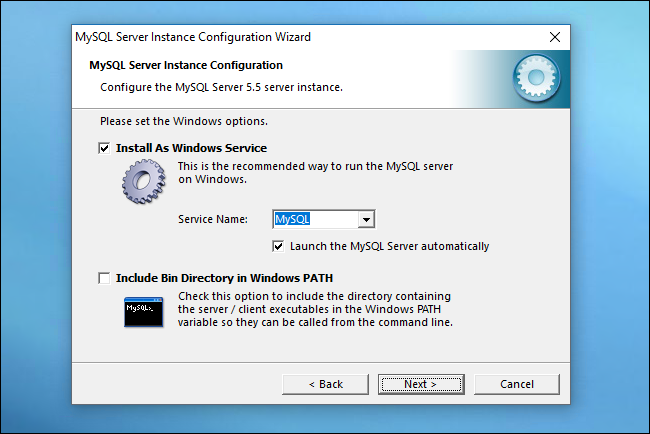
On the next screen, check “Install As Windows Service”, name it MySQL—or, if you’re running multiple MySQL servers for some purpose, give it a unique name—and check “Launch the MySQL Server Automatically” to ensure the MySQL server is always on when you need it.
在下一个屏幕上,选中“作为Windows服务安装”,将其命名为MySQL;或者,如果出于某种目的而运行多个MySQL服务器,则为其指定唯一的名称,然后选中“自动启动MySQL服务器”以确保MySQL需要时,服务器始终处于打开状态。
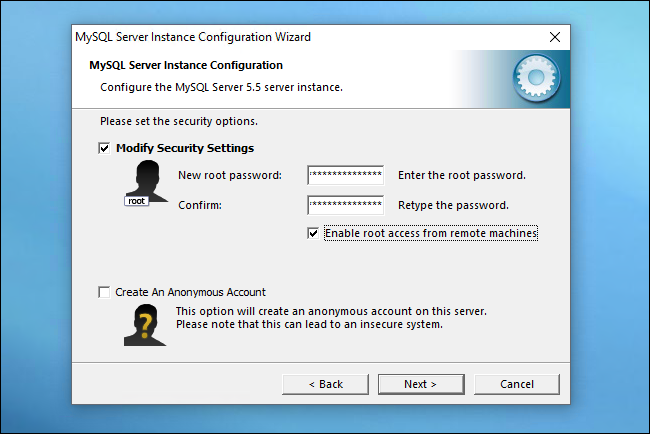
On the next screen, check Modify Security Settings, plug in a new root password, and check Enable root access from remote machines.
在下一个屏幕上,选中“修改安全设置”,插入新的root密码,然后选中“启用来自远程计算机的root访问”。
Click through to the final screen and press Execute to let the wizard set everything up with the parameters you’ve specified. When it’s finished, move on to Step Two.
单击进入最后一个屏幕,然后按执行以使向导使用您指定的参数设置所有内容。 完成后,继续执行第二步。
第二步:设置您MySQL用户 (Step Two: Set Up Your MySQL User)
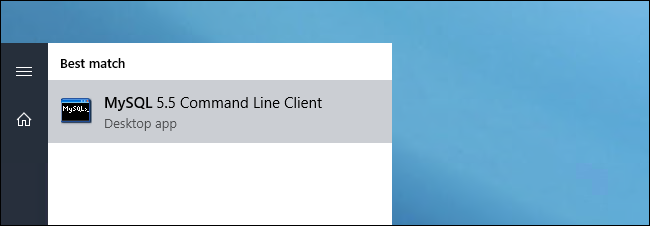
Next, it’s time to create a user account on the MySQL server for your media centers. We’ll need a bit of command line work for this. To start, run the MySQL Command Line Client—you should have an entry for it in your Start Menu.
接下来,是时候在MySQL服务器上为您的媒体中心创建一个用户帐户了。 为此,我们需要一些命令行工作。 首先,运行MySQL命令行客户端-您应该在开始菜单中为其输入一个条目。
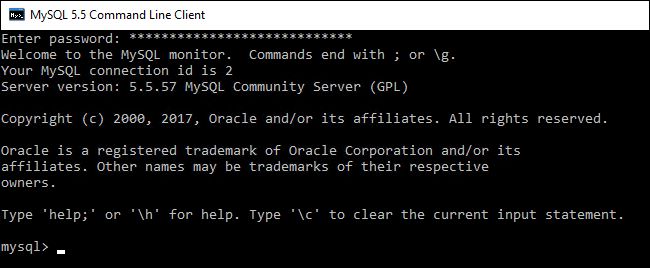
When the console opens, enter the password you created in the previous step. You’ll then find yourself at the MySQL server prompt.
控制台打开时,输入您在上一步中创建的密码。 然后,您将在MySQL服务器提示符下找到自己。
At the prompt, type the following commands, pressing Enter after each one, to create a user on the database server:
在提示符下,键入以下命令,每输入一个命令后按Enter,以在数据库服务器上创建一个用户:
CREATE USER 'kodi' IDENTIFIED BY 'kodi';
GRANT ALL ON *.* TO 'kodi';
flush privileges;
The first portion of the first command creates the user, the second portion creates the password. While identical login/passwords are generally a huge security no-no in this case we’re comfortable using a matching pair for the sake of simplicity. A MySQL database, on a private server, that tracks which episodes of Dexter you’ve watched is hardly a high risk installation.
第一条命令的第一部分创建用户,第二部分创建密码。 尽管相同的登录名/密码通常是一个巨大的安全禁忌,但在这种情况下,为简单起见,我们很乐意使用匹配对。 在私人服务器上的一个MySQL数据库,该数据库跟踪您所观看的Dexter情节几乎不是高风险的安装。

That’s all you need to do in the command line for now—though we recommend keep the command prompt open for the MySQL server, however, as we’re going to check in later and take a peek at the databases once Kodi has created them for us.
这就是您现在需要在命令行中执行的所有操作-尽管我们建议为MySQL服务器打开命令提示符,但是,因为稍后我们将进行检入,并在Kodi为它们创建数据库后浏览数据库我们。
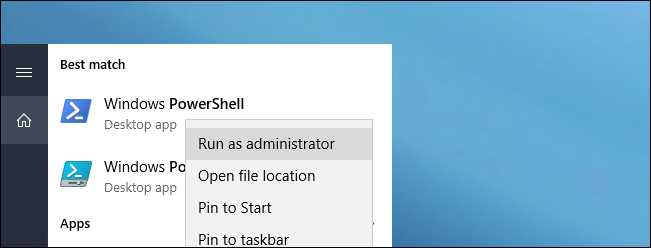
We have one final task before going to configure Kodi. Make sure that Port 3306 (the MySQL server port) is open on the firewall of the machine you’ve installed MySQL onto. By default, the Windows installer should open the port automatically, but we’ve seen situations in which it didn’t. The easiest way to open the port is with a PowerShell command. Search for PowerShell in your Start menu, then right-click on it and choose “Run as Administrator”.
在配置Kodi之前,我们还有最后一项任务。 确保已将MySQL安装到的计算机的防火墙上打开了端口3306(MySQL服务器端口)。 默认情况下,Windows安装程序应自动打开端口,但是我们已经看到了没有打开端口的情况。 打开端口的最简单方法是使用PowerShell命令。 在“开始”菜单中搜索PowerShell,然后右键单击它,然后选择“以管理员身份运行”。
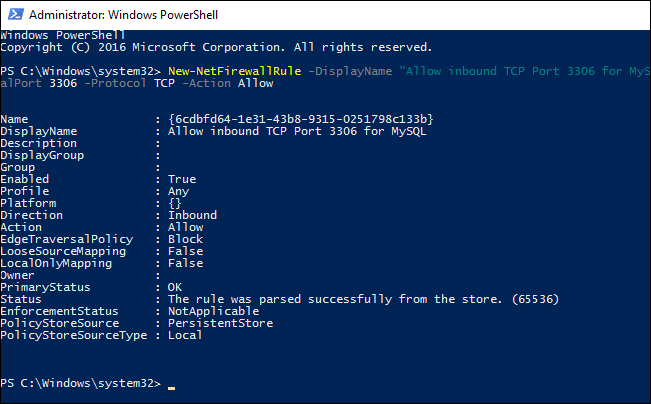
Then, run the following command and press Enter:
然后,运行以下命令并按Enter:
New-NetFirewallRule -DisplayName "Allow inbound TCP Port 3306 for MySQL" -Direction inbound –LocalPort 3306 -Protocol TCP -Action Allow
If the command was successful, as shown below, you should be good to continue.
如果命令成功执行,如下所示,则最好继续。
第三步:备份当前的Kodi库(可选) (Step Three: Back Up Your Current Kodi Library (Optional))
By default, Kodi uses an internal SQLite database. In order for Kodi to communicate effectively across your home network, we need to instruct it to use an external MySQL database. Before we get to that step, however, you’ll need to make an executive decision: you can either back up your current library and restore it later (which can sometimes be finicky), or you can start fresh with a new library (which is easy but will require you to re-set the watched state on your shows, and possibly re-choose your artwork if you don’t store it locally).
默认情况下,Kodi使用内部SQLite数据库。 为了使Kodi能够在您的家庭网络中有效地进行通信,我们需要指示它使用外部MySQL数据库。 但是,在执行此步骤之前,您需要做出一个行政决定:您可以备份当前的库并在以后进行还原(有时可能有点麻烦),也可以从新的库开始(很容易,但是需要您重新设置节目的观看状态,如果您不在本地存储艺术品,则可能需要重新选择艺术品。
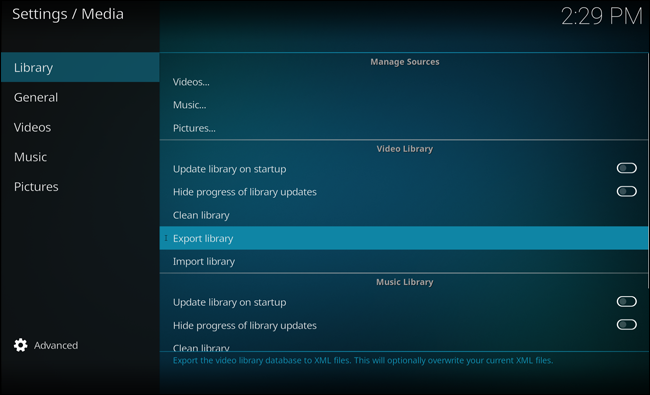
If you want to back up your current library, you can do so from within Kodi. Only do this from one machine—choose the machine with the most up to date libraries. Open Kodi and head to Settings > Media Settings > Export Library. (If you don’t see these options, make sure your menus are set to “Advanced” or “Expert” in Kodi.)
如果要备份当前库,可以在Kodi中进行。 仅在一台计算机上执行此操作-选择具有最新库的计算机。 打开Kodi,然后转到设置>媒体设置>导出库。 (如果看不到这些选项,请确保在Kodi中将菜单设置为“高级”或“专家”。)
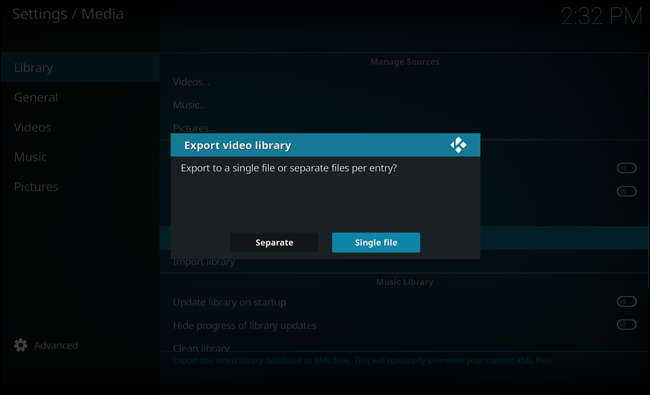
You can export your library as a single file or as separate files. A single file will allow you to put your backup in one place, while multiple files will scatter extra JPG and NFO files into your media folders—this is more reliable, but quite cluttered. Choose whichever option you want.
您可以将库导出为单个文件或单独的文件。 单个文件可让您将备份放在一个位置,而多个文件会将多余的JPG和NFO文件分散到媒体文件夹中-这更可靠,但很混乱。 选择所需的任何选项。
Once your library is backed up, continue to the next step.
备份库后,请继续下一步。
第四步:配置Kodi以使用新MySQL服务器 (Step Four: Configure Kodi to Use Your New MySQL Server)
Once you’ve backed up the library (or opted to not worry about it and start from scratch), you’re ready to point Kodi to your MySQL server. You’ll need to perform this step on every machine running Kodi, but we recommend setting it up on one machine first—probably the same machine you backed up your library from, if you chose to do so.
一旦备份了库(或选择不担心它并从头开始),就可以将Kodi指向MySQL服务器了。 您需要在每台运行Kodi的计算机上执行此步骤,但是我们建议您首先在一台计算机上进行设置-如果选择这样做,可能是您从其库备份的同一台计算机上。
In order to point Kodi to MySQL, we need to edit Kodi’s advancedsettings.xml file. By default this file does not exist (although it is possible that, during the installation process, Kodi created one for you to deal with specific configuration issues). If the advancedsettings.xml file exists, it will be in the following location, based on your OS:
为了将Kodi指向MySQL,我们需要编辑Kodi的advancedsettings.xml文件。 默认情况下,此文件不存在(尽管在安装过程中Kodi可能为您创建了一个文件来处理特定的配置问题)。 如果存在advancedsettings.xml文件,则文件将位于以下位置,具体取决于您的操作系统:
Windows: C:\Users\[username]\AppData\Roaming\Kodi\userdata
Windows :C:\ Users \ [用户名] \ AppData \ Roaming \ Kodi \ userdata
Linux and other Live versions of Kodi: $HOME/.kodi/userdata
Linux和其他Kodi Live版本 :$ HOME / .kodi / userdata
macOS: /Users/[username]/Library/Application Support/Kodi/userdata
macOS :/ Users / [用户名] / Library / Application Support / Kodi / userdata
Check in that folder. Is there an advancedsettings.xml file there? Yes? Open it up. No? You’ll need to open a text editor and create one. Regardless of whether you’re editing the existing one or create a new one, cut and paste the following text into the file (note: if there are already some entries in your advancedsettings.xml file, leave those in place and put these values within the correct sections):
检入该文件夹。 那里有Advancedsettings.xml文件吗? 是? 打开它。 没有? 您需要打开一个文本编辑器并创建一个。 无论您是编辑现有的还是创建新的,都将以下文本剪切并粘贴到文件中(请注意:如果您的advancedsettings.xml文件中已经有一些条目,请保留这些条目并将其放在正确的部分):
<advancedsettings> <videodatabase> <type>mysql</type> <host>192.168.1.10</host> <port>3306</port> <user>kodi</user> <pass>kodi</pass> </videodatabase>
<advancedsettings> <videodatabase> <type> mysql </ type> <host> 192.168.1.10 </ host> <port> 3306 </ port> <user> kodi </ user> <pass> kodi </ pass> </视频数据库>
<musicdatabase> <type>mysql</type> <host>192.168.1.10</host> <port>3306</port> <user>kodi</user> <pass>kodi</pass> </musicdatabase> </advancedsettings>
<musicdatabase> <type> mysql </ type> <host> 192.168.1.10 </ host> <port> 3306 </ port> <user> kodi </ user> <pass> kodi </ pass> </ musicdatabase> < / advancedsettings>
Edit the above text to reflect the IP address of your server on your LAN and the username/password of your MySQL database (in our example, it was just kodi/kodi). This basic setup should get your video and music libraries synced, but you can also sync other portions of Kodi, as well as sync multiple profiles with the name tag if you use them.
编辑上面的文本,以反映局域网上服务器的IP地址和MySQL数据库的用户名/密码(在我们的示例中,它只是kodi / kodi)。 此基本设置应使您的视频和音乐库同步,但是如果您使用Kodi ,还可以同步Kodi的其他部分 ,以及使用name标签同步多个配置文件 。

Once your advancedsettings.xml file is ready to go, open Kodi on that machine. You’ll need to either import your library (from Settings > Media Settings > Import Library), or rescan your sources to begin populating the MySQL database from scratch. Do that now.
准备好您的advancedsettings.xml文件后,请在该计算机上打开Kodi。 您需要导入库(从“设置”>“媒体设置”>“导入库”),或重新扫描源以开始从头开始填充MySQL数据库。 现在就做。
When that’s done and your library is back in place, you can hop over to your MySQL command prompt and check to make sure Kodi created and populated the databases. At the mySQL comment prompt, run:
完成之后,您的库就位了,您可以跳到MySQL命令提示符并检查以确保Kodi创建并填充了数据库。 在mySQL注释提示下,运行:
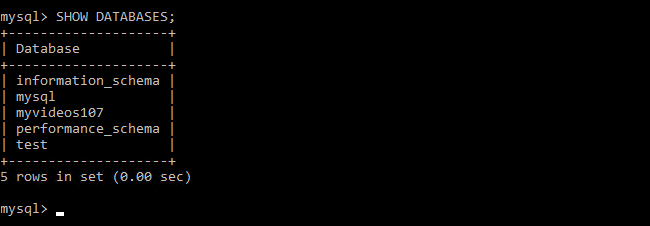
SHOW DATABASES;
It will output all the databases currently on the MySQL server. You should see, at minimum, at least the following databases: information_schema , mysql , and performance_scheme , as these are part of the MySQL installation itself. The default database names for Kodi are myvideos107 and mymusic60 (we’re not using a database for music in our example, so only our video database is appearing in the list).
它将输出当前在MySQL服务器上的所有数据库。 您至少应该至少看到以下数据库: information_schema , mysql和performance_scheme ,因为它们是MySQL安装本身的一部分。 Kodi的默认数据库名称是myvideos107和mymusic60 (在我们的示例中,我们没有使用音乐数据库,因此列表中仅显示视频数据库)。
If you ever need to remove a database from your MySQL server, you can use the following command:
如果您需要从MySQL服务器中删除数据库,则可以使用以下命令:
DROP DATABASE databasename;
Empty databases take up hardly any space, and won’t negatively impact the performance of your syncing system, but it’s nice to keep things tidy.
空数据库几乎不占用任何空间,并且不会对同步系统的性能产生负面影响,但是保持整洁是很好的。
If your databases are there, that’s a good start, but it’s worth performing a simple check to see if Kodi is properly populating the databases. From the MySQL command prompt run the following commands (replacing databasename with the name of your video database):
如果您的数据库在那里,那是个不错的开始,但是值得进行一次简单的检查,看看Kodi是否正确地填充了数据库。 在MySQL命令提示符下,运行以下命令(将databasename名称替换为视频数据库的名称):
SELECT COUNT(*) from databasename.movie;
SELECT COUNT(*) from databasename.tvshow;
Each query will return the total number of movies and television shows, respectively, contained in your library (according to the the MySQL database). As you can see, in our case, it is recognizing our library with 182 movies and 43 TV shows:
每个查询将分别返回库中包含的电影和电视节目总数(根据MySQL数据库)。 如您所见,在我们的案例中,它以182部电影和43部电视节目识别了我们的图书馆:

If the number of entries is zero, there is a problem somewhere along the line. Here’s is a quick troubleshooting checklist of common mistakes:
如果条目数为零,则说明该行某处存在问题。 这是常见错误的快速故障排除清单:
- Did you copy the advancedsettings.xml file to your machine before you started Kodi and re-populated your library? 在启动Kodi并重新填充库之前,您是否将advancedsettings.xml文件复制到您的计算机上?
- Did you use the GRANT ALL command to give the Kodi account access to the MySQL server? 您是否使用GRANT ALL命令授予Kodi帐户对MySQL服务器的访问权限?
- Did you open port 3306 on the MySQL host machine’s firewall? 您是否在MySQL主机的防火墙上打开了端口3306?
- Are your sources valid and scannable when you remove the advancedsettings.xml file and revert to the local database? If not, you’ll need to troubleshoot your sources independently of your MySQL problems. 当您删除advancedsettings.xml文件并还原到本地数据库时,您的源有效且可扫描吗? 如果没有,您将需要独立于MySQL问题对源进行故障排除。
If everything looks good and your SELECT COUNT query pans out, that means you’re ready to start taking advantage of the cross-media-center syncing.
如果一切正常,并且您的SELECT COUNT查询成功,则意味着您已准备好开始利用跨媒体中心同步。
第五步:对其他Kodi机器重复第四步 (Step Five: Repeat Step Four for Your Other Kodi Machines)
The hard part is over! Now you just need to go to each of your other Kodi machines and place the same text in the advancedsettings.xml file that you did in step four. Once you do so (and restart Kodi on that machine), it should immediately grab your library information from the MySQL server (instead of you needing to re-populate the library yourself).
困难的部分结束了! 现在,您只需要转到其他每台Kodi机器,并将与第四步中相同的文本放置在advancedsettings.xml文件中。 一旦这样做(然后在那台机器上重启Kodi),它应该立即从MySQL服务器上获取您的库信息(而不是您需要自己重新填充库)。
On some devices, like Raspberry Pis running LibreELEC, you’ll need to go into the Network settings and make sure “Wait for network before starting Kodi” is turned on for this to work properly.
在某些设备上,例如运行LibreELEC的Raspberry Pi,您需要进入“网络”设置,并确保打开“在启动Kodi之前等待网络”才能正常工作。
In addition, if your videos are on a share that requires a password, and you get an error after setting up your advancedsettings.xml on a new machine, you may have to go to the “Files” view, click “Add Videos”, and access a folder on the share so Kodi prompts you for your credentials. You can then click “Cancel” or add the source as containing “None” type of media.
此外,如果您的视频位于需要密码的共享上,并且在新计算机上设置了advancedsettings.xml后出现错误,则可能必须转到“文件”视图,单击“添加视频”,并访问共享上的文件夹,以便Kodi提示您输入凭据。 然后,您可以单击“取消”或将源添加为包含“无”类型的媒体。
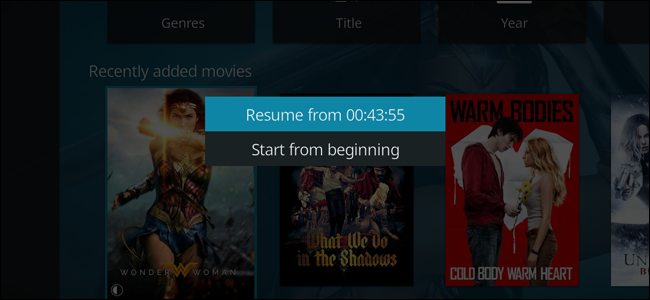
From there, try watching a video on one box. You should find that when you’re finished, it shows as “watched” on your other Kodi devices as well! You can even stop a video on one machine, then pick up where you left off just by selecting it to play on another machine. Enjoy your new whole-house library syncing!
从那里,尝试在一个盒子上观看视频。 您应该发现完成后,它在其他Kodi设备上也显示为“已观看”! 您甚至可以在一台机器上停止视频,然后只需选择要在另一台机器上播放的视频,即可从上次中断的地方接听。 享受新的全屋图书馆同步!
Image Credit: FLIRC Kodi Edition Raspberry Pi Case
图片来源: FLIRC Kodi版Raspberry Pi保护壳
翻译自: https://www.howtogeek.com/75535/how-to-sync-your-media-across-your-entire-house-with-xbmc/
emby kodi 同步


 876
876

 被折叠的 条评论
为什么被折叠?
被折叠的 条评论
为什么被折叠?
 到【灌水乐园】发言


