


dd-wrt固件

We’ve already shown you how to mod your home router with the DD-WRT alternative firmware for greatly improved performance, and today we’re going to show you how to take it even further with the DD-WRT Mod-Kit.
我们已经向您展示了如何使用DD-WRT替代固件来调制家用路由器,以大大提高性能,今天,我们将向您展示如何使用DD-WRT Mod-Kit进一步扩展它。
If you haven’t already, be sure and check out the two previous articles in the series:
如果还没有,请确保并查看该系列中的前两篇文章:
Turn Your Home Router Into a Super-Powered Router with DD-WRT
How to Boost Your Wi-Fi Network Signal and Increase Range with DD-WRT
Assuming you are familiar with those topics, keep reading. Keep in mind that this guide is a little more technical, and beginners should be careful when modding their router.
假设您熟悉这些主题,请继续阅读。 请记住,本指南是一些技术性文章,初学者在更换路由器时应格外小心。
总览 (Overview)
This guide will give a step by step rundown of how to create your own DD-WRT firmware with modifications and additions using the “firmware modification kit“.
本指南将逐步介绍如何使用“ 固件修改套件 ”通过修改和添加来创建自己的DD-WRT固件。
The firmware modification kit enables one to make modifications to the firmware without compiling it from source. Making changes this way, with the aid of the provided scripts, becomes a simple matter of downloading, replacing and deleting some files.
固件修改套件使您无需从源代码进行编译即可对固件进行修改。 在提供的脚本的帮助下,以这种方式进行更改成为下载,替换和删除某些文件的简单问题。
The most predominant reason to use this method is because lately DD-WRT’s support for the Openwrt IPKG packages has shifted towards routers that have hard drives (via USB), which makes the mod-kit the only consistently working way of installing the IPKG packages successfully for cases where an HD is unavailable. In addition, this method has the added advantage of relieving you from the JFFS dependency for packages installation, which for routers with only 4MB of flash is a real problem.
使用此方法的最主要的原因是因为DD-WRT最近对Openwrt IPKG软件包的支持已转向具有硬盘驱动器的路由器(通过USB),这使mod-kit成为成功安装IPKG软件包的唯一一致的工作方式对于无法使用HD的情况。 此外,此方法还具有使您摆脱安装软件包的JFFS依赖性的优点,对于仅具有4MB闪存的路由器而言,这是一个实际问题。
目标 (Goals)
While instructions for this procedure, are detailed on DD-WRT’s wiki and on the developer’s site, we aim to make this guide a copy & paste procedure that anyone can use to achieve the following goals:
尽管有关此过程的说明在DD-WRT的Wiki和开发人员的网站上都有详细说明,但我们的目标是使本指南成为一个复制粘贴过程,任何人都可以用来实现以下目标:
- Install the knockd package and its dependencies. 安装已敲除的软件包及其依赖项。
Install the ssmtp package with NVRAM based generated configurations.
使用基于NVRAM的生成的配置安装ssmtp软件包。
- Optionally with support for TLS smtp (a.k.a. Gmail support). (可选)支持TLS smtp(又名Gmail支持)。
Once you have followed this procedure it should be relevantly simple to adapt it for other packages installations.
完成此过程后,将其简单地适应于其他软件包安装就应该很简单。

Warning: Tread lightly… keep in mind that incorrect usage of the modification kit, can leave you with a router that needs de-brick-ing (as in turn it into a useless brick). However if you’re a true geek you probably subscribe to the ideology that, he who can destroy a thing, controls a thing, and only true geeks do that
警告 :轻踩一下……请记住,错误使用改装套件会导致您需要拆卸砖头的路由器(从而将其变成无用的砖头 )。 但是,如果您是真正的怪胎,则您可能会接受这样的意识形态: 他可以摧毁事物,控制事物 ,只有真正的怪才能够做到这一点
先决条件 (Prerequisites)
Using this procedure can brick your router, as in make your router unusable, we take no responsibility for any damages that may be caused directly or other wise due to the use of the procedures below.
使用此步骤可能会使您的路由器变砖 ,因为使您的路由器无法使用,对于因使用以下步骤可能直接或其他原因造成的任何损坏,我们不承担任何责任。
- This procedure was performed on Debian based systems (Lenny, Squeeze and Mint) and the instructions below assume you are using one as well. 该过程是在基于Debian的系统(Lenny,Squeeze和Mint)上执行的,下面的说明假定您也正在使用一个。
This procedure is only recommended for people who have experience with flashing their router with DD-WRT, with all the prerequisites,caveats and limitations that apply for their hardware setup. a good place to start would be our Turn Your Home Router Into a Super-Powered Router with DD-WRT guide.
仅对于具有使用DD-WRT刷新路由器并具有适用于其硬件设置的所有先决条件,注意事项和限制的经验的人员,建议执行此过程。 一个不错的起点是我们的《 将您的家用路由器变成具有DD-WRT的超级功率路由器》指南。
- Your router has to support at least the “mini” version of DD-WRT. 您的路由器必须至少支持DD-WRT的“迷你”版本。
- This procedure was created and tested on Linksys WRT54GS/L routers, if your using routers from other vendors, your mileage may very. 此过程是在Linksys WRT54GS / L路由器上创建并测试的,如果您使用其他供应商的路由器,则可能会非常麻烦。
建立 (Setup)
Installing required packages
安装所需的软件包
The firmware modification kit has some dependencies for it to compile and work. In order to install/update them all at once Issue this command in a terminal:
固件修改套件具有一些依赖项,因此它无法编译和工作。 为了一次安装/更新它们,请在终端中发出以下命令:
sudo aptitude install gcc g++ binutils patch bzip2 flex bison make gettext unzip zlib1g-dev libc6 subversion
sudo aptitude install gcc g++ binutils patch bzip2 flex bison make gettext unzip zlib1g-dev libc6 subversion
Download the mod-kit
下载mod-kit
Create a sub-folder, and get the kit from the official SVN:
创建一个子文件夹,然后从官方SVN获取套件:
mkdir firmware_mod_kit
 cd firmware_mod_kit
 svn checkout http://firmware-mod-kit.googlecode.com/svn/trunk/ firmware-mod-kit-read-only
 cd firmware-mod-kit-read-only/trunk/
mkdir firmware_mod_kit
 cd firmware_mod_kit
 svn checkout http://firmware-mod-kit.googlecode.com/svn/trunk/ firmware-mod-kit-read-only
 cd firmware-mod-kit-read-only/trunk/
Download a firmware to work on
下载固件以继续工作
The first thing to consider is which version you want to use? A rule of thumb is: when in doubt use “mini”. This is because as long as your router supports at least the “mini” version, using it gives you all of the most commonly used features without any bloatware. thus leaving both space for the procedures and even some JFFS space for other usages in most cases.
首先要考虑的是您要使用哪个版本? 经验法则是:如有疑问,请使用“迷你”。 这是因为只要您的路由器至少支持“ mini”版本,使用它就可以为您提供所有最常用的功能,而无需任何膨胀软件。 因此,在大多数情况下,都为过程保留了空间,甚至为其他用法保留了一些JFFS空间。
Once you’ve decided on a version, it is recommended to use the latest revision of the firmware available, as they tend to have a lot of bug fixes compared to their “stable” counterparts. At the time of this writing the latest was “03-17-11-r16454” and this revision is used in the commands that follow.
确定版本后,建议使用可用固件的最新版本,因为与“稳定”版本相比,它们往往有很多错误修复。 在撰写本文时,最新的版本是“ 03-17-11-r16454”,并且此版本在随后的命令中使用。
wget http://www.dd-wrt.com/dd-wrtv2/downloads/others/eko/BrainSlayer-V24-preSP2/2011/03-17-11-r16454/broadcom/dd-wrt.v24_mini_generic.bin
wget http://www.dd-wrt.com/dd-wrtv2/downloads/others/eko/BrainSlayer-V24-preSP2/2011/03-17-11-r16454/broadcom/dd-wrt.v24_mini_generic.bin
In order to make it easier to keep track of what version we are using, rename the downloaded file to represent its version number:
为了更容易跟踪我们使用的版本,请重命名下载的文件以表示其版本号:
mv dd-wrt.v24_mini_generic.bin dd-wrt.v24_mini_generic-03-17-11-r16454.bin
mv dd-wrt.v24_mini_generic.bin dd-wrt.v24_mini_generic-03-17-11-r16454.bin
This is of course optional, but the commands below assume that you have renamed the file.
这当然是可选的,但是下面的命令假定您已重命名该文件。
Extracting the firmware
提取固件
In order to be able to change files within the firmware we need to extract its content into a temporary directory. The syntax of this command is: ./extract_firmware.sh FIRMWARE_IMAGE WORKING_DIRECTORY In our case, this would translate to:
为了能够更改固件中的文件,我们需要将其内容提取到一个临时目录中。 该命令的语法是:./extract_firmware.sh FIRMWARE_IMAGE WORKING_DIRECTORY在我们的例子中,这将转换为:
./extract_firmware.sh dd-wrt.v24_mini_generic-03-17-11-r16454.bin ./working_dir_mini1
./extract_firmware.sh dd-wrt.v24_mini_generic-03-17-11-r16454.bin ./working_dir_mini1
Note: The first time you run this command, it builds the mod-kit tools on your system. this happens only once and may take a little while… so be patient…
注意:第一次运行此命令时,它将在您的系统上构建mod-kit工具。 这只会发生一次,可能要花一点时间...所以要耐心...
安装套件 (Installing packages)
Now that the firmware is extracted we can install the packages to it. In general, the procedure is to download the package and its dependencies in the form of an ipk file from the openWRT repository. Once downloaded install them into the extracted firmware using the provided script.
现在,固件已解压缩,我们可以将软件包安装到其中了。 通常,过程是从openWRT存储库以ipk文件的形式下载软件包及其依赖项 。 下载完成后,使用提供的脚本将它们安装到提取的固件中。
敲开包装 (The knockd package)
Detailed instructions on how to configure and use Knockd will be detailed in a future article, so you may opt to skip this step for now or do it in preparation for the future as Knockd doesn’t take a lot of space anyhow.
有关如何配置和使用Knockd的详细说明将在以后的文章中详细介绍,因此您可以选择暂时跳过此步骤,或者为将来做准备,因为Knockd不会占用太多空间。
Knockd is a daemon that listens to communication events at the link layer for sequences then acts on them. What this means, is that you can have the device running the daemon not even “listen” on the ports (a port scan will not see them as open) and still make it do something you need, from a single command all the way up to a full script. Using this technique you could trigger the server to perform any sort of operation you need of it remotely (across the internet) without exposing your home network.
Knockd是一个守护程序,它在链接层侦听通信事件以获取序列,然后对其进行操作。 这是什么意思,就是你可以有设备运行进程甚至没有端口“听”(端口扫描不会看到他们开放),仍然让它做你需要的东西,从一个单一的命令所有的一路攀升完整的脚本。 使用此技术,您可以触发服务器远程(通过Internet)执行您需要的任何类型的操作,而无需暴露您的家庭网络。
Knockd has only one listed dependency, so download the package and its dependency by issuing:
Knockd仅列出了一个依赖项,因此可以通过发出以下命令来下载软件包及其依赖项:
wget http://downloads.openwrt.org/backports/rc5/knockd_0.5-1_mipsel.ipk
 wget http://downloads.openwrt.org/whiterussian/packages/libpcap_0.9.4-1_mipsel.ipk
wget http://downloads.openwrt.org/backports/rc5/knockd_0.5-1_mipsel.ipk
 wget http://downloads.openwrt.org/whiterussian/packages/libpcap_0.9.4-1_mipsel.ipk
Install the “knock daemon” (knockd) ipk into the firmware:
在固件中安装“ knock守护程序”(knockd)ipk:
./ipkg_install.sh knockd_0.5-1_mipsel.ipk ./working_dir_mini1/
./ipkg_install.sh knockd_0.5-1_mipsel.ipk ./working_dir_mini1/
Install the “packet capture” (libpcap) ipk into the firmware:
将“数据包捕获”(libpcap)ipk安装到固件中:
./ipkg_install.sh libpcap_0.9.4-1_mipsel.ipk ./working_dir_mini1/
./ipkg_install.sh libpcap_0.9.4-1_mipsel.ipk ./working_dir_mini1/
As “knockd” can be invoked with an alternate configuration file (how will be explained in a future article), there is no need to perform any other operation and you may skip to the firmware building section, if its all you wanted to install.
由于“ knockd”可以通过备用配置文件调用(将在以后的文章中进行介绍),因此无需执行任何其他操作,并且如果要安装所有固件,则可以跳至“固件构建”部分。
SSMTP程序包 (The SSMTP package)
The SSMTP package enables your router to send Email messages just like we showed in our How To Setup Email Alerts on Linux Using Gmail or SMTP for servers. We promised you back then that we will show how to configure this for DD-WRT and we will now deliver. This is mainly useful if your going to create scripts on the router that you would like to receive feedback on their operation via email.
SSMTP软件包使您的路由器能够发送电子邮件,就像我们在Linux上如何使用Gmail或SMTP为服务器设置电子邮件警报中所显示的那样。 那时我们已经向您保证,我们将展示如何为DD-WRT进行配置,现在我们将交付。 如果您要在路由器上创建脚本并希望通过电子邮件接收有关其操作的反馈,则此功能非常有用。
This package’s setup is a bit more complex then it is on normal Linux systems because of the limitation imposed by an embedded system, so take a deep breath… ready?…. lets go… :)
由于嵌入式系统的限制,该软件包的设置要比普通Linux系统复杂一些,因此请深呼吸……准备好了吗……。 我们走吧… :)
Download the package:
下载包:
wget http://downloads.openwrt.org/backports/rc5/ssmtp_2.61-1_mipsel.ipk
wget http://downloads.openwrt.org/backports/rc5/ssmtp_2.61-1_mipsel.ipk
Install the “ssmtp” ipk into the firmware:
将“ ssmtp” ipk安装到固件中:
./ipkg_install.sh ssmtp_2.61-1_mipsel.ipk ./working_dir_mini1/
./ipkg_install.sh ssmtp_2.61-1_mipsel.ipk ./working_dir_mini1/
TLS support (Optional) SSMTP doesn’t list any other packages as its dependencies, however if you want to be able to use an smtp gateway that requires TLS authentication (i.e. Gmail), you have to install the openSSL pakage as well. Note: There is a HUGE drawback to doing this in the form of considerably reduced space on the router for JFFS later on. That is, the openSSL package takes about 500K of space from your total of 4MB (for a normal non “mega” supporting router), compound to that the JFFS overhead and you will discover that your left with, but a precious few, blocks of free JFFS space (about 60KB on WRT54GL).
TLS支持(可选) SSMTP不会列出任何其他软件包作为其依赖项,但是,如果您希望能够使用需要TLS身份验证的smtp网关(例如Gmail ),则还必须安装openSSL软件包。 注意 :这样做的缺点是,稍后在JFFS路由器上的空间会大大减少。 也就是说,openSSL软件包从您的总4MB(用于普通的非“巨型”支持路由器)中占用了大约500K的空间,加之JFFS开销,您会发现剩下的只有很少的块空间。免费的JFFS空间(在WRT54GL上约为60KB)。
As there are still non TLS requiring smtp servers out there (usually your ISP’s), i suggest taking a minute to think if you really need to use the TLS requiring gateway.
由于仍然有非TLS要求smtp服务器(通常是ISP的服务器),我建议花一点时间考虑一下您是否真的需要使用TLS要求网关。
If you have decided to enable TLS support despite its disadvantage, download the openSSL package:
如果您决定启用TLS支持(尽管有其缺点),请下载openSSL软件包:
wget http://downloads.openwrt.org/whiterussian/packages/libopenssl_0.9.8d-1_mipsel.ipk
wget http://downloads.openwrt.org/whiterussian/packages/libopenssl_0.9.8d-1_mipsel.ipk
Install the “openSSL” (libopenssl) ipk into the firmware:
将“ openSSL”(libopenssl)ipk安装到固件中:
./ipkg_install.sh libopenssl_0.9.8d-1_mipsel.ipk ./working_dir_mini1/
./ipkg_install.sh libopenssl_0.9.8d-1_mipsel.ipk ./working_dir_mini1/
Configurations There is a limitation with the SSMTP package, that it is not possible to invoke it with an alternate configuration file. Because the firmware is read-only when its on the router, that means that out of the box we can only hardcode the configuration into the firmware. However, what if we don’t want to go through all of the firmware modification steps, just to change the Email settings? (for example a password change).
配置 SSMTP程序包存在一个限制,即无法使用备用配置文件来调用它。 因为固件在路由器上时是只读的,所以这意味着我们只能将配置硬编码到固件中。 但是,如果我们不想更改所有固件修改步骤,而只是更改电子邮件设置怎么办? (例如密码更改)。
To that end, both Jeremy (the firmware mod-kit creator) and myself reached the conclusion (independently if i may humbly add) that the only sane way to do this would be to:
为此,Jeremy(固件mod-kit的创建者)和我本人都得出了结论(如果可以谦虚地补充说,则是独立的),这样做的唯一明智的方法是:
- Make the configuration files location which the ssmtp package points to the read-only location under etc, point to the tmp directory which is writable to at runtime. 将ssmtp程序包指向的配置文件位置指向etc下的只读位置,指向在运行时可写的tmp目录。
- Create a script that would dynamically generate the configurations based off of NVRAM variables at startup. 创建一个脚本,该脚本将在启动时根据NVRAM变量动态生成配置。
To achieve that, some additional steps are required…
为此,还需要一些其他步骤……
Symlink the ssmtp configuration directory As explained above, we need to make the /etc/ssmtp location on the router, point to the /tmp directory as its the only writable place we have on the router at run time. To do this, delete the ssmtp directory that was created by the ipk installer:
Symlink ssmtp配置目录如上所述,我们需要在路由器上放置/ etc / ssmtp位置,指向/ tmp目录,这是我们在运行时在路由器上唯一可写的位置。 为此,请删除由ipk安装程序创建的ssmtp目录:
rm -rf ./working_dir_mini1/rootfs/etc/ssmtp/
rm -rf ./working_dir_mini1/rootfs/etc/ssmtp/
Create a new symbolic link that points the /etc/ssmtp on the router’s root file-system, to point to /tmp/etc/ssmtp as an absolute path:
创建一个新的符号链接,该链接指向路由器的根文件系统上的/ etc / ssmtp,并指向/ tmp / etc / ssmtp作为绝对路径:
ln -s /tmp/etc/ssmtp/ ./working_dir_mini1/rootfs/etc/ssmtp
ln -s /tmp/etc/ssmtp/ ./working_dir_mini1/rootfs/etc/ssmtp
Note: Even though this looks illogical right now, because we are pointing the package’s configuration directory to a location outside of the firmware modification kit’s working directory, I assure you that this looks totally fine from the routers point of view at run time.
注意 :即使现在看来这是不合逻辑的,但是由于我们将软件包的配置目录指向了固件修改工具包工作目录之外的位置,因此我向您保证,从运行时的路由器角度来看,这一切都很好。
An init script While it is completely possible to not inject this script into the firmware and run it as a startup script later on, I feel its appropriate to put it here if only as an example for future use. Originally Jeremy created the script tailored to someone’s request, later on, I adjusted and augmented it to be more compatible with DD-WRT and syslog reporting.
初始化脚本尽管完全可以不将该脚本注入固件并稍后将其作为启动脚本运行,但我觉得应该将其放在此处,以作为将来的示例。 最初,Jeremy创建了针对某人的请求量身定制的脚本,后来,我对其进行了调整和扩充,使其与DD-WRT和syslog报告更加兼容。
Create the new init (startup) script:
创建新的初始化(启动)脚本:
vi ./working_dir_mini1/rootfs/etc/init.d/S80ssmtp
vi ./working_dir_mini1/rootfs/etc/init.d/S80ssmtp
Note: You may use another editor, I use vi because its consistent with what’s available on the router… Make this its content:
注意:您可以使用其他编辑器,我使用vi是因为它与路由器上的可用文件保持一致...使其内容:
#!/bin/sh
 #
 # title: ssmtp_nvram.sh
 # author: Jeremy Collake and Aviad Raviv
 # site: http://www.bitsum.com, http://howtogeek.com
 #
 # script to build config file from nvram vars.
 # will work for any config file that uses
 # var=value type pairs.
 #
 # uses prefixes for nvram variables.
 #
 # i.e.
 # ssmtp_hostname=something
 # translates to ssmtp.conf
 # hostname=something
 #
 logger_func()
 {
 logger -s -p local0.notice -t SSMTP_init $1
 }
#!/bin/sh
 #
 # title: ssmtp_nvram.sh
 # author: Jeremy Collake and Aviad Raviv
 # site: http://www.bitsum.com, http://howtogeek.com
 #
 # script to build config file from nvram vars.
 # will work for any config file that uses
 # var=value type pairs.
 #
 # uses prefixes for nvram variables.
 #
 # ie
 # ssmtp_hostname=something
 # translates to ssmtp.conf
 # hostname=something
 #
 logger_func()
 {
 logger -s -p local0.notice -t SSMTP_init $1
 }
logger_func "###########Started the SSMTP init run###########"
 logger_func "Creating the etc directory in /tmp"
 [ ! -d /etc/ssmtp/ ] && mkdir -p /tmp/etc/ssmtp/
 CONFIG_FILE=/etc/ssmtp/ssmtp.conf
 NVRAM_PREFIX=ssmtp_
 PACKAGE_NAME=`echo $NVRAM_PREFIX | sed 's/_/ /'`
logger_func "###########Started the SSMTP init run###########"
 logger_func "Creating the etc directory in /tmp"
 [ ! -d /etc/ssmtp/ ] && mkdir -p /tmp/etc/ssmtp/
 CONFIG_FILE=/etc/ssmtp/ssmtp.conf
 NVRAM_PREFIX=ssmtp_
 PACKAGE_NAME=`echo $NVRAM_PREFIX | sed 's/_/ /'`
logger_func "Generating $CONFIG_FILE for package $PACKAGE_NAME"
 #echo $0: generating $CONFIG_FILE for package $PACKAGE_NAME
 echo "#!/bin/sh" > $CONFIG_FILE
 echo "#" >> $CONFIG_FILE
 echo "# auto generated based on nvram by $0" >> $CONFIG_FILE
 echo "#" >> $CONFIG_FILE
logger_func "Generating $CONFIG_FILE for package $PACKAGE_NAME"
 #echo $0: generating $CONFIG_FILE for package $PACKAGE_NAME
 echo "#!/bin/sh" > $CONFIG_FILE
 echo "#" >> $CONFIG_FILE
 echo "# auto generated based on nvram by $0" >> $CONFIG_FILE
 echo "#" >> $CONFIG_FILE
if [ -z "`nvram show | grep ssmtp`" ]
 then
 logger_func "It appears that you have not set the NVRAM variables required to generate the conf file"
 logger_func "**Consider** using these commands in you startup script:"
 logger_func "nvram set ssmtp_root=username@gmail.com"
 logger_func "nvram set ssmtp_mailhub=smtp.gmail.com:587"
 logger_func "nvram set ssmtp_hostname=username@gmail.com"
 logger_func "nvram set ssmtp_UseSTARTTLS=YES"
 logger_func "nvram set ssmtp_AuthUser=username"
 logger_func "nvram set ssmtp_AuthPass=password"
 logger_func "nvram set ssmtp_FromLineOverride=YES"
 logger_func "create the NVRAM variables and re-run the init script or reboot for the settings to take affect."
 exit 0
 fi
###########################################################
 #
 # main loop
 #
 SED_COMMAND="s/$NVRAM_PREFIX/ /"
 CONFIG_VARS=`nvram show | grep $NVRAM_PREFIX | sed "$SED_COMMAND"`
 for i in $CONFIG_VARS; do
 echo $i >> $CONFIG_FILE
 done
###########################################################
 #
 # main loop
 #
 SED_COMMAND="s/$NVRAM_PREFIX/ /"
 CONFIG_VARS=`nvram show | grep $NVRAM_PREFIX | sed "$SED_COMMAND"`
 for i in $CONFIG_VARS; do
 echo $i >> $CONFIG_FILE
 done
###########################################################
 #
 # sanity check
 #
 if [ ! -f "$CONFIG_FILE" ]; then
 # echo "$0: ERROR - could not create $CONFIG_FILE. Perhaps there is no symink /etc/XXXX -> /tmp/etc/XXXX ?"
 logger_func "ERROR - could not create $CONFIG_FILE. Perhaps there is no symink /etc/XXXX -> /tmp/etc/XXXX ?"
 fi
 logger_func "###########Finished the SSMTP init run###########"
Make it executable:
使它可执行:
chmod +x ./working_dir_mini1/rootfs/etc/init.d/S80ssmtp
chmod +x ./working_dir_mini1/rootfs/etc/init.d/S80ssmtp
Take note of the NVRAM waiting variables in the script, it is our responsibility to give them something to work with after we have installed our modified firmware on the router.
请注意脚本中的NVRAM等待变量,在路由器上安装修改后的固件后,有责任为它们提供一些操作。
构建修改后的固件 (Build the modified Firmware)
Now that everything is in place, it is time to re-package the modified firmware into a compressed binary that we can flash to the router. The “build.sh” script syntax is: ./build_firmware.sh OUTPUT_DIR WORKING_DIRECTORY
现在一切就绪,是时候将修改后的固件重新打包为压缩的二进制文件了,我们可以将其刷新到路由器了。 “ build.sh”脚本语法为:./build_firmware.sh OUTPUT_DIR WORKING_DIRECTORY
To do this we use the supplied script, so issue:
为此,我们使用提供的脚本,因此发出:
./build_firmware.sh output_mini1 ./working_dir_mini1/
./build_firmware.sh output_mini1 ./working_dir_mini1/
Once the “build” operation is done, there will be several firmware images waiting to be used in the “output” directory.
一旦完成“构建”操作,“输出”目录中将有几个固件映像等待使用。
You may now flash the file called “custom_image_00001-generic.bin” to your router as you normally would a DD-WRT firmware.
您现在可以像通常使用DD-WRT固件一样,将名为“ custom_image_00001-generic.bin”的文件刷新到路由器。
Note: Don’t forget to restore to “factory defaults” before, during and right after the firmware flash.
注意 :不要忘记在固件刷新之前,期间和之后恢复“出厂默认设置”。
Post flash steps
发布Flash步骤
Because we made the SSMTP package look for NVRAM variables in order to generate the ssmtp configuration file, we now need to supply it with the missing information. We will accomplish this by using the web-GUI “Run commands” function.
因为我们使SSMTP程序包寻找NVRAM变量以生成ssmtp配置文件,所以我们现在需要为其提供缺少的信息。 我们将通过使用Web-GUI“运行命令”功能来完成此任务。
Go to the web-GUI -> “administration” -> “commands” -> paste in the text-box the following:
转到网络GUI->“管理”->“命令”->在文本框中粘贴以下内容:
nvram set ssmtp_root=your-email@gmail.com
 nvram set ssmtp_mailhub=smtp.gmail.com:587
 nvram set ssmtp_hostname=you-email@gmail.com
 nvram set ssmtp_UseSTARTTLS=YES
 nvram set ssmtp_AuthUser=your-gmail-user-name(without the @gmail.com)
 nvram set ssmtp_AuthPass=you-gmail-password
 nvram set ssmtp_FromLineOverride=YES
 nvram commit
Replace the text after the equal (=) sign, with your actual information, And then Hit “Run commands”. Note: if your using a regular, non TLS using, smtp server the port to use is 25 instead of 587.
用您的实际信息替换等号(=)后的文本,然后单击“运行命令”。 注意 :如果您使用的是常规的,非TLS使用的smtp服务器,则要使用的端口为25,而不是587。
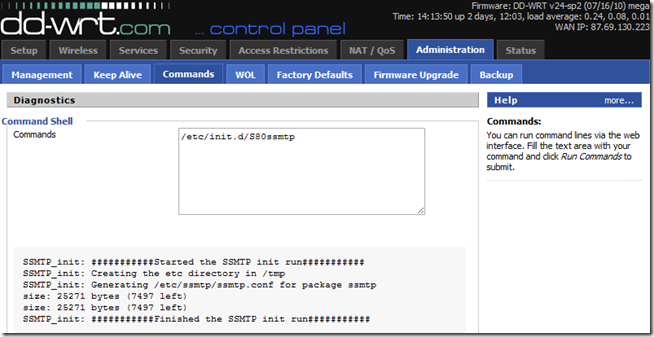
Now that the SSMTP information is ready for use, you will need to invoke the init script. So you can either reboot the router, Or paste this into the “commands” text-box:
现在可以使用SSMTP信息了,您将需要调用init脚本。 因此,您可以重启路由器,也可以将其粘贴到“命令”文本框中:
/etc/init.d/S80ssmtp
/etc/init.d/S80ssmtp
Then hit “Run commands” again. The output of this command should look like:
然后再次点击“运行命令”。 该命令的输出应如下所示:
Test that you can send Email Again paste this into the “commands” text-box the following command with your email address:
测试您可以再次发送电子邮件,然后将以下命令和您的电子邮件地址一起粘贴到“命令”文本框中:
echo "testing crucible emailing 123 qwe" | ssmtp -vvv your@email.com
echo "testing crucible emailing 123 qwe" | ssmtp -vvv your@email.com
Then hit “Run commands” again. Because we used the -vvv option for extra verbosity, the output of this command should look like:
然后再次点击“运行命令”。 因为我们使用-vvv选项来获得额外的详细信息,所以此命令的输出应类似于:
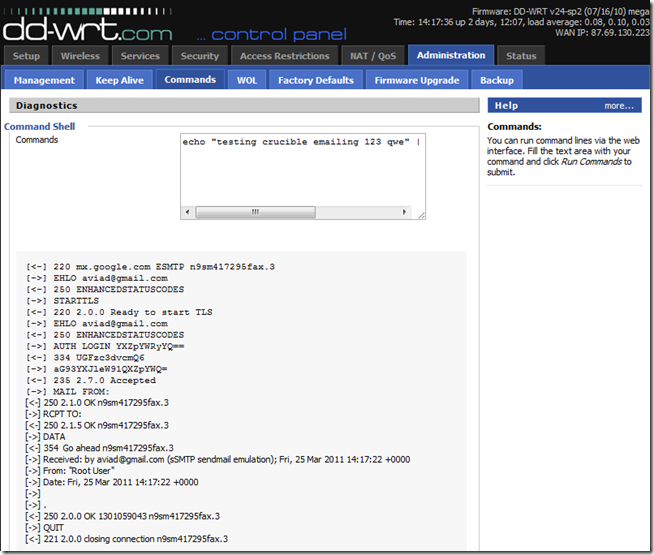
If everything went well, you should be getting the test email within seconds.
如果一切顺利,您应该在几秒钟内收到测试电子邮件。
We hope that you can use this information to push your home router’s limits even further then you thought possible and you now truly control your home router, and DD-WRT…
我们希望您可以使用此信息将您的家用路由器的极限进一步提高到您认为可能的范围,现在您可以真正控制自己的家用路由器和DD-WRT …
Linux extends life, Linux expands consciousness… Linux is vital for packet travel
Linux延长生活,Linux扩大意识……Linux对于数据包传输至关重要
翻译自: https://www.howtogeek.com/56922/unleash-even-more-power-from-your-home-router-with-dd-wrt-mod-kit/
dd-wrt固件


 9428
9428


 被折叠的 条评论
为什么被折叠?
被折叠的 条评论
为什么被折叠?
 到【灌水乐园】发言


