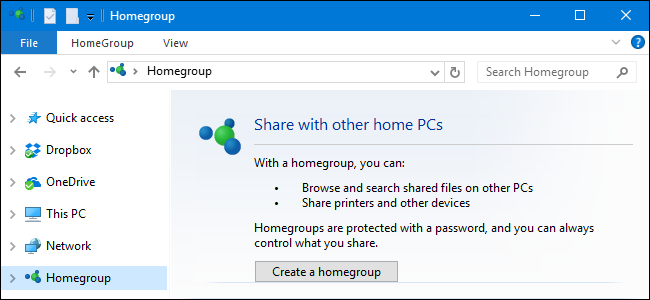
HomeGroups make sharing files and printers with other PCs pretty simple. But if you don’t use it and would prefer not to see it in File Explorer at all, it’s not too hard to disable.
家庭组使与其他PC共享文件和打印机变得非常简单。 但是,如果您不使用它,并且根本不想在文件资源管理器中看到它,则禁用它并不是很难。
Windows networking can get pretty complicated. If all you want to do is share your files and printers with a few other Windows PCs on your local network, though, the HomeGroups feature makes that task much easier. Still, if you don’t use it at all and would prefer to not see it in your File Explorer—or Open/Save As dialog boxes—you can disable the HomeGroup service. You’ll need to disable a couple of services and then—if you’re running Windows 8 or 10—take a quick dive into the Registry. Here’s how to get it done.
Windows网络可能变得非常复杂。 但是,如果您只想与本地网络上的其他几台Windows PC共享文件和打印机,则HomeGroups功能将使这项任务变得更加容易。 不过,如果您根本不使用它,并且希望在“文件资源管理器”或“打开/另存为”对话框中看不到它,则可以禁用HomeGroup服务。 您需要禁用几个服务,然后(如果您正在运行Windows 8或Windows 10)快速进入注册表。 这是完成任务的方法。
第一步:如果您的PC当前是其中一员,则离开HomeGroup (Step One: Leave the HomeGroup if Your PC is Currently Part of One)
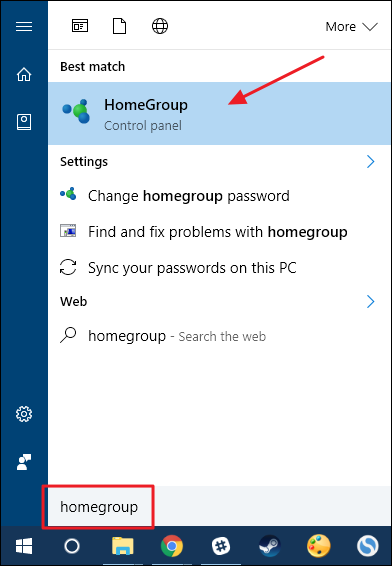
If your PC is part of a HomeGroup, you’ll need to leave the HomeGroup before disabling the service. Click Start, type “homegroup,” and then click the “HomeGroup” control panel app.
如果您的PC是家庭组的一部分,则需要先退出家庭组,然后再禁用该服务。 单击“开始”,键入“ homegroup”,然后单击“ HomeGroup”控制面板应用程序。
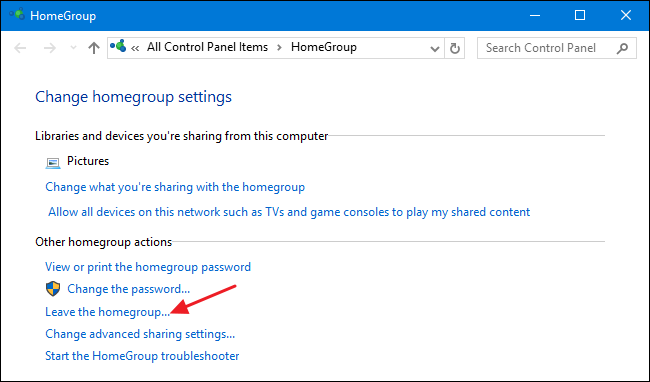
In the main “HomeGroup” window, click “Leave the homegroup.”
在“家庭组”主窗口中,单击“离开家庭组”。
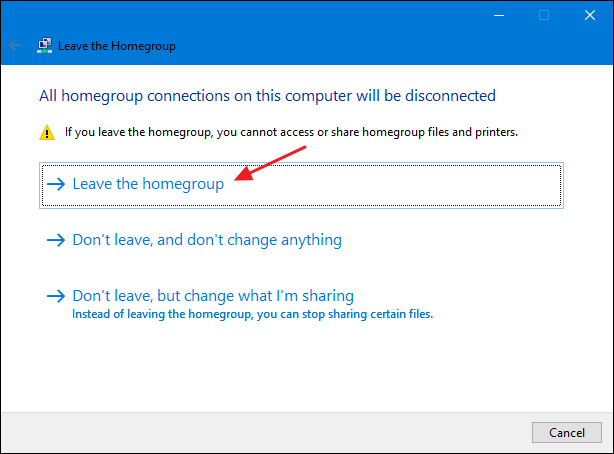
On the “Leave the Homegroup” window, confirm that you want to leave by clicking “Leave the homegroup.”
在“离开家庭组”窗口中,单击“离开家庭组”确认您要离开。
When the wizard finishes removing you from the HomeGroup, click the “Finish” button.
向导完成将您从家庭组中删除后,单击“完成”按钮。
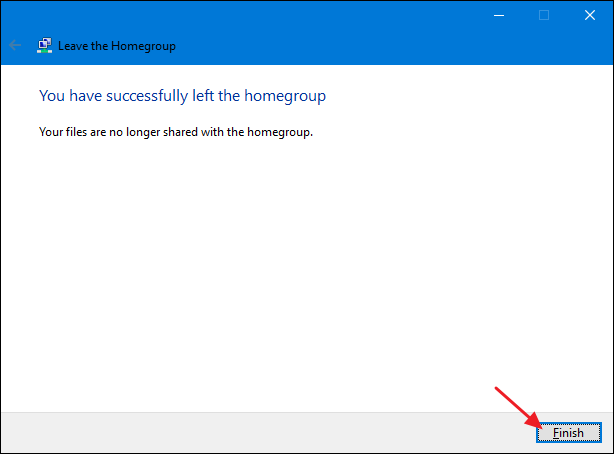
Now that you’re no longer part of a HomeGroup, you can disable the HomeGroup services.
现在您不再属于HomeGroup,可以禁用HomeGroup服务。
第二步:禁用家庭组服务 (Step Two: Disable HomeGroup Services)
To disable the HomeGroup feature in Windows, you’ll need to disable two HomeGroup services. Click Start, type “Services,” and then click the “Services” app.
要在Windows中禁用HomeGroup功能,您需要禁用两个HomeGroup服务。 单击开始,键入“服务”,然后单击“服务”应用程序。

In the right-hand pane of the Services window, scroll down and find the “HomeGroup Listener” and “HomeGroup Provider” services. Double-click the “HomeGroup Listener” service to open its properties window.
在“服务”窗口的右侧窗格中,向下滚动并找到“ HomeGroup Listener”和“ HomeGroup Provider”服务。 双击“ HomeGroup Listener”服务以打开其属性窗口。

In the properties window, select “Disabled” from the “Startup type” drop-down menu and then click “OK.”
在属性窗口中,从“启动类型”下拉菜单中选择“禁用”,然后单击“确定”。
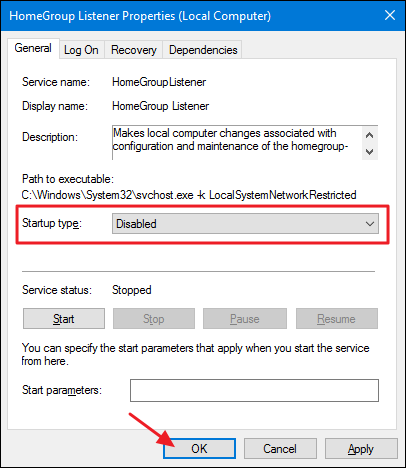
Next, you’ll need to disable the “HomeGroup Provider” service in exactly the same way. Open its properties window and set “Startup type” to “Disabled.”
接下来,您需要以完全相同的方式禁用“ HomeGroup Provider”服务。 打开其属性窗口,然后将“启动类型”设置为“禁用”。
If you’re using Windows 7, that’s all it takes to disable the HomeGroup feature and remove it from your File Explorer window. In fact, as soon as you stop and disable the “HomeGroup Provider” service, HomeGroup will disappear from File Explorer in Windows 7.
如果您使用的是Windows 7,那么只需禁用HomeGroup功能并将其从“文件资源管理器”窗口中删除即可。 实际上,一旦停止并禁用“ HomeGroup Provider”服务,HomeGroup就会从Windows 7中的文件资源管理器中消失。
If you’re running Windows 8 or 10, the steps you’ve taken so far will disable the HomeGroup feature, but you’ll need to move on to step three and make a quick Registry edit to remove it from the File Explorer window.
如果您运行的是Windows 8或10,那么到目前为止,您将执行的步骤将禁用HomeGroup功能,但是您需要继续执行步骤3,并进行快速注册表编辑,以将其从“文件资源管理器”窗口中删除。
第三步:通过编辑注册表从文件资源管理器中删除HomeGroup(仅Windows 8或10) (Step Three: Remove HomeGroup from File Explorer by Editing the Registry (Windows 8 or 10 only))
In Windows 8 or 10, you’ll need to take the extra step of creating a Registry key that you can use to remove HomeGroup from File Explorer.
在Windows 8或10中,您需要采取额外的步骤来创建注册表项,可用于从文件资源管理器中删除HomeGroup。
Standard warning: Registry Editor is a powerful tool and misusing it can render your system unstable or even inoperable. This is a pretty simple hack and as long as you stick to the instructions, you shouldn’t have any problems. That said, if you’ve never worked with it before, consider reading about how to use the Registry Editor before you get started. And definitely back up the Registry (and your computer!) before making changes.
标准警告 :注册表编辑器是一个功能强大的工具,滥用它会使您的系统不稳定甚至无法运行。 这是一个非常简单的技巧,只要您按照说明进行操作,就不会有任何问题。 也就是说,如果您以前从未使用过它,请在开始之前考虑阅读有关如何使用注册表编辑器的信息 。 并在进行更改之前一定要备份注册表 (和您的计算机 !)。
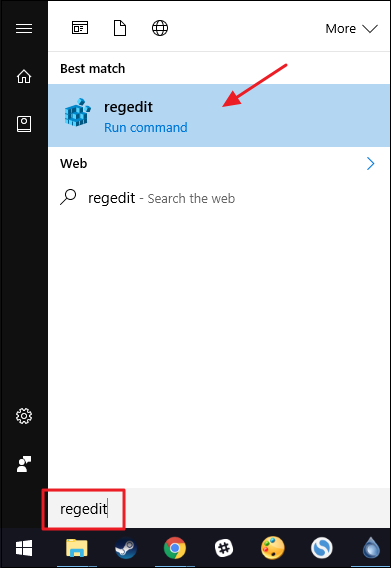
Open the Registry Editor by hitting Start and typing “regedit.” Press Enter to open Registry Editor and give it permission to make changes to your PC.
通过单击开始并键入“ regedit”来打开注册表编辑器。 按Enter键打开注册表编辑器,并授予其对PC进行更改的权限。
In the Registry Editor, use the left sidebar to navigate to the following key:
在注册表编辑器中,使用左侧边栏导航至以下键:
HKEY_LOCAL_MACHINE\SOFTWARE\Classes\{B4FB3F98-C1EA-428d-A78A-D1F5659CBA93}
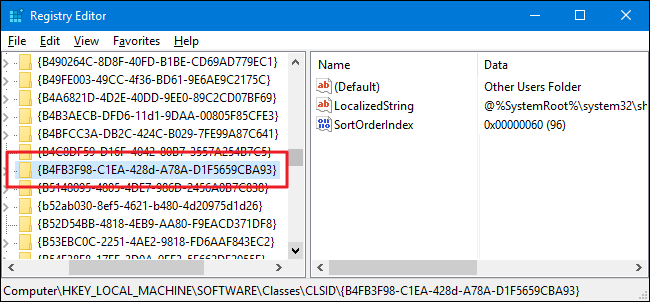
By default, this key is protected, so you’ll need to take ownership of it before you can do any editing. Follow our instructions on how to gain full permissions to edit protected Registry keys and then you can proceed with the instructions here.
默认情况下,此密钥是受保护的,因此您需要拥有它的所有权才能进行任何编辑。 按照我们的说明进行操作, 以获取编辑受保护的注册表项的完整权限 ,然后可以按照此处的说明进行操作。
After taking ownership of the {B4FB3F98-C1EA-428d-A78A-D1F5659CBA93} key, right-click it and choose New > DWORD (32-bit) Value. Name the new value “System.IsPinnedToNameSpaceTree.”
拥有{B4FB3F98-C1EA-428d-A78A-D1F5659CBA93}密钥的所有权后,右键单击它,然后选择“新建”>“ DWORD(32位)值”。 将新值命名为“ System.IsPinnedToNameSpaceTree”。
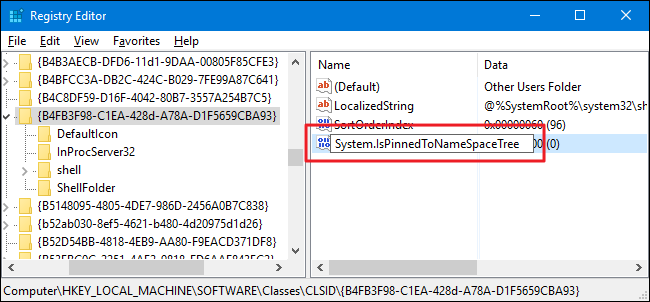
When you create the new System.IsPinnedToNameSpaceTree value, it’s value data is already set to 0, which is the setting you want for removing HomeGroup from File Explorer. Changes should take effect immediately, so open a File Explorer window and double-check to make sure that HomeGroup has been removed.
创建新的System.IsPinnedToNameSpaceTree值时,其值数据已设置为0,这是您要从文件资源管理器中删除HomeGroup的设置。 更改应立即生效,因此请打开“文件资源管理器”窗口并再次检查以确保已删除HomeGroup。
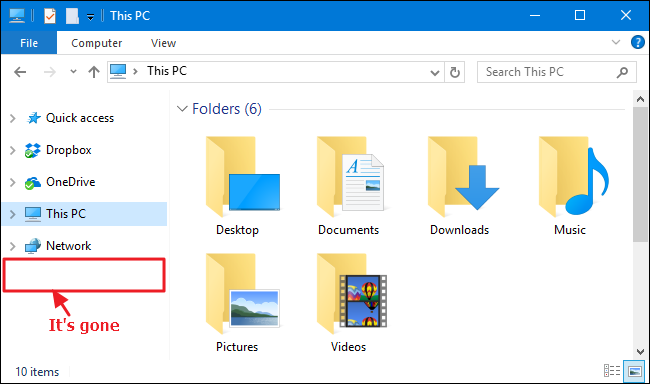
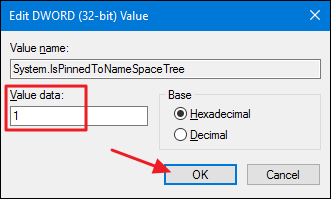
If all was successful, you can go ahead and close Registry Editor. If you ever want to reverse this change, just go back into Registry Editor, double-click the System.IsPinnedToNameSpaceTree value to open its properties window, and change the “Value data” box from 0 to 1.
如果一切成功,则可以继续并关闭注册表编辑器。 如果要撤消此更改,只需返回到注册表编辑器,双击System.IsPinnedToNameSpaceTree值以打开其属性窗口,然后将“值数据”框从0更改为1。
禁用后如何重新启用家庭组 (How to Re-Enable HomeGroup After Disabling It)
If you want to enable HomeGroup again, you’ll just need to reverse the instructions we’ve covered here.
如果您想再次启用HomeGroup,则只需按照我们在此介绍的说明进行操作即可。
Use Registry Editor to set the
System.IsPinnedToNameSpaceTreevalue to 1 or just delete the value altogether.使用注册表编辑器将
System.IsPinnedToNameSpaceTree值设置为1或完全删除该值。- Use the Services app to set the “HomeGroup Listener” and “HomeGroup Provider” services back to “Manual.” 使用服务应用程序将“ HomeGroup Listener”和“ HomeGroup Provider”服务设置回“ Manual”。
You should then be able see HomeGroup in File Explorer and create or join a HomeGroup again.
然后,您应该能够在文件资源管理器中看到HomeGroup,然后再次创建或加入HomeGroup。
Even though having the HomeGroup item showing in File Explorer won’t be a big deal to most people, it’s still nice knowing that you can remove it if you want to. It can be especially handy if you share your computer and just don’t want people accidentally stumbling across a way to share your files with other computers.
即使在文件资源管理器中显示HomeGroup项对大多数人来说都没什么大不了的,但是知道可以删除它还是很不错的。 如果您共享计算机,并且只是不想让人们不小心绊倒与其他计算机共享文件的方式,这可能会特别方便。
翻译自: https://www.howtogeek.com/howto/27091/how-to-disable-or-enable-the-homegroup-feature-in-windows-7/


 本文介绍如何在Windows中禁用家庭组功能,包括离开家庭组、禁用相关服务及通过注册表编辑彻底移除家庭组选项。此外,还提供了如何在未来重新启用家庭组的步骤。


 209
209

 被折叠的 条评论
为什么被折叠?


