
ubuntu备份文件
If you’ve ever asked for help with your Windows computer that won’t boot anymore, you’ve probably been told to “Backup all your data and then reinstall”… but if you can’t boot, how can you get to your data? That’s the question we’ll be answering today.
如果您曾经寻求过有关无法再启动的Windows计算机的帮助,则可能会被告知“备份所有数据,然后重新安装”……但是,如果无法启动,如何进入您的计算机?数据? 这就是我们今天要回答的问题。
One of the easiest methods to access your data is to simply boot off an Ubuntu Live CD… and it’s completely free (except for the cost of a blank cd).
访问数据最简单的方法之一就是简单地从Ubuntu Live CD引导…并且它是完全免费的(除了空白CD的成本外)。
Burn an Ubuntu Live CD
刻录Ubuntu Live CD
If you have another computer, you can download and burn the Ubuntu Live CD using a very simple application called ImgBurn. Otherwise, you can bug one of your friends to help you burn a copy.
如果您有另一台计算机,则可以使用名为ImgBurn的非常简单的应用程序下载并刻录Ubuntu Live CD 。 否则,您可以打扰您的一个朋友,以帮助您刻录副本。
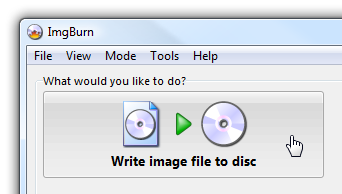
Just open up ImgBurn, and click the icon to “Write image file to disc”
只需打开ImgBurn,然后单击图标以“将图像文件写入光盘”
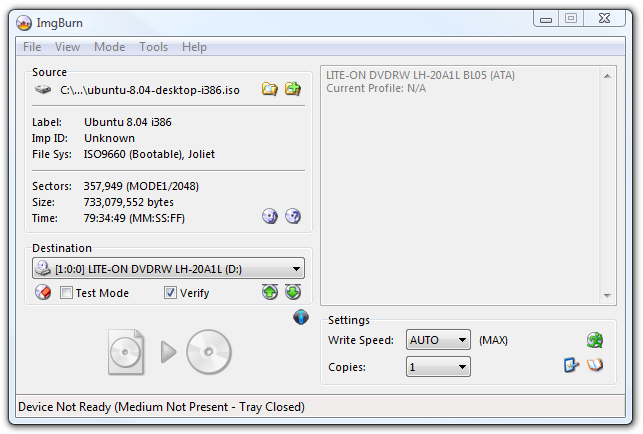
Then click on the icon next to “Source”, pick the downloaded ISO file, stick a recordable CD into the drive, and click burn.
然后单击“源”旁边的图标,选择下载的ISO文件,将可刻录CD插入驱动器,然后单击刻录。
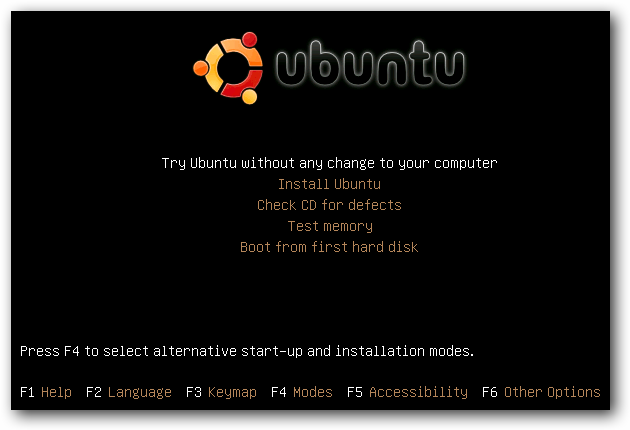
Now that you have the boot cd (which you should keep in a safe place, as it’s very useful), just stick it in the drive of the computer and boot from it. You should see an option to “Try Ubuntu without any change to your computer”.
现在您已经有了启动CD(非常有用,应该将其保存在安全的地方),只需将其粘贴到计算机的驱动器中并从中启动即可。 您应该看到一个选项“在不对计算机进行任何更改的情况下尝试Ubuntu”。
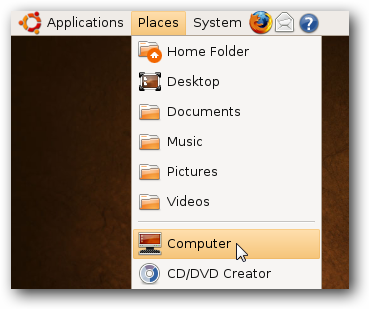
Once the system has started up, the first thing you want to do is choose Places \ Computer from the menu.
系统启动后,您要做的第一件事是从菜单中选择Places \ Computer。
This should show you all the drives available in the system, including your Windows drive. In my case, that is the 52.4 GB volume.
这应该向您显示系统中所有可用的驱动器,包括Windows驱动器。 就我而言,这就是52.4 GB的卷。
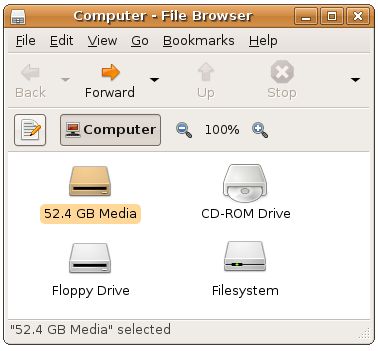
You can try and double-click on the drive to open it… and if it immediately works then lucky you! Most of the time it’s going to give you an error saying “Unable to mount the volume”, because Windows didn’t shut it down cleanly.
您可以尝试双击驱动器以将其打开……如果它可以立即运行,那就很幸运! 在大多数情况下,它会给您一个错误消息,提示“无法安装该卷”,因为Windows并未彻底关闭它。
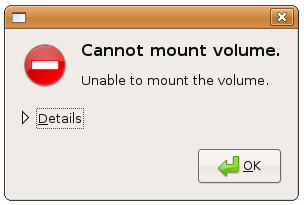
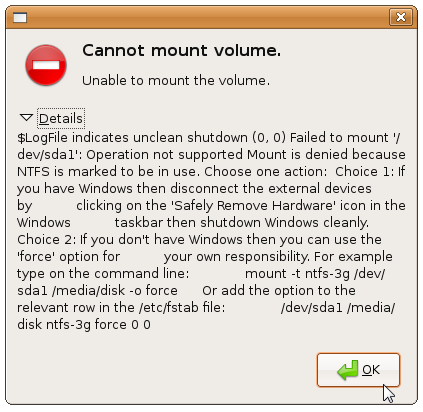
Click the Details link so that you can see the full message, and leave this window open. You’ll see a “Choice 2” in the message, which includes the commands to force Ubuntu to use that drive even though there’s something wrong.
单击详细信息链接,以便您可以看到完整的消息,并使此窗口保持打开状态。 您将在消息中看到“选择2”,其中包括强制Ubuntu即使出现问题也要使用该驱动器的命令。
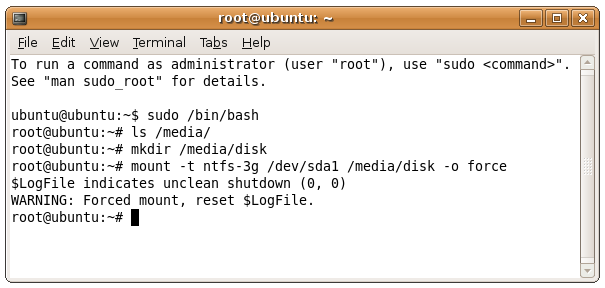
What you’ll want to do is open a new Terminal from Applications \ Accessories \ Terminal on the top menu. Once you’ve done that, then you’ll want to type in a bunch of commands, which I’ll walk you through.
您需要做的是从顶部菜单上的Applications \ Accessories \ Terminal打开一个新的Terminal。 完成此操作后,您将需要输入一堆命令,我将逐步指导您完成。
First, we’ll want to switch to “administrator” mode, which in Linux terms is known as “root”. The simplest way to do it is with this command:
首先,我们要切换到“管理员”模式,在Linux术语中称为“ root”。 最简单的方法是使用以下命令:
sudo /bin/bash
须藤/ bin / bash
Now we’ll need to create a directory that we’ll mount the drive on. The full explanation of mounting drives is a little complex, so just run this command:
现在,我们需要创建一个目录,将驱动器安装在该目录上。 安装驱动器的完整说明有些复杂,因此只需运行以下命令:
mkdir /media/disk
mkdir /媒体/磁盘
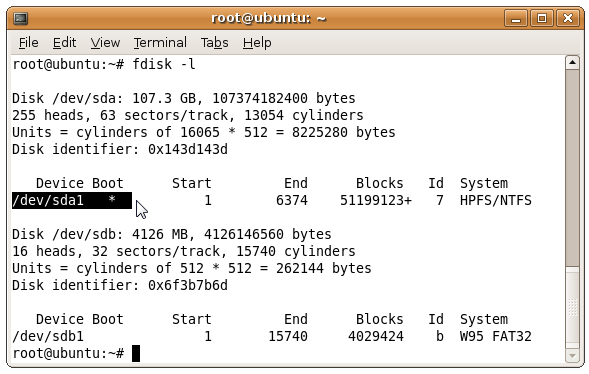
Now comes the tricky part. You’ll need to type out a command very similar to this one, but you’ll need to replace /dev/sda1 with what you see in that message box we showed you above. This command tells Ubuntu to use the ntfs-3g driver, and force mount even if there is a problem.
现在是棘手的部分。 您需要输入与该命令非常相似的命令,但是您需要用上面显示的消息框中的内容替换/ dev / sda1。 此命令告诉Ubuntu使用ntfs-3g驱动程序,即使出现问题也强制安装。
mount -t ntfs-3g /dev/sda1 /media/disk -o force
挂载-t ntfs-3g / dev / sda1 / media / disk -o force
If your drive is FAT32 instead of NTFS, then you can use the following command instead:
如果您的驱动器是FAT32而不是NTFS,则可以使用以下命令:
mount -t vfat -o umask=000 /dev/sda1 /media/disk
挂载-t vfat -o umask = 000 / dev / sda1 / media / disk
If you are having problems figuring out whether you have NTFS or FAT32, and you can’t figure out which /dev/whatever to use, then type in the following command at your prompt (make sure you already ran the command to run things as root)
如果您在确定是否具有NTFS或FAT32时遇到问题,并且无法弄清楚要使用哪个/ dev /,请在提示符下键入以下命令(确保已运行该命令来运行根)
fdisk -l
fdisk -l
In the output you should see a lot more information about the available drives… you can see in this example that the filesystem type is NTFS and the device name is /dev/sda1.
在输出中,您应该看到有关可用驱动器的更多信息……在此示例中,您可以看到文件系统类型为NTFS,设备名称为/ dev / sda1。
At this point, you should be able to access your hard drive through the icon in Computer.
此时,您应该可以通过“计算机”中的图标访问硬盘驱动器。
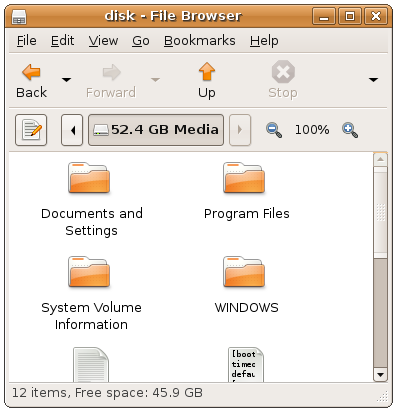
Note: If you have more than one drive in the computer, or more than one partition, they should show up separately in Computer. You should perform the same steps as above to open those drives up as well.
注意:如果计算机中有多个驱动器或一个分区,则它们应分别显示在计算机中。 您应该执行与上述相同的步骤来打开这些驱动器。
Backing Up to External USB
备份到外部USB
The absolute simplest thing to do at this point is to plug in an external USB drive, which should place an icon on the Ubuntu desktop, and most likely immediately pop up a nautilus window showing the contents of the drive.
此时,绝对最简单的方法是插入外部USB驱动器,该驱动器应在Ubuntu桌面上放置一个图标,并且很可能会立即弹出一个Nautilus窗口,显示驱动器的内容。
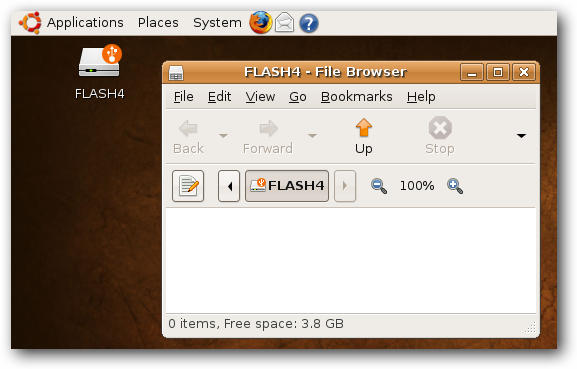
Note: I plugged in a USB Flash drive for illustration… it would be better to plug in a full external USB drive so you’ll have more space for backups.
注意:我插入了USB闪存驱动器进行说明……最好插入完整的外部USB驱动器,这样您将有更多的备份空间。
What Should I Backup?
我应该备份什么?
If you aren’t extremely technical, you might be wondering what on earth you should be backing up… and that’s a very good question.
如果您不是非常熟练的技术人员,那么您可能想知道到底应该备份什么……这是一个很好的问题。
1) Best Method
1)最佳方法
If you have loads of empty space on your external drive or network share, you should simply backup the entire contents of the drive, and sort through it later. It’ll take a little longer, but at least that way you can be sure everything has been backed up.
如果外部驱动器或网络共享上有大量空白空间,则应仅备份驱动器的全部内容,并在以后对其进行排序。 这将花费更长的时间,但是至少这样可以确保所有内容都已备份。
2) Still Good
2)还不错
You should try and backup your entire user folder… on XP you’ll go to “Documents and Settings”, and on Vista you’ll go to “Users”, and you should see your username in the list:
您应该尝试备份整个用户文件夹…在XP上,转到“文档和设置”,在Vista上,转到“用户”,您应该在列表中看到用户名:
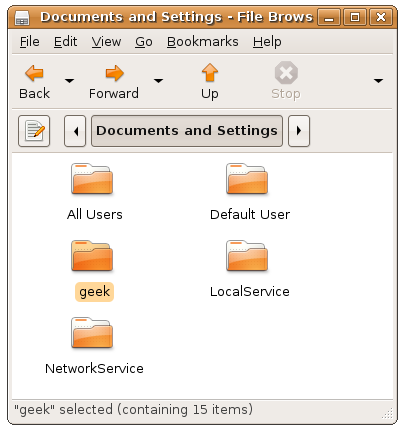
You can simply copy this entire folder to your backup drive, which should contain your music, documents, bookmarks, and most of your important files.
您可以简单地将整个文件夹复制到备份驱动器,其中应包含您的音乐,文档,书签和大多数重要文件。
Important Note: This will not backup your application files, and you should look around your drive and see if you’ve saved anything important somewhere else. This is especially true if you have more than one drive. Again, your best bet is to simply backup everything.
重要说明 :这不会备份您的应用程序文件,您应该环顾驱动器,看看是否在其他地方保存了重要的内容。 如果您有多个驱动器,则尤其如此。 同样,最好的选择是简单地备份所有内容。
Backing Up to Network Share
备份到网络共享
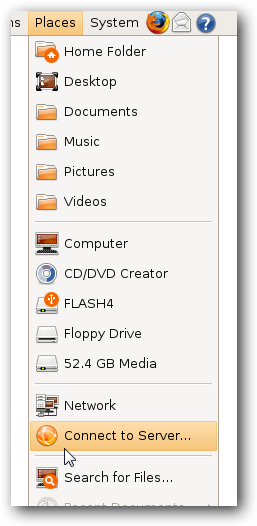
If you would rather backup your drive to a network share on another computer, you can use the Places \ Connect to Server item on the menu.
如果您希望将驱动器备份到另一台计算机上的网络共享,则可以使用菜单上的Places \ Connect to Server项。
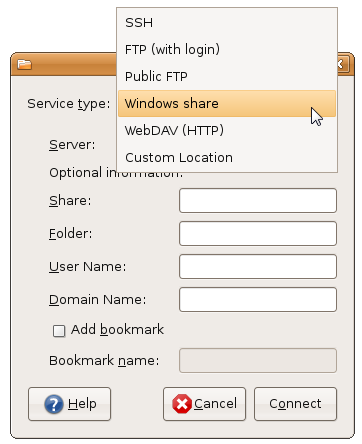
Change the Service type menu to “Windows share”…
将服务类型菜单更改为“ Windows共享”…
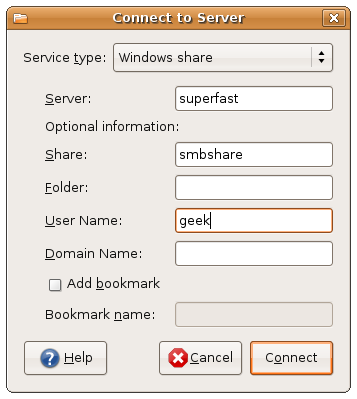
And then enter in the details for your network drive, with these being the required fields:
然后输入您的网络驱动器的详细信息,这些是必填字段:
- Server: Computer Name 服务器:计算机名
- Share: Shared Folder Name 共享:共享文件夹名称
- User Name: your username 用户名:您的用户名
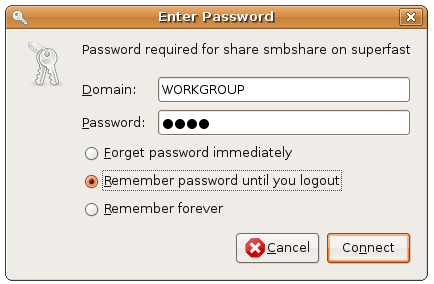
Once you click the Connect button, you’ll be prompted to enter in your password. Typically you can leave Domain set to the default, but if you have a custom workgroup name you should enter that instead. I also chose the “Remember password until you logout” button just so I won’t have to enter the password again.
单击“连接”按钮后,系统将提示您输入密码。 通常,您可以将“域”设置为默认值,但是如果您具有自定义工作组名称,则应输入该名称。 我还选择了“在注销之前记住密码”按钮,这样就不必再次输入密码。
Once you click the Connect button you should have an icon on the desktop for your network share.
单击“连接”按钮后,桌面上应该有一个用于网络共享的图标。
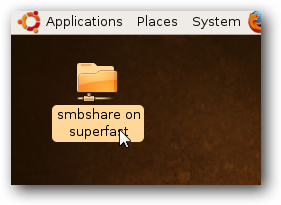
Now you can open up the network share, and if everything is setup correctly on the shared folder side of things, you can copy all of your files across the network using the instructions above on which files to choose.
现在,您可以打开网络共享,并且如果所有内容都在共享文件夹侧正确设置,则可以按照上面有关选择哪些文件的说明在网络上复制所有文件。
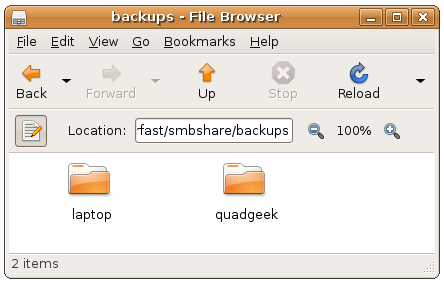
At this point you should have a backup of your data. If you backed up to an external hard drive, you might want to consider also copying those files to another computer just in case, and if you copied across the network you could consider backing that up elsewhere as well.
此时,您应该已经备份了数据。 如果备份到外部硬盘驱动器,则可能需要考虑将这些文件也复制到另一台计算机,以防万一,并且如果您是通过网络复制的,则可以考虑将其备份到其他位置。
Now you can proceed with reinstalling or whatever else you’d like to do. If you are having issues, be sure to leave them on our forum.
现在,您可以继续进行重新安装或执行其他任何操作。 如果您遇到问题,请确保将其留在我们的论坛上 。
ubuntu备份文件


 当Windows计算机无法启动时,可以使用Ubuntu Live CD轻松访问数据。通过下载ImgBurn刻录Ubuntu Live CD,然后从CD启动电脑,选择不改变计算机的Ubuntu试用版。虽然通常无法直接打开Windows驱动器,但可以使用命令行强制挂载。通过运行sudo /bin/bash切换到管理员模式,创建目录如mkdir /media/disk,然后使用mount命令挂载驱动器(例如mount -t ntfs-3g /dev/sda1 /media/disk -o force)。备份数据可以选择整个用户文件夹或仅备份重要文件,也可以备份到外部USB或网络共享。


 被折叠的 条评论
为什么被折叠?


