


美团脱颖而出的经验

Outlook lets you create and customize folder views in many ways, like adding and removing columns or grouping and sorting messages. You can also apply rules to make Outlook display messages in different ways based on their properties (like the sender, subject line, or timestamp). This is called conditional formatting. Let’s take a look at how it works.
Outlook使您可以通过多种方式创建和自定义文件夹视图 ,例如添加和删除列或对消息进行分组和排序。 您还可以应用规则,以使Outlook根据邮件的属性(例如发件人,主题行或时间戳)以不同的方式显示邮件。 这称为条件格式 。 让我们看看它是如何工作的。
Update: One of our readers brought to our attention that conditional formatting is only available on the Windows version of Outlook and not the macOS version. Thanks, Christy!
更新 :我们的一位读者引起了我们的注意,条件格式仅适用于Windows版本的Outlook, 而不适用于macOS版本。 谢谢,克里斯蒂!
入门 (Getting Started)
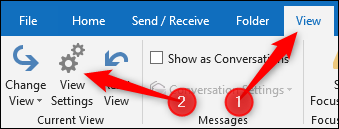
To get started setting up conditional formatting, head to View > View Settings.
要开始设置条件格式,请转到查看>查看设置。
You can also access Advanced View Settings by right-clicking the folder head and selecting the “View Settings” command.
您还可以通过右键单击文件夹头并选择“查看设置”命令来访问“高级查看设置”。

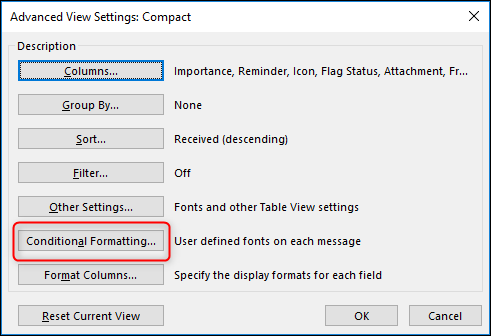
The Advanced View Settings window lets you customize the folder view. Click the “Conditional Formatting” button.
“高级视图设置”窗口使您可以自定义文件夹视图。 单击“条件格式”按钮。
This brings you to the Conditional Formatting window that you’ll be using to set up different rules for how messages are formatted.
这将带您进入条件格式窗口,该窗口将用于为邮件的格式设置不同的规则。
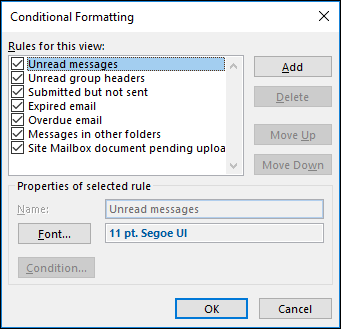
The items displayed in the “Rules for this view” list are the default rules that come with an un-customized folder view. For example, you can see that “Unread messages” are displayed in bold, blue Segoe UI font with a size of 11 points.
“此视图的规则”列表中显示的项目是未自定义文件夹视图随附的默认规则。 例如,您可以看到“未读消息”以11点的粗体蓝色Segoe UI字体显示。
规则如何运作 (How the Rules Work)
The “rules” are the conditions that a message has to meet for Outlook to apply the formatting. In the default rules, for example, the “Unread Messages” rule is activated when a message is marked as unread. When that rule is activated, Outlook uses the bold, blue, 11-point Segoe UI font to display it.
“规则”是邮件必须具备的条件,Outlook才能应用格式。 例如,在默认规则中,当邮件标记为未读时,将激活“未读邮件”规则。 激活该规则后,Outlook将使用加粗的蓝色11点Segoe UI字体显示它。
Outlook applies rules in order from the top of the list. Rules higher up on the list take precedence over rules lower down. How does this work in practice? Let’s say you have two rules, one at the top of the list that changes the font to green, and one lower down in the list that changes the font to red. If a message meets the conditions of both rules, the font will be changed to green because that rule is higher up on the list—the rule which sets the font to red is ignored.
Outlook从列表顶部开始按顺序应用规则。 列表中较高的规则优先于较低的规则。 在实践中这是如何工作的? 假设您有两个规则,一个位于列表顶部,将字体更改为绿色,另一个位于列表中较低的列表,将字体更改为红色。 如果消息同时符合这两个规则的条件,则该字体将更改为绿色,因为该规则在列表中位于较高位置-将字体设置为红色的规则将被忽略。
With the default rules, you can only change the font. You can’t delete default rules, or move the order around, or change the conditions for the rule. You can turn default rules off though, by unchecking them in the “Rules for this view” list.
使用默认规则,您只能更改字体。 您不能删除默认规则,也不能移动顺序或更改规则的条件。 不过,您可以通过在“此视图的规则”列表中取消选中默认规则来关闭默认规则。
如何添加新规则 (How to Add a New Rule)
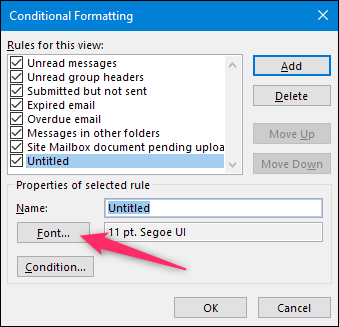
In the Conditional Formatting window, click the “Add” button. A new rule called “Untitled” will be added to the list. Give your rule a name and then click the “Condition” button.
在“条件格式设置”窗口中,单击“添加”按钮。 名为“无标题”的新规则将添加到列表中。 为您的规则命名,然后单击“条件”按钮。

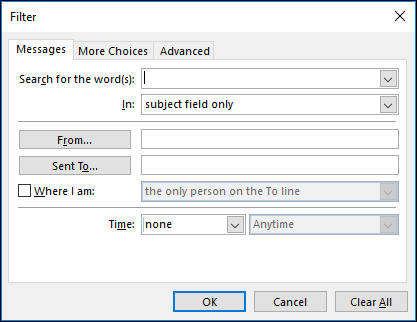
The Filter window lets you decide on the condition, or conditions, that the mail has to meet to be formatted.
通过“过滤器”窗口,您可以确定要格式化邮件的一个或多个条件。
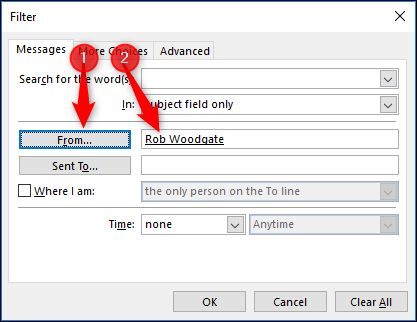
We’re just going to use a simple example here and have it look for messages that were sent by “Rob Woodgate” and contain the word “Outlook” in the Subject field.
我们仅在此处使用一个简单的示例,让它查找“ Rob Woodgate”发送的邮件,并在“主题”字段中包含“ Outlook”一词。
To do this, first click the “From” button, which opens up the address book, and select a contact.
为此,首先单击“发件人”按钮,这将打开通讯簿,然后选择一个联系人。
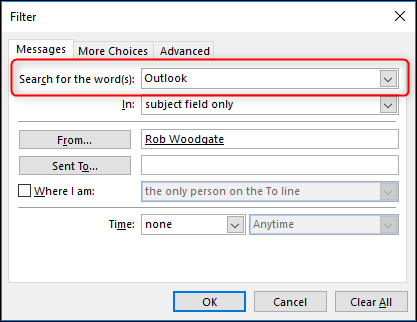
Then we add “Outlook” into the “Search for the word(s)” field, making sure that the “Subject Field Only” option is selected from the “In” drop-down list. Click “OK” when you’re done.
然后,将“ Outlook”添加到“搜索词”字段中,确保从“输入”下拉列表中选择了“仅主题字段”选项。 完成后,单击“确定”。
Back in the Conditional Formatting, click the “Font” button.
返回条件格式,单击“字体”按钮。
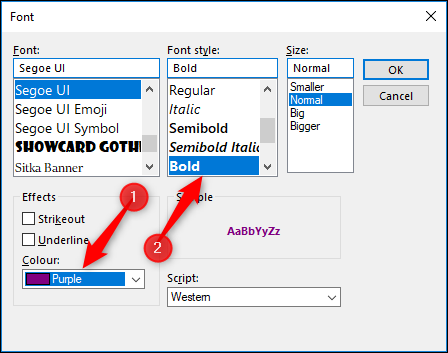
We’re going to make messages that match the filter we set up be displayed in purple and bold. Set yours up however you want, click the “OK” button, click “OK” again to close the Conditional Formatting window, and then one more time to close the Advanced View Settings window.
我们将使与我们设置的过滤器匹配的消息以紫色和粗体显示。 根据需要进行设置,单击“确定”按钮,再次单击“确定”关闭“条件格式设置”窗口,然后再关闭一次“高级视图设置”窗口。
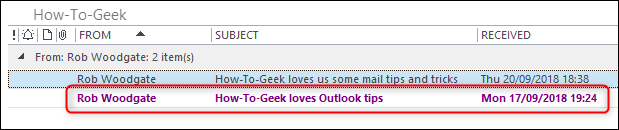
The rules are applied immediately. You can see below that messages meeting our conditions are now bold and purple.
该规则将立即应用。 您可以在下面看到符合我们条件的消息现在为粗体和紫色。
This is just a simple example—you can add lots of conditions, even very complex ones. Back in that Filter window, you can switch over to the “More Choices” tab to see a bunch of additional conditions you can pick.
这只是一个简单的示例-您可以添加很多条件,甚至是非常复杂的条件。 返回该“过滤器”窗口,您可以切换到“更多选择”选项卡,以查看可以选择的其他条件。
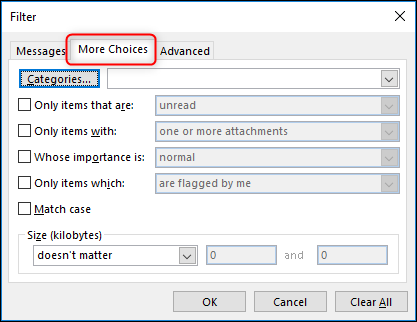
Here you can choose to match a message on whether:
您可以在此处选择是否匹配以下消息:
- It’s been assigned a particular category 已为其分配了特定类别
- It’s read or unread 它是已读还是未读
- It has attachments or no attachments 它具有附件或没有附件
- It’s marked as high, normal, or low priority 标记为高,正常或低优先级
- It’s been flagged by you, by someone else, by no-one, or marked as complete 它已被您,其他人,没有人标记或标记为已完成
- The text you’re searching for needs to match the case 您要搜索的文本需要匹配大小写
- It’s a particular size, greater or smaller than a particular size, or between two sizes 它是特定大小,大于或小于特定大小,或介于两个大小之间
Switch over to the “Advanced” tab, and you can create complex conditions.
切换到“高级”选项卡,您可以创建复杂的条件。
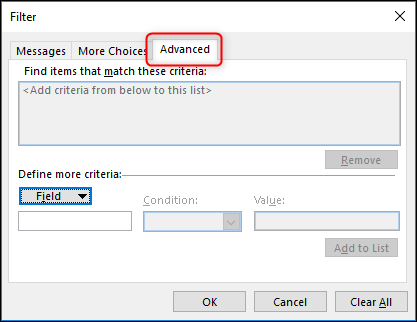
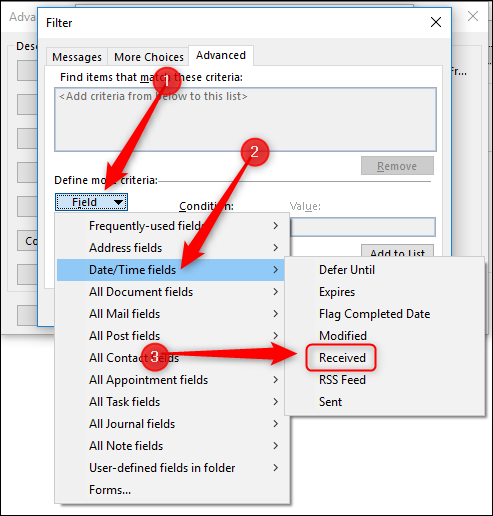
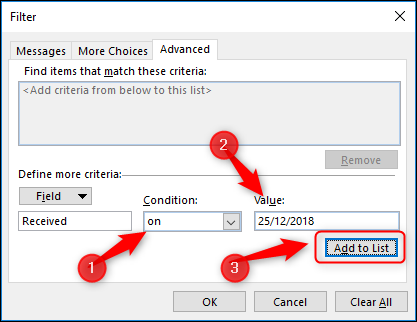
The Advanced tab allows you to select any field from anywhere in Outlook, and select a condition that you want to match. This could be quite simple, such as matching the sender to an exact address, but you have a lot of options to choose from. Let’s say you want your rule to match emails that you received. Click the “Field” button, point to “Date/Time Fields,” and then click the “Received” option.
通过“高级”选项卡,您可以从Outlook中的任何位置选择任何字段,然后选择要匹配的条件。 这可能非常简单,例如将发件人匹配到确切的地址,但是您有很多选择。 假设您希望您的规则与您收到的电子邮件匹配。 单击“字段”按钮,指向“日期/时间字段”,然后单击“已接收”选项。
Click the “Condition” dropdown to choose your condition.
点击“条件”下拉菜单选择您的条件。

The choices are much greater than you might expect:
选择比您预期的要大得多:
- Anytime 任何时间
- Yesterday 昨天
- Today 今天
- Tomorrow 明天
- In the last 7 days 最近7天
- In the next 7 days 在接下来的7天内
- Last Week 上个星期
- This Week 本星期
- Next Week 下周
- Last Month 上个月
- This Month 这个月
- Next Month 下个月
- On 上
- On or after 在或之后
- On or before 在或之前
- Between 之间
- Exists 存在
- Does not exist 不存在
And the other fields you can choose offer similar amounts of options.
您可以选择的其他字段提供相似数量的选项。
Select your Condition, add a value, and click the “Add to List” button.
选择您的条件,添加一个值,然后单击“添加到列表”按钮。
You can add as many conditions to the list as you like. To give you some idea of how many fields there are, here’s a look at just the “All Mail fields” menu.
您可以根据需要在列表中添加尽可能多的条件。 为了让您大致了解有多少个字段,下面仅介绍“所有邮件字段”菜单。
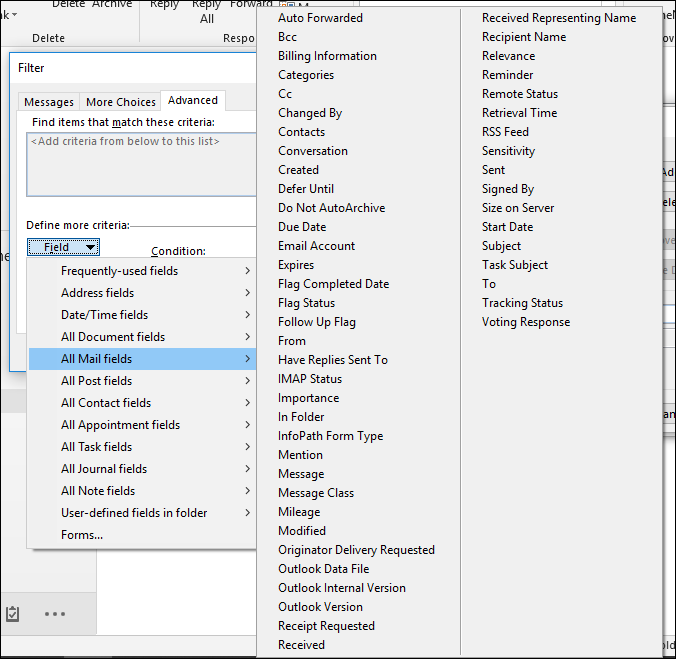
The “All Contact fields” menu has over four columns of options—so many we couldn’t fit it into a sensible screenshot. So we’re not going to go through each of the fields and conditions, but now you know where they are and how to use them.
“所有联系人字段”菜单具有四列选项-太多了,我们无法将其放入合理的屏幕截图中。 因此,我们不会遍历每个字段和条件,但是现在您知道它们在哪里以及如何使用它们。
You can set up multiple conditions in a rule to get things as specific as you like. Want to have Outlook display messages in a red 16pt font if they are from a certain contact, received in the last seven days, contain a specific word in the subject, and include an attachment? Not a problem.
您可以在规则中设置多个条件,以根据需要获得特定的信息。 是否希望Outlook以过去的7天收到来自某个联系人的消息以红色的16pt字体显示消息, 并在主题中包含特定单词并包含附件? 没问题
如何删除规则 (How to Delete a Rule)
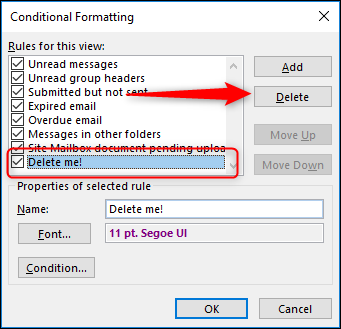
If you’ve created a rule and you no longer want it, it’s easy to delete. In the Conditional Formatting window, select the rule you want to delete and click the “Delete” button. Just remember that you can only delete rules you’ve created—not Outlook’s built-in default rules.
如果您已经创建了一条规则而不再想要它,则可以轻松删除它。 在“条件格式设置”窗口中,选择要删除的规则,然后单击“删除”按钮。 请记住,您只能删除自己创建的规则,而不能删除Outlook的内置默认规则。
You can add as many conditions as you like, and have as many rules as you like. And as we showed you before, once you’ve got the conditional formatting rules set up the way you want then you can copy the view to another folder, or to all folders if you want.
您可以添加任意数量的条件,并具有任意数量的规则。 正如我们之前向您展示的那样,一旦您以所需的方式设置了条件格式设置规则,便可以将视图复制到另一个文件夹或复制到所有文件夹(如果需要)。
翻译自: https://www.howtogeek.com/367502/a-guide-to-conditional-formatting-in-outlook/
美团脱颖而出的经验


 被折叠的 条评论
为什么被折叠?
被折叠的 条评论
为什么被折叠?
 到【灌水乐园】发言


