


win7 wi-fi热点

Windows can turn your laptop (or desktop) into a wireless hotspot, allowing other devices to connect to it. With Internet Connection Sharing, it can share your Internet connection with those connected devices. Here’s how the whole thing works.
Windows可以将您的笔记本电脑(或台式机)变成一个无线热点,允许其他设备连接到它。 使用Internet连接共享,它可以与那些连接的设备共享Internet连接。 这就是整个过程的原理。
Thanks to a hidden virtual Wi-Fi adapter feature in Windows, you can even create a Wi-Fi hotspot while you’re connected to another Wi-Fi network, sharing one Wi-Fi connection over another one.
由于Windows中具有隐藏的虚拟Wi-Fi适配器功能,您甚至可以在连接到另一个Wi-Fi网络时创建Wi-Fi热点,从而在另一个Wi-Fi网络上共享一个Wi-Fi连接。
轻松将PC变成Wi-Fi热点 (Turn Your PC Into a Wi-Fi Hotspot the Easy Way)

Connectify Hotspot is great if you’re at a hotel that charges per device, or if you’re on a plane and you connect your laptop but don’t want to pay more to connect your phone. If you pay for the Pro version you can even use your PC as a Wi-Fi repeater or a wired router, or share a tethered connection off your phone
如果您在一家按设备收费的酒店,或者在飞机上并连接了笔记本电脑但不想支付更多费用来连接手机, Connectify Hotspot就是很棒的选择。 如果您购买专业版,甚至可以将PC用作Wi-Fi中继器或有线路由器,或者通过手机共享网络连接
It’s really more of a power user tool, but if you’re looking for a good solution, Hotspot is free to try out, and the basic version is free with some limitations.
它实际上更像是一个高级用户工具,但是如果您正在寻找一个好的解决方案,则可以免费试用Hotspot,而基本版本是免费的,但有一些限制。
在Windows 10中共享有线或无线Internet连接 (Share a Wired or Wireless Internet Connection in Windows 10)
If you’re running Windows 10 with the Anniversary Update installed, then you’re in luck. With that update, Windows now has a single switch for turning any PC with Wi-Fi into a hotspot, and it doesn’t matter whether the Internet connection you want to share is wired or wireless.
如果您运行的是安装了周年更新的 Windows 10,那么您很幸运。 通过该更新,Windows现在具有一个开关,可以将任何具有Wi-Fi的PC变成一个热点,并且您要共享的Internet连接是有线还是无线都没有关系。
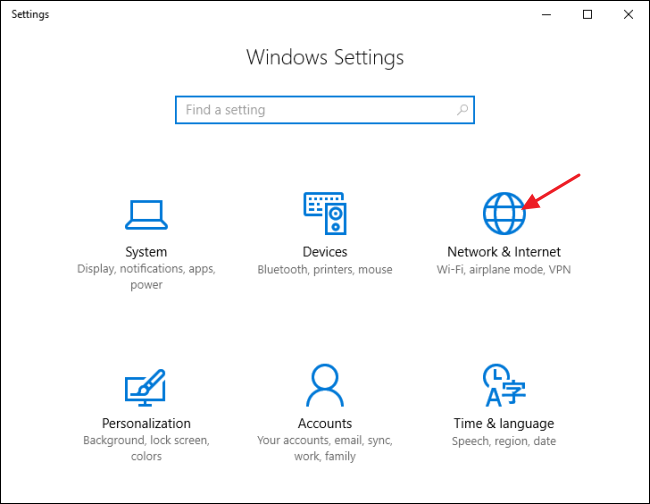
First, fire up Settings by pressing Windows+I on your keyboard. On the main Settings page, click “Network & Internet.”
首先,通过按键盘上的Windows + I启动设置。 在“设置”主页面上,单击“网络和Internet”。
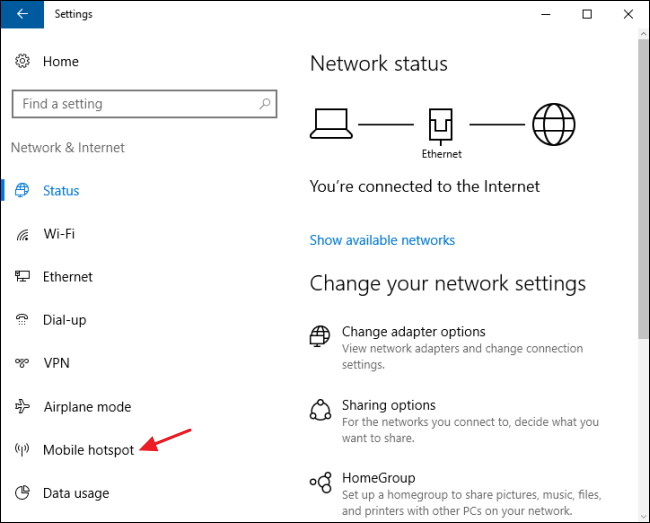
On the Network & Internet page, on the left-hand side, click “Mobile hotspot.”
在“网络和Internet”页面的左侧,单击“移动热点”。
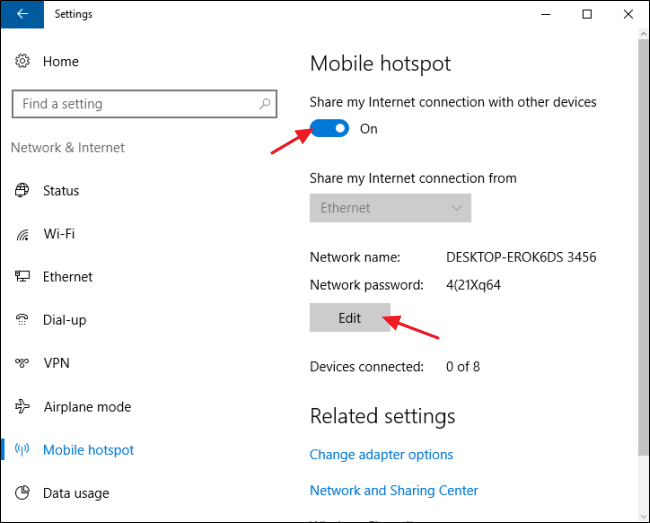
On the right-hand side, turn on the “Share my Internet connection with other devices” switch. If you want something other than the default network name and password, click the “Edit” button.
在右侧,打开“与其他设备共享我的Internet连接”开关。 如果您需要默认网络名称和密码以外的其他名称,请单击“编辑”按钮。
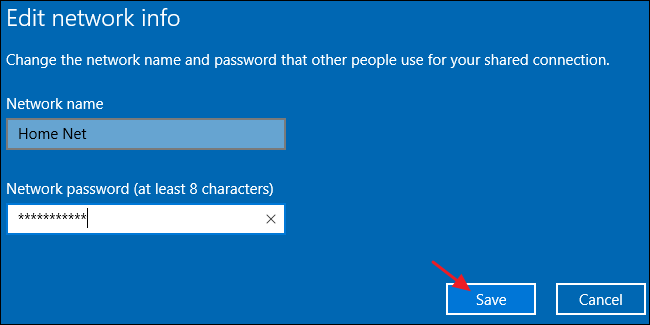
In the Edit window, type whatever network name and password you want to use and then click “OK.”
在“编辑”窗口中,键入要使用的任何网络名称和密码,然后单击“确定”。
And that’s all you really have to do in Windows 10. It’s one of the best new features of the Windows 10 Anniversary Update, even though it rolled out with relatively little fanfare.
这就是您在Windows 10中真正要做的全部工作。这是Windows 10周年更新的最佳新功能之一,即使该更新推出得很少。
If you experience problems with this feature, here are some potential troubleshooting steps.
如果您在使用此功能时遇到问题,请执行以下一些潜在的故障排除步骤 。
在Windows 7中共享有线Internet连接 (Share a Wired Internet Connection in Windows 7)
The ability to share your PC’s wired Internet connection to wireless devices is integrated into Windows 7’s networking interface through something called an ad-hoc network. An ad-hoc network is really just a simple, direct network connection between devices. In this case, you’ll be creating an ad-hoc network between your PC’s wireless connection and any wireless devices you want to connect. You just need to make sure that your wired connection is set up and that the PC does have Wi-Fi available.
通过称为ad-hoc网络的某种方式,将PC的有线Internet连接共享到无线设备的功能已集成到Windows 7的网络接口中。 临时网络实际上只是设备之间的简单直接网络连接。 在这种情况下,您将在PC的无线连接与要连接的任何无线设备之间创建一个临时网络。 您只需要确保已建立有线连接并且PC确实具有Wi-Fi。
Note that when you set up an ad-hoc network using your PC’s Wi-Fi, it will disable any existing connection that uses that Wi-Fi adapter. That’s why this method only works if your internet is coming from an Ethernet source.
请注意,当您使用PC的Wi-Fi设置临时网络时,它将禁用任何使用该Wi-Fi适配器的现有连接。 这就是为什么仅当您的Internet来自以太网源时此方法才有效的原因。
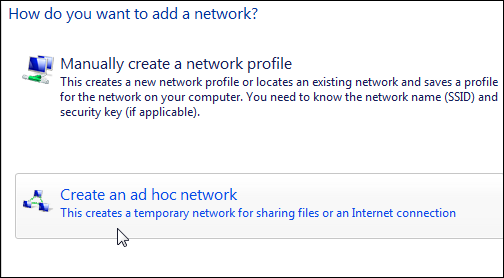
If you’ve never set up a network like this, be sure to read our full guide to sharing an Internet connection through an ad-hoc network. In short, though, you’ll open the Manage Wireless Networks window (you can find it by opening start and searching for “wireless”), click the Add button, and then click “Create an ad hoc network”. Enter a name and passphrase for the network and it’ll appear in the list of wireless networks. Select it and your laptop will disconnect from its current Wi-Fi network and start hosting an ad-hoc network your other devices can connect to.
如果您从未建立过这样的网络,请务必阅读我们的完整指南,以通过临时网络共享Internet连接 。 简而言之,您将打开“管理无线网络”窗口(您可以通过打开开始并搜索“无线”来找到它),单击“添加”按钮,然后单击“创建临时网络”。 输入网络的名称和密码,它将显示在无线网络列表中。 选择它,您的笔记本电脑将断开与当前Wi-Fi网络的连接,并开始托管其他设备可以连接的临时网络。
Be sure to enable the “Allow other network users to connect through this computer’s Internet connection” checkbox so that your PC will share its wired Internet connection with the devices connected to your PC over the ad-hoc network.
确保启用“允许其他网络用户通过此计算机的Internet连接进行连接”复选框,以便您的PC将与通过ad hoc网络连接到PC的设备共享其有线Internet连接。
在Windows 8中共享有线Internet连接 (Share a Wired Internet Connection in Windows 8)
Unfortunately, Windows 8 stripped away the graphical interface for setting up an ad-hoc network, so it’s not quite as easy to set up as it is in Windows 7 or 10. The underlying feature is still present, though. You just have to resort to a little command line trickery.
不幸的是,Windows 8剥夺了用于设置临时网络的图形界面,因此它的设置并不像Windows 7或10那样容易。尽管如此,其基本功能仍然存在。 您只需要诉诸一些命令行技巧即可。
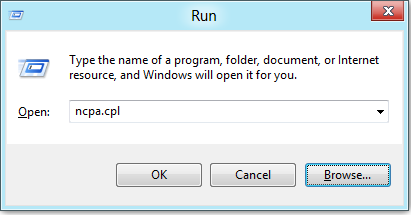
First, you’ll need to make sure your existing wireless network is shared with other network users. Press Windows+R on your keyboard to open the Run dialog box, type “ncpa.cpl”, and then hit Enter.
首先,您需要确保现有的无线网络已与其他网络用户共享。 在键盘上按Windows + R打开“运行”对话框,键入“ ncpa.cpl”,然后按Enter。
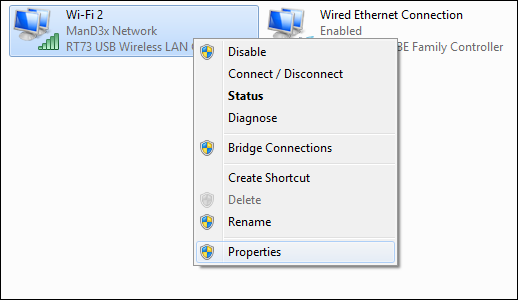
In the network connections window, right-click your Wireless network and select “Properties” from the context menu.
在网络连接窗口中,右键单击您的无线网络,然后从上下文菜单中选择“属性”。
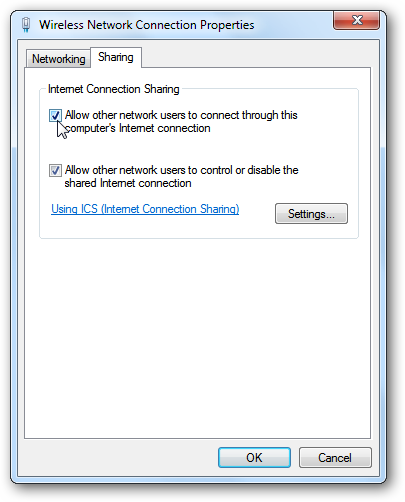
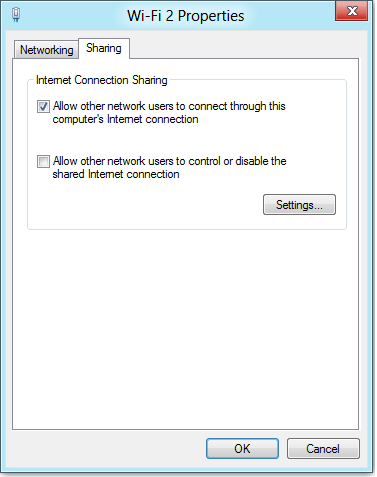
Switch over to the “Sharing” tab and enable the “Allow other network users to connect through this computer’s Internet connection” checkbox. Go ahead and clear the “Allow other network users to control or disable the shared Internet connection” checkbox while you’re at it and then click the “OK” button.
切换到“共享”选项卡,并启用“允许其他网络用户通过此计算机的Internet连接进行连接”复选框。 继续并清除“允许其他网络用户控制或禁用共享的Internet连接”复选框,然后单击“确定”按钮。
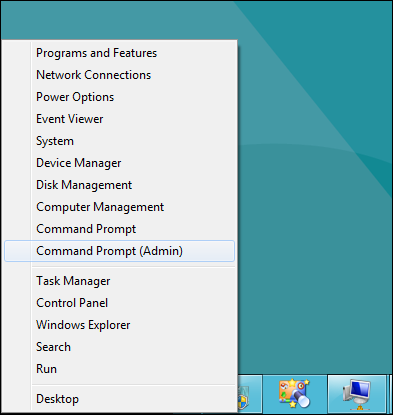
Next, you’ll need to launch the Command Prompt with administrative privileges. Right-click in the bottom left of your screen (or hit Windows+X) and then select “Command Prompt (Admin)” on the Power Users menu that appears.
接下来,您需要使用管理权限启动命令提示符。 右键单击屏幕的左下角(或单击Windows + X),然后在出现的“高级用户”菜单上选择“命令提示符(管理)”。
Note: If you see PowerShell instead of Command Prompt on the Power Users menu, that’s a switch that came about with the Creators Update for Windows 10. It’s very easy to switch back to showing the Command Prompt on the Power Users menu if you want, or you can give PowerShell a try. You can do pretty much everything in PowerShell that you can do in Command Prompt, plus a lot of other useful things.
注意 :如果您在Power Users菜单上看到PowerShell而不是Command Prompt,那是Windows 10的Creators Update附带的开关。 如果需要,可以很容易地切换回在“高级用户”菜单上显示命令提示符 ,或者可以尝试使用PowerShell。 您可以在PowerShell中完成几乎可以在命令提示符中执行的所有操作,以及许多其他有用的操作。
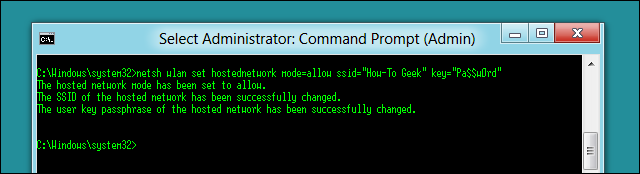
With the command prompt open, your next step is to set up the wireless network using the netsh like so:
打开命令提示符后,下一步是使用netsh设置无线网络,如下所示:
netsh wlan set hostednetwork mode=allow ssid="<SSID>" key="<PASSWORD>"
Where <SSID> is the name of your network and <PASSWORD> is the password you want users to connect with. The access point is created with WPA2-PSK (AES) encryption.
其中<SSID>是您的网络名称, <PASSWORD>是您希望用户连接的密码。 接入点是使用WPA2-PSK(AES)加密创建的。
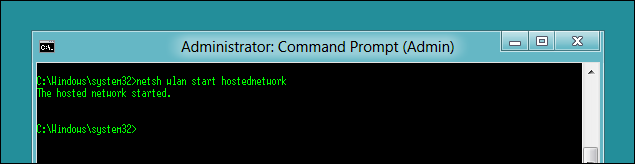
Next, you’ll start broadcasting our network with the following command:
接下来,您将使用以下命令开始广播我们的网络:
netsh wlan start hostednetwork
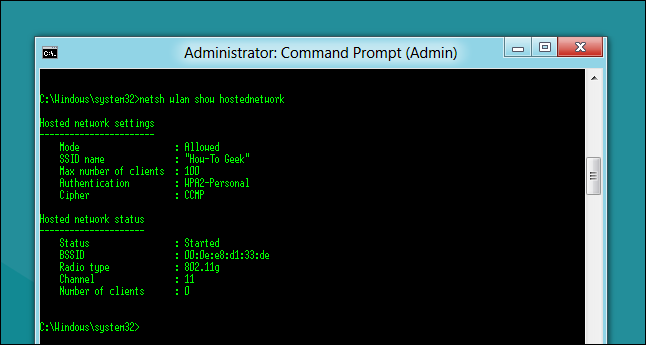
And at any time, you can use this last command to show information about the connection. It lists things like the channel your connection uses, ssid name, authentication type, radio type, and the number of clients connected to your network.
而且,您可以随时使用最后一个命令来显示有关连接的信息。 它列出了诸如连接所使用的通道,ssid名称,身份验证类型,无线电类型以及连接到网络的客户端数量之类的信息。
netsh wlan show hostednetwork
When you’re done, you should be able to connect any Wi-Fi device to your new ad-hoc network.
完成后,您应该可以将任何Wi-Fi设备连接到新的临时网络。
在Windows 8或7中共享无线Internet连接 (Share a Wireless Internet Connection in Windows 8 or 7)
Note: this software doesn’t appear to work anymore. You’ll want to use Connectify Hotspot or one of the other methods mentioned above.
注意:该软件似乎不再起作用。 您将要使用Connectify Hotspot或上述其他方法之一。
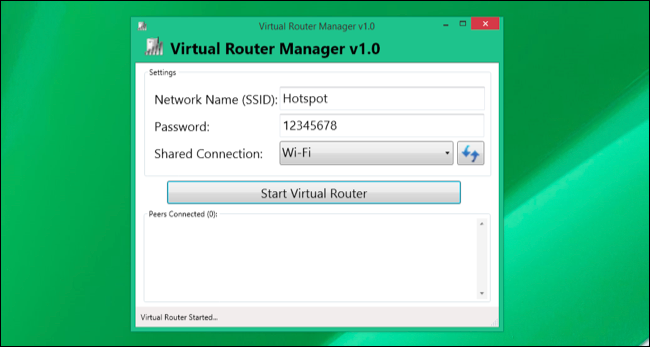
If you want to share a wireless Internet connection in Windows 8 or 7 with other wireless devices, you’ll need use a third party app. We recommend Virtual Router because it’s free, open-source, and easy to set up. You can also use it to share a wired connection if you just want an easier way to do it than creating an ad-hoc network.
如果要与其他无线设备共享Windows 8或7中的无线Internet连接,则需要使用第三方应用程序。 我们建议您使用虚拟路由器,因为它是免费的,开源的并且易于设置。 如果您只想要比创建临时网络更简单的方法,也可以使用它共享有线连接。
Start by downloading Virtual Router and starting it up. Using it really couldn’t be easier. Provide a name for your network, enter a passphrase, and choose the connection you want to share with devices that connect to that Wi-Fi network. Click the “Start Virtual Router” button, and you’re done. You can even see a list of connected devices in this window.
首先下载并启动虚拟路由器。 使用它真的很容易。 为您的网络提供名称,输入密码,然后选择要与连接到该Wi-Fi网络的设备共享的连接。 单击“启动虚拟路由器”按钮,操作完成。 您甚至可以在此窗口中查看已连接设备的列表。
Setting up a mobile hotspot on your Windows PC can be a bit of a hassle, or it can be pretty easy. It just depends on what version of Windows you’re running and whether you’re willing to use a third-party app. But the next time you’re stuck somewhere with only a wired Internet connection, at least you know you can use your PC to share that connection with your other wireless devices.
在Windows PC上设置移动热点可能有些麻烦,或者非常简单。 这仅取决于您运行的Windows版本以及是否愿意使用第三方应用程序。 但是,下次当您仅停留在有线Internet连接的某个地方时,至少您知道可以使用PC与其他无线设备共享该连接。
Image Credit: Iain Watson on Flickr
图片来源: Flickr上的Iain Watson
翻译自: https://www.howtogeek.com/214080/how-to-turn-your-windows-pc-into-a-wi-fi-hotspot/
win7 wi-fi热点


 1559
1559


 被折叠的 条评论
为什么被折叠?
被折叠的 条评论
为什么被折叠?
 到【灌水乐园】发言


