


django创建应用程序
Django is a fully featured Python web framework that can be used to build complex web applications. In this tutorial, you’ll jump in and learn Django by example. You’ll follow the steps to create a fully functioning web application and, along the way, learn some of the most important features of the framework and how they work together.
Django是功能齐全的Python Web框架,可用于构建复杂的Web应用程序。 在本教程中,您将通过示例学习Django 。 您将按照以下步骤创建一个功能全面的Web应用程序,并逐步学习该框架的一些最重要功能以及它们如何协同工作。
In later posts in this series, you’ll see how to build more complex websites using even more of Django’s features than you’ll cover in this tutorial.
在本系列的后续文章中,您将了解如何使用Django的更多功能来构建更复杂的网站,而本教程将不介绍这些功能。
By the end of this tutorial, you will be able to:
在本教程结束时,您将能够:
- Understand what Django is and why it’s a great web framework
- Understand the architecture of a Django site and how it compares with other frameworks
- Set up a new Django project and app
- Build a Personal Portfolio Website with Django
- 了解Django是什么以及为什么它是一个很棒的Web框架
- 了解Django网站的架构及其与其他框架的比较
- 设置一个新的Django项目和应用
- 使用Django建立个人投资组合网站
Free Bonus: Click here to get access to a free Django Learning Resources Guide (PDF) that shows you tips and tricks as well as common pitfalls to avoid when building Python + Django web applications.
免费红利: 单击此处可获得免费的Django学习资源指南(PDF) ,其中显示了一些技巧和窍门,以及在构建Python + Django Web应用程序时应避免的常见陷阱。
为什么要学习Django (Why You Should Learn Django)
There are endless web development frameworks out there, so why should you learn Django over any of the others? First of all, it’s written in Python, one of the most readable and beginner-friendly programming languages out there.
那里有无穷无尽的Web开发框架,那么为什么要比其他任何一个学习Django? 首先,它是用Python编写的,它是目前最易读且对初学者友好的编程语言之一。
Note: This tutorial assumes an intermediate knowledge of the Python language. If you’re new to programming with Python, check out some of our beginner tutorials or the introductory course.
注意:本教程假定您具有Python语言的中级知识。 如果您不熟悉使用Python进行编程,请查看我们的一些初学者教程或入门课程 。
The second reason you should learn Django is the scope of its features. If you need to build a website, you don’t need to rely on any external libraries or packages if you choose Django. This means that you don’t need to learn how to use anything else, and the syntax is seamless as you’re using only one framework.
您应该学习Django的第二个原因是其功能范围。 如果您需要构建网站,则选择Django无需依赖任何外部库或软件包。 这意味着您不需要学习如何使用其他任何东西,并且语法是无缝的,因为您仅使用一个框架。
There’s also the added benefit that you don’t need to worry that updating one library or framework will render others that you’ve installed useless.
还有一个额外的好处,您不必担心更新一个库或框架会使您安装的其他库或框架无用。
If you do find yourself needing to add extra features, there are a range of external libraries that you can use to enhance your site.
如果您确实需要添加其他功能,则可以使用一系列外部库来增强站点。
One of the great things about the Django framework is its in-depth documentation. It has detailed documentation on every aspect of Django and also has great examples and even a tutorial to get you started.
Django框架的一大优点是其深入的文档 。 它具有有关Django各方面的详细文档,还提供了出色的示例,甚至还提供了入门指南。
There’s also a fantastic community of Django developers, so if you get stuck there’s almost always a way forward by either checking the docs or asking the community.
还有一个由Django开发人员组成的绝佳社区,因此,如果您陷入困境,那么几乎总是可以通过检查文档或询问社区来解决问题 。
Django is a high-level web application framework with loads of features. It’s great for anyone new to web development due to its fantastic documentation, and particularly if you’re also familiar with Python.
Django是具有大量功能的高级Web应用程序框架。 由于其出色的文档,尤其对于您也熟悉Python的人来说,它对Web开发新手来说非常有用。
Django网站的结构 (The Structure of a Django Website)
A Django website consists of a single project that is split into separate apps. The idea is that each app handles a self-contained function that the site needs to perform. As an example, imagine an application like Instagram. There are several different functions that need to be performed:
Django网站由单个项目组成,该项目被拆分为单独的应用程序 。 这个想法是,每个应用程序都处理站点需要执行的独立功能。 例如,假设有一个像Instagram这样的应用程序。 有几种不同的功能需要执行:
- User management: Login, logout, register, and so on
- The image feed: Uploading, editing, and displaying images
- Private messaging: Private messages between users and notifications
- 用户管理 :登录,注销,注册等
- 图像供稿 :上传,编辑和显示图像
- 私人消息 :用户和通知之间的私人消息
These are each separate pieces of functionality, so if this were a Django site, then each piece of functionality should be a different Django app inside a single Django project.
这些都是独立的功能,因此,如果这是Django站点,则每个功能应该是单个Django项目中的不同Django应用。
The Django project holds some configurations that apply to the project as a whole, such as project settings, URLs, shared templates and static files. Each application can have its own database and has its own functions to control how the data is displayed to the user in HTML templates.
Django项目拥有一些适用于整个项目的配置,例如项目设置,URL,共享模板和静态文件。 每个应用程序可以具有自己的数据库,并具有自己的功能来控制如何以HTML模板向用户显示数据。
Each application also has its own URLs as well as its own HTML templates and static files, such as JavaScript and CSS.
每个应用程序还具有自己的URL以及自己HTML模板和静态文件,例如JavaScript和CSS。
Django apps are structured so that there is a separation of logic. It supports the Model-View-Controller Pattern, which is the architecture on which most web frameworks are built. The basic principle is that in each application there are three separate files that handle the three main pieces of logic separately:
Django应用的结构合理,因此逻辑上是分开的。 它支持Model-View-Controller Pattern,这是构建大多数Web框架的体系结构。 基本原理是,在每个应用程序中都有三个单独的文件,分别处理三个主要逻辑部分:
- Model defines the data structure. This is usually a database and is the base layer to an application.
- View displays some or all of the data to the user with HTML and CSS.
- Controller handles how the database and the view interact.
- 模型定义了数据结构。 这通常是一个数据库,是应用程序的基础层。
- 视图使用HTML和CSS向用户显示部分或全部数据。
- 控制器处理数据库和视图的交互方式。
If you want to learn more about the MVC pattern, then check out Model-View-Controller (MVC) Explained – With Legos.
如果您想了解有关MVC模式的更多信息,请查看“使用Legos的Model-View-Controller(MVC)解释-” 。
In Django, the architecture is slightly different. Although based upon the MVC pattern, Django handles the controller part itself. There’s no need to define how the database and views interact. It’s all done for you!
在Django中,架构略有不同。 尽管基于MVC模式,但Django会自行处理控制器部分。 无需定义数据库和视图之间的交互方式。 一切都为您完成!
The pattern Django utilizes is called the Model-View-Tempalate (MVT) pattern. The view and template in the MVT pattern make up the view in the MVC pattern. All you need to do is add some URL configurations to map the views to, and Django handles the rest!
Django使用的模式称为模型-视图-温度(MVT)模式。 MVT模式中的视图和模板构成MVC模式中的视图。 您需要做的就是添加一些URL配置以将视图映射到其中,而Django将处理其余的工作!
A Django site starts off as a project and is built up with a number of applications that each handle separate functionality. Each app follows the Model-View-Template pattern. Now that you’re familiar with the structure of a Django site, let’s have a look at what you’re going to build!
Django站点从一个项目开始,并由许多分别处理不同功能的应用程序构成。 每个应用程序都遵循“模型-视图-模板”模式。 既然您已经熟悉了Django网站的结构,那么让我们来看看您将要构建的内容!
你要建造什么 (What You’re Going to Build)
Before you get started with any web development project, it’s a good idea to come up with a plan of what you’re going to build. In this tutorial, we are going to build an application with the following features:
在开始任何Web开发项目之前,最好先制定一个要构建的计划。 在本教程中,我们将构建具有以下功能的应用程序:
-
A fully functioning blog: If you’re looking to demonstrate your coding ability, a blog is a great way to do that. In this application, you will be able to create, update, and delete blog posts. Posts will have categories that can be used to sort them. Finally, users will be able to leave comments on posts.
-
A portfolio of your work: You can showcase previous web development projects here. You’ll build a gallery style page with clickable links to projects that you’ve completed.
功能完善的博客 :如果您想证明自己的编码能力,那么博客是实现此目标的一种好方法。 在此应用程序中,您将能够创建,更新和删除博客文章。 帖子将具有可用于对其进行排序的类别。 最后,用户将能够对帖子发表评论。
您的作品集 :您可以在这里展示以前的Web开发项目。 您将构建一个库样式页面,其中包含指向已完成项目的可单击链接。
Note: Before you get started, you can pull down the source code and follow along with the tutorial.
注意:开始之前,您可以先下拉源代码,然后按照本教程进行操作。
If you prefer to follow along by writing the code yourself, don’t worry. I’ve referenced the relevant parts of the source code throughout so you can refer back to it.
如果您喜欢自己编写代码,请不要担心。 我在整个过程中都引用了源代码的相关部分,因此您可以重新参考它。
We won’t be using any external Python libraries in this tutorial. One of the great things about Django is that it has so many features that you don’t need to rely on external libraries. However, we will add Bootstrap 4 styling in the templates.
在本教程中,我们不会使用任何外部Python库。 Django的一大优点是它具有众多功能,您无需依赖外部库。 但是,我们将在模板中添加Bootstrap 4样式。
By building these two apps, you’ll learn the basics of Django models, view functions, forms, templates, and the Django admin page. With knowledge of these features, you’ll be able to go away and build loads more applications. You’ll also have the tools to learn even more and build sophisticated Django sites.
通过构建这两个应用程序,您将学习Django模型的基础知识,查看功能,表单,模板和Django管理页面。 有了这些功能的知识,您就可以轻松构建更多应用程序。 您还将拥有用于学习更多内容并构建完善的Django网站的工具。
你好,世界! (Hello, World!)
Now that you know the structure of a Django application, and what you are about to build, we’re going to go through the process of creating an application in Django. You’ll extend this later into your personal portfolio application.
既然您已经知道Django应用程序的结构以及要构建的内容,那么我们将逐步完成在Django中创建应用程序的过程。 您稍后将其扩展到您的个人投资组合应用程序中。
设置您的开发环境 (Set Up Your Development Environment)
Whenever you are starting a new web development project, it’s a good idea to first set up your development environment. Create a new directory for your project to live in, and cd into it:
每当您开始一个新的Web开发项目时,最好先设置您的开发环境。 为项目创建生活在一个新的目录, cd到其中:
 $ mkdir rp-portfolio
$ mkdir rp-portfolio
$ $ cd rp-portfolio
cd rp-portfolio
Once your inside the main directory, it’s a good idea to create a virtual environment to manage dependencies. There are many different ways to set up virtual environments, but here you’re going to use venv:
一旦进入主目录,最好创建一个虚拟环境来管理依赖项。 设置虚拟环境的方法有很多,但是这里您将使用venv :
This command will create a folder venv in your working directory. Inside this directory, you’ll find several files including a copy of the Python standard library. Later, when you install new dependencies, they will also be stored in this directory. Next, you need to activate the virtual environment by running the following command:
此命令将在您的工作目录中创建一个文件夹venv 。 在此目录中,您会找到几个文件,包括Python标准库的副本。 以后,当您安装新的依赖项时,它们也将存储在此目录中。 接下来,您需要通过运行以下命令来激活虚拟环境:
 $ $ source venv/bin/activate
source venv/bin/activate
Note: If you’re not using bash shell, you might need to use a different command to activate your virtual environment. For example, on windows you need this command:
注意:如果您不使用bash shell,则可能需要使用其他命令来激活您的虚拟环境。 例如,在Windows上,您需要以下命令:
You’ll know that your virtual environment has been activated, because your console prompt in the terminal will change. It should look something like this:
您会知道您的虚拟环境已被激活,因为终端中的控制台提示符将更改。 它看起来应该像这样:
 (venv) $
(venv) $
Note: Your virtual environment directory doesn’t have to be called venv. If you want to create one under a different name, for example my_venv, just replace with the second venv with my_venv.
注意:您的虚拟环境目录不必称为venv 。 如果要使用其他名称创建一个,例如my_venv ,只需将第二个venv替换为venv my_venv 。
Then, when activating your virtual environment, replace venv with my_venv again. The prompt will also now be prefixed with (my_venv).
然后,在激活虚拟环境时,再次用my_venv替换venv 。 现在,该提示还将带有(my_venv)前缀。
Now that you’ve created a virtual environment, it’s time to install Django. You can do this using pip:
现在您已经创建了虚拟环境,是时候安装Django了。 您可以使用pip执行此操作:
Once you’ve set up the virtual environment and installed Django, you can now dive in to creating the application.
设置虚拟环境并安装Django之后,您现在就可以开始创建应用程序了。
创建一个Django项目 (Create a Django Project)
As you saw in the previous section, a Django web application is made up of a project and its constituent apps. Making sure you’re in the rp_portfolio directory, and you’ve activated your virtual environment, run the following command to create the project:
如上一节所述,Django Web应用程序由一个项目及其组成的应用程序组成。 确保您在rp_portfolio目录中,并且已经激活了虚拟环境,请运行以下命令来创建项目:
 $ django-admin startproject personal_portfolio
$ django-admin startproject personal_portfolio
This will create a new directory personal_portfolio. If you cd into this new directory you’ll see another directory called personal_portfolio and a file called manage.py. Your directory structure should look something like this:
这将创建一个新目录personal_portfolio 。 如果你cd到这个新目录你会看到另一个名为目录personal_portfolio和一个名为manage.py 。 您的目录结构应如下所示:
Most of the work you do will be in that first personal_portfolio directory. To save having to cd through several directories each time you come to work on your project, it can be helpful to reorder this slightly by moving all the files up a directory. While you’re in the rp-portfolio directory, run the following commands:
您所做的大部分工作将在第一个personal_portfolio目录中。 为了避免每次都要使用cd通过多个目录进行cd ,将所有文件上移一个目录来对它重新排序会很有帮助。 在rp-portfolio目录中时,运行以下命令:
 $ mv personal_portfolio/manage.py ./
$ mv personal_portfolio/manage.py ./
$ mv personal_portfolio/personal_portfolio/* personal_portfolio
$ mv personal_portfolio/personal_portfolio/* personal_portfolio
$ rm -r personal_portfolio/personal_portfolio/
$ rm -r personal_portfolio/personal_portfolio/
You should end up with something like this:
您应该以如下形式结束:
Once your file structure is set up, you can now start the server and check that your set up was successful. In the console, run the following command:
设置文件结构后,您现在就可以启动服务器并检查设置是否成功。 在控制台中,运行以下命令:
 $ python manage.py runserver
$ python manage.py runserver
Then, in your browser go to localhost:8000, and you should see the following:
然后,在浏览器中转到localhost:8000 ,您应该看到以下内容:
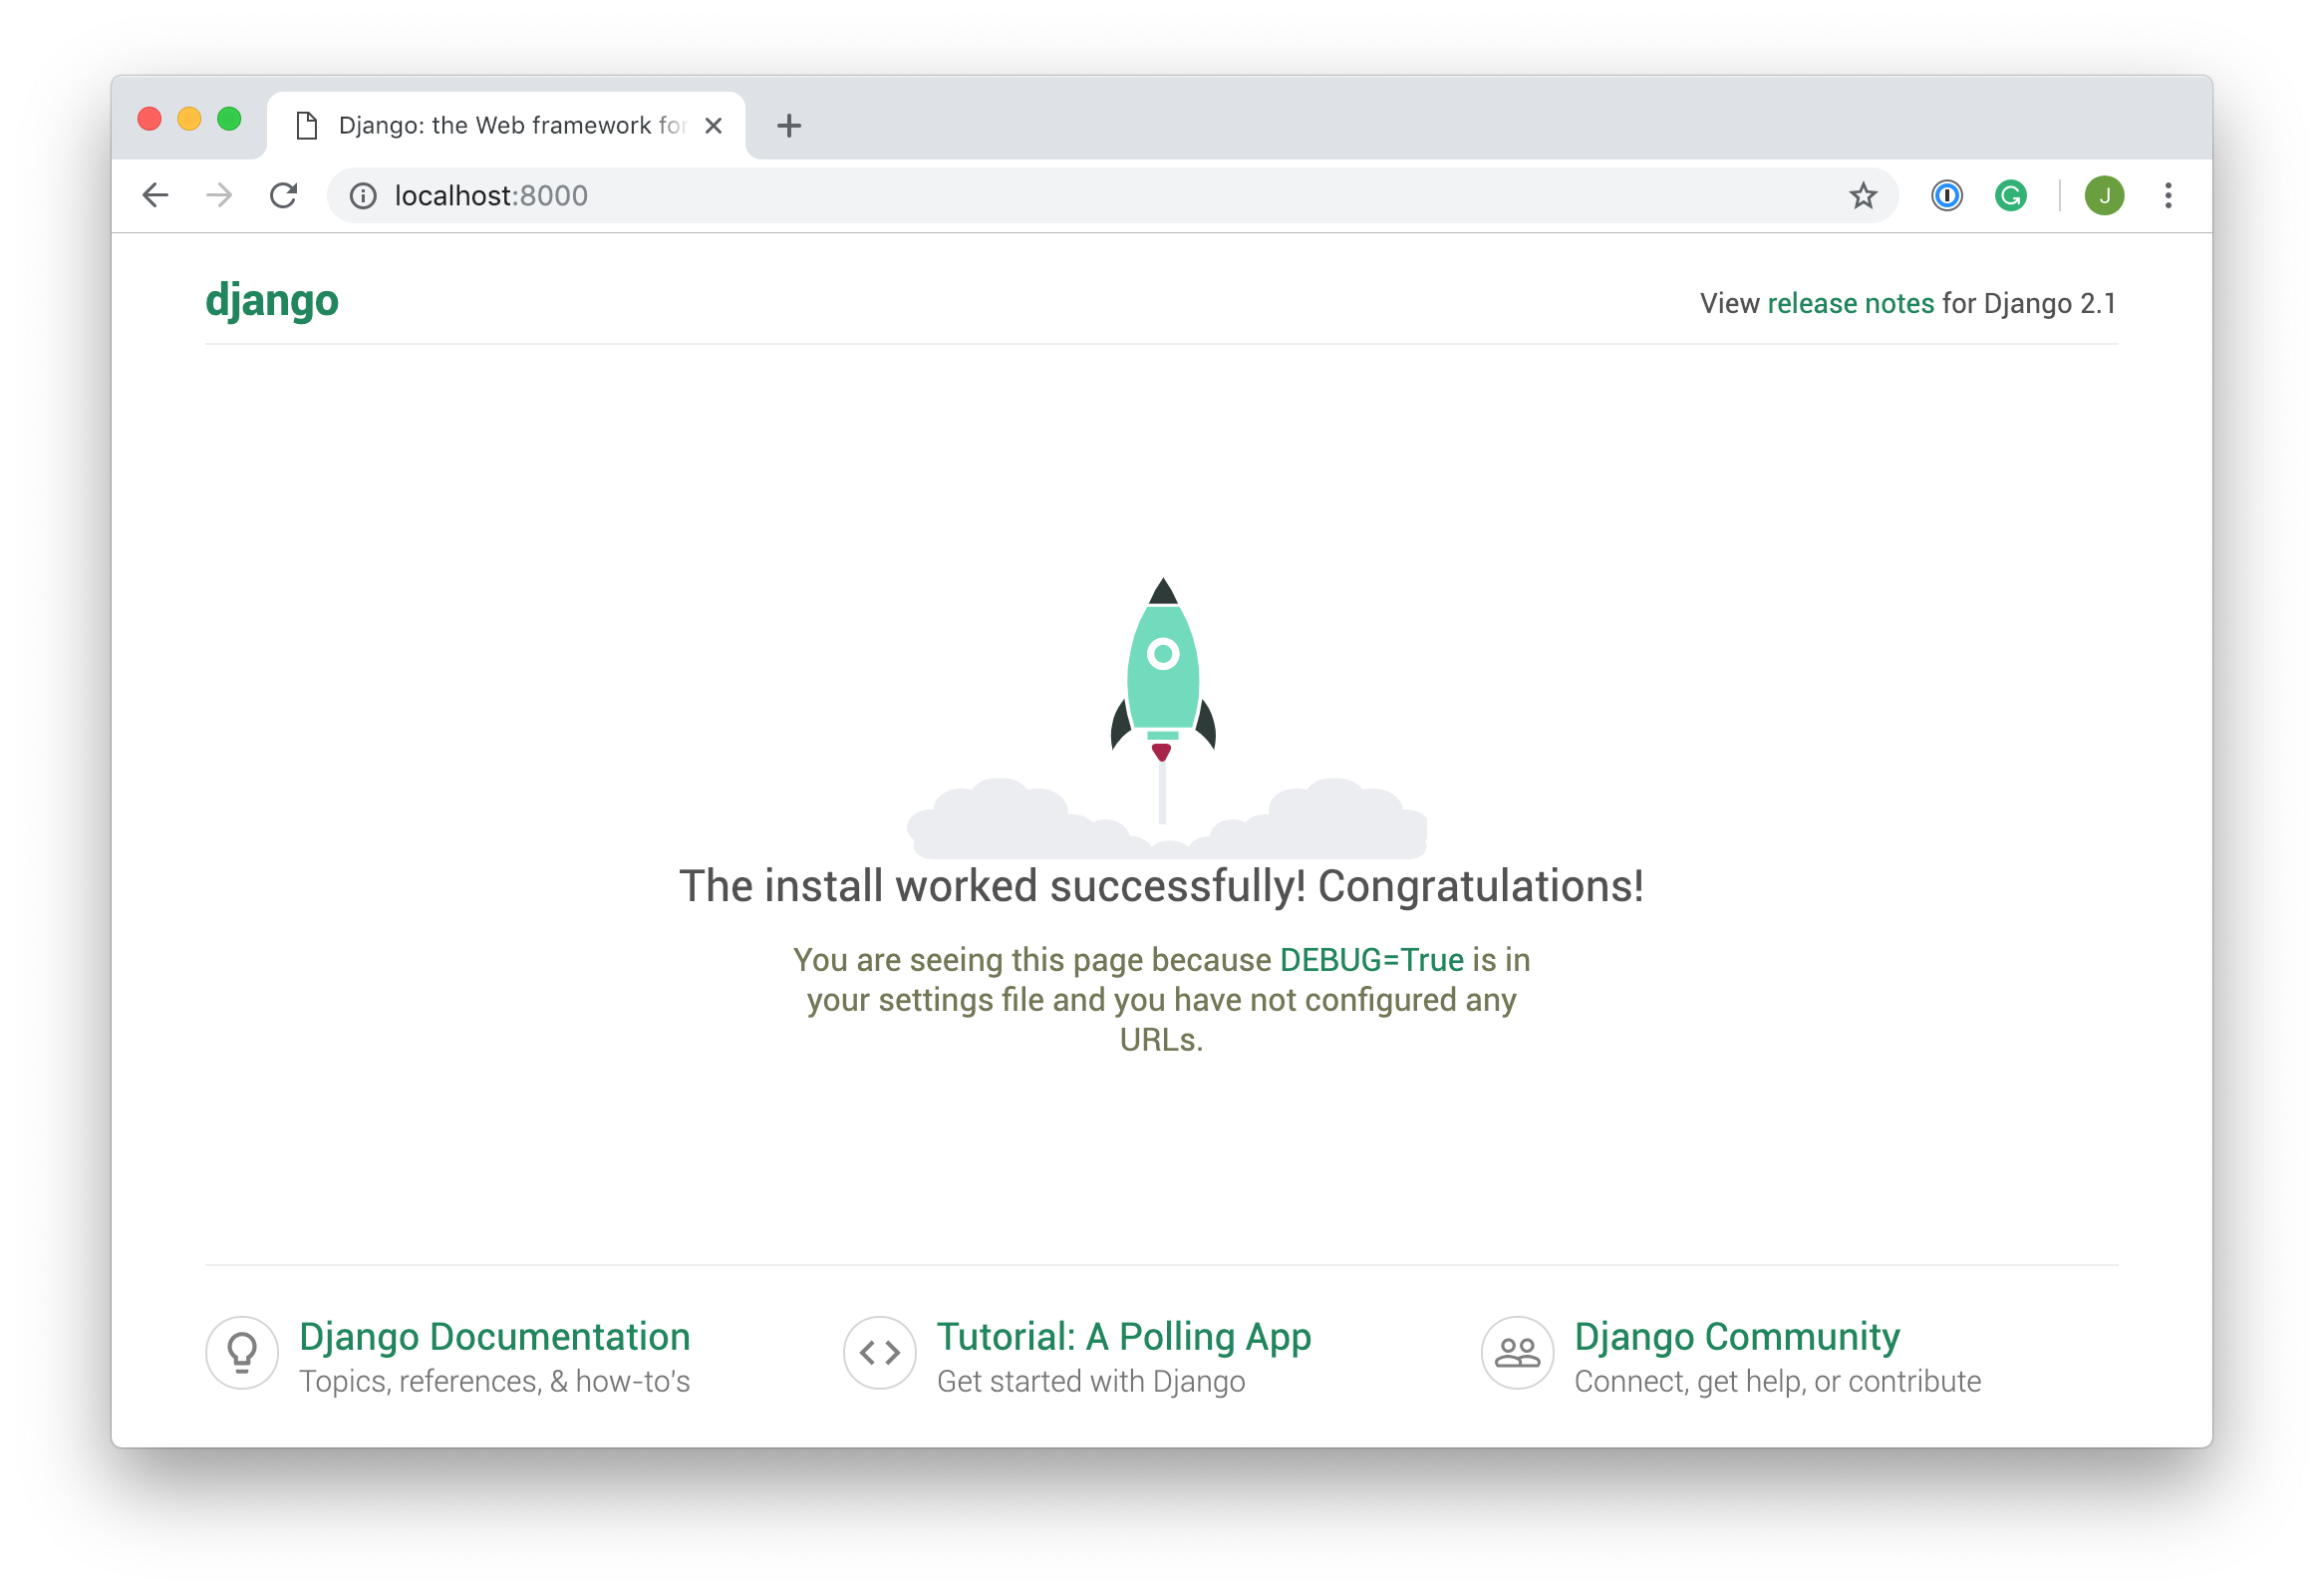
Congratulations, you’ve created a Django site! The source code for this part of the tutorial can be found on GitHub. The next step is to create apps so that you can add views and functionality to your site.
恭喜,您已经创建了Django网站! 本部分教程的源代码可以在GitHub上找到 。 下一步是创建应用程序,以便您可以向网站添加视图和功能。
创建一个Django应用程序 (Create a Django Application)
For this part of the tutorial, we’ll create an app called hello_world, which you’ll subsequently delete as its not necessary for our personal portfolio site.
在本教程的这一部分中,我们将创建一个名为hello_world的应用程序,您将随后删除该应用程序,因为它对于我们的个人作品集网站不是必需的。
To create the app, run the following command:
要创建该应用,请运行以下命令:
This will create another directory called hello_world with several files:
这将创建另一个带有几个文件的目录hello_world :
__init__.pytells Python to treat the directory as a Python package.admin.pycontains settings for the Django admin pages.apps.pycontains settings for the application configuration.models.pycontains a series of classes that Django’s ORM converts to database tables.tests.pycontains test classes.views.pycontains functions and classes that handle what data is displayed in the HTML templates.
-
__init__.py告诉Python将目录视为Python包。 -
admin.py包含Django管理页面的设置。 -
apps.py包含应用程序配置的设置。 -
models.py包含Django的ORM转换为数据库表的一系列类。 -
tests.py包含测试类。 -
views.py包含处理HTML模板中显示哪些数据的函数和类。
Once you’ve created the app, you need to install it in your project. In rp-portfolio/settings.py, add the following line of code under INSTALLED_APPS:
创建应用程序后,需要将其安装在项目中。 在rp-portfolio/settings.py ,在INSTALLED_APPS下添加以下代码行:
 INSTALLED_APPS INSTALLED_APPS = = [
    [
    'django.contrib.admin''django.contrib.admin' ,
    ,
    'django.contrib.auth''django.contrib.auth' ,
    ,
    'django.contrib.contenttypes''django.contrib.contenttypes' ,
    ,
    'django.contrib.sessions''django.contrib.sessions' ,
    ,
    'django.contrib.messages''django.contrib.messages' ,
    ,
    'django.contrib.staticfiles''django.contrib.staticfiles' ,
,
'hello_world''hello_world' ,
,
]
]
That line of code means that your project now knows that the app you just created exists. The next step is to create a view so that you can display something to a user.
该行代码意味着您的项目现在知道您刚刚创建的应用程序存在。 下一步是创建视图,以便您可以向用户显示内容。
创建一个视图 (Create a View)
Views in Django are a collection of functions or classes inside the views.py file in your app directory. Each function or class handles the logic that gets processed each time a different URL is visited.
Django中的视图是您应用目录中views.py文件内部的函数或类的集合。 每个函数或类都会处理每次访问不同URL时都会处理的逻辑。
Navigate to the views.py file in the hello_world directory. There’s already a line of code in there that imports render(). Add the following code:
导航到hello_world目录中的views.py文件。 那里已经有一行代码导入了render() 。 添加以下代码:
In this piece of code, you’ve defined a view function called hello_world(). When this function is called, it will render an HTML file called hello_world.html. That file doesn’t exist yet, but we’ll create it soon.
在这段代码中,您定义了一个名为hello_world()的视图函数 。 调用此函数时,它将呈现一个名为hello_world.htmlHTML文件。 该文件尚不存在,但我们会尽快创建。
The view function takes one argument, request. This object is an HttpRequestObject that is created whenever a page is loaded. It contains information about the request, such as the method, which can take several values including GET and POST.
视图函数接受一个参数request 。 该对象是一个HttpRequestObject ,每当加载页面时都会创建该对象。 它包含有关请求的信息(例如方法),该信息可以采用多个值,包括GET和POST 。
Now that you’ve created the view function, you need to create the HTML template to display to the user. render() looks for HTML templates inside a directory called templates inside your app directory. Create that directory and subsequently a file named hello_world.html inside it:
现在,您已经创建了视图功能,您需要创建HTML模板以显示给用户。 render()在应用程序目录内的名为templates的目录中查找HTML模板。 创建该目录,然后创建一个名为hello_world.html的文件:
 $ mkdir hello_world/templates/
$ mkdir hello_world/templates/
$ touch hello_world/templates/hello_world.html
$ touch hello_world/templates/hello_world.html
Add the following lines of HTML to your file:
将以下HTML行添加到文件中:
You’ve now created a function to handle your views and templates to display to the user. The final step is to hook up your URLs so that you can visit the page you’ve just created. Your project has a module called urls.py in which you need to include a URL configuration for the hello_world app. Inside personal_portfolio/urls.py, add the following:
现在,您已经创建了一个函数来处理视图和模板以显示给用户。 最后一步是连接您的URL,以便您可以访问刚刚创建的页面。 您的项目有一个名为urls.py的模块,您需要在其中包含hello_world应用程序的URL配置。 在personal_portfolio/urls.py ,添加以下内容:
 from from django.contrib django.contrib import import admin
admin
from from django.urls django.urls import import pathpath , , include
include
urlpatterns urlpatterns = = [
    [
    pathpath (( 'admin/''admin/' , , adminadmin .. sitesite .. urlsurls ),
),
pathpath (( '''' , , includeinclude (( 'hello_world.urls''hello_world.urls' )),
)),
]
]
This looks for a module called urls.py inside the hello_world application and registers any URLs defined there. Whenever you visit the root path of your URL (localhost:8000), the hello_world application’s URLs will be registered. The hello_world.urls module doesn’t exist yet, so you’ll need to create it:
这将在hello_world应用程序中寻找一个名为urls.py的模块,并注册在那里定义的所有URL。 每当您访问URL的根路径( localhost:8000 )时, hello_world应用程序的URL都会被注册。 hello_world.urls模块尚不存在,因此您需要创建它:
Inside this module, we need to import the path object as well as our app’s views module. Then we want to create a list of URL patterns that correspond to the various view functions. At the moment, we have only created one view function, so we need only create one URL:
在此模块内部,我们需要导入path对象以及应用程序的views模块。 然后,我们想创建一个与各种视图功能相对应的URL模式列表。 目前,我们只创建了一个视图函数,因此我们只需要创建一个URL:
 from from django.urls django.urls import import path
path
from from hello_world hello_world import import views

views

urlpatterns urlpatterns = = [
    [
    pathpath (( '''' , , viewsviews .. hello_worldhello_world , , namename == 'hello_world''hello_world' ),
),
]
]
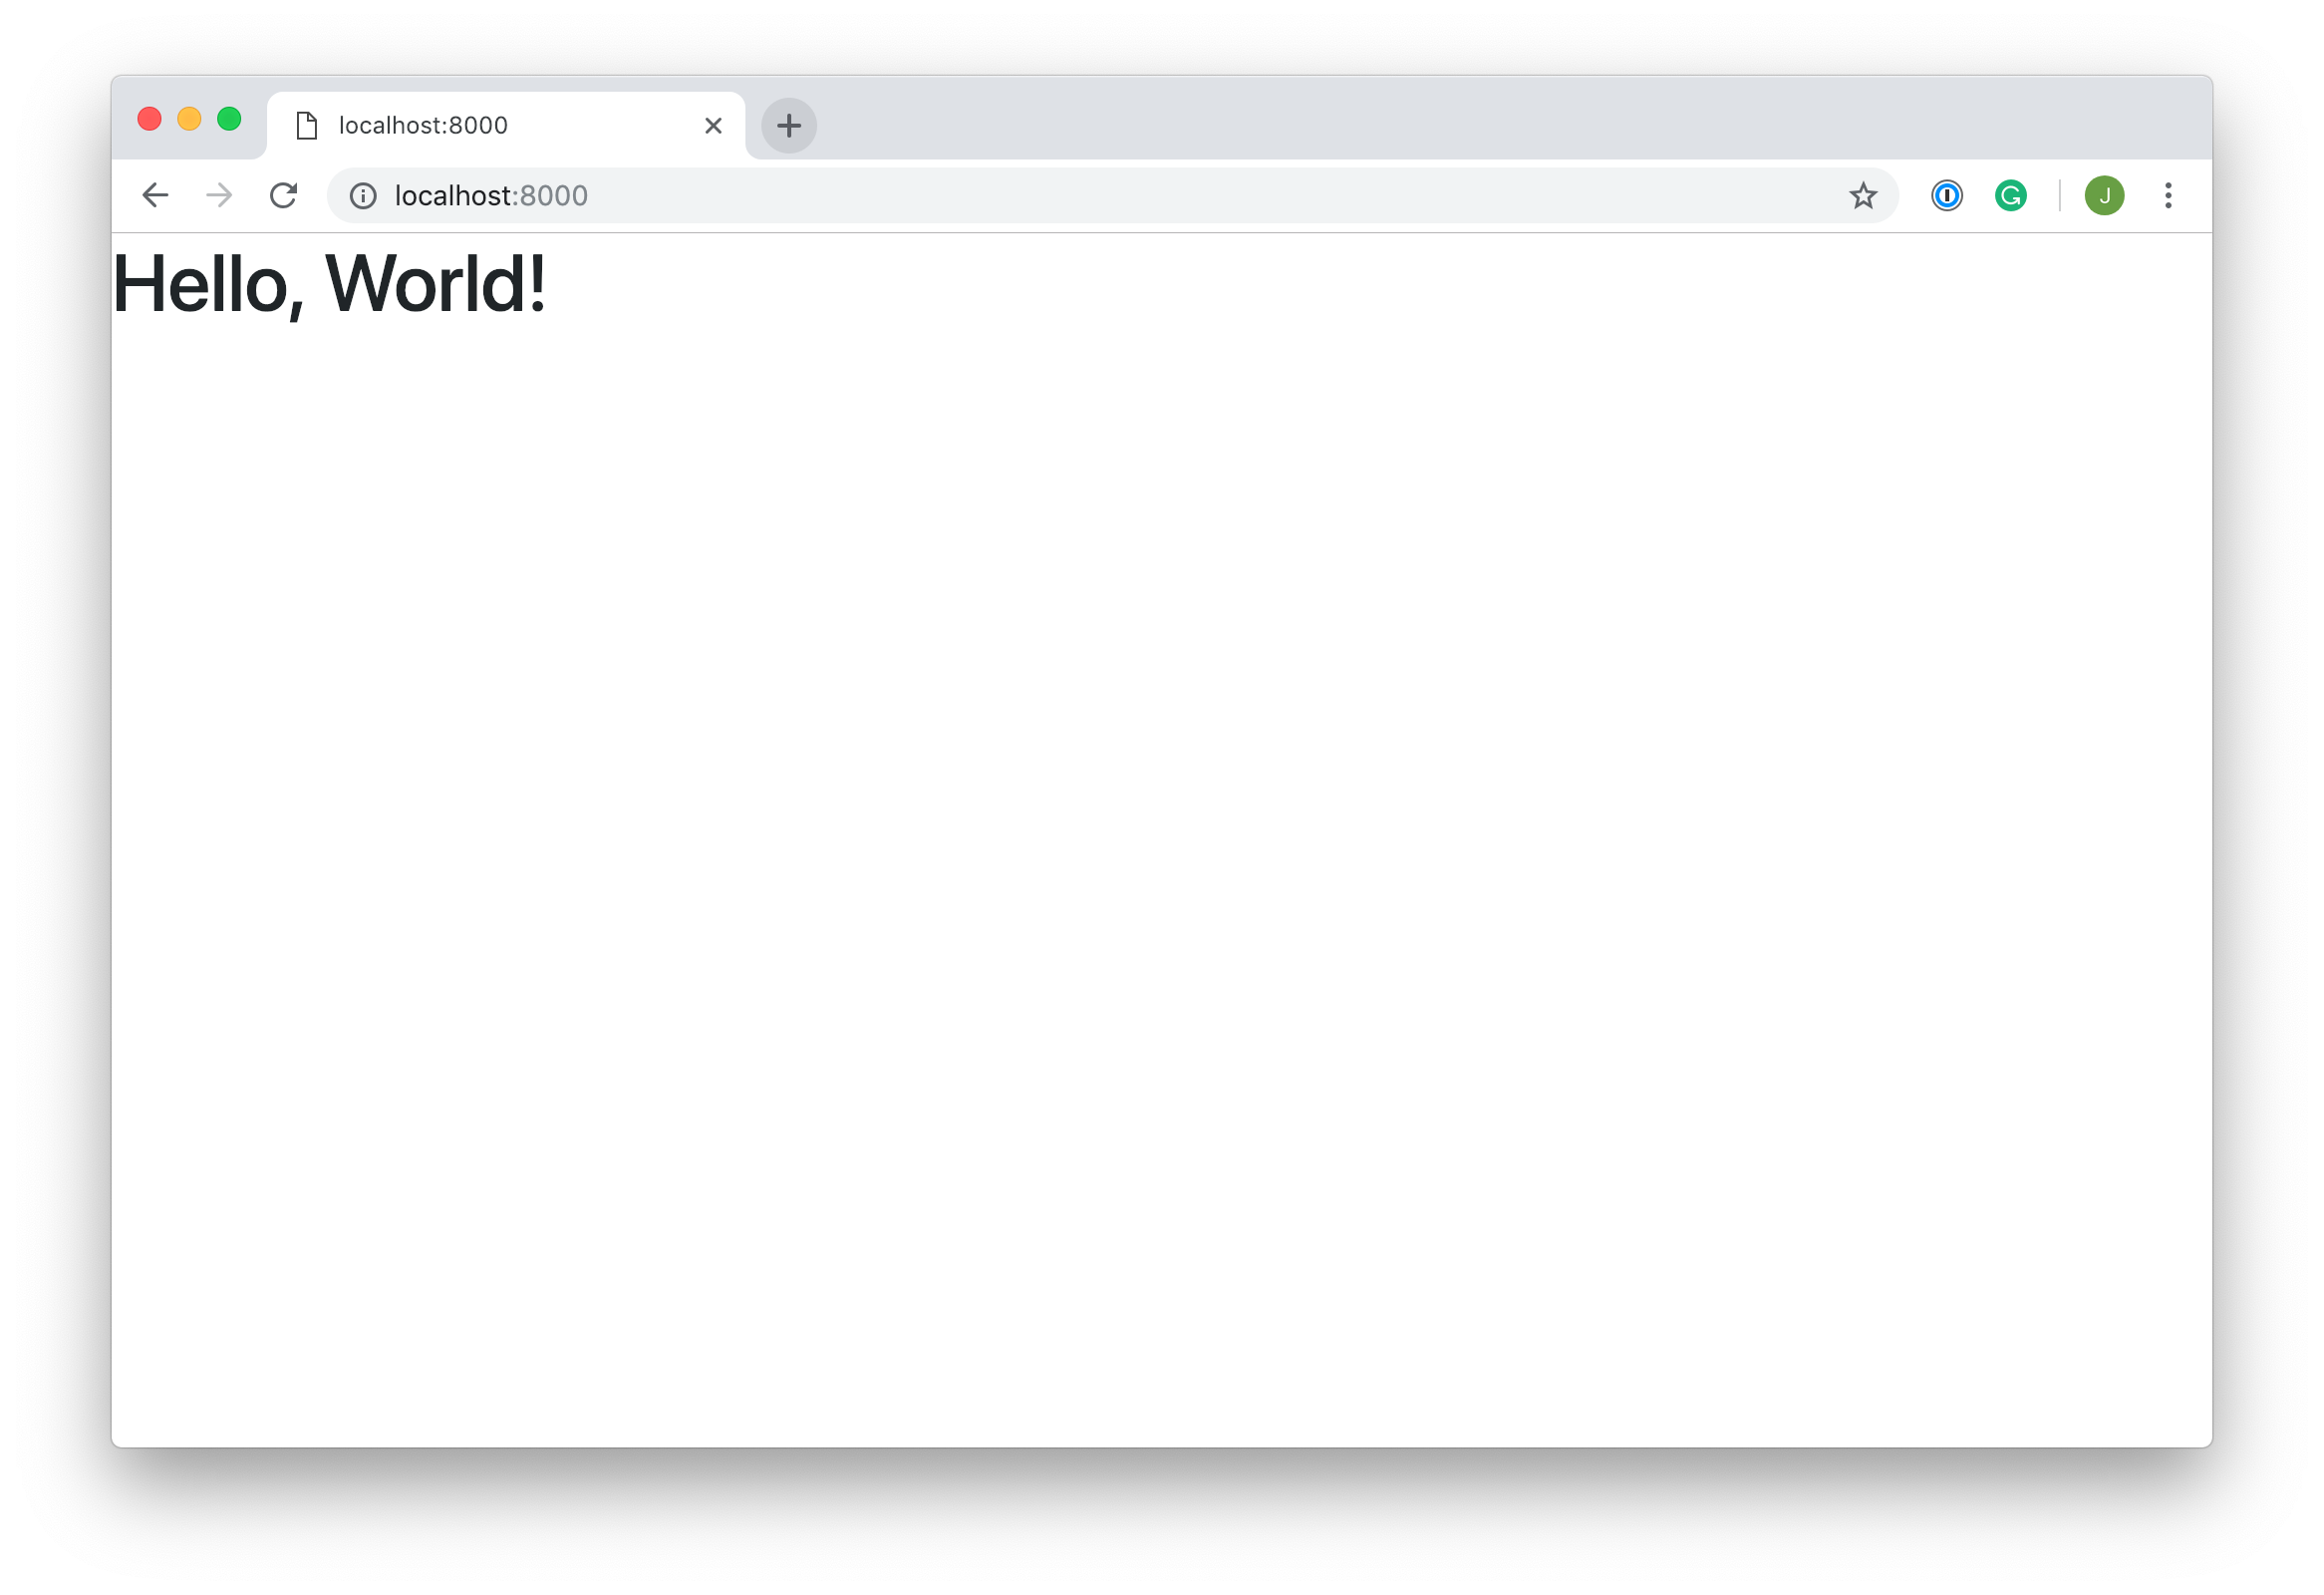
Now, when you restart the server and visit localhost:8000, you should be able to see the HTML template you created:
现在,当您重新启动服务器并访问localhost:8000 ,您应该能够看到创建HTML模板:

Congratulations, again! You’ve created your first Django app and hooked it up to your project. Don’t forget to check out the source code for this section and the previous one. The only problem now is that it doesn’t look very nice. In the next section, we’re going to add bootstrap styles to your project to make it prettier!
再次恭喜! 您已经创建了第一个Django应用并将其连接到项目。 不要忘记查看本节和上一节的源代码 。 现在唯一的问题是它看起来不是很好。 在下一节中,我们将为您的项目添加引导样式,使其更漂亮!
将Bootstrap添加到您的应用 (Add Bootstrap to Your App)
If you don’t add any styling, then the app you create isn’t going to look too nice. Instead of going into CSS styling with this tutorial, we’ll just cover how to add bootstrap styles to your project. This will allow us to improve the look of the site without too much effort.
如果您不添加任何样式,则您创建的应用看起来不会太漂亮。 本教程将不介绍CSS样式,而仅介绍如何向您的项目中添加引导样式。 这将使我们无需过多努力即可改善网站的外观。
Before we get started with the Bootstrap styles, we’ll create a base template that we can import to each subsequent view. This template is where we’ll subsequently add the Bootstrap style imports.
在开始使用Bootstrap样式之前,我们将创建一个基本模板,该模板可以导入到每个后续视图中。 我们随后将在此模板中添加Bootstrap样式导入。
Create another directory called templates, this time inside personal_portfolio, and a file called base.html, inside the new directory:
这次在personal_portfolio内创建另一个名为templates目录,并在新目录内创建一个名为base.html的文件:
We create this additional templates directory to store HTML templates that will be used in every Django app in the project. As you saw previously, each Django project can consist of multiple apps that handle separated logic, and each app contains its own templates directory to store HTML templates related to the application.
我们创建此附加模板目录来存储将在项目中的每个Django应用中使用HTML模板。 如您先前所见,每个Django项目可以由多个处理独立逻辑的应用程序组成,并且每个应用程序都包含自己的templates目录,用于存储与该应用程序相关HTML模板。
This application structure works well for the back end logic, but we want our entire site to look consistent on the front end. Instead of having to import Bootstrap styles into every app, we can create a template or set of templates that are shared by all the apps. As long as Django knows to look for templates in this new, shared directory it can save a lot of repeated styles.
该应用程序结构对于后端逻辑很好,但是我们希望整个站点在前端看起来一致。 不必将Bootstrap样式导入每个应用程序,我们可以创建一个模板或一组模板,这些模板或模板可以被所有应用程序共享。 只要Django知道要在这个新的共享目录中查找模板,它就可以节省很多重复的样式。
Inside this new file (personal_portfolio/templates/base.html), add the following lines of code:
在这个新文件( personal_portfolio/templates/base.html )内,添加以下代码行:
{% block page_content %}{% endblock %}
{% block page_content %}{% endblock %}
Now, in hello_world/templates/hello_world.html, we can extend this base template:
现在,在hello_world/templates/hello_world.html ,我们可以扩展此基本模板:
What happens here is that any HTML inside the page_content block gets added inside the same block in base.html.
这里发生的是, page_content块内的任何HTML都被添加到base.html的同一块内。
To install Bootstrap in your app, you’ll use the Bootstrap CDN. This is a really simple way to install Bootstrap that just involves adding a few lines of code to base.html. Check out the source code to see how to add the CDN links to your project.
要在您的应用中安装Bootstrap,请使用Bootstrap CDN 。 这是安装Bootstrap的非常简单的方法,只需向base.html添加几行代码。 查看源代码,以了解如何将CDN链接添加到您的项目。
All future templates that we create will extend base.html so that we can include Bootstrap styling on every page without having to import the styles again.
我们创建的所有将来的模板都将扩展base.html以便我们可以在每个页面上包括Bootstrap样式,而无需再次导入样式。
Before we can see our new styled application, we need to tell our Django project that base.html exists. The default settings register template directories in each app, but not in the project directory itself. In personal_portfolio/settings.py, update TEMPLATES:
在看到新样式的应用程序之前,我们需要告诉Django项目base.html存在。 默认设置在每个应用程序中注册template目录,但不在项目目录本身中注册。 在personal_portfolio/settings.py ,更新TEMPLATES :
 TEMPLATES TEMPLATES = = [
    [
    {
        {
        "BACKEND""BACKEND" : : "django.template.backends.django.DjangoTemplates""django.template.backends.django.DjangoTemplates" ,
,
"DIRS""DIRS" : : [[ "personal_portfolio/templates/""personal_portfolio/templates/" ],
],
"APP_DIRS""APP_DIRS" : : TrueTrue ,
        ,
        "OPTIONS""OPTIONS" : : {
            {
            "context_processors""context_processors" : : [
                [
                "django.template.context_processors.debug""django.template.context_processors.debug" ,
                ,
                "django.template.context_processors.request""django.template.context_processors.request" ,
                ,
                "django.contrib.auth.context_processors.auth""django.contrib.auth.context_processors.auth" ,
                ,
                "django.contrib.messages.context_processors.messages""django.contrib.messages.context_processors.messages" ,
            ,
            ]
        ]
        },
    },
    }
}
]
]
Now, when you visit localhost:8000, you should see that the page has been formatted with slightly different styling:
现在,当您访问localhost:8000 ,您应该看到页面的格式设置略有不同:
Whenever you want create templates or import scripts that you intend to use in all your Django apps inside a project, you can add them to this project-level directory and extend them inside your app templates.
每当您要创建模板或导入打算在项目内的所有Django应用程序中使用的脚本时,都可以将其添加到该项目级目录中,并将其扩展到您的应用程序模板中。
Adding templates is the last stage to building your Hello, World! Django site. You learned how the Django templating engine works and how to create project-level templates that can be shared by all the apps inside your Django project.
添加模板是构建Hello World的最后一步! Django网站。 您了解了Django模板引擎的工作原理以及如何创建可由Django项目中的所有应用程序共享的项目级模板。
In this section, you learned how to create a simple Hello, World! Django site by creating a project with a single app. In the next section, you’ll create another application to showcase web development projects, and you’ll learn all about models in Django!
在本节中,您学习了如何创建一个简单的Hello World! 通过使用单个应用程序创建项目的Django网站。 在下一节中,您将创建另一个应用程序来展示Web开发项目,并且您将学习有关Django中所有模型的知识!
The source code for this section can be found on GitHub.
展示您的项目 (Showcase Your Projects)
Any web developer looking to create a portfolio needs a way to show off projects they have worked on. That’s what you’ll be building now. You’ll create another Django app called projects that will hold a series of sample projects that will be displayed to the user. Users can click on projects and see more information about your work.
任何想要创建项目组合的Web开发人员都需要一种方法来炫耀他们从事的项目。 那就是您现在要构建的。 您将创建另一个名为projects Django应用,该应用将包含一系列将显示给用户的示例项目。 用户可以单击项目,并查看有关您的工作的更多信息。
Before we build the projects app, let’s first delete the hello_world application. All you need to do is delete the hello_world directory and remove the line "hello_world", from INSTALLED_APPS in settings.py:
在构建projects应用程序之前,让我们首先删除hello_world应用程序。 您所需要做的就是从settings.py INSTALLED_APPS中删除hello_world目录并删除"hello_world",行:
Finally, you need to remove the URL path created in personal_portfolio/urls.py:
最后,您需要删除在personal_portfolio/urls.py创建的URL路径:
 from from django.contrib django.contrib import import admin
admin
from from django.urls django.urls import import pathpath , , include

include

urlpatterns urlpatterns = = [
    [
    pathpath (( 'admin/''admin/' , , adminadmin .. sitesite .. urlsurls ),
),
pathpath (( '''' , , includeinclude (( 'hello_world.urls''hello_world.urls' )),  )),  # Delete this line
# Delete this line
]
]
Now that you’ve removed the hello_world app, we can create the projects app. Making sure you’re in the rp-portfolio directory, run the following command in your console:
现在您已经删除了hello_world应用程序,我们可以创建projects应用程序。 确保您在rp-portfolio目录中,在控制台中运行以下命令:
This will create a directory named projects. The files created are the same as those created when we set up the hello_world application. In order to hook up our app, we need to add it into INSTALLED_APPS in settings.py:
这将创建一个名为projects的目录。 创建的文件与设置hello_world应用程序时创建的文件相同。 为了连接我们的应用程序,我们需要将其添加到settings.py INSTALLED_APPS中:
 INSTALLED_APPS INSTALLED_APPS = = [
    [
    'django.contrib.admin''django.contrib.admin' ,
    ,
    'django.contrib.auth''django.contrib.auth' ,
    ,
    'django.contrib.contenttypes''django.contrib.contenttypes' ,
    ,
    'django.contrib.sessions''django.contrib.sessions' ,
    ,
    'django.contrib.messages''django.contrib.messages' ,
    ,
    'django.contrib.staticfiles''django.contrib.staticfiles' ,
,
'projects''projects' ,
,
]
]
Check out the source code for this section on GitHub. We’re not going to worry about URLs for this application just yet. Instead, we’re going to focus on building a Project model.
在GitHub上查看此部分的源代码 。 我们暂时不会担心此应用程序的URL。 相反,我们将专注于构建Project模型。
项目应用:模型 (Projects App: Models)
If you want to store data to display on a website, then you’ll need a database. Typically, if you want to create a database with tables and columns within those tables, you’ll need to use SQL to manage the database. But when you use Django, you don’t need to learn a new language because it has a built-in Object Relational Mapper (ORM).
如果要存储数据以显示在网站上,则需要一个数据库。 通常,如果要创建包含表和这些表中的列的数据库,则需要使用SQL来管理数据库。 但是,当您使用Django时,您无需学习一种新语言,因为它具有内置的对象关系映射器(ORM)。
An ORM is a program that allows you to create classes that correspond to database tables. Class attributes correspond to columns, and instances of the classes correspond to rows in the database. So, instead of learning a whole new language to create our database and its tables, we can just write some Python classes.
ORM是允许您创建与数据库表相对应的类的程序。 类属性对应于列,而类的实例对应于数据库中的行。 因此,我们无需学习一种全新的语言来创建数据库及其表,而是可以编写一些Python类。
When you’re using an ORM, the classes you build that represent database tables are referred to as models. In Django, they live in the models.py module of each Django app.
使用ORM时,所构建的代表数据库表的类称为模型 。 在Django中,它们位于每个Django应用程序的models.py模块中。
In your projects app, you’ll only need one table to store the different projects you’ll display to the user. That means you’ll only need to create one model in models.py.
在您的项目应用中,您只需要一个表即可存储要显示给用户的不同项目。 这意味着您只需要在models.py创建一个模型。
The model you’ll create will be called Project and will have the following fields:
您将创建的模型称为Project ,并将具有以下字段:
titlewill be a short string field to hold the name of your project.descriptionwill be a larger string field to hold a longer piece of text.technologywill be a string field, but its contents will be limited to a select number of choices.imagewill be an image field that holds the file path where the image is stored.
-
title将是一个短字符串字段,用于保存您的项目名称。 -
description将是一个较大的字符串字段,用于容纳更长的文本。 -
technology将是一个字符串字段,但其内容将限于一个选择项。 -
image将是一个图像字段,其中包含存储图像的文件路径。
To create this model, we’ll create a new class in models.py and add the following in our fields:
要创建此模型,我们将在models.py创建一个新类,并在我们的字段中添加以下内容:
Django models come with many built-in model field types. We’ve only used three in this model. CharField is used for short strings and specifies a maximum length.
Django模型带有许多内置的模型字段类型 。 在此模型中,我们仅使用了三个。 CharField用于短字符串,并指定最大长度。
TextField is similar to CharField but can be used for longer form text as it doesn’t have a maximum length limit. Finally, FilePathField also holds a string but must point to a file path name.
TextField与CharField类似,但由于没有最大长度限制,因此可用于较长格式的文本。 最后, FilePathField也包含一个字符串,但必须指向文件路径名。
Now that we’ve created our Project class, we need Django to create the database. By default, the Django ORM creates databases in SQLite, but you can use other databases that use the SQL language, such as PostgreSQL or MySQL, with the Django ORM.
现在我们已经创建了Project类,我们需要Django创建数据库。 默认情况下,Django ORM在SQLite中创建数据库,但是您可以在Django ORM中使用其他使用SQL语言的数据库,例如PostgreSQL或MySQL。
To start the process of creating our database, we need to create a migration. A migration is a file containing a Migration class with rules that tell Django what changes need to be made to the database. To create the migration, type the following command in the console, making sure you’re in the rp-portfolio directory:
要开始创建数据库的过程,我们需要创建一个迁移 。 迁移是一个文件,其中包含带有规则的Migration类,该规则告诉Django需要对数据库进行哪些更改。 要创建迁移,请在控制台中键入以下命令,并确保您位于rp-portfolio目录中:
 $ python manage.py makemigrations projects
$ python manage.py makemigrations projects
Migrations for 'projects':
Migrations for 'projects':
  projects/migrations/0001_initial.py
  projects/migrations/0001_initial.py
    - Create model Project
    - Create model Project
You should see that a file projects/migrations/0001_initial.py has been created in the projects app. Check out that file in the source code to make sure your migration is correct.
您应该看到在项目应用程序中已创建文件projects/migrations/0001_initial.py 。 在源代码中检出该文件,以确保您的迁移正确。
Now that you’ve create a migration file, you need to apply the migrations set out in the migrations file and create your database using the migrate command:
现在你已经创建迁移文件,您需要申请载于迁移文件中的迁移,并使用该数据库migrate命令:
Note: When running both the makemigrations and migrate commands, we added projects to our command. This tells Django to only look at models and migrations in the projects app. Django comes with several models already created.
注:当同时运行makemigrations和migrate命令,我们添加projects到我们的命令。 这告诉Django仅在projects应用程序中查看模型和迁移。 Django附带了一些已经创建的模型。
If you run makemigrations and migrate without the projects flag, then all migrations for all the default models in your Django projects will be created and applied. This is not a problem, but for the purposes of this section, they are not needed.
如果您运行makemigrations和migrate没有projects标志,然后在你的Django项目的所有默认的模型所有迁移将被创建和应用。 这不是问题,但是出于本节的目的,它们不是必需的。
You should also see that a file called db.sqlite3 has been created in the root of your project. Now your database is set up and ready to go. You can now create rows in your table that are the various projects you want to show on your portfolio site.
您还应该看到在项目的根目录中创建了一个名为db.sqlite3的文件。 现在,您的数据库已建立并可以使用。 现在,您可以在表中创建行,这些行是要显示在投资组合网站上的各种项目。
To create instances of our Project class, we’re going to have to use the Django shell. The Django shell is similar to the Python shell but allows you to access the database and create entries. To access the Django shell, we use another Django management command:
要创建Project类的实例,我们将不得不使用Django shell。 Django Shell与Python Shell相似,但是允许您访问数据库并创建条目。 要访问Django Shell,我们使用另一个Django管理命令:
 $ python manage.py shell
$ python manage.py shell
Once you’ve accessed the shell, you’ll notice that the command prompt will change from $ to >>>. You can then import your models:
访问完外壳程序后,您会注意到命令提示符将从$更改为>>> 。 然后,您可以导入模型:
>>> from projects.models import Project
We’re first going to create a new project with the following attributes:
我们首先要创建一个具有以下属性的新项目:
name:My First Projectdescription:A web development project.technology:Djangoimage:img/project1.png
-
name:My First Project -
description:A web development project. -
technology:Django -
image:img/project1.png
To do this, we create an instance of the Project class in the Django shell:
为此,我们在Django Shell中创建Project类的实例:
 >>>  p1 = Project (
...     title = 'My First Project' ,
...     description = 'A web development project.' ,
...     technology = 'Django' ,
...     image = 'img/project1.png'
...  )
>>>  p1 . save ()
This creates a new entry in your projects table and saves it to the database. Now you have created a project that you can display on your portfolio site.
这将在您的项目表中创建一个新条目,并将其保存到数据库中。 现在,您已经创建了一个项目,可以在您的投资组合网站上显示该项目。
The final step in this section is to create two more sample projects:
本部分的最后一步是创建另外两个示例项目:
 >>>  p2 = Project (
...     title = 'My Second Project' ,
...     description = 'Another web development project.' ,
...     technology = 'Flask' ,
...     image = 'img/project2.png'
...  )
>>>  p2 . save ()
>>>  p3 = Project (
...     title = 'My Third Project' ,
...     description = 'A final development project.' ,
...     technology = 'Django' ,
...     image = 'img/project3.png'
...  )
>>>  p3 . save ()
Well done for reaching the end of this section! You now know how to create models in Django and build migration files so that you can translate these model classes into database tables. You’ve also used the Django shell to create three instances of your model class.
做得好,到本节结束! 现在,您知道如何在Django中创建模型并构建迁移文件,以便将这些模型类转换为数据库表。 您还使用了Django Shell创建了模型类的三个实例。
In the next section, we’ll take these three projects you created and create a view function to display them to users on a web page. You can find the source code for this section of the tutorial on GitHub.
在下一节中,我们将采用您创建的这三个项目,并创建一个视图功能以在网页上向用户显示它们。 您可以在GitHub上找到本教程本部分的源代码 。
项目应用程序:视图 (Projects App: Views)
Now you’ve created the projects to display on your portfolio site, you’ll need to create view functions to send the data from the database to the HTML templates.
现在,您已经创建了要显示在投资组合网站上的项目,需要创建视图功能以将数据从数据库发送到HTML模板。
In the projects app, you’ll create two different views:
在projects应用中,您将创建两个不同的视图:
- An index view that shows a snippet of information about each project
- A detail view that shows more information on a particular topic
- 索引视图,显示有关每个项目的信息摘要
- 详细视图,显示有关特定主题的更多信息
Let’s start with the index view, as the logic is slightly simpler. Inside views.py, you’ll need to import the Project class from models.py and create a function project_index() that renders a template called project_index.html. In the body of this function, you’ll make a Django ORM query to select all objects in the Project table:
让我们从索引视图开始,因为逻辑稍微简单一些。 在views.py内部,您需要从models.py导入Project类,并创建一个函数project_index() ,该函数呈现一个名为project_index.html的模板。 在此函数的主体中,您将进行Django ORM查询以选择Project表中的所有对象:
There’s quite a lot going on in this code block, so let’s break it down.
此代码块中发生了很多事情,因此让我们对其进行分解。
In line 6, you perform a query. A query is simply a command that allows you to create, retrieve, update, or delete objects (or rows) in your database. In this case, you’re retrieving all objects in the projects table.
在第6行中 ,执行查询 。 查询只是一个命令,它使您可以创建,检索,更新或删除数据库中的对象(或行)。 在这种情况下,您将检索projects表中的所有对象。
A database query returns a collection of all objects that match the query, known as a Queryset. In this case, you want all objects in the table, so it will return a collection of all projects.
数据库查询返回与查询匹配的所有对象的集合,称为Queryset 。 在这种情况下,您需要表中的所有对象,因此它将返回所有项目的集合。
In line 7 of the code block above, we define a dictionary context. The dictionary only has one entry projects to which we assign our Queryset containing all projects. The context dictionary is used to send information to our template. Every view function you create needs to have a context dictionary.
在上面的代码块的第7行中,我们定义了一个dictionary context 。 该词典只有一个条目projects ,我们为其分配了包含所有项目的Queryset。 上下文字典用于将信息发送到我们的模板。 您创建的每个视图函数都需要一个上下文字典。
In line 10, context is added as an argument to render(). Any entries in the context dictionary are available in the template, as long as the context argument is passed to render(). You’ll need to create a context dictionary and pass it to render in each view function you create.
在第10行中 , context被添加为render()的参数。 只要context参数传递给render() ,模板中就可以使用context字典中的任何条目。 你需要创建一个语境词典,并通过它来render在您创建的每个视图功能。
We also render a template named project_index.html, which doesn’t exist yet. Don’t worry about that for now. You’ll create the templates for these views in the next section.
我们还渲染了一个名为project_index.html的模板,该模板尚不存在。 现在不用担心。 您将在下一部分中为这些视图创建模板。
Next, you’ll need to create the project_detail() view function. This function will need an additional argument: the id of the project that’s being viewed.
接下来,您需要创建project_detail()视图函数。 该函数将需要一个附加参数:正在查看的项目的ID。
Otherwise, the logic is similar:
否则,逻辑类似:
 def def project_detailproject_detail (( requestrequest , , idid ):
    ):
    project project = = ProjectProject .. objectsobjects .. getget (( pkpk == idid )
    )
    context context = = {
        {
        'project''project' : : project
    project
    }
    }
    return return renderrender (( requestrequest , , 'project_detail.html''project_detail.html' , , contextcontext )
)
In line 14, we perform another query. This query retrieves the project with primary key, pk, equal to that in the function argument. We then assign that project in our context dictionary, which we pass to render(). Again, there’s a template project_detail.html, which we have yet to create.
在第14行中 ,我们执行另一个查询。 此查询使用与函数参数中的主键pk相同的主键检索项目。 然后,我们在context字典中分配该项目,并将其传递给render() 。 再次,有一个模板project_detail.html ,我们尚未创建。
Once your view functions are created, we need to hook them up to URLs. We’ll start by creating a file projects/urls.py to hold the URL configuration for the app. This file should contain the following code:
创建视图功能后,我们需要将其连接到URL。 我们将从创建文件projects/urls.py开始,以保存应用程序的URL配置。 该文件应包含以下代码:
In line 5, we hook up the root URL of our app to the project_index view. It is slightly more complicated to hook up the project_detail view. To do this, we want the URL to be /1, or /2, and so on, depending on the pk of the project.
在第5行中 ,我们将应用程序的根URL连接到project_index视图。 连接project_detail视图稍微复杂一些。 为此,我们希望URL为/1或/2 ,依此类推,具体取决于项目的pk 。
The pk value in the URL is the same pk passed to the view function, so you need to dynamically generate these URLs depending on which project you want to view. To do this, we used the <int:pk> notation. This just tells Django that the value passed in the URL is an integer, and its variable name is pk.
URL中的pk值与传递给view函数的pk相同,因此您需要根据要查看的项目动态生成这些URL。 为此,我们使用了<int:pk>表示法。 这只是告诉Django,URL中传递的值是整数,其变量名是pk 。
With those now set up, we need to hook these URLs up to the project URLs. In personal_portfolio/urls.py, add the following highlighted line of code:
现在设置了这些URL,我们需要将这些URL链接到项目URL。 在personal_portfolio/urls.py ,添加以下突出显示的代码行:
 from from django.contrib django.contrib import import admin
admin
from from django.urls django.urls import import pathpath , , include

include

urlpatterns urlpatterns = = [
    [
    pathpath (( "admin/""admin/" , , adminadmin .. sitesite .. urlsurls ),
),
pathpath (( "projects/""projects/" , , includeinclude (( "projects.urls""projects.urls" )),
)),
]
]
This line of code includes all the URLs in the projects app but means they are accessed when prefixed by projects/. There are now two full URLs that can be accessed with our project:
该行代码包含了projects应用程序中的所有URL,但意味着当使用projects/作为前缀时可以访问它们。 现在,我们的项目可以访问两个完整的URL:
localhost:8000/projects: The project index pagelocalhost:8000/projects/3: The detail view for the project withpk=3
-
localhost:8000/projects:项目索引页面 -
localhost:8000/projects/3:pk=3的项目的详细视图
These URLs still won’t work properly because we don’t have any HTML templates. But our views and logic are up and running so all that’s left to do is create those templates. If you want to check your code, take a look at the source code for this section.
这些网址仍然无法正常工作,因为我们没有任何HTML模板。 但是我们的视图和逻辑是正常运行的,因此剩下要做的就是创建这些模板。 如果要检查代码,请查看本节的源代码 。
项目应用程序:模板 (Projects App: Templates)
Phew! You’re nearly there with this app. Our final step is to create two templates:
! 您即将使用此应用了。 我们的最后一步是创建两个模板:
- The
project_indextemplate - The
project_detailtemplate
-
project_index模板 -
project_detail模板
As we’ve added Bootstrap styles to our application, we can use some pre-styled components to make the views look nice. Let’s start with the project_index template.
在向应用程序中添加Bootstrap样式后,我们可以使用一些预样式化的组件来使视图看起来不错。 让我们从project_index模板开始。
For the project_index template, you’ll create a grid of Bootstrap cards, with each card displaying details of the project. Of course, we don’t know how many projects there are going to be. In theory, there could be hundreds to display.
对于project_index模板,您将创建一个Bootstrap卡网格,每个卡都显示项目的详细信息。 当然,我们不知道会有多少个项目。 从理论上讲,可能有数百个要显示。
We don’t want to have to create 100 different Bootstrap cards and hard-code in all the information to each project. Instead, we’re going to use a feature of the Django template engine: for loops.
我们不需要创建100个不同的Bootstrap卡,并在每个项目的所有信息中进行硬编码。 相反,我们将使用Django模板引擎的功能: for loops 。
Using this feature, you’ll be able to loop through all the projects and create a card for each one. The for loop syntax in the Django template engine is as follows:
使用此功能,您将能够遍历所有项目并为每个项目创建一张卡片。 Django模板引擎中的for循环语法如下:
Now that you know how for loops work, you can add the following code to a file named projects/templates/project_index.html:
现在您知道了for循环的工作原理,可以将以下代码添加到名为projects/templates/project_index.html的文件中:
{% extends "base.html" %}
{% load static %}
{% block page_content %}
{% extends "base.html" %}
{% load static %}
{% block page_content %}
<< h1h1 >Projects> Projects </</ h1h1 >
>
<< div div classclass == "row""row" >
{% for project in projects %}
    >
{% for project in projects %}
    << div div classclass == "col-md-4""col-md-4" >
        >
        << div div classclass == "card mb-2""card mb-2" >
            >
            << img img classclass == "card-img-top" "card-img-top" srcsrc == "{% static project.image %}""{% static project.image %}" >
            >
            << div div classclass == "card-body""card-body" >
                >
                << h5 h5 classclass == "card-title""card-title" >{{ project.title }}> {{ project.title }} </</ h5h5 >
                >
                << p p classclass == "card-text""card-text" >{{ project.description }}> {{ project.description }} </</ pp >
                >
                << a a hrefhref == "{% url 'project_detail' project.pk %}"
                   "{% url 'project_detail' project.pk %}"
                   classclass == "btn btn-primary""btn btn-primary" >
                    Read More
                >
                    Read More
                </</ aa >
            >
            </</ divdiv >
        >
        </</ divdiv >
    >
    </</ divdiv >
    {% endfor %}
>
    {% endfor %}
</</ divdiv >
{% endblock %}
>
{% endblock %}
There’s a lot of Bootstrap HTML here, which is not the focus of this tutorial. Feel free to copy and paste and take a look at the Bootstrap docs if you’re interested in learning more. Instead of focusing on the Bootstrap, there are a few things to highlight in this code block.
这里有很多Bootstrap HTML,这不是本教程的重点。 如果您有兴趣了解更多信息,请随时复制和粘贴并看一下Bootstrap文档。 在此代码块中,除了着重介绍Bootstrap之外,还强调了一些事情。
In line 1, we extend base.html as we did in the Hello, World! app tutorial. I’ve added some more styling to this file to include a navigation bar and so that all the content is contained in a Bootstrap container. The changes to base.html can be seen in the source code on GitHub.
在第1行中 ,我们像在Hello,World!中一样扩展了base.html 。 应用程式教学课程。 我为此文件添加了更多样式,以包括导航栏 ,以便所有内容都包含在Bootstrap容器中 。 可以在GitHub的源代码中看到对base.html的更改。
On line 2, we include a {% load static %} tag to include static files such as images. Remember back in the section on Django models, when you created the Project model. One of its attributes was a filepath. That filepath is where we’re going to store the actual images for each project.
在第2行中 ,我们包含一个{% load static %}标签,以包含诸如图像之类的静态文件。 在创建Project模型时,请记住关于Django模型的部分。 它的属性之一是文件路径。 该文件路径是我们将存储每个项目的实际图像的位置。
Django automatically registers static files stored in a directory named static/ in each application. Our image file path names were of the structure: img/<photo_name>.png.
Django自动在每个应用程序中注册存储在名为static/的目录中的静态文件。 我们的图像文件路径名具有以下结构: img/<photo_name>.png 。
When loading static files, Django looks in the static/ directory for files matching a given filepath within static/. So, we need to create a directory named static/ with another directory named img/ inside. Inside img/, you can copy over the images from the source code on GitHub.
当负载静态文件,Django就在static/目录中匹配一个给定的文件路径文件static/ 。 因此,我们需要创建一个名为static/的目录,并在其中创建另一个名为img/目录。 在img/内部,您可以复制GitHub上源代码中的图像。
On line 6, we begin the for loop, looping over all projects passed in by the context dictionary.
在第6行 ,我们开始for循环,遍历context字典传递的所有项目。
Inside this for loop, we can access each individual project. To access the project’s attributes, you can use dot notation inside double curly brackets. For example, to access the project’s title, you use {{ project.title }}. The same notation can be used to access any of the project’s attributes.
在此for循环中,我们可以访问每个单独的项目。 要访问项目的属性,可以在双大括号内使用点表示法。 例如,要访问项目的标题,请使用{{ project.title }} 。 相同的符号可用于访问项目的任何属性。
On line 9, we include our project image. Inside the src attribute, we add the code {% static project.image %}. This tells Django to look inside the static files to find a file matching project.image.
在第9行 ,我们包含了我们的项目图像。 在src属性内,我们添加代码{% static project.image %} 。 这告诉Django在静态文件中查找以找到与project.image匹配的文件。
The final point that we need to highlight is the link on line 13. This is the link to our project_detail page. Accessing URLs in Django is similar to accessing static files. The code for the URL has the following form:
我们需要强调的最后一点是第13行上的链接。 这是指向我们的project_detail页面的链接。 在Django中访问URL类似于访问静态文件。 URL的代码具有以下形式:
In this case, we are accessing a URL path named project_detail, which takes integer arguments corresponding to the pk number of the project.
在这种情况下,我们将访问一个名为project_detail的URL路径,该路径采用与项目的pk编号相对应的整数参数。
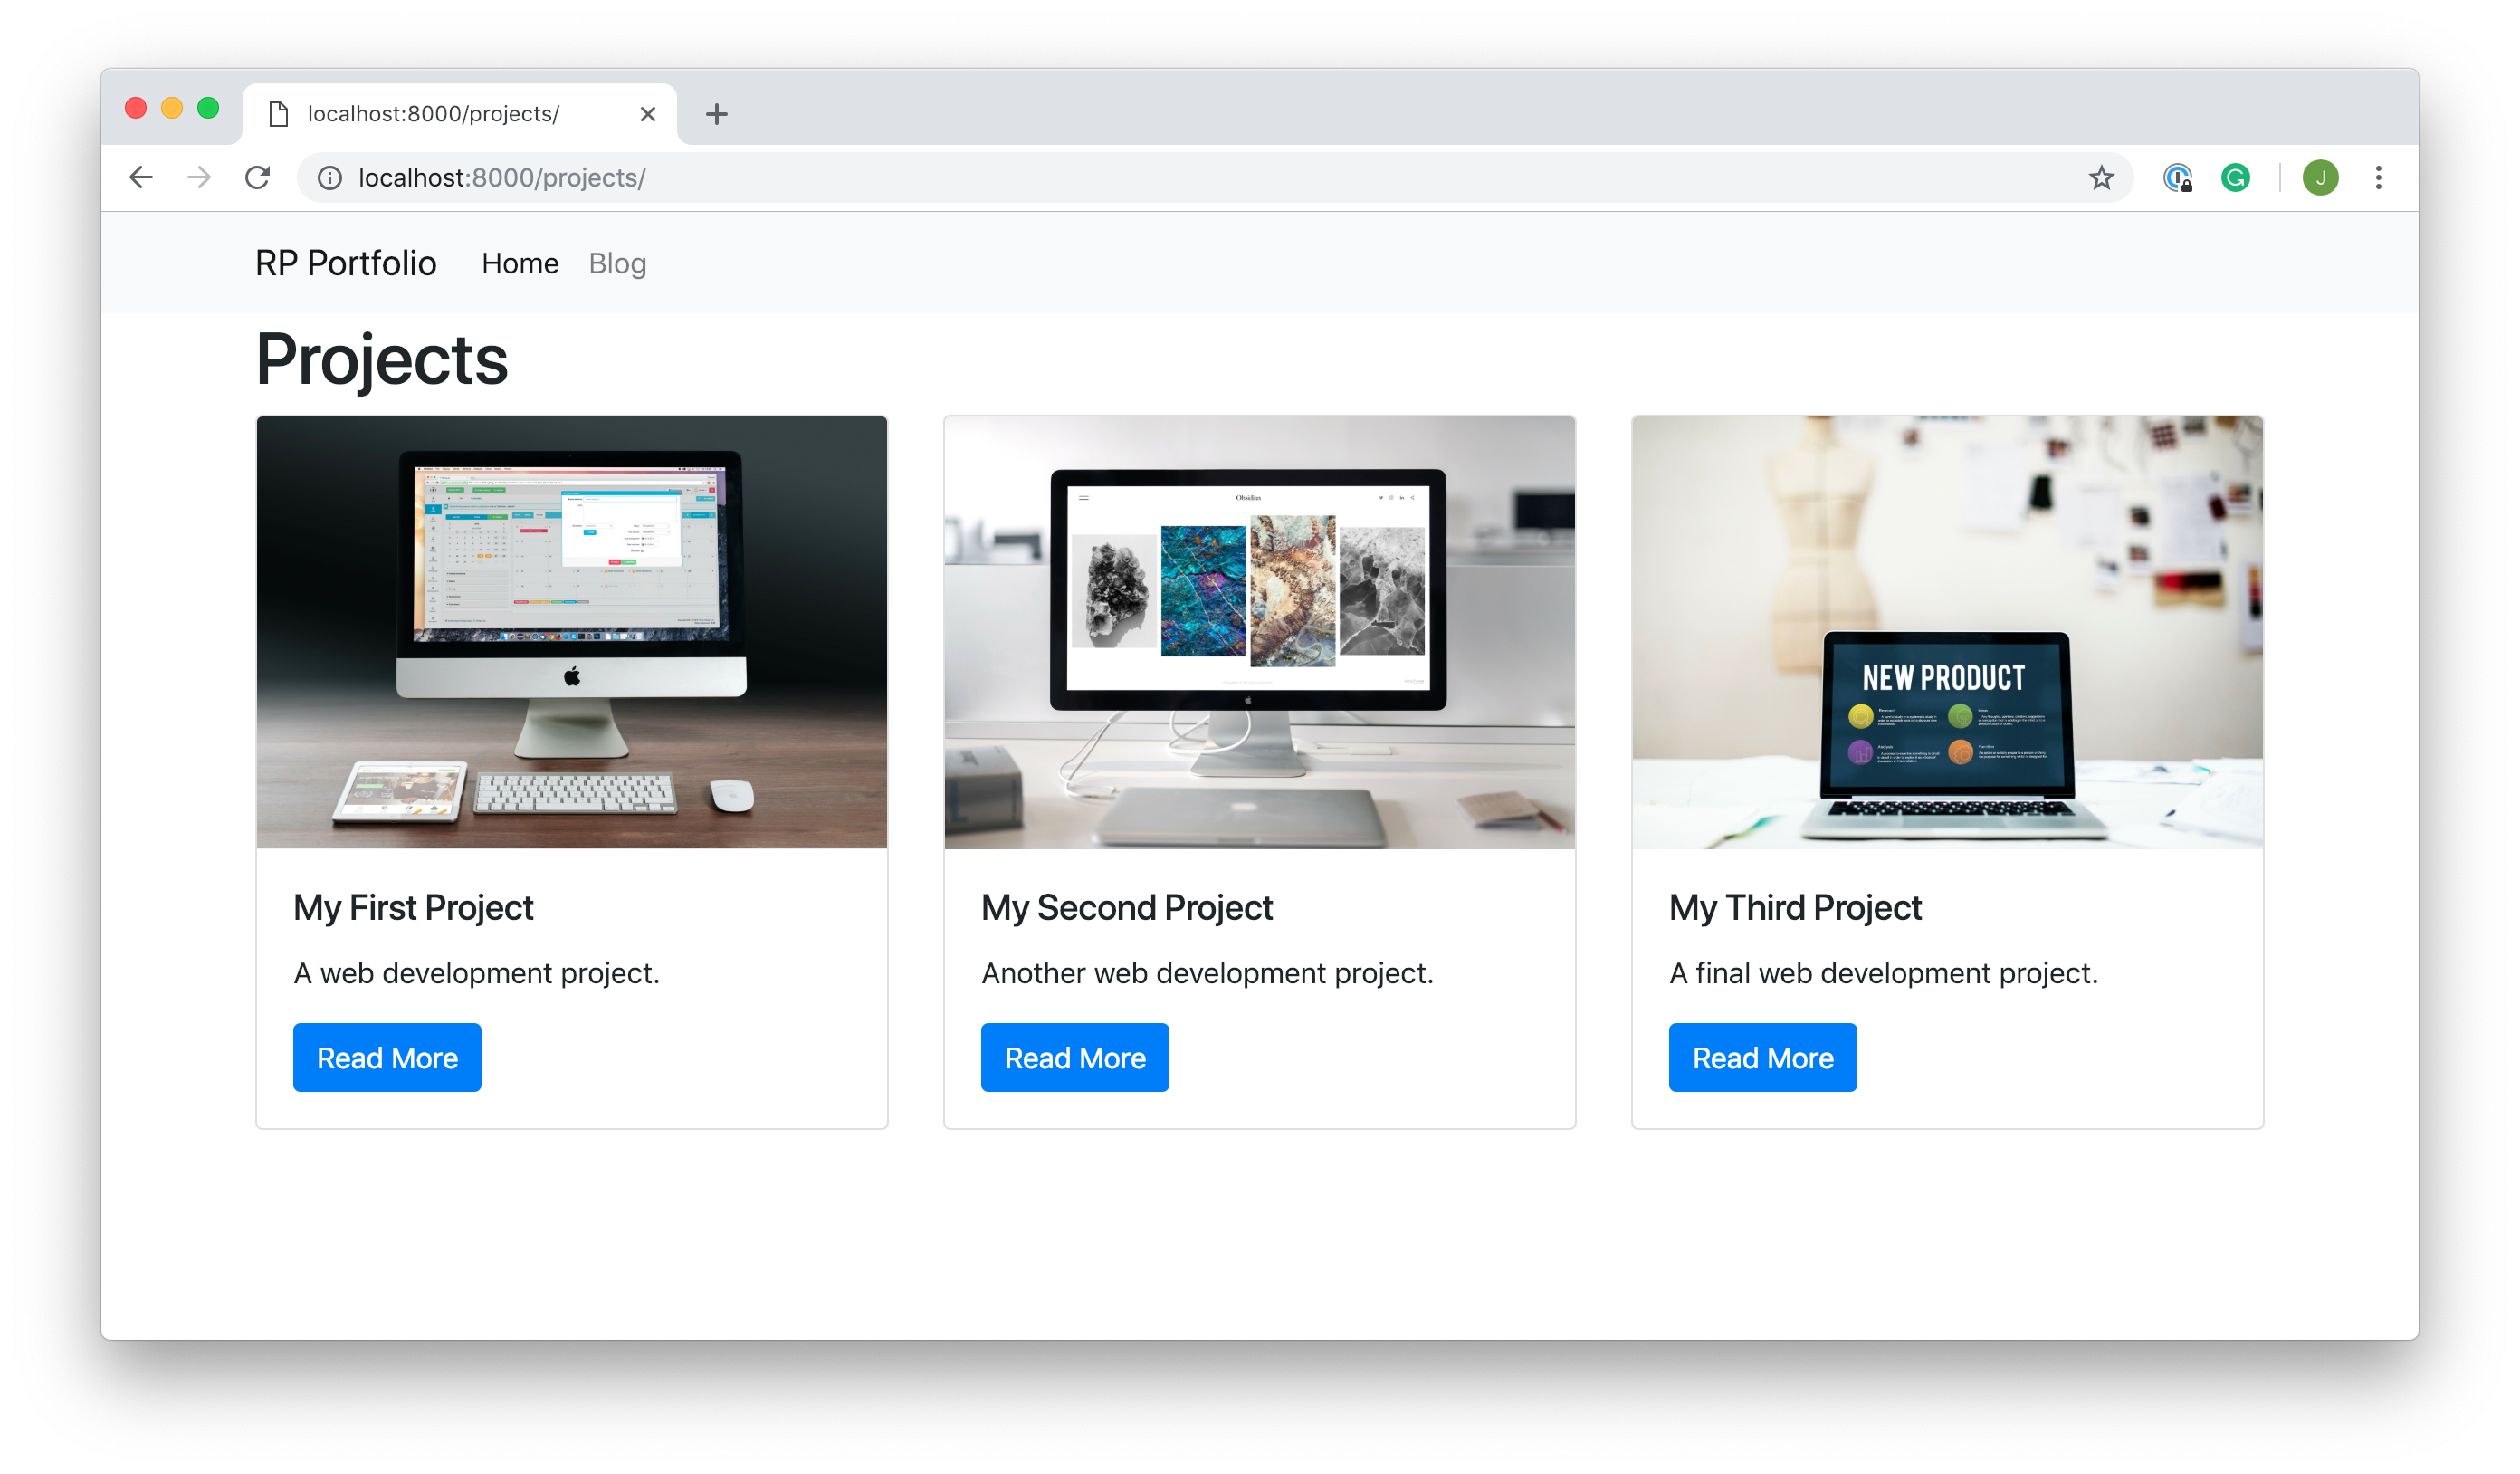
With all that in place, if you start the Django server and visit localhost:8000/projects, then you should see something like this:
一切就绪后,如果启动Django服务器并访问localhost:8000/projects ,则应该看到类似以下内容:
With the project_index.html template in place, it’s time to create the project_detail.html template. The code for this template is below:
放置好project_index.html模板之后,就该创建project_detail.html模板了。 该模板的代码如下:
{% extends "base.html" %}
{% load static %}

{% block page_content %}
{% extends "base.html" %}
{% load static %}

{% block page_content %}
<< h1h1 >{{ project.title }}> {{ project.title }} </</ h1h1 >
>
<< div div classclass == "row""row" >
    >
    << div div classclass == "col-md-8""col-md-8" >
        >
        << img img srcsrc == "{% static project.image %}" "{% static project.image %}" altalt == "" "" widthwidth == "100%""100%" >
    >
    </</ divdiv >
    >
    << div div classclass == "col-md-4""col-md-4" >
        >
        << h5h5 >About the project:> About the project: </</ h5h5 >
        >
        << pp >{{ project.description }}> {{ project.description }} </</ pp >
        >
        << brbr >
        >
        << h5h5 >Technology used:> Technology used: </</ h5h5 >
        >
        << pp >{{ project.technology }}> {{ project.technology }} </</ pp >
    >
    </</ divdiv >
>
</</ divdiv >
{% endblock %}
>
{% endblock %}
The code in this template has the same functionality as each project card in the project_index.html template. The only difference is the introduction of some Bootstrap columns.
该模板中的代码具有与project_index.html模板中的每个项目卡相同的功能。 唯一的区别是引入了一些Bootstrap列。
If you visit localhost:8000/projects/1, you should see the detail page for that first project you created:
如果访问localhost:8000/projects/1 ,则应该看到您创建的第一个项目的详细信息页面:

In this section, you learned how to use models, views, and templates to create a fully functioning app for your personal portfolio project. Check out the source code for this section on GitHub.
在本节中,您学习了如何使用模型,视图和模板为您的个人投资组合项目创建功能全面的应用程序。 在GitHub上查看此部分的源代码 。
In the next section, you’ll build a fully functioning blog for your site, and you’ll also learn about the Django admin page and forms.
在下一部分中,您将为您的网站构建一个功能全面的博客,并且还将了解Django管理页面和表单。
通过博客分享您的知识 (Share Your Knowledge With a Blog)
A blog is a great addition to any personal portfolio site. Whether you update it monthly or weekly, it’s a great place to share your knowledge as you learn. In this section, you’re going to build a fully functioning blog that will allow you to perform the following tasks:
博客是对任何个人投资组合网站的绝佳补充。 无论您每月或每周更新一次,它都是在学习时分享您的知识的好地方。 在本节中,您将构建一个功能全面的博客,该博客将允许您执行以下任务:
- Create, update, and delete blog posts
- Display posts to the user as either an index view or a detail view
- Assign categories to posts
- Allow users to comment on posts
- 创建,更新和删除博客文章
- 以索引视图或详细视图的形式向用户显示帖子
- 为帖子分配类别
- 允许用户对帖子发表评论
You’ll also learn how to use the Django Admin interface, which is where you’ll create, update, and delete posts and categories as necessary.
您还将学习如何使用Django Admin界面,在该界面中,您可以根据需要创建,更新和删除帖子和类别。
Before you get into building out the functionality of this part of your site, create a new Django app named blog. Don’t delete projects. You’ll want both apps in your Django project:
在开始构建网站此部分的功能之前,请创建一个名为blog的新Django应用。 不要删除projects 。 您将需要两个应用程序都在Django项目中:
This may start to feel familiar to you, as its your third time doing this. Don’t forget to add blog to your INSTALLED_APPS in personal_porfolio/settings.py:
您可能会开始感到陌生,因为这是您第三次这样做。 不要忘记在personal_porfolio/settings.py中将blog添加到您的INSTALLED_APPS中:
 INSTALLED_APPS INSTALLED_APPS = = [
    [
    "django.contrib.admin""django.contrib.admin" ,
    ,
    "django.contrib.auth""django.contrib.auth" ,
    ,
    "django.contrib.contenttypes""django.contrib.contenttypes" ,
    ,
    "django.contrib.sessions""django.contrib.sessions" ,
    ,
    "django.contrib.messages""django.contrib.messages" ,
    ,
    "django.contrib.staticfiles""django.contrib.staticfiles" ,
    ,
    "projects""projects" ,
,
"blog""blog" ,
,
]
]
Hold off on hooking up the URLs for now. As with the projects app, you’ll start by adding your models.
现在暂不连接URL。 与projects应用程序一样,您将从添加模型开始。
博客应用:模型 (Blog App: Models)
The models.py file in this app is much more complicated than in the projects app.
此应用程序中的models.py文件比projects应用程序中的复杂得多。
You’re going to need three separate database tables for the blog:
您将需要博客的三个独立的数据库表:
PostCategoryComment
-
Post -
Category -
Comment
These tables need to be related to one another. This is made easier because Django models come with fields specifically for this purpose.
这些表需要相互关联。 这使之更加容易,因为Django模型附带了专门用于此目的的字段。
Below is the code for the Category and Post models:
下面是Category和Post模型的代码:
The Category model is very simple. All that’s needed is a single CharField in which we store the name of the category.
Category模型非常简单。 所需要的只是一个CharField ,我们在其中存储类别的名称。
The title and body fields on the Post model are the same field types as you used in the Project model. We only need a CharField for the title as we only want a short string for the post title. The body needs to be a long-form piece of text, so we use a TextField.
在title和body上的字段Post模型是相同的字段类型,你在使用的Project模型。 title只需要一个CharField ,因为帖子标题只需要一个短字符串。 主体需要是一个长格式的文本,因此我们使用TextField 。
The next two fields, created_on and last_modified, are Django DateTimeFields. These store a datetime object containing the date and time when the post was created and modified respectively.
接下来的两个字段created_on和last_modified是Django DateTimeFields 。 这些存储一个datetime对象,其中包含分别创建和修改帖子的日期和时间。
On line 11, the DateTimeField takes an argument auto_now_add=True. This assigns the current date and time to this field whenever an instance of this class is created.
在第11行 , DateTimeField接受参数auto_now_add=True 。 每当创建此类的实例时,都会将当前日期和时间分配给该字段。
On line 12, the DateTimeField takes an argument auto_now=True. This assigns the current date and time to this field whenever an instance of this class is saved. That means whenever you edit an instance of this class, the date_modified is updated.
在第12行 , DateTimeField接受参数auto_now=True 。 每当保存此类的实例时,都会将当前日期和时间分配给该字段。 这意味着只要您编辑此类的实例,就会更新date_modified 。
The final field on the post model is the most interesting. We want to link our models for categories and posts in such a way that many categories can be assigned to many posts. Luckily, Django makes this easier for us by providing a ManytoManyField field type. This field links the Post and Category models and allows us to create a relationship between the two tables.
邮政模型的最后一个字段是最有趣的。 我们希望将类别和帖子的模型链接起来,以便可以将许多类别分配给很多帖子。 幸运的是,Django通过提供ManytoManyField字段类型为我们ManytoManyField了ManytoManyField 。 该字段链接了Post和Category模型,并允许我们在两个表之间创建关系。
The ManyToManyField takes two arguments. The first is the model with which the relationship is, in this case its Category. The second allows us to access the relationship from a Category object, even though we haven’t added a field there. By adding a related_name of posts, we can access category.posts to give us a list of posts with that category.
ManyToManyField接受两个参数。 首先是与之建立关系的模型,在本例中为其Category 。 第二种方法使我们可以从Category对象访问关系,即使我们没有在该对象中添加字段也是如此。 通过添加posts的related_name ,我们可以访问category.posts来提供具有该类别的帖子列表。
The third and final model we need to add is Comment. We’ll use another relationship field similar the ManyToManyField that relates Post and Category. However, we only want the relationship to go one way: one post should have many comments.
我们需要添加的第三个也是最后一个模型是Comment 。 我们将使用另一个关系字段,类似于与Post和Category相关的ManyToManyField 。 但是,我们只希望这种关系朝一种方向发展:一个帖子应该有很多评论。
You’ll see how this works after we define the Comment class:
在定义Comment类之后,您将看到它是如何工作的:
 class class CommentComment (( modelsmodels .. ModelModel ):
    ):
    author author = = modelsmodels .. CharFieldCharField (( max_lengthmax_length == 6060 )
    )
    body body = = modelsmodels .. TextFieldTextField ()
    ()
    created_on created_on = = modelsmodels .. DateTimeFieldDateTimeField (( auto_now_addauto_now_add == TrueTrue )
    )
    post post = = modelsmodels .. ForeignKeyForeignKey (( 'Post''Post' , , on_deleteon_delete == modelsmodels .. CASCADECASCADE )
)
The first three fields on this model should look familiar. There’s an author field for users to add a name or alias, a body field for the body of the comment, and a created_on field that is identical to the created_on field on the Post model.
该模型的前三个字段应该看起来很熟悉。 有一个author字段,用户添加一个名称或别名,一个body的注释内容字段和created_on字段是相同的created_on场上Post的模型。
On line 20, we use another relational field, the ForeignKey field. This is similar to the ManyToManyField but instead defines a many to one relationship. The reasoning behind this is that many comments can be assigned to one post. But you can’t have a comment that corresponds to many posts.
在第20行 ,我们使用另一个关系字段ForeignKey字段。 这类似于ManyToManyField但是定义了多对一关系。 其背后的原因是, 许多评论可以分配给一个帖子。 但是您不能发表与很多帖子相对应的评论。
The ForeignKey field takes two arguments. The first is the other model in the relationship, in this case, Post. The second tells Django what to do when a post is deleted. If a post is deleted, then we don’t want the comments related to it hanging around. We, therefore, want to delete them as well, so we add the argument on_delete=models.CASCADE.
ForeignKey字段ForeignKey两个参数。 第一个是关系中的另一个模型,在这种情况下为Post 。 第二条告诉Django帖子删除后的处理方式。 如果帖子被删除,那么我们不希望与此相关的评论四处徘徊。 因此,我们也希望删除它们,因此我们添加了参数on_delete=models.CASCADE 。
Once you’ve created the models, you can create the migration files with makemigrations:
创建模型后,可以使用makemigrations创建迁移文件:
The final step is to migrate the tables. This time, don’t add the app-specific flag. Later on, you’ll need the User model that Django creates for you:
最后一步是迁移表。 这次,请勿添加特定于应用的标志。 稍后,您将需要Django为您创建的User模型:
 $ python manage.py migrate
$ python manage.py migrate
Now that you’ve created the models, we can start to add some posts and categories. You won’t be doing this from the command line as you did with the projects, as typing out a whole blog post into the command line would be unpleasant to say the least!
创建模型后,我们就可以开始添加一些帖子和类别了。 您不会像在项目中那样从命令行执行此操作,因为至少可以说在命令行中键入整个博客文章是不愉快的!
Instead, you’ll learn how to use the Django Admin, which will allow you to create instances of your model classes in a nice web interface.
相反,您将学习如何使用Django Admin,它将允许您在一个不错的Web界面中创建模型类的实例。
Don’t forget that you can check out the source code for this section on GitHub before moving onto the next section.
不要忘记,您可以在进入下一部分之前在GitHub上查看本部分的源代码 。
博客应用:Django Admin (Blog App: Django Admin)
The Django Admin is a fantastic tool and one of the great benefits of using Django. As you’re the only person who’s going to be writing blog posts and creating categories, there’s no need to create a user interface to do so.
Django Admin是一个很棒的工具,并且是使用Django的巨大好处之一。 由于您是唯一将撰写博客文章和创建类别的人,因此无需创建用户界面。
On the other hand, you don’t want to have to write blog posts in the command line. This is where the admin comes in. It allows you to create, update, and delete instances of your model classes and provides a nice interface for doing so.
另一方面,您不需要在命令行中编写博客文章。 这是管理员的用武之地。它允许您创建,更新和删除模型类的实例,并为此提供了一个不错的界面。
Before you can access the admin, you need to add yourself as a superuser. This is why, in the previous section, you applied migrations project-wide as opposed to just for the app. Django comes with built-in user models and a user management system that will allow you to login to the admin.
您需要先将自己添加为超级用户,然后才能访问管理员。 这就是为什么在上一节中,您在项目范围内而不是仅针对应用程序应用了迁移。 Django带有内置的用户模型和用户管理系统,可让您登录到管理员。
To start off, you can add yourself as superuser using the following command:
首先,您可以使用以下命令将您自己添加为超级用户:
You’ll then be prompted to enter a username followed by your email address and password. Once you’ve entered the required details, you’ll be notified that the superuser has been created. Don’t worry if you make a mistake since you can just start again:
然后,系统将提示您输入用户名,然后输入您的电子邮件地址和密码。 输入所需的详细信息后,将通知您已创建超级用户。 如果您输入有误,请不要担心,因为您可以重新开始:
 Username (leave blank to use 'jasmine'): jfiner
Username (leave blank to use 'jasmine'): jfiner
Email address: jfiner@example.com
Email address: jfiner@example.com
Password:
Password:
Password (again):
Password (again):
Superuser created successfully.
Superuser created successfully.
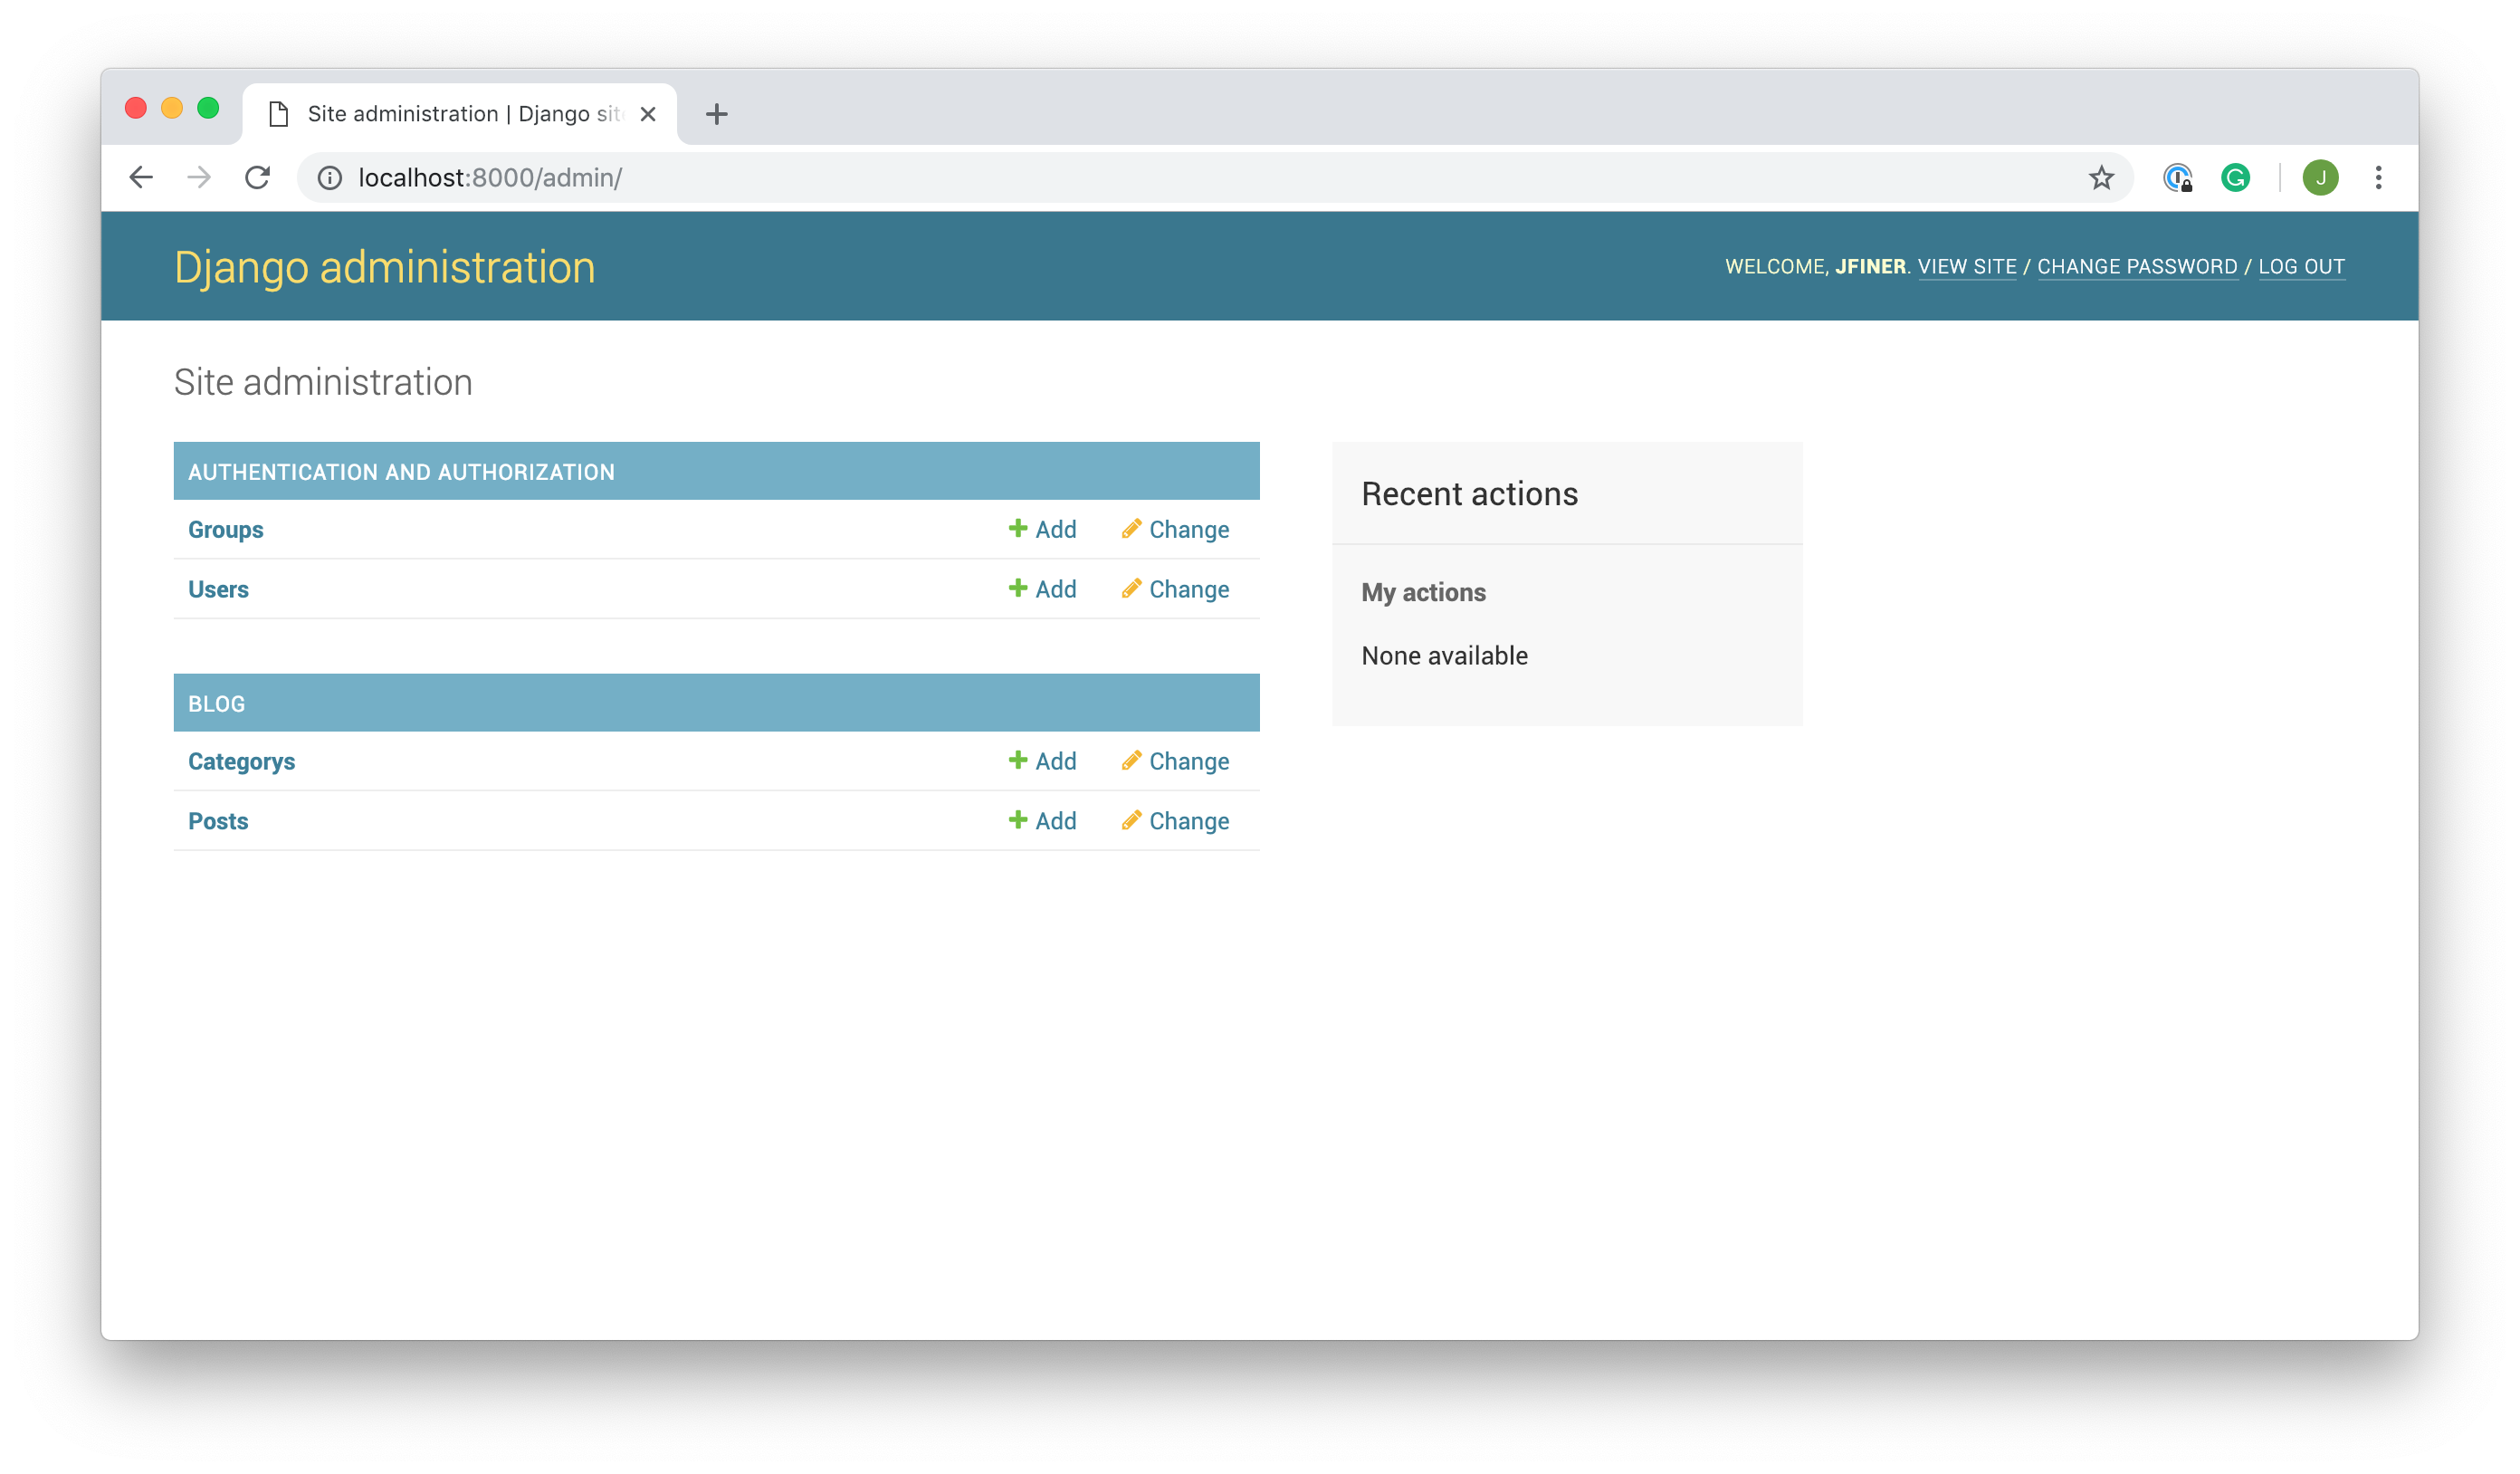
Navigate to localhost:8000/admin and log in with the credentials you just used to create a superuse. You’ll see a page similar to the one below:
导航到localhost:8000/admin并使用您刚用来创建超级用例的凭据登录。 您将看到类似于以下页面的页面:
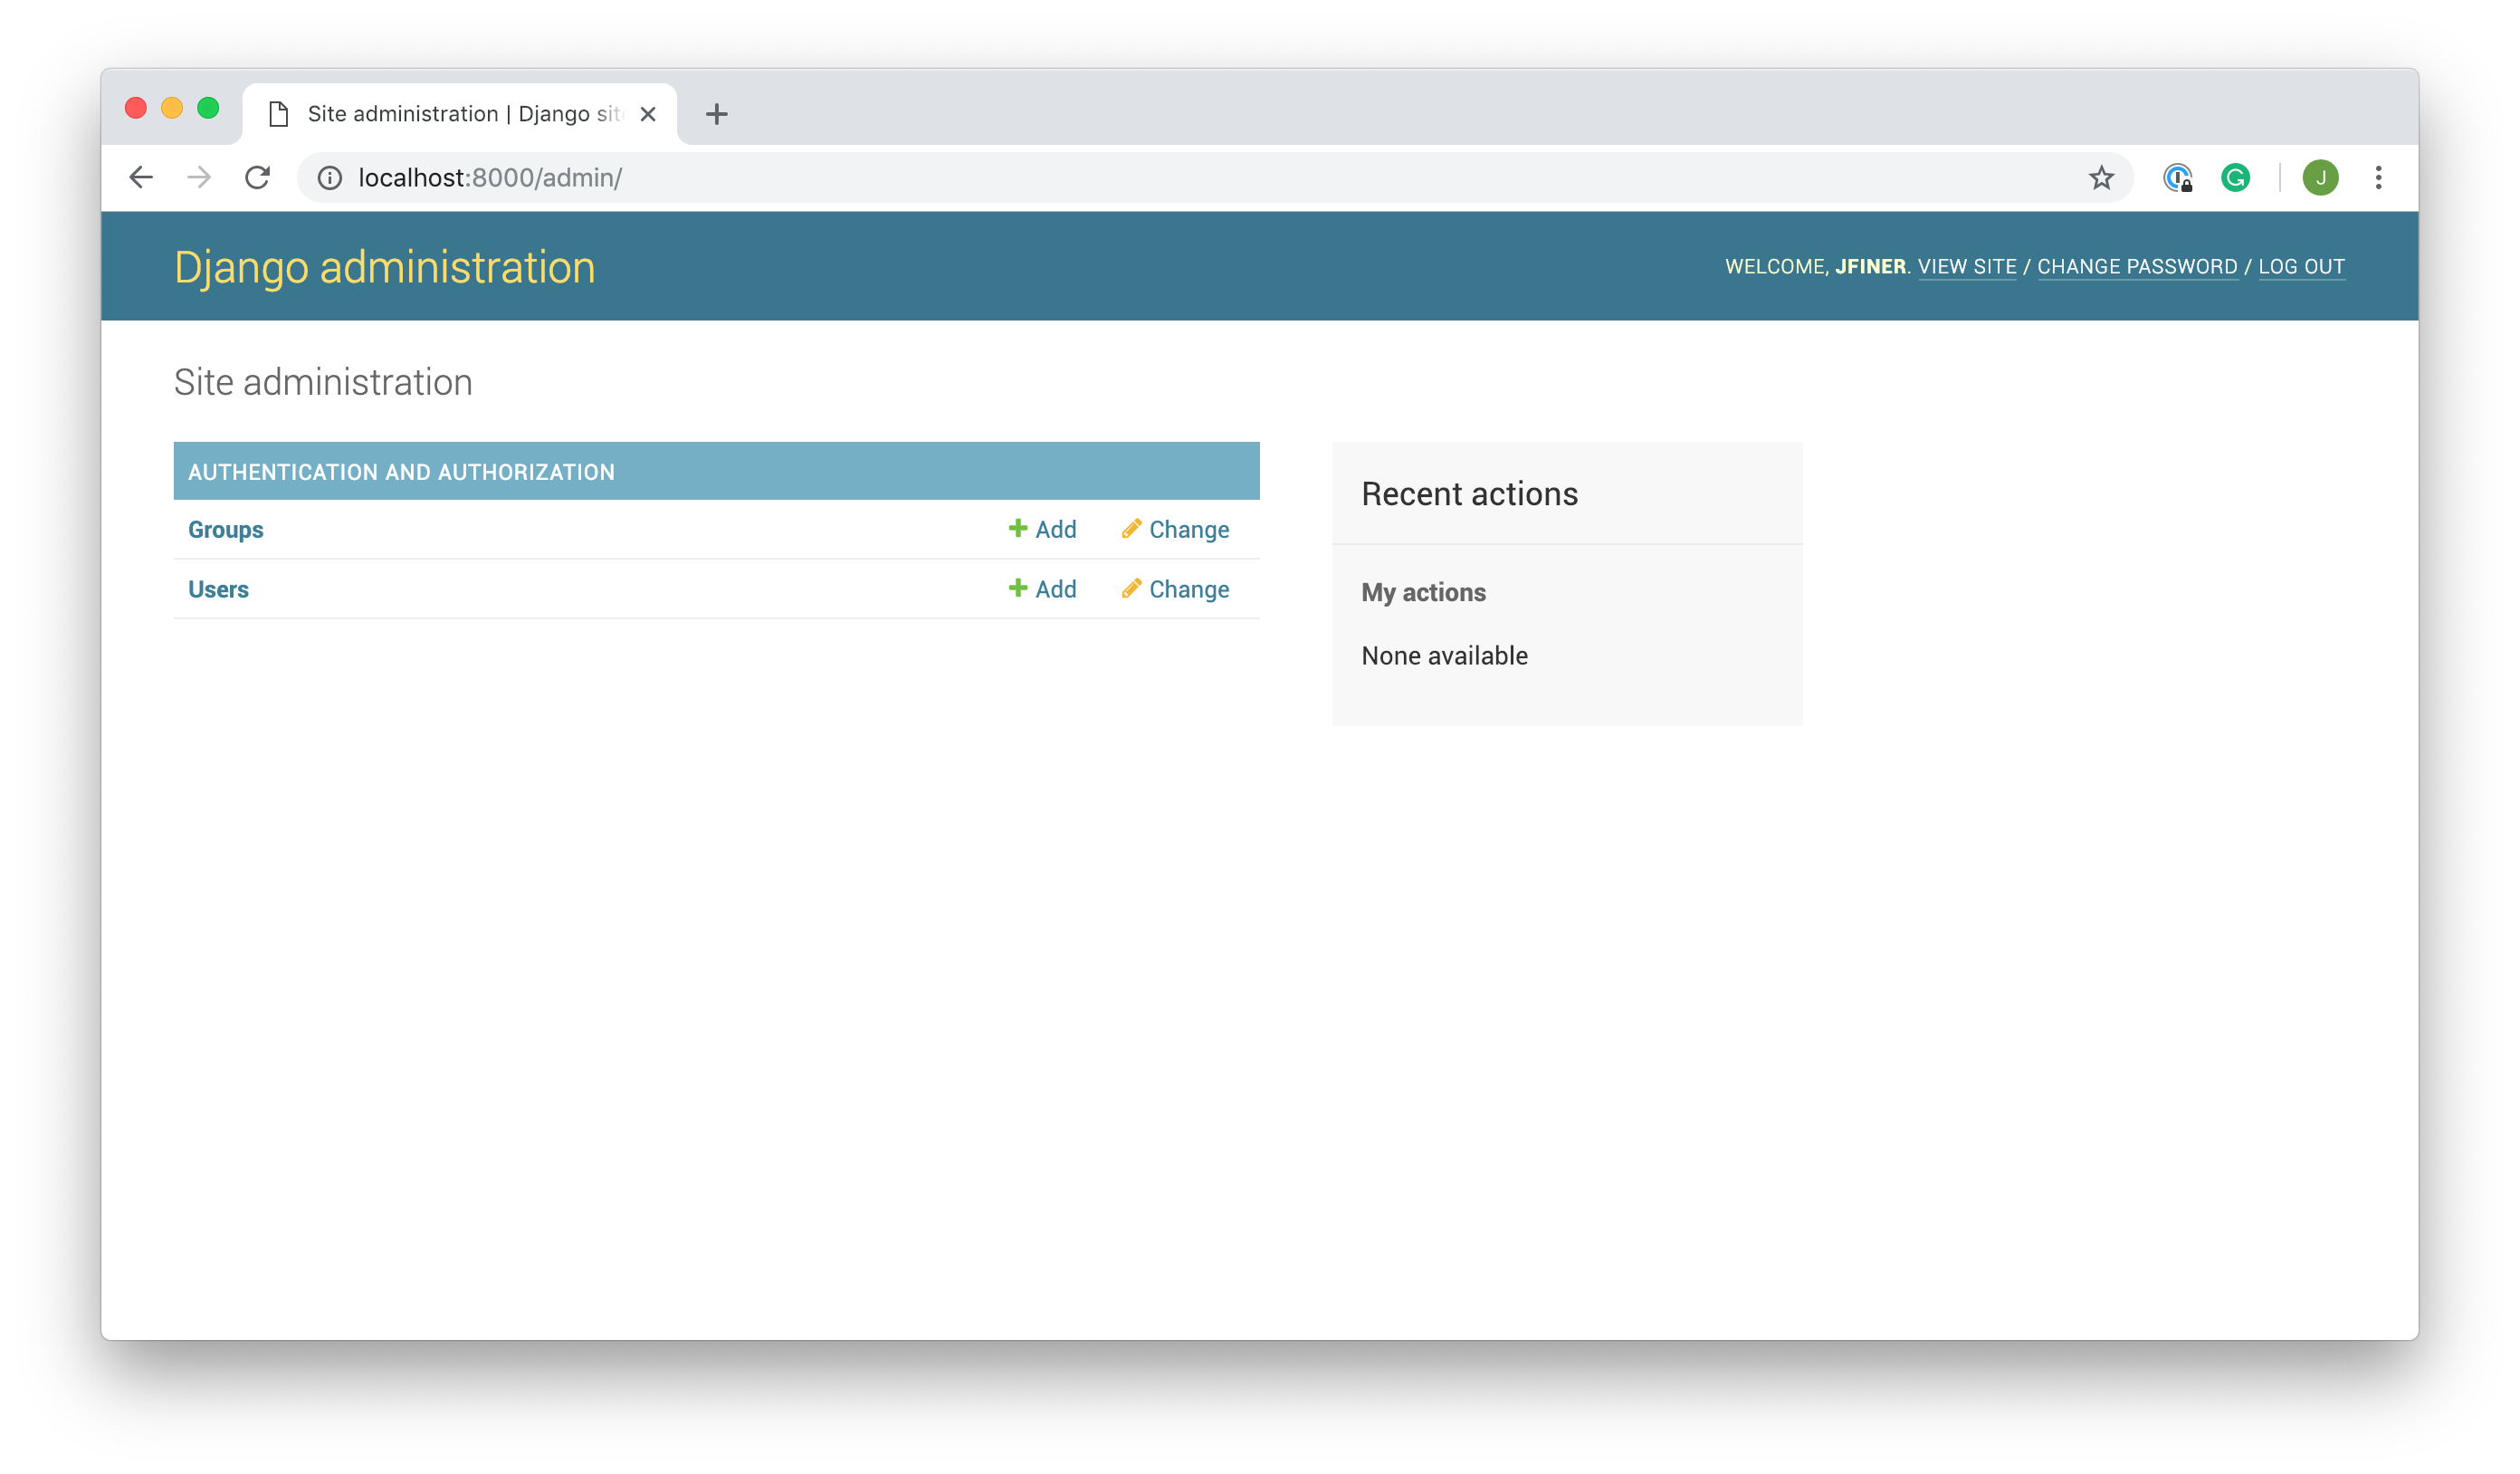
The User and Groups models should appear, but you’ll notice that there’s no reference to the models you’ve created yourself. That’s because you need to register them inside the admin.
应该会出现“用户”和“组”模型,但是您会注意到没有对您自己创建的模型的引用。 那是因为您需要在管理员内部注册它们。
In the blog directory, open the file admin.py and type the following lines of code:
在blog目录中,打开文件admin.py并键入以下代码行:
On line 2, you import the models you want to register on the admin page.
在第2行上 ,导入要在管理页面上注册的模型。
Note: We’re not adding the comments to the admin. That’s because it’s not usually necessary to edit or create comments yourself.
注意:我们不会将评论添加到管理员。 那是因为通常不需要自己编辑或创建评论。
If you wanted to add a feature where comments are moderated, then go ahead and add the Comments model too. The steps to do so are exactly the same!
如果您想添加一个功能来管理评论,请继续添加评论模型。 这样做的步骤完全相同!
On line 5 and line 9, you define empty classes PostAdmin and CategoryAdmin. For the purposes of this tutorial, you don’t need to add any attributes or methods to these classes. They are used to customize what is shown on the admin pages. For this tutorial, the default configuration is enough.
在第5行和第9行 ,定义空类PostAdmin和CategoryAdmin 。 出于本教程的目的,您无需向这些类添加任何属性或方法。 它们用于自定义管理页面上显示的内容。 对于本教程,默认配置就足够了。
The last two lines are the most important. These register the models with the admin classes. If you now visit localhost:8000/admin, then you should see that the Post and Category models are now visible:
最后两行是最重要的。 这些用admin类注册模型。 如果现在访问localhost:8000/admin ,则应该看到Post和Category模型现在可见:
If you click into Posts or Categorys, you should be able to add new instances of both models. I like to add the text of fake blog posts by using lorem ipsum dummy text.
如果单击“帖子”或“类别”,则应该能够添加两个模型的新实例。 我喜欢使用lorem ipsum虚拟文本来添加虚假博客文章的文本。
Create a couple of fake posts and assign them fake categories before moving onto the next section. That way, you’ll have posts you can view when we create our templates.
在进入下一部分之前,创建几个假帖子并为它们分配假类别。 这样,您将拥有可以在我们创建模板时查看的帖子。
Don’t forget to check out the source code for this section before moving on to building out the views for our app.
在继续为我们的应用程序构建视图之前,请不要忘记查看本节的源代码 。
博客应用:观看次数 (Blog App: Views)
You’ll need to create three view functions in the views.py file in the blog directory:
您需要在blog目录的views.py文件中创建三个视图函数:
blog_indexwill display a list of all your posts.blog_detailwill display the full post as well as comments and a form to allow users to create new comments.blog_categorywill be similar toblog_index, but the posts viewed will only be of a specific category chosen by the user.
-
blog_index将显示您所有帖子的列表。 -
blog_detail将显示完整的帖子以及评论,以及一个允许用户创建新评论的表格。 -
blog_category将类似于blog_index,但是查看的帖子仅属于用户选择的特定类别。
The simplest view function to start with is blog_index(). This will be very similar to the project_index() view from your project app. You’ll just query the Post models and retrieve all its objects:
开始的最简单的视图函数是blog_index() 。 这将与project应用程序中的project_index()视图非常相似。 您只需查询Post模型并检索其所有对象:
 from from django.shortcuts django.shortcuts import import render
render
from from blog.models blog.models import import Post

Post

def def blog_indexblog_index (( requestrequest ):
    ):
    posts posts = = PostPost .. objectsobjects .. allall ()() .. order_byorder_by (( '-created_on''-created_on' )
    )
    context context = = {
        {
        "posts""posts" : : postsposts ,
    ,
    }
    }
    return return renderrender (( requestrequest , , "blog_index.html""blog_index.html" , , contextcontext )
)
On line 3, you import the Post model, and on line 6 inside the view function, you obtain a Queryset containing all the posts in the database. order_by() orders the Queryset according to the argument given. The minus sign tells Django to start with the largest value rather than the smallest. We use this, as we want the posts to be ordered with the most recent post first.
在第3行中 ,导入Post模型,在view函数中的第6行中 ,获得一个Queryset,其中包含数据库中的所有帖子。 order_by()根据给定的参数对查询集进行排序。 减号告诉Django从最大值开始,而不是最小。 我们之所以使用它,是因为我们希望帖子按照最新的帖子排列。
Finally, you define the context dictionary and render the template. Don’t worry about creating it yet. You’ll get to creating those in the next section.
最后,定义context词典并渲染模板。 不用担心创建它。 您将在下一节中创建它们。
Next, you can start to create the blog_category() view. The view function will need to take a category name as an argument and query the Post database for all posts that have been assigned the given category:
接下来,您可以开始创建blog_category()视图。 view函数将需要使用类别名称作为参数,并在Post数据库中查询已分配给定类别的所有帖子:
On line 14, you’ve used a Django Queryset filter. The argument of the filter tells Django what conditions need to be met for an object to be retrieved. In this case, we only want posts whose categories contain the category with the name corresponding to that given in the argument of the view function. Again, you’re using order_by() to order posts starting with the most recent.
在第14行 ,您使用了Django Queryset过滤器 。 过滤器的参数告诉Django要检索对象需要满足哪些条件。 在这种情况下,我们只需要其类别包含名称与视图函数自变量中给出的名称相对应的类别的帖子。 同样,您使用order_by()对从最新开始的帖子进行排序。
We then add these posts and the category to the context dictionary, and render our template.
然后,我们将这些帖子和类别添加到context词典中,并渲染我们的模板。
The last view function to add is blog_detail(). This is more complicated as we are going to include a form. Before you add the form, just set up the view function to show a specific post with a comment associated with it. This function will be almost equivalent to the project_detail() view function in the projects app:
最后要添加的视图函数是blog_detail() 。 因为我们要包含一个表单,所以这更加复杂。 在添加表单之前,只需设置视图功能以显示带有相关注释的特定帖子。 此函数几乎等效于projects应用程序中的project_detail()视图函数:
 def def blog_detailblog_detail (( requestrequest , , pkpk ):
    ):
    post post = = PostPost .. objectsobjects .. getget (( pkpk == pkpk )
    )
    comments comments = = CommentComment .. objectsobjects .. filterfilter (( postpost == postpost )
    )
    context context = = {
        {
        "post""post" : : postpost ,
        ,
        "comments""comments" : : commentscomments ,
    ,
    }

    }

    return return renderrender (( requestrequest , , "blog_detail.html""blog_detail.html" , , contextcontext )
)
The view function takes a pk value as an argument and, on line 22, retrieves the object with the given pk.
view函数将pk值作为参数,并在第22行 ,使用给定pk检索对象。
On line 23, we retrieve all the comments assigned to the given post using Django filters again.
在第23行 ,我们再次使用Django过滤器检索分配给给定帖子的所有评论。
Lastly, add both post and comments to the context dictionary and render the template.
最后,将post和comments添加到context字典中并渲染模板。
To add a form to the page, you’ll need to create another file in the blog directory named forms.py. Django forms are very similar to models. A form consists of a class where the class attributes are form fields. Django comes with some built-in form fields that you can use to quickly create the form you need.
要将表单添加到页面,您需要在blog目录中创建另一个文件,命名为forms.py 。 Django表单与模型非常相似。 表单由一个类组成,其中类属性是表单字段。 Django带有一些内置的表单字段,您可以使用它们快速创建所需的表单。
For this form, the only fields you’ll need are author, which should be a CharField, and body, which can also be a CharField.
对于此表单,您唯一需要的字段是author (应该是CharField )和body (也可以是CharField 。
Note: If the CharField of your form corresponds to a model CharField, make sure both have the same max_length value.
注意:如果表单的CharField对应于模型CharField ,请确保两者具有相同的max_length值。
blog/forms.py should contain the following code:
blog/forms.py应该包含以下代码:
You’ll also notice an argument widget has been passed to both the fields. The author field has the forms.TextInput widget. This tells Django to load this field as an HTML text input element in the templates. The body field uses a forms.TextArea widget instead, so that the field is rendered as an HTML text area element.
您还会注意到参数widget已传递到两个字段。 author字段具有forms.TextInput小部件。 这告诉Django将这个字段作为HTML文本输入元素加载到模板中。 body字段使用forms.TextArea小部件代替,因此该字段呈现为HTML文本区域元素。
These widgets also take an argument attrs, which is a dictionary and allows us to specify some CSS classes, which will help with formatting the template for this view later. It also allows us to add some placeholder text.
这些小部件还带有一个参数attrs ,它是一个字典,并允许我们指定一些CSS类,这将有助于以后格式化此视图的模板。 它还允许我们添加一些占位符文本。
When a form is posted, a POST request is sent to the server. So, in the view function, we need to check if a POST request has been received. We can then create a comment from the form fields. Django comes with a handy is_valid() on its forms, so we can check that all the fields have been entered correctly.
发布表单后, POST请求发送到服务器。 因此,在视图功能中,我们需要检查是否已收到POST请求。 然后,我们可以从表单字段创建注释。 Django在其表单上附带了一个方便的is_valid() ,因此我们可以检查是否正确输入了所有字段。
Once you’ve created the comment from the form, you’ll need to save it using save() and then query the database for all the comments assigned to the given post. Your view function should contain the following code:
从表单创建评论后,需要使用save()保存它,然后在数据库中查询分配给给定帖子的所有评论。 您的视图函数应包含以下代码:
 def def blog_detailblog_detail (( requestrequest , , pkpk ):
    ):
    post post = = PostPost .. objectsobjects .. getget (( pkpk == pkpk )

)

form form = = CommentFormCommentForm ()
()
if if requestrequest .. method method == == 'POST''POST' :
:
form form = = CommentFormCommentForm (( requestrequest .. POSTPOST )
)
if if formform .. is_validis_valid ():
():
comment comment = = CommentComment (
(
authorauthor == formform .. cleaned_datacleaned_data [[ "author""author" ],
],
bodybody == formform .. cleaned_datacleaned_data [[ "body""body" ],
],
postpost == post
post
)
)
commentcomment .. savesave ()
()
comments comments = = CommentComment .. objectsobjects .. filterfilter (( postpost == postpost )
    )
    context context = = {
        {
        "post""post" : : postpost ,
        ,
        "comments""comments" : : commentscomments ,
,
"form""form" : : CommentFormCommentForm (),
(),
}
    }
    return return renderrender (( requestrequest , , "blog_detail.html""blog_detail.html" , , contextcontext )
)
On line 25, we create an instance of our form class. Don’t forget to import your form at the beginning of the file:
在第25行 ,我们创建表单类的实例。 不要忘记在文件的开头导入表单:
We then go on to check if a POST request has been received. If it has, then we create a new instance of our form, populated with the data entered into the form.
然后,我们继续检查是否已收到POST请求。 如果有,那么我们将创建表单的新实例,并填充输入表单的数据。
The form is then validated using is_valid(). If the form is valid, a new instance of Comment is created. You can access the data from the form using form.cleaned_data, which is a dictionary.
然后使用is_valid()验证表单。 如果表单有效,则会创建一个Comment的新实例。 您可以使用作为字典的form.cleaned_data从表单访问数据。
They keys of the dictionary correspond to the form fields, so you can access the author using form.cleaned_data['author']. Don’t forget to add the current post to the comment when you create it.
字典的键对应于表单字段,因此您可以使用form.cleaned_data['author']访问作者。 创建帖子时,请不要忘记将当前帖子添加到评论中。
Note: The life cycle of submitting a form can be a little complicated, so here’s an outline of how it works:
注意:提交表单的生命周期可能会有些复杂,因此这里概述了它的工作方式:
- When a user visits a page containing a form, they send a
GETrequest to the server. In this case, there’s no data entered in the form, so we just want to render the form and display it. - When a user enters information and clicks the Submit button, a
POSTrequest, containing the data submitted with the form, is sent to the server. At this point, the data must be processed, and two things can happen:- The form is valid, and the user is redirected to the next page.
- The form is invalid, and empty form is once again displayed. The user is back at step 1, and the process repeats.
- 当用户访问包含表单的页面时,他们将
GET请求发送到服务器。 在这种情况下,表单中没有输入任何数据,因此我们只想呈现表单并显示它。 - 当用户输入信息并单击Submit按钮时,包含表单提交的数据的
POST请求将发送到服务器。 此时,必须处理数据,并且可能发生两件事:- 该表格有效,并且用户被重定向到下一页。
- 表格无效,并再次显示空白表格。 用户返回到步骤1,然后重复该过程。
The Django forms module will output some errors, which you can display to the user. This is beyond the scope of this tutorial, but you can read more about rendering form error messages in the Django documentation.
Django表单模块将输出一些错误,您可以将其显示给用户。 这超出了本教程的范围,但是您可以在Django文档中阅读有关渲染表单错误消息的更多信息 。
On line 34, save the comment and go on to add the form to the context dictionary so you can access the form in the HTML template.
在第34行上 ,保存注释并继续将form添加到context字典中,以便您可以在HTML模板中访问表单。
The final step before you get to create the templates and actually see this blog up and running is to hook up the URLs. You’ll need create another urls.py file inside blog/ and add the URLs for the three views:
创建模板并真正看到并运行此博客之前的最后一步是连接URL。 您需要在blog/创建另一个urls.py文件,并添加三个视图的URL:
 from from django.urls django.urls import import path
path
from from . . import import views

views

urlpatterns urlpatterns = = [
    [
    pathpath (( """" , , viewsviews .. blog_indexblog_index , , namename == "blog_index""blog_index" ),
    ),
    pathpath (( "<int:pk>/""<int:pk>/" , , viewsviews .. blog_detailblog_detail , , namename == "blog_detail""blog_detail" ),
    ),
    pathpath (( "<category>/""<category>/" , , viewsviews .. blog_categoryblog_category , , namename == "blog_category""blog_category" ),
),
]
]
Once the blog-specific URLs are in place, you need to add them to the projects URL configuration using include():
特定于博客的URL到位后,您需要使用include()将它们添加到项目URL配置中:
With this set up, all the blog URLs will be prefixed with blog/, and you’ll have the following URL paths:
通过此设置,所有博客URL都将以blog/为前缀,并且您将具有以下URL路径:
localhost:8000/blog: Blog indexlocalhost:8000/blog/1: Blog detail view of blog withpk=1localhost:8000/blog/python: Blog index view of all posts with categorypython
-
localhost:8000/blog:博客索引 -
localhost:8000/blog/1:pk=1的博客的博客详细信息视图 -
localhost:8000/blog/python:类别为python的所有帖子的博客索引视图
These URLs won’t work just yet as you still need to create the templates.
这些网址暂时无法使用,因为您仍然需要创建模板。
In this section, you created all the views for your blog application. You learned how to use filters when making queries and how to create Django forms. It won’t be long now until you can see your blog app in action!
在本部分中,您为博客应用程序创建了所有视图。 您学习了如何在进行查询时使用过滤器以及如何创建Django表单。 不久之后,您就可以看到实际的博客应用了!
As always, don’t forget that you can check out the source code for this section on GitHub.
与往常一样,不要忘记您可以在GitHub上查看此部分的源代码 。
博客应用:模板 (Blog App: Templates)
The final piece of our blog app is the templates. By the end of this section, you’ll have created a fully functioning blog.
我们博客应用程序的最后一部分是模板。 在本节的最后,您将创建一个功能全面的博客。
You’ll notice there are some bootstrap elements included in the templates to make the interface prettier. These aren’t the focus of the tutorial so I’ve glossed over what they do but do check out the Bootstrap docs to find out more.
您会注意到模板中包含一些引导程序元素,以使界面更漂亮。 这些不是本教程的重点,因此我已经掩盖了它们的作用,但是请查阅Bootstrap文档以了解更多信息。
The first template you’ll create is for the blog index in a new file blog/templates/blog_index.html. This will be very similar to the projects index view.
您将创建的第一个模板是新文件blog/templates/blog_index.html的博客索引。 这将与项目索引视图非常相似。
You’ll use a for loop to loop over all the posts. For each post, you’ll display the title and a snippet of the body. As always, you’ll extend the base template personal_porfolio/templates/base.html, which contains our navigation bar and some extra formatting:
您将使用for循环遍历所有帖子。 对于每个帖子,您将显示标题和正文片段。 与往常一样,您将扩展基本模板personal_porfolio/templates/base.html ,其中包含我们的导航栏和一些其他格式:
{% extends "base.html" %}
{% block page_content %}
{% extends "base.html" %}
{% block page_content %}
<< div div classclass == "col-md-8 offset-md-2""col-md-8 offset-md-2" >
>
<< h1h1 >Blog Index> Blog Index </</ h1h1 >
>
<< hrhr >
{% for post in posts %}
>
{% for post in posts %}
<< h2h2 ><>< a a hrefhref == "{% url 'blog_detail' post.pk%}""{% url 'blog_detail' post.pk%}" >{{ post.title }}> {{ post.title }} </</ aa ></></ h2h2 >
>
<< smallsmall >
{{ post.created_on.date }} |>
{{ post.created_on.date }} |
Categories:
Categories:
{% for category in post.categories.all %}
{% for category in post.categories.all %}
<< a a hrefhref == "{% url 'blog_category' category.name %}""{% url 'blog_category' category.name %}" >
{{ category.name }}
>
{{ category.name }}
</</ aa >>
{% endfor %}
{% endfor %}
</</ smallsmall >
>
<< pp >{{ post.body | slice:":400" }}...> {{ post.body | slice:":400" }}... </</ pp >
{% endfor %}
>
{% endfor %}
</</ divdiv >
{% endblock %}
>
{% endblock %}
On line 7, we have the post title, which is a hyperlink. The link is a Django link where we are pointing to the URL named blog_detail, which takes an integer as its argument and should correspond to the pk value of the post.
在第7行 ,我们有帖子标题,它是一个超链接。 该链接是Django链接,我们指向的URL名为blog_detail ,该URL接受一个整数作为参数,并且应与帖子的pk值相对应。
Underneath the title, we’ll display the created_on attribute of the post as well as its categories. On line 11, we use another for loop to loop over all the categories assigned to the post.
在标题下,我们将显示帖子的created_on属性及其类别。 在第11行 ,我们使用另一个for循环遍历分配给帖子的所有类别。
On line 17, we use a template filter slice to cut off the post body at 400 characters so that the blog index is more readable.
在第17行 ,我们使用模板过滤器 slice将帖子正文截断为400个字符,以便博客索引更具可读性。
Once that’s in place, you should be able to access this page by visiting localhost:8000/blog:
安装到位后,您应该可以通过访问localhost:8000/blog来访问此页面:
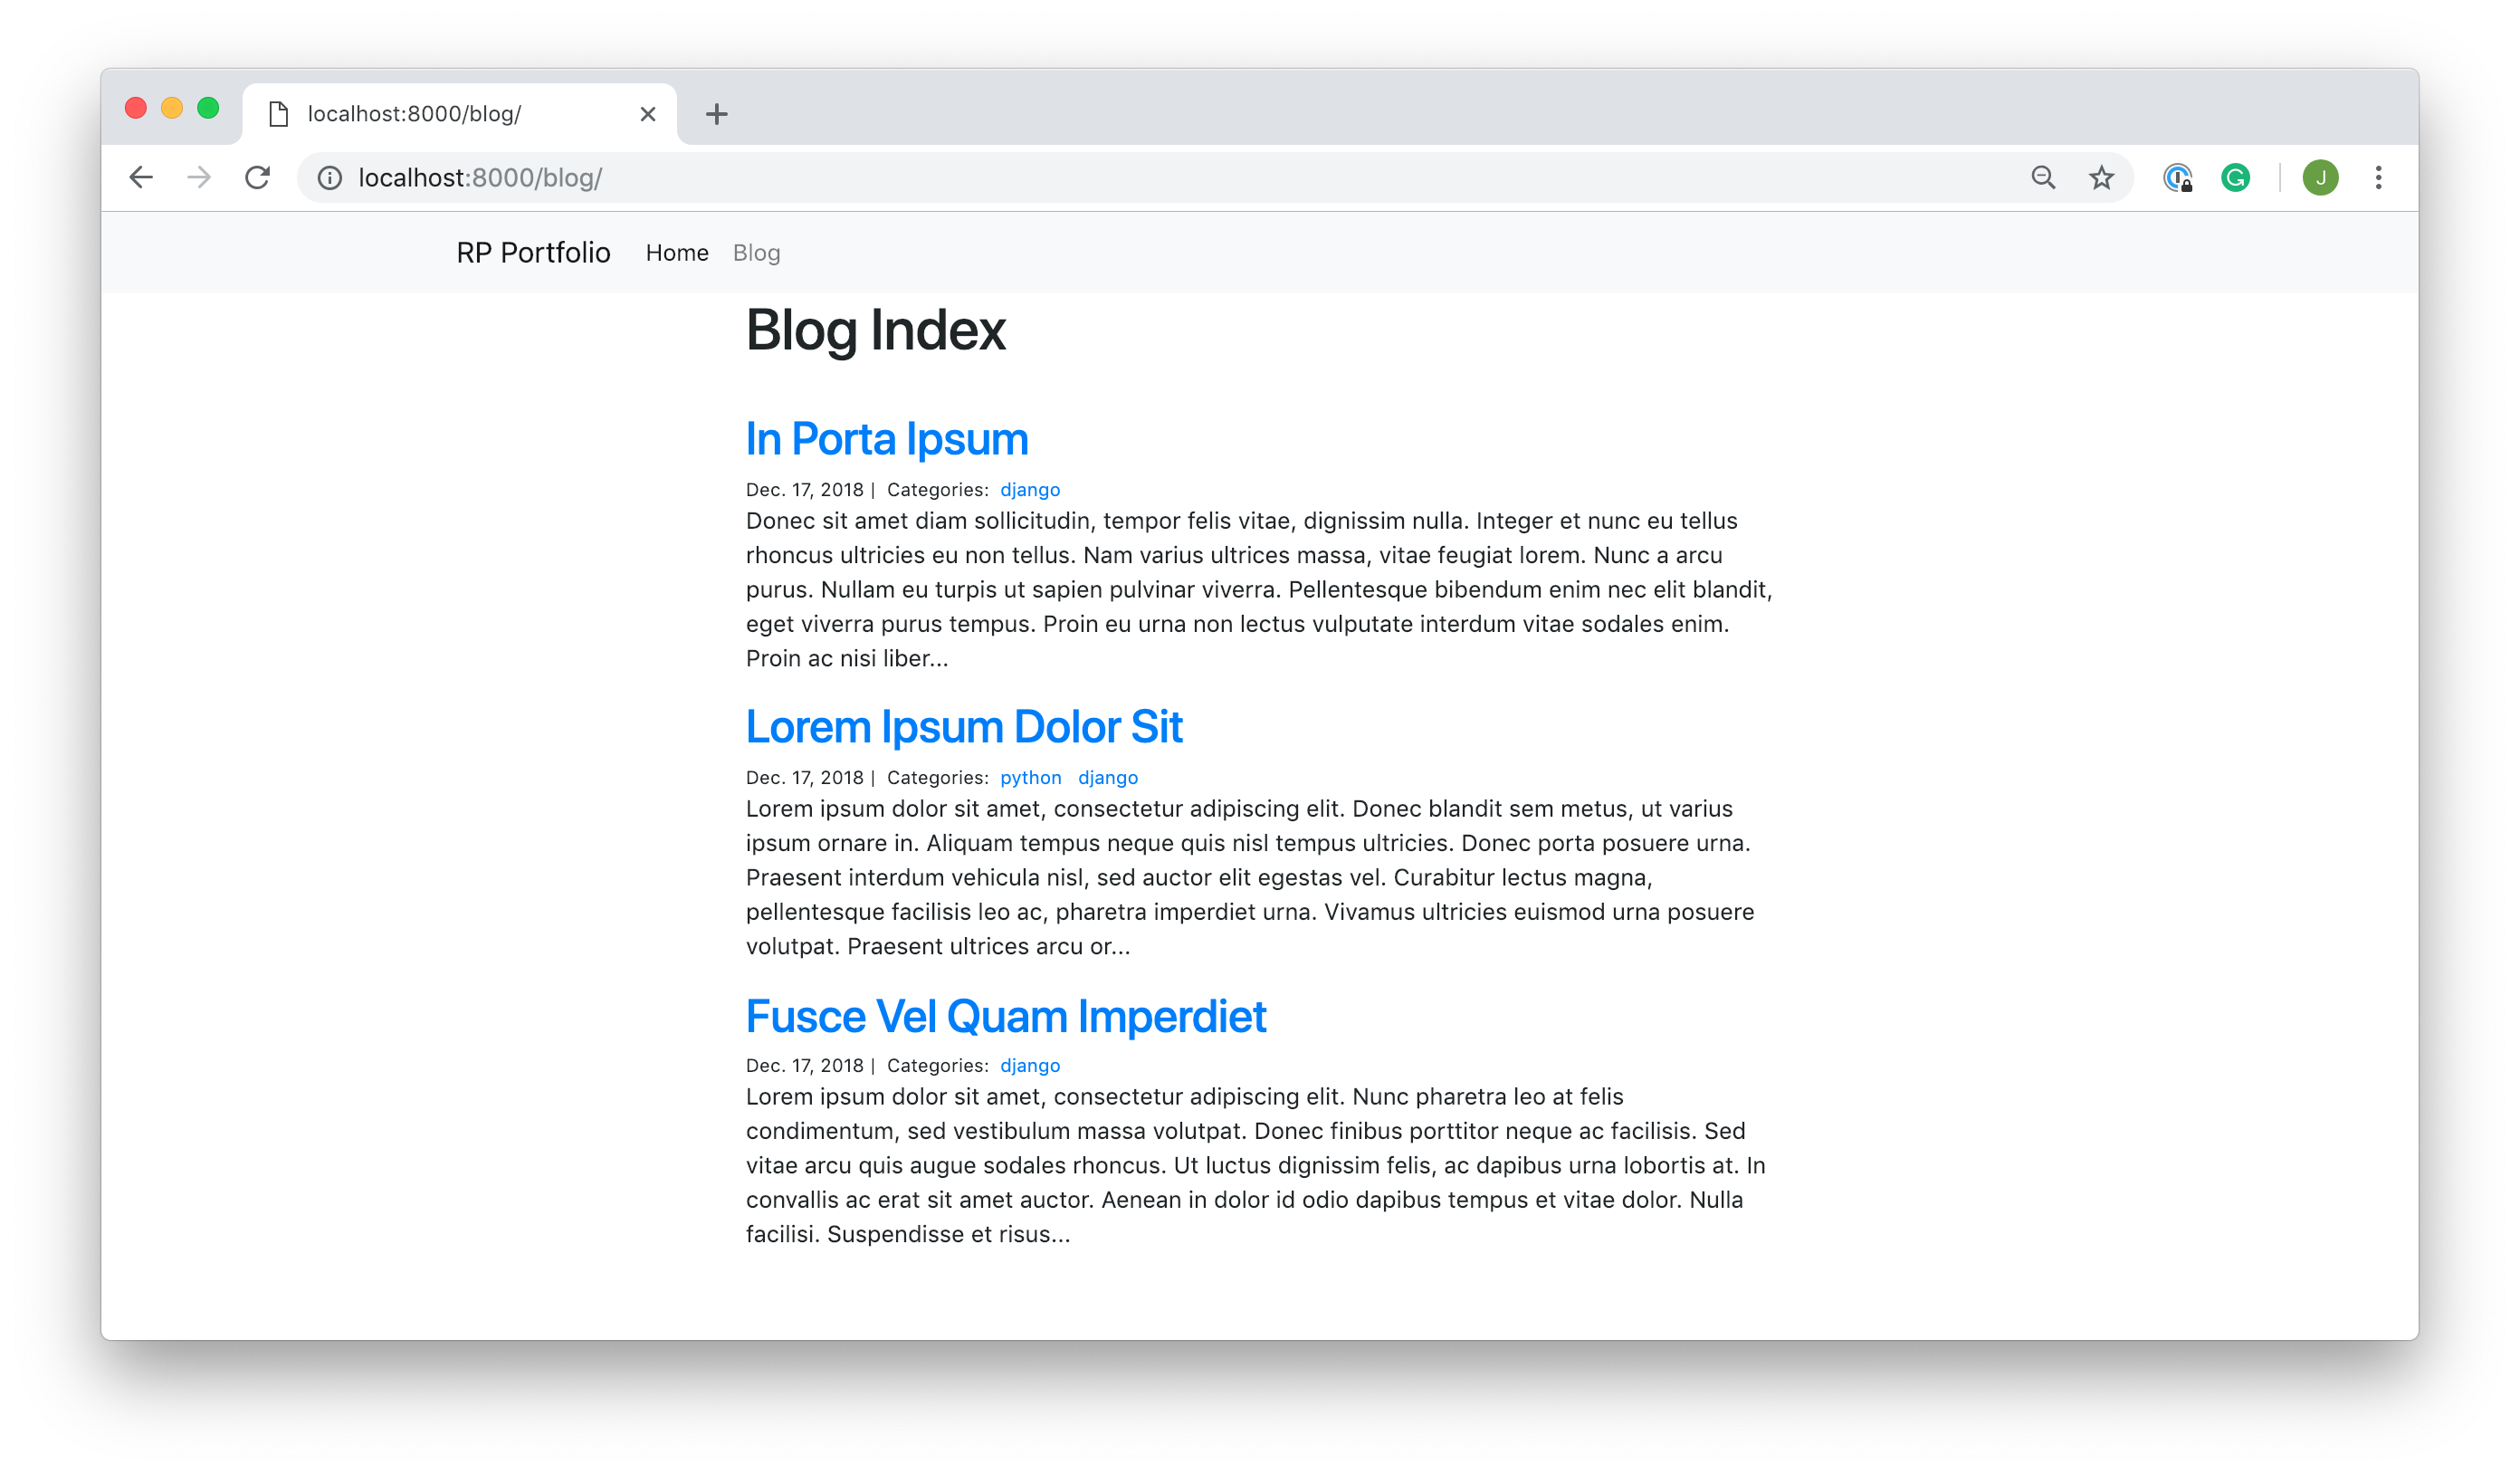
Next, create another HTML file blog/templates/blog_category.html where your blog_category template will live. This should be identical to blog_index.html, except with the category name inside the h1 tag instead of Blog Index:
接下来,创建另一个HTML文件blog/templates/blog_category.html , blog_category模板将blog/templates/blog_category.html在其中。 这应该与blog_index.html相同,除了h1标记内的类别名称而不是Blog Index :
Most of this template is identical to the previous template. The only difference is on line 4, where we use another Django template filter title. This applies titlecase to the string and makes words start with an uppercase character.
此模板的大部分与以前的模板相同。 唯一的区别是在第4行 ,在此我们使用了另一个Django模板过滤器title 。 这会将标题大写应用于字符串,并使单词以大写字符开头。
With that template finished, you’ll be able to access your category view. If you defined a category named python, you should be able to visit localhost:8000/blog/python and see all the posts with that category:
完成该模板后,您将可以访问类别视图。 如果您定义了一个名为python的类别,则应该能够访问localhost:8000/blog/python并查看具有该类别的所有帖子:
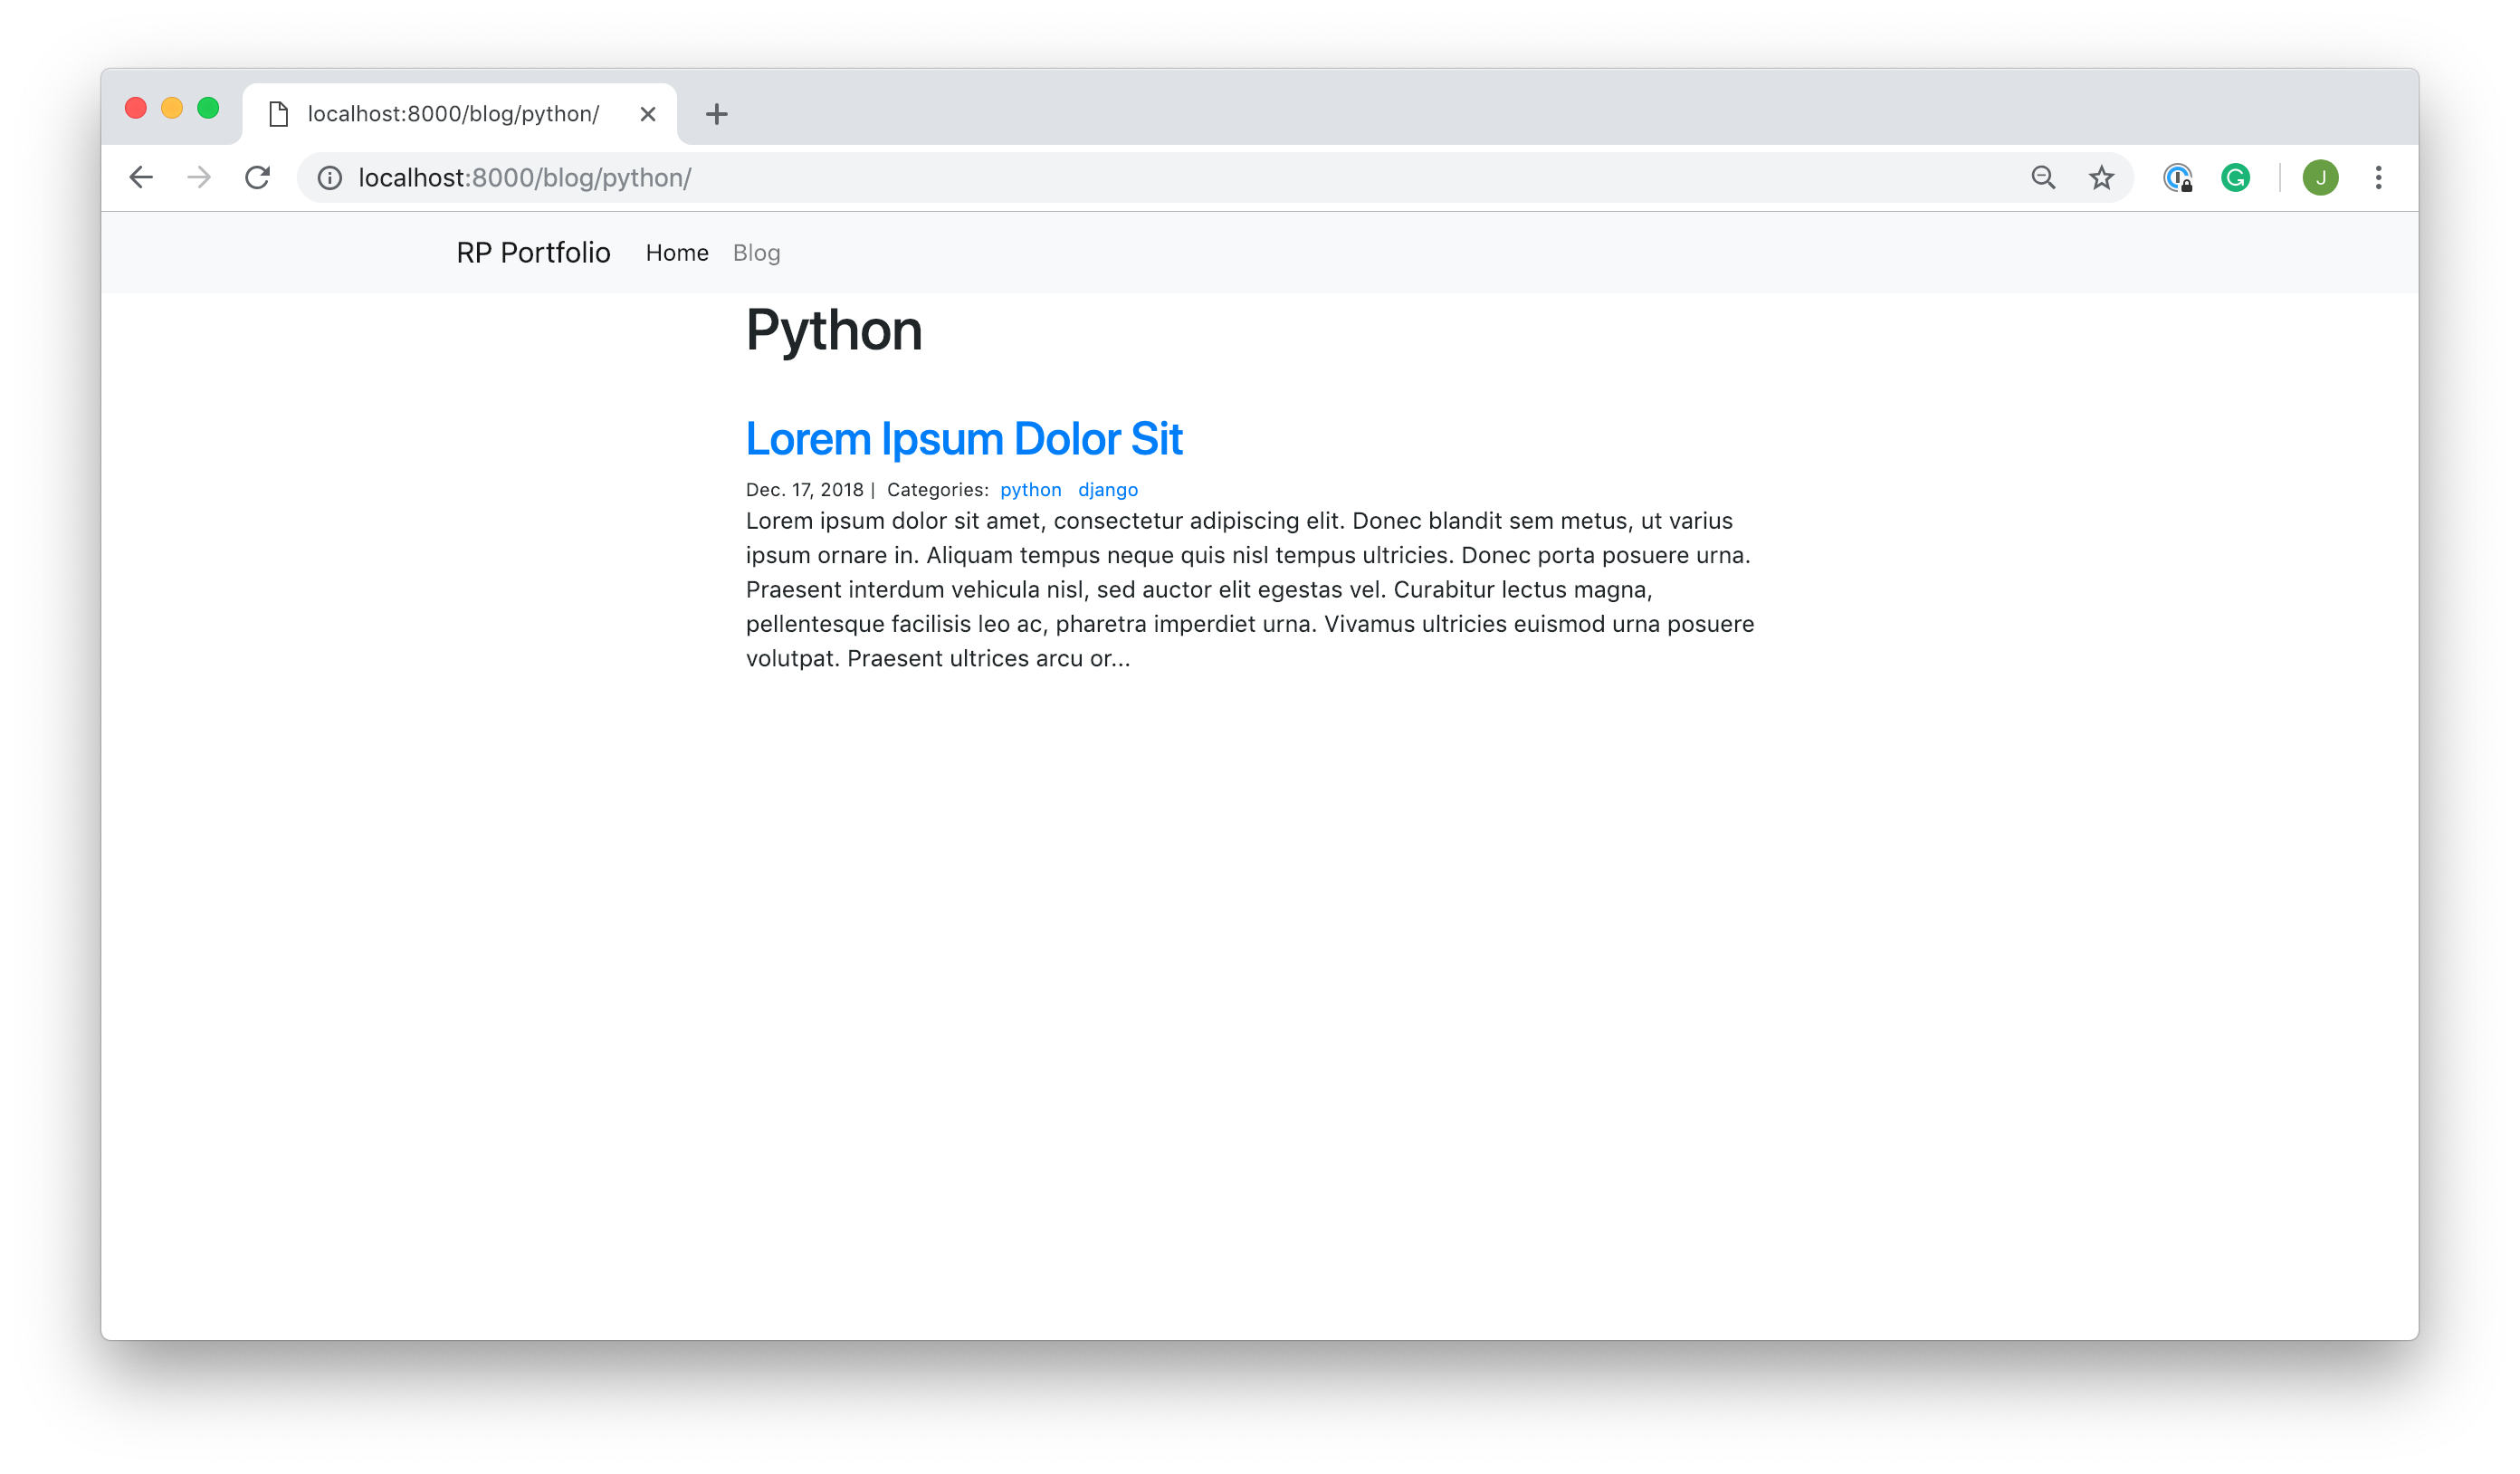
The last template to create is the post_detail template. In this template, you’ll display the title and full body of a post.
最后创建的模板是post_detail模板。 在此模板中,您将显示帖子的标题和全文。
Between the title and the body of the post, you’ll display the date the post was created and any categories. Underneath that, you’ll include a comments form so users can add a new comment. Under this, there will be a list of comments that have already been left:
在标题和帖子正文之间,您将显示帖子的创建日期和所有类别。 在其下,您将包括一个评论表单,以便用户可以添加新评论。 在此之下,将有一个已留下的评论列表:
{% extends "base.html" %}
{% block page_content %}
{% extends "base.html" %}
{% block page_content %}
<< div div classclass == "col-md-8 offset-md-2""col-md-8 offset-md-2" >
>
<< h1h1 >{{ post.title }}> {{ post.title }} </</ h1h1 >
>
<< smallsmall >
{{ post.created_on.date }} |>
{{ post.created_on.date }} |
Categories:
Categories:
{% for category in post.categories.all %}
{% for category in post.categories.all %}
<< a a hrefhref == "{% url 'blog_category' category.name %}""{% url 'blog_category' category.name %}" >
{{ category.name }}
>
{{ category.name }}
</</ aa >>
{% endfor %}
{% endfor %}
</</ smallsmall >
>
<< pp >{{ post.body | linebreaks }}> {{ post.body | linebreaks }} </</ pp >
>
<< h3h3 >Leave a comment:> Leave a comment: </</ h3h3 >
>
<< form form actionaction == "/blog/{{ post.pk }}/" "/blog/{{ post.pk }}/" methodmethod == "post""post" >
{% csrf_token %}
>
{% csrf_token %}
<< div div classclass == "form-group""form-group" >
{{ form.author }}
>
{{ form.author }}
</</ divdiv >
>
<< div div classclass == "form-group""form-group" >
{{ form.body }}
>
{{ form.body }}
</</ divdiv >
>
<< button button typetype == "submit" "submit" classclass == "btn btn-primary""btn btn-primary" >Submit> Submit </</ buttonbutton >
>
</</ formform >
>
<< h3h3 >Comments:> Comments: </</ h3h3 >
{% for comment in comments %}
>
{% for comment in comments %}
<< pp >
On {{comment.created_on.date }}>
On {{comment.created_on.date }}
<< bb >{{ comment.author }}> {{ comment.author }} </</ bb > wrote:
> wrote:
</</ pp >
>
<< pp >{{ comment.body }}> {{ comment.body }} </</ pp >
>
<< hrhr >
{% endfor %}
>
{% endfor %}
</</ divdiv >
{% endblock %}
>
{% endblock %}
The first few lines of the template in which we display the post title, date, and categories is the same logic as for the previous templates. This time, when rendering the post body, use a linebreaks template filter. This tag registers line breaks as new paragraphs, so the body doesn’t appear as one long block of text.
显示帖子标题,日期和类别的模板的前几行与先前模板的逻辑相同。 这次,在渲染帖子正文时,请使用linebreaks模板过滤器。 此标记将换行符注册为新段落,因此正文不会显示为一长段文本。
Underneath the post, on line 16, you’ll display your form. The form action points to the URL path of the page to which you’re sending the POST request to. In this case, it’s the same as the page that is currently being visited. You then add a csrf_token, which provides security and renders the body and author fields of the form, followed by a submit button.
在帖子下方的第16行 ,您将显示表单。 表单操作指向您要将POST请求发送到的页面的URL路径。 在这种情况下,它与当前正在访问的页面相同。 然后,添加一个csrf_token ,它提供安全性并呈现表单的正文和作者字段,后跟一个提交按钮。
To get the bootstrap styling on the author and body fields, you need to add the form-control class to the text inputs.
要在author和body字段上获得引导样式,您需要将form-control类添加到文本输入中。
Because Django renders the inputs for you when you include {{ form.body }} and {{ form.author }}, you can’t add these classes in the template. That’s why you added the attributes to the form widgets in the previous section.
由于当您包含{{ form.body }}和{{ form.author }} ,Django会为您呈现输入,因此您无法在模板中添加这些类。 这就是在上一节中将属性添加到表单小部件的原因。
Underneath the form, there’s another for loop that loops over all the comments on the given post. The comments, body, author, and created_on attributes are all displayed.
在表单下方,还有一个for循环,遍历给定帖子上的所有评论。 注释, body , author和created_on属性都将显示。
Once that template is in place, you should be able to visit localhost:8000/blog/1 and view your first post:
模板到位后,您应该可以访问localhost:8000/blog/1并查看第一篇文章:

You should also be able to access the post detail pages by clicking on their title in the blog_index view.
您还应该能够通过在blog_index视图中单击其标题来访问帖子详细信息页面。
The final finishing touch is to add a link to the blog_index to the navigation bar in base.html. This way, when you click on Blog in the navigation bar, you’ll be able to visit the blog. Check out the updates to base.html in the source code to see how to add that link.
最后的修饰是将指向blog_index的链接添加到base.html的导航栏中。 这样,当您单击导航栏中的Blog时,就可以访问该Blog。 在源代码中查看对base.html 的更新 ,以了解如何添加该链接。
With that now in place, your personal portfolio site is complete, and you’ve created your first Django site. The final version of the source code containing all the features can be found on GitHub, so check it out! Click around the site a bit to see all the functionality and try leaving some comments on your posts!
现在,您的个人投资组合站点已完成,并且您已经创建了第一个Django站点。 包含所有功能的源代码的最终版本可以在GitHub上找到,所以请查看! 稍微单击该站点即可查看所有功能,并尝试在您的帖子上留下一些评论!
You may find a few things here and there that you think need polishing. Go ahead and tidy them up. The best way to learn more about this web framework is through practice, so try to extend this project and make it even better! If you’re not sure where to start, I’ve left a few ideas for you in the conclusion below!
您可能会在这里和那里发现一些您认为需要完善的东西。 继续整理它们。 了解更多有关此Web框架的最佳方法是通过实践,因此,请尝试扩展此项目并使之更好! 如果您不确定从哪里开始,请在下面的结论中为您提供一些建议!
结论 (Conclusion)
Congratulations, you’ve reached the end of the tutorial! We’ve covered a lot, so make sure to keep practicing and building. The more you build the easier it will become and the less you’ll have to refer back to this article or the documentation. You’ll be building sophisticated web applications in no time.
恭喜,您已经完成了本教程的结尾! 我们已经介绍了很多内容,因此请确保继续练习和构建。 构建的内容越多,构建起来就越容易,而您回引用本文或文档所需要的内容也就越少。 您将立即构建复杂的Web应用程序。
In this tutorial you’ve seen:
在本教程中,您已经看到:
- How to create Django projects and apps
- How to add web pages with views and templates
- How to get user input with forms
- How to hook your views and templates up with URL configurations
- How to add data to your site using relational databases with Django’s Object Relational Mapper
- How to use the Django Admin to manage your models
- 如何创建Django 项目和应用
- 如何添加带有视图和模板的网页
- 如何通过表单获取用户输入
- 如何使用URL配置连接视图和模板
- 如何通过Django的Object Relational Mapper使用关系数据库将数据添加到您的站点
- 如何使用Django Admin管理模型
In addition, you’ve learned about the MVT structure of Django web applications and why Django is such a good choice for web development.
此外,您还了解了Django Web应用程序的MVT结构以及为什么Django是Web开发如此之好的选择。
If you want to learn more about Django, do check out the documentation and make sure to stay tuned for Part 2 of this series!
如果您想了解有关Django的更多信息,请查阅文档并确保继续关注本系列的第2部分!
翻译自: https://www.pybloggers.com/2019/04/get-started-with-django-part-1-build-a-portfolio-app/
django创建应用程序


 278
278

 被折叠的 条评论
为什么被折叠?
被折叠的 条评论
为什么被折叠?
 到【灌水乐园】发言


