


 本文介绍了适用于Python开发人员的Git高级技巧,包括版本选择、处理中断、比较修订、改变历史以及解决合并冲突的方法。通过相对参照、修订范围、stash等工具,提升Git使用效率,同时讲解了如何在合并冲突时进行格式调整和使用命令行工具解决冲突。
python git
If you’ve done a little work in Git and are starting to understand the basics we covered in our introduction to Git, but you want to learn to be more efficient and have more control, then this is the place for you!
如果您在Git中做了一些工作并且开始了解我们在Git简介中介绍的基础知识,但是您想学习提高效率和拥有更多控制权,那么这里就是您的地方!
In this tutorial, we’ll talk about how to address specific commits and entire ranges of commits, using the stash to save temporary work, comparing different commits, changing history, and how to clean up the mess if something doesn’t work out.
在本教程中,我们将讨论如何处理特定的提交和整个提交范围,如何使用存储来保存临时工作,比较不同的提交,更改历史记录以及如何在无法解决问题的情况下清理混乱。
This article assumes you’ve worked through our first Git tutorial or at a minimum understand the basics of what Git is and how it works.
本文假定您已经完成了我们的第一个Git教程,或者至少了解了什么是Git及其工作原理。
There’s a lot of ground to cover, so let’s get going.
有很多方面需要解决,所以让我们开始吧。
版本选择 (Revision Selection)
There are several options to tell Git which revision (or commit) you want to use. We’ve already seen that we can use a full SHA (25b09b9ccfe9110aed2d09444f1b50fa2b4c979c) and a short SHA (25b09b9cc) to indicate a revision.
有几个选项可以告诉Git您要使用哪个修订版(或提交)。 我们已经看到可以使用完整的SHA( 25b09b9ccfe9110aed2d09444f1b50fa2b4c979c )和简短的SHA( 25b09b9cc )来指示修订。
We’ve also seen how you can use HEAD or a branch name to specify a particular commit as well. There are a few other tricks that Git has up its sleeve, however.
我们还看到了如何使用HEAD或分支名称来指定特定的提交。 但是,Git还掌握了其他一些技巧。
相对参照 (Relative Referencing)
Sometimes it’s useful to be able to indicate a revision relative to a known position, like HEAD or a branch name. Git provides two operators that, while similar, behave slightly differently.
有时,能够指示相对于已知位置的修订是有用的,例如HEAD或分支名称。 Git提供了两个运算符,它们虽然相似,但是行为略有不同。
The first of these is the tilde (~) operator. Git uses tilde to point to a parent of a commit, so HEAD~ indicates the revision before the last one committed. To move back further, you use a number after the tilde: HEAD~3 takes you back three levels.
其中的第一个是波浪号( ~ )运算符。 Git使用代字号指向一个提交的父级,因此HEAD~指示最后一个提交之前的修订。 要进一步向后移动,请在波浪号后面使用一个数字: HEAD~3将您带回到三个级别。
This works great until we run into merges. Merge commits have two parents, so the ~ just selects the first one. While that works sometimes, there are times when you want to specify the second or later parent. That’s why Git has the caret (^) operator.
这很好,直到我们遇到合并。 合并提交有两个父母,所以~仅选择第一个。 尽管有时可行,但有时您需要指定第二个或更高版本的父级。 这就是Git具有插入号( ^ )运算符的原因。
The ^ operator moves to a specific parent of the specified revision. You use a number to indicate which parent. So HEAD^2 tells Git to select the second parent of the last one committed, not the “grandparent.” It can be repeated to move back further: HEAD^2^^ takes you back three levels, selecting the second parent on the first step. If you don’t give a number, Git assumes 1.
^运算符移至指定修订的特定父级。 您使用数字来指示哪个父母。 因此HEAD^2告诉Git选择最后提交的第二个父级, 而不是 “祖父母”。 可以重复进行进一步的操作: HEAD^2^^将您带回到三个级别,在第一步中选择第二个父级。 如果您不提供数字,则Git假设为1 。
Note: Those of you using Windows will need to escape the ^ character on the DOS command line by using a second ^.
注意:那些使用Windows的用户将需要使用第二个^在DOS命令行上转义^字符。
To make life even more fun and less readable, I’ll admit, Git allows you to combine these methods, so 25b09b9cc^2~3^3 is a valid way to indicate a revision if you’re walking back a tree structure with merges. It takes you to the second parent, then back three revisions from that, and then to the third parent.
我承认,为了让生活更有趣,更易读,Git允许您组合使用这些方法,因此,如果您要通过合并返回树结构,则25b09b9cc^2~3^3是指示修订的有效方法。 它会将您带到第二个父级,然后从该父级退回三个修订,然后再返回到第三个父级。
修订范围 (Revision Ranges)
There are a couple of different ways to specify ranges of commits for commands like git log. These don’t work exactly like slices in Python, however, so be careful!
有两种不同的方法可以为git log类的命令指定提交范围。 但是,它们并不完全像Python中的slice那样工作,所以要小心!
Double Dot Notation
双点符号
The “double dot” method for specifying ranges looks like it sounds: git log b05022238cdf08..60f89368787f0e. It’s tempting to think of this as saying “show me all commits after b05022238cdf08 up to and including 60f89368787f0e” and, if b05022238cdf08 is a direct ancestor of 60f89368787f0e, that’s exactly what it does.
用于指定范围的“双点”方法听起来像: git log b05022238cdf08..60f89368787f0e 。 人们很容易认为这是说:“告诉我毕竟提交b05022238cdf08直至并包括60f89368787f0e ”,如果b05022238cdf08是的直接祖先60f89368787f0e ,这也正是它做什么。
Note: For the rest of this section, I will be replacing the SHAs of individual commits with capital letters as I think that makes the diagrams a little easier to follow. We’ll use this “fake” notation later as well.
注意:在本节的其余部分中,我将用大写字母替换单个提交的SHA,因为我认为这会使图表更易于理解。 我们稍后还将使用这种“伪”表示法。
It’s a bit more powerful than that, however. The double dot notation actually is showing you all commits that are included in the second commit that are not included in the first commit. Let’s look at a few diagrams to clarify:
但是,它的功能要强大得多。 双点符号实际上是向您显示第二个提交中包含的所有提交,而不是第一个提交中包含的所有提交。 让我们看一些图表来阐明:
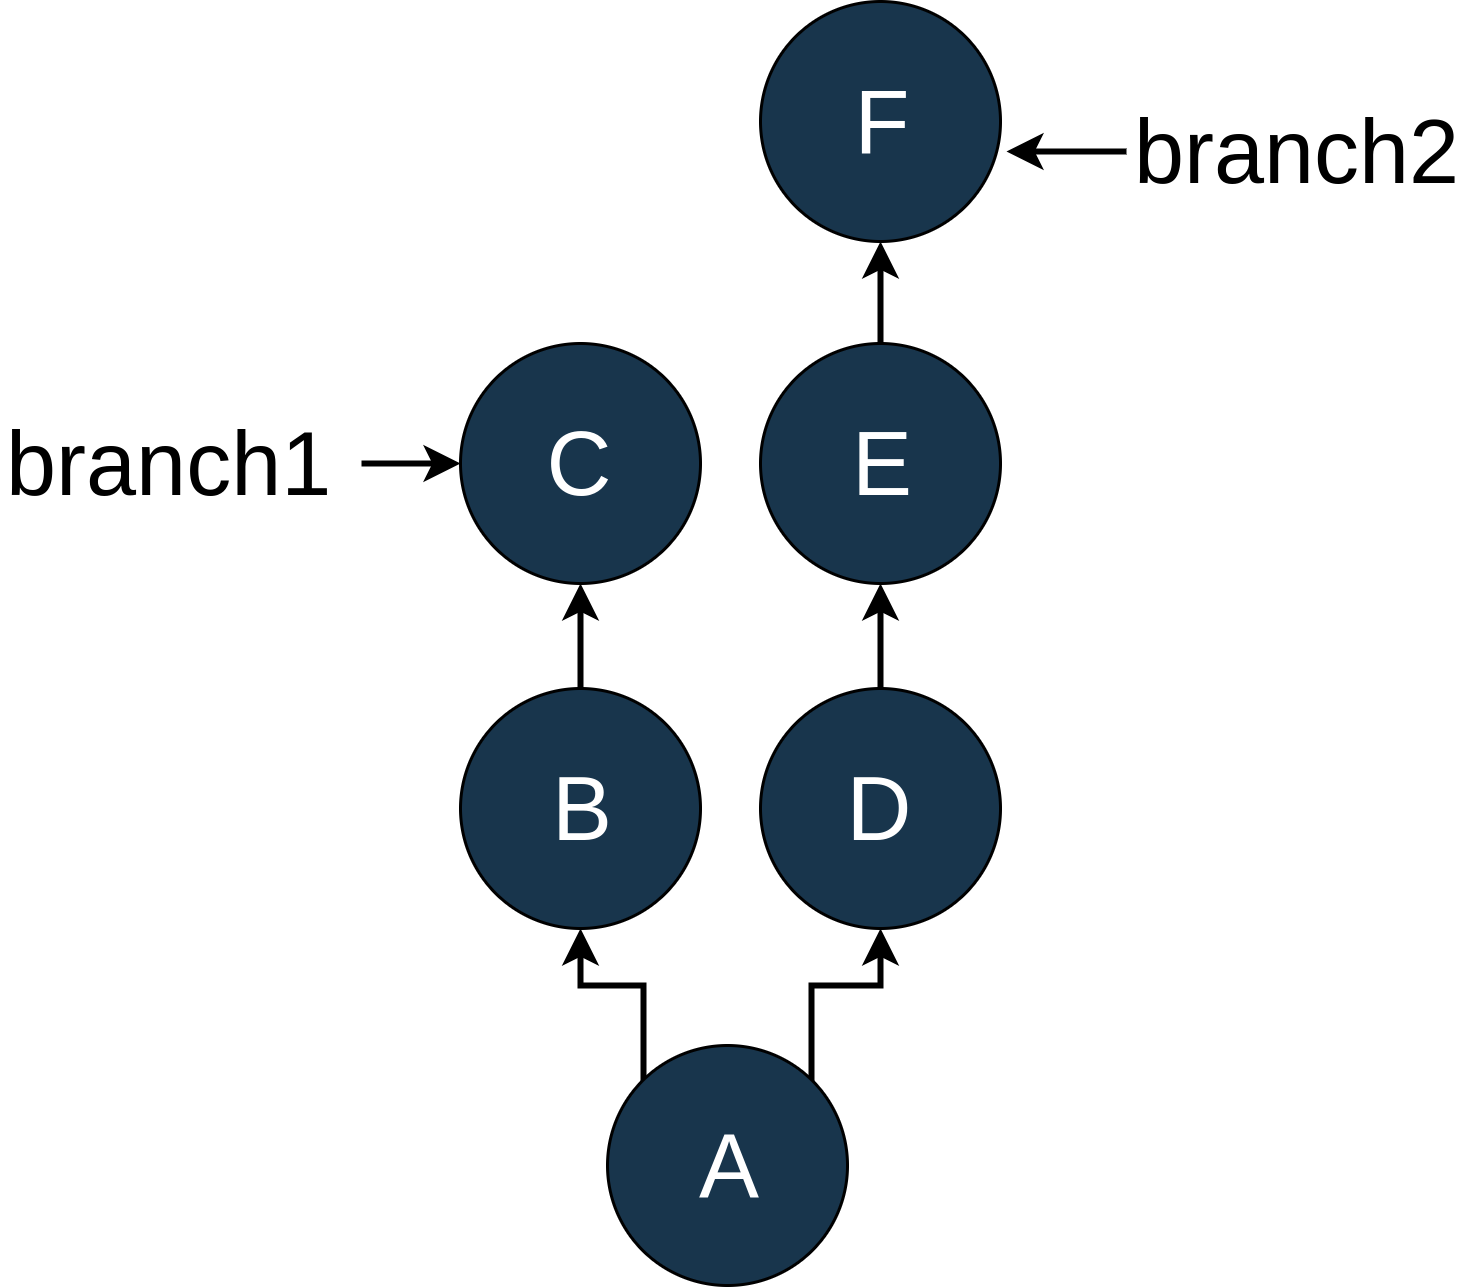
As you can see, we have two branches in our example repo, branch1 and branch2, which diverged after commit A. For starters, let’s look at the simple situation. I’ve modified the log output so that it matches the diagram:
如您所见,示例存储库中有两个分支branch1和branch2 ,它们在提交A之后branch1 。 首先,让我们看一下简单的情况。 我已经修改了日志输出,使其与图表匹配:
 $ git log --oneline D..F
$ git log --oneline D..F
E "Commit message for E"
E "Commit message for E"
F "Commit message for F"
F "Commit message for F"
D..F gives you all of the commits on branch2 after commit D.
D..F 在提交D 之后为您提供branch2上的所有提交。
A more interesting example, and one I learned about while writing this tutorial, is the following:
下面是一个更有趣的示例,我在编写本教程时了解到了一个示例:
This shows the commits that are part of commit F that are not part of commit C. Because of the structure here, there is not a before/after relationship to these commits because they are on different branches.
这显示了属于提交F的提交而不属于提交C的提交。 由于这里的结构,这些提交没有之前/之后的关系,因为它们在不同的分支上。
What do you think you’ll get if you reverse the order of C and F?
如果反转C和F的顺序,您会得到什么?
 $ git log --oneline F..C
$ git log --oneline F..C
B "Commit message for B"
B "Commit message for B"
C "Commit message for C"
C "Commit message for C"
Triple Dot
三点
Triple dot notation uses, you guessed it, three dots between the revision specifiers. This works in a similar manner to the double dot notation except that it shows all commits that are in either revision that are not included in both revisions. For our diagram above, using C...F shows you this:
您猜到,三点符号在修订说明符之间使用了三个点。 这与双点符号的工作方式相似,不同之处在于它显示了两个修订中未包含的所有修订。 对于上面的图表,使用C...F向您显示以下内容:
Double and triple dot notation can be quite powerful when you want to use a range of commits for a command, but they’re not as straightforward as many people think.
当您想对命令使用一系列提交时,双点和三点符号可能会非常强大,但是它们并不像许多人所想的那样简单。
Branches vs. HEAD vs. SHA
分支机构与HEAD与SHA
This is probably a good time to review what branches are in Git and how they relate to SHAs and HEAD.
这可能是检查Git中的分支以及它们与SHA和HEAD的关系的好时机。
HEAD is the name Git uses to refer to “where your file system is pointing right now.” Most of the time, this will be pointing to a named branch, but it does not have to be. To look at these ideas, let’s walk through an example. Suppose your history looks like this:
HEAD是Git用来表示“文件系统现在指向的位置”的名称。 大多数时候,这将指向一个已命名的分支,但不一定如此。 为了了解这些想法,让我们来看一个例子。 假设您的历史记录如下:
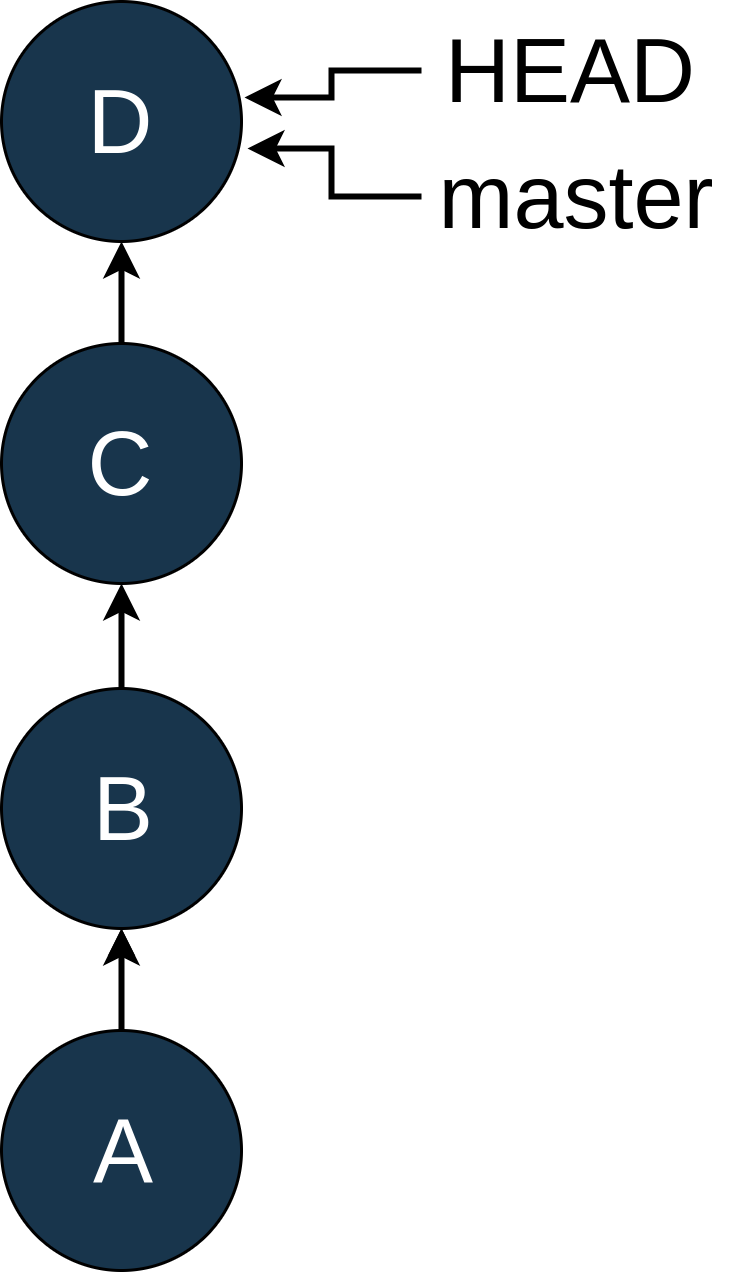
At this point, you discover that you accidentally committed a Python logging statement in commit B. Rats. Now, most people would add a new commit, E, push that to master and be done. But you are learning Git and want to fix this the hard way and hide the fact that you made a mistake in the history.
此时,您发现您在提交B. Rats中意外提交了Python日志记录语句。 现在,大多数人会添加一个新的提交E ,将其推送到master并完成。 但是,您正在学习Git,并想用硬方法解决此问题,并隐藏您在历史中犯了一个错误的事实。
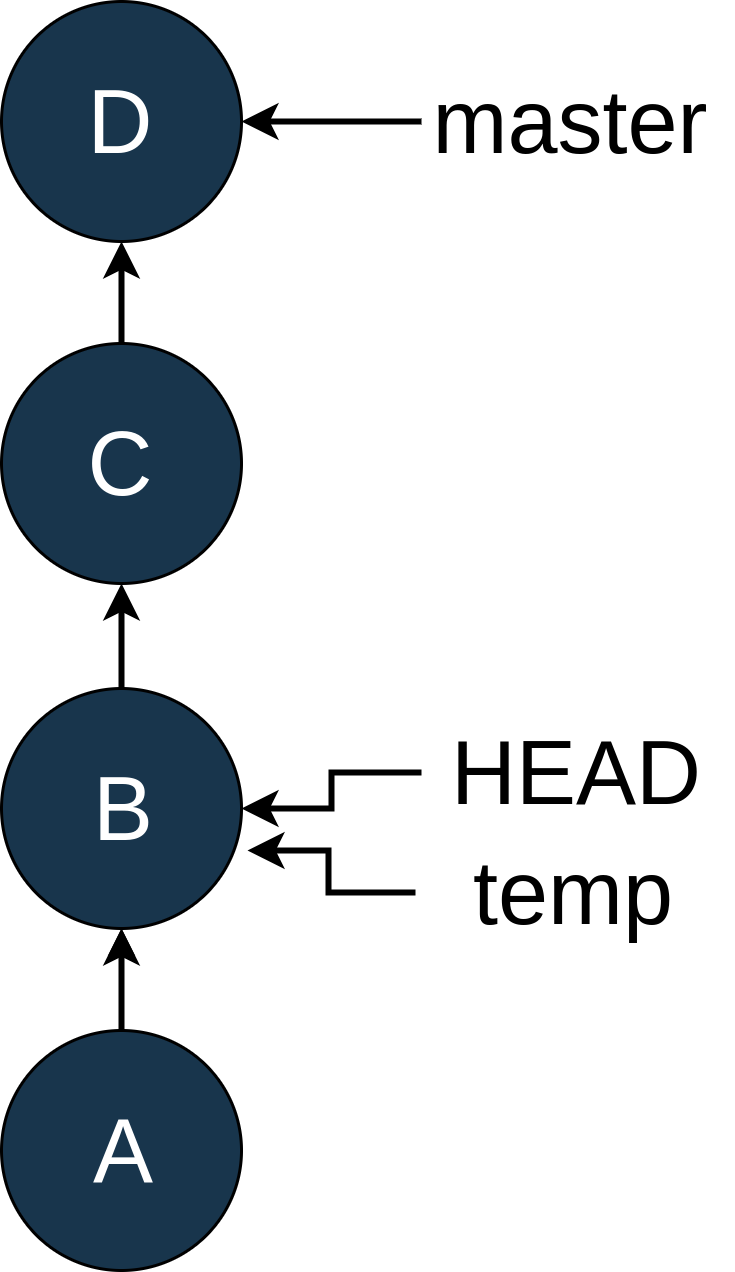
So you move HEAD back to B using git checkout B, which looks like this:
所以,您将HEAD回B使用git checkout B ,它看起来像这样:

You can see that master hasn’t changed position, but HEAD now points to B. In the Intro to Git tutorial, we talked about the “detached HEAD” state. This is that state again!
您可以看到master尚未更改位置,但是HEAD现在指向B 在Git入门教程中,我们讨论了“分离的HEAD”状态。 这又是那种状态!
Since you want to commit changes, you create a new branch with git checkout -b temp:
由于要提交更改,因此可以使用git checkout -b temp创建一个新分支:
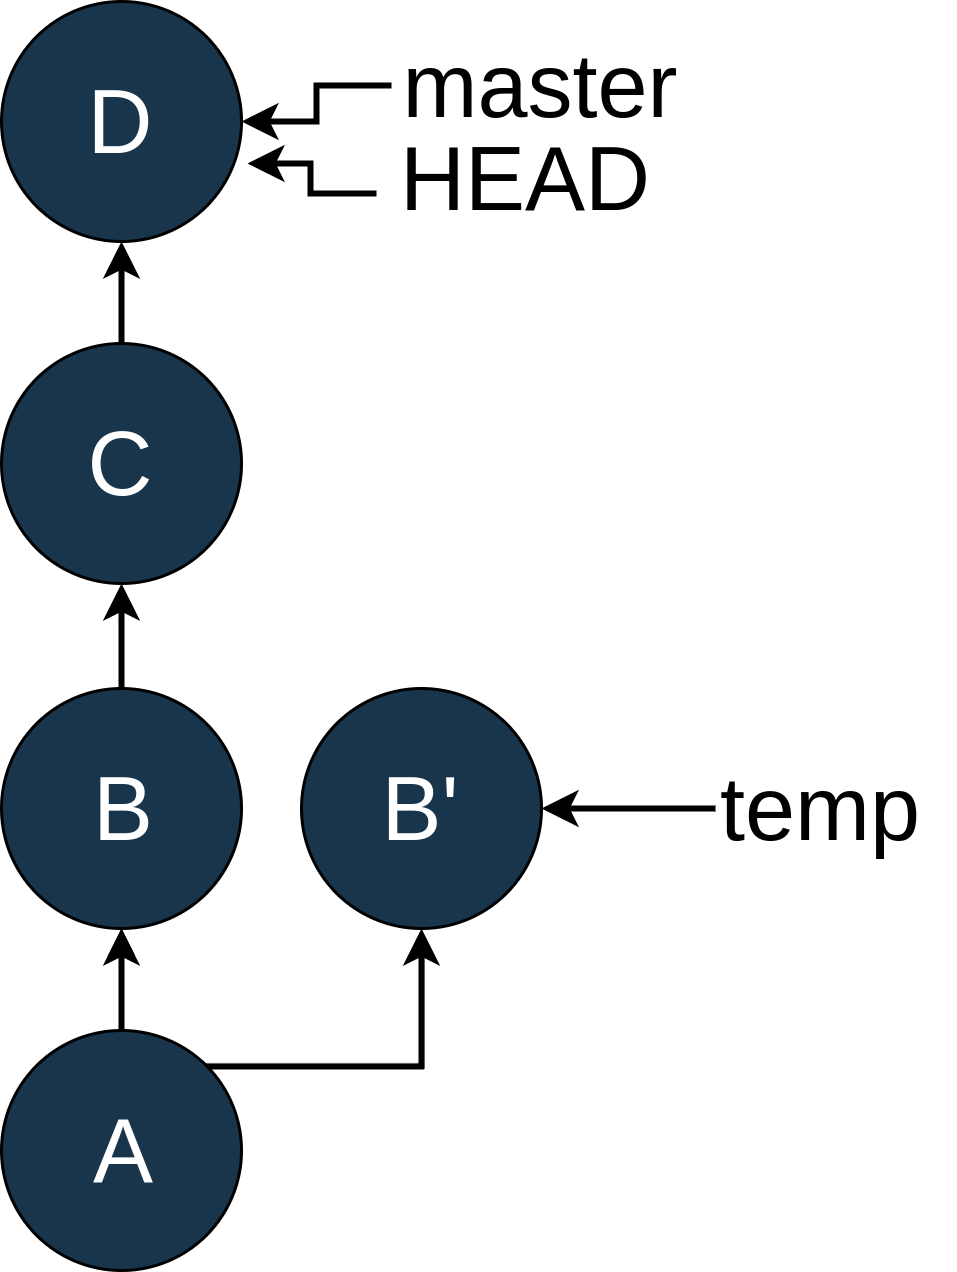
Now you edit the file and remove the offending log statement. Once that is done, you use git add and git commit --amend to modify commit B:
现在,您编辑文件并删除有问题的日志语句。 完成后,您可以使用git add和git commit --amend修改提交B :

Whoa! There’s a new commit here called B'. Just like B, it has A as its parent, but C doesn’t know anything about it. Now we want master to be based on this new commit, B'.
哇! 这里有一个新的提交,称为B' 。 就像B一样,它以A为父级,但是C对此一无所知。 现在我们希望master基于此新提交B' 。
Because you have a sharp memory, you remember that the rebase command does just that. So you get back to the master branch by typing git checkout master:
因为您的内存很锐利,所以请记住rebase命令就是这样做的。 因此,您可以通过输入git checkout master返回master分支:
Once you’re on master, you can use git rebase temp to replay C and D on top of B:
一旦掌握了,就可以使用git rebase temp在B之上重播C和D :

You can see that the rebase created commits C' and D'. C' still has the same changes that C has, and D' has the same changes as D, but they have different SHAs because they are now based on B' instead of B.
您可以看到创建的rebase提交了C'和D' 。 C'仍然有同样的变化C了,而D'具有相同的变化D ,但他们有不同的SHA,因为它们现在基于B' ,而不是B 。
As I mentioned earlier, you normally wouldn’t go to this much trouble just to fix an errant log statement, but there are times when this approach could be useful, and it does illustrate the differences between HEAD, commits, and branches.
正如我前面提到的,通常只修复一个错误的log语句并不会带来太多麻烦,但是有时候这种方法可能有用,并且确实说明了HEAD ,commits和branch之间的区别。
More
更多
Git has even more tricks up its sleeve, but I’ll stop here as I’ve rarely seen the other methods used in the wild. If you’d like to learn about how to do similar operations with more than two branches, checkout the excellent write-up on Revision Selection in the Pro Git book.
Git有很多技巧,但是我将在这里停留,因为我很少看到野外使用的其他方法。 如果您想了解如何使用两个以上的分支进行类似的操作,请参阅Pro Git书中有关“版本选择”的出色文章。
处理中断: git stash (Handling Interruptions: git stash)
One of the Git features I use frequently and find quite handy is the stash. It provides a simple mechanism to save the files you’re working on but are not ready to commit so you can switch to a different task. In this section, you’ll walk through a simple use case first, looking at each of the different commands and options, then you will wrap up with a few other use cases in which git stash really shines.
其中的Git的功能,我经常使用和查找非常方便的是stash 。 它提供了一种简单的机制来保存正在处理但尚未准备好提交的文件,因此您可以切换到其他任务。 在本节中,您将首先浏览一个简单的用例,查看每个不同的命令和选项,然后再总结一些其他真正使git stash发挥作用的用例。
git stash save和git stash pop (git stash save and git stash pop)
Suppose you’re working on a nasty bug. You’ve got Python logging code in two files, file1 and file2, to help you track it down, and you’ve added file3 as a possible solution.
假设您正在处理一个讨厌的错误。 您已经在两个文件file1和file2获得了Python日志记录代码,以帮助您对其进行跟踪,并且还添加了file3作为可能的解决方案。
In short, the changes to the repo are as follows:
简而言之,对存储库的更改如下:
- You’ve edited
file1and donegit add file1. - You’ve edited
file2but have not added it. - You’ve created
file3and have not added it.
- 您已经编辑了
file1并完成了git add file1。 - 您已经编辑了
file2但尚未添加它。 - 您已经创建了
file3并且尚未添加它。
You do a git status to confirm the condition of the repo:
您执行git status确认回购条件:
 $ git status
$ git status
On branch master
On branch master
Changes to be committed:
Changes to be committed:
  (use "git reset HEAD <file>..." to unstage)

  (use "git reset HEAD <file>..." to unstage)

   modified:   file1

   modified:   file1

Changes not staged for commit:
Changes not staged for commit:
  (use "git add <file>..." to update what will be committed)
  (use "git add <file>..." to update what will be committed)
  (use "git checkout -- <file>..." to discard changes in working directory)

  (use "git checkout -- <file>..." to discard changes in working directory)

   modified:   file2

   modified:   file2

Untracked files:
Untracked files:
  (use "git add <file>..." to include in what will be committed)

  (use "git add <file>..." to include in what will be committed)

   file3
   file3
Now a coworker (aren’t they annoying?) walks up and tells you that production is down and it’s “your turn.” You know you can break out your mad git stash skills to save you some time and save the day.
现在,一个同事(不是很烦吗?)走上去,告诉您生产下降了,这是“轮到您了”。 您知道您可以发挥疯狂的git stash技能来节省一些时间并节省一天。
You haven’t finished with the work on files 1, 2, and 3, so you really don’t want to commit those changes but you need to get them off of your working directory so you can switch to a different branch to fix that bug. This is the most basic use case for git stash.
您还没有完成对文件1、2和3的工作,因此您确实不想提交这些更改,但是需要将其从工作目录中删除,以便可以切换到其他分支来修复该问题。错误。 这是git stash最基本用例。
You can use git stash save to “put those changes away” for a little while and return to a clean working directory. The default option for stash is save so this is usually written as just git stash.
您可以使用git stash save暂时git stash save “这些更改”并返回到干净的工作目录。 stash的默认选项是save因此通常写成git stash 。
When you save something to stash, it creates a unique storage spot for those changes and returns your working directory to the state of the last commit. It tells you what it did with a cryptic message:
当您将某些内容保存到stash ,它将为这些更改创建一个唯一的存储点,并将您的工作目录返回到上一次提交的状态。 它告诉您对一个隐秘消息的处理方式:
In that output, master is the name of the branch, 387dcfc is the SHA of the last commit, adding some files is the commit message for that commit, and WIP stands for “work in progress.” The output on your repo will likely be different in those details.
在该输出中, master是分支的名称, 387dcfc是上次提交的SHA, adding some files是该提交的提交消息, WIP表示“进行中的工作”。 在这些细节上,您的仓库中的输出可能会有所不同。
If you do a status at this point, it will still show file3 as an untracked file, but file1 and file2 are no longer there:
如果此时进行status检查,它仍将file3显示为未跟踪的文件,但file1和file2不再存在:
 $ git status
$ git status
On branch master
On branch master
Untracked files:
Untracked files:
  (use "git add <file>..." to include in what will be committed)

  (use "git add <file>..." to include in what will be committed)

   file3

   file3

nothing added to commit but untracked files present (use "git add" to track)
nothing added to commit but untracked files present (use "git add" to track)
At this point, as far as Git is concerned, your working directory is “clean,” and you are free to do things like check out a different branch, cherry-pick changes, or anything else you need to.
在这一点上,就Git而言,您的工作目录是“干净的”,您可以自由地执行其他操作,例如签出其他分支,进行自动选择或其他任何需要的操作。
You go and check out the other branch, fix the bug, earn the admiration of your coworkers, and now are ready to return to this work.
您可以去检查另一个分支,修复错误,赢得同事的赞赏,现在准备返回此工作。
How do you get the last stash back? git stash pop!
您如何找回最后的藏匿处? git stash pop !
Using the pop command at this point looks like this:
此时使用pop命令如下所示:
Now you can see at the bottom that it has a message about “Dropped refs/stash@{0}”. We’ll talk more about that syntax below, but it’s basically saying that it applied the changes you had stashed and got rid of the stash itself. Before you ask, yes, there is a way to use the stash and not get rid of it, but let’s not get ahead of ourselves.
现在,您可以在底部看到有关“ Dropped refs / stash @ {0}”的消息。 我们将在下面讨论更多有关该语法的内容,但基本上是说它应用了您隐藏的更改并摆脱了隐藏本身。 在您问之前,是的,有一种方法可以使用藏匿处而不是摆脱它,但是让我们不要超越自己。
You’ll notice that file1 used to be in the index but no longer is. By default, git stash pop doesn’t maintain the status of changes like that. There is an option to tell it to do so, of course. Add file1 back to the index and try again:
您会注意到file1曾经在索引中,但现在不再存在。 默认情况下, git stash pop不会保持这样的更改状态。 当然,有一个选项可以告诉它这样做。 将file1添加回索引,然后重试:
 $ git add file1
$ git add file1
$ git status
$ git status
On branch master
On branch master
Changes to be committed:
Changes to be committed:
  (use "git reset HEAD <file>..." to unstage)

  (use "git reset HEAD <file>..." to unstage)

   modified:   file1

   modified:   file1

Changes not staged for commit:
Changes not staged for commit:
  (use "git add <file>..." to update what will be committed)
  (use "git add <file>..." to update what will be committed)
  (use "git checkout -- <file>..." to discard changes in working directory)

  (use "git checkout -- <file>..." to discard changes in working directory)

   modified:   file2

   modified:   file2

Untracked files:
Untracked files:
  (use "git add <file>..." to include in what will be committed)

  (use "git add <file>..." to include in what will be committed)

   file3

   file3

$ git stash save $ git stash save "another try"
"another try"
Saved working directory and index state On master: another try
Saved working directory and index state On master: another try
HEAD is now at 387dcfc adding some files
HEAD is now at 387dcfc adding some files
$ git stash pop --index
$ git stash pop --index
On branch master
On branch master
Changes to be committed:
Changes to be committed:
  (use "git reset HEAD <file>..." to unstage)

  (use "git reset HEAD <file>..." to unstage)

   modified:   file1

   modified:   file1

Changes not staged for commit:
Changes not staged for commit:
  (use "git add <file>..." to update what will be committed)
  (use "git add <file>..." to update what will be committed)
  (use "git checkout -- <file>..." to discard changes in working directory)

  (use "git checkout -- <file>..." to discard changes in working directory)

   modified:   file2

   modified:   file2

Untracked files:
Untracked files:
  (use "git add <file>..." to include in what will be committed)

  (use "git add <file>..." to include in what will be committed)

   file3

   file3

Dropped refs/stash@{0} (aed3a02aeb876c1137dd8bab753636a294a3cc43)
Dropped refs/stash@{0} (aed3a02aeb876c1137dd8bab753636a294a3cc43)
You can see that the second time we added the --index option to the git pop command, which tells it to try to maintain the status of whether or not a file is in the index.
您可以看到我们第二次在git pop命令中添加了--index选项,它告诉它尝试保持文件是否在索引中的状态。
In the previous two attempts, you probably noticed that file3 was not included in your stash. You might want to keep file3 together with those other changes. Fortunately, there is an option to help you with that: --include-untracked.
在前两次尝试中,您可能会注意到file3没有包含在存储中。 您可能希望将file3与其他更改保持在一起。 幸运的是,有一个选项可以帮助您:-- --include-untracked 。
Assuming we’re back to where we were at the end of the last example, we can re-run the command:
假设我们回到了上一个示例末尾的位置,则可以重新运行命令:
This put the untracked file3 into the stash with our other changes.
这会将未跟踪的file3与我们的其他更改一起放到存储库中。
Before we move on, I just want to point out that save is the default option for git stash. Unless you’re specifying a message, which we’ll discuss later, you can simply use git stash, and it will do a save.
在继续之前,我只想指出一下save是git stash的默认选项。 除非您指定一条消息(稍后我们将进行讨论),否则您可以简单地使用git stash ,它将进行save 。
git stash list (git stash list)
One of the powerful features of git stash is that you can have more than one of them. Git stores stashes in a stack, which means that by default it always works with the most recently saved stash. The git stash list command will show you the stack of stashes in your local repo. Let’s create a couple of stashes so we can see how this works:
git stash的强大功能之一是您可以拥有多个功能。 Git将堆栈存储在堆栈中 ,这意味着默认情况下它始终与最近保存的堆栈一起使用。 git stash list命令将向您显示本地git stash list堆栈。 让我们创建一些存储,以便我们了解其工作原理:
 $ $ echo echo "editing file1" >> file1
"editing file1" >> file1
$ git stash save $ git stash save "the first save"
"the first save"
Saved working directory and index state On master: the first save
Saved working directory and index state On master: the first save
HEAD is now at b3e9b4d adding file3
HEAD is now at b3e9b4d adding file3
$ $ # you can see that stash save cleaned up our working directory
# you can see that stash save cleaned up our working directory
$ $ # now create a few more stashes by "editing" files and saving them
# now create a few more stashes by "editing" files and saving them
$ $ echo echo "editing file2" >> file2
"editing file2" >> file2
$ git stash save $ git stash save "the second save"
"the second save"
Saved working directory and index state On master: the second save
Saved working directory and index state On master: the second save
HEAD is now at b3e9b4d adding file3
HEAD is now at b3e9b4d adding file3
$ $ echo echo "editing file3" >> file3
"editing file3" >> file3
$ git stash save $ git stash save "the third save"
"the third save"
Saved working directory and index state On master: the third save
Saved working directory and index state On master: the third save
HEAD is now at b3e9b4d adding file3
HEAD is now at b3e9b4d adding file3
$ git status
$ git status
On branch master
On branch master
nothing to commit, working directory clean
nothing to commit, working directory clean
You now have three different stashes saved. Fortunately, Git has a system for dealing with stashes that makes this easy to deal with. The first step of the system is the git stash list command:
现在,您已保存了三个不同的存储区。 幸运的是,Git有一个用于处理藏匿处的系统,这使得它很容易处理。 系统的第一步是git stash list命令:
List shows you the stack of stashes you have in this repo, the newest one first. Notice the stash@{n} syntax at the start of each entry? That’s the name of that stash. The rest of the git stash subcommand will use that name to refer to a specific stash. Generally if you don’t give a name, it always assumes you mean the most recent stash, stash@{0}. You’ll see more of this in a bit.
清单显示了您在此存储库中拥有的存储堆栈,最新的存储池优先。 注意每个条目开头的stash@{n}语法吗? 那就是那个藏匿处的名字。 其余的git stash子命令将使用该名称来引用特定的存储。 通常,如果您不提供名称,它将始终假定您的意思是最新存储stash@{0} 。 您稍后会看到更多。
Another thing I’d like to point out here is that you can see the message we used when we did the git stash save "message" command in the listing. This can be quite helpful if you have a number of things stashed.
我想在这里指出的另一件事是,您可以看到清单中执行git stash save "message"命令时使用的git stash save "message" 。 如果您藏有很多东西,这可能会很有帮助。
As we mentioned above, the save [name] portion of the git stash save [name] command is not required. You can simply type git stash, and it defaults to a save command, but the auto-generated message doesn’t give you much information:
如上所述,不需要git stash save [name]命令的save [name]部分。 您可以简单地输入git stash ,它默认为save命令,但是自动生成的消息不会给您太多信息:
 $ $ echo echo "more editing file1" >> file1
"more editing file1" >> file1
$ git stash
$ git stash
Saved working directory and index state WIP on master: 387dcfc adding some files
Saved working directory and index state WIP on master: 387dcfc adding some files
HEAD is now at 387dcfc adding some files
HEAD is now at 387dcfc adding some files
$ git stash list
$ git stash list
stash@{0}: WIP on master: 387dcfc adding some files
stash@{0}: WIP on master: 387dcfc adding some files
stash@{1}: On master: the third save
stash@{1}: On master: the third save
stash@{2}: On master: the second save
stash@{2}: On master: the second save
stash@{3}: On master: the first save
stash@{3}: On master: the first save
The default message is WIP on <branch>: <SHA> <commit message>., which doesn’t tell you much. If we had done that for the first three stashes, they all would have had the same message. That’s why, for the examples here, I use the full git stash save <message> syntax.
默认消息是WIP on <branch>: <SHA> <commit message>. ,这并不能告诉您太多。 如果我们在前三个存储中做到了这一点,那么它们都会有相同的信息。 这就是为什么对于此处的示例,我使用完整的git stash save <message>语法。
git stash show (git stash show)
Okay, so now you have a bunch of stashes, and you might even have meaningful messages describing them, but what if you want to see exactly what’s in a particular stash? That’s where the git stash show command comes in. Using the default options tells you how many files have changed, as well as which files have changed:
好的,现在您有了很多存储,甚至可能有描述它们的有意义的消息,但是如果您想确切查看特定存储中的内容怎么办? 这就是git stash show命令的来源。使用默认选项可以告诉您更改了多少文件以及更改了哪些文件:
The default options do not tell you what the changes were, however. Fortunately, you can add the -p/--patch option, and it will show you the diffs in “patch” format:
但是,默认选项不会告诉您所做的更改。 幸运的是,您可以添加-p/--patch选项,它将以“ patch”格式向您显示差异:
 $ git stash show -p stash@$ git stash show -p stash@ {{ 22 }
}
diff --git a/file1 b/file1
diff --git a/file1 b/file1
index e212970..04dbd7b 100644
index e212970..04dbd7b 100644
--- a/file1
--- a/file1
+++ b/file1
+++ b/file1
@@ -1 +1,2 @@
@@ -1 +1,2 @@
 file1
 file1
+editing file1
+editing file1
Here it shows you that the line “editing file1” was added to file1. If you’re not familiar with the patch format for displaying diffs, don’t worry. When you get to the git difftool section below, you’ll see how to bring up a visual diff tool on a stash.
在这里,您可以看到“ editing file1”行已添加到file1 。 如果您不熟悉用于显示差异的补丁格式,请不要担心。 当您git difftool下面的git difftool部分时,您将看到如何在存储中调出可视化diff工具。
git stash pop与git stash apply (git stash pop vs. git stash apply)
You saw earlier how to pop the most recent stash back into your working directory by using the git stash pop command. You probably guessed that the stash name syntax we saw earlier also applies to the pop command:
您之前已经了解了如何使用git stash pop命令将最新的存储库弹出回到工作目录。 您可能会猜到我们之前看到的存储名称语法也适用于pop命令:
You can see that the git stash pop stash@{1} put “the second save” back into our working directory and collapsed our stack so that only the first and third stashes are there. Notice how “the first save” changed from stash@{2} to stash@{1} after the pop.
您会看到git stash pop stash@{1}将“第二个保存”放回到我们的工作目录中,并折叠了我们的堆栈,因此只有第一个和第三个存储在那里。 请注意, pop后“首次保存”如何从stash@{2}变为stash@{1} 。
It’s also possible to put a stash onto your working directory but leave it in the stack as well. This is done with git stash apply:
也可以将存储区放到您的工作目录中,但也将其保留在堆栈中。 这是通过git stash apply :
 $ git stash list
$ git stash list
stash@{0}: On master: the third save
stash@{0}: On master: the third save
stash@{1}: On master: the first save
stash@{1}: On master: the first save
$ git stash apply stash@$ git stash apply stash@ {{ 11 }
}
On branch master
On branch master
Changes not staged for commit:
Changes not staged for commit:
  (use "git add <file>..." to update what will be committed)
  (use "git add <file>..." to update what will be committed)
  (use "git checkout -- <file>..." to discard changes in working directory)

  (use "git checkout -- <file>..." to discard changes in working directory)

   modified:   file1
   modified:   file1
   modified:   file2

   modified:   file2

no changes added to commit (use "git add" and/or "git commit -a")
no changes added to commit (use "git add" and/or "git commit -a")
$ git stash list
$ git stash list
stash@{0}: On master: the third save
stash@{0}: On master: the third save
stash@{1}: On master: the first save
stash@{1}: On master: the first save
This can be handy if you want to apply the same set of changes multiple times. I recently used this while working on prototype hardware. There were changes needed to get the code to work on the particular hardware on my desk, but none of the others. I used git stash apply to apply these changes each time I brought down a new copy of master.
如果要多次应用同一组更改,这将很方便。 我最近在处理原型硬件时使用了它。 为了使代码能够在我的办公桌上的特定硬件上工作,需要进行一些更改,但没有其他更改。 每次关闭新的master副本时,我都使用git stash apply来应用这些更改。
git stash drop (git stash drop)
The last stash subcommand to look at is drop. This is useful when you want to throw away a stash and not apply it to your working directory. It looks like this:
最后一个隐藏子命令是drop 。 当您想丢弃存储而不将其应用于工作目录时,此功能很有用。 看起来像这样:
This dropped the last two stashes, and Git did not change your working directory. There are a couple of things to notice in the above example. First, the drop command, like most of the other git stash commands, can use the optional stash@{n} names. If you don’t supply it, Git assumes stash@{0}.
这删除了最后两个存储,并且Git并未更改您的工作目录。 上面的示例中有两点需要注意。 首先, drop命令与其他大多数git stash命令一样,可以使用可选的stash@{n}名称。 如果您不提供它,则Git会使用stash@{0} 。
The other interesting thing is that the output from the drop command gives you a SHA. Like other SHAs in Git, you can make use of this. If, for example, you really meant to do a pop and not a drop on stash@{1} above, you can create a new branch with that SHA it showed you (9aaa9996):
另一个有趣的事情是drop命令的输出为您提供了SHA。 像Git中的其他SHA一样,您可以利用它。 例如,如果您确实要pop而不是在上面的stash@{1}上drop ,则可以使用它向您显示的SHA创建一个新分支( 9aaa9996 ):
 $ git branch tmp 9aaa9996
$ git branch tmp 9aaa9996
$ git status
$ git status
On branch master
On branch master
nothing to commit, working directory clean
nothing to commit, working directory clean
$ $ # use git log <branchname> to see commits on that branch
# use git log <branchname> to see commits on that branch
$ git log tmp
$ git log tmp
commit 9aaa9996bd6aa363e7be723b4712afaae4fc3235
commit 9aaa9996bd6aa363e7be723b4712afaae4fc3235
Merge: b3e9b4d f2d6ecc
Merge: b3e9b4d f2d6ecc
Author: Jim Anderson <your_email_here@gmail.com>
Author: Jim Anderson <your_email_here@gmail.com>
Date:   Sat May 12 09:34:29 2018 -0600

Date:   Sat May 12 09:34:29 2018 -0600

    On master: the first save
    On master: the first save
[rest of log deleted for brevity]
[rest of log deleted for brevity]
Once you have that branch, you can use the git merge or other techniques to get those changes back to your branch. If you didn’t save the SHA from the git drop command, there are other methods to attempt to recover the changes, but they can get complicated. You can read more about it here.
拥有该分支后,您可以使用git merge或其他技术将这些更改返回给您的分支。 如果您没有从git drop命令中保存SHA,那么还有其他方法可以尝试恢复更改,但是它们可能会变得很复杂。 您可以在此处了解更多信息。
git stash示例:拉入一棵肮脏的树 (git stash Example: Pulling Into a Dirty Tree)
Let’s wrap up this section on git stash by looking at one of its uses that wasn’t obvious to me at first. Frequently when you’re working on a shared branch for a longer period of time, another developer will push changes to the branch that you want to get to your local repo. You’ll remember that we use the git pull command to do this. However, if you have local changes in files that the pull will modify, Git refuses with an error message explaining what went wrong:
让我们在git stash上结束本节,首先看看它对我而言并不明显的用途。 通常,当您在共享分支上工作更长的时间时,另一位开发人员会将更改推送到您要获取的本地存储库中。 您会记得我们使用git pull命令来执行此操作。 但是,如果您对请求将修改的文件进行了本地更改,则Git会拒绝并显示一条错误消息,说明出现了什么问题:
You could commit this and then do a pull , but that would create a merge node, and you might not be ready to commit those files. Now that you know git stash, you can use it instead:
您可以提交此文件,然后执行pull ,但这将创建一个合并节点,并且您可能尚未准备好提交那些文件。 现在您知道了git stash ,可以改为使用它:
 $ git stash
$ git stash
Saved working directory and index state WIP on master: b25fe34 Cleaned up when no TOKEN is present. Added ignored tasks
Saved working directory and index state WIP on master: b25fe34 Cleaned up when no TOKEN is present. Added ignored tasks
HEAD is now at <SHA> <commit message>
HEAD is now at <SHA> <commit message>
$ git pull
$ git pull
Updating <SHA1>..<SHA2>
Updating <SHA1>..<SHA2>
Fast-forward
Fast-forward
  <more info here>
  <more info here>
$ git stash pop
$ git stash pop
On branch master
On branch master
Your branch is up-to-date with 'origin/master'.
Your branch is up-to-date with 'origin/master'.
Changes not staged for commit:
Changes not staged for commit:
   <rest of stash pop output trimmed>
   <rest of stash pop output trimmed>
It’s entirely possible that doing the git stash pop command will produce a merge conflict. If that’s the case, you’ll need to hand-edit the conflict to resolve it, and then you can proceed. We’ll discuss resolving merge conflicts below.
完全有可能执行git stash pop命令会产生合并冲突。 如果是这种情况,您需要手动编辑冲突以解决它,然后就可以继续进行。 我们将在下面讨论解决合并冲突。
比较修订: git diff (Comparing Revisions: git diff)
The git diff command is a powerful feature that you’ll find yourself using quite frequently. I looked up the list of things it can compare and was surprised by the list. Try typing git diff --help if you’d like to see for yourself. I won’t cover all of those use cases here, as many of them aren’t too common.
git diff命令是一项强大的功能,您会发现自己经常使用它。 我查找了可以比较的事物列表,并对列表感到惊讶。 如果您想亲自看看,请尝试输入git diff --help 。 我不会在这里介绍所有这些用例,因为其中许多用例并不常见。
This section has several use cases with the diff command, which displays on the command line. The next section shows how you can set Git up to use a visual diff tool like Meld, Windiff, BeyondCompare, or even extensions in your IDE. The options for diff and difftool are the same, so most of the discussion in this section will apply there too, but it’s easier to show the output on the command line version.
本节介绍diff命令的几种使用情况,该命令显示在命令行上。 下一节将说明如何设置Git以使用可视化的diff工具,例如IDE中的Meld,Windiff,BeyondCompare甚至扩展。 diff和difftool的选项相同,因此本节中的大多数讨论也将在此处应用,但在命令行版本中显示输出会更容易。
The most common use of git diff is to see what you have modified in your working directory:
git diff的最常见用法是查看您在工作目录中所做的修改:
As you can see, diff shows you the diffs in a “patch” format right on the command line. Once you work through the format, you can see that the + characters indicate that a line has been added to the file, and, as you’d expect, the line I'm editing file3 now was added to file3.
如您所见, diff在命令行上以“补丁”格式显示了差异。 处理完格式后,您可以看到+字符表示已将一行添加到文件中,并且,正如您所期望的, I'm editing file3 now的行I'm editing file3 now已添加到file3 。
The default options for git diff are to show you what changes are in your working directory that are not in your index or in HEAD. If you add the above change to the index and then do diff, it shows that there are no diffs:
git diff的默认选项是向您显示工作目录中未包含在索引或HEAD中的更改。 如果将以上更改添加到索引,然后进行比较,则表明没有差异:
 $ git add file3
$ git add file3
$ git diff
$ git diff
[no output here]
[no output here]
I found this confusing for a while, but I’ve grown to like it. To see the changes that are in the index and staged for the next commit, use the --staged option:
我觉得这有点混乱,但是我已经变得喜欢它了。 要查看索引中为下一次提交而暂存的更改,请使用--staged选项:
The git diff command can also be used to compare any two commits in your repo. This can show you the changes between two SHAs:
git diff命令也可以用来比较仓库中的任何两个提交。 这可以向您显示两个SHA之间的更改:
 $ git diff b3e9b4d 387dcfc
$ git diff b3e9b4d 387dcfc
diff --git a/file3 b/file3
diff --git a/file3 b/file3
deleted file mode 100644
deleted file mode 100644
index faf2282..0000000
index faf2282..0000000
--- a/file3
--- a/file3
+++ /dev/null
+++ /dev/null
@@ -1,3 +0,0 @@
@@ -1,3 +0,0 @@
-file1
-file1
-file2
-file2
-file3
-file3
You can also use branch names to see the full set of changes between one branch and another:
您还可以使用分支名称来查看一个分支与另一个分支之间的完整更改集:
You can even use any mix of the revision naming methods we looked at above:
您甚至可以混合使用上面介绍的修订版本命名方法:
 $ git diff master^ master
$ git diff master^ master
diff --git a/file3 b/file3
diff --git a/file3 b/file3
new file mode 100644
new file mode 100644
index 0000000..faf2282
index 0000000..faf2282
--- /dev/null
--- /dev/null
+++ b/file3
+++ b/file3
@@ -0,0 +1,3 @@
@@ -0,0 +1,3 @@
+file1
+file1
+file2
+file2
+file3
+file3
When you compare two branches, it shows you all of the changes between two branches. Frequently, you only want to see the diffs for a single file. You can restrict the output to a file by listing the file after a -- (two minuses) option:
比较两个分支时,它将显示两个分支之间的所有更改。 通常,您只想查看单个文件的差异。 您可以通过在-- (两个减号)选项后列出文件来将输出限制为文件:
There are many, many options for git diff, and I won’t go into them all, but I do want to explore another use case, which I use frequently, showing the files that were changed in a commit.
git diff有很多选项,我不会git diff ,但我确实想探究另一个用例,该用例经常使用,显示提交中已更改的文件。
In your current repo, the most recent commit on master added a line of text to file1. You can see that by comparing HEAD with HEAD^:
在您当前的仓库中,对master最新提交在file1添加了一行文本。 通过比较HEAD和HEAD^可以看到:
 $ git diff HEAD^ HEAD
$ git diff HEAD^ HEAD
diff --git a/file1 b/file1
diff --git a/file1 b/file1
index e212970..04dbd7b 100644
index e212970..04dbd7b 100644
--- a/file1
--- a/file1
+++ b/file1
+++ b/file1
@@ -1 +1,2 @@
@@ -1 +1,2 @@
 file1
 file1
+editing file1
+editing file1
That’s fine for this small example, but frequently the diffs for a commit can be several pages long, and it can get quite difficult to pull out the filenames. Of course, Git has an option to help with that:
对于这个小示例来说,这很好,但是一次提交的差异通常可能长达数页,并且提取文件名会变得非常困难。 当然,Git有一个选项可以帮助您:
The --name-only option will show you the list of filename that were changed between two commits, but not what changed in those files.
--name-only选项将向您显示两次提交之间更改的文件名列表,但不显示这些文件中更改的文件名。
As I said above, there are many options and use cases covered by the git diff command, and you’ve just scratched the surface here. Once you have the commands listed above figured out, I encourage you to look at git diff --help and see what other tricks you can find. I definitely learned new things preparing this tutorial!
正如我上面所说的, git diff命令涵盖了许多选项和用例,而您只是在这里打了水漂。 一旦找出了上面列出的命令,我鼓励您看一下git diff --help ,看看还能找到什么其他的技巧。 我肯定在准备本教程时学到了新东西!
git difftool (git difftool)
Git has a mechanism to use a visual diff tool to show diffs instead of just using the command line format we’ve seen thus far. All of the options and features you looked at with git diff still work here, but it will show the diffs in a separate window, which many people, myself included, find easier to read. For this example, I’m going to use meld as the diff tool because it’s available on Windows, Mac, and Linux.
Git有一种使用可视化差异工具来显示差异的机制,而不仅仅是使用到目前为止我们已经看到的命令行格式。 您使用git diff查看的所有选项和功能仍然可以在此处使用,但是它将在单独的窗口中显示diff,很多人(包括我在内)都更容易阅读。 对于本示例,我将使用meld作为diff工具,因为它可以在Windows,Mac和Linux上使用。
Difftool is something that is much easier to use if you set it up properly. Git has a set of config options that control the defaults for difftool. You can set these from the shell using the git config command:
如果正确设置Difftool,它会更容易使用。 Git有一组配置选项,用于控制difftool的默认值。 您可以使用git config命令从外壳程序中进行设置:
 $ git config --global diff.tool meld
$ git config --global diff.tool meld
$ git config --global difftool.prompt $ git config --global difftool.prompt false
false
The prompt option is one I find important. If you do not specify this, Git will prompt you before it launches the external build tool every time it starts. This can be quite annoying as it does it for every file in a diff, one at a time:
prompt选项是我认为很重要的选项。 如果您未指定此选项,则Git会在每次启动外部构建工具之前提示您。 这可能非常烦人,因为它对差异中的每个文件都执行一次,一次:
Setting prompt to false forces Git to launch the tool without asking, speeding up your process and making you that much better!
将prompt设置为false会强制Git无需询问就启动该工具,从而加快了过程并让您变得更好!
In the diff discussion above, you covered most of the features of difftool, but I wanted to add one thing I learned while researching for this article. Do you remember above when you were looking at the git stash show command? I mentioned that there was a way to see what is in a given stash visually, and difftool is that way. All of the syntax we learned for addressing stashes works with difftool:
在上面的diff讨论中,您介绍了difftool大多数功能,但是我想补充一下我在研究本文时学到的一件事。 您还记得上面的git stash show命令吗? 我提到过,有一种方法可以直观地查看给定存储中的内容,而difftool就是这样。 我们学习的用于处理隐藏的所有语法都可以与difftool一起使用:
 $ git difftool stash@$ git difftool stash@ {{ 11 }
}
As with all stash subcommands, if you just want to see the latest stash, you can use the stash shortcut:
与所有stash子命令一样,如果您只想查看最新的stash,则可以使用stash快捷方式:
Many IDEs and editors have tools that can help with viewing diffs. There is a list of editor-specific tutorials at the end of the Introduction to Git tutorial.
许多IDE和编辑器都有可以帮助查看差异的工具。 《 Git入门》教程的末尾有一系列特定于编辑器的教程。
改变历史 (Changing History)
One feature of Git that frightens some people is that it has the ability to change commits. While I can understand their concern, this is part of the tool, and, like any powerful tool, you can cause trouble if you use it unwisely.
Git使某些人感到恐惧的一个特征是它具有更改提交的能力。 虽然我可以理解他们的担心,但这是工具的一部分,并且像任何功能强大的工具一样,如果使用不当,可能会造成麻烦。
We’ll talk about several ways to modify commits, but before we do, let’s discuss when this is appropriate. In previous sections you saw the difference between your local repo and a remote repo. Commits that you have created but have not pushed are in your local repo only. Commits that other developers have pushed but you have not pulled are in the remote repo only. Doing a push or a pull will get these commits into both repos.
我们将讨论几种修改提交的方法,但是在进行修改之前,让我们先讨论一下何时合适。 在前面的部分中,您了解了本地存储库和远程存储库之间的区别。 您创建但尚未推送的提交仅在本地存储库中。 承诺其他开发人员已推送但您尚未撤消仅在远程存储库中。 进行push或pull会将这些提交同时放入两个存储库中。
The only time you should be thinking about modifying a commit is if it exists on your local repo and not the remote. If you modify a commit that has already been pushed from the remote, you are very likely to have a difficult time pushing or pulling from that remote, and your coworkers will be unhappy with you if you succeed.
您唯一需要考虑的修改就是提交是否在本地仓库而不是远程仓库中。 如果您修改了已经从远程推送的提交,那么很可能很难从该远程推送或拉出,并且如果您成功了,您的同事将对您不满意。
That caveat aside, let’s talk about how you can modify commits and change history!
抛开这些警告,让我们谈谈如何修改提交和更改历史记录!
git commit --amend (git commit --amend)
What do you do if you just made a commit but then realize that flake8 has an error when you run it? Or you spot a typo in the commit message you just entered? Git will allow you to “amend” a commit:
如果您刚刚提交但又发现flake8在运行时出现错误,您该怎么办? 或者您在刚刚输入的提交消息中发现了一个错字? Git将允许您“修改”提交:
 $ git commit -m $ git commit -m "I am bad at spilling"
"I am bad at spilling"
[master 63f74b7] I am bad at spilling
[master 63f74b7] I am bad at spilling
 1 file changed, 4 insertions(+)
 1 file changed, 4 insertions(+)
$ git commit --amend -m $ git commit --amend -m "I am bad at spelling"
"I am bad at spelling"
[master 951bf2f] I am bad at spelling
[master 951bf2f] I am bad at spelling
 Date: Tue May 22 20:41:27 2018 -0600
 Date: Tue May 22 20:41:27 2018 -0600
 1 file changed, 4 insertions(+)
 1 file changed, 4 insertions(+)
Now if you look at the log after the amend, you’ll see that there was only one commit, and it has the correct message:
现在,如果您查看修改后的日志,您将看到只有一次提交,并且它具有正确的消息:
If you had modified and added files before the amend, those would have been included in the single commit as well. You can see that this is a handy tool for fixing mistakes. I’ll warn you again that doing a commit --amend modifies the commit. If the original commit was pushed to a remote repo, someone else may already have based changes on it. That would be a mess, so only use this for commits that are local-only.
如果您在修改之前修改和添加了文件,则这些文件也将包含在单个提交中。 您会看到这是修复错误的便捷工具。 我会再次警告您,执行commit --amend会修改提交。 如果原始提交已推送到远程存储库,则其他人可能已经在其上进行了更改。 那将是一团糟,因此仅将其用于仅本地的提交。
git rebase (git rebase)
A rebase operation is similar to a merge, but it can produce a much cleaner history. When you rebase, Git will find the common ancestor between your current branch and the specified branch. It will then take all of the changes after that common ancestor from your branch and “replay” them on top of the other branch. The result will look like you did all of your changes after the other branch.
rebase操作类似于合并,但是它可以产生更清晰的历史记录。 重新设定基准时,Git将在当前分支和指定分支之间找到公共祖先。 然后,它将在您的分支的那个共同祖先之后获取所有更改,并将它们“重播”到另一个分支的顶部。 结果看起来就像您在另一个分支之后进行了所有更改。
This can be a little hard to visualize, so let’s look at some actual commits. For this exercise, I’m going to use the --oneline option on the git log command to cut down on the clutter. Let’s start with a feature branch you’ve been working on called my_feature_branch. Here’s the state of that branch:
这可能很难想象,所以让我们看一些实际的提交。 对于本练习,我将在git log命令上使用--oneline选项以减少混乱。 让我们从您一直在研究的功能分支my_feature_branch 。 这是该分支的状态:
  $ git log --oneline
 $ git log --oneline
143ae7f second feature commit
143ae7f second feature commit
aef68dc first feature commit
aef68dc first feature commit
2512d27 Common Ancestor Commit
2512d27 Common Ancestor Commit
You can see that the --oneline option, as you might expect, shows just the SHA and the commit message for each commit. Your branch has two commits after the one labeled 2512d27 Common Ancestor Commit.
您可能会看到--oneline选项(如您所料)仅显示SHA和每次提交的提交消息。 在标记为2512d27 Common Ancestor Commit分支之后,您的分支有两次2512d27 Common Ancestor Commit 。
You need a second branch if you’re going to do a rebase and master seems like a good choice. Here’s the current state of the master branch:
如果要进行重新基准化,则需要第二个分支,而master似乎是一个不错的选择。 这是master分支的当前状态:
There are three commits on master after 2512d27 Common Ancestor Commit. While you still have my_feature_branch checked out, you can do a rebase to put the two feature commits after the three commits on master:
2512d27 Common Ancestor Commit之后, master上有3次2512d27 Common Ancestor Commit 。 虽然你仍然有my_feature_branch签出,你可以做一个rebase把两个特征提交上主的三个提交后 :
 $ git rebase master
$ git rebase master
First, rewinding head to replay your work on top of it...
First, rewinding head to replay your work on top of it...
Applying: first feature commit
Applying: first feature commit
Applying: second feature commit
Applying: second feature commit
$ git log --oneline
$ git log --oneline
cf16517 second feature commit
cf16517 second feature commit
69f61e9 first feature commit
69f61e9 first feature commit
23a558c third master commit
23a558c third master commit
5ec06af second master commit
5ec06af second master commit
190d6af first master commit
190d6af first master commit
2512d27 Common Ancestor Commit
2512d27 Common Ancestor Commit
There are two things to notice in this log listing:
此日志清单中有两件事要注意:
1) As advertised, the two feature commits are after the three master commits.
1)如广告所示,两个功能提交在三个主提交之后。
2) The SHAs of those two feature commits have changed.
2)这两个功能提交的SHA均已更改。
The SHAs are different because the repo is slightly different. The commits represent the same changes to the files, but since they were added on top of the changes already in master, the state of the repo is different, so they have different SHAs.
SHA有所不同,因为存储库略有不同。 提交表示对文件的相同更改,但是由于它们是在master已添加的更改之上添加的,因此回购的状态不同,因此它们具有不同的SHA。
If you had done a merge instead of a rebase, there would have been a new commit with the message Merge branch 'master' into my_feature_branch, and the SHAs of the two feature commits would be unchanged. Doing a rebase avoids the extra merge commit and makes your revision history cleaner.
如果你做了一个merge ,而不是一个的rebase ,也将是一个新的提交与消息Merge branch 'master' into my_feature_branch ,两个功能提交的SHA值将保持不变。 重新进行基准避免了额外的合并提交,并使修订历史记录更加整洁。
git pull -r (git pull -r)
Using a rebase can be a handy tool when you’re working on a branch with a different developer, too. If there are changes on the remote, and you have local commits to the same branch, you can use the -r option on the git pull command. Where a normal git pull does a merge to the remote branch, git pull -r will rebase your commits on top of the changes that were on the remote.
当您与其他开发人员一起使用分支时,使用rebase可能是一种方便的工具。 如果远程上有更改,并且本地提交到同一分支,则可以在git pull命令上使用-r选项。 在普通的git pull merge到远程分支的地方, git pull -r将在远程更改的基础上重新提交。
git rebase -i (git rebase -i)
The rebase command has another method of operation. There is a -i flag you can add to the rebase command that will put it into interactive mode. While this seems confusing at first, it is an amazingly powerful feature that lets you have full control over the list of commits before you push them to a remote. Please remember the warning about not changing the history of commits that have been pushed.
rebase命令具有另一种操作方法。 您可以将-i标志添加到rebase命令中,以使其进入交互模式。 虽然这乍看起来似乎很令人困惑,但它是一项非常强大的功能,可以让您在将提交推送到远程之前完全控制提交列表。 请记住有关不更改已推送的提交历史的警告。
These examples show a basic interactive rebase, but be aware that there are more options and more use cases. The git rebase --help command will give you the list and actually does a good job of explaining them.
这些示例显示了基本的交互式基础,但是请注意,还有更多的选择和更多的用例。 git rebase --help命令将为您提供列表,并且实际上可以很好地解释它们。
For this example, you’re going to imagine you’ve been working on your Python library, committing several times to your local repo as you implement a solution, test it, discover a problem and fix it. At the end of this process you have a chain of commits on you local repo that all are part of the new feature. Once you’ve finished the work, you look at your git log:
对于本示例,您将想象自己一直在使用Python库,在实现解决方案,测试它,发现问题并修复它的过程中多次提交到本地存储库。 在此过程结束时,您在本地存储库上有一系列提交,所有这些都是新功能的一部分。 完成工作后,请查看您的git log :
There are several commits here that don’t add value to other developers or even to you in the future. You can use rebase -i to create a “squash commit” and put all of these into a single point in history.
这里有一些提交不会为其他开发人员甚至未来增加价值。 您可以使用rebase -i创建一个“ squash commit”,并将所有这些都放入历史记录中。
To start the process, you run git rebase -i af21a53, which will bring up an editor with a list of commits and some instructions:
要开始该过程,请运行git rebase -i af21a53 ,它将显示一个带有提交列表和一些说明的编辑器:
pick 3b8a6f2 First attempt at solution
pick a113f67 found a bug fixing
pick 7f82500 pylint cleanup
pick 08dc922 another bug fix
pick d9b1f9e restructuring to clean up
pick 56d1c23 more flake8 clean up
pick 504d520 added unit test to cover new bug
pick 8bb7af8 implemented feedback from code review

# Rebase af21a53..8bb7af8 onto af21a53 (8 command(s))
#
# Commands:
# p, pick = use commit
# r, reword = use commit, but edit the commit message
# e, edit = use commit, but stop for amending
# s, squash = use commit, but meld into previous commit
# f, fixup = like "squash", but discard this commit's log message
# x, exec = run command (the rest of the line) using shell
# d, drop = remove commit
#
# These lines can be re-ordered; they are executed from top to bottom.
#
# If you remove a line here THAT COMMIT WILL BE LOST.
#
# However, if you remove everything, the rebase will be aborted.
#
# Note that empty commits are commented out
You’ll notice that the commits are listed in reverse order, oldest first. This is the order in which Git will replay the commits on top of af21a53. If you just save the file at this point, nothing will change. This is also true if you delete all the text and save the file.
您会注意到,提交是按相反顺序列出的,最早的是最早的。 这是Git在af21a53之上重播提交的af21a53 。 如果此时仅保存文件,则不会有任何改变。 如果删除所有文本并保存文件,也是如此。
Also, there are several lines starting with a # reminding you how to edit this file. These comments can be removed but do not need to be.
另外,有几行以#开头,提醒您如何编辑此文件。 这些评论可以删除,但不必删除。
But you want to squash all of these commits into one so that “future you” will know that this is the commit that completely added the feature. To do that, you can edit the file to look like this:
但是您希望将所有这些提交压缩为一个,以便“将来您”将知道这是完全添加了功能的提交。 为此,您可以将文件编辑为如下所示:
You can use either the full word for the commands, or, as you did after the first two lines, use the single character version. The example above selected to “pick” the oldest commit and the “squash” each of the subsequent commits into that one. If you save and exit the editor, Git will proceed to put all of those commits into one and then will bring up the editor again, listing all of the commit messages for the squashed commit:
您可以使用完整的单词作为命令,也可以像前两行之后那样使用单个字符版本。 上面的示例选择“选择”最旧的提交,并将每个后续提交“压扁”到该提交中。 如果您保存并退出编辑器,Git将继续将所有这些提交放入一个,然后再次启动编辑器,列出被压缩的提交的所有提交消息:
# This is a combination of 8 commits.
# The first commit's message is:
Implemented feature ABC

# This is the 2nd commit message:

found a bug fixing

# This is the 3rd commit message:

pylint cleanup

# This is the 4th commit message:

another bug fix

[the rest trimmed for brevity]
# This is a combination of 8 commits.
# The first commit's message is:
Implemented feature ABC

# This is the 2nd commit message:

found a bug fixing

# This is the 3rd commit message:

pylint cleanup

# This is the 4th commit message:

another bug fix

[the rest trimmed for brevity]
By default a squash commit will have a long commit message with all of the messages from each commit. In your case it’s better to reword the first message and delete the rest. Doing that and saving the file will finish the process, and your log will now have only a single commit for this feature:
默认情况下,壁球提交将包含一条长提交消息,其中包含每次提交的所有消息。 在您的情况下,最好将第一个消息改写成单词,然后删除其余的。 这样做并保存文件将完成此过程,并且您的日志现在仅具有此功能的一次提交:
Cool! You just hid any evidence that you had to do more than one commit to solve this issue. Good work! Be warned that deciding when to do a squash merge is frequently more difficult than the actual process. There’s a great article that does a nice job of laying out the complexities.
凉! 您只是隐藏了任何证据,表明您必须做多个承诺才能解决此问题。 干得好! 请注意,决定何时进行壁球合并通常比实际过程更困难。 有一篇很棒的文章很好地阐述了复杂性。
As you probably guessed, git rebase -i will allow you to do far more complex operations. Let’s look at one more example.
您可能已经猜到了, git rebase -i将允许您执行更复杂的操作。 让我们再看一个例子。
In the course of a week, you’ve worked on three different issues, committing changes at various times for each. There’s also a commit in there that you regret and would like to pretend never happened. Here’s your starting log:
在一周的时间里,您已经研究了三个不同的问题,每个问题在不同的时间进行更改。 还有一个承诺让您后悔,并想假装从未发生过。 这是您的开始日志:
 $ git log --oneline
$ git log --oneline
2f0a106 feature 3 commit 3
2f0a106 feature 3 commit 3
f0e14d2 feature 2 commit 3
f0e14d2 feature 2 commit 3
b2eec2c feature 1 commit 3
b2eec2c feature 1 commit 3
d6afbee really rotten, very bad commit
d6afbee really rotten, very bad commit
6219ba3 feature 3 commit 2
6219ba3 feature 3 commit 2
70e07b8 feature 2 commit 2
70e07b8 feature 2 commit 2
c08bf37 feature 1 commit 2
c08bf37 feature 1 commit 2
c9747ae feature 3 commit 1
c9747ae feature 3 commit 1
fdf23fc feature 2 commit 1
fdf23fc feature 2 commit 1
0f05458 feature 1 commit 1
0f05458 feature 1 commit 1
3ca2262 older stuff here
3ca2262 older stuff here
Your mission is to get this into three clean commits and remove that one bad one. You can follow the same process, git rebase -i 3ca2262, and Git presents you with the command file:
您的任务是将其分为三个干净的提交,并删除一个坏的提交。 您可以遵循相同的过程git rebase -i 3ca2262 ,Git为您提供命令文件:
Interactive rebase allows your to not only specify what to do with each commit but also lets you rearrange them. So, to get to your three commits, you edit the file to look like this:
交互式rebase不仅使您可以指定每次提交的操作,还可以重新排列它们。 因此,要进行三个提交,您可以将文件编辑为如下所示:
pick 0f05458 feature 1 commit 1
s c08bf37 feature 1 commit 2
s b2eec2c feature 1 commit 3
pick fdf23fc feature 2 commit 1
s 70e07b8 feature 2 commit 2
s f0e14d2 feature 2 commit 3
pick c9747ae feature 3 commit 1
s 6219ba3 feature 3 commit 2
s 2f0a106 feature 3 commit 3
# pick d6afbee really rotten, very bad commit
The commits for each feature are grouped together with only one of them being “picked” and the rest “squashed.” Commenting out the bad commit will remove it, but you could have just as easily deleted that line from the file to the same effect.
每个功能的提交都被分组在一起,其中只有一个被“挑选”,其余被“压缩”。 注释掉错误的提交将删除它,但是您可以很容易地从文件中删除该行,以达到相同的效果。
When you save that file, you’ll get a separate editor session to create the commit message for each of the three squashed commits. If you call them feature 1, feature 2, and feature 3, your log will now have only those three commits, one for each feature:
保存该文件时,您将获得一个单独的编辑器会话,以为三个压缩的提交中的每一个创建提交消息。 如果您将它们称为feature 1 , feature 2和feature 3 ,则您的日志现在将仅具有这三个提交,每个功能一个:
Just like any rebase or merge, you might run into conflicts in this process, which you will need to resolve by editing the file, getting the changes correct, git add-ing the file, and running git rebase --continue.
就像任何rebase或merge一样,您可能会在此过程中遇到冲突,您需要通过编辑文件,正确完成更改, git add文件以及运行git rebase --continue 。
I’ll end this section by pointing out a few things about rebase:
在本节结束时,我将指出一些有关变基的内容:
1) Creating squash commits is a “nice to have” feature, but you can still work successfully with Git without using it.
1)创建壁球提交是一项“不错的功能”,但是您仍然可以在不使用Git的情况下成功使用它。
2) Merge conflicts on large interactive rebases can be confusing. None of the individual steps are difficult, but there can be a lot of them
2)大型交互式资源库上的合并冲突可能会造成混淆。 没有一个单独的步骤很困难,但是可以有很多步骤
3) We’ve just scratched the surface on what you can do with git rebase -i. There are more features here than most people will ever discover.
3)我们只是简单介绍了git rebase -i可以做什么。 这里的功能比大多数人都发现的更多。
git revert vs. git reset :清理 (git revert vs. git reset: Cleaning Up)
Unsurprisingly, Git provides you several methods for cleaning up when you’ve made a mess. These techniques depend on what state your repo is in and whether or not the mess is local to your repo or has been pushed to a remote.
毫不奇怪,当您陷入困境时,Git为您提供了几种清理方法。 这些技术取决于您的存储库所处的状态,以及该混乱是否位于您的存储库中或是否已被推送到远程。
Let’s start by looking at the easy case. You’ve made a commit that you don’t want, and it hasn’t been pushed to remote. Start by creating that commit so you know what you’re looking at:
让我们从简单的案例开始。 您做出了您不想要的提交,并且尚未将其推送到远程。 首先创建该提交,以便您了解所要查看的内容:
 $ ls >> file_i_do_not_want
$ ls >> file_i_do_not_want
$ git add file_i_do_not_want
$ git add file_i_do_not_want
$ git commit -m $ git commit -m "bad commit"
"bad commit"
[master baebe14] bad commit
[master baebe14] bad commit
 2 files changed, 31 insertions(+)
 2 files changed, 31 insertions(+)
 create mode 100644 file_i_do_not_want
 create mode 100644 file_i_do_not_want
$ git log --oneline
$ git log --oneline
baebe14 bad commit
baebe14 bad commit
443272f feature 2
443272f feature 2
0ff80ca feature 1
0ff80ca feature 1
3ca2262 older stuff here
3ca2262 older stuff here
The example above created a new file, file_i_do_not_want, and committed it to the local repo. It has not been pushed to the remote repo yet. The rest of the examples in this section will use this as a starting point.
上面的示例创建了一个新文件file_i_do_not_want ,并将其提交到本地存储库。 它尚未被推送到远程仓库。 本节中的其余示例将以此为起点。
To manage commits that are on the local repo only, you can use the git reset command. There are two options to explore: --soft and --hard.
要仅管理本地存储库中的提交,可以使用git reset命令。 有两个选项可供选择:-- --soft和--hard 。
The git reset --soft <SHA> command tells Git to move HEAD back to the specified SHA. It doesn’t change the local file system, and it doesn’t change the index. I’ll admit when I read that description, it didn’t mean much to me, but looking at the example definitely helps:
git reset --soft <SHA>命令告诉Git将HEAD移动回指定的SHA。 它不会更改本地文件系统,也不会更改索引。 我承认,当我阅读该说明时,对我来说意义不大,但是查看示例肯定会有所帮助:
In the example, we reset HEAD to HEAD^. Remember that ^ tells Git to step back one commit. The --soft option told Git to not change the index or the local file system, so the file_i_do_not_want is still in the index in the “Changes to be committed:” state. The git log command shows that the bad commit was removed from the history, though.
在示例中,我们将HEAD重置为HEAD^ 。 请记住, ^告诉Git后退一次提交。 --soft选项告诉Git 不要更改索引或本地文件系统,因此file_i_do_not_want仍处于“要提交的更改:”状态的索引中。 git log命令显示bad commit已从历史记录中删除。
That’s what the --soft option does. Now let’s look at the --hard option. Let’s go back to your original state so that bad commit is in the repo again and try --hard:
这就是--soft选项的作用。 现在让我们看一下--hard选项。 让我们回到原始状态,以便bad commit再次出现在仓库中,然后尝试--hard :
 $ git log --oneline
$ git log --oneline
2e9d704 bad commit
2e9d704 bad commit
443272f feature 2
443272f feature 2
0ff80ca feature 1
0ff80ca feature 1
3ca2262 older stuff here
3ca2262 older stuff here
$ git reset --hard HEAD^
$ git reset --hard HEAD^
HEAD is now at 443272f feature 2
HEAD is now at 443272f feature 2
$ git status
$ git status
On branch master
On branch master
nothing to commit, working directory clean
nothing to commit, working directory clean
$ git log --oneline
$ git log --oneline
443272f feature 2
443272f feature 2
0ff80ca feature 1
0ff80ca feature 1
3ca2262 older stuff here
3ca2262 older stuff here
There are several things to notice here. First the reset command actually gives you feedback on the --hard option where it does not on the --soft. I’m not sure of why this is, quite honestly. Also, when we do the git status and git log afterwards, you see that not only is the bad commit gone, but the changes that were in that commit have also been wiped out. The --hard option resets you completely back to the SHA you specified.
这里有几件事要注意。 首先, reset命令实际上会给您有关--hard选项的反馈,而不--soft提供反馈。 老实说,我不确定为什么会这样。 另外,当我们随后执行git status和git log ,您不仅看到bad commit已经消失,而且该bad commit的更改也被清除了。 --hard选项可将您完全重置为您指定的SHA。
Now, if you remember the last section about changing history in Git, it’s dawned on you that doing a reset to a branch you’ve already pushed to a remote might be a bad idea. It changes the history and that can really mess up your co-workers.
现在,如果您还记得有关更改Git中的历史记录的最后一部分,那么您已经意识到,重置为已经推送到远程的分支可能是个坏主意。 它改变了历史,这确实会使您的同事不知所措。
Git, of course, has a solution for that. The git revert command allows you to easily remove the changes from a given commit but does not change history. It does this by doing the inverse of the commit you specify. If you added a line to a file, git revert will remove that line from the file. It does this and automatically creates a new “revert commit” for you.
Git当然有解决方案。 git revert命令使您可以轻松删除给定提交中的更改,但不更改历史记录。 它通过执行与指定的提交相反的操作来实现。 如果您向文件添加了一行,则git revert将从文件中删除该行。 它会执行此操作,并自动为您创建一个新的“还原提交”。
Once again, reset the repo back to the point that bad commit is the most recent commit. First confirm what the changes are in bad commit:
再一次,将存储库重新设置为bad commit是最新的提交。 首先确认bad commit的更改:
You can see that we’ve simply added the new file_i_do_not_want to the repo. The lines below @@ -0,0 +1,6 @@ are the contents of that new file. Now, assuming that this time you’ve pushed that bad commit to master and you don’t want your co-workers to hate you, use revert to fix that mistake:
您可以看到我们只是将新的file_i_do_not_want添加到了file_i_do_not_want中。 @@ -0,0 +1,6 @@下面的行是该新文件的内容。 现在,假设这次您已将bad commit推向了master,并且您不希望您的同事讨厌您,请使用revert修复该错误:
 $ git revert HEAD
$ git revert HEAD
[master 8a53ee4] Revert "bad commit"
[master 8a53ee4] Revert "bad commit"
 1 file changed, 6 deletions(-)
 1 file changed, 6 deletions(-)
 delete mode 100644 file_i_do_not_want
 delete mode 100644 file_i_do_not_want
When you run that command, Git will pop up an editor window allowing you to modify the commit message for the revert commit:
当您运行该命令时,Git将弹出一个编辑器窗口,允许您修改还原消息的提交消息:
Unlike commit, git revert does not have an option for specifying the commit message on the command line. You can use -n to skip the message editing step and tell Git to simply use the default message.
与commit不同, git revert没有用于在命令行上指定提交消息的选项。 您可以使用-n跳过消息编辑步骤,并告诉Git仅使用默认消息。
After we revert the bad commit, our log shows a new commit with that message:
还原错误的提交后,日志将显示一条带有该消息的新提交:
 $ git log --oneline
$ git log --oneline
8a53ee4 Revert "bad commit"
8a53ee4 Revert "bad commit"
1fec3f7 bad commit
1fec3f7 bad commit
443272f feature 2
443272f feature 2
0ff80ca feature 1
0ff80ca feature 1
3ca2262 older stuff here
3ca2262 older stuff here
The “bad commit” is still there. It needs to be there because you don’t want to change history in this case. There’s a new commit, however, which “undoes” the changes that are in that commit.
“错误的提交”仍然存在。 它必须存在,因为在这种情况下您不想更改历史记录。 但是,有一个新的提交,它“撤消”了该提交中的更改。
git clean (git clean)
There’s another “clean up” command that I find useful, but I want to present it with a caution.
我发现还有另一个“清理”命令很有用,但我要谨慎使用。
Caution: Using git clean can wipe out files that are not committed to the repo that you will not be able to recover.
注意:使用git clean可以清除未提交到存储库的文件,这些文件将无法恢复。
git clean does what you guess it would: it cleans up your local working directory. I’ve found this quite useful when something large goes wrong and I end up with several files on my file system that I do not want.
git clean完成您的猜测:清理本地工作目录。 当出现大问题时,我发现此功能非常有用,并且最终在文件系统上出现一些我不想要的文件。
In its simple form, git clean simply removes files that are not “under version control.” This means that files that show up in the Untracked files section when you look at git status will be removed from the working tree. There is not a way to recover if you do this accidentally, as those files were not in version control.
git clean以其简单的形式只是删除不在“版本控制下”的文件。 这意味着当您查看git status时显示在“未Untracked files部分中的Untracked files将从工作树中删除。 如果您不小心执行此操作,则无法恢复,因为这些文件不在版本控制中。
That’s handy, but what if you want to remove all of the pyc files created with your Python modules? Those are in your .gitignore file, so they don’t show up as Untracked and they don’t get deleted by git clean.
这很方便,但是如果您要删除使用Python模块创建的所有pyc文件,该怎么办? 它们在您的.gitignore文件中,因此它们不会显示为Untracked,也不会被git clean删除。
The -x option tells git clean to remove untracked and ignored files, so git clean -x will take care of that problem. Almost.
-x选项告诉git clean删除未跟踪和忽略的文件,因此git clean -x将解决该问题。 几乎。
Git is a little conservative with the clean command and won’t remove untracked directories unless you tell it to do so. Python 3 likes to create __pycache__directories, and it’d be nice to clean these up, too. To solve this, you would add the -d option. git clean -xd will clean up all of the untracked and ignored files and directories.
Git的clean命令有些保守,除非您告诉它,否则不会删除未跟踪的目录。 Python 3喜欢创建__pycache__目录,也很高兴清理它们。 要解决此问题,您可以添加-d选项。 git clean -xd将清除所有未跟踪和忽略的文件和目录。
Now, if you’ve raced ahead and tested this out, you’ve noticed that it doesn’t actually work. Remember that warning I gave at the beginning of this section? Git tries to be cautious when it comes to deleting files that you can’t recover. So, if you try the above command, you see an error message:
现在,如果您已经进行了竞赛并进行了测试,您会注意到它实际上是行不通的。 还记得我在本节开始时给出的警告吗? 在删除无法恢复的文件时,Git会尝试保持谨慎。 因此,如果尝试上述命令,则会看到错误消息:
While it’s possible to change your git config files to not require it, most people I’ve talked to simply get used to using the -f option along with the others:
虽然可以将git config文件更改为不需要它,但我所交谈的大多数人只是习惯于与其他人一起使用-f选项:
 $ git clean -xfd
$ git clean -xfd
Removing file_to_delete
Removing file_to_delete
Again, be warned that git clean -xfd will remove files that you will not be able to get back, so please use this with caution!
再次提醒您, git clean -xfd将删除您将无法找回的文件,因此请谨慎使用!
解决合并冲突 (Resolving Merge Conflicts)
When you’re new to Git, merge conflicts seem like a scary thing, but with a little practice and a few tricks, they can become much easier to deal with.
当您不熟悉Git时,合并冲突似乎是一件令人恐惧的事情,但是只要稍加实践和一些技巧,合并冲突就会变得更容易处理。
Let’s start with some of the tricks that can make this easier. The first one changes the format of how conflicts are shown.
让我们从一些可以简化此过程的技巧开始。 第一个更改冲突显示方式的格式。
diff3格式 (diff3 Format)
We’ll walk through a simple example to see what Git does by default and what options we have to make it easier. To do this, create a new file, merge.py, that looks like this:
我们将通过一个简单的示例来了解Git默认情况下的功能以及使它变得更容易的选项。 为此,请创建一个新文件merge.py ,如下所示:
Add and commit this file to your branch master, and this will be your baseline commit. You’ll create branches that modify this file in different ways, and then you’ll see how to resolve the merge conflict.
添加此文件并将其提交到您的分支master ,这将是您的基准提交。 您将创建以不同方式修改此文件的分支,然后您将看到如何解决合并冲突。
You now need to create separate branches that will have conflicting changes. You’ve seen how this is done before, so I won’t describe it in detail:
现在,您需要创建单独的分支,这些分支将发生冲突。 您之前已经看过这是如何完成的,因此我将不对其进行详细描述:
 $ git checkout -b mergebranch
$ git checkout -b mergebranch
Switched to a new branch 'mergebranch'
Switched to a new branch 'mergebranch'
$ vi merge.py $ vi merge.py # edit file to change 'project' to 'program'
# edit file to change 'project' to 'program'
$ git add merge.py
$ git add merge.py
$ git commit -m $ git commit -m "change project to program"
"change project to program"
[mergebranch a775c38] change project to program
[mergebranch a775c38] change project to program
 1 file changed, 1 insertion(+), 1 deletion(-)
 1 file changed, 1 insertion(+), 1 deletion(-)
$ git status
$ git status
On branch mergebranch
On branch mergebranch
nothing to commit, working directory clean
nothing to commit, working directory clean
$ git checkout master
$ git checkout master
Switched to branch 'master'
Switched to branch 'master'
$ vi merge.py $ vi merge.py # edit file to add 'very cool' before project
# edit file to add 'very cool' before project
$ git add merge.py
$ git add merge.py
$ git commit -m $ git commit -m "added description of project"
"added description of project"
[master ab41ed2] added description of project
[master ab41ed2] added description of project
 1 file changed, 1 insertion(+), 1 deletion(-)
 1 file changed, 1 insertion(+), 1 deletion(-)
$ git show-branch master mergebranch
$ git show-branch master mergebranch
* [master] added description of project
* [master] added description of project
 ! [mergebranch] change project to program
 ! [mergebranch] change project to program
--
--
*  [master] added description of project
*  [master] added description of project
 + [mergebranch] change project to program
 + [mergebranch] change project to program
*+ [master^] baseline for merging
*+ [master^] baseline for merging
At this point you have conflicting changes on mergebranch and master. Using the show-branch command we learned in our Intro tutorial, you can see this visually on the command line:
在这一点上,您在mergebranch和master上的更改存在冲突。 使用我们在Intro教程中学到的show-branch命令,您可以在命令行上直观地看到此内容:
You’re on branch master, so let’s try to merge in mergebranch. Since you’ve made the changes with the intent of creating a merge conflict, lets hope that happens:
您在分支机构master ,所以让我们尝试在mergebranch进行合并。 由于您出于创建合并冲突的目的进行了更改,因此希望发生这种情况:
 $ git merge mergebranch
$ git merge mergebranch
Auto-merging merge.py
Auto-merging merge.py
CONFLICT (content): Merge conflict in merge.py
CONFLICT (content): Merge conflict in merge.py
Automatic merge failed; fix conflicts and then commit the result.
Automatic merge failed; fix conflicts and then commit the result.
As you expected, there’s a merge conflict. If you look at status, there’s a good deal of useful information there. Not only does it say that you’re in the middle of a merge, You have unmerged paths, but it also shows you which files are modified, merge.py:
如您所料,存在合并冲突。 如果您查看状态,那里会有很多有用的信息。 它不仅表明您处于合并的中间, You have unmerged paths ,而且还显示了修改了哪些文件merge.py :
You have done all that work to get to the point of having a merge conflict. Now you can start learning about how to resolve it! For this first part, you’ll be working with the command line tools and your editor. After that, you’ll get fancy and look at using visual diff tools to solve the problem.
您已完成所有工作以达到合并冲突的目的。 现在您可以开始学习如何解决它了! 对于第一部分,您将使用命令行工具和编辑器。 在那之后,您将看中并使用可视化差异工具解决该问题。
When you open merge.py in your editor, you can see what Git produced:
在编辑器中打开merge.py时,可以看到Git产生了什么:
 def def displaydisplay ():
():
<<<<<<< <<<<<<< HEAD
    HEAD
    printprint (( "Welcome to my very cool project!""Welcome to my very cool project!" )
)
=======
    =======
    printprint (( "Welcome to my program!""Welcome to my program!" )
)
>>>>>>> >>>>>>> mergebranch
mergebranch
Git uses diff syntax from Linux to display the conflict. The top portion, between <<<<<<< HEAD and =======, are from HEAD, which in your case is master. The bottom portion, between ======= and >>>>>>> mergebranch are from, you guessed it, mergebranch.
Git使用Linux的diff语法显示冲突。 在<<<<<<< HEAD和=======之间的顶部来自HEAD,在您的情况下为master 。 您猜对了,在=======和>>>>>>> mergebranch之间的底部是mergebranch 。
Now, in this very simple example, it’s pretty easy to remember which changes came from where and how we should merge this, but there’s a setting you can enable which will make this easier.
现在,在这个非常简单的示例中,很容易记住哪些更改来自何处以及我们应该如何合并此更改,但是您可以启用一个设置来简化此设置。
The diff3 setting modifies the output of merge conflicts to more closely approximate a three-way merge, meaning in this case that it will show you what’s in master, followed by what it looked like in the common ancestor, followed by what it looks like in mergebranch:
diff3设置修改了合并冲突的输出,使其更接近于三路合并,这意味着在这种情况下,它将向您显示master ,然后向您显示共同祖先中的内容,然后向您展示其中的内容。 mergebranch :
Now that you can see the starting point, “Welcome to my project!”, you can see exactly what change was made on master and what change was made on mergebranch. This might not seem like a big deal on such a simple example, but it can make a huge difference on large conflicts, especially merges where someone else made some of the changes.
现在您可以看到起点“欢迎来到我的项目!”,您可以确切地看到在master进行了哪些更改以及在mergebranch上进行了哪些更改。 在这样一个简单的示例上,这看起来似乎没什么大不了的,但是对于大的冲突,尤其是在其他人进行某些更改的合并时,它可能会产生巨大的变化。
You can set this option in Git globally by issuing the following command:
您可以通过发出以下命令在Git中全局设置此选项:
 $ git config --global merge.conflictstyle diff3
$ git config --global merge.conflictstyle diff3
Okay, so you understand how to see the conflict. Let’s go through how to fix it. Start by editing the file, removing all of the markers Git added, and making the one conflicting line correct:
好的,所以您了解如何查看冲突。 让我们看一下如何解决它。 首先编辑文件,删除Git添加的所有标记,然后使一条冲突的行正确:
You then add your modified file to the index and commit your merge. This will finish the merge process and create the new node:
然后,将修改后的文件添加到索引并提交合并。 这将完成合并过程并创建新节点:
 $ git add merge.py
$ git add merge.py
$ git commit
$ git commit
[master a56a01e] Merge branch 'mergebranch'
[master a56a01e] Merge branch 'mergebranch'
$ git log --oneline
$ git log --oneline
a56a01e Merge branch 'mergebranch'
a56a01e Merge branch 'mergebranch'
ab41ed2 added description of project
ab41ed2 added description of project
a775c38 change project to program
a775c38 change project to program
f29b775 baseline for merging
f29b775 baseline for merging
Merge conflicts can happen while you’re cherry-picking, too. The process when you are cherry-picking is slightly different. Instead of using the git commit command, you use the git cherry-pick --continue command. Don’t worry, Git will tell you in the status message which command you need to use. You can always go back and check that to be sure.
采摘时也可能发生合并冲突。 挑选樱桃的过程略有不同。 您可以使用git cherry-pick --continue命令来代替git commit命令。 不用担心,Git会在状态消息中告诉您需要使用哪个命令。 您可以随时返回并进行确认。
git mergetool (git mergetool)
Similar to git difftool, Git will allow you to configure a visual diff tool to deal with three-way merges. It knows about several different tools on different operating systems. You can see the list of tools it knows about on your system by using the command below. On my Linux machine, it shows the following:
与git difftool相似,Git将允许您配置可视化diff工具来处理三向合并。 它了解不同操作系统上的几种不同工具。 您可以使用以下命令查看系统上已知的工具列表。 在我的Linux机器上,它显示以下内容:
Also similar to difftool, you can configure the mergetool options globally to make it easier to use:
也类似于difftool ,您可以全局配置mergetool选项以使其易于使用:
 $ git config --global merge.tool meld
$ git config --global merge.tool meld
$ git config --global mergetool.prompt $ git config --global mergetool.prompt false
false
The final option, mergetool.prompt, tells Git not to prompt you each time it opens a window. This might not sound annoying, but when your merge involves several files it will prompt you between each of them.
最后一个选项mergetool.prompt告诉Git每次打开窗口时不提示您。 这听起来可能并不令人讨厌,但是当您的合并涉及多个文件时,它将在每个文件之间提示您。
结论 (Conclusion)
You’ve covered a lot of ground in these tutorials, but there is so much more to Git. If you’d like to take a deeper dive into Git, I can recommend these resources:
在这些教程中,您已经了解了很多基础知识,但是Git还有很多东西。 如果您想更深入地研究Git,我可以推荐以下资源:
- The free, on-line, Pro Git is a very handy reference.
- For those of you who like to read on paper, there’s a print version of Pro Git, and I found O’Reilly’s Version Control with Git to be useful when I read it.
--helpis useful for any of the subcommands you know.git diff --helpproduces almost 1000 lines of information. While portions of these are quite detailed, and some of them assume a deep knowledge of Git, reading the help for commands you use frequently can teach you new tricks on how to use them.
- 免费的在线Pro Git是非常方便的参考。
- 对于喜欢在纸上阅读的人,有Pro Git的印刷版,当我阅读时,我发现O'Reilly的带有Git的Version Control很有用。
-
--help对您知道的任何子命令很有用。git diff --help产生近1000行信息。 尽管其中的某些部分非常详细,并且其中一些假设对Git有很深的了解,但阅读常用命令的帮助可以教会您如何使用它们的新技巧。
翻译自: https://www.pybloggers.com/2018/08/advanced-git-tips-for-python-developers/
python git


 766
766

 被折叠的 条评论
为什么被折叠?
被折叠的 条评论
为什么被折叠?
 到【灌水乐园】发言


