


django 入门
In this tutorial, we will use Django Channels to create a real-time application that updates a list of users as they log in and out.
在本教程中,我们将使用Django Channels创建一个实时应用程序,该应用程序会在用户登录和注销时更新其列表。

With WebSockets (via Django Channels) managing the communication between the client and the server, whenever a user is authenticated, an event will be broadcasted to every other connected user. Each user’s screen will change automatically, without them having to reload their browsers.
使用WebSockets(通过Django Channels)管理客户端和服务器之间的通信时,每当对用户进行身份验证时,事件都会广播到所有其他已连接的用户。 每个用户的屏幕都会自动更改,而无需重新加载浏览器。
NOTE: We recommend that you have some experience with Django before beginning this tutorial. Also, you should be familiar with the concept of WebSockets.
注意:我们建议您在开始本教程之前具有Django的使用经验。 另外,您应该熟悉WebSockets的概念。
Our application uses:
我们的应用程序使用:
- Python (v3.6.0)
- Django (v1.10.5)
- Django Channels (v1.0.3)
- Redis (v3.2.8)
- Python(v3.6.0)
- Django(v1.10.5)
- Django频道(v1.0.3)
- Redis(v3.2.8)
目标 (Objectives)
By the end of this tutorial, you will be able to…
在本教程结束时,您将能够...
- Add Web sockets support to a Django project via Django Channels
- Set up a simple connection between Django and a Redis server
- Implement basic user authentication
- Leverage Django Signals to take action when a user logs in or out
- 通过Django Channels向Django项目添加Web套接字支持
- 在Django和Redis服务器之间建立简单的连接
- 实施基本的用户身份验证
- 利用Django Signals在用户登录或注销时采取措施
入门 (Getting Started)
First, create a new virtual environment to isolate our project’s dependencies:
首先,创建一个新的虚拟环境以隔离项目的依赖关系:
|
Install Django, Django Channels, and ASGI Redis, and then create a new Django project and app:
安装Django,Django Channels和ASGI Redis ,然后创建一个新的Django项目和应用程序:
|
NOTE: During the course of this tutorial, we will create a variety of different files and folders. Please refer to the folder structure from the project’s repository if you get stuck.
注意:在本教程的过程中,我们将创建各种不同的文件和文件夹。 如果遇到问题,请参考项目存储库中的文件夹结构。
Next, download and install Redis. If you’re on a Mac, we recommend using Homebrew:
接下来,下载并安装Redis 。 如果您使用的是Mac,建议您使用Homebrew :
|
Start the Redis server in a new terminal window and make sure that it is running on its default port, 6379. The port number will be important when we tell Django how to communicate with Redis.
在新的终端窗口中启动Redis服务器,并确保它在其默认端口6379上运行。当我们告诉Django如何与Redis通信时,端口号将很重要。
Complete the setup by updating INSTALLED_APPS in the project’s settings.py file:
通过更新项目的settings.py文件中的INSTALLED_APPS来完成设置:
|
Then Configure the CHANNEL_LAYERS by setting a default backend and routing:
然后通过设置默认后端和路由来配置CHANNEL_LAYERS :
|
This uses a Redis backend which is also needed in production.
这使用了Redis后端 ,这在生产中也需要。
Web套接字101 (WebSockets 101)
Normally, Django uses HTTP to communicate between the client and server:
通常,Django使用HTTP在客户端和服务器之间进行通信:
- The client sends an HTTP request to the server.
- Django parses the request, extracts a URL, and then matches it to a view.
- The view processes the request and returns an HTTP response to the client.
- 客户端将HTTP请求发送到服务器。
- Django解析请求,提取URL,然后将其与视图匹配。
- 该视图处理请求,并向客户端返回HTTP响应。
Unlike HTTP, the WebSockets protocol allows bi-directional communication, meaning that the server can push data to the client without being prompted by the user. With HTTP, only the client that made a request receives a response. With WebSockets, the server can communicate with multiple clients simultaneously. As we will see later on in this tutorial, we send WebSockets messages using the ws:// prefix, as opposed to http://.
与HTTP不同,WebSockets协议允许双向通信,这意味着服务器可以将数据推送到客户端,而无需用户提示。 使用HTTP,只有发出请求的客户端才会收到响应。 使用WebSocket,服务器可以同时与多个客户端进行通信。 正如我们将在本教程的后面部分看到的那样,我们使用ws://前缀而不是http://发送WebSockets消息。
NOTE: Before diving in, quickly review the Channels Concepts documentation.
注意:潜水之前,请快速阅读Channels Concepts文档。
消费者和群体 (Consumers and Groups)
Let’s create our first consumer, which handle the basic connections between the client and the server. Create a new file called example_channels/example/consumers.py:
让我们创建第一个使用者 ,它处理客户端和服务器之间的基本连接。 创建一个名为example_channels / example / consumers.py的新文件:
|
Consumers are the counterpart to Django views. Any user connecting to our app will be added to the “users” group and will receive messages sent by the server. When the client disconnects from our app, the channel is removed from the group, and the user will stop receiving messages.
消费者是Django视图的对应者。 连接到我们应用程序的所有用户都将添加到“用户”组中,并将接收服务器发送的消息。 当客户端与我们的应用断开连接时,该频道将从群组中删除,并且用户将停止接收消息。
Next, let’s set up routes, which work in almost the same manner as Django URL configuration, by adding the following code to a new file called example_channels/routing.py:
接下来,通过将以下代码添加到名为example_channels / routing.py的新文件中,来设置路由,其工作方式与Django URL配置几乎相同。
|
So, we defined channel_routing instead of urlpatterns and route() instead of url(). Notice that we linked our consumer functions to WebSockets.
因此,我们定义了channel_routing而不是urlpatterns并定义了route()而不是url() 。 注意,我们将使用者函数链接到WebSockets。
范本 (Templates)
Let’s write up some HTML that can communicate with our server via a WebSocket. Create a “templates” folder within “example” and then add an “example” folder within “templates” – “example_channels/example/templates/example”.
让我们写一些可以通过WebSocket与我们的服务器通信HTML。 在“示例”中创建一个“模板”文件夹,然后在“模板”中添加一个“示例”文件夹–“ example_channels / example / templates / example”。
Add a _base.html file:
添加_base.html文件:
|
And user_list.html:
和user_list.html:
|
Now, when the client successfully opens a connection with the server using a WebSocket, we will see a confirmation message print to the console.
现在,当客户端使用WebSocket成功打开与服务器的连接时,我们将看到一条确认消息打印到控制台。
观看次数 (Views)
Set up a supporting Django view to render our template within example_channels/example/views.py:
设置支持的Django视图以在example_channels / example / views.py中渲染我们的模板:
|
Add the URL to example_channels/example/urls.py:
将网址添加到example_channels / example / urls.py:
|
Update the project URL as well in example_channels/example_channels/urls.py:
在example_channels / example_channels / urls.py中也更新项目URL:
|
测试 (Test)
Ready to test?
准备测试了吗?
|
NOTE: You can alternatively run
python manage.py runserver --noworkerandpython manage.py runworkerin two different terminals to test the interface and worker servers as two separate processes. Both methods work!注意:您也可以在两个不同的终端中运行
python manage.py runserver --noworker和python manage.py runworker,以将接口服务器和辅助服务器作为两个单独的进程进行测试。 两种方法都可以!
When you visit http://localhost:8000/, you should see the connection message print to the terminal:
当您访问http:// localhost:8000 /时 ,您应该看到连接消息打印到终端:
|
用户认证 (User Authentication)
Now that we have proven that we can open a connection, our next step is to handle user authentication. Remember: We want a user to be able to log into our app and see a list of all of the other users who are subscribed to that user’s group. First, we need a way for users to create accounts and log in. Begin by creating a simple login page that will allow a user to authenticate with a username and password.
既然我们已经证明可以打开连接,那么下一步就是处理用户身份验证。 切记:我们希望用户能够登录到我们的应用程序,并查看订阅该用户组的所有其他用户的列表。 首先,我们需要一种让用户创建帐户并登录的方法。首先创建一个简单的登录页面,该页面将允许用户使用用户名和密码进行身份验证。
Create a new file called log_in.html within “example_channels/example/templates/example”:
在“ example_channels / example / templates / example”中创建一个名为log_in.html的新文件:
|
Next, update example_channels/example/views.py like so:
接下来,像这样更新example_channels / example / views.py:
|
Django comes with forms that support common authentication functionality. We can use the AuthenticationForm to handle user login. This form checks the supplied username and password, then returns a User object if a validated user is found. We log in the validated user and redirect them to our homepage. A user should also have to ability to log out of the application, so we create a logout view that provides that functionality and then takes the user back to the login screen.
Django带有支持通用身份验证功能的表单。 我们可以使用AuthenticationForm来处理用户登录。 该表单检查提供的用户名和密码,如果找到经过验证的用户,则返回User对象。 我们登录经过验证的用户并将其重定向到我们的主页。 用户还应该具有注销应用程序的能力,因此我们创建了一个提供该功能的注销视图,然后将用户带回登录屏幕。
Then update example_channels/example/urls.py:
然后更新example_channels / example / urls.py:
|
We also need a way to create new users. Create a sign-up page in the same manner as the login by adding a new file called sign_up.html to “example_channels/example/templates/example”:
我们还需要一种创建新用户的方法。 通过将一个名为sign_up.html的新文件添加到“ example_channels / example / templates / example”,以与登录相同的方式创建注册页面:
|
Notice that the login page has a link to the sign-up page, and the sign-up page has a link back to the login.
请注意,登录页面具有指向注册页面的链接,而注册页面具有指向登录名的链接。
Add the following function to the views:
在视图中添加以下功能:
|
We use another built-in form for user creation. After successful form validation, we redirect to the login page.
我们使用另一种内置形式来创建用户。 表单验证成功后,我们将重定向到登录页面。
Make sure to import the form:
确保导入表格:
|
Update example_channels/example/urls.py again:
再次更新example_channels / example / urls.py:
|
At this point, we need to create a user. Run the server and visit http://localhost:8000/sign_up/ in your browser. Fill in the form with a valid username and password and submit it to create our first user.
此时,我们需要创建一个用户。 运行服务器,然后在浏览器中访问http://localhost:8000/sign_up/ 。 使用有效的用户名和密码填写表格,然后提交以创建我们的第一个用户。
NOTE: Try using
michaelas the username andjohnson123as the password.注意:尝试使用
michael作为用户名,并使用johnson123作为密码。
The sign_up view redirects us to the log_in view, and from there we can authenticate our newly created user.
sign_up视图将我们重定向到log_in视图,从那里我们可以验证我们新创建的用户。
After we log in, we can test our new authentication views.
登录后,我们可以测试新的身份验证视图。
Use the sign up form to create several new users in preparation for the next section.
使用注册表单创建几个新用户,为下一节做准备。
登录警报 (Login Alerts)
We have basic user authentication working, but we still need to display a list of users and we need the server to tell the group when a user logs in and out. We need to edit our consumer functions so that they send a message right after a client connects and right before a client disconnects. The message data will include the user’s username and connection status.
我们具有基本的用户身份验证功能,但是我们仍然需要显示用户列表,并且需要服务器在用户登录和注销时告诉该组。 我们需要编辑使用者函数,以便它们在客户端连接之后和客户端断开连接之前立即发送消息。 消息数据将包括用户的用户名和连接状态。
Update example_channels/example/consumers.py like so:
像这样更新example_channels / example / consumers.py:
|
Notice that we have added decorators to the functions to get the user from the Django session. Also, all messages must be JSON-serializable, so we dump our data into a JSON string.
注意,我们已经在函数中添加了装饰器,以从Django会话中获取用户。 另外,所有消息都必须是JSON可序列化的,因此我们将数据转储到JSON字符串中。
Next, update example_channels/example/templates/example/user_list.html:
接下来,更新example_channels / example / templates / example / user_list.html:
|
On our homepage, we expand our user list to display a list of users. We store each user’s username as a data attribute to make it easy to find the user item in the DOM. We also add an event listener to our WebSocket that can handle messages from the server. When we receive a message, we parse the JSON data, find the <li> element for the given user, and update that user’s status.
在我们的主页上,我们扩展了用户列表以显示用户列表。 我们将每个用户的用户名存储为数据属性,以便轻松在DOM中查找用户项。 我们还向WebSocket添加了一个事件侦听器,该事件侦听器可以处理来自服务器的消息。 收到消息后,我们将解析JSON数据,找到给定用户的<li>元素,并更新该用户的状态。
Django does not track whether a user is logged in, so we need to create a simple model to do that for us. Create a LoggedInUser model with a one-to-one connection to our User model in example_channels/example/models.py:
Django不会跟踪用户是否已登录,因此我们需要创建一个简单的模型来为我们执行此操作。 在example_channels / example / models.py中创建一个与我们的User模型一对一连接的LoggedInUser模型:
|
Our app will create a LoggedInUser instance when a user logs in, and the app will delete the instance when the user logs out.
当用户登录时,我们的应用程序将创建一个LoggedInUser实例,而当用户注销时,该应用程序将删除该实例。
Make the schema migration and then migrate our database to apply the changes.
进行模式迁移,然后迁移我们的数据库以应用更改。
|
Next, update our user list view, in example_channels/example/views.py, to retrieve a list of users to render:
接下来,在example_channels / example / views.py中更新我们的用户列表视图,以检索要呈现的用户列表:
|
If a user has an associated LoggedInUser, then we record the user’s status as “Online”, and if not, the user is “Offline”. We also add a @login_required decorator to both our user list and log out views to restrict access only to registered users.
如果用户具有关联的LoggedInUser ,那么我们LoggedInUser用户的状态记录为“在线”,否则将用户记录为“离线”。 我们还在用户列表和注销视图中都添加了一个@login_required装饰器,以仅将访问权限限制为注册用户。
Add the imports as well:
还要添加导入:
|
At this point, users can log in and out, which will trigger the server to send messages to the client, but we have no way of knowing which users are logged in when the user first logs in. The user only sees updates when another user’s status changes. This is where the LoggedInUser comes into play, but we need a way to create a LoggedInUser instance when a user logs in, and then delete it when that user logs out.
此时,用户可以登录和注销,这将触发服务器向客户端发送消息,但是我们无法知道用户首次登录时哪些用户已登录。用户仅在其他用户的登录时看到更新。状态更改。 这是LoggedInUser发挥作用的地方,但是我们需要一种方法来在用户登录时创建LoggedInUser实例,然后在该用户注销时将其删除。
The Django library includes a feature known as signals that broadcasts notifications when certain actions occur. Applications can listen for those notifications and then act on them. We can exploit two helpful, built-in signals (user_logged_in and user_logged_out) to handle our LoggedInUser behavior.
Django库包含称为信号的功能,该功能可在发生某些操作时广播通知。 应用程序可以侦听那些通知,然后对它们进行操作。 我们可以利用两个有用的内置信号( user_logged_in和user_logged_out )来处理LoggedInUser行为。
Within “example_channels/example”, add a new file called signals.py:
在“ example_channels / example”中,添加一个名为signals.py的新文件:
|
We have to make the signals available in our app configuration, example_channels/example/apps.py:
我们必须在我们的应用程序配置example_channels / example / apps.py中提供信号:
|
Update example_channels/example/__init__.py as well:
同时更新example_channels / example / __ init__.py:
|
完整性检查 (Sanity Check)
Now we are finished coding and are ready to connect to our server with multiple users to test our app.
现在,我们已完成编码,并准备与多个用户连接到我们的服务器以测试我们的应用程序。
Run the Django server, log in as a user, and visit the homepage. We should see a list of all of the users in our app, each with a status of “Offline”. Next, open a new Incognito window and log in as a different user and watch both screens. Right when we log in, the regular browser updates the user status to “Online”. From our Incognito window, we see that the user logged in also has a status of “Online”. We can test the WebSockets by logging in and out on our different devices with various users.
运行Django服务器,以用户身份登录,然后访问主页。 我们应该在我们的应用程序中看到所有用户的列表,每个用户的状态为“离线”。 接下来,打开一个新的隐身窗口,以其他用户身份登录并观看两个屏幕。 在我们登录时,常规浏览器将用户状态更新为“在线”。 在“隐身”窗口中,我们看到已登录的用户的状态也为“在线”。 我们可以通过与不同用户在不同设备上登录和注销来测试WebSocket。
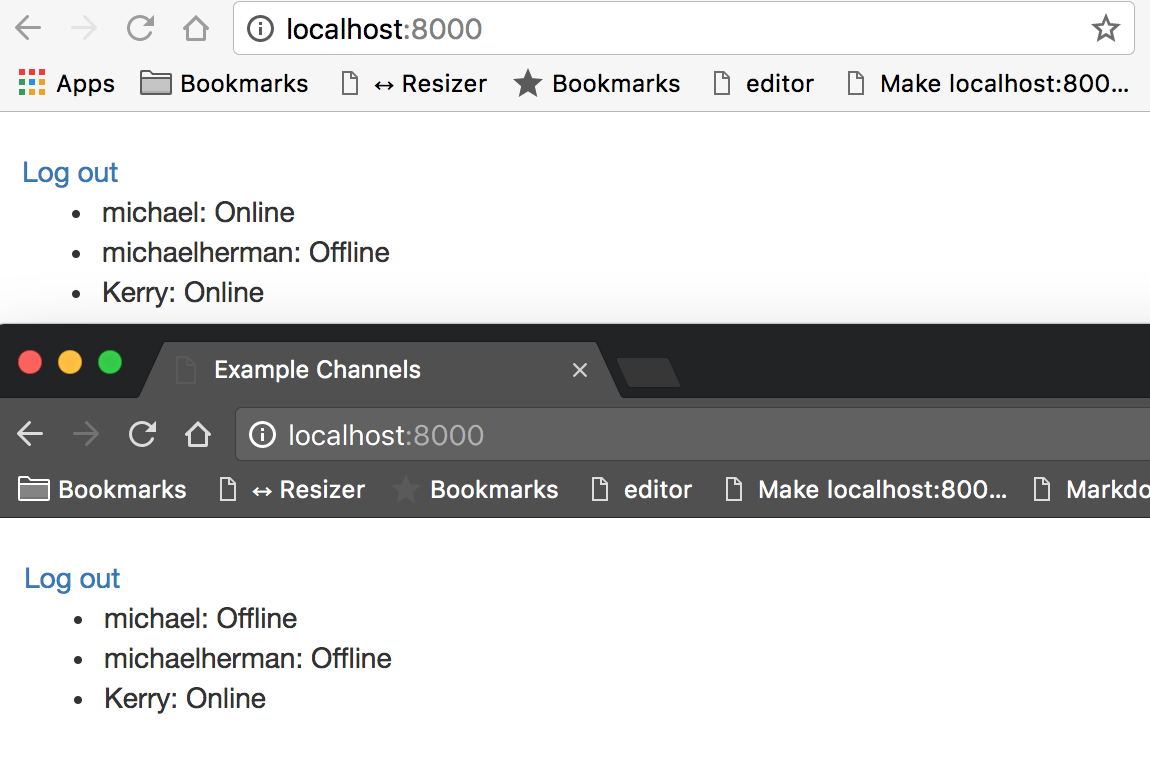
Observing the developer console on the client and the server activity in our terminal, we can confirm that WebSocket connections are being formed when a user logs in and destroyed when a user logs out.
观察客户端上的开发人员控制台以及终端中的服务器活动,我们可以确认WebSocket连接在用户登录时已形成,而在用户注销时已销毁。
|
NOTE: You could also use ngrok to expose the local server to the internet securely. Doing this will allow you to hit the local server from various devices such as your phone or tablet.
注意 :您还可以使用ngrok将本地服务器安全地公开到Internet。 这样做可以让您从各种设备(例如手机或平板电脑)访问本地服务器。
总结思想 (Closing Thoughts)
We covered a lot in this tutorial – Django Channels, WebSockets, user authentication, signals, and some front-end development. The main take away is this: Channels extends the functionality of a traditional Django app by letting us push messages from the server to groups of users via WebSockets.
在本教程中,我们涵盖了很多内容– Django通道,WebSocket,用户身份验证,信号和一些前端开发。 主要收获是:Channels允许我们通过WebSockets将消息从服务器推送到用户组,从而扩展了传统Django应用程序的功能。
This is powerful stuff!
这是强大的东西!
Think of some of the applications. We can create chat rooms, multiplayer games, and collaborative apps that allow users to communicate in real time. Even mundane tasks are improved with WebSockets. For example, instead of periodically polling the server to see if a long-running task has completed, the server can push a status update to the client when it finishes.
考虑一些应用程序。 我们可以创建聊天室,多人游戏和协作应用程序,以允许用户进行实时交流。 WebSockets甚至可以改善平凡的任务。 例如,服务器可以在完成时将状态更新推送到客户端,而不是定期轮询服务器以查看长时间运行的任务是否已完成。
翻译自: https://www.pybloggers.com/2017/02/getting-started-with-django-channels/
django 入门


 580
580

 被折叠的 条评论
为什么被折叠?
被折叠的 条评论
为什么被折叠?
 到【灌水乐园】发言


