


上海流浪汉沈
I’ve written about using vagrant for 99.9% of my python work on here before (see here and here for examples). In addition to vagrant, I use jupyter notebooks on 99.9% of the work that I do, so I figured I’d spend a little time describing how I use jupyter with vagrant.
我之前在这里写过关于使用vagrant进行99.9%python工作的信息(请参阅此处和此处的示例)。 除了无业游民之外,我还用99.9%的工作来使用jupyter笔记本,所以我认为我会花一些时间来描述如何将jupyter与无业游民结合使用。
First off, you’ll need to have vagrant set up and running (descriptions for linux, MacOS, Windows). Once you have vagrant installed, we need to make a few changes to the VagrantFile to allow port forwarding from the vagrant virtual machine to the browser on your computer. If you followed the Vagrant on Windows post, you’ll have already set up the configuration that you need for vagrant to forward the necessary port for jupyter. For those that haven’t read that post, below are the tweaks you need to make.
首先,您需要设置并运行流浪汉(针对linux , MacOS , Windows的描述)。 一旦您安装了vagrant,我们需要对VagrantFile进行一些更改,以允许端口从vagrant虚拟机转发到计算机上的浏览器。 如果您遵循Windows上的Vagrant帖子,那么您已经设置了vagrant所需的配置,以将必要的端口转发给jupyter。 对于那些尚未阅读该文章的人,以下是您需要进行的调整。
My default VagrantFile is shown in figure 1 below.
我的默认VagrantFile显示在下面的图1中。
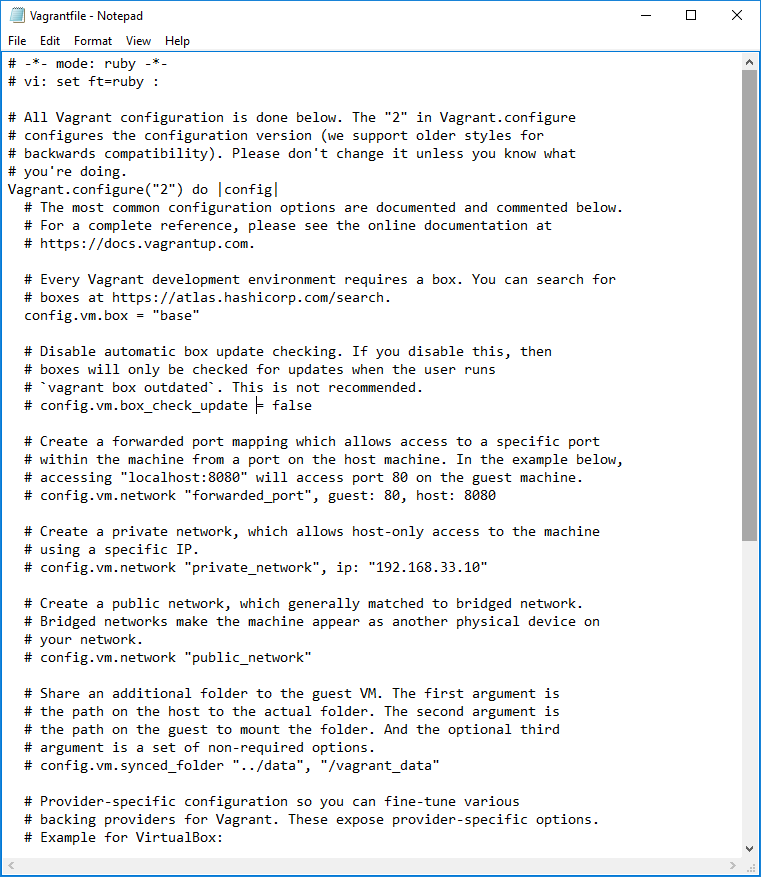
You’ll only need to change 1 line to get port forwarding working. You’ll need to change the line that reads:
您只需要更改1条线路就可以进行端口转发。 您需要更改以下内容:
# config.vm.network "forwarded_port", guest: 80, host: 8080
to the following:
到以下内容:
config.vm.network "forwarded_port", guest: 8888, host: 8888
This line will forward port 8888 on the guest to port 8888 on the host. If you aren’t using the default port of 8888 for jupyter, you’ll need to change ‘8888’ to the port you wish to you.
该线路会将来宾上的端口8888转发到主机上的端口8888。 如果您没有将默认端口8888用于jupyter,则需要将“ 8888”更改为您想要的端口。
Now that the VagrantFile is ready to go, do a quick ‘vagrant up’ and ‘vagrant ssh’ to start your vagrant VM and log into it. Next, set up any virtual environments that you want / need (I use virtualenv to set up a virtual environment for every project). You can skip this step if you wish, but it is recommended.
现在VagrantFile已准备就绪,可以快速执行“ vagrant up”和“ vagrant ssh”启动您的vagrant VM并登录。 接下来,设置您想要/需要的任何虚拟环境(我使用virtualenv为每个项目设置一个虚拟环境)。 如果愿意,可以跳过此步骤,但建议这样做。
If you set up a virtual environment, go ahead and source into it so that you are using a clean environment and then run the command below to install jupyter. If you didn’t go then you can just run the below to install jupyter.
如果您设置了虚拟环境,请继续使用该环境,以便使用干净的环境,然后运行以下命令来安装jupyter。 如果您不这样做,则可以运行以下命令来安装jupyter。
pip install jupyter
You are all set. Jupyter should be installed and ready to go. To run it so it is accessible from your browser, just run the following command:
你们都准备好了。 Jupyter应该已安装并准备就绪。 要运行它以便可以从浏览器访问它,只需运行以下命令:
jupyter notebook --ip=0.0.0.0
This command tells jupyter to listen on any IP address.
此命令告诉jupyter侦听任何IP地址。
In your browser, you should be able to visit your new fangled jupyter (via vagrant) instance by visiting the following url:
在浏览器中,您应该能够通过访问以下URL来访问新的有鳞的jupyter实例(通过无业游民):
http://0.0.0.0:8888/tree
Now you’re ready to go with jupyter with vagrant.
现在您已经准备好与流浪汉一起使用jupyter。

翻译自: https://www.pybloggers.com/2017/01/jupyter-with-vagrant/
上海流浪汉沈


 被折叠的 条评论
为什么被折叠?
被折叠的 条评论
为什么被折叠?
 到【灌水乐园】发言


