


vim python
It has come to my attention that somebody ‘round these parts has been preaching the gospel of Sublime Text 3. Well, as the resident senior developer (err, old fogey), I feel it’s my duty to provide a counterexample by way of the only TRUE Python development environment you will ever need – and that environment is of course VIM. That’s right. VIM is ubiquitous, fast, and never crashes. And it can do just about anything!
引起我注意的是,这些部分周围的人一直在传扬崇高文本3的福音。 嗯,作为常驻的高级开发人员(err,老祖父),我觉得我有责任通过您将需要的唯一TRUE Python开发环境提供一个反例,而且该环境当然是VIM 。 那就对了。 VIM无处不在,速度很快,而且从不崩溃。 它几乎可以做任何事!
On the down side though, VIM can be a pain to configure, but fear not – This article will show you how to get a powerful VIM environment setup, geared towards wrangling Python day in and day out.
从不利的方面来看,VIM的配置可能很麻烦,但请不要担心– 本文将向您展示如何获得功能强大的VIM环境设置,以适应日复一日地困扰Python的需求。
To get the most out of this article you should have at least a basic understanding on how to use VIM and its command modes. If you’re just getting started, check out this resource or this one. Spend some time with it before moving on.
要充分利用本文,您应该至少对如何使用VIM及其命令模式有基本的了解。 如果您只是入门,请查看此资源或该 资源 。 在继续之前花一些时间。
正在安装 (Installing)
Since VIM comes pre-installed on a number of *nix systems, let’s first and foremost check to see if it’s installed:
由于VIM已预先安装在许多* nix系统上,因此让我们首先检查一下是否已安装:
|
If installed, you should see something like:
如果已安装,则应该看到类似以下内容的内容:
|
At this point, you want to look for two things-
在这一点上,您想寻找两件事-
- The VIM version. This should be > 7.3.
- Python Support. Under the list of features, make sure you see
+python.
- VIM版本。 这应该是> 7.3。
- Python支持。 在功能列表下,确保您看到
+python。
If you have both of these, then move right along to VIM Extensions. If not, it’s time to install/upgrade.
如果您同时拥有这两个功能,请继续前进至VIM Extensions 。 如果没有,那么该安装/升级了 。
OSX (OSX)
Grab Homebrew, if you don’t already have it, and run:
抓住Homebrew ,如果还没有,请运行:
|
* NIX (*NIX)
For Debian or Ubuntu you can try:
对于Debian或Ubuntu,您可以尝试:
|
For other flavors of Linux check the docs from your package manager. Here is a link to get you started: Install Vim
对于其他版本的Linux,请检查软件包管理器中的文档。 这是一个入门的链接: 安装Vim
视窗 (Windows)
There are many different ways to install VIM on Windows. Start with the official docs.
在Windows上有多种不同的安装VIM的方法。 从官方文档开始。
验证安装 (Verifying the Install)
Make sure you have installed VIM > 7.3 with Python support. Again, run vim --version to verify this. If you want to check the specific version of Python used in VIM, run :python import sys; print(sys.version) from within VIM:
确保已安装具有Python支持的VIM> 7.3。 再次运行vim --version进行验证。 如果要检查VIM中使用的特定Python版本,请运行:python import sys; print(sys.version) 从VIM中:python import sys; print(sys.version) :
|
This should output your current version of Python. If you get an error, then you don’t have Python support and you either need to reinstall or recompile if you’re building from source.
这应该输出您当前的Python版本。 如果遇到错误,则说明您不支持Python,并且如果要从源代码进行构建,则需要重新安装或重新编译。
With VIM installed, let’s look at how to customize VIM for Python development.
安装了VIM后,让我们看看如何为Python开发自定义VIM。
VIM扩展 (VIM Extensions)
VIM can do a lot of what developers need right out of the box. However, VIM is also massively extensible and there are some pretty killer extensions that make VIM behave more like a “modern” IDE. So, the very first thing you need is a good extension manager.
VIM可以立即完成开发人员需要执行的许多任务。 但是,VIM也可以大规模扩展,并且有一些漂亮的杀手级扩展使VIM表现得更像“现代” IDE。 因此,您首先需要的是一个好的扩展管理器。
Extensions in VIM are often referred to as bundles or plugins.
VIM中的扩展通常称为捆绑软件或插件 。
文德尔 (Vundle)
VIM has several extension managers, but the one we strongly recommend is Vundle. Think of it as pip for VIM. It makes installing and updating packages trivial.
VIM有几个扩展管理器,但我们强烈建议您使用Vundle 。 可以将其视为VIM的一点。 它使安装和更新软件包变得微不足道。
Let’s get Vundle installed:
让我们安装Vundle:
|
This command downloads the Vundle plugin manager and chucks it in your VIM bundles directory. Now you can manage all your extensions from the .vimrc configuration file.
此命令将下载Vundle插件管理器,并将其安装在您的VIM bundles目录中。 现在,您可以从.vimrc 配置文件管理所有扩展。
Add the file to your user’s home directory:
将文件添加到用户的主目录:
|
Now set up Vundle in your .vimrc by adding the following to the top of the file:
现在,通过在文件顶部添加以下内容,在.vimrc设置Vundle:
|
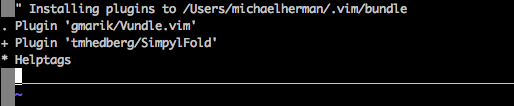
That’s it. You’re now set up to use Vundle. Afterward you can add the plugins you want to install, then fire up VIM and run:
而已。 现在,您已设置为使用Vundle。 之后,您可以添加要安装的插件,然后启动VIM并运行:
|
This command tells Vundle to work its magic – downloading all the plugins and installing/updating them for you.
该命令告诉Vundle发挥魔力-下载所有插件并为您安装/更新它们。
For Windows users, check out the Windows Installation Instructions.
对于Windows用户,请查阅Windows安装说明 。
让我们做一个IDE (Let’s make an IDE)
We couldn’t possibly list all the VIM features, but let’s look at a quick list of some of the powerful out-of-the-box features perfect for Python development.
我们不可能列出所有VIM功能,但让我们看一下一些快速强大的现成功能,这些功能非常适合Python开发。
抛开鼠标 (Ditch the Mouse)
Probably the MOST important feature of VIM is that it doesn’t require a mouse (except for the graphical variants of VIM). At first this may seem like a horrible idea, but after you invest the time – and it does take time – to learn the key combinations, you will speed up your overall workflow!
VIM的最重要的功能可能就是它不需要鼠标(VIM的图形变体除外)。 乍一看,这似乎是一个可怕的主意,但是在您花时间(确实需要时间)来学习按键组合之后 ,您将加快整体工作流程!
分割版面 (Split Layouts)
Open a file with :sv <filename> and you split the layout vertically (e.g., the new file opens below the current file) or reverse the keys to :vs <filename> and you get a horizontal split (e.g., the new file opens to the right of your current file).
使用:sv <filename>打开文件,然后垂直拆分布局(例如,新文件在当前文件下方打开),或将键反转至:vs <filename> ,然后进行水平拆分(例如,新文件打开)在您当前文件的右侧)。
You can nest splits as well, so you can have splits inside of splits, horizontal and vertical, to your heart’s content. As we all know we often need to look at several files at once when developing.
您也可以嵌套拆分,这样就可以在拆分中将水平和垂直拆分放入您的内心。 众所周知,开发时经常需要一次查看多个文件。
Pro Tip: Make sure to utilize tab completion to find files after typing :sv.
专业提示 :键入:sv后,请确保利用制表符完成功能来查找文件。
Pro Tip: You can also specify different areas of the screen where the splits should occur by adding the following lines to the .vimrc file:
专家提示 :您还可以通过将以下行添加到.vimrc文件中,来指定应在屏幕上发生拆分的不同区域:
|
Pro Tip: Want to move between the splits without using the mouse? Simply add the following to .vimrc and you can jump between splits with just one key combination:
专家提示 :是否希望在不使用鼠标的情况下在拆分之间移动? 只需将以下内容添加到.vimrc中,您就可以通过一个键组合在拆分之间跳转:
|
Key combos:
关键连击:
Ctrl-jmove to the split belowCtrl-kmove to the split aboveCtrl-lmove to the split to the rightCtrl-hmove to the split to the left
-
Ctrl-j移至以下拆分 -
Ctrl-k移至上方的拆分 -
Ctrl-l移至右侧的拆分 -
Ctrl-h移到左侧的拆分
In other words, press Ctrl plus the standard VIM movement key to move to a specific pane.
换句话说,按Ctrl和标准VIM移动键可移动到特定窗格。
But wait what is the
nnoremapthing? – in a nutshellnnoremapremaps one key combination to another; the no part means remap the key in normal mode as opposed to visual mode. Basicallynnoremap <C-J> <C-W><C-j>says in normal mode when I hit<C-J>do<C-W><C-j>instead. More info can be found here.但是,等等什么是
nnoremap? 简而言之,nnoremap一个键组合重新映射到另一个键组合; 没有任何部分意味着在正常模式下而不是视觉模式下重新映射键。 基本上nnoremap <CJ> <CW><Cj>在正常模式下说,当我按下<CJ>请改为执行<CW><Cj>。 在这里可以找到更多信息。
缓冲液 (Buffers)
While VIM can do tabs, many prefer buffers and splits. You can think of a buffer as a recently opened file. VIM provides easy access to recent buffers, just type :b <buffer name or number> to switch to an open buffer (autocomplete works here as well). You can also use :ls to list all buffers.
尽管VIM可以执行制表符,但许多人更喜欢缓冲区和拆分。 您可以将缓冲区视为最近打开的文件。 VIM提供了对最近缓冲区的轻松访问,只需键入:b <buffer name or number>即可切换到打开的缓冲区(自动完成功能在这里也适用)。 您也可以使用:ls列出所有缓冲区。
Pro Tip: At the end of the :ls output, VIM will prompt with Hit enter to continue. You can instead type :b <buffer number> and pick the buffer immediately while you still have the list displayed (which saves a keystroke and having to remember the buffer number).
提示 :在:ls输出的末尾,VIM将提示您按Hit enter to continue 。 您可以改用:b <buffer number>并在仍然显示列表的同时立即选择缓冲区(这样可以节省击键次数,并且必须记住缓冲区号)。
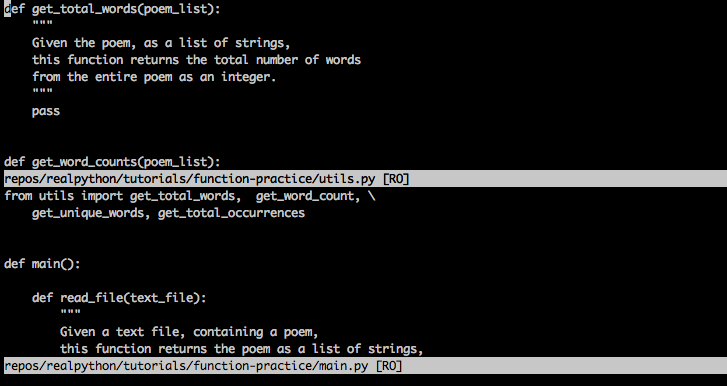
代码折叠 (Code Folding)
Most “modern” IDEs provide a way to collapse (or fold) methods and classes, showing you just the class/method definition lines instead of all the code.
大多数“现代” IDE提供一种折叠(或折叠 )方法和类的方法,仅向您显示类/方法定义行而不是所有代码。
You can enable that in .vimrc with the following lines:
您可以在.vimrc中使用以下几行启用该功能:
|
This works all right, but you have to type za to fold (and unfold). The space key would be much better. So add this line to your .vimrc file as well:
可以,但是您必须键入za才能折叠(展开)。 空格键会更好。 所以也将这一行添加到您的.vimrc文件中:
|
Now you can easily hide portions of your code that you’re not currently working on.
现在,您可以轻松隐藏当前未使用的代码部分。
The initial command, set foldmethod=indent, creates folds based upon line indents. This however often creates more folds that you really want. But have no fear! There are several extensions that attempt to rectify that. We recommend SimpylFold. Install it with Vundle by adding the following line to .vimrc
初始命令set foldmethod=indent ,基于行缩进创建折叠。 但是,这通常会创建更多您真正想要的折叠。 但是不要害怕! 有几种扩展程序试图纠正这一问题。 我们建议使用SimpylFold 。 通过在.vimrc添加以下行,将其与Vundle一起安装
|
Don’t forget to install the plugin –
:PluginInstall.不要忘记安装插件–
:PluginInstall。
Pro Tip: Want to see the docstrings for folded code?
专业提示 :是否想查看折叠代码的文档字符串?
|
Python缩进 (Python Indentation)
Of course for code folding to work based on indentations, you want your indents to be correct. Again VIM falls short a bit out of the box because it doesn’t handle auto-indent after a function definition. Two things can be done with indentation:
当然,为了使代码折叠能够基于缩进工作,您希望缩进正确。 再次,VIM有点开箱即用,因为它在函数定义后不处理自动缩进。 缩进可以完成两件事:
- The first is to get indentation to follow PEP8 standards.
- The second part is to better handle auto-indentation.
- 首先是要缩进以遵循PEP8标准。
- 第二部分是更好地处理自动缩进。
PEP8
PEP8
To add the proper PEP8 indentation, add the following to your .vimrc:
要添加正确的PEP8缩进,请在.vimrc中添加以下内容:
|
This will give you the standard four spaces when you hit tab, ensure your line length doesn’t go beyond 80 characters, and store the file in a unix format so you don’t get a bunch of conversion issues when checking into GitHub and/or sharing with other users.
当您按下Tab键时,这将为您提供标准的四个空格,确保您的行长不超过80个字符,并以Unix格式存储文件,因此在登录GitHub和/时不会遇到很多转换问题或与其他用户共享。
And for full stack development you can use another au command for each filetype:
对于全栈开发,您可以为每个文件类型使用另一个au命令:
|
This way you can have different settings for different filetypes. There is also a plugin called ftypes which will allow you to have a separate file for each filetype you want to maintain settings for, so use that if you see fit.
这样,您可以对不同的文件类型进行不同的设置。 还有一个名为ftypes的插件,该插件可让您为要维护其设置的每种文件类型拥有一个单独的文件,因此请在合适的情况下使用它。
Auto-Indentation
自动缩进
Autoindent will help but in some cases (like when a function signature spans multiple lines), it doesn’t always do what you want, especially when it comes to conforming to PEP8 standards. To fix that, we can use the indentpython.vim extension:
自动缩进会有所帮助,但在某些情况下(例如,函数签名跨越多行),它并不总是能够满足您的要求,尤其是在符合PEP8标准时。 为了解决这个问题,我们可以使用indentpython.vim扩展名:
|
标记不必要的空格 (Flagging Unnecessary Whitespace)
We also want to avoid extraneous whitespace. We can have VIM flag that for us so that it’s easy to spot – and then remove.
我们还想避免多余的空格。 我们可以为我们提供VIM标志,以便轻松发现-然后将其删除。
|
This will mark extra whitespace as bad, and probably color it red.
这会将多余的空白标记为坏的,并且可能将其着色为红色。
UTF8支持 (UTF8 Support)
For the most part, you should be using UTF8 when working with Python, especially if you’re working with Python 3. Make sure VIM knows that with the following line:
在大多数情况下,使用Python时应使用UTF8,尤其是在使用Python 3时。请确保VIM通过以下行知道这一点:
|
自动完成 (Auto-complete)
The best plugin for Python auto-complete is YouCompleteMe. Again, use Vundle to install:
最好的Python自动完成插件是YouCompleteMe 。 再次,使用Vundle安装:
|
Under the hood YouCompleteMe uses a few different auto-completers (including Jedi for Python), and it needs some C libraries to be installed for it to work correctly. The docs have very good installation instructions so I won’t repeat them here, but be sure you follow them.
在幕后,YouCompleteMe使用了几种不同的自动完成器(包括用于Python的Jedi ),并且需要安装一些C库才能使其正常工作。 这些文档具有非常好的安装说明,因此在这里我不再赘述,但是请确保您遵循它们。
It works out of the box pretty well, but let’s add a few customizations:
开箱即用的效果很好,但是让我们添加一些自定义设置:
|
The former line ensures that the autocomplete window goes away when you’re done with it, and the latter defines a shortcut for goto definition.
前一行确保自动完成窗口在完成后消失,而后者则定义了goto定义的快捷方式。
My leader key is mapped to space, so
space-gwill goto definition of whatever I’m currently on. Helpful when exploring new code.我的前导键映射到空间,因此
space-g将转到我当前正在使用的任何内容的定义。 探索新代码时很有帮助。
虚拟环境支持 (Virtualenv Support)
One issue with the goto definition above is that VIM by default doesn’t know anything about virtualenv, so you have to make VIM and YouCompleteMe aware of your virtualenv by adding the following lines of code to .vimrc:
上面的goto定义的一个问题是,默认情况下VIM对virtualenv一无所知,因此您必须通过向.vimrc中添加以下代码行,使VIM和YouCompleteMe意识到您的virtualenv:
|
This determines if you are running inside a virtualenv, and then switches to that specific virtualenv and sets up your system path so that YouCompleteMe will find the appropriate site packages.
这将确定您是否在virtualenv中运行,然后切换到该特定的virtualenv并设置您的系统路径,以便YouCompleteMe将找到适当的站点程序包。
语法检查/突出显示 (Syntax Checking/Highlighting)
You can have VIM check your syntax on each save with the syntastic extension:
你可以有VIM检查每个语法保存与syntastic扩展:
|
Also add PEP8 checking with this nifty little plugin:
还使用这个漂亮的小插件添加PEP8检查:
|
Finally, make your code look pretty:
最后,使您的代码看起来很漂亮:
|
配色方案 (Color Schemes)
Color schemes work in conjunction with the basic color scheme that you are using. Check out solarized for GUI mode, and Zenburn for terminal mode:
配色方案与您使用的基本配色方案一起使用。 查看solarized的GUI模式,以及Zenburn的终端模式:
|
Then just add a bit of logic to define which scheme to use based upon the VIM mode:
然后只需添加一些逻辑,即可根据VIM模式定义要使用的方案:
|
Solarized also ships with a dark and light theme. To make switching between them very easy (by pressing F5) add:
Solarized也带有暗色和亮色主题。 要使它们之间的切换非常容易(按F5键),请添加:
|
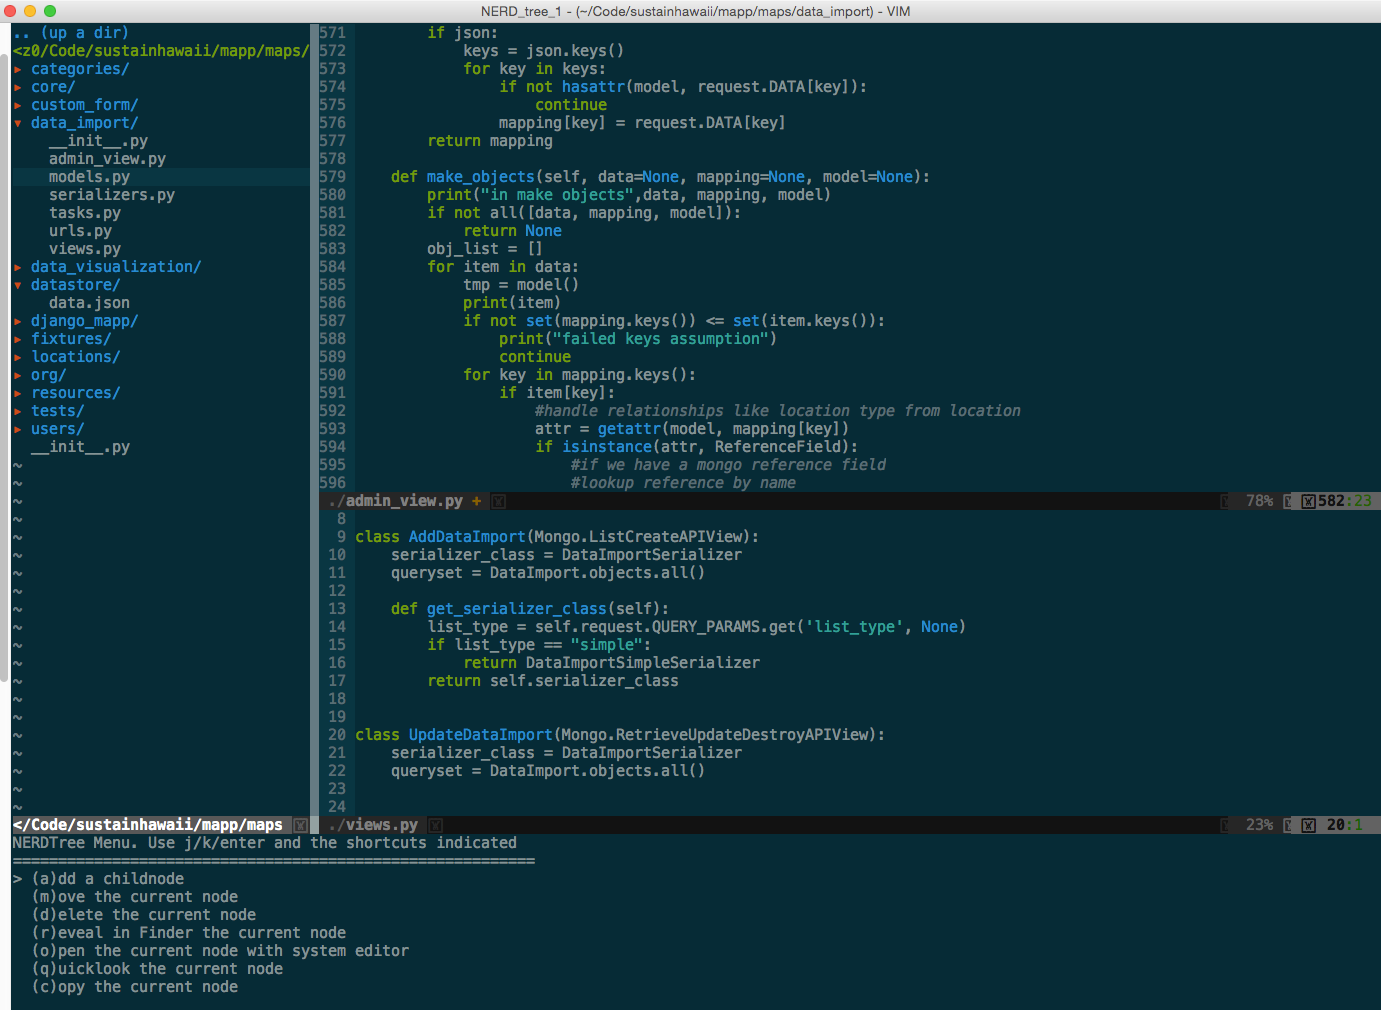
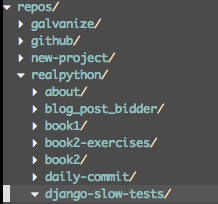
档案浏览 (File Browsing)
If you want a proper file tree then NERDTree is the way to go.
如果您想要一个合适的文件树,那么NERDTree是您要走的路。
|
And if you want to use tabs, utilize vim-nerdtree-tabs:
如果要使用选项卡,请使用vim-nerdtree-tabs :
|
Want to hide .pyc files? Then add the following line:
是否要隐藏.pyc文件? 然后添加以下行:
|
超级搜寻 (Super Searching)
Want to search for basically anything from VIM? Check out ctrlP:
是否想从VIM中搜索基本内容? 查看ctrlP :
|
As expected, press Ctrl-P to enable the search and then just start typing. If your search matches anything close to the file you’re looking for, it will find it. Oh – and it’s not just files; it will find tags as well! For more, check out this YouTube video.
如预期的那样,按Ctrl-P启用搜索,然后开始输入。 如果您的搜索与您要查找的文件接近,则它将找到它。 哦–不只是文件;还有 它也会找到标签! 有关更多信息,请观看此YouTube视频 。
行号 (Line Numbering)
Turn on line numbers on the side of the screen with:
使用以下方法打开屏幕侧面的行号:
|
Git集成 (Git Integration)
Want to perform basic git commands without leaving the comfort of VIM? Then vim-fugitive is the way to go:
是否想在不离开VIM的情况下执行基本的git命令? 那么vim逃亡是必经之路:
|
See it in action on VIMcasts.
电源线 (Powerline)
Powerline is a status bar that displays things like the current virtualenv, git branch, files being edited, and much more.
电力线是一个状态栏,显示诸如当前的virtualenv,git分支,正在编辑的文件等内容。

It’s written in Python, and it supports a number of other environments like zsh, bash, tmux, and IPython.
它是用Python编写的,并且支持zsh,bash,tmux和IPython等许多其他环境。
|
Take a look at the official docs for all the configuration options.
查看所有配置选项的官方文档 。
系统剪贴板 (System clipboard)
Vim usually has its own clipboard and ignores the system keyboards, but sometimes you might want to cut, copy, and/or paste to/from other applications outside of VIM. On OSX, you can access your system clipboard with this line:
Vim通常具有自己的剪贴板,并且忽略系统键盘,但是有时您可能想要从VIM之外的其他应用程序剪切,复制和/或粘贴。 在OSX上,您可以使用以下行访问系统剪贴板:
|
外壳中的VIM (VIM in the Shell)
And finally, once you’ve mastered VIM and its keyboard shortcuts, you’ll often find yourself getting annoyed with the lack of those same shortcuts in the shell. Fear not, most shells have a VI mode. To turn it on for your shell, add the following line to ~/.inputrc:
最后,一旦您掌握了VIM及其键盘快捷键,您就会经常发现自己对Shell中缺少这些相同的快捷键感到恼火。 不用担心,大多数外壳都具有VI模式。 要为您的shell打开它,请将以下行添加到〜/ .inputrc:
|
Now you will not only be able to use VIM key combos in the shell, but also in the Python interpreter and any other tool that uses GNU Readline (i.e., most database shells). Now you have VIM everywhere!
现在,您不仅可以在外壳中使用VIM键组合,而且还可以在Python解释器和使用GNU Readline的任何其他工具(即大多数数据库外壳)中使用。 现在您到处都有VIM!
结论 (Conclusion)
That’s more or less it (for Python development, at least). There are a ton of other extensions that you can use, as well as alternatives to everything detailed in this post. What are some of your favorite extensions? How have you configured VIM to match your personality?
差不多就是这样(至少对于Python开发而言)。 您可以使用大量其他扩展,以及本文中详细介绍的所有替代方法。 您最喜欢的扩展有哪些? 您如何配置VIM以匹配您的个性?
Here is a link to my current VIM config. Got one of your own? Please share!
这是我当前VIM配置的链接。 有自己的一个吗? 请分享!
Thanks for reading!
谢谢阅读!
资源资源 (Resources)
- VIM Tutor comes with VIM, so once VIM is install just type
vimtutorfrom the command line and the program will teach you how to use VIM by, well, using VIM. - VIMcasts are advanced tutorial videos describing how to use many of VIM’s features.
- Official VIM docs
- Open Vim
- Learn Vimscript the Hard Way is perfect for learning vimscript.
- VIM Tutor随VIM一起提供,因此,安装VIM后,只需从命令行键入
vimtutor,程序就会教您如何通过VIM使用VIM。 - VIMcasts是高级教程视频,描述了如何使用VIM的许多功能。
- VIM官方文档
- 打开Vim
- 艰难地学习Vimscript非常适合学习Vimscript。
翻译自: https://www.pybloggers.com/2015/10/vim-and-python-a-match-made-in-heaven/
vim python


 621
621

 被折叠的 条评论
为什么被折叠?
被折叠的 条评论
为什么被折叠?
 到【灌水乐园】发言


