


web高级程序python
This tutorial explores how to create dynamic web applications with Python.
本教程探讨了如何使用Python创建动态Web应用程序。
Originally published in Real Python Course 1: Introduction to Python
网络应用 (Web Applications)
You know how to write useful Python scripts, and now you want to show them off to the world… but how? Most non-programmers won’t have any use for your .py script files. Programs like PyInstaller and cx_Freeze help turn Python scripts into executable programs that run by themselves on different platforms without the need to use Python to interpret the code. More and more, however, we’re seeing a trend away from “desktop”-based applications and toward web applications that can be accessed and run through Internet browsers.
您知道如何编写有用的Python脚本,现在想向世界展示它们……但是如何? 大多数非程序员都不会对您的.py脚本文件有任何用处。 诸如PyInstaller和cx_Freeze之类的程序可将Python脚本转变为可执行程序,这些程序可在不同平台上自行运行,而无需使用Python解释代码。 但是,越来越多的人看到从基于“桌面”的应用程序转向可以通过Internet浏览器访问和运行的Web应用程序的趋势。
Historically, websites on the Internet were full of plain webpages that offered the exact same information to every user; you would request a page, and the information from that page would be displayed. These webpages were “static” because their content never changed; a web server would simply respond to a user’s request for a webpage by sending along that page, regardless of who the user was or what other actions the user took.
从历史上看,Internet上的网站到处都是普通网页,这些网页可以为每个用户提供完全相同的信息。 您将请求一个页面,然后将显示该页面中的信息。 这些网页是“静态的”,因为它们的内容从未改变。 无论用户是谁或用户采取了什么其他操作,网络服务器都可以通过沿着页面发送来简单地响应用户对网页的请求。
Today, most websites are actually web applications, which offer “dynamic” webpages that can change their content in any number of ways. For instance, a webmail application allows the user to interact with it, displaying all sorts of different information, often while staying in a single webpage.
如今,大多数网站实际上都是Web应用程序,它们提供“动态”网页,可以以多种方式更改其内容。 例如,Webmail应用程序允许用户与其交互,显示各种不同的信息,而这些信息经常停留在单个网页中。
The idea behind creating a Python-driven web application is that you can use Python code to determine what content to show a user and what actions to take. The code is actually run by the web server that hosts your website, so your user doesn’t need to install anything to use your application; if the user has a browser and an Internet connection, then everything else will be run online.
创建Python驱动的Web应用程序背后的想法是,您可以使用Python代码来确定向用户显示哪些内容以及采取哪些操作。 该代码实际上是由托管您的网站的Web服务器运行的,因此您的用户无需安装任何程序即可使用您的应用程序。 如果用户具有浏览器和Internet连接,则其他所有内容都将在线运行。
Google App引擎 (Google App Engine)
The task of getting Python code to run on a website is a complicated one, but there are a number of different web frameworks available for Python that automatically take care the details.
使Python代码在网站上运行的任务是一项复杂的工作,但是有许多不同的Web框架可用于Python,这些框架会自动处理细节。
The first thing that you will need is a web hosting plan that allows and supports the ability to run Python code. Since these usually cost money (and since not everyone even has a website), we’ll stick with a free alternative that is one of the simplest to set up: Google App Engine, which uses a web framework called webapp2.
您需要做的第一件事是一个网络托管计划,该计划允许并支持运行Python代码的能力。 由于这些程序通常要花钱(而且并不是每个人都拥有一个网站),因此我们将坚持使用一种最简单的免费替代方法: Google App Engine ,它使用一个称为webapp2的网络框架。
There are a number of other alternatives (both free and paid) that are more customizable, and you can use webapp2 on its own later without relying on Google App Engine, but getting started with Google App Engine will be the quickest and easiest way to begin learning about web application development in Python.
还有许多其他的选项(免费和付费),它们更具可定制性,您以后可以在不依赖Google App Engine的情况下单独使用webapp2,但是开始使用Google App Engine将是最快,最简单的方法了解Python中的Web应用程序开发。
下载 (Download)
First, go here to download and install the appropriate Python SDK (Software Development Kit) for Google App Engine. This particular SDK includes two main resources: a “web server” application, which will allow you to run your web applications on your own computer without actually putting them online, and the Google App Engine Launcher, which will help with getting your web applications online.
首先,请转到此处下载并安装适用于Google App Engine的Python SDK( 软件开发工具包 )。 这个特定的SDK包括两个主要资源:“网络服务器”应用程序(可让您无需实际将其在线运行即可在自己的计算机上运行该Web应用程序)和Google App Engine启动器(可帮助使您的Web应用程序联机) 。
NOTE: Unfortunately, Google App Engine only works with Python 2.7 and has no immediate plans to support Python 3 code.
注意 :不幸的是,Google App Engine仅适用于Python 2.7,并且没有立即计划支持Python 3代码。
请求-响应 (Request-Response)
Before we dive into writing a web application, let’s get a very broad, generalized overview of what’s about to happen. There are a lot of different pieces involved, and they all have to communicate with each other to function correctly:
在开始编写Web应用程序之前,让我们对即将发生的事情有一个非常广泛的概括概述。 其中涉及许多不同的部分,并且它们都必须相互通信才能正常运行:
- First, your user makes a “request” for a particular webpage on your website (i.e., by typing a URL into a browser).
- This request gets received by the web server that hosts your website.
- The web server uses App Engine to look at the configuration file for your application. App Engine matches the user’s request to a particular portion of your Python script.
- This Python code is called up by App Engine. When your code runs, it writes out a “response” webpage.
- App Engine delivers this response back to your user through the web server.
- The user can then view the web server’s response (i.e., by displaying the resulting webpage in a browser).
- 首先,您的用户对您网站上的特定网页进行“请求”(即,通过在浏览器中键入URL)。
- 托管您的网站的Web服务器会收到此请求。
- 网络服务器使用App Engine查看您的应用程序的配置文件。 App Engine将用户的请求与Python脚本的特定部分匹配。
- 此Python代码由App Engine调用。 当您的代码运行时,它会写出一个“响应”网页。
- App Engine通过网络服务器将该响应传递回您的用户。
- 然后,用户可以查看Web服务器的响应(即,通过在浏览器中显示结果网页)。
静态网络应用 (Static Web App)
The application we’re going to create will rely on a couple different files, so the first thing we need to do is make a project folder to hold all of these files.
我们将要创建的应用程序将依赖于几个不同的文件,因此,我们要做的第一件事是创建一个项目文件夹来保存所有这些文件。
项目设置 (Project Setup)
Create a new folder named “first_app” anywhere you like (just remember where it is). First we will write a very simple Python script that can “respond” with the content of your webpage:
在您喜欢的任何地方创建一个名为“ first_app”的新文件夹(只记得它在哪里)。 首先,我们将编写一个非常简单的Python脚本,该脚本可以“响应”您的网页内容:
|
Save this code in a script named hello.py inside your “first_app” folder.
将此代码保存在“ first_app”文件夹中名为hello.py的脚本中。
So what’s with the first two print statements? Web servers communicate with users (usually browsers) through HTTP by receiving HTTP requests and sending HTTP responses. The HTTP response that our application sends can have both header lines and a body.
那么前两个打印语句是什么? Web服务器通过接收HTTP请求并发送HTTP响应,通过HTTP与用户(通常是浏览器)进行通信。 我们的应用程序发送的HTTP响应可以包含标头行和正文。
We added a header line to our HTTP response in the first line. Header lines contain optional information to let a browser know how to interpret the body of the response. In this case, setting our header’s Content-Type equal to the value text/plain is the way that our HTTP response lets a browser know to expect the body to contain plain text as opposed to HTML code, an image, or some other type of file. Leaving a blank line after this header line is how we told the browser, “the header lines are over now; here comes the actual body to display.”
我们在第一行中的HTTP响应中添加了标题行。 标题行包含可选信息,以使浏览器知道如何解释响应的正文。 在这种情况下,将标头的Content-Type设置为text/plain值是HTTP响应使浏览器知道正文包含纯文本而不是HTML代码,图像或其他类型的内容的方式文件。 在此标题行之后留下空白行是我们告诉浏览器的方式:“标题行已经结束; 这里是要显示的实际主体。”
The body of the response is what we will actually see when we load the page in a browser. In this case, it’s just a simple string of text: “Congratulations, it’s a web app!”
响应的主体是在浏览器中加载页面时实际看到的内容。 在这种情况下,它只是一个简单的文本字符串:“恭喜,这是一个网络应用程序!”
YAML配置 (YAML Config)
Before we can run our web application, we need to provide App Engine with a configuration file. This is the file that the web server will use to get information about what Python code we want it to run. Open up any text editor and copy the following text into a new file:
在运行Web应用程序之前,我们需要为App Engine提供配置文件 。 Web服务器将使用此文件来获取有关我们希望其运行的Python代码的信息。 打开任何文本编辑器,然后将以下文本复制到新文件中:
|
Now name this file app.yaml and save it in the same “first_app” folder as the Python script.
现在,将此文件命名为app.yaml并将其保存在与Python脚本相同的“ first_app”文件夹中。
NOTE: Make sure you get the spacing correct; the last line includes two leading spaces so that “script” lines up under “url”. Just like Python, YAML files rely on precise indentation.
注意 :请确保正确设置间距; 最后一行包含两个前导空格,以便“脚本”在“ URL”下对齐。 与Python一样,YAML文件也需要精确的缩进。
The YAML configuration file gives App Engine all the necessary information it needs to run the web application:
YAML配置文件为App Engine提供了运行Web应用程序所需的所有必要信息:
- First,
application: helloprovides a unique identifying name for the application so that we will be able to launch it later; we are giving the namehelloto our web app. - Next, the line
version: 1lets App Engine know that this is version 1 of our application. (If we update this later toversion: 2, App Engine will keep a copy of version 1 in memory so that we can go back to running this previous version if necessary.) - The lines
runtime: python27andapi_version: 1let App Engine know that we want to use Python 2.7 to run our application. - The line
threadsafe: falsemeans that our web application isn’t designed to be able to receive multiple requests at once; if App Engine has multiple requests then it will send them to our application one at a time instead of all at once. - Finally we define our
handlersto handle different webpage requests from our users (i.e., if a user requested the main page at “/” or another page at a different address on our site). These requested paths can each be assigned to a different piece of Python code. In this case, we only have one script, hello.py, so we want to direct user requests for any page on the website to the same script. In these last two lines of the configuration file, we say that any URL matching the regular expression/.*(which is any URL on our site) should be directed to the hello.py script.
- 首先,
application: hello为application: hello提供了唯一的标识名,以便我们稍后能够启动它。 我们给我们的网络应用程序打个hello。 - 接下来,一行
version: 1让App Engine知道这是我们应用程序的版本1。 (如果我们稍后将此version: 2更新为version: 2,则App Engine将在内存中保留版本1的副本,以便如有必要,我们可以返回到运行此先前版本。) - 行
runtime: python27api_version: 1和api_version: 1让App Engine知道我们要使用Python 2.7运行我们的应用程序。 -
threadsafe: false行threadsafe: false表示我们的Web应用程序不能同时接收多个请求; 如果App Engine有多个请求,则它将一次将它们发送到我们的应用程序,而不是一次发送给我们。 - 最后,我们定义
handlers以处理来自用户的不同网页请求(即,如果用户在“ /”处请求主页,或者在我们站点上其他地址处请求另一个页面)。 可以将这些请求的路径分别分配给不同的Python代码。 在这种情况下,我们只有一个脚本hello.py,因此我们希望将用户对网站上任何页面的请求都定向到同一脚本。 在配置文件的最后两行中,我们说匹配正则表达式/.*所有URL(这是我们网站上的任何URL)都应定向到hello.py脚本。
完整性检查! (Sanity Check!)
Okay, now we can finally take a look at our application!
好的,现在我们终于可以看一下我们的应用程序了!
It’s not online yet, but we can view it by running the application through our own “local” web server (that can’t be accessed by other users) using Google App Engine. This will help us simulate what things will look like to a user once our application is online.
它尚未在线,但是我们可以使用Google App Engine通过我们自己的“本地”网络服务器(其他用户无法访问)运行应用程序来查看它。 一旦我们的应用程序在线,这将帮助我们模拟用户的外观。
Open the Google App Engine Launcher program, then choose File –> Add Existing Application… You can then browse to and select your “first_app” folder that contains the web application. Add the application using port 8080, then select the application in the main window and click the green “Run” button.
打开Google App Engine启动器程序,然后选择“文件”->“添加现有应用程序...”。然后,您可以浏览并选择包含Web应用程序的“ first_app”文件夹。 使用端口8080添加应用程序,然后在主窗口中选择应用程序,然后单击绿色的“运行”按钮。
NOTE: Linux users – you will need to navigate in your Terminal to the directory just before the “first_app” folder (i.e., its parent directory), then type the following command to launch the web application (which will run on port 8080 by default):
google_appengine/dev_appserver.py first_app/注意 :Linux用户–您需要在终端中导航到“ first_app”文件夹之前的目录(即其父目录),然后键入以下命令以启动Web应用程序(默认情况下将在端口8080上运行) ):
google_appengine/dev_appserver.py first_app/
The console window that appears will track lots of extra information, but your web application is up and running once you see a blinking cursor.
出现的控制台窗口将跟踪许多其他信息,但是一旦您看到闪烁的光标,您的Web应用程序便已启动并正在运行。
The “port” number can be thought of as selecting a particular channel to use, similar to broadcasting a television or radio channel. We chose to run the web application on port 8080, meaning that the user can essentially “tune in” to this port number and receive communication from our web server. (We could host a completely different web application using a different port number and the two would not interfere with each other.)
可以将“端口”号视为选择要使用的特定频道,类似于广播电视或广播频道。 我们选择在端口8080上运行Web应用程序,这意味着用户可以从本质上“调入”该端口号并从Web服务器接收通信。 (我们可以使用不同的端口号托管一个完全不同的Web应用程序,并且两者不会互相干扰。)
Once the web application is running (this might take a little while), we can click “Browse” to view the web application in the default web browser. This will open up the page at the URL “localhost:8080” (which we can also type into a browser manually to load the web application). The web address “localhost” is just a way of saying “the web address of my own computer” (since the application isn’t actually online yet). The “:8080” specifies that we should listen for communication on port number 8080.
Web应用程序运行后(可能需要一些时间),我们可以单击“浏览”以在默认Web浏览器中查看该Web应用程序。 这将打开URL为“ localhost:8080”的页面(我们也可以手动在浏览器中键入该页面以加载Web应用程序)。 网址“ localhost”只是说“我自己的计算机的网址”的一种方式(因为该应用程序实际上尚未在线)。 “:8080”指定我们应该侦听端口号8080上的通信。
If everything has been set up correctly, your browser should load a page that displays the plain text: Congratulations, it’s a web app!
如果一切均已正确设置,则浏览器应加载一个显示纯文本的页面: 恭喜,这是一个Web应用程序!
NOTE: If you make any changes to your script, as long as Google App Engine Launcher is still running your application, all you need to do in order to view the newest version of the web application is to save the script and reload the webpage. App Engine will automatically listen for any changes that might have been made.
注意 :如果您对脚本进行了任何更改,只要Google App Engine Launcher仍在运行您的应用程序,要查看该Web应用程序的最新版本,您需要做的就是保存脚本并重新加载网页。 App Engine将自动侦听可能进行的任何更改。
WSGI应用程序 (WSGI Application)
Well, that’s a start. As far as an “application” goes, however, the Python script involved was fairly useless. In order to make something with a bit more potential, we need to create a special object in our Python code called a WSGIApplication. WSGI stands for Web Server Gateway Interface and is a way to allow Python to communicate with the web server in a better way than simply “printing” a single chunk of information back as a response.
好吧,这是一个开始。 但是,就“应用程序”而言,所涉及的Python脚本是相当无用的。 为了使事情更有潜力,我们需要在Python代码中创建一个名为WSGIApplication的特殊对象。 WSGI代表Web服务器网关接口,是一种允许Python以更好的方式与Web服务器通信的方法,而不仅仅是简单地“打印”单个信息作为响应。
Our new Python script, which still just displays the same line of text, is considerably more complicated:
我们的新Python脚本仍然只显示同一行文本,但要复杂得多:
|
We now had to import webapp2 in order to use WSGI. In the last line of our script, we are using the webapp2 web framework to create a WSGIApplication object named my_app that will allow our code to communicate with the web server.
现在,我们必须导入webapp2才能使用WSGI。 在脚本的最后一行,我们使用webapp2 Web框架创建一个名为my_app的WSGIApplication对象,该对象将允许我们的代码与Web服务器进行通信。
This time we are creating a new class using the “class” keyword; this means that MainPage is a new type of object (specifically, a type of webapp2.RequestHandler object) that can have its own methods and attributes just like any other object.
这次我们使用“ class”关键字创建一个新类; 这意味着MainPage是一种新型的对象(特别是webapp2.RequestHandler对象的一种),可以像其他任何对象一样拥有自己的方法和属性。
Even though it looks like the get() method takes an argument of “self”, this special keyword is automatically created and used internally by the new object as a way to keep track of itself. We have to use this “self” keyword within a new object that we’ve defined, because the object needs to know when it’s referring to its own methods and attributes. For instance, we have to call self.response in order to access the response stored in our MainPage RequestHandler object. For a deeper look into how to make and use a Python class, checkout the ‘OOP Appendix’ in Real Python Course 1. Or you might want to take a look at Codecademy’s Introduction to Classes and my accompanying practice project.
即使看起来get()方法采用“ self”作为参数,该特殊关键字也会自动创建并由新对象在内部使用,以跟踪自身。 我们必须在已定义的新对象中使用此“ self”关键字,因为该对象需要知道何时引用其自身的方法和属性。 例如,我们必须调用self.response才能访问存储在MainPage RequestHandler对象中的响应。 要更深入地了解如何制作和使用Python类,请查看Real Python课程1中的“ OOP附录”。 或者,您可能想看看Codecademy的《课程简介》和我随附的练习项目 。
As the first argument of our WSGIApplication, we passed a list of tuples called routes. In this case, routes only contains one tuple, ('/', MainPage). This “route” tells our WSGI application that anyone accessing the main directory of our application should get directed to MainPage. We call MainPage a “request handler” because it is in charge of handling any user requests for that particular webpage.
作为WSGIApplication的第一个参数,我们传递了一个称为routes的元组列表。 在这种情况下, routes仅包含一个元组( '/', MainPage )。 此“路由”告诉我们的WSGI应用程序,任何访问应用程序主目录的人都应定向到MainPage 。 我们称MainPage为“请求处理程序”,因为它负责处理对该特定网页的任何用户请求。
The “/” is how we represent the main “root” directory of our application (i.e., our website). If we had provided a second tuple, ('/images/', ImagesPage), then anyone who accesses the (hypothetical) “images” directory of our website would be directed to the class ImagesPage in the Python script.
“ /”是我们表示应用程序的主“根”目录(即我们的网站)的方式。 如果我们提供了第二个元组( '/images/', ImagesPage ),那么访问我们网站的(假想的)“ images”目录的任何人都将被定向到Python脚本中的ImagesPage类。
If we make a mistake in the code, our application’s debug=True argument will allow us to see the errors reported by Python in our web application; otherwise, all we would see is a “500 Internal Server Error” message.
如果我们在代码中输入错误,则应用程序的debug=True参数将使我们能够看到Python在我们的Web应用程序中报告的错误; 否则,我们只会看到“ 500 Internal Server Error”消息。
Because of how we defined routes, when our web server receives a request to load the page “/”, webapp2 creates a new MainPage object (called a request handler because it responds to the request for a webpage). The get() method of MainPage is automatically called when it is created, which is how our WSGIApplication responds to the web server.
由于我们定义路由的方式,当我们的Web服务器收到加载页面“ /”的请求时,webapp2创建了一个新的MainPage对象(称为请求处理程序,因为它响应对网页的请求)。 MainPage的get()方法在创建时会自动调用,这就是我们的WSGIApplication响应Web服务器的方式。
The response is written out with these two lines:
通过以下两行写出响应:
|
Again, we have to write both a header line and a body. The header line gets packed into headers like in a dictionary, setting the value of the Content-Type equal to text/plain. This time, we create the body of the response using the write() method. WSGI takes care of separating the header lines from the body, so this time there’s no need to write() a blank line first.
同样,我们必须同时编写标题行和正文。 标题行被打包成标题,就像在字典中一样,将Content-Type的值设置为text/plain 。 这次,我们使用write()方法创建响应的主体。 WSGI负责将标题行与正文分开,因此这一次无需首先write()空行。
We now have to update our YAML configuration file as well:
现在,我们还必须更新YAML配置文件:
|
The only difference from the previous configuration file is the very last line, where we point the “script” to use hello.my_app instead of hello.py; instead of the entire Python script, we now want the web server to run the WSGIApplication object inside of our script named my_app, which we access using the simple dot notation of hello.my_app. (There’s no new file named hello.my_app – we’re just pointing our configuration file to the my_app object inside the hello.py script.)
与之前的配置文件唯一的不同是最后一行,我们将“脚本”指向使用hello.my_app而不是hello.py。 而不是整个Python脚本,我们现在希望Web服务器在名为my_app的脚本中运行WSGIApplication对象,我们使用简单的点号hello.my_app 。 (没有名为hello.my_app的新文件–我们只是将配置文件指向hello.py脚本中的my_app对象。)
健全性检查(两个)! (Sanity Check (take two)!)
If all goes well, you should now be able to save these two files, reload the webpage, and see the exact same thing as before: Congratulations, it’s a web app!
如果一切顺利,您现在应该可以保存这两个文件,重新加载网页,并看到与以前完全相同的东西: 恭喜,这是一个Web应用程序!
NOTE: If you make a mistake in your Python script, your web application might load a horrendous error page that makes it look as if you broke the Internet for good. Don’t panic! Just look at the last line, which will point you to the specific error (usually a line of your code displayed in red) that caused the entire chain of failure.
注意 :如果您在Python脚本中犯了一个错误,您的Web应用程序可能会加载一个可怕的错误页面,使它看起来好像您永久断开了Internet。 不要惊慌! 只需查看最后一行,这将为您指出导致整个故障链的特定错误(通常以红色显示您的代码行)。
If you do end up with an error that your browser refuses to give you further advice about (instead showing a “500 Internal Server Error”, even when you’ve set your WSGIApplication to have debug=True), you can try running the Python script itself in IDLE. Although it won’t run (because Python won’t be able to find the webapp2 module), IDLE can still point out if your code has any syntax errors.
如果您最终遇到错误,但浏览器拒绝为您提供进一步的建议(即使显示WSGIApplication为debug=True ,也不显示“ 500 Internal Server Error”,您可以尝试运行Python)脚本本身在IDLE中。 尽管它无法运行(因为Python无法找到webapp2模块),但是IDLE仍然可以指出您的代码是否存在语法错误。
复习练习 (Review Exercises)
- Play around with your web application; make small changes to the script and see how App Engine responds
- Use your WSGIApplication to create a basic HTML page by changing the
Content-Typeheader value totext/htmland then usingwrite()multiple times to respond with lines of HTML code; for instance, the firstwrite()statement could beself.response.write('<html>')to begin the HTML webpage
- 播放您的Web应用程序; 对脚本进行少量更改,然后查看App Engine如何响应
- 使用WSGIApplication来创建基本HTML页面,方法是将
Content-Type标头值更改为text/html,然后多次使用write()来响应HTML代码行; 例如,第一个write()语句可以是self.response.write('<html>')以开始HTML网页
动态网络应用 (Dynamic Web App)
Now that we’ve upgraded our web application to use WSGI, we can create multiple pages that interact with the user. We’ll start by creating an HTML form that takes some text input from the user and displays that text back on a new page:
现在,我们已经升级了Web应用程序以使用WSGI,我们可以创建与用户交互的多个页面。 我们将从创建一个HTML表单开始,该表单接受用户的一些文本输入并将该文本显示在新页面上:
- The first URL of our web application will be the main “/” page that users see by default.
- Our second page will be located at “/welcome” (i.e., this path will appear after the name of the website).
- 我们的Web应用程序的第一个URL将是用户默认看到的主“ /”页面。
- 我们的第二页将位于“ / welcome”(即,该路径将出现在网站名称之后)。
In order to do this, we need to include two tuples in our routes:
为此,我们需要在路由中包含两个元组:
|
We don’t need to update the configuration file, because we still want any request for a webpage to be directed to our WSGIApplication object my_app inside the hello.py script. From there, my_app is responsible for directing any webpage requests to the correct “request handler” – either MainPage or Greeting.
我们不需要更新配置文件,因为我们仍然希望将任何网页请求定向到hello.py脚本中的WSGIApplication对象my_app 。 从那里, my_app负责将任何网页请求定向到正确的“请求处理程序” MainPage或Greeting 。
Our full web application code will look like this:
我们完整的Web应用程序代码如下所示:
|
This time, we specified the Content-Type to be text/html because we’re writing out webpages in HTML code. We did this using multi-line strings, although we also could have broken the content into multiple write() commands.
这次,我们将Content-Type指定为text/html因为我们正在用HTML代码编写网页。 尽管可以将内容分成多个write()命令,但我们还是使用多行字符串来完成的。
As before, our main page (handled by the request handler MainPage) has a get() method so that it can respond to requests to “get” its information. In the content body, we included a title for our webpage and a simple form. Our form has a single text input field called my_name and a submit button labeled “Sign In”. When a user clicks on the “Sign In” button, our form posts) its data (i.e., the value of my_name) to the webpage located at “/welcome”.
和以前一样,我们的主页(由请求处理程序MainPage处理)具有get()方法,以便它可以响应请求以“获取”其信息。 在内容主体中,我们包括了网页的标题和一个简单的表单。 我们的表单有一个名为my_name文本输入字段和一个标记为“ Sign In”的提交按钮。 当在“登录”按钮,我们的形式提供给用户点击的帖子 )的数据(即,价值my_name )到位于“/欢迎”的网页。
Meanwhile, our “/welcome” page (handled by the request handler Greeting) has a post() method so that it can respond when it receives “posted” data. We could have used get() to send the user’s data (and we will in the next example), but information that is sent using get() becomes a part of the URL; this would become a problem if we later decided that we want the user to include sensitive information (like a password).
同时,我们的“ / welcome”页面(由请求处理程序Greeting处理)具有post()方法,以便它在接收到“ posted ”数据时可以做出响应。 我们本可以使用get()发送用户的数据(在下一个示例中,我们将这样做),但是使用get()发送的信息成为URL的一部分。 如果我们后来决定让用户包括敏感信息(例如密码),这将成为一个问题。
Within post(), we used self.request.get("my_name") to get the user-supplied value of my_name from the user’s “post” request, which we stored in a string variable called username. We then created a welcome_string, which is a multi-line string representing the full HTML code for our “/welcome” page, including the inserted value of username. As before, we then write() out the header line and content body to display the resulting webpage.
在post() ,我们使用self.request.get("my_name")从用户的“ post”请求中获取用户提供的my_name值,该请求存储在名为username的字符串变量中。 然后,我们创建了welcome_string ,它是一个多行字符串,代表“ / welcome”页面的完整HTML代码,包括插入的username值。 和以前一样,我们然后write()出标题行和内容主体以显示结果网页。
健全性检查(三个)! (Sanity Check (take three)!)
Save your script and reload the browser to view your new web application. Notice how, when you “Sign In” to the web application, you are directed to the new webpage “localhost:8080/welcome” – which should hopefully display back what you typed!
保存脚本并重新加载浏览器以查看新的Web应用程序。 请注意,当您“登录” Web应用程序时,如何将您定向到新的网页“ localhost:8080 / welcome” –希望它可以显示您键入的内容!
转义表格输入 (Escaping Form Input)
Actually, there’s one important change we need to make to our code. The fact that we take input from a user and display that input back without first investigating what we are about to display is a huge security hole. Sure, maybe you don’t expect to have malicious users who are actively trying to break your application, but never underestimate the potential for users to do unexpected things that cause your application to break in unexpected ways.
实际上,我们需要对代码进行一项重要更改。 我们从用户那里获取输入并显示该输入而没有先调查我们将要显示的内容的事实是一个巨大的安全漏洞。 当然,也许您不希望恶意用户主动尝试破坏您的应用程序,但永远不要低估用户做意外事件的可能性,这些意外事件可能导致您的应用程序以意外方式崩溃。
For instance, maybe someone decides that an appropriate username to enter into our application is <b>. Our “/welcome” webpage ends up displaying:
例如,也许有人认为输入我们应用程序的适当用户名是<b> 。 我们的“ / welcome”网页最终显示:
|
Since we’re inserting this text into HTML code, the <b> was interpreted as an HTML tag to begin making text bold – so instead of greeting our user, we only change our explanation point to be displayed bold. (You can imagine how this might present a security problem; any user can now write code that runs on our web server.)
由于我们将文本插入HTML代码中,因此<b>被解释为HTML标记,以开始使文本变为粗体–因此,我们不问候用户,只将解释点更改为粗体显示。 (您可以想象这可能会带来安全问题;任何用户现在都可以编写在我们的Web服务器上运行的代码。)
To avoid this, we can use Python’s built-in cgi.escape() function, which converts the special HTML characters <, >, and & into equivalent representations that can be displayed correctly. You will first need to import cgi into your Python script to use this functionality. Then, when you get() the value of my_name from the user’s request, you can convert any special HTML characters by instead saying:
为避免这种情况,我们可以使用Python的内置cgi.escape()函数,该函数将特殊HTML字符< , >和&转换为可以正确显示的等效表示形式。 首先,您需要将cgi导入Python脚本中才能使用此功能。 然后,当您从用户的请求中get() my_name的值时,可以通过以下方式转换任何特殊HTML字符:
|
健全性检查(四个)! (Sanity Check (take four)!)
With these changes, try re-running your web application and signing in with a username of <b> again. You should now see it display the username back to you correctly:
进行这些更改后,请尝试重新运行Web应用程序,并再次使用用户名<b>登录。 现在,您应该看到它正确显示了用户名:
|
温度转换器 (Temperature Converter)
Okay, so we can now create one webpage that helps the user “post” data to another webpage interactively. What about using the get() method to make a single page interactive? Let’s look at an example with just a little bit more Python code behind it and revisit the “temperature converter” script that we wrote way back in the Functions and Loops chapter and again as a simple GUI application in the Graphical User Interface chapter in Real Python Course 1.
好的,因此我们现在可以创建一个网页,以帮助用户以交互方式将数据“发布”到另一网页。 使用get()方法使单个页面具有交互性怎么样? 让我们看一个示例,该示例后面仅包含一些Python代码,然后重新访问我们在“功能和循环”一章中编写的“温度转换器”脚本,并再次作为Real Python中“图形用户界面”一章中的简单GUI应用程序课程一
The webpage we want to display will have a simple text field where the user can input a temperature in degrees Celsius. We will also include a “Convert” button to convert the user’s supplied Celsius temperature into degrees Fahrenheit. This converted result will be displayed on the next line and will be updated whenever the user clicks the “Convert” button.
我们要显示的网页将具有一个简单的文本字段,用户可以在其中输入以摄氏度为单位的温度。 我们还将包括一个“转换”按钮,用于将用户提供的摄氏温度转换为华氏度。 转换后的结果将显示在下一行,并在用户单击“转换”按钮时进行更新。
The HTML for this page, with place-holders for the actual temperature values, will look like so:
该页面HTML带有实际温度值的占位符,如下所示:
|
This time, our form uses the get() method with a form “action” that points back to the main page itself. In other words, when the user submits this form by clicking on the “Convert” button, instead of sending a “post” request to a new webpage, the user will send a “get” request for the same page, providing the page with some input data.
这次,我们的表单将get()方法与表单“ action”一起使用,该表单指向主页本身。 换句话说,当用户通过单击“转换”按钮提交此表单时,用户将向同一页面发送“获取”请求,而不是向新网页发送“发布”请求,从而为该页面提供一些输入数据。
Just as we did before, we will want to put the temperature conversion into a function of its own.
就像我们之前所做的那样,我们将希望将温度转换成它自己的函数。
The full code will look as follows:
完整的代码如下所示:
|
As before, our convert_temp() function checks to see if the user supplied a valid value. Since the user won’t have supplied any value when the page first loads (and we don’t want to start out by saying “invalid input”), we check first for this condition and return an empty string if the text field is also blank.
和以前一样,我们的convert_temp()函数检查用户是否提供了有效值。 由于用户在页面首次加载时不会提供任何值(并且我们不想以“无效输入”开头),因此我们首先检查这种情况,如果文本字段也是空白。
We used self.request.get("cel_temp") to get the user-supplied value of cel_temp from the user’s “get” request (just like we did for the user’s “post” request in the previous example). The HTML code that we write() out as a multi-line string now includes two user-supplied values: the cel_temp, which is the value that the user entered into the text field, and the far_temp, which is the calculated result returned by our function. If we had not written the value of cel_temp into the text box, then this input box would be cleared when the user clicks on the button.
我们使用self.request.get("cel_temp")从用户的“ get”请求中获取用户提供的cel_temp值(就像在上一个示例中对用户的“ post”请求所做的一样)。 现在,我们以多行字符串形式write()HTML代码包括两个用户提供的值: cel_temp (这是用户在文本字段中输入的值)和far_temp (这是用户返回的计算结果)我们的职能。 如果我们没有将cel_temp的值写入文本框中,那么当用户单击按钮时,将清除此输入框。
Save this script as temperature.py in the same “first_app” folder, then update the app.yaml configuration file accordingly. Since we renamed our script, we changed the name of the module where the WSGIApplication object my_app should be loaded:
将该脚本另存为temperature.py,位于同一“ first_app”文件夹中,然后相应地更新app.yaml配置文件。 自重命名脚本以来,我们更改了将WSGIApplication对象my_app加载到的模块的名称:
|
We also updated the name of the application just to provide a descriptive name for what the application actually does. Even if you left App Engine running, this name will update automatically in the Launcher. Notice how we used a dash but didn’t use any capitalization in the name; application names for Google App Engine can only include lower-case letters, digits and hyphens.
我们还更新了应用程序的名称,只是提供了应用程序实际操作的描述性名称。 即使您使App Engine处于运行状态,该名称也会在启动器中自动更新。 请注意,我们如何使用破折号但未使用任何大写字母; Google App Engine的应用程序名称只能包含小写字母,数字和连字符。
健全性检查(五个)! (Sanity Check (take five)!)
You should now be able to use your new web application, supplying temperatures and seeing the converted result appear on the same webpage. Since we use a “get” request, we can also now see the user-supplied data appear in the URL. In fact, you can even circumvent the form and provide your own value for cel_temp by supplying an appropriate address. For instance, try typing the URL localhost:8080/?cel_temp=30 directly into your browser and you will see the resulting temperature conversion.
现在,您应该能够使用新的Web应用程序,提供温度并看到转换后的结果出现在同一网页上。 由于我们使用“获取”请求,因此我们现在还可以看到用户提供的数据出现在URL中。 实际上,您甚至可以通过提供适当的地址来绕过表单并为cel_temp提供自己的值。 例如,尝试直接在浏览器中输入URL localhost:8080 /?cel_temp = 30,您将看到最终的温度转换。
复习练习: (Review exercises:)
Modify the “log in” web application example so that it only has a single main webpage that can receive “get” requests from the user; instead of a “Sign In” button under the text field, make a “Greet me!” button that, when clicked, reloads the page to greet the user by name (if a name has been supplied) and display the greeting form again
修改“登录” Web应用程序示例,使其仅具有一个可以接收用户“获取”请求的主网页; 而不是在文本字段下方使用“登录”按钮,而是使用“问候我!” 单击该按钮后,将重新加载页面以按名称向用户打招呼(如果已提供名称)并再次显示问候语
分配 (Assignment)
诗人获得网络影响 (The poet gains a web presence)
Recreate the random poem generator from the first Real Python course. You should use a web form like the one at poem-generator.appspot.com to help your user generate poems. You can view the source of this webpage to reverse-engineer most of the necessary HTML code. Your web application should use a single webpage with a single form that accepts “get” requests from the user. Bonus: Learn how to use static files like CSS in your web application to improve its overall appearance and make your HTML code easier to read and maintain.
从第一本Real Python课程重新创建随机诗歌生成器 。 您应该使用类似于poem-generator.appspot.com上的Web表单来帮助您的用户生成诗歌。 您可以查看此网页的源代码,以对大多数必要HTML代码进行反向工程。 您的Web应用程序应使用具有单个表单的单个网页,该表单可以接受来自用户的“获取”请求。 奖励:了解如何在Web应用程序中使用 CSS之类的静态文件来改善其整体外观,并使HTML代码更易于阅读和维护。
部署方式 (Deployment)
It’s finally time to share your beautiful work with the world. Getting your content online is actually a fairly simple process with Google App Engine.
现在终于是时候与全世界分享您的美丽作品了。 使用Google App Engine,实际上使内容在线化是一个相当简单的过程。
Google provides a free service at appspot.com to allow you to host up to ten different web applications (as long as you don’t have millions of users accessing them every month, in which case you will need to upgrade to a paid plan). You will first need to go to the Google Developer Console and sign in.
Google在appspot.com上提供了一项免费服务,可让您托管多达十个不同的Web应用程序(只要您每月没有数百万的用户访问它们,在这种情况下,您将需要升级到付费计划) 。 您首先需要转到Google Developer Console并登录。
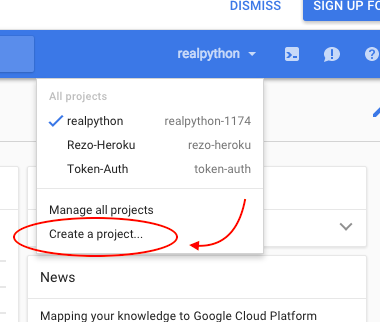
Once you’ve logged in, you can create a new project and give it a unique project name. This name will appear in the URL of your application, which will look like: http://your-application-name.appspot.com. The next three pictures will walk you through the clicks that you need to get this done. In the pictured examples I used “realpython” as my project name.
登录后,您可以创建一个新项目并为其指定唯一的项目名称。 该名称将出现在您的应用程序的URL中,该URL类似于:http: //your-application-name.appspot.com。 接下来的三张图片将引导您完成此操作所需的单击。 在上图的示例中,我使用“ realpython”作为项目名称。
Navigate to the dashboard view and you will see this toolbar. This button on the left side will show you the list of Google projects that you own.
导航到仪表板视图,您将看到此工具栏。 左侧的此按钮将向您显示您拥有的Google项目的列表。

In that list, click “Create a Project”.
在该列表中,单击“创建项目”。
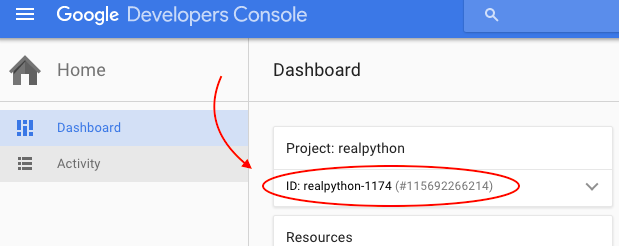
Within your dashboard your new project name will be displayed with a unique ID. In my case “realpython-1174”.
在仪表板上,您的新项目名称将显示为唯一ID。 在我的情况下为“ realpython-1174”。
Since this is a direct URL that must be unique, Google will help you out by adding some numbers to the end of your chosen name if it is already taken. I’m going to use the temperature conversion application and name mine “temperature-converter”. Whatever you end up using as your project name, be sure to update your configuration file so that the name provided for the “application” in the very first line of the file matches this project ID.
由于这是一个必须唯一的直接URL,因此Google会在所选名称的末尾添加一些数字(如果已使用)来帮助您。 我将使用温度转换应用程序,并将其命名为“ temperature-converter”。 无论最终使用什么作为项目名称,请确保更新配置文件,以使文件第一行中为“应用程序”提供的名称与此项目ID匹配。
At this point you are ready to launch your app. Be sure to run this next command with your project ID (not ‘realpython-1174’). In the first_app directory run this line:
此时,您就可以启动应用程序了。 确保使用您的项目ID (不是'realpython-1174')运行此下一个命令。 在first_app目录中运行以下行:
|
A window should pop up asking you to verify that you are the owner of this Google account. Conform and now your app is up and running!!! Go to http://YourProjectID.appspot.com/ to have a look.
应该会弹出一个窗口,要求您确认自己是该Google帐户的所有者。 符合要求,现在您的应用程序已启动并正在运行!!! 转到http://YourProjectID.appspot.com/进行查看。
Linux users: you will need to navigate to the folder just before the “first_app” folder, then use the following command for uploading the application through App Engine: google_appengine/appcfg.py update first_app/
Linux用户:您需要导航到“ first_app”文件夹之前的文件夹,然后使用以下命令通过App Engine上传应用程序: google_appengine/appcfg.py update first_app/
If you see the message “This application does not exist”, then either you have not registered the application correctly or the name of your web application does not match the application identifier that you provided. Congratulations! You now have a live webpage of your own running Python code.
如果看到消息“此应用程序不存在”,则说明您没有正确注册该应用程序,或者您的Web应用程序名称与您提供的应用程序标识符不匹配。 恭喜你! 现在,您将拥有一个自己的正在运行的Python代码的实时网页。
Google has a number of other handy built-in features, including the ability to store “persistent” user data (that lasts even after the user leaves the website) within your application and even a way to integrate your application with your users’ Google accounts. The current tutorials and documentation include functional but outdated example code, although it can still provide an idea of what is possible beyond the basics.
Google还具有许多其他便捷的内置功能,包括在应用程序中存储“持久”用户数据(即使用户离开网站后仍然存在)的功能,甚至可以将应用程序与用户的Google帐户集成。 当前的教程和文档包括功能齐全但过时的示例代码,尽管它仍然可以提供基本知识以外的可能的想法。
翻译自: https://www.pybloggers.com/2016/02/python-driven-web-applications/
web高级程序python


 1522
1522


 被折叠的 条评论
为什么被折叠?
被折叠的 条评论
为什么被折叠?
 到【灌水乐园】发言


