


react 入门教程
React's Context API has become the state management tool of choice for many, oftentimes replacing Redux altogether. In this quick 5-minute tutorial, you'll see an introduction to what Context is and how to use it!
React的Context API已成为许多人选择的状态管理工具,通常完全替换Redux。 在这个5分钟的快速教程中,您将了解什么是上下文以及如何使用它!
If you want a proper introduction to this subject, you can join the waitlist for my upcoming advanced React course, or if you're still a beginner, check out my free introductory course on React.
如果您想对该主题进行适当的介绍,可以加入我即将举行的高级React课程的候补名单,或者如果您仍然是初学者,请查看我关于React的免费入门课程。
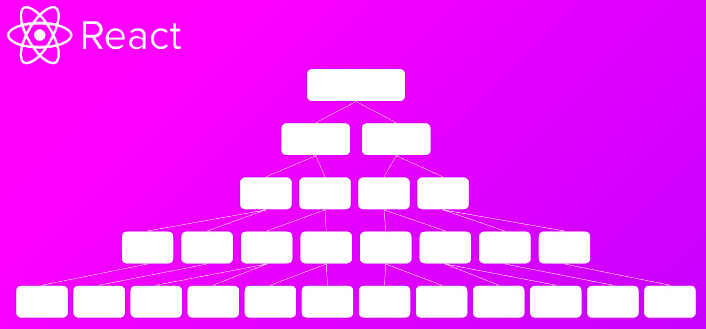
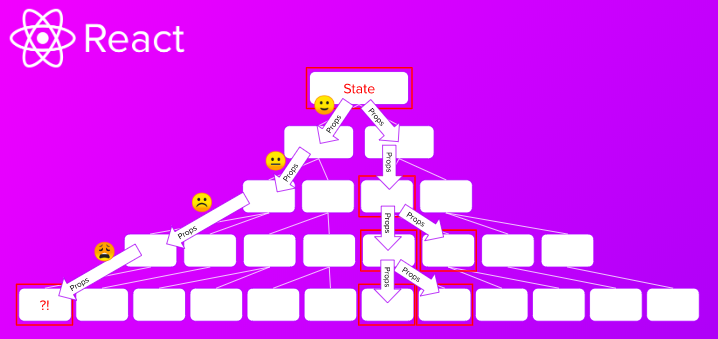
Consider this tree, in which the bottom boxes represent separate components:
考虑一下这棵树,其中的底部框代表单独的组件:
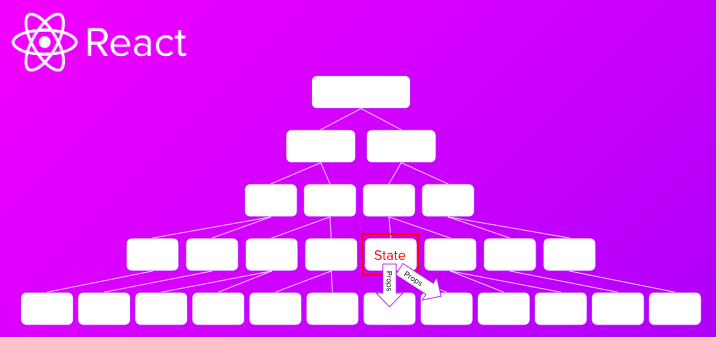
We can easily add state to the bottom components, but until now the only way to pass data to a component's sibling was to move state to a higher component and then pass it back down to the sibling via props.
我们可以轻松地将状态添加到底部组件,但是直到现在,将数据传递到组件同级的唯一方法是将状态移动到更高的组件,然后通过props将其向下传递给同级。
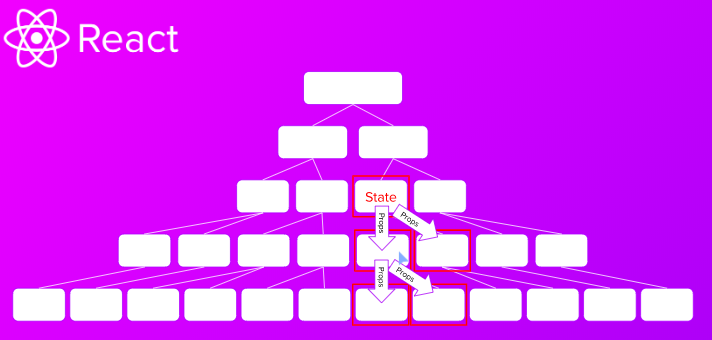
If we later find out that the sibling of the component with state also needs the data, we have to lift state up again, and pass it back down:
如果以后发现具有状态的组件同级也需要数据,则必须再次提升状态,并将其传递回去:
While this solution does work, problems begin if a component on a different branch needs the data:
尽管此解决方案确实有效,但如果不同分支上的组件需要数据,就会出现问题:
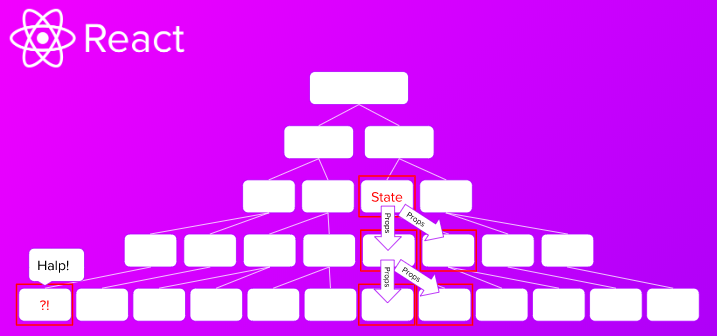
In this case, we need to pass state from the top level of the application through all the intermediary components to the one which needs the data at the bottom, even though the intermediary levels don't need it. This tedious and time-consuming process is known as prop drilling.
在这种情况下,我们需要将状态从应用程序的顶层通过所有中间组件传递到需要底层数据的组件,即使中间层不需要它也是如此。 这个繁琐且耗时的过程称为钻探钻探 。
This is where Context API comes in. It provides a way of passing data through the component tree via a Provider-Consumer pair without having to pass props down through every level. Think of it as the components playing Catch with data - the intermediary components might not even "know" that anything is happening:
这就是Context API的用武之地。它提供了一种通过Provider-Consumer对通过组件树传递数据的方法,而不必向下传递每个层次的props。 可以将其视为正在捕获数据的组件-中间组件甚至可能不会“知道”正在发生的事情:

To demonstrate this, we will create this funky (and super useful) day-to-night switching image.
为了演示这一点,我们将创建此时髦的(且超级有用)的日夜转换图像。

If you want to see the full code, be sure to check out the Scrimba playground for this article.
如果您想查看完整的代码,请务必查看本文的Scrimba游乐场 。
创建上下文 (Create Context)
To begin, we create a new Context. As we want the entire app to have access to this, we go to index.js and wrap the app in ThemeContext.Provider.
首先,我们创建一个新的上下文。 因为我们希望整个应用程序都可以访问它,所以我们转到index.js并将应用程序包装在ThemeContext.Provider 。
We also pass the value prop to our Provider. This holds the data we want to save. For now, we just hardcode in 'Day'.
我们还将value支持传递给我们的提供商。 这保存了我们要保存的数据。 现在,我们只是在'Day'硬编码。
import React from "react";
import ReactDOM from "react-dom";
import ThemeContext from "./themeContext";

import App from "./App";

ReactDOM.render(
  <ThemeContext.Provider value={"Day"}>
    <App />
  </ThemeContext.Provider>,
  document.getElementById("root")
);
使用contextType消费Context (Consuming Context with contextType)
Currently, in App.js, we are simply returning the <Image /> component.
当前,在App.js ,我们只是返回了<Image />组件。
import React from "react";
import Image from "./Image";

class App extends React.Component {
  render() {
    return (
      <div className="app">
        <Image />
      </div>
    );
  }
}

export default App;
Our goal is to use Context to switch the classNames in Image.js from Day to Night, depending on which image we want to render. To do this, we add a static property to our component called ContextType and then use string interpolation to add it to the classNames in the <Image /> component.
我们的目标是使用Context将Image.js的className从Day切换到Night ,具体取决于我们要渲染的图像。 为此,我们将一个静态属性添加到名为ContextType的组件中,然后使用字符串插值将其添加到<Image />组件的classNames中。
Now, the classNames contain the string from the value prop. Note: I have moved ThemeContext into its own file to prevent a bug.
现在,classNames包含value prop中的字符串。 注意:我已将ThemeContext移到其自己的文件中以防止发生错误。
import React from "react";
import Button from "./Button";
import ThemeContext from "./themeContext";

class Image extends React.Component {
  render() {
    const theme = this.context;
    return (
      <div className={`${theme}-image image`}>
        <div className={`${theme}-ball ball`} />
        <Button />
      </div>
    );
  }
}

Image.contextType = ThemeContext;

export default Image;
上下文消费者 (Context.Consumer)
Unfortunately, this approach only works with class-based components. If you've learned about Hooks in React already, you'll know we can do just about anything with functional components these days. So for good measure, we should convert our components into functional components and then use ThemeContext.Consumer component to pass info through the app.
不幸的是,这种方法仅适用于基于类的组件。 如果您已经了解了React中的Hooks ,那么您将知道我们现在可以使用功能组件来做任何事情。 因此,为了达到良好的效果,我们应该将组件转换为功能组件,然后使用ThemeContext.Consumer组件通过应用程序传递信息。
This is done by wrapping our elements in an instance of <ThemeContext.Consumer> and within that (where the children go), providing a function which returns the elements. This uses the "render prop" pattern where we provide a regular function as a child that returns some JSX to render.
这是通过将元素包装在<ThemeContext.Consumer>实例中并在其中( children所在的位置)来完成的,提供了一个返回元素的函数。 这使用“ render prop”模式,在该模式下,我们提供一个常规功能作为子代,该子代返回一些JSX进行渲染。
import React from "react";
import Button from "./Button";
import ThemeContext from "./themeContext";

function Image(props) {
  // We don't need this anymore
  // const theme = this.context

  return (
    <ThemeContext.Consumer>
      {theme => (
        <div className={`${theme}-image image`}>
          <div className={`${theme}-ball ball`} />
          <Button />
        </div>
      )}
    </ThemeContext.Consumer>
  );
}

// We don't need this anymore
// Image.contextType = ThemeContext;

export default Image;
Note: We also need to wrap the <Button /> component in <ThemeContext.Consumer> - this allows us to add functionality to the button later.
注意:我们还需要将<Button />组件包装在<ThemeContext.Consumer> -这允许我们稍后向按钮添加功能。
import React from "react";
import ThemeContext from "./themeContext";

function Button(props) {
  return (
    <ThemeContext.Consumer>
      {context => (
        <button className="button">
          Switch
          <span role="img" aria-label="sun">
            🌞
          </span>
          <span role="img" aria-label="moon">
            🌚
          </span>
        </button>
      )}
    </ThemeContext.Consumer>
  );
}

export default Button;
提取上下文提供者 (Extract Context Provider)
We are currently passing a hard-coded value down through the Provider, however, our goal is to switch between night and day with our button.
我们目前正在通过提供商传递硬编码的值,但是,我们的目标是使用按钮在白天和黑夜之间切换。
This requires moving our Provider to a separate file and putting it in its own component, in this case, called ThemeContextProvider.
这需要将我们的Provider移到一个单独的文件中,并将其放在自己的组件中,在本例中称为ThemeContextProvider 。
import React, { Component } from "react";
const { Provider, Consumer } = React.createContext();

class ThemeContextProvider extends Component {
  render() {
    return <Provider value={"Day"}>{this.props.children}</Provider>;
  }
}

export { ThemeContextProvider, Consumer as ThemeContextConsumer };
Note: the value property is now being handled in the new file ThemeContext.js, and should, therefore, be removed from index.js.
注意: value属性现在在新文件ThemeContext.js中处理,因此应该从index.js中删除。
Changing Context To wire up the button, we first add state to ThemeContextProvider:
更改上下文要连接按钮,我们首先将状态添加到ThemeContextProvider :
import React, { Component } from "react";
const { Provider, Consumer } = React.createContext();

// Note: You could also use hooks to provide state and convert this into a functional component.
class ThemeContextProvider extends Component {
  state = {
    theme: "Day"
  };
  render() {
    return <Provider value={"Day"}>{this.props.children}</Provider>;
  }
}

export { ThemeContextProvider, Consumer as ThemeContextConsumer };
Next, we add a method for switching between day and night:
接下来,我们添加一种在白天和黑夜之间切换的方法:
toggleTheme = () => {
  this.setState(prevState => {
    return {
      theme: prevState.theme === "Day" ? "Night" : "Day"
    };
  });
};
Now we change our value property to this.state.theme so that it returns the info from state.
现在,我们将value属性更改为this.state.theme以便它从state返回信息。
render() {
    return <Provider value={this.state.theme}>{this.props.children}</Provider>;
  }
}
Next, we change value to an object containing {theme: this.state.theme, toggleTheme: this.toggleTheme}, and update all the places where we use a single value to look for theme in an object. This means that every theme becomes context and every reference to theme as value becomes context.theme.
接下来,我们将value更改为包含{theme: this.state.theme, toggleTheme: this.toggleTheme} ,并更新所有使用单个值在对象中查找theme的位置。 这意味着每个theme变成context并且每个对theme引用都变成了context.theme 。
Finally, we tell the button to listen for the onClick event and then fire context.toggleTheme - this updates the Consumers which are using the state from the Provider. The code for the button looks like this:
最后,我们告诉按钮监听onClick事件,然后触发context.toggleTheme这将更新正在使用提供者状态的使用者。 该按钮的代码如下所示:
import React from "react";
import { ThemeContextConsumer } from "./themeContext";

function Button(props) {
  return (
    <ThemeContextConsumer>
      {context => (
        <button onClick={context.toggleTheme} className="button">
          Switch
          <span role="img" aria-label="sun">
            🌞
          </span>
          <span role="img" aria-label="moon">
            🌚
          </span>
        </button>
      )}
    </ThemeContextConsumer>
  );
}

export default Button;
Our button now switches the image between night and day in one click!
现在,我们的按钮只需单击一下即可在夜晚和白天之间切换图像!
上下文警告 (Context caveats)
Like all good things in code, there are some caveats to using Context:
像代码中的所有好东西一样,使用Context也有一些注意事项:
Don't use Context to avoid drilling props down just one or two layers. Context is great for managing state which is needed by large portions of an application. However, prop drilling is faster if you are just passing info down a couple of layers.
不要使用Context来避免仅向下钻一层或两层道具。 上下文对于管理应用程序大部分需要的状态非常有用。 但是,如果仅将信息向下传递几层,则道具钻探会更快。
Avoid using Context to save state that should be kept locally. So if you need to save a user's form inputs, for example, use local state and not Context.
避免使用上下文来保存应在本地保留的状态。 因此,例如,如果您需要保存用户的表单输入,请使用本地状态而不是上下文。
Always wrap the Provider around the lowest possible common parent in the tree - not the app's highest-level component. No need for overkill.
始终将Provider包裹在树中最低的公共父对象周围,而不是应用程序的最高级别组件。 无需过度杀伤力。
Lastly, if you pass an object as your value prop, monitor performance and refactor as necessary. This probably won't be needed unless a drop in performance is noticeable.
最后,如果您将一个对象作为您的价值Struts,请监控性能并根据需要进行重构。 除非性能明显下降,否则可能不需要这样做。
结语 (Wrap up)
This example is pretty simple and it would probably be easier to put state in the app and pass it down via props. However, it hopefully shows the power of having Consumers which can access data independently of the components above them in the tree.
这个例子非常简单,将状态放入应用程序并通过props传递下来可能会更容易。 但是,它希望显示出使使用者可以独立于树中位于其上方的组件访问数据的功能。
To learn more about React Context and other great features of React, you can join the waitlist for my upcoming advanced React course. Or if you're looking for a more beginner friendly you can check out my free introductory course on React.
要了解有关React Context和React其他重要功能的更多信息,可以加入我即将举行的高级React课程的候补名单。 或者,如果您正在寻找对初学者更友好的内容,则可以查看我关于React的免费入门课程。
Happy coding :)
快乐的编码:)
翻译自: https://www.freecodecamp.org/news/react-context-in-5-minutes/
react 入门教程


 326
326


 被折叠的 条评论
为什么被折叠?
被折叠的 条评论
为什么被折叠?
 到【灌水乐园】发言


