Do you want to install WordPress in a subdirectory? Installing WordPress in a subdirectory allows you to run multiple WordPress instances under the same domain or even a subdomain name. In this article, we will show you how to install WordPress in a subdirectory without affecting the parent domain name.
您是否要在子目录中安装WordPress? 在子目录中安装WordPress可让您在同一域甚至一个子域名下运行多个WordPress实例。 在本文中,我们将向您展示如何在子目录中安装WordPress而不影响父域名。

子域还是子目录? 哪个更适合SEO? (Subdomain vs Subdirectory? Which One is Better for SEO?)
Normally, you would want to start a WordPress website on its own domain name (for example, wpbeginner.com). However, sometimes you may want to create additional websites on the same domain name.
通常,您希望以自己的域名 (例如,wpbeginner.com) 启动WordPress网站 。 但是,有时您可能想在同一域名上创建其他网站。
This can be done by either installing WordPress in a subdomain (http://newebsite.example.com) or as a subdirectory (http://example.com/newwebsite/).
可以通过将WordPress安装在子域(http://newebsite.example.com)或作为子目录(http://example.com/newwebsite/)来完成。
One question that we get asked is which one is better for SEO?
我们被问到的一个问题是哪个更适合SEO?
Search engines treat subdomains differently from root domain names and assign them rankings as a separate website.
搜索引擎将子域名与根域名区别对待,并将其排名分配为单独的网站。
For instance, search Engines consider WPBeginner and our WPBeginner Videos website as two separate websites.
例如,搜索引擎将WPBeginner和我们的WPBeginner视频网站视为两个单独的网站。
On the other hand, sub-directories directly benefit from the domain authority of the root domain thus ranking higher in most cases.
另一方面,子目录直接受益于根域的域权限,因此在大多数情况下排名较高。
One way to create separate WordPress sites in both subdomain or subdirectory is by installing WordPress multisite network.
在子域或子目录中创建单独的WordPress网站的一种方法是安装WordPress多站点网络 。
However, if you want to keep two websites managed separately, then you can install different instances of WordPress. You can also use WordPress site management tools to set up a single dashboard for managing your multiple WordPress installations.
但是,如果要分开管理两个网站,则可以安装WordPress的不同实例。 您还可以使用WordPress站点管理工具来设置单个仪表板,以管理多个WordPress安装。
在子目录中安装WordPress的要求 (Requirements for Installing WordPress in Subdirectory)
There are no special requirements to install WordPress in a subdirectory. If you already have a WordPress website in the root domain name, then you are good to go.
将WordPress安装在子目录中没有特殊要求。 如果您已经在根域名中拥有一个WordPress网站,那您就走了。
All top WordPress hosting companies make it very easy to install multiple WordPress websites using the same hosting account.
所有顶级WordPress托管公司都非常容易使用同一托管帐户安装多个WordPress网站。
For instance, if you are using Bluehost, you can add a new WordPress website from your hosting dashboard.
例如,如果您使用的是Bluehost ,则可以从托管仪表板添加一个新的WordPress网站。
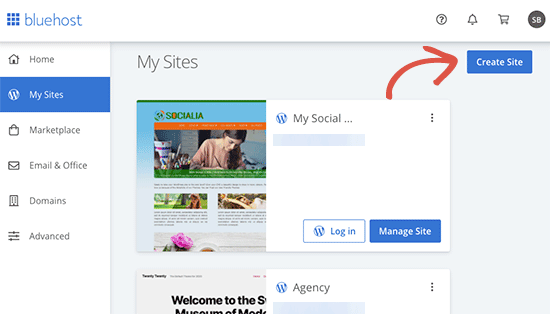
However, please keep in mind that most shared hosting accounts have limited server resources. A sudden traffic spike on one of your websites will affect the performance and speed of all other websites on the same account.
但是,请记住,大多数共享托管帐户的服务器资源有限。 您的一个网站上的流量突然激增将影响同一帐户上所有其他网站的性能和速度。
If you are just starting out, then you can do that on shared hosting. Keeping in mind that you’ll need to upgrade to a managed WordPress hosting as your business grows.
如果您只是刚入门,则可以在共享主机上进行。 请记住,随着业务的增长,您将需要升级到托管的WordPress托管 。
That being said, let’s take a look at how to easily install WordPress in a subdirectory.
话虽如此,让我们看一下如何在子目录中轻松安装WordPress。
步骤1.在“根域名”下创建一个子目录 (Step 1. Create a Subdirectory under The Root Domain Name)
First, you need to create a subdirectory or a folder under the main website. This is where you will install WordPress files.
首先,您需要在主网站下创建一个子目录或文件夹。 在这里您将安装WordPress文件。
Connect to your WordPress hosting account using a FTP client or File Manager in cPanel.
使用cPanel中的FTP客户端或文件管理器连接到您的WordPress托管帐户。
Once connected, go to the root folder of your website. Usually it is the /public_html/ folder. If you already have WordPress installed in the root folder, then you will see your WordPress files and folders there.
连接后,转到网站的根文件夹。 通常是/ public_html /文件夹。 如果您已经在根文件夹中安装了WordPress,那么您将在其中看到WordPress文件和文件夹。
Next, you need to right click and select ‘Create new directory’ from the menu.
接下来,您需要右键单击并从菜单中选择“创建新目录”。
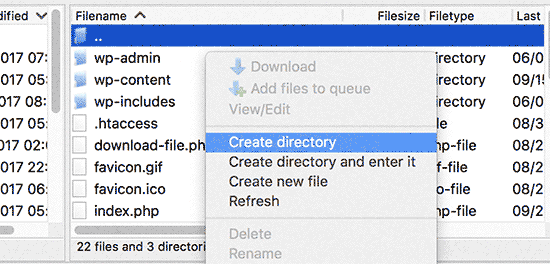
You need to be careful when choosing the name for your subdirectory. This will be part of your new WordPress site’s URL and what your users will type in their browsers to reach this website.
为子目录选择名称时,请务必小心。 这将是您新的WordPress网站URL的一部分,以及您的用户将在其浏览器中键入的内容,以访问此网站。
For example, if you name this directory travel-guides then your WordPress website’s address will be:
例如,如果您将此目录命名为旅行指南,那么您的WordPress网站地址将为:
http://example.com/travel-guides/
http://example.com/travel-guides/

第2步。上传WordPress文件 (Step 2. Upload WordPress Files)
Your newly created subdirectory is empty at the moment. Let’s change that by uploading WordPress files.
您新创建的子目录目前为空。 让我们通过上传WordPress文件来更改它。
First you need to visit WordPress.org website and click on the download button.
首先,您需要访问WordPress.org网站,然后单击下载按钮。
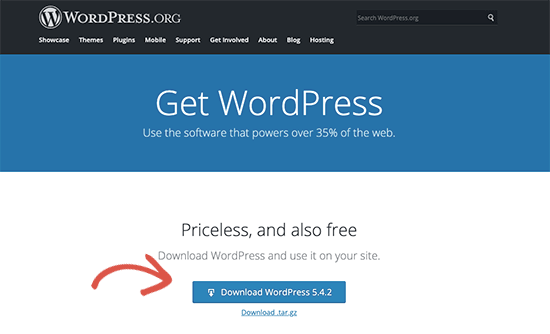
Your browser will now download the zip file containing the latest WordPress software to your computer.
您的浏览器现在将包含最新WordPress软件的zip文件下载到您的计算机。
After downloading the file, you need to select and extract it. Mac users can double click the file to extract it and Windows users need to right-click and then select ‘Extract All’.
下载文件后,您需要选择并解压缩它。 Mac用户可以双击该文件以将其解压缩,而Windows用户则需要右键单击,然后选择“全部提取”。
After extracting the zip file, you will see ‘wordpress’ folder containing all the WordPress files.
解压缩zip文件后,您将看到包含所有WordPress文件的“ wordpress”文件夹。
Now let’s upload these files to your new subdirectory.
现在,将这些文件上传到新的子目录。
Connect to your website using an FTP client and go to the subdirectory you created in the first step.
使用FTP客户端连接到您的网站,然后转到您在第一步中创建的子目录。
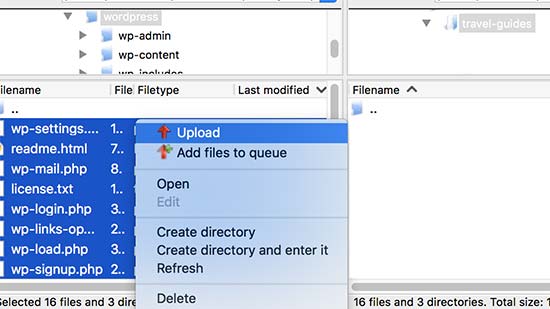
In the local files panel of your FTP client, go to the ‘wordpress’ folder you just extracted.
在FTP客户端的本地文件面板中,转到刚提取的'wordpress'文件夹。
Select all files inside the folder and then upload them to your new subdirectory.
选择文件夹中的所有文件,然后将它们上传到新的子目录。
步骤3.创建新数据库 (Step 3. Create New Database)
WordPress stores all your content in a database. You need to create a new database to use with your new WordPress site installed in a subdirectory.
WordPress将所有内容存储在数据库中 。 您需要创建一个新数据库,以与安装在子目录中的新WordPress网站一起使用。
First, you need to login to the cPanel dashboard of your WordPress hosting account. Click on ‘MySQL Databases’ under the databases section.
首先,您需要登录到WordPress托管帐户的cPanel仪表板。 单击“数据库”部分下的“ MySQL数据库”。
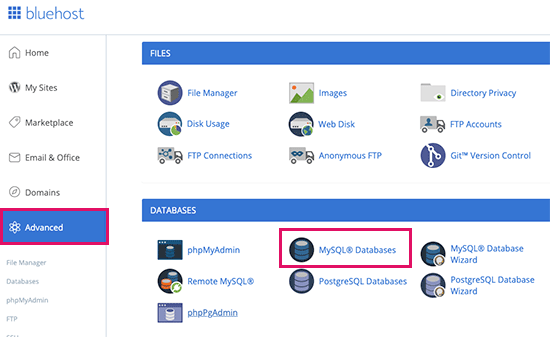
Note: Your hosting dashboard may look different than the screenshot above. You simply need to locate the ‘Databases’ section.
注意:您的托管仪表板看上去可能与上面的屏幕截图有所不同。 您只需要找到“数据库”部分。
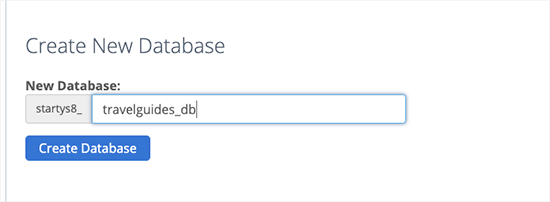
On the next screen, enter a name for your new database and then click on the ‘Create Database’ button to continue.
在下一个屏幕上,输入新数据库的名称,然后单击“创建数据库”按钮继续。
Your cPanel dashboard will now create the new MySQL database. Click on the Go Back button to return to the Databases page.
现在,您的cPanel仪表板将创建新的MySQL数据库 。 单击“返回”按钮以返回到“数据库”页面。
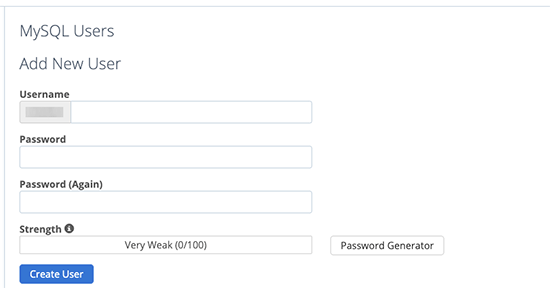
Next, you need to add a username and password for the database.
接下来,您需要为数据库添加用户名和密码。
Simply scroll down to the ‘MySQL Users’ section and provide a new username and password. Click on ‘Create User’ button to continue.
只需向下滚动到“ MySQL用户”部分并提供新的用户名和密码。 点击“创建用户”按钮继续。
Next, you need to give this newly created user privileges to work on the database you created earlier.
接下来,您需要赋予此新创建的用户特权以使用您先前创建的数据库。
Scroll down to ‘Add user to database’ section. Select your MySQL username and then select your newly created database.
向下滚动到“将用户添加到数据库”部分。 选择您MySQL用户名,然后选择您新创建的数据库。
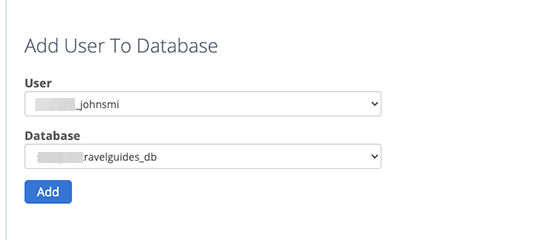
Click on the Add button to continue.
单击添加按钮继续。
Cpanel will now grant the MySQL user full privileges on your newly created database.
Cpanel现在将向MySQL用户授予您新创建的数据库的全部特权。
步骤4.安装WordPress (Step 4. Install WordPress)
Now that everything is in place, you can go ahead and install WordPress. Simply visit the directory you created earlier in a web browser by typing the URL like this:
现在一切就绪,您可以继续安装WordPress。 只需输入以下网址即可访问您先前在网络浏览器中创建的目录:
http://example.com/your-subdirectory-name/
http://example.com/您的子目录名称/
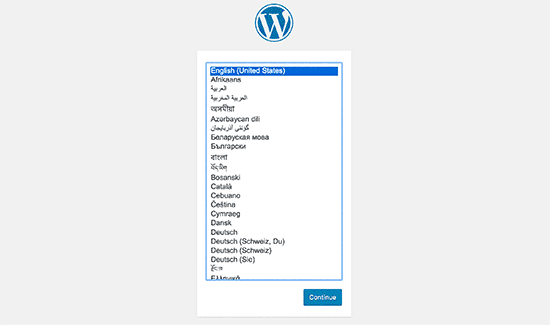
This will bring up the WordPress installation wizard. First, you need to select the language for your WordPress website and click on the continue button.
这将显示WordPress安装向导。 首先,您需要为WordPress网站选择语言,然后单击继续按钮。
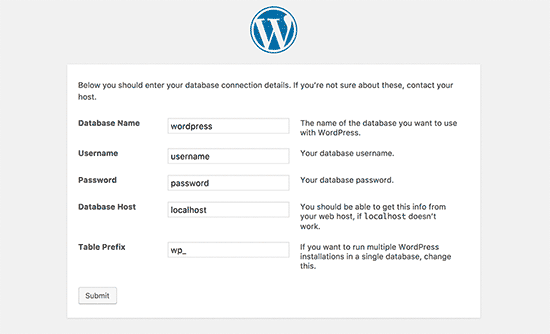
Next, you will be asked to provide your WordPress database name, database username, password, and host. Enter the database details and click on the submit button.
接下来,将要求您提供WordPress数据库名称,数据库用户名,密码和主机。 输入数据库详细信息,然后单击提交按钮。
WordPress will now connect to your database and you will see a success message like this:
WordPress现在将连接到您的数据库,您将看到类似以下的成功消息:
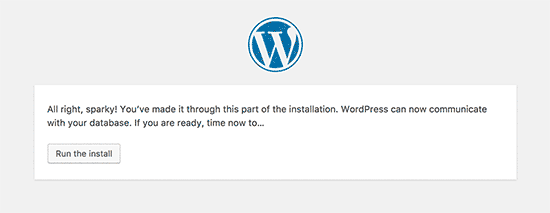
Click on ‘Run the install’ button to continue.
单击“运行安装”按钮继续。
On the next screen, you will be asked to provide a title for your website and choose an admin username, password, and email address.
在下一个屏幕上,将要求您提供网站标题并选择管理员用户名,密码和电子邮件地址。
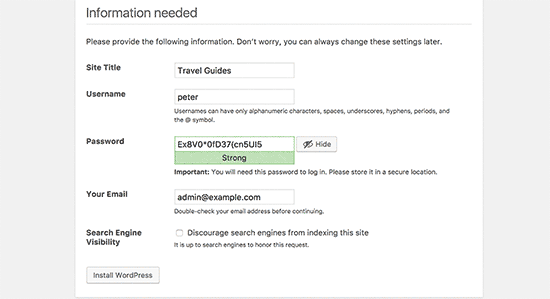
After entering your website details, click on ‘Run install’ button to continue.
输入您的网站详细信息后,单击“运行安装”按钮继续。
WordPress will now set up your website and will show you a success message:
WordPress现在将建立您的网站,并向您显示成功消息:
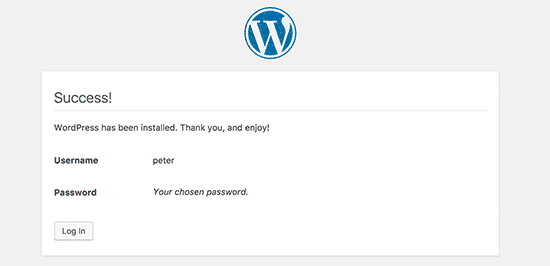
You can now go ahead and login to your new WordPress website installed in the subdirectory.
您现在可以继续并登录到安装在该子目录中的新WordPress网站。
步骤5.修复固定链接 (Step 5. Fix Permalinks)
If you have a separate WordPress install in the root directory, then the .htaccess files of your subdirectory will cause conflict. This will result in 404 errors on your website.
如果您在根目录中安装了单独的WordPress,则子目录的.htaccess文件将引起冲突。 这将在您的网站上导致404错误。
To solve this, you need to edit the .htaccess file in your subdirectory WordPress install. Replace the code inside your .htaccess file with the following code:
要解决此问题,您需要在子目录WordPress安装中编辑.htaccess文件。 将您的.htaccess文件中的代码替换为以下代码:
# BEGIN WordPress
<IfModule mod_rewrite.c>
RewriteEngine On
RewriteBase /your-subdirectory/
RewriteRule ^index.php$ - [L]
RewriteCond %{REQUEST_FILENAME} !-f
RewriteCond %{REQUEST_FILENAME} !-d
RewriteRule . /your-subdirectory/index.php [L]
</IfModule>

# END WordPress
Don’t forget to replace /your-subdirectory/ with your own subdirectory name.
不要忘记用您自己的子目录名称替换/ your-subdirectory /。
We hope this article helped you install WordPress in a subdirectory. You may also want to see our ultimate step by step WordPress SEO guide for beginners.
我们希望本文能帮助您将WordPress安装在子目录中。 您可能还想看看我们针对初学者的终极一步一步WordPress SEO指南 。
If you liked this article, then please subscribe to our YouTube Channel for WordPress video tutorials. You can also find us on Twitter and Facebook.
如果您喜欢这篇文章,请订阅我们的YouTube频道 WordPress视频教程。 您也可以在Twitter和Facebook上找到我们。
翻译自: https://www.wpbeginner.com/wp-tutorials/how-to-install-wordpress-in-a-subdirectory-step-by-step/


 1319
1319


 被折叠的 条评论
为什么被折叠?


