


linux vim命令
VIM or the Vi Improved text editor is one of the most advanced text editors available. Let’s learn the top 20 best Linux Vim commands that you must know to gain amazing levels of productivity.
VIM或Vi改进的文本编辑器是可用的最高级的文本编辑器之一。 让我们学习您必须知道的前20条最佳Linux Vim命令,以获得惊人的生产力。
Remember, the VIM text editor has a pretty steep learning curve. But once you put in the time to get used to the commands, you will attain unmatched productivity in your day-to-day tasks that require working with text (perfect text-editor for programmers!)
记住,VIM文本编辑器的学习曲线相当陡峭。 但是一旦您花时间习惯了这些命令,您将在需要处理文本的日常任务中获得无与伦比的生产力(程序员的完美文本编辑器!)
Very geeky isn’t it? Let’s understand the editor and the commands in it.
是很讨厌吗? 让我们了解编辑器及其中的命令。
用于基本导航的Linux Vim命令 ()
Before we begin, let’s go over how we can navigate within the VIM editor. VIM is a keyboard focused editor so you have to start getting used to not touching the mouse for basic navigation tasks.
在开始之前,我们先来看一下如何在VIM编辑器中导航。 VIM是专注于键盘的编辑器,因此您必须开始习惯于不触摸鼠标来执行基本的导航任务。
| Keys | Action |
|---|---|
| Arrow Keys h j k l | Basic cursor movement as normal |
| B b W w | Move backward and forward by one word at a time – cursor at the start of the word |
| <Line Number>G | Jump to a specified line number |
| Ctrl+u Ctrl+d | Similar to page up/down key while the cursor stays on-screen. |
| e | Move forward by one word – cursor at the end of the word |
| # * | Find the word within the document that your cursor is currently at. |
| n N | Repeats the last find command |
| 按键 | 行动 |
|---|---|
| 方向键 j | 基本光标移动正常 |
| b w | 一次向前和向后移动一个单词–在单词开头的光标 |
| <行号> G | 跳转到指定的行号 |
| Ctrl + u Ctrl + d | 类似于光标停留在屏幕上时的向上/向下翻页键。 |
| Ë | 向前移动一个单词-光标位于单词的末尾 |
| # * | 在文档中找到光标当前所在的词。 |
| ñ ñ | 重复最后一个查找命令 |
掌握Linux Vim的主要命令和功能 (Geek Out with the Top Linux Vim Commands and Features)
The VIM editor is not only flexible and comprehensive but also very intuitive and “smart” when it comes to understanding the code that’s written.
在理解所编写的代码时,VIM编辑器不仅灵活,全面,而且非常直观和“智能”。
But if you don’t mind spending your time moving the mouse cursor around pointing and clicking at things, there’s no reason for you to consider VIM. This text editor is for programmers and geeks who really love to go all out, ignore the mouse for good, and do everything using the keyboard.
但是,如果您不介意花费时间在指向和单击事物周围移动鼠标光标,则没有理由考虑使用VIM。 该文本编辑器适用于那些真正喜欢全力以赴,永远忽略鼠标并使用键盘进行所有操作的程序员和怪胎。
The thing with VIM is, if it can be done with a mouse in other text editors, it can be done with just the keyboard in VIM.
VIM的好处是,如果可以在其他文本编辑器中用鼠标完成操作,则可以仅在VIM中使用键盘完成操作。
1.在Vim中处理多个文件 (1. Work With Multiple Files in Vim)
Most of us programmers are used to working with multiple files at the same time. Our GUI text editors give us tabs that allow switching between files while all stay open simultaneously. Even though there are a few keyboard shortcuts to play around with those tabs, it’s nowhere compared to what VIM can do.
我们大多数程序员习惯于同时处理多个文件。 我们的GUI文本编辑器为我们提供了一些选项卡,可在所有文件同时保持打开状态时在文件之间进行切换。 尽管在这些选项卡上有一些键盘快捷键可以使用,但与VIM相比,这是无与伦比的。
:tabedit <tab key to scroll through files in directory>

The best part? You don’t touch the mouse whatsoever. How do you move around the files? With gt or gT to switch tabs forward or backward respectively. Also :tabfirst and :tablast will let you jump back and forth from the first to the last tabs that are currently open.
最好的部分? 您什么也不要触摸鼠标。 您如何在文件之间移动? 使用gt或gT分别向前或向后切换选项卡。 也可以使用:tabfirst和:tablast从当前打开的第一个选项卡到最后一个选项卡来回跳转。
But if you want to open all the files directly at the start, just type:
但是,如果要在开始时直接打开所有文件,只需键入:
vim -p source_file1.py source_file2.py source_file3.py
2.在VIM中保存并打开Tab会话 (2. Save and Open Tab Sessions in VIM )
Alright, so now you have opened a ton of files in tabs and also moved across made changes to the files. But did you notice that you have to always open the files every time you want to have them in the tabs?
好了,现在您已经在选项卡中打开了大量文件,并且还对文件进行了更改。 但是您是否注意到,每次要在选项卡中保存文件时,都必须始终打开文件?
What if there was a way to save the open files as they are and just move with it?
如果有一种方法可以保存打开的文件原样并随其移动呢?
That’s exactly what VIM sessions are for. When you work with multiple files in VIM, it’s better to save a VIM session so the next time you open the session file, everything will come back up exactly as you left it.
这正是VIM会话的目的。 当您在VIM中处理多个文件时,最好保存一个VIM会话,以便下次打开该会话文件时,所有内容都将按照您离开时的状态完全恢复。
How do you create a VIM session? You first move out of the insert mode by pressing the Esc key. Then enter the below command.
如何创建VIM会话? 您首先通过按Esc键退出插入模式。 然后输入以下命令。
:mksession <Session Name>.vim
Now the next time when you want to open the session, you can directly open it from the terminal by typing:
现在,下一次要打开会话时,可以通过以下方式从终端直接打开它:
vim -S <Session Name>.vim
Or if you want to open a session file while inside VIM, just type:
或者,如果您想在VIM中打开会话文件,只需键入:
:source <Session Name>.vim
3.在VIM中自动完成文本 (3. AutoComplete Text in VIM)
Feel that VIM cannot compare with the autocomplete features of other IDEs or text editors? Well, give it a shot. Even though it doesn’t use Artificial Intelligence or any sort of machine learning algorithms to back this feature, it’s robust enough.
觉得VIM无法与其他IDE或文本编辑器的自动完成功能进行比较? 好吧,试一试。 即使它不使用人工智能或任何类型的机器学习算法来支持此功能,也足够强大。
When you’re in your VIM editor trying to edit some code, press the below key combination to check it’s superb auto-completion.
当您在VIM编辑器中尝试编辑一些代码时,请按以下组合键检查其自动完成功能。
Ctrl+n
Based on the letters typed, the editor finds the closest match for the word you might type. Though it doesn’t understand anything of what you type, it does the job really well.
根据键入的字母,编辑器会找到与您可能键入的单词最接近的匹配项。 尽管它不了解您键入的内容,但确实可以很好地完成工作。
4. Linux VIM命令执行括号匹配 (4. Linux VIM Commands to Perform Brace Matching)
As we previously mentioned that the VIM editor searches for patterns within the text, it brings with it brace matching while you’re coding. It makes things very easy for us when we’re working with long codes.
正如我们之前提到的,VIM编辑器在文本中搜索模式,因此在编码时会带来大括号匹配。 当我们使用长代码时,这对我们来说非常容易。
This one is pretty straight forward. Take your cursor to the opening/closing brace and press the % sign on the keyboard.
这很简单。 将光标移至打开/关闭括号,然后按键盘上的%符号。
And just like that, your cursor will jump to the matching brace.
这样,您的光标将跳至匹配的括号。
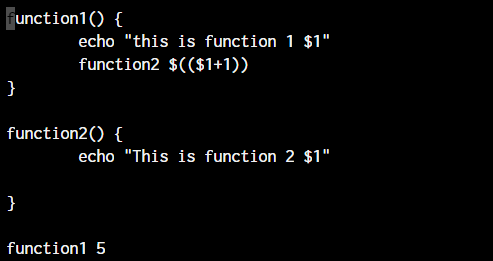
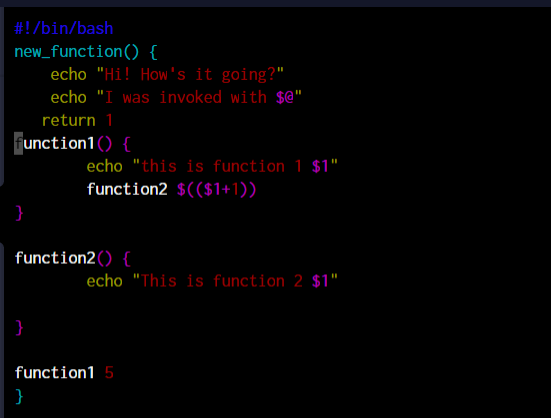
5.在VIM中标记并折叠代码块 (5. Mark and Fold Code Blocks in VIM)
This isn’t as straightforward as you’d want it to be because the code editor does not understand what we are typing but only works on pattern matching.
这并不像您希望的那样简单明了,因为代码编辑器不了解我们正在输入的内容,而仅适用于模式匹配。
So how do we go about folding code inside vim editor? We start with bringing the cursor to where we want to begin the folding and from there we use the letter V to begin marking the code until where we want it to fold.
那么我们如何在vim编辑器中折叠代码呢? 我们首先将光标移到我们要开始折叠的位置,然后使用letter V开始标记代码,直到我们希望其折叠为止。
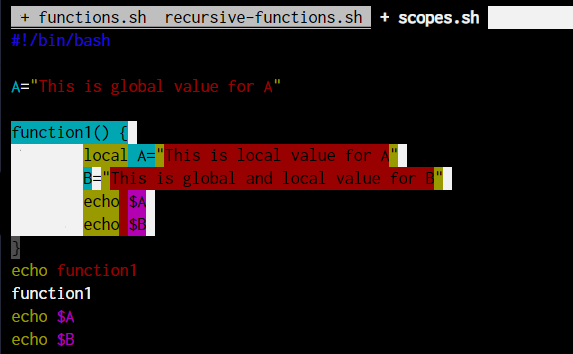
Once we have marked the code with the letter V , then press zf to fold the code. The f in the zf stands for fold. how do we open the Code we just press by highlighting the first line of the folded code
一旦我们用字母V标记了代码,然后按zf折叠代码。 zf中的f代表fold 。 我们如何通过突出显示折叠代码的第一行来打开我们刚刚按下的代码
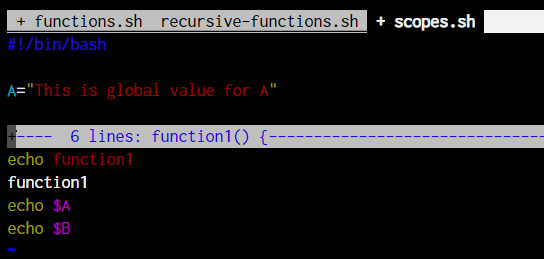
To open the code now, we can bring our cursor to the line where the folded code is (as you can see in the above screenshot, the grey colored line which says 6 lines: function1(). Once your cursor is on that line, press zo where o stands for open.
现在要打开代码,我们可以将光标移到折叠代码所在的行(如您在上面的屏幕截图中所看到的,灰色的行表示6行:function1()) 。按下zo ,o代表打开 。
But the above method is good in cases where the code is small. What if you want to jump through a few hundred lines of code? Let me show you another marking technique that will cut your time in half.
但是,在代码较小的情况下,上述方法很好。 如果您想跳过几百行代码怎么办? 让我向您展示另一种标记技术,它将使您的时间减少一半。
- Go to the line where you want to start the folding of the code 转到您要开始折叠代码的行
- Press the
letter mfollowed by any other letter to name the marking. For example mk 按letter m再按其他字母以命名标记。 例如mk - Highlight any of the braces within the code and press % to jump directly to the matching close brace. 突出显示代码中的任何大括号,然后按%直接跳到匹配的右括号。
- Press
zf'k按zf'k
The 'k signals the fold command to look for the “k” mark which we pointed out by typing out mk at the start.
'k表示fold命令寻找“ k”标记,我们通过在开头输入mk指出了该标记。
6.在不离开VIM的情况下浏览系统中的文件 (6. Explore Files in Your System, Without Leaving VIM)
A regular GUI text/code editor person would feel that they miss the “Project folder” column that usually is provided on the left sidebar of the code editor window. Can VIM replicate that?
普通的GUI文本/代码编辑人员会感到他们错过了通常在代码编辑器窗口的左侧栏中提供的“项目文件夹”列。 VIM可以复制吗?
Of course!
当然!
With the two commands :Vexplore and :Sexplore, you can split the window into two sections and browse through the entire file system. Have a look at both the commands.
使用两个命令:Vexplore和:Sexplore ,您可以将窗口分为两部分,并浏览整个文件系统。 看一下这两个命令。
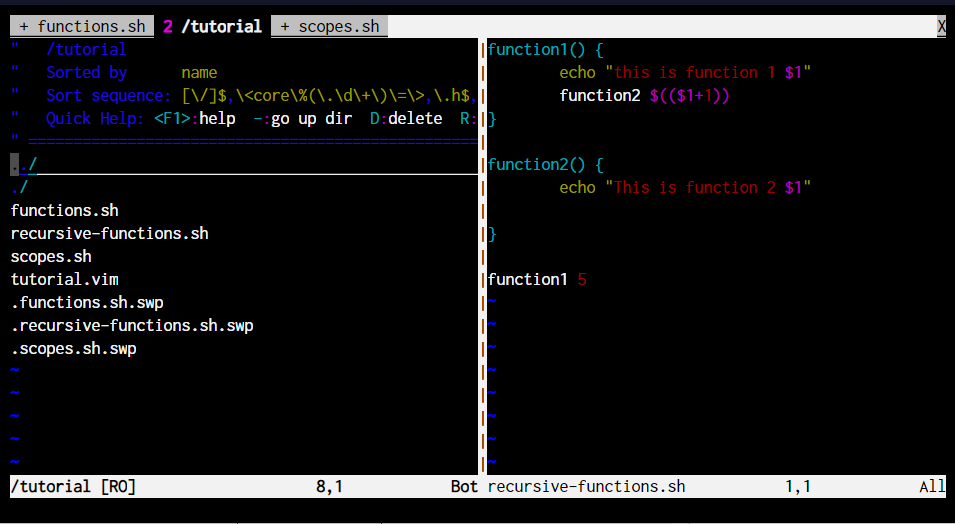
As you can see, in both cases, the file manager is opened and you can navigate through the files without losing your focus from the code file that you were working on.
如您所见,在两种情况下,都将打开文件管理器,并且您可以浏览文件而不会从正在处理的代码文件中失去焦点。
Since we’ve already seen the split-screen capabilities of VIM, how do we split the screen in two and edit two codes?
既然我们已经看到了VIM的分屏功能,那么如何将屏幕分为两部分并编辑两个代码?
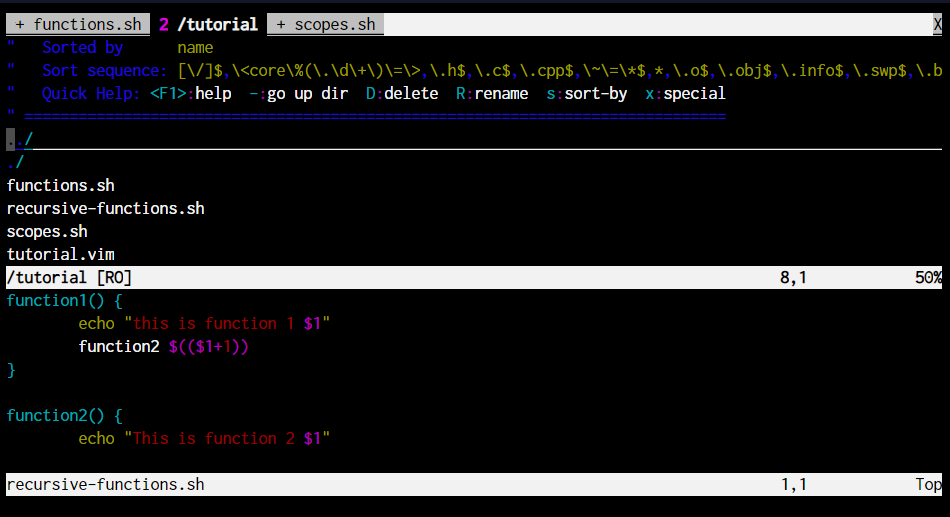
7.拆分VIM代码窗口 (7. Split VIM Code Window )
You can either Vertically or Horizontally split the VIM window and edit multiple code files without moving away from the other. How? Let’s have a look.
您可以垂直或水平拆分VIM窗口并编辑多个代码文件,而又不会相互偏离。 怎么样? 我们来看一下。
The Vexplore and Sexplore commands allow us to browse through files and open any file in the split section of the terminal. But if you just want to open the file, you can use the vsplit or split command.
使用Vexplore和Sexplore命令,我们可以浏览文件并在终端的split部分中打开任何文件。 但是,如果您只想打开文件,则可以使用vsplit或split命令。
VERTICAL SPLIT
:vsplit <filename>

OR

:vsp <filename>

HORIZONTAL SPLIT
:split <filename>

OR

:sp <filename>
The above command will split the terminal vertically and open the other file for you.
上面的命令将垂直拆分终端并为您打开另一个文件。

| Command | Action |
|---|---|
| Ctrl-w ← OR Ctrl-w h | Focus on the left adjacent split |
| Ctrl-w → OR Ctrl-w l | Focus on the right adjacent split |
| Ctrl-w ↓ OR Ctrl-w j | Focus on the bottom adjacent split |
| Ctrl-w ↑ OR Ctrl-w k | Focus on the top adjacent split |
| Ctrl-w n+ OR Ctrl-w n– | Increase or decrease the size of the split by n lines |
| 命令 | 行动 |
|---|---|
| Ctrl-w← 要么 Ctrl-W | 专注于左侧相邻的拆分 |
| Ctrl-w→ 要么 Ctrl-w l | 专注于右侧相邻分割 |
| Ctrl-w↓ 要么 Ctrl-w j | 专注于底部相邻的拆分 |
| Ctrl-w↑ 要么 Ctrl-w k | 专注于顶部相邻的拆分 |
| Ctrl-W n + 要么 Ctrl-w n – | 增加或减少n行分割的大小 |
If you’re working through an SSH client software like Terminus to connect to your Linux server, using the default VIM commands to switch splits will simply close the connection.
如果您正在通过诸如Terminus之类的SSH客户端软件来连接到Linux服务器,那么使用默认的VIM命令来切换拆分将简单地关闭连接。
Because Ctrl-W is the default shortcut to close tabs on Terminus and on many other Windows software. So how do we go about this?
因为Ctrl-W是关闭Terminus和许多其他Windows软件上的选项卡的默认快捷方式。 那么我们该如何做呢?
VIM allows us to remap keys to save keystrokes and also to avoid conflicts.
VIM允许我们重新映射键以保存键击并避免冲突。
8.重新映射和更改Linux VIM命令 (8. Remap and Change Linux VIM Commands )
Some shortcuts in VIM are quite cumbersome and can make us wonder if all the effort is even worth it!
VIM中的一些快捷方式非常繁琐,可能使我们怀疑所有的努力是否值得!
The remap, noremap, nnoremap, inoremap, vnoremap commands allow us to remap existing VIM commands to any other key that we’d like to set up.
remap , noremap , nnoremap , inoremap , vnoremap命令允许我们将现有的VIM命令重新映射到我们想要设置的任何其他键。
The difference between the mapping commands is the map modes they work in. Covering the map modes is out of scope for this topic so I’ll leave it to you to read. Go ahead and type in :help map-modes.
映射命令之间的区别在于它们使用的地图模式。本主题涵盖的地图模式不在本主题的讨论范围之内,因此我将让您阅读。 继续输入:help map-modes 。

This is the overview of the map-modes but the help topic has a ton of details if you’re interested in understanding these modes.
这是地图模式的概述,但是如果您想了解这些模式,则帮助主题将提供大量详细信息。
How to map the existing vim command shortcuts? We’ll work with the “map” command.
如何映射现有的vim命令快捷方式? 我们将使用“地图”命令。
Syntax:
语法 :
:map <new key-combo> <existing key-combo>

For example:
:map <C-J> <C-W><C-J>
:map <C-K> <C-W><C-K>
:map <C-L> <C-W><C-L>
:map <C-H> <C-W><C-H>
:map l gg
The above mappings will change the default split-window switching commands to Ctrl-J, Ctrl-K and so on instead of the added Ctrl-W.
上面的映射会将默认的拆分窗口切换命令更改为Ctrl-J,Ctrl-K等,而不是添加的Ctrl-W。
The last command will change the gg command to l. So whenever you press l, you’ll be taken to the first line.
最后一条命令会将gg命令更改为l 。 因此,无论何时按l,您都将被带到第一行。
Do this for as many commands as you need. But these mappings are session-based. Once you quit vim, the mappings are reset.
对所需的命令执行此操作。 但是这些映射是基于会话的。 退出vim后,映射将重置。
To set persistent key mapping, we need to add the commands to the VIMrc file. Simply copy-paste the commands without the : in the ~/.vimrc file. If the file does not exist, just create one with only the commands that you need to run on startup of VIM.
要设置持久键映射,我们需要将命令添加到VIMrc文件。 只需在〜/ .vimrc文件中复制粘贴不带:的命令即可。 如果该文件不存在,则仅使用启动VIM时需要运行的命令来创建一个。
To set up these key mappings in addition to the existing default vim configuration, just make a copy or symlink the original file as below:
要在现有的默认vim配置之外设置这些键映射,只需如下所示对原始文件进行复制或符号链接:
root@ubuntu:~# ln -s ~/code/dotfiles/vim/vimrc ~/.vimrc
9. Linux VIM命令启用语法突出显示 (9. Linux VIM commands to enable Syntax Highlighting)
Continuing from our previous section, we can add the command syntax on in the ~/.vimrc file to enable the syntax highlight. Have a look at the difference that it would make.
在上一节的基础上,我们可以在〜/ .vimrc文件中添加命令syntax on以启用语法突出显示。 看看会带来什么变化。
You can obviously turn the syntax highlighting on and off while in session too as we did for all other commands before.
显然,您也可以像在之前其他所有命令中一样,在会话中打开和关闭语法高亮显示。
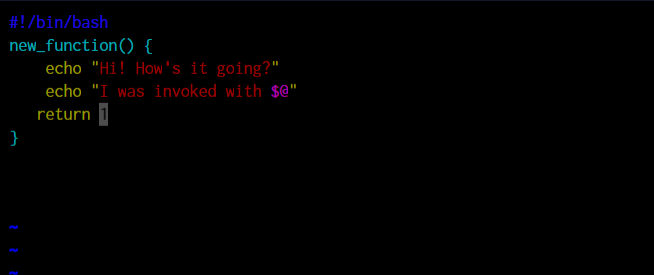
10. Linux VIM命令剪切,复制和粘贴 (10. Linux VIM commands to Cut, Copy, and Paste)
Copying and pasting are not as straightforward as Ctrl-c Ctrl-v but it’s pretty easy!
复制和粘贴不像Ctrl-c Ctrl-v那样简单,但是非常简单!
In VIM, Copy action is called Yank, and Cut action is called Delete. The paste action continues to be called Paste.
在VIM中,复制动作称为Yank ,而剪切动作称为Delete 。 粘贴动作继续称为Paste 。
So the shortcuts are named according to these names. For example, if I have to “Yank” something, I can type y and the selected text gets yanked.
因此,快捷方式是根据这些名称来命名的。 例如,如果我必须“表示”某些内容,则可以键入y ,然后选中的文本将被选中。
To cut a text, the command is the same as delete, the letter d. So you can understand that even when you delete a piece of text, the VIM editor is actually preparing the text to be pasted somewhere else.
要剪切文本,命令与删除相同,即字母d 。 因此,您可以理解,即使删除一段文本,VIM编辑器实际上也正在准备将文本粘贴到其他地方。
Whatever section the cursor is at, will get copied or deleted. To paste the copied text, just type p to paste after the cursor, and P to paste before the cursor.
光标所处的任何区域都将被复制或删除。 要粘贴复制的文本,只需键入p光标后粘贴,以及P光标前粘贴。
11. VIM中的拼写检查 (11. Spell Checking in VIM)
Didn’t expect to see this point, did you? Well, VIm does have a spell checking option that works based on a dictionary file that is already available. All we have to do is set up the language.
没想到看到这一点,是吗? 好吧,VIm确实有一个拼写检查选项,该选项可基于已经可用的字典文件工作。 我们要做的就是设置语言。

In the ~/.vimrc file, add the following line:
在〜/ .vimrc文件中,添加以下行:
set spell spelllang=en_us

As you can see, the Lorem Ipsum text gets instantly highlighted when I enabled the spell check.
如您所见,当我启用拼写检查时,Lorem Ipsum文本会立即突出显示。
12.替代–在VIM中查找和替换 (12. Substitution – Find and Replace in VIM)
The find and replace functionality that all the GUI text editors offer is also found on VIM. How? Because of pattern matching.
所有GUI文本编辑器都提供的查找和替换功能也可以在VIM上找到。 怎么样? 由于模式匹配。
:%s /Lorem/JournalDev/g
The above line will instantly replace every occurrence of Lorem on each line (g) with the word JournalDev.
上一行将立即用JournalDev单词替换每行( g )上出现的Lorem。
13.在VIM中执行Linux命令 (13. Execute Linux Commands In VIM)
So you’re editing some code and need to quickly run a command. Do you need to save and exit VIm just to run the code? Not really!
因此,您正在编辑一些代码,并且需要快速运行命令。 您是否需要保存并退出VIm才能运行代码? 并不是的!
Vim allows you to run the code from within the editor without having to lose track of the code. You can do this by the use of an exclamation mark after the colon. Here’s an example:
Vim允许您从编辑器中运行代码,而不必失去对代码的跟踪。 您可以通过在冒号后使用感叹号来做到这一点。 这是一个例子:
:!ping www.journaldev.com
That’s it! Now if it’s a command that ends after output, you can hit the ENTER key and get back to programming. But in case of this ping command, you can hit the keyboard interrupt Ctrl-C and then hit the ENTER key without losing your VIM editor from the background.
而已! 现在,如果这是一条在输出后结束的命令,则可以按ENTER键并返回编程。 但是,在执行此ping命令的情况下,您可以按键盘中断Ctrl-C ,然后按Enter键,而不会从后台丢失VIM编辑器。
Alternatively, you can just type :shell to directly get a shell opened up for you. Once you’re done with what you need to do, you just type exit to exit the shell and get back to VIM which stays as it was left before.
另外,您可以键入:shell直接为您打开一个shell。 完成所需的工作后,只需键入exit即可退出外壳程序并返回到VIM(保留之前的状态)。
14.删除多个单词 (14. Deleting Multiple Words)
You know that the words to the right of your cursor need to be deleted. But not the entire sentence. How do you do it? With the same command and some additional parameters.
您知道光标右边的单词需要删除。 但不是整个句子。 你怎么做呢? 使用相同的命令和一些其他参数。
The d command will simply make use of the number specified after it to delete those many words. Have a look at the command below. Both commands work based on where the cursor is at.
d命令将仅使用其后指定的数字来删除许多单词。 看下面的命令。 这两个命令都基于光标所在的位置。
d3w #This will delete 3 words to the right
d3b #This will delete 3 words to the left
15. Linux VIM命令撤消更改 (15. Linux VIM command to Undo Changes)
While you’re getting used to VIM, there will be times when you end up deleting something that you didn’t want to. The Ctrl-Z approach doesn’t work on VIM so how do you undo your work?
当您习惯了VIM时,有时您最终会删除不需要的内容。 Ctrl-Z方法在VIM上不起作用,那么如何撤消工作?
u
The letter u will automatically undo the changes just like ctrl-z would.
字母u会像ctrl-z一样自动撤消更改。
16.从其他文件插入文本 (16. Insert Text From Different File)
This is a pretty useful productivity hack. Saves time copy-pasting things from multiple files to merge between them.
这是一个非常有用的生产力黑客。 节省了从多个文件复制粘贴内容以在它们之间合并的时间。
So what exactly is this? It simply reads text from another file that is specified and inserts the entire text right after the cursor.
那到底是什么呢? 它只是从另一个指定的文件中读取文本,然后将整个文本插入到光标之后。
:r <file name>
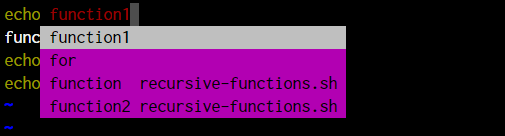
17. VIM中的宏 (17. Macros in VIM)
We know VIM can do a lot, but did you imagine a command-line editor to be able to record macros? Well, you better start imagining as this editor is called powerful because of the great potential this simple-looking editor has.
我们知道VIM可以做很多事情,但是您是否想像命令行编辑器能够记录宏? 好吧,您最好开始想象一下,因为此编辑器具有巨大的潜力,因此它被称为功能强大的编辑器。
How do you record a macro? It’s very easy! You enter the command mode (If you’re in insert mode, just press Esc).
您如何录制宏? 非常简单! 您进入命令模式(如果处于插入模式,只需按Esc ) 。
qb #The letter after q is just to identify the macro. Can be anything
q #Stop recording macro
@b #Replay the macro. The letter runs that specific macro
What’s the use of this macro? Anything that you can do within the VIm editor can be done with a macro. So for example you:
这个宏有什么用? 在VIm编辑器中可以执行的任何操作都可以使用宏来完成。 例如,您:
- Go to the first word 转到第一个字
- Delete the first word 删除第一个字
- Replace it with something else 用其他东西代替
If you have to do this for multiple lines, all you need to do is record a macro and replay it.
如果必须对多行执行此操作,则只需记录一个宏并重播它即可。
18.使用计数命令 (18. Using Count For Commands)
Almost every command that “might” need to enter multiple times, accepts a number as an argument. For example, the delete command d, the line jump command k, etc.
几乎每个“可能”需要多次输入的命令都接受一个数字作为参数。 例如,删除命令d ,行跳转命令k等。
So if I want to delete 6 lines, I can do the d command 6 times or just say 6d.
因此,如果要删除6行,可以执行d命令6次,或只说6d 。
That’s for delete, you can also do it when moving around the text. If I want to move by 3 words, all I type is 3w or 3e depending on where I want the cursor to be placed, at the start or at the end.
这是为了删除,您也可以在移动文本时进行删除。 如果我想移动3个单词,则根据键入光标的位置(在开头还是结尾),我键入的都是3w或3e 。
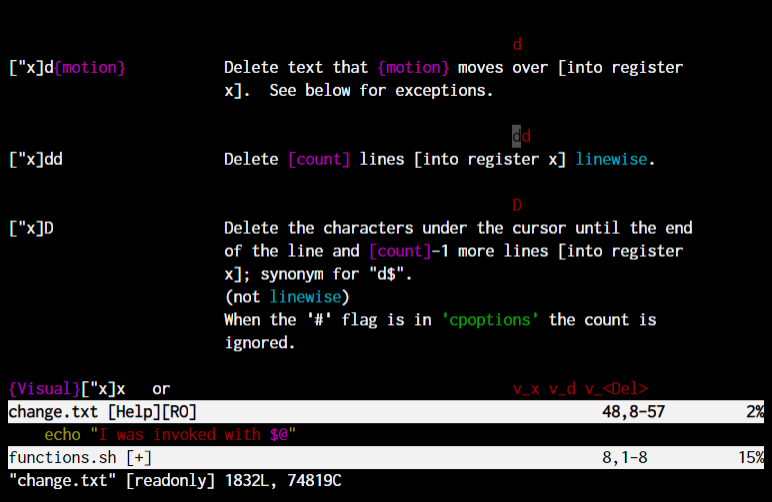
19.了解文件中的进度 (19. Knowing Progress Within File)
If you’re scrolling through a long file and you simply need to know where you are at present, go for this command. It will give you a percentage figure of where you stand at the present moment within the file.
如果要滚动浏览一个长文件,而只需要知道当前位置,请执行此命令。 它将为您提供文件中当前位置的百分比图。

As you can see in the above image, it tells me that my cursor’s current position is at the 40% mark from the end of the file. The command to do this is by typing Ctrl-G when you’re in command mode.
如上图所示,它告诉我光标的当前位置位于文件末尾40%的位置。 执行此命令的命令是在命令模式下键入Ctrl-G 。
20. Linux VIM命令的帮助模块 (20. Help Modules For Linux VIM commands )
I’m going to end this post by talking about the handy tool, the help command. Similar to man pages in Linux, the help command allows users to understand all the vim commands in detail. Here’s an example of what the help command shows for our delete command.
在本文的结尾,我将讨论方便的工具help命令。 类似于Linux中的手册页, help命令使用户可以详细了解所有vim命令。 这是help命令显示我们的delete命令的示例。
:help d
结论 (Conclusion)
This is just going to be the start of your journey in vim-land. There are loads of commands and features that you’ll explore as you go along with learning VIm.
这只是您在vim-land之旅的起点。 学习VIm时将探索大量的命令和功能。
But there’s one thing that you can be assured of. If you learn VIM well enough once, it will just become second nature to you to expect those features when you start using any other editor!
但是您可以放心一件事。 如果您足够了解VIM,那么当您开始使用任何其他编辑器时,期待这些功能将成为您的第二天性!
参考资料 (References)
- ftp://ftp.vim.org/pub/vim/doc/book/vimbook-OPL.pdf – The 572 page complete guidebook by VIm that goes over everything that VIM has to offer. ftp://ftp.vim.org/pub/vim/doc/book/vimbook-OPL.pdf – VIm提供的572页的完整指南,涵盖了VIM必须提供的所有内容。
linux vim命令


 8335
8335

 被折叠的 条评论
为什么被折叠?
被折叠的 条评论
为什么被折叠?
 到【灌水乐园】发言


