


Welcome to Spring Boot MongoDB example. Spring Boot is the easiest way to spin a spring project quickly and MongoDB is the most popular NoSQL database. Let’s see how to integrate spring with MongoDB database.
欢迎使用Spring Boot MongoDB示例。 Spring Boot是快速旋转Spring项目的最简单方法,而MongoDB是最受欢迎的NoSQL数据库。 让我们看看如何将spring与MongoDB数据库集成。
Spring Boot MongoDB (Spring Boot MongoDB)
We need following APIs to work with Spring Boot and MongoDB database.
我们需要以下API来使用Spring Boot和MongoDB数据库。
- Spring Data MongoDB Spring Data MongoDB
- Spring Boot Sprint Boot
There are two approaches through which we can connect to MongoDB database – MongoRepository and MongoTemplate. We will try to establish what one API offers over another and when should you choose any one of them for your use-case. We will make use of Spring Initializr tool for quickly setting up the project. So, let’s get started.
我们可以通过两种方法连接到MongoDB数据库: MongoRepository和MongoTemplate 。 我们将尝试确定一个API可以提供比另一个API更多的功能,以及何时应为您的用例选择它们中的任何一个。 我们将使用Spring Initializr工具快速设置项目。 因此,让我们开始吧。
Spring Boot MongoDB项目设置 (Spring Boot MongoDB Project Setup)
We will make use of Spring Initializr tool for quickly setting up the project. We will use just two dependencies as shown below:
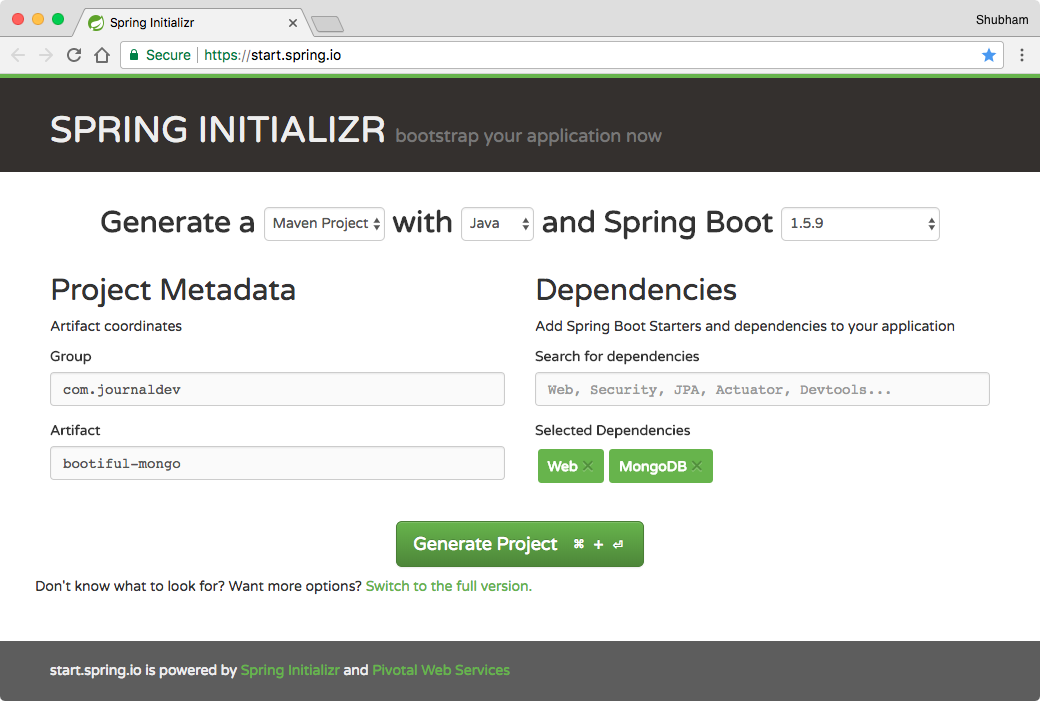
我们将使用Spring Initializr工具快速设置项目。 我们将仅使用两个依赖项,如下所示:
Download the project and unzip it. Then import it into your favorite IDE – Eclipse or IntelliJ IDEA.
下载项目并解压缩。 然后将其导入您喜欢的IDE – Eclipse或IntelliJ IDEA。
Maven依赖 (Maven Dependencies)
Though we already completed the setup with the tool, if you want to set it up manually, we use Maven build system for this project and here are the dependencies we used:
尽管我们已经使用该工具完成了设置,但是如果您想手动设置它,我们将为该项目使用Maven构建系统,这是我们使用的依赖项:
<?xml version="1.0" encoding="UTF-8"?>
<project xmlns="https://maven.apache.org/POM/4.0.0" xmlns:xsi="https://www.w3.org/2001/XMLSchema-instance"
	xsi:schemaLocation="https://maven.apache.org/POM/4.0.0 https://maven.apache.org/xsd/maven-4.0.0.xsd">
	<modelVersion>4.0.0</modelVersion>

	<groupId>com.journaldev.spring</groupId>
	<artifactId>spring-boot-mongodb</artifactId>
	<version>0.0.1-SNAPSHOT</version>
	<packaging>jar</packaging>

	<name>spring-boot-mongodb</name>
	<description>Spring Boot MongoDB Example</description>

	<parent>
		<groupId>org.springframework.boot</groupId>
		<artifactId>spring-boot-starter-parent</artifactId>
		<version>1.5.9.RELEASE</version>
		<relativePath /> <!-- lookup parent from repository -->
	</parent>

	<properties>
		<project.build.sourceEncoding>UTF-8</project.build.sourceEncoding>
		<project.reporting.outputEncoding>UTF-8</project.reporting.outputEncoding>
		<java.version>1.8</java.version>
	</properties>

	<dependencies>
		<dependency>
			<groupId>org.springframework.boot</groupId>
			<artifactId>spring-boot-starter-data-mongodb</artifactId>
		</dependency>
		<dependency>
			<groupId>org.springframework.boot</groupId>
			<artifactId>spring-boot-starter-web</artifactId>
		</dependency>

		<dependency>
			<groupId>org.springframework.boot</groupId>
			<artifactId>spring-boot-starter-test</artifactId>
			<scope>test</scope>
		</dependency>
	</dependencies>

	<build>
		<plugins>
			<plugin>
				<groupId>org.springframework.boot</groupId>
				<artifactId>spring-boot-maven-plugin</artifactId>
			</plugin>
		</plugins>
	</build>
</project>
Make sure to use stable version for Spring Boot from the maven central.
确保从Maven Central使用稳定版本的Spring Boot 。
Spring Boot MongoDB模型类 (Spring Boot MongoDB Model Class)
We have a simple model class User.java.
我们有一个简单的模型类User.java 。
package com.journaldev.bootifulmongodb.model;

import java.util.Date;
import java.util.HashMap;
import java.util.Map;

import org.springframework.data.annotation.Id;
import org.springframework.data.mongodb.core.mapping.Document;

@Document
public class User {

	@Id
	private String userId;
	private String name;
	private Date creationDate = new Date();
	private Map<String, String> userSettings = new HashMap<>();

	public String getUserId() {
		return userId;
	}

	public void setUserId(String userId) {
		this.userId = userId;
	}

	public String getName() {
		return name;
	}

	public void setName(String name) {
		this.name = name;
	}

	public Date getCreationDate() {
		return creationDate;
	}

	public void setCreationDate(Date creationDate) {
		this.creationDate = creationDate;
	}

	public Map<String, String> getUserSettings() {
		return userSettings;
	}

	public void setUserSettings(Map<String, String> userSettings) {
		this.userSettings = userSettings;
	}
}
Spring Boot MongoDB API (Spring Boot MongoDB APIs)
We will have following functionalities and Database interactions in our app.
我们的应用程序中将具有以下功能和数据库交互。
- Get all users 获取所有用户
- Get a user with ID 获取具有ID的用户
- Get user settings 获取用户设置
- Get a particular key from the Map 从地图上获取特定的钥匙
- Add/Update user setting 添加/更新用户设置
Spring数据MongoDB – MongoRepository (Spring Data MongoDB – MongoRepository)
Now we will use Spring Data MongoDB repository to access our data. Spring Data MongoRepository provide us common functionalities that we can easily plug-in and use it.
现在,我们将使用Spring Data MongoDB存储库访问我们的数据。 Spring Data MongoRepository为我们提供了常见的功能,我们可以轻松地插入和使用它。
Let us define our Repository interface.
让我们定义我们的Repository接口。
package com.journaldev.bootifulmongodb.dal;

import org.springframework.data.mongodb.repository.MongoRepository;
import org.springframework.stereotype.Repository;

import com.journaldev.bootifulmongodb.model.User;

@Repository
public interface UserRepository extends MongoRepository<User, String> {
}
定义MongoDB属性 (Defining MongoDB properties)
Before we lay out our controller, it is important that we make a connection with a local instance of MongoDB. We will use Spring Boot properties to do this.
在布置控制器之前,重要的是要与MongoDB的本地实例建立连接。 我们将使用Spring Boot属性来执行此操作。
#Local MongoDB config
spring.data.mongodb.authentication-database=admin
spring.data.mongodb.username=root
spring.data.mongodb.password=root
spring.data.mongodb.database=user_db
spring.data.mongodb.port=27017
spring.data.mongodb.host=localhost

# App config
server.port=8102
spring.application.name=BootMongo
server.context-path=/user
So, the app will run on port 8102 and connect to a local mongoDB instance with provided credentials. If you have a local instance without authorization enabled, you can just remove the first three lines of configuration.
因此,该应用程序将在端口8102上运行,并使用提供的凭据连接到本地mongoDB实例。 如果您有未启用授权的本地实例,则只需删除配置的前三行。
定义弹簧控制器 (Defining the Spring Controller)
Let us finally move to making our Controller class.
最后,让我们开始制作Controller类。
package com.journaldev.bootifulmongodb.controller;

import java.util.List;

import org.slf4j.Logger;
import org.slf4j.LoggerFactory;
import org.springframework.web.bind.annotation.PathVariable;
import org.springframework.web.bind.annotation.RequestBody;
import org.springframework.web.bind.annotation.RequestMapping;
import org.springframework.web.bind.annotation.RequestMethod;
import org.springframework.web.bind.annotation.RestController;

import com.journaldev.bootifulmongodb.dal.UserRepository;
import com.journaldev.bootifulmongodb.model.User;

@RestController
@RequestMapping(value = "/")
public class UserController {

	private final Logger LOG = LoggerFactory.getLogger(getClass());

	private final UserRepository userRepository;

	public UserController(UserRepository userRepository) {
		this.userRepository = userRepository;
	}
}
We just Autowired the repository interface dependency and we will use this next.
我们只是自动连接库接口的依赖,我们将使用这个未来。
定义API (Defining the APIs)
For the functionalities we mentioned, we will now be making APIs and accessing the userRepository dependency which will internally use Spring Data MongoRepository API. Notice that we do not have to write any database interaction code in the interface as Spring Data does it all for us.
对于我们提到的功能,我们现在将制作API并访问将在内部使用Spring Data MongoRepository API的userRepository依赖项。 注意,我们不必在接口中编写任何数据库交互代码,因为Spring Data会为我们完成所有这些工作。
获取所有用户 (Getting all users)
@RequestMapping(value = "", method = RequestMethod.GET)
public List<User> getAllUsers() {
	LOG.info("Getting all users.");
	return userRepository.findAll();
}
findAll() is just a method which Spring Data MongoRepository provides internally.
findAll()只是Spring Data MongoRepository内部提供的一种方法。
通过ID获取用户 (Getting a user by ID)
Now, let us get a specific user with an ID.
现在,让我们获取具有ID的特定用户。
@RequestMapping(value = "/{userId}", method = RequestMethod.GET)
public User getUser(@PathVariable String userId) {
	LOG.info("Getting user with ID: {}.", userId);
	return userRepository.findOne(userId);
}
findOne() is just a method which Spring Data MongoRepository provides internally to get an Object by an ID.
findOne()只是Spring Data MongoRepository内部提供的一种通过ID获取对象的方法。
添加新用户 (Adding a new User)
We will be adding a new user in the function below.
我们将在下面的功能中添加一个新用户。
@RequestMapping(value = "/create", method = RequestMethod.POST)
public User addNewUsers(@RequestBody User user) {
	LOG.info("Saving user.");
	return userRepository.save(user);
}
获取用户设置 (Getting User settings)
Now that we have added sample data into the DB, let’s try to extract some part of it.
现在,我们已将示例数据添加到数据库中,让我们尝试提取其中的一部分。
@RequestMapping(value = "/settings/{userId}", method = RequestMethod.GET)
public Object getAllUserSettings(@PathVariable String userId) {
	User user = userRepository.findOne(userId);
	if (user != null) {
		return user.getUserSettings();
	} else {
		return "User not found.";
	}
}
获取特定的用户设置 (Getting a particular User setting)
@RequestMapping(value = "/settings/{userId}/{key}", method = RequestMethod.GET)
public String getUserSetting(@PathVariable String userId, @PathVariable String key) {
	User user = userRepository.findOne(userId);
	if (user != null) {
		return user.getUserSettings().get(key);
	} else {
		return "User not found.";
	}
}
Notice in the above query, we got the user object, then extracted the complete Setting map (which could have contained 1000s of objects) and finally got our own value. This is a downside for Spring Data query when we use it as straight API.
注意,在上面的查询中,我们获得了用户对象,然后提取了完整的设置图(可能包含1000个对象),最后得到了我们自己的值。 当我们将Spring Data查询用作直接API时,这是不利的。
添加新的用户设置 (Adding a new User setting)
Let’s try to add some data to an existing user:
让我们尝试向现有用户添加一些数据:
@RequestMapping(value = "/settings/{userId}/{key}/{value}", method = RequestMethod.GET)
public String addUserSetting(@PathVariable String userId, @PathVariable String key, @PathVariable String value) {
	User user = userRepository.findOne(userId);
	if (user != null) {
		user.getUserSettings().put(key, value);
		userRepository.save(user);
		return "Key added";
	} else {
		return "User not found.";
	}
}
With all the code we wrote, it’s clear that we didn’t have to write a single line of code to access the database apart from defining the repository interface and autowiring the dependency.
使用我们编写的所有代码,很明显,除了定义存储库接口和自动装配依赖关系之外,我们无需编写任何代码即可访问数据库。
This is the ease Spring Data MongoRepository API offers us but it also has some downsides. We will elaborate this when we have defined the MongoTemplate version as well. Let’s get started with that too.
Spring Data MongoRepository API可以轻松为我们提供服务,但也有一些缺点。 当我们还定义了MongoTemplate版本时,我们将详细说明。 让我们也开始吧。
Spring Data MongoDB – MongoTemplate (Spring Data MongoDB – MongoTemplate)
We will be defining the MongoTemplate database queries here. With MongoTemplate, you will see that we have much more granular control over what we query and what data is included in the results.
我们将在这里定义MongoTemplate数据库查询。 使用MongoTemplate,您将看到我们可以更精确地控制查询内容以及结果中包含的数据。
定义DAL接口 (Defining the DAL interface)
To provide a contract at the database access layer, we will start by defining an interface which works just like our Spring Data in-built methods.
为了在数据库访问层提供合同,我们将首先定义一个接口,该接口的工作方式与我们的Spring Data内置方法一样。
package com.journaldev.bootifulmongodb.dal;

import java.util.List;

import com.journaldev.bootifulmongodb.model.User;

public interface UserDAL {

	List<User> getAllUsers();

	User getUserById(String userId);

	User addNewUser(User user);

	Object getAllUserSettings(String userId);

	String getUserSetting(String userId, String key);

	String addUserSetting(String userId, String key, String value);
}
实施DAL接口 (Implementing the DAL interface)
Let’s move on and define these methods.
让我们继续并定义这些方法。
package com.journaldev.bootifulmongodb.dal;

import java.util.List;

import org.springframework.beans.factory.annotation.Autowired;
import org.springframework.data.mongodb.core.MongoTemplate;
import org.springframework.data.mongodb.core.query.Criteria;
import org.springframework.data.mongodb.core.query.Query;
import org.springframework.stereotype.Repository;

import com.journaldev.bootifulmongodb.model.User;

@Repository
public class UserDALImpl implements UserDAL {

	@Autowired
	private MongoTemplate mongoTemplate;

	@Override
	public List<User> getAllUsers() {
		return mongoTemplate.findAll(User.class);
	}

	@Override
	public User getUserById(String userId) {
		Query query = new Query();
		query.addCriteria(Criteria.where("userId").is(userId));
		return mongoTemplate.findOne(query, User.class);
	}

	@Override
	public User addNewUser(User user) {
		mongoTemplate.save(user);
		// Now, user object will contain the ID as well
		return user;
	}

	@Override
	public Object getAllUserSettings(String userId) {
		Query query = new Query();
		query.addCriteria(Criteria.where("userId").is(userId));
		User user = mongoTemplate.findOne(query, User.class);
		return user != null ? user.getUserSettings() : "User not found.";
	}

	@Override
	public String getUserSetting(String userId, String key) {
		Query query = new Query();
		query.fields().include("userSettings");
		query.addCriteria(Criteria.where("userId").is(userId).andOperator(Criteria.where("userSettings." + key).exists(true)));
		User user = mongoTemplate.findOne(query, User.class);
		return user != null ? user.getUserSettings().get(key) : "Not found.";
	}

	@Override
	public String addUserSetting(String userId, String key, String value) {
		Query query = new Query();
		query.addCriteria(Criteria.where("userId").is(userId));
		User user = mongoTemplate.findOne(query, User.class);
		if (user != null) {
			user.getUserSettings().put(key, value);
			mongoTemplate.save(user);
			return "Key added.";
		} else {
			return "User not found.";
		}
	}
}
The method implementations in above class are using MongoTemplate dependency.
上一类中的方法实现使用MongoTemplate依赖项。
See how getUserById(...) method gets the user. We construct a query and passed required parameters.
查看getUserById(...)方法如何获取用户。 我们构造一个查询并传递必需的参数。
What will interests you more is the getUserSetting query. Let us understand what happened above:
您更感兴趣的是getUserSetting查询。 让我们了解上面发生的事情:
- We constructed queries with criteria to check equality. 我们构造了带有条件的查询来检查是否相等。
- The include method includes the field names which the result should include when it is extracted from DB. This means, in this case, userSettings key will be extracted which will save a lot of data to be fetched which is not needed include方法包含从数据库中提取结果时应包括的字段名称。 这意味着,在这种情况下,将提取userSettings密钥,这将节省大量不需要提取的数据
- Also, we queried upon both user and the map key. Id any of it isn’t found, we return empty data meaning the required key wasn’t found. This saves from even fetching the User object at all if the required key was not present 此外,我们同时询问了用户和地图密钥。 如果未找到任何内容,我们将返回空数据,这意味着未找到所需的密钥。 如果不存在所需的密钥,这甚至可以根本避免获取User对象
Spring Data MongoDB测试运行 (Spring Data MongoDB Test Run)
We can run this app simply by using a single command:
我们只需使用一个命令即可运行此应用程序:
mvn spring-boot:runOnce the app is running, we can try saving a new user by using this API:
应用程序运行后,我们可以尝试使用以下API保存新用户:
https://localhost:8102/user/createAs this will be a POST request, we will be sending JSON data as well:
由于这将是POST请求,因此我们还将发送JSON数据:
{
  "name" : "Shubham",
  "userSettings" : {
    "bike" : "pulsar"
  }
}
As we are returning the Mongo response itself, we will get something like:
当我们返回Mongo响应本身时,我们将得到类似以下内容:
{
  "userId": "5a5f28cc3178058b0fafe1dd",
  "name": "Shubham",
  "creationDate": 1516165830856,
  "userSettings": {
    "bike" : "pulsar"
  }
}
You can get all users by using the API as GET request:
您可以使用API作为GET请求来获取所有用户:
https://localhost:8102/user/We will get back something like:
我们将得到类似的信息:
[
  {
    "userId": "5a5f28cc3178058b0fafe1dd",
    "name": "Shubham",
    "creationDate": 1516165830856,
    "userSettings": {
      "bike" : "pulsar"
    }
  }
]
If you see above UserController class, we haven’t hooked up MongoTemplate to be used. Below code snippet shows the changes required to use MongoTemplate for reading user settings.
如果您在UserController类的上方看到,我们尚未连接要使用的MongoTemplate。 下面的代码片段显示了使用MongoTemplate读取用户设置所需的更改。
//define Data Access Layer object
private final UserDAL userDAL;

//initialize DAL object via constructor autowiring
public UserController(UserRepository userRepository, UserDAL userDAL) {
	this.userRepository = userRepository;
	this.userDAL = userDAL;
}

//change method implementation to use DAL and hence MongoTemplate
@RequestMapping(value = "/settings/{userId}", method = RequestMethod.GET)
public Object getAllUserSettings(@PathVariable String userId) {
    User user = userRepository.findOne(userId);
    if (user != null) {
        return userDAL.getAllUserSettings(userId);
    } else {
        return "User not found.";
    }
}

//change method implementation to use DAL and hence MongoTemplate
@RequestMapping(value = "/settings/{userId}/{key}", method = RequestMethod.GET)
public String getUserSetting(
        @PathVariable String userId, @PathVariable String key) {
    return userDAL.getUserSetting(userId, key);
}
Restart the app and run scenarios to get all user settings and to get any specific key. Below image shows the output from Postman app.
重新启动应用程序并运行方案以获取所有用户设置并获取任何特定密钥。 下图显示了Postman应用程序的输出。
MongoTemplate和MongoRepository (MongoTemplate vs MongoRepository)
- MongoTemplate provides a lot more control when it comes to querying data and what data to pull from database. MongoTemplate在查询数据以及从数据库中提取什么数据时提供了更多控制。
- Spring Data repositories provide us a convenient outlook on how to fetch data. Spring Data存储库为我们提供了有关如何获取数据的便利视图。
- MongoTemplate is database dependent. What this means is, with Spring Data repositories, you can easily switch to a different database altogether by simply using a different Spring Data repositories for MySQL or Neo4J or anything else. This is not possible with MongoTemplate. MongoTemplate与数据库有关。 这意味着,使用Spring Data存储库,您可以简单地将不同的Spring Data存储库用于MySQL或Neo4J或其他任何类型,轻松地将其完全切换到其他数据库。 MongoTemplate无法做到这一点。
Spring Boot MongoDB摘要 (Spring Boot MongoDB Summary)
In this lesson, we looked at how MongoTemplate can provide us more control over Spring Data repositories but can also be a little complicated when deeper queries are involved. So, this is completely your call what to choose when you develop your idea. Feel free to leave comments below.
在本课程中,我们研究了MongoTemplate如何为我们提供对Spring Data存储库的更多控制,但是当涉及到更深层次的查询时,它也会变得有些复杂。 因此,这完全是您提出想法时的选择。 随时在下面发表评论。
Download the source code from below link. Please make sure that you change the MongoDB credentials before running the provided app.
从下面的链接下载源代码。 在运行提供的应用程序之前,请确保您更改了MongoDB凭据。


 3918
3918


 被折叠的 条评论
为什么被折叠?
被折叠的 条评论
为什么被折叠?
 到【灌水乐园】发言


