


Spring Boot Elasticsearch 6 (Spring Boot Elasticsearch 6)
In this post, we will setup up a sample Spring boot Elasticsearch application. We will use latest version of Elasticsearch i.e. 6.1.x. To interact with the Elasticsearch search engine, we will use Elasticsearch Rest client. We are not using Spring Data ElasticSearch because that doesn’t support latest ElasticSearch version i.e 6.x.
在本文中,我们将设置一个示例Spring boot Elasticsearch应用程序。 我们将使用最新版本的Elasticsearch,即6.1.x。 为了与Elasticsearch搜索引擎进行交互,我们将使用Elasticsearch Rest客户端 。 我们不使用Spring Data ElasticSearch,因为它不支持最新的ElasticSearch版本,即6.x。
设置项目 (Setting up the project)
Maven依赖 (Maven Dependencies)
We will use Maven build system for this project and here are the dependencies we used:
我们将为此项目使用Maven构建系统,这是我们使用的依赖项:
<parent>
  <groupId>org.springframework.boot</groupId>
  <artifactId>spring-boot-starter-parent</artifactId>
  <version>1.5.9.RELEASE</version>
  <relativePath/>
  <!-- lookup parent from repository -->
</parent>
<properties>
  <project.build.sourceEncoding>UTF-8</project.build.sourceEncoding>
  <project.reporting.outputEncoding>UTF-8</project.reporting.outputEncoding>
  <java.version>1.8</java.version>
</properties>
<dependencies>
  <dependency>
    <groupId>org.springframework.boot</groupId>
    <artifactId>spring-boot-starter</artifactId>
  </dependency>
  <dependency>
    <groupId>org.springframework.boot</groupId>
    <artifactId>spring-boot-starter-web</artifactId>
  </dependency>
  <dependency>
    <groupId>org.springframework.boot</groupId>
    <artifactId>spring-boot-starter-test</artifactId>
    <scope>test</scope>
  </dependency>
  <!-- Elasticsearch Dependencies -->
  <dependency>
    <groupId>org.elasticsearch</groupId>
    <artifactId>elasticsearch</artifactId>
    <version>6.1.2</version>
  </dependency>
  <dependency>
    <groupId>org.elasticsearch.client</groupId>
    <artifactId>elasticsearch-rest-high-level-client</artifactId>
    <version>6.1.2</version>
  </dependency>
  <dependency>
    <groupId>org.apache.logging.log4j</groupId>
    <artifactId>log4j-api</artifactId>
    <version>2.8.2</version>
  </dependency>
  <dependency>
    <groupId>org.apache.logging.log4j</groupId>
    <artifactId>log4j-core</artifactId>
    <version>2.8.2</version>
  </dependency>
  <dependency>
    <groupId>org.elasticsearch.client</groupId>
    <artifactId>elasticsearch-rest-client</artifactId>
    <version>6.1.2</version>
  </dependency>
  <dependency>
    <groupId>org.elasticsearch.client</groupId>
    <artifactId>elasticsearch-rest-client-sniffer</artifactId>
    <version>6.1.2</version>
  </dependency>
</dependencies>
<build>
  <plugins>
    <plugin>
      <groupId>org.springframework.boot</groupId>
      <artifactId>spring-boot-maven-plugin</artifactId>
    </plugin>
  </plugins>
</build>
Make sure to use stable version for Spring Boot from the maven central.
确保从Maven Central使用稳定版本的Spring Boot 。
Elasticsearch配置 (Elasticsearch Configuration)
Now, we will have to configure ElasticSearch in our application. Let’s d this in two parts. First, we will provide Elasticsearch address in our application.properties file:
现在,我们将不得不在应用程序中配置ElasticSearch。 让我们分为两部分。 首先,我们将在application.properties文件中提供Elasticsearch地址:
spring.data.elasticsearch.cluster-name=elasticsearch
spring.data.elasticsearch.cluster-nodes=elasticsearch
We only provided the Elasticsearch cluster name and node name here and these are actually the default values. Now, it’s time to put these values to use in our Java config class.
我们仅在此处提供了Elasticsearch集群名称和节点名称,而这些实际上是默认值。 现在,是时候在Java配置类中使用这些值了。
package com.journaldev.elasticsearch.config;

import org.apache.http.HttpHost;
import org.elasticsearch.client.RestClient;
import org.elasticsearch.client.RestHighLevelClient;
import org.slf4j.Logger;
import org.slf4j.LoggerFactory;
import org.springframework.beans.factory.annotation.Value;
import org.springframework.beans.factory.config.AbstractFactoryBean;
import org.springframework.context.annotation.Configuration;

@Configuration
public class ElasticSearchConfiguration extends AbstractFactoryBean {

    private static final Logger LOG = LoggerFactory.getLogger(ElasticSearchConfiguration.class);
    @Value("${spring.data.elasticsearch.cluster-nodes}")
    private String clusterNodes;
    @Value("${spring.data.elasticsearch.cluster-name}")
    private String clusterName;
    private RestHighLevelClient restHighLevelClient;

    @Override
    public void destroy() {
        try {
            if (restHighLevelClient != null) {
                restHighLevelClient.close();
            }
        } catch (final Exception e) {
            LOG.error("Error closing ElasticSearch client: ", e);
        }
    }

    @Override
    public Class<RestHighLevelClient> getObjectType() {
        return RestHighLevelClient.class;
    }

    @Override
    public boolean isSingleton() {
        return false;
    }

    @Override
    public RestHighLevelClient createInstance() {
        return buildClient();
    }

    private RestHighLevelClient buildClient() {
        try {
            restHighLevelClient = new RestHighLevelClient(
                    RestClient.builder(
                            new HttpHost("localhost", 9200, "http"),
                            new HttpHost("localhost", 9201, "http")));
        } catch (Exception e) {
            LOG.error(e.getMessage());
        }
        return restHighLevelClient;
    }
}
With this configuration, we ensured that ElasticSearch is able to make a successful connection to its server using the Rest Client API.
通过这种配置,我们确保了ElasticSearch能够使用Rest Client API与其服务器成功建立连接。
使用应用程序 (Working the app)
Let’s start putting the working components of the app now.
现在让我们开始放置应用程序的工作组件。
应用程式模型 (Model for the app)
We will be just using a simple model as a User:
我们将以简单的模型作为用户:
package com.journaldev.elasticsearch.model;

import com.fasterxml.jackson.annotation.JsonInclude;

@JsonInclude(JsonInclude.Include.NON_EMPTY)
public class Book {

    private String id;
    private String title;
    private String author;
    private float price;

    //standard setters and getters
}
We will be making following functionalities and Database interactions in our app:
我们将在我们的应用程序中进行以下功能和数据库交互:
- Get a book with ID 获取带有ID的书
- Insert a Book 插入一本书
- Update a Book 更新一本书
- Delete a Book 删除书籍
定义控制器 (Defining the Controller)
Let us move to making our Controller:
让我们开始制作我们的控制器:
package com.journaldev.elasticsearch.controller;

import com.journaldev.elasticsearch.model.Book;
import com.journaldev.elasticsearch.dao.BookDao;
import org.springframework.web.bind.annotation.*;

import java.util.Map;

@RestController
@RequestMapping("/books")
public class BookController {

    private BookDao bookDao;

    public BookController(BookDao bookDao) {
        this.bookDao = bookDao;
    }
  ...
}
We just Autowired the DAO dependency and we will use this next.
我们只是自动装配了DAO依赖项,接下来将使用它。
定义API (Defining the APIs)
For the functionalities we mentioned, we will now be making APIs and accessing the DAO dependency which will internally use Elasticsearch Rest Client API.
对于我们提到的功能,我们现在将制作API并访问内部将使用Elasticsearch Rest Client API的DAO依赖项。
获取带有ID的书 (Get a book with ID)
Let us get a book with ID:
让我们得到一本ID为的书:
@GetMapping("/{id}")
public Map<String, Object> getBookById(@PathVariable String id){
  return bookDao.getBookById(id);
}
插入一本书 (Insert a Book)
Now, let us insert a book now:
现在,让我们现在插入一本书:
@PostMapping
public Book insertBook(@RequestBody Book book) throws Exception {
  return bookDao.insertBook(book);
}
更新一本书 (Update a book)
We will be updating a book in this snippet:
我们将在以下片段中更新一本书:
@PutMapping("/{id}")
public Map<String, Object> updateBookById(@RequestBody Book book, @PathVariable String id) {
  return bookDao.updateBookById(id, book);
}
删除书 (Deleting a Book)
Now that we have added sample data into the DB, let’s try to extract some part of it:
现在,我们已经将示例数据添加到数据库中,让我们尝试提取其中的一部分:
@DeleteMapping("/{id}")
public void deleteBookById(@PathVariable String id) {
  bookDao.deleteBookById(id);
}
This is the ease Spring Data API offers us but it also has some downsides. We will elaborate this when we Have defined the ElasticsearchTemplate version as well. Let’s get started with that too.
这是Spring Data API为我们提供的便利,但也有一些缺点。 当我们还定义了ElasticsearchTemplate版本时,我们将详细说明。 让我们也开始吧。
定义DAO层 (Defining the DAO layer)
Now, we will actually define the DAL queries which achieves these objectives.
现在,我们将实际定义实现这些目标的DAL查询。
定义DAO (Defining DAO)
We will start by mentioning the dependencies we need:
我们将从提及我们需要的依赖关系开始:
package com.journaldev.elasticsearch.dao;

import com.journaldev.elasticsearch.model.Book;
import com.fasterxml.jackson.core.JsonProcessingException;
import com.fasterxml.jackson.databind.ObjectMapper;
import org.elasticsearch.ElasticsearchException;
import org.elasticsearch.action.delete.DeleteRequest;
import org.elasticsearch.action.delete.DeleteResponse;
import org.elasticsearch.action.get.GetRequest;
import org.elasticsearch.action.get.GetResponse;
import org.elasticsearch.action.index.IndexRequest;
import org.elasticsearch.action.index.IndexResponse;
import org.elasticsearch.action.update.UpdateRequest;
import org.elasticsearch.action.update.UpdateResponse;
import org.elasticsearch.client.RestHighLevelClient;
import org.elasticsearch.common.xcontent.XContentType;
import org.springframework.stereotype.Repository;

import java.util.HashMap;
import java.util.Map;
import java.util.UUID;

@Repository
public class BookDao {

  private final String INDEX = "bookdata";
  private final String TYPE = "books";
  private RestHighLevelClient restHighLevelClient;
  private ObjectMapper objectMapper;

  public BookDao( ObjectMapper objectMapper, RestHighLevelClient restHighLevelClient) {
    this.objectMapper = objectMapper;
    this.restHighLevelClient = restHighLevelClient;
  }
  ...
}
插入查询 (Insert Query)
We will start by inserting a Book into the ES:
我们将从在ES中插入一本书开始:
public Book insertBook(Book book){
  book.setId(UUID.randomUUID().toString());
  Map dataMap = objectMapper.convertValue(book, Map.class);
  IndexRequest indexRequest = new IndexRequest(INDEX, TYPE, book.getId())
                .source(dataMap);
  try {
    IndexResponse response = restHighLevelClient.index(indexRequest);
  } catch(ElasticsearchException e) {
    e.getDetailedMessage();
  } catch (java.io.IOException ex){
    ex.getLocalizedMessage();
  }
  return book;
}
Clearly, we need to convert the model data to a Map data structure before we insert it into the ES database.
显然,在将模型数据插入ES数据库之前,我们需要将其转换为Map数据结构。
搜索查询 (Search Query)
We will now search a book with an ID:
现在,我们将搜索ID为:的图书:
public Map<String, Object> getBookById(String id){
  GetRequest getRequest = new GetRequest(INDEX, TYPE, id);
  GetResponse getResponse = null;
  try {
    getResponse = restHighLevelClient.get(getRequest);
  } catch (java.io.IOException e){
    e.getLocalizedMessage();
  }
  Map<String, Object> sourceAsMap = getResponse.getSourceAsMap();
  return sourceAsMap;
}
Here, this is to be noted that data is searched and got back as a Map data structure as well. This is something we need to handle, converting data to Map and forth to make DB transactions.
在此,要注意的是,数据也作为地图数据结构被搜索并返回。 这是我们需要处理的事情,将数据转换为Map来进行数据库事务。
public Map<String, Object> updateBookById(String id, Book book){
  UpdateRequest updateRequest = new UpdateRequest(INDEX, TYPE, id)
          .fetchSource(true);    // Fetch Object after its update
  Map<String, Object> error = new HashMap<>();
  error.put("Error", "Unable to update book");
  try {
    String bookJson = objectMapper.writeValueAsString(book);
    updateRequest.doc(bookJson, XContentType.JSON);
    UpdateResponse updateResponse = restHighLevelClient.update(updateRequest);
    Map<String, Object> sourceAsMap = updateResponse.getGetResult().sourceAsMap();
    return sourceAsMap;
  }catch (JsonProcessingException e){
    e.getMessage();
  } catch (java.io.IOException e){
    e.getLocalizedMessage();
  }
  return error;
}
删除资料 (Deleting Data)
We will now search a book with an ID:
现在,我们将搜索ID为:的图书:
public void deleteBookById(String id) {
  DeleteRequest deleteRequest = new DeleteRequest(INDEX, TYPE, id);
  try {
    DeleteResponse deleteResponse = restHighLevelClient.delete(deleteRequest);
  } catch (java.io.IOException e){
    e.getLocalizedMessage();
  }
}
I think deleting an object was having the easiest query. Let’s try this application now by running it.
我认为删除对象的查询最简单。 现在通过运行它来尝试该应用程序。
运行应用程序 (Running the application)
We can run this app simply by using a single command:
我们只需使用一个命令即可运行此应用程序:
mvn spring-boot:runOnce the app is running, we can try saving a new book by using this API. Before doing that, just confirm that the ES is running by using this API:
应用程序运行后,我们可以尝试使用此API保存新书。 在此之前,只需使用以下API确认ES正在运行:
127.0.0.1:9200We will get this response:
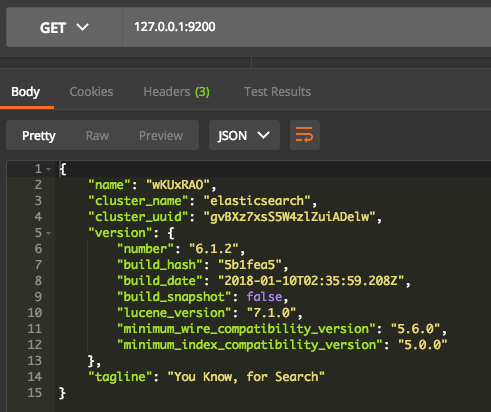
Now let’s inserting the data by using following API:
我们将收到以下答复:
现在,使用以下API插入数据:
127.0.0.1:8080/booksWe use a POST request with this JSON:
我们使用带有JSON的POST请求:
{
  "title" : "Java Always",
  "author" : "JournalDev",
  "price" : 99.1
}
We have the following response:
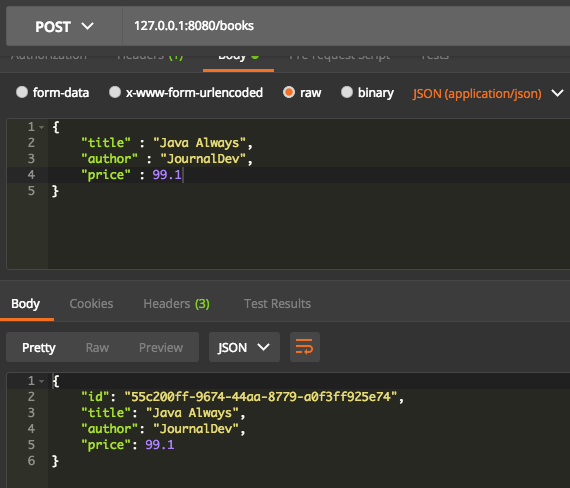
Let’s try another request to get the book with above ID. We will use GET request on this API:
我们有以下回应:
让我们尝试另一个请求以获取具有上述ID的书。 我们将在此API上使用GET请求:
127.0.0.1:8080/books/55c200ff-9674-44aa-8779-a0f3ff925e74This is what we get back:
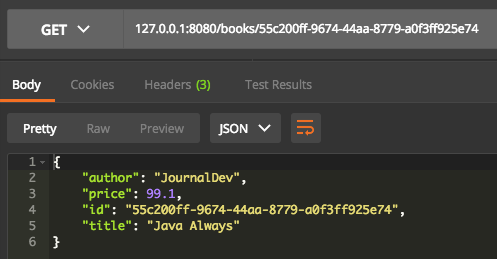
Go on and try more APIs we defined.
这就是我们得到的:
继续尝试我们定义的更多API。
摘要 (Summary)
In this lesson, we looked at how Elasticsearch can be queried using a Rest Client API it provides. Download the source code here and modify it.
在本课程中,我们研究了如何使用它提供的Rest Client API查询Elasticsearch。 在此处下载源代码并进行修改。
翻译自: https://www.journaldev.com/18148/spring-boot-elasticsearch


 490
490

 被折叠的 条评论
为什么被折叠?
被折叠的 条评论
为什么被折叠?
 到【灌水乐园】发言


