


spring
介绍
在Spring Integration的支持下,您的应用程序可以使用出站Web服务网关来调用Web服务。 调用由此网关处理,因此您只需要担心构建请求消息和处理响应。 但是,使用这种方法并不明显,如何配置其他选项,例如设置超时或操作缓存。 本文将展示如何设置客户端超时并将其与网关集成。
本文分为以下几节:
- 介绍。
- Web服务调用概述。
- 配置消息发件人。
- 示例应用程序。
- 结论。
- 源代码可以在github上找到。
Web服务调用概述
Web服务出站网关将Web服务调用委托给Spring Web Services WebServiceTemplate 。 当消息到达出站网关时,此模板使用消息发件人以创建新连接。 下图显示了该流程的概述:
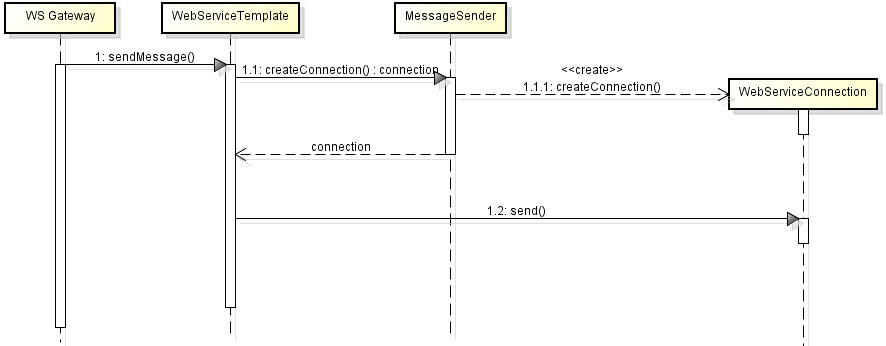

默认情况下,Web服务模板将HttpUrlConnectionMessageSender设置为其消息发送者,这是不支持配置选项的基本实现。 但是,可以通过设置具有设置读取和连接超时能力的更高级的消息发送者来覆盖此行为。
我们将在下一部分中配置消息发送者。
配置消息发件人
我们将配置消息发件人到出站网关。 这样,网关将使用提供的模板设置模板的消息发送者。
我们在示例中提供的实现是HttpComponentsMessageSender类,也来自Spring Web Services项目。 该消息发件人允许我们定义以下超时:
- connectionTimeout :设置建立连接之前的超时。
- readTimeout :设置基础HttpClient的套接字超时。 这是服务回复所需的时间。
组态:
<bean id="messageSender" class="org.springframework.ws.transport.http.HttpComponentsMessageSender">
    <property name="connectionTimeout" value="${timeout.connection}"/>
    <property name="readTimeout" value="${timeout.read}"/>
</bean>
属性文件包含两个值,它们都设置为两秒钟:
timeout.connection = 2000
timeout.read = 2000
配置完成后,我们将其添加到Web服务出站网关配置中:
<int-ws:outbound-gateway uri="http://localhost:8080/spring-ws-courses/courses"
    marshaller="marshaller" unmarshaller="marshaller"
    request-channel="requestChannel" message-sender="messageSender"/>
要使用此消息发件人,您将需要添加以下依赖项:
<dependency>
    <groupId>org.apache.httpcomponents</groupId>
    <artifactId>httpclient</artifactId>
    <version>4.3.3</version>
</dependency>
就是这样; 下一部分将显示示例应用程序以查看其工作方式。
样例应用
流程很简单; 它包含一个向Web服务发送请求并接收响应的应用程序。 Web服务源代码可以在github上找到。
<beans xmlns="http://www.springframework.org/schema/beans"
    xmlns:xsi="http://www.w3.org/2001/XMLSchema-instance"
    xmlns:context="http://www.springframework.org/schema/context"
    xmlns:int="http://www.springframework.org/schema/integration"
    xmlns:int-ws="http://www.springframework.org/schema/integration/ws"
    xmlns:oxm="http://www.springframework.org/schema/oxm"
    xsi:schemaLocation="
        http://www.springframework.org/schema/beans http://www.springframework.org/schema/beans/spring-beans-3.0.xsd
        http://www.springframework.org/schema/context http://www.springframework.org/schema/context/spring-context-3.0.xsd
        http://www.springframework.org/schema/integration http://www.springframework.org/schema/integration/spring-integration.xsd
        http://www.springframework.org/schema/integration/ws http://www.springframework.org/schema/integration/ws/spring-integration-ws.xsd
        http://www.springframework.org/schema/oxm http://www.springframework.org/schema/oxm/spring-oxm-3.0.xsd">

    <context:component-scan base-package="xpadro.spring.integration.ws"/>
    <context:property-placeholder location="classpath:props/service.properties"/>

    <!-- System entry -->
    <int:gateway id="systemEntry" default-request-channel="requestChannel"
        service-interface="xpadro.spring.integration.ws.gateway.CourseService"/>

    <!-- Web service invocation -->
    <int-ws:outbound-gateway uri="http://localhost:8080/spring-ws-courses/courses"
            marshaller="marshaller" unmarshaller="marshaller"
            request-channel="requestChannel" message-sender="messageSender"/>

    <oxm:jaxb2-marshaller id="marshaller" contextPath="xpadro.spring.integration.ws.types" />

    <bean id="messageSender" class="org.springframework.ws.transport.http.HttpComponentsMessageSender">
        <property name="connectionTimeout" value="${timeout.connection}"/>
        <property name="readTimeout" value="${timeout.read}"/>
    </bean>

</beans>
网关包含我们将进入消息传递系统的方法:
public interface CourseService {

    @Gateway
    GetCourseResponse getCourse(GetCourseRequest request);
}
最后,测试:
@ContextConfiguration(locations = {"/xpadro/spring/integration/ws/config/int-course-config.xml"})
@RunWith(SpringJUnit4ClassRunner.class)
public class TestIntegrationApp {

    @Autowired
    private CourseService service;

    @Test
    public void invokeNormalOperation() {
        GetCourseRequest request = new GetCourseRequest();
        request.setCourseId("BC-45");

        GetCourseResponse response = service.getCourse(request);
        assertNotNull(response);
        assertEquals("Introduction to Java", response.getName());
    }

    @Test
    public void invokeTimeoutOperation() {
        try {
            GetCourseRequest request = new GetCourseRequest();
            request.setCourseId("DF-21");

            GetCourseResponse response = service.getCourse(request);
            assertNull(response);
        } catch (WebServiceIOException e) {
            assertTrue(e.getCause() instanceof SocketTimeoutException);
        }
    }
}
结论
我们已经学习了如何为Web服务出站网关设置其他选项以建立超时。 在下一篇文章中,我将解释如何缓存此调用。
翻译自: https://www.javacodegeeks.com/2014/05/spring-integration-configure-web-service-client-timeout.html
spring


 1842
1842

 被折叠的 条评论
为什么被折叠?
被折叠的 条评论
为什么被折叠?
 到【灌水乐园】发言


