


servlet
Java Servlets是一种基于Java的Web技术。 Java Servlet技术为Web开发人员提供了一种简单,一致的机制,以扩展Web服务器的功能并访问现有的业务系统。
几乎可以将Servlet看作是在服务器端运行的applet,它没有任何表情。 Java servlet使许多Web应用程序成为可能。
Java Servlet构成Java Enterprise Edition(Java EE)的基本部分。 请注意,Java Servlet必须在兼容Servlet的“ Servlet容器(例如Web服务器)内执行”才能起作用。
本教程可作为基于Java Servlet的代码的全面的入门指南。
目录
1.简介
Servlet是Java编程语言类,是Java Enterprise Edition(Java EE)的一部分。 Sun Microsystems在1997年开发了第一个版本1.0。当前版本是Servlet 3.1。
Servlet用于通过扩展服务器的功能在Java中创建动态Web应用程序。 它可以在任何与Servlet容器集成的Web服务器上运行。
1.1 Java Servlet流程
servlet的过程如下所示:

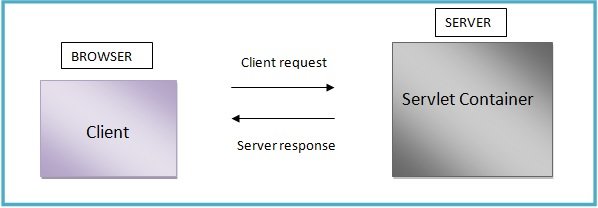
图1:用户请求的servlet处理
- 客户端将请求发送到Servlet容器。 该容器充当Web服务器。
- Web服务器搜索servlet并启动它。
- 客户端请求由Servlet处理,并将响应发送回服务器。
- 然后,服务器响应将转发给客户端。
1.2优点
- Servlet是独立于平台的,因为它们可以在任何平台上运行。
- Servlet API继承了Java平台的所有功能。
- 它为服务器端扩展构建和修改安全逻辑。
- Servlet继承了Web服务器提供的安全性。
- 在Servlet中,仅单个请求实例同时运行。 它不会在单独的进程中运行。 因此,它通过消除为每个请求创建新进程的开销来节省内存。
2.生命周期
Servlet生命周期描述Servlet容器如何管理Servlet对象。
- 加载Servlet类
- Servlet实例在加载Servlet类时由Web容器创建
-
init():仅在创建servlet时调用一次。 无需多次调用它。
public void init() throws ServletException {

}-
service():Web容器调用它来处理来自客户端的请求。 此处完成了代码的实际功能。 每次收到Servlet请求时,Web容器都会调用此方法。
它调用doGet() , doPost() , doTrace() , doPut() , doDelete()和其他方法
-
doGet():
public void doGet(HttpServletRequest request,HttpServletResponse response)
    throws ServletException, IOException {
// code
}-
doPost():
public void doPost(HttpServletRequest request, HttpServletResponse response)
    throws ServletException, IOException {
    // code
}-
destroy():它用于清除资源,并在除去servlet实例之前调用。
public void destroy()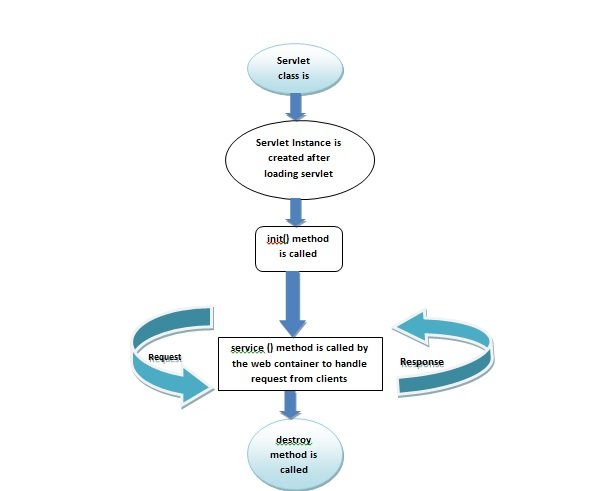

图2:Servlet生命周期
3.容器
它被称为Servlet引擎,它管理Web服务器顶部的Java Servlet组件,以处理客户端发送的请求。
3.1服务
Servlet容器提供以下服务:
- 它管理Servlet的生命周期。
- Servlet,JSP页面和HTML文件等资源由Servlet容器管理。
- 它将会话ID附加到URL路径以维护会话。
- 提供安全服务。
- 它从网络服务,文件系统(如远程文件系统)和本地文件系统中加载Servlet类。
3.2 Servlet容器配置
可以使用Web服务器将servlet容器配置为通过以下三种方式管理servlet:
- 独立容器
- 加工容器
- 后处理容器
独立容器:这种类型的Web服务器功能由Servlet容器使用。 在这里,容器与Web服务器紧密耦合。
进程中容器:在此容器中,该容器在Web服务器进程中运行。
进程外容器:在这种类型中,需要将servlet容器配置为在Web服务器进程外部运行。 在某些情况下使用它,例如需要在不同的进程/系统中运行Servlet和Servlet容器。
4.演示:首先
这是显示Demo Servlet的示例。 请遵循以下步骤,从NetBeansIDE中的第一个Servlet应用程序开始。
步骤1:打开NetBeansIDE->文件->新建项目-> WebApplication->将项目名称设置为WebApplicationServletDemo
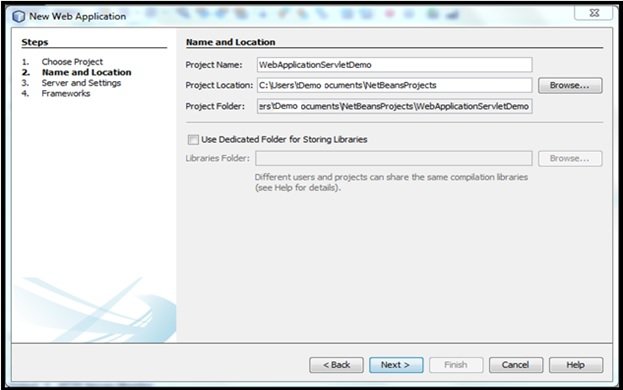

图3:在NetBeansIDE中创建新的WebApplication项目:WebApplicationServletDemo
步骤2:现在,单击Next>,如上所示。 这将创建具有以下目录结构的新项目。

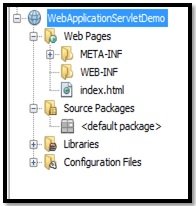
图4:创建新项目后的项目目录
步骤3:通过右键单击Project Directory-> New-> Servlet创建新的Servlet应用程序

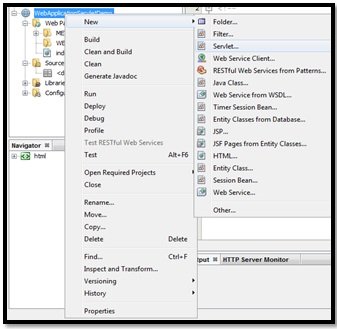
图5:添加Servlet文件
步骤4:将Servlet类名称添加为“ ServletDemo ”,然后单击Next 。

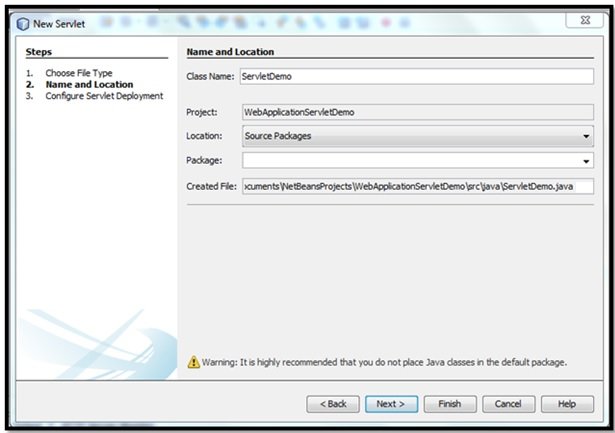
图6:添加Servlet类名
步骤5:现在,通过选中“将信息添加到部署描述符(web.xml) ”并添加URL模式(链接可见)作为ServletDemo来配置Servlet部署。 此步骤将在WEB-INF文件夹中生成web.xml文件。
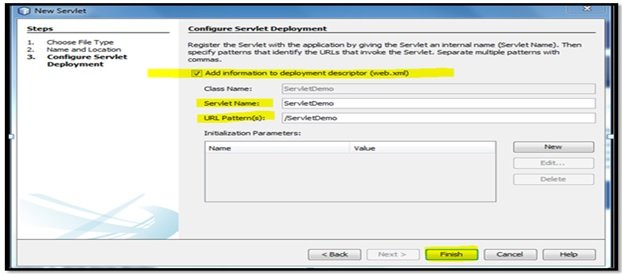

图7:配置Servlet部署
步骤6:如上图所示,单击Finish,这将在项目目录下添加ServletDemo.java servlet。 检查目录结构下的更改:

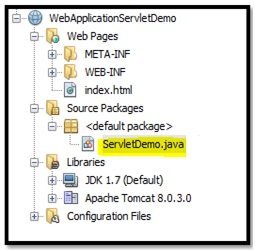
图8:配置后项目目录下的更改
这是URL- patter为/ ServletDemo的部署描述符(web.xml)的代码:
清单1:web.xml
<?xml version="1.0" encoding="UTF-8"?>
<web-app version="3.1" xmlns="http://xmlns.jcp.org/xml/ns/javaee" xmlns:xsi="http://www.w3.org/2001/XMLSchema-instance" xsi:schemaLocation="http://xmlns.jcp.org/xml/ns/javaee http://xmlns.jcp.org/xml/ns/javaee/web-app_3_1.xsd">
<servlet>
<servlet-name>ServletDemo</servlet-name>
<servlet-class>ServletDemo</servlet-class>
</servlet>
<servlet-mapping>
    <servlet-name>ServletDemo</servlet-name>
    <url-pattern>/ServletDemo</url-pattern>
</servlet-mapping>
<session-config>
<session-timeout>
            30
</session-timeout>
</session-config>
</web-app>
这里,
<servlet-name>: name given to Servlet
<servlet-class>: servlet class
<servlet-mapping>: maps internal name to URL
<url-pattern>: link displays when Servlet runs超链接下被提及作为ServletDemo。 因此,当用户单击它时,页面将重定向到ServletDemo servlet,该servlet的url-pattern被称为ServetDemo :
清单2:index.html
<html>
<head>
<title>Welcome</title>
<meta charset="UTF-8">
<meta name="viewport" content="width=device-width, initial-scale=1.0">
</head>
<body>
<div><h2>Welcome</h2></div>
<p>We're still under development stage. Stay Tuned for our website's new design and learning content.</p>
<a href="ServletDemo"><b>Next</b></a>
</body>
</html>
清单3:ServletDemo.java
import java.io.IOException;
import java.io.PrintWriter;
import javax.servlet.ServletException;
import javax.servlet.http.HttpServlet;
import javax.servlet.http.HttpServletRequest;
import javax.servlet.http.HttpServletResponse;

public class ServletDemo extends HttpServlet {

	protected void processRequest(HttpServletRequest request, HttpServletResponse response)
			throws ServletException, IOException {
		response.setContentType("text/html;charset=UTF-8");
		try (PrintWriter out = response.getWriter()) {
			out.println("<!DOCTYPE html>");
			out.println("<html>");
			out.println("<head>");
			out.println("<title>Servlet ServletDemo</title>");
			out.println("</head>");
			out.println("<body>");
			out.println("<h1>Servlet ServletDemo at " + request.getContextPath() + "</h1>");
			out.println("</body>");
			out.println("</html>");
		}
	}

	@Override
	protected void doGet(HttpServletRequest request, HttpServletResponse response)
			throws ServletException, IOException {
		response.setContentType("text/html;charset=UTF-8");
		PrintWriter out = response.getWriter();
		try {
			/* TODO output your page here. You may use following sample code. */
			out.println("<!DOCTYPE html>");
			out.println("<html>");
			out.println("<head>");
			out.println("<title>Servlets</title>");
			out.println("</head>");
			out.println("<body>");
			out.println("<br /><p><h2>First Demo Servlet application</h2><br />Here, the URL-pattern is ServletDemo in web.xml. So, the address is <i>WebApplicationServletDemo/ServletDemo</i>.</p>");
			out.println("<br /><br /><a href=\"index.html\">Previous Page</a>");
			out.println("</body>");
			out.println("</html>");
		}
		finally
		{
		out.close();
		}
	}
}

图9:显示index.html欢迎页面的输出
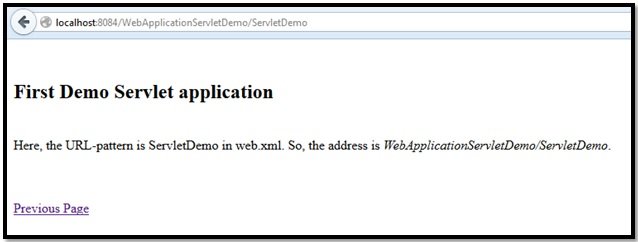

图10:显示重定向到ServletDemo.java的输出
5.筛选
过滤器将请求,响应和标头信息的内容从一种格式转换为另一种格式。 这些是可重用的代码。
- 过滤器类在部署描述符中声明。
- 它用于编写可重用的组件。
- 该请求是使用过滤器调用之前的处理过程。
- 它可以在Web应用程序下用于某些任务,例如:
- 验证方式
5.1界面
它由以下3个过滤器组成:

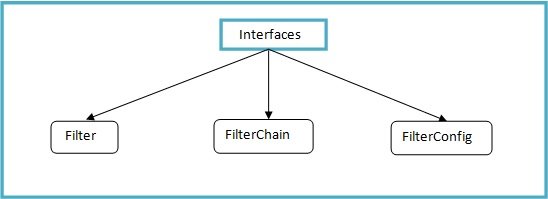
图11:过滤器API接口
过滤
这是所有过滤器类都应实现的初始接口和基本接口。 Java.servlet.Filter接口具有以下方法:
| 方法 | 描述 |
|---|---|
init(FilterConfig) | 该方法初始化过滤器 |
doFilter(ServletRequest, ServletResponse, FilterChain) | 此方法将服务逻辑封装在ServletRequest上以生成ServletResponse。 FilterChain将请求/响应对转发到下一个过滤器。 |
destroy() | 它破坏了过滤器类的实例。 |
FilterConfig
过滤器初始化时使用其对象。 部署描述符(web.xml)由配置信息组成。 FilterConfig接口的对象用于获取有关web.xml中指定的过滤器的配置信息。 其方法如下:
| 方法 | 描述 |
|---|---|
getFilterName() | 它在web.xml中返回过滤器的名称 |
getInitParameter(String) | 它从web.xml返回指定的初始化参数的值 |
getInitParameterNames() | 它返回过滤器的所有初始化参数的枚举。 |
getServletContext() | 它返回ServletContext对象。 |
过滤链
它存储有关1个以上过滤器(链)的信息。 在处理请求之前,应根据请求应用此链中的所有筛选器。
5.2范例
这是一个显示NetBeansIDE中的筛选器应用程序的示例。 以与演示部分相同的方式创建WebApplication项目WebApplicationFilterDemo 。 右键单击项目目录->新建->过滤器,可以在Web应用程序中添加新过滤器。

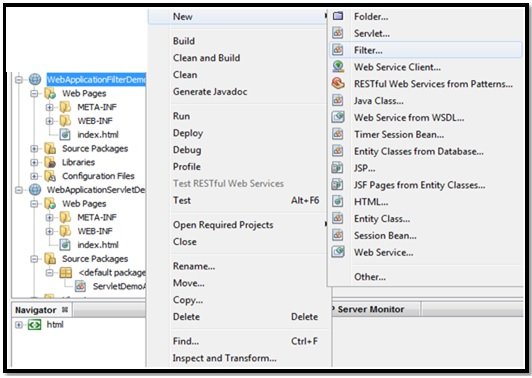
图12:将新的过滤器添加到Web应用程序

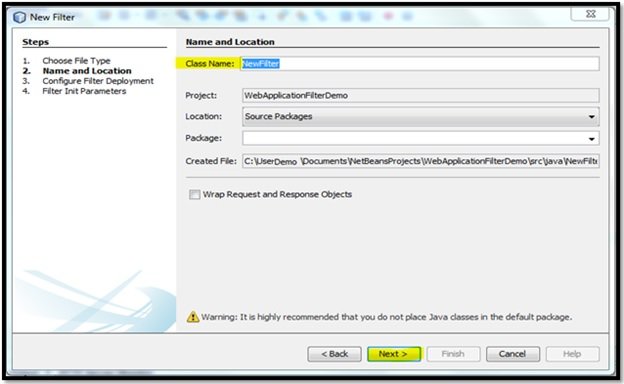
图13:将类名添加为NewFilter,然后单击Next
通过选中“将信息添加到部署描述符(web.xml) ”来配置过滤器部署。 现在,由于图13中突出显示的错误,此处的“下一步”按钮被禁用。可以通过单击“新建”来解决“输入至少一个URL模式”错误。
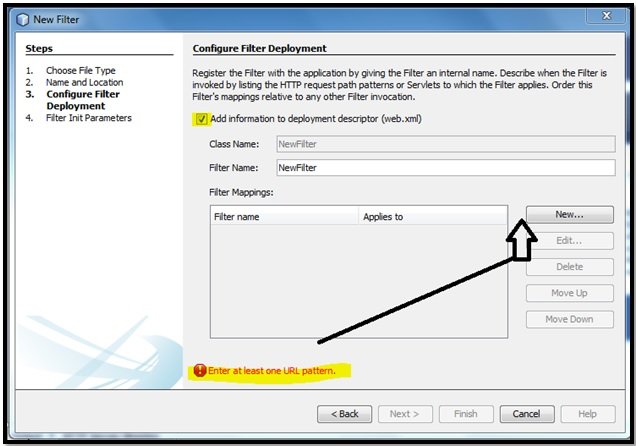

图14:通过选中“将信息添加到部署描述符(web.xml)”来配置过滤器部署
现在,通过添加URL模式来映射过滤器,如图15所示。
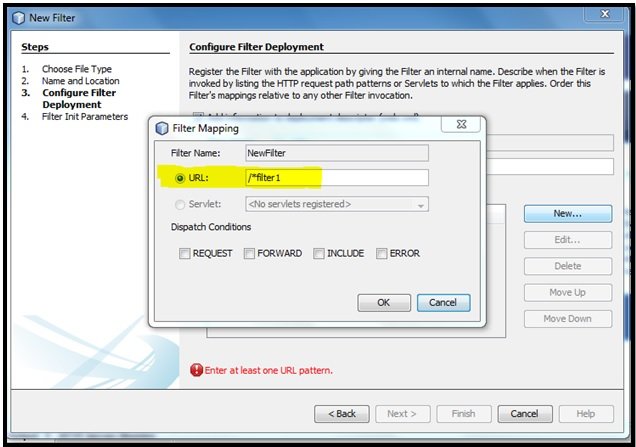

图15:过滤器映射
添加新的过滤器并单击“确定”后,错误将得到解决。 现在,添加带有名称和值的init参数。 然后单击完成。

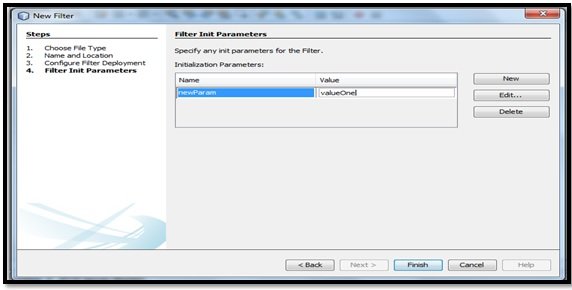
图16:添加init参数
清单4:web.xml
可以将Filter NewFilter应用于每个servlet,因为此处为URL模式指定了/ *。
<?xml version="1.0" encoding="UTF-8"?>
<web-app version="3.1" xmlns="http://xmlns.jcp.org/xml/ns/javaee" xmlns:xsi="http://www.w3.org/2001/XMLSchema-instance" xsi:schemaLocation="http://xmlns.jcp.org/xml/ns/javaee http://xmlns.jcp.org/xml/ns/javaee/web-app_3_1.xsd">
<filter>
<filter-name>NewFilter</filter-name>
<filter-class>NewFilter</filter-class>
  <init-param>
      <param-name>newParam</param-name>
      <param-value>valueOne</param-value>
  </init-param>
</filter>
<filter-mapping>
     <filter-name>NewFilter</filter-name>
     <url-pattern>/*</url-pattern>
</filter-mapping>
<session-config>
    <session-timeout>
            30
   </session-timeout>
</session-config>
</web-app>
清单5:NewFilter.java
import java.io.*;
import javax.servlet.*;
import javax.servlet.http.*;
import java.util.*;

public class NewFilter implements Filter {

	public void init(FilterConfigfilterConfig) {
		// init parameter
		String value = filterConfig.getInitParameter("newParam");

		// displaying init parameter value
		System.out.println("The Parameter value: " + value);
	}

	public void doFilter(ServletRequest request, ServletResponse response, FilterChain chain)
			throws IOException, ServletException {

		// IP address of the client machine.
		String remoteAddress = request.getRemoteAddr();

		// Returns the remote address
		System.out.println("Remote Internet Protocl Address: "+ remoteAddress);

		chain.doFilter(request,response);
	}

	public void destroy( ){

	}
}

图17:显示控制台输出
6.会议
它是客户端和服务器之间的HTTP请求的集合。 会话在过期时将被销毁,并且其资源将返回给Servlet引擎。
6.1会话处理
这是跟踪会话数据的一种方法。 这表示在会话中传输的数据。 当Web服务器可能需要来自一个会话的会话数据来完成相同或不同会话中的任务时,将使用此方法。 会话处理也称为会话跟踪。
6.2会话处理机制
会话处理有四种机制:
URL重写:下一个请求中所需的会话数据将附加到客户端用于发出下一个请求的URL路径中。
·查询字符串:在请求的URI之后附加的字符串是查询字符串。 该字符串后面加上分隔符“?” 字符。
示例1): http://localhost:8080/newproject/login?user=test&passwd=abcde
·路径信息:它是请求URI的一部分。 会话数据可以添加到请求URI的路径信息部分。
示例2): http://localhost:8080/newproject/myweb/login;user=test&passwd=abcde
隐藏的表单字段:一种HTML表单字段,在视图中保持隐藏状态。 其他一些表单字段包括:文本框,密码等。此方法可用于基于表单的请求。 它仅用于从其他不同类型的用户隐藏用户数据。
示例3: <input type="hidden" username="name" value="nameOne"/>
Cookies :它是一个文件,包含服务器发送给客户端的信息。 Cookie通过HTTP响应标头传输到客户端(从服务器)后,将保存在客户端。
当我们想减少网络流量时,cookie被认为是最好的。 它的属性是名称,值,域,版本号,路径和注释。 包javax.servlet.http由一个名为Cookie的类组成。
下面列出了javax.servlet.http.Cookie类中的一些方法:
-
setValue (String) -
getValue() -
getName() -
setComment(String) -
getComment() -
setVersion(String) -
getVersion() -
setDomain(String) -
setPath(String) -
getPath() -
setSecure(boolean) -
getSecure(boolean)
HTTP会话:它提供通过HttpSession对象实现的会话管理服务。
这里列出了一些HttpSession对象方法。 这是从Oracle官方文档中引用的:
| 方法 | 描述 |
|---|---|
public Object getAttribute(String name) | 它在此会话中返回与指定名称绑定的对象;如果该名称下未绑定任何对象,则返回null。 |
public Enumeration getAttributeNames() | 它返回String对象的Enumeration,其中包含绑定到此会话的所有对象的名称。 |
public String getId() | 它返回一个字符串,其中包含分配给该会话的唯一标识符。 |
public long getCreationTime() | 它返回创建此会话的时间,以格林尼治标准时间1970年1月1日午夜以来的毫秒数为单位。 |
public long getLastAccessedTime() | 它返回客户端最后一次发送与此会话关联的请求的时间。 |
public int getMaxInactiveInterval() | 它返回最大时间间隔(以秒为单位),servlet容器将在客户机访问之间保持此会话打开。 |
public void invalidate() | 它使该会话无效,然后取消绑定到该会话的任何对象。 |
public boolean isNew() | 如果客户端尚不知道会话或客户端选择不加入会话,则返回true。 |
6.3范例
在此示例下,将打印会话信息,例如会话ID,会话创建时间,上次访问时间等。
清单6:ServletSession.java
import java.io.IOException;
import java.io.PrintWriter;
import java.util.Date;
import javax.servlet.ServletException;
import javax.servlet.http.HttpServlet;
import javax.servlet.http.HttpServletRequest;
import javax.servlet.http.HttpServletResponse;
import javax.servlet.http.HttpSession;

public class ServletSession extends HttpServlet {

@Override
 protected void doGet(HttpServletRequest request, HttpServletResponse response)
            throws ServletException, IOException {
           // session object creation
           HttpSessionnewSession = request.getSession(true);
      // Session creation time.
      Date cTime = new Date(newSession.getCreationTime());
      // The last time the client sent a request.
      Date lTime = new Date( newSession.getLastAccessedTime());

      /* sets the time, in seconds, between client requests before the servlet container
      invalidates this session */
      newSession.setMaxInactiveInterval(1 * 60 * 60);
      String str = "Website | Session";

      response.setContentType("text/html");
      PrintWriter out = response.getWriter();

      String document =
      "<!doctype html public \"-//w3c//dtd html 4.0 " +
      "transitional//en\">\n";
      out.println(document +
                "<html>\n" +
                "<head><title>" + str + "</title></head>\n" +
                "<body bgcolor=\"#bbf5f0\">\n" +
                 "<h2>Website: Displaying Session Information</h2>\n" +
                "<table border=\"2\">\n" +
                "<tr>\n" +
                "  <td>Unique identifier assigned to this session</td>\n" +
                "  <td>" + newSession.getId() + "</td>"
              + "</tr>\n" +
                "<tr>\n" +
                "  <td>The time when this session was created</td>\n" +
                "  <td>" + cTime +
                "  </td>"
              + "</tr>\n" +
                "<tr>\n" +
                "  <td>The last time the client sent a request associated with this session</td>\n"
              + "  <td>" + lTime +
                "  </td>"
              + "</tr>\n" +
                "</tr>\n" +
                "<tr>\n" +
                "  <td> the maximum time interval, in seconds that the servlet container will keep this session open between client accesses.</td>\n" +
                "  <td>" + newSession.getMaxInactiveInterval() +
                "  </td>"
              + "</tr>\n" +
                     "</table>\n" +
                "</body></html>");
  }
}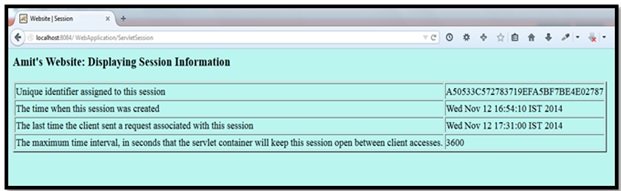

图18:显示输出
7.异常处理
异常用于处理错误。 这是对无法忍受的条件的React。 这是web.xml的角色,即用于运行JSP和servlet页面的部署描述。 容器在web.xml中搜索配置以查找匹配项。 因此,在servlet引发异常时,在web.xml中使用这些异常类型元素与所引发的异常类型进行匹配。
7.1错误代码配置
当出现状态码为403的错误时,将调用/ HandlerClass servlet,如下所示:
清单7:错误代码为403
<error-page>
  <error-code>403</error-code>
  <location>/HandlerClass</location>
</error-page>
7.2异常类型配置
如果应用程序引发IOException,则/ HandlerClass servlet被容器调用:
清单8:对于异常类型IOException
<error-page>
  <exception-type>java.io.IOException</exception-type >
  <location>/HandlerClass</location>
</error-page> 如果要避免添加单独的元素的开销,请使用java.lang.Throwable作为异常类型:
清单9:对于所有异常,请提及java.lang.Throwable:
<error-page>
  <exception-type>java.lang.Throwable</exception-type >
  <location>/HandlerClass</location>
</error-page>
8.调试
在Servlet中,大量的客户机/服务器交互。 这使得错误很难定位。 对于位置警告和错误,可以采用不同的方法。
8.1消息记录
提供日志以获取有关警告和错误消息的信息。 为此,使用标准的日志记录方法。 Servlet API可以使用log()方法生成此信息。 使用Apache Tomcat,可以在TomcatDirectory / logs中找到这些日志。
8.2 Java调试器
可以使用JDB调试器(即Java调试器)调试Servlet。 在此,要调试的程序是sun.servlet.http.HttpServer。 设置调试器的类路径以查找以下类:
- servlet.http.HttpServer
- server_root / servlet和server_root / classes:通过此调试器,可以在servlet中设置断点。
8.3标头
用户应该掌握一些与HTTP标头结构有关的信息。 可以使用它们来判断问题,从而可以进一步定位一些未知错误。 与HTTP标头相关的信息可以帮助您查找错误。 研究请求和响应可以帮助您猜测进展不顺利。
8.4刷新
刷新浏览器的网页,以避免其缓存先前的请求。 在某些阶段,浏览器会显示先前执行的请求。 这是一个已知点,但是对于那些工作正常但无法正确显示结果的人来说可能是个问题。
清单21:ServletDebugging.java
在这里,显示了Servlet Debugging,它在Tomcat日志中显示错误。
import java.io.IOException;
import java.io.PrintWriter;
import javax.servlet.ServletContext;
import javax.servlet.ServletException;
import javax.servlet.http.HttpServlet;
import javax.servlet.http.HttpServletRequest;
import javax.servlet.http.HttpServletResponse;

public class ServletDebugging extends HttpServlet {

	@Override
	protected void doGet(HttpServletRequest request, HttpServletResponse response)
			throws ServletException, IOException {

		// parameter "name"
		String strpm = request.getParameter("name");

		ServletContext context = getServletContext( );

		// checks if the parameter is set or not
		if (strpm == null || strpm.equals(""))
		context.log("No message received:", new IllegalStateException("Sorry, the
		parameter is missing."));
		else
		context.log("Here is the visitor's message: " +strpm);

	}
}

图19:在Apache Tomcat日志中可见的输出
9.国际化
在建立全球网站时,要考虑一些重要点,其中包括与用户国籍有关的语言。 国际化使网站能够根据用户的国籍提供以不同语言翻译的内容。
9.1方法
为了找到访客的本地区域和语言,使用了以下方法:
| 方法 | 描述 |
|---|---|
String getCountry() | 返回国家代码。 |
String getDisplayCountry() | 返回访问者所在国家/地区的名称。 |
String getLanguage() | 返回语言代码。 |
String getDisplayLanguage() | 返回访问者语言的名称。 |
String getISO3Country() | 返回访问者所在国家/地区的三个字母的缩写。 |
String getISO3Language() | 返回访问者语言的三个字母的缩写。 |
9.2范例
该示例显示用户的当前语言环境。 在NetBeansIDE中创建以下项目:
Project Name: WebApplicationInternationalization
Project Location: C:\Users\Test\Documents\NetBeansProjects
Servlet: ServletLocale
URL Pattern: /ServletLocale
清单22:ServletLocale.java
import java.io.IOException;
import java.io.PrintWriter;
import java.util.Locale;
import javax.servlet.ServletException;
import javax.servlet.http.HttpServlet;
import javax.servlet.http.HttpServletRequest;
import javax.servlet.http.HttpServletResponse;

public class ServletLocale extends HttpServlet {

@Override
    protected void doGet(HttpServletRequest request, HttpServletResponse response)
            throws ServletException, IOException {
           //Get the client's Locale
      Locale newloc = request.getLocale();
      String country = newloc.getCountry();

      // Set response content type
      response.setContentType("text/html");
      PrintWriter out = response.getWriter();

      // this sets the page title and body content
      String title = "Finding Locale of current user";
      String docType =
      "<!doctype html public \"-//w3c//dtd html 4.0 " +
      "transitional//en\">\n";
       out.println(docType +
        "<html>\n" +
        "<head><title>" + title + "</title></head>\n" +
        "<body bgcolor=\"#C0C0C0\">\n" + "<h3>" + country + "</h3>\n" +
        "</body></html>");
    }
}
清单23:具有位置超链接作为URL模式的index.html – ServletLocale
<html>
<head>
<title>User's Location</title>
<meta charset="UTF-8">
<meta name="viewport" content="width=device-width, initial-scale=1.0">
</head>
<body>
    <p>Click on the following link for finding the locale of visitor:</p>
    <a href="ServletLocale"><b>Location</b></a>
</body>
</html>
清单24:带有URL模式为/ ServletLocale的web.xml
<?xml version="1.0" encoding="UTF-8"?>
<web-app version="3.1" xmlns="http://xmlns.jcp.org/xml/ns/javaee" xmlns:xsi="http://www.w3.org/2001/XMLSchema-instance" xsi:schemaLocation="http://xmlns.jcp.org/xml/ns/javaee http://xmlns.jcp.org/xml/ns/javaee/web-app_3_1.xsd">
<servlet>
    <servlet-name>ServletLocale</servlet-name>
    <servlet-class>ServletLocale</servlet-class>
</servlet>
<servlet-mapping>
     <servlet-name>ServletLocale</servlet-name>
     <url-pattern>/ServletLocale</url-pattern>
</servlet-mapping>
<session-config>
<session-timeout>
            30
</session-timeout>
</session-config>
</web-app>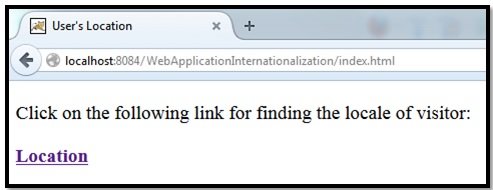

图20:显示index.html

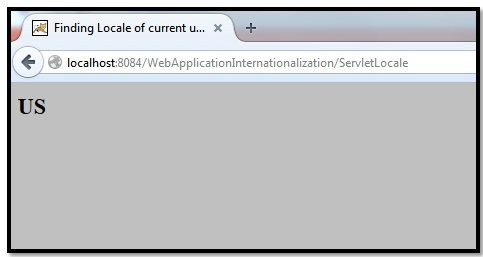
图21:将语言环境显示为输出
10.参考
10.1网站
10.2书籍
- 首要的Servlet和JSP:通过Sun认证的Web组件开发人员考试,作者Bryan Basham,Kathy Sierra和Bert Bates
- Servlet和JSP(教程),作者Budi Kurniawan
11.结论
与传统的通用网关接口(CGI)相比,Servlet具有快速的性能并且易于使用。 通过本指南,您可以轻松学习与Java Servlet相关的概念。 项目代码是在NetBeansIDE下开发的,因此您还将对它的一些惊人的用户友好功能有所了解。
12.下载
这是有关Java Servlet的教程。
翻译自: https://www.javacodegeeks.com/2014/12/java-servlet-tutorial.html
servlet


 382
382


 被折叠的 条评论
为什么被折叠?
被折叠的 条评论
为什么被折叠?
 到【灌水乐园】发言


