To create a Servlet application you need to follow the below mentioned steps. These steps are common for all the Web server. In our example we are using Apache Tomcat server. Apache Tomcat is an open source web server for testing servlets and JSP technology. Download latest version of Tomcat Server and install it on your machine.
要创建Servlet应用程序,您需要执行以下提到的步骤。 这些步骤对于所有Web服务器都是通用的。 在我们的示例中,我们使用的是Apache Tomcat服务器。 Apache Tomcat是用于测试servlet和JSP技术的开源Web服务器。 下载最新版本的Tomcat服务器并将其安装在您的计算机上。
After installing Tomcat Server on your machine follow the below mentioned steps :
在您的机器上安装Tomcat Server之后,请执行以下提到的步骤:
Create directory structure for your application.
为您的应用程序创建目录结构。
Create a Servlet
创建一个Servlet
Compile the Servlet
编译Servlet
Create Deployement Descriptor for your application
为您的应用程序创建部署描述符
Start the server and deploy the application
启动服务器并部署应用程序
All these 5 steps are explained in details below, lets create our first Servlet Application.
下面将详细解释所有这5个步骤,让我们创建第一个Servlet应用程序。
1.创建目录结构 (1. Creating the Directory Structure)
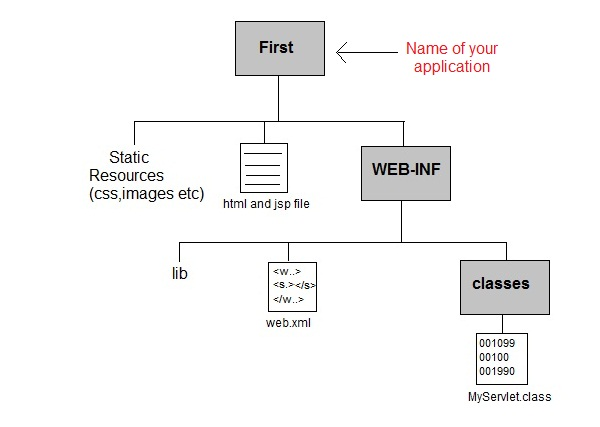
Sun Microsystem defines a unique directory structure that must be followed to create a servlet application.
Sun Microsystem定义了创建servlet应用程序必须遵循的唯一目录结构。

Create the above directory structure inside Apache-Tomcat\webapps directory. All HTML, static files(images, css etc) are kept directly under Web application folder. While all the Servlet classes are kept inside classes folder.
在Apache-Tomcat \ webapps目录中创建以上目录结构。 所有HTML,静态文件(图像,css等)都直接保存在Web应用程序文件夹下。 而所有的Servlet类都保存在classes文件夹中。
The web.xml (deployement descriptor) file is kept under WEB-INF folder.
web.xml (部署描述符)文件保存在WEB-INF文件夹下。
2.创建一个Servlet (2. Creating a Servlet)
There are three different ways to create a servlet.
有三种创建servlet的方法。
By implementing Servlet interface
通过实现Servlet接口
By extending GenericServlet class
通过扩展GenericServlet类
By extending HttpServlet class
通过扩展HttpServlet类
But mostly a servlet is created by extending HttpServlet abstract class. As discussed earlier HttpServlet gives the definition of service() method of the Servlet interface. The servlet class that we will create should not override service() method. Our servlet class will override only doGet() or doPost() method.
但是大多数情况下,通过扩展HttpServlet抽象类来创建servlet。 如前所述, HttpServlet给出了Servlet接口的service()方法的定义。 我们将创建的servlet类不应覆盖service()方法。 我们的Servlet类将仅覆盖doGet()或doPost()方法。
When a request comes in for the servlet, the Web Container calls the servlet's service() method and depending on the type of request the service() method calls either the doGet() or doPost() method.
当收到对Servlet的请求时,Web容器将调用Servlet的service()方法,并且根据请求的类型, service()方法将调用doGet()或doPost()方法。
NOTE: By default a request is Get request.
注意:默认情况下,请求是“ 获取请求”。
import javax.servlet.*;
import javax.servlet.http.*;
import java.io.*;

public MyServlet extends HttpServlet
{
	public void doGet(HttpServletRequest request,HttpServletResposne response)
	                     throws ServletException {
		response.setContentType("text/html");
		PrintWriter out = response.getWriter();
		out.println("<html><body>");
		out.println("<h1>Hello Readers</h1>");
		out.println("</body></html>");
	}
}
Write above code in a notepad file and save it as MyServlet.java anywhere on your PC. Compile it(explained in next step) from there and paste the class file into WEB-INF/classes/ directory that you have to create inside Tomcat/webapps directory.
将上述代码写在记事本文件中,并将其另存为PC上任何位置的MyServlet.java 。 从那里编译它(在下一步中解释),然后将类文件粘贴到必须在Tomcat / webapps目录中创建的WEB-INF/classes/目录中。
3.编译Servlet (3. Compiling a Servlet)
To compile a Servlet a JAR file is required. Different servers require different JAR files. In Apache Tomcat server servlet-api.jar file is required to compile a servlet class.
要编译Servlet,需要JAR文件。 不同的服务器需要不同的JAR文件。 在Apache Tomcat服务器中,编译Servlet类需要servlet-api.jar文件。
Steps to compile a Servlet:
编译Servlet的步骤:
Set the Class Path.
设置类路径。

Download servlet-api.jar file.
下载servlet-api.jar文件。
Paste the servlet-api.jar file inside
Java\jdk\jre\lib\extdirectory.将servlet-api.jar文件粘贴到
Java\jdk\jre\lib\ext目录中。
Compile the Servlet class.
编译Servlet类。

NOTE: After compiling your Servlet class you will have to paste the class file into WEB-INF/classes/ directory.
注意:编译Servlet类后,必须将类文件粘贴到WEB-INF/classes/目录中。
4.创建部署描述符 (4. Create Deployment Descriptor)
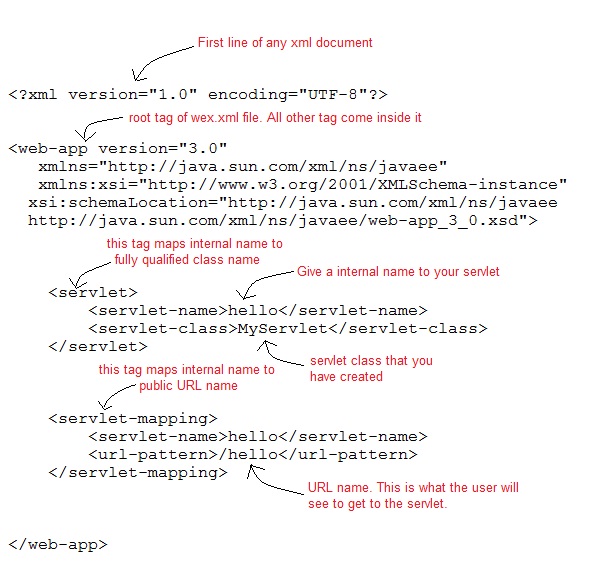
Deployment Descriptor(DD) is an XML document that is used by Web Container to run Servlets and JSP pages. DD is used for several important purposes such as:
部署描述符(DD)是一个XML文档,Web容器使用它来运行Servlet和JSP页面。 DD用于几个重要目的,例如:
Mapping URL to Servlet class.
将URL映射到Servlet类。
Initializing parameters.
初始化参数。
Defining Error page.
定义错误页面。
Security roles.
安全角色。
Declaring tag libraries.
声明标签库。
We will discuss about all these in details later. Now we will see how to create a simple web.xml file for our web application.
稍后我们将详细讨论所有这些内容。 现在,我们将看到如何为我们的Web应用程序创建一个简单的web.xml文件。

5.启动服务器 (5. Start the Server)
Double click on the startup.bat file to start your Apache Tomcat Server.
双击startup.bat文件以启动您的Apache Tomcat服务器。
Or, execute the following command on your windows machine using RUN prompt.
或者,在Windows机器上使用RUN提示符执行以下命令。
C:\apache-tomcat-7.0.14\bin\startup.bat
6.首次启动Tomcat服务器 (6. Starting Tomcat Server for the first time)
If you are starting Tomcat Server for the first time you need to set JAVA_HOME in the Enviroment variable. The following steps will show you how to set it.
如果是第一次启动Tomcat Server,则需要在Enviroment变量中设置JAVA_HOME。 以下步骤将向您展示如何进行设置。
Right Click on My Computer, go to Properites.
右键单击“ 我的电脑” ,转到“ 属性” 。

Go to Advanced Tab and Click on Enviroment Variables... button.
转到高级选项卡,然后单击环境变量...按钮。

Click on New button, and enter JAVA_HOME inside Variable name text field and path of JDK inside Variable value text field. Click OK to save.
单击“ 新建”按钮,然后在“变量名”文本字段内输入JAVA_HOME ,在“变量值”文本字段内输入JDK的路径。 单击确定保存。

7.运行Servlet应用程序 (7. Run Servlet Application)
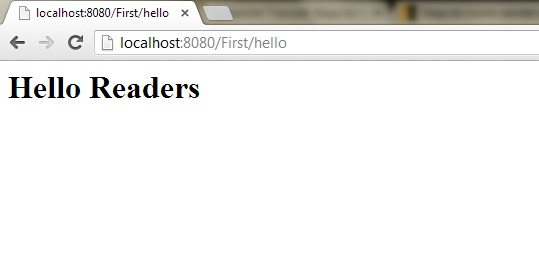
Open Browser and type http:localhost:8080/First/hello
打开浏览器,然后输入http:localhost:8080 / First / hello

Hurray! Our first Servlet Application ran successfully.
欢呼! 我们的第一个Servlet应用程序成功运行。
翻译自: https://www.studytonight.com/servlet/steps-to-create-servlet-using-tomcat-server.php


 本文详细介绍了在Apache Tomcat服务器上创建Servlet应用程序的步骤,包括创建目录结构、编写Servlet、编译、创建部署描述符、启动服务器以及运行应用。通过遵循这些通用步骤,你可以成功地创建和运行第一个Servlet应用程序。


 259
259

 被折叠的 条评论
为什么被折叠?


