


element-ui
本文是我们名为“ Android UI设计–基础”的学院课程的一部分。
在本课程中,您将了解Android UI设计的基础知识。 您将了解用户输入,视图和布局以及适配器和片段。 在这里查看!
目录
1.概述
在上一篇文章中,我们讨论了Views并说明了如何使用Views构建用户界面。 我们发现了具有不同控件的不同类型的Views 。 Android提供了几种常用控件,使用它们我们可以构建吸引人的用户界面。 我们看到了一些在创建用户界面时可以实现的有用模式,从而可以保证与应用程序界面的一致性。
在本文中,我们想探索如何组织这些视图以及如何将这些视图放置在屏幕上。 换句话说,我们将详细分析布局管理器,或仅分析布局。
2.布局概述
创建应用程序界面时,我们使用一些充当容器的特殊视图。 这些特殊视图控制其他视图在智能手机/平板电脑屏幕上的放置方式。 Android提供了一组布局管理器,每个布局管理器都采用不同的策略来保存,管理和放置其子级。 从API的角度来看,所有布局管理器都派生自ViewGroup类。 有些布局将孩子水平或垂直放置,而另一些布局则采用了不同的策略。 我们将在本文后面详细分析它们。
在Android中,布局可以嵌套,因此我们可以在界面的不同区域使用不同的布局。 但是,请注意,不建议创建过于复杂的布局,因为这会影响整个应用程序的性能。 我们可以通过两种方式声明布局:
- 使用XML:在这种情况下,使用XML文件“描述”用户界面的外观。 我们定义出现在用户界面中的元素(视图和子布局)。 同时,如上一篇文章中所见,我们定义了它们的属性。
- 在运行时:在这种情况下,我们编码布局以实例化
ViewGroup并将Views附加到它。 我们可以通过编程设置属性来操纵它们的属性。
我们可以在我们的应用程序中使用这两种方法。 例如,我们可以使用XML创建用户界面,并为其Views分配一些属性。 在运行时,我们可以查找(或查找)此Views和ViewGroup (布局)并以编程方式更改其属性。 例如,我们可以有一个红色背景的View ,在运行时我们将其更改为绿色。 从这个角度来看,Android非常强大和灵活。
使用XML,我们以某种方式使表示与处理其行为的代码脱钩。 在XML中,UI描述位于源代码的外部,因此从理论上讲,我们可以更改表示形式,仅表示XML文件,而无需更改源代码。 例如,当我们要针对多个屏幕尺寸调整用户界面时就是这种情况。 在这种情况下,我们定义了具有相同名称但位于不同目录中的不同布局,并且系统选择了与屏幕尺寸最匹配的布局。 这是Android为了处理多种屏幕尺寸而采取的标准方法。 此外,稍后我们将看到可以使用基于片段的另一种技术。 如果我们使用XML,则可以使用绘制布局并轻松调试它。
从的API点View ,每ViewGroup定义称为嵌套类LayoutParameter保持限定的尺寸和位置用于属于每个视图的一些参数ViewGroup 。 所有ViewGroup都有一个公共的两个参数,即每个View必须定义的参数width和height(或layout_width和layout_height )。 这两个参数代表View的宽度和高度。 我们可以指定一个数值或更多的时候我们可以使用两个常数:
-
wrap_content,意味着视图的尺寸将取决于实际内容 fill_parent(或match_parent),这意味着视图必须与包含它的父视图一样大
Android中的视图是一个矩形,视图位置表示为一对坐标的左上角。 这两个值确定View在其ViewGroup位置。布局内另一个重要的View属性是padding,用四个值(let,top,right,bottom)表示。 使用padding,我们可以移动View的内容。
Android提供了几种标准的布局管理器:
- 线性布局
- 表格布局
- 相对布局
- 框架布局
- 网格布局
线性布局
这是最简单的布局管理器。 此布局根据方向参数垂直或水平放置其子级。 要使用XML定义此布局,我们可以使用:
<LinearLayout xmlns:android="http://schemas.android.com/apk/res/android"
    xmlns:tools="http://schemas.android.com/tools"
    android:layout_width="match_parent"
    android:layout_height="match_parent">

</LinearLayout>
方向属性是最重要的属性,因为它确定视图的放置方式。 它可以采用两个值:水平或垂直。 在第一种情况下,视图是水平放置的,在第二种情况下,它们是竖直放置的。 还有两个其他参数会影响视图的位置和大小。 它们是重力和重量。
重力参数的行为类似于路线。 因此,如果我们想将视图向左侧对齐,如果我们要将其向右对齐,则可以将重力设置为左侧或右侧。 XML中的相应属性是layout_gravity 。 如果我们创建一个应用,请使用如下所示的布局:
<LinearLayout xmlns:android="http://schemas.android.com/apk/res/android"
    xmlns:tools="http://schemas.android.com/tools"
    android:layout_width="match_parent"
    android:layout_height="match_parent"
    android:orientation="vertical" >

    <TextView
        android:layout_width="match_parent"
        android:layout_height="wrap_content"
        android:gravity="left"
        android:text="Left" />

    <TextView
        android:layout_width="match_parent"
        android:layout_height="wrap_content"
        android:gravity="right"
        android:text="Right" />

    <TextView
        android:layout_width="match_parent"
        android:layout_height="wrap_content"
        android:gravity="center"
        android:text="Center" />

</LinearLayout>
并运行它,我们有:
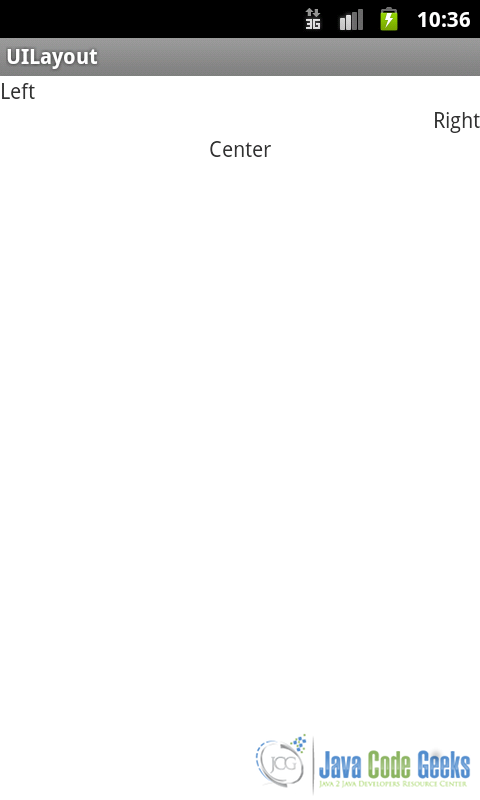

图1
另一个重要参数是权重(或XML中的layout_weight )。 使用weight参数,我们可以为View的其他方面分配重要性值。 具有较高重要性的View比具有较低重要性的Views更重要。 换句话说, Views与更高的权重值消耗比其它更多的空间Views 。 例如,请参见以下布局:
<LinearLayout xmlns:android="http://schemas.android.com/apk/res/android"
    xmlns:tools="http://schemas.android.com/tools"
    android:layout_width="match_parent"
    android:layout_height="match_parent"
    android:orientation="vertical" >

    <TextView
        android:layout_width="match_parent"
        android:layout_height="wrap_content"
        android:layout_weight="0"
        android:gravity="left"
        android:text="Left" />

    <TextView
        android:layout_width="match_parent"
        android:layout_height="wrap_content"
        android:layout_weight="1"
        android:gravity="right"
        android:text="Right" />

    <TextView
        android:layout_width="match_parent"
        android:layout_height="wrap_content"
        android:layout_weight="0"
        android:gravity="center"
        android:text="Center" />

</LinearLayout>在这种情况下,我们使用layout_weight,我们更重视具有正确文本的TextView 。 运行该应用程序,我们有:
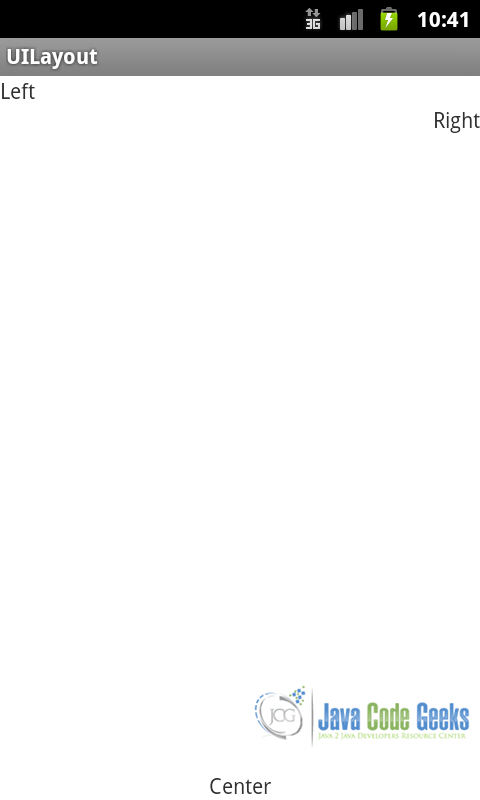

图2
我们必须考虑的另一个重要方面是android:gravity和layout_gravity之间的区别。 即使它们看起来非常相似,它们也具有不同的含义。 android:gravity是View使用的属性,而layout_gravity是容器使用的参数。
表格布局
这是布局管理器,将其子级放置在一个表中,将它们按行和列分组。 例如,使用下面显示的布局,我们创建两个不同的行,其中包含两个单元格。
<?xml version="1.0" encoding="utf-8"?>
<TableLayout xmlns:android="http://schemas.android.com/apk/res/android"
    android:layout_width="match_parent"
    android:layout_height="match_parent" >

    <TableRow>

        <TextView
            android:layout_width="match_parent"
            android:layout_height="match_parent"
            android:text="Cell 1" >
        </TextView>

        <TextView
            android:layout_width="match_parent"
            android:layout_height="match_parent"
            android:text="Cell 2" >
        </TextView>
    </TableRow>

    <TableRow>

        <TextView
            android:layout_width="match_parent"
            android:layout_height="match_parent"
            android:text="Cell 3" >
        </TextView>

        <TextView
            android:layout_width="match_parent"
            android:layout_height="match_parent"
            android:text="Cell 4" >
        </TextView>
    </TableRow>

</TableLayout>我们将TableRow用作TableLayout子级,它表示表内的一行。 使用这种布局运行应用程序,我们可以:
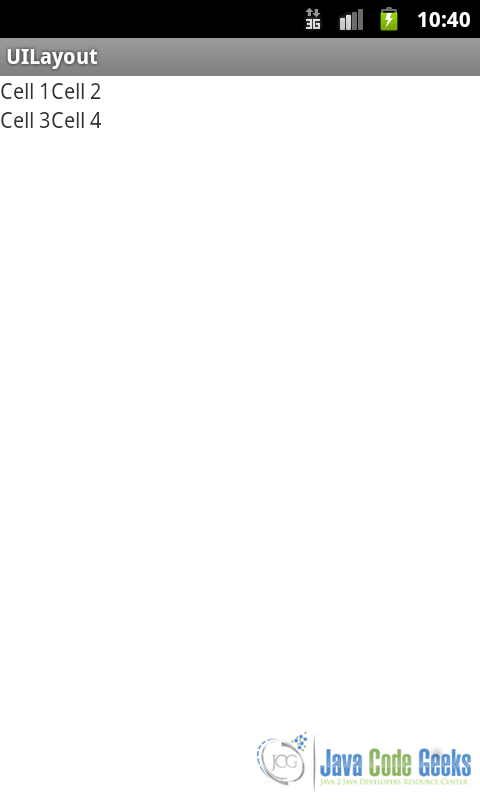

图3
我们甚至可以为不同的行使用不同的单元格编号,如下例所示,在第二行中,我们有三个单元格:
<?xml version="1.0" encoding="utf-8"?>
<TableLayout xmlns:android="http://schemas.android.com/apk/res/android"
    android:layout_width="match_parent"
    android:layout_height="match_parent" >

    <TableRow>

        <TextView
            android:layout_width="match_parent"
            android:layout_height="match_parent"
            android:text="Cell 1" >
        </TextView>

        <TextView
            android:layout_width="match_parent"
            android:layout_height="match_parent"
            android:text="Cell 2" >
        </TextView>
    </TableRow>

    <TableRow>

        <TextView
            android:layout_width="match_parent"
            android:layout_height="match_parent"
            android:text="Cell 3" >
        </TextView>

        <TextView
            android:layout_width="match_parent"
            android:layout_height="match_parent"
            android:text="Cell 4" >
        </TextView>

        <TextView
            android:layout_width="match_parent"
            android:layout_height="match_parent"
            android:text="Cell 5" >
        </TextView>
    </TableRow>

</TableLayout>
在这种情况下,第一行具有一个空单元格。 运行示例,我们有:
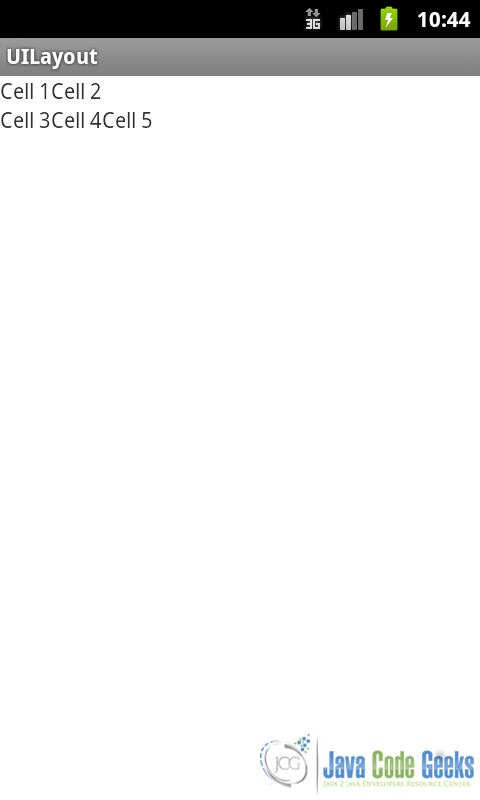

图4
不需要使用TableRow ,因为我们可以使用扩展View类的所有组件。 在这种情况下,此组件将具有与表格相同的宽度。 例如:
<?xml version="1.0" encoding="utf-8"?>
<TableLayout xmlns:android="http://schemas.android.com/apk/res/android"
    android:layout_width="match_parent"
    android:layout_height="match_parent" >

    <TextView
        android:layout_width="wrap_content"
        android:layout_height="wrap_content"
        android:text="This is a row!" >
    </TextView>

    <TableRow>

        <TextView
            android:layout_width="match_parent"
            android:layout_height="match_parent"
            android:text="Cell 1" >
        </TextView>

        <TextView
            android:layout_width="match_parent"
            android:layout_height="match_parent"
            android:text="Cell 2" >
        </TextView>
    </TableRow>

    <TableRow>

        <TextView
            android:layout_width="match_parent"
            android:layout_height="match_parent"
            android:text="Cell 3" >
        </TextView>

        <TextView
            android:layout_width="match_parent"
            android:layout_height="match_parent"
            android:text="Cell 4" >
        </TextView>

        <TextView
            android:layout_width="match_parent"
            android:layout_height="match_parent"
            android:text="Cell 5" >
        </TextView>
    </TableRow>

</TableLayout>在这种情况下,我们不使用TableRow而是使用TextView作为第一个TableLayout子级,并且指定TextView宽度应与内容一样大。 如果我们使用这种布局运行一个应用程序,我们将:
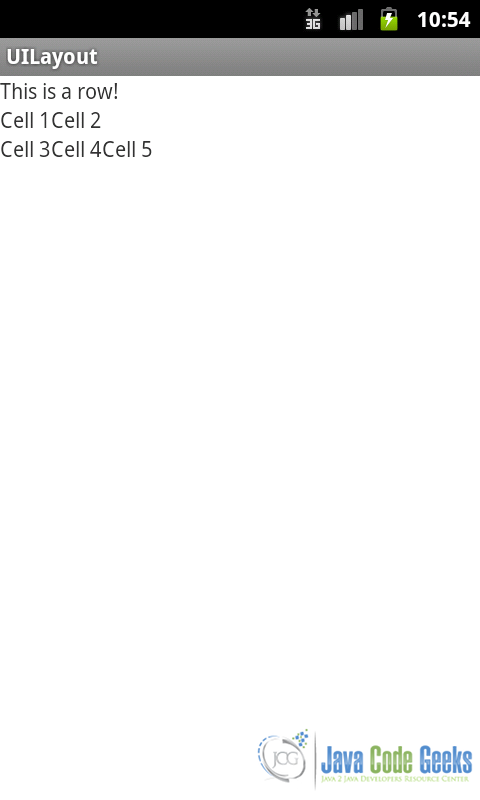

图5
您会注意到,即使我们指定TextView应该与内容一样大,它仍然占据整个行。
相对布局
这是Android中最灵活的布局。 此布局管理器使用以下策略:容器将其视图相对于其他Views放置。 我们可以使用此布局管理器实现非常复杂的UI结构。
RelativeLayout实现了一些可用于放置View视图属性。 有一些属性可以控制View相对于其他Views :
-
layout_toLeftof:此视图的右边缘位置在特定视图的左侧 layout_toRightof:此视图的左边缘位置在特定视图的右侧layout_below:此视图的顶部边缘在特定视图的下面layout_above:此视图的底部边缘在特定视图之上
还有其他一些参数可用于将视图放置在其容器上:
-
layout_alignParentLeft:此视图的左边缘与其容器的左边缘匹配 layout_alignParentRight:此视图的右边缘与其容器的右边缘匹配layout_alignParentTop:此视图的顶部边缘与其容器的顶部边缘匹配layout_alignParentBottom:此视图的底部边缘与其容器的底部边缘匹配
可以使用其他一些参数,建议您查看文档。 例如:
<?xml version="1.0" encoding="utf-8"?>
<RelativeLayout xmlns:android="http://schemas.android.com/apk/res/android"
    android:layout_width="match_parent"
    android:layout_height="match_parent" >

    <TextView
        android:id="@+id/t1"
        android:layout_width="wrap_content"
        android:layout_height="wrap_content"
        android:text="Text1" />

    <TextView
        android:id="@+id/t2"
        android:layout_width="wrap_content"
        android:layout_height="wrap_content"
        android:layout_below="@id/t1"
        android:text="Text2" />

    <TextView
        android:id="@+id/t3"
        android:layout_width="wrap_content"
        android:layout_height="wrap_content"
        android:layout_below="@id/t1"
        android:layout_toRightOf="@id/t2"
        android:text="Text3" />

</RelativeLayout>在上面的例子中,我们放置TextView与以下ID T2 TextView id为t1时, TextView id为T3是地方向左T2 T1及以下。 运行示例,我们有:
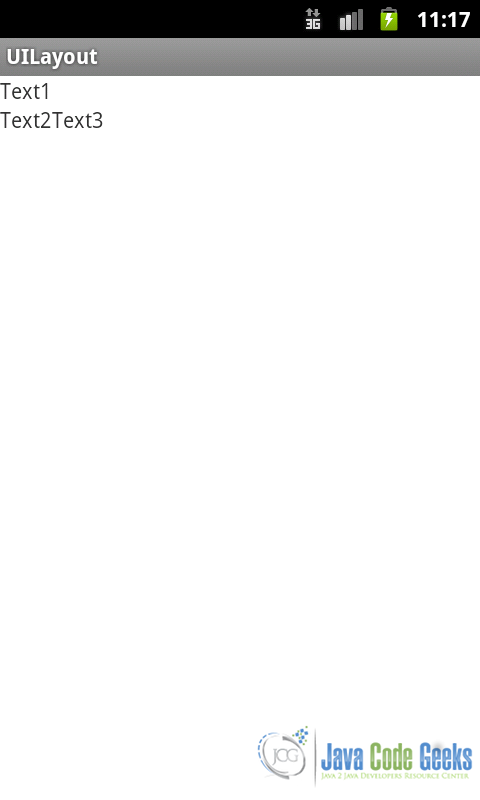

图6
让我们假设我们想在上面的布局中添加另一个TextView ,并且该TextView必须放置在右下角,所以我们有:
<?xml version="1.0" encoding="utf-8"?>
<RelativeLayout xmlns:android="http://schemas.android.com/apk/res/android"
    android:layout_width="match_parent"
    android:layout_height="match_parent" >

    <TextView
        android:id="@+id/t1"
        android:layout_width="wrap_content"
        android:layout_height="wrap_content"
        android:text="Text1" />

    <TextView
        android:id="@+id/t2"
        android:layout_width="wrap_content"
        android:layout_height="wrap_content"
        android:layout_below="@id/t1"
        android:text="Text2" />

    <TextView
        android:id="@+id/t3"
        android:layout_width="wrap_content"
        android:layout_height="wrap_content"
        android:layout_below="@id/t1"
        android:layout_toRightOf="@id/t2"
        android:text="Text3" />

    <TextView
        android:id="@+id/t4"
        android:layout_width="wrap_content"
        android:layout_height="wrap_content"
        android:layout_alignParentBottom="true"
        android:layout_alignParentRight="true"
        android:text="Text4" />

</RelativeLayout>
运行示例,我们有:
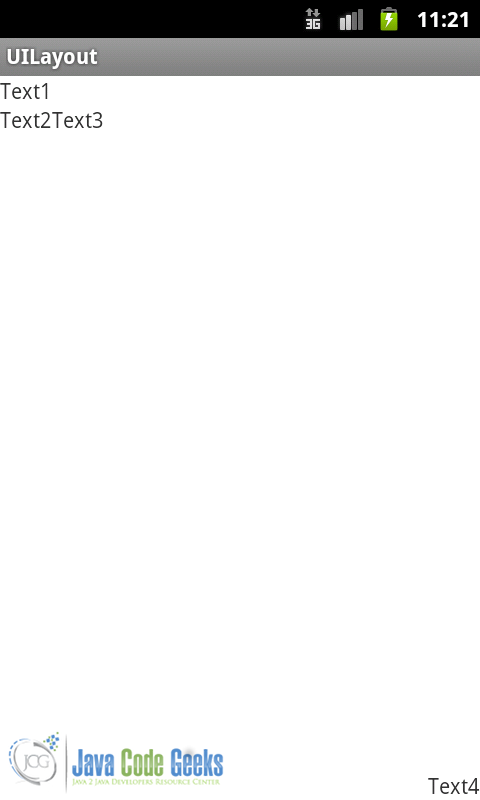

图7
框架布局
FrameLayout是一种特殊的布局,我们将在后面详细介绍。 我们看到了不同的布局管理器,该管理器实现了一些特定的策略以在UI上放置视图。 当我们要动态显示视图时,使用FrameLayout 。 当我们使用Fragments时,它非常有用。
网格布局
这是我们在本文中介绍的最后一个布局管理器。 它与TableLayout非常相似,它是从Android 4.0开始引入的。 该布局管理器以网格形式放置其视图,但是相对于TableLayout它更易于使用。 GridLayout将屏幕区域划分为多个单元格。 它的子代占据一个或多个单元格。
布局和多屏支持
当我们要支持多种屏幕尺寸时,需要特别注意。 当我们要为多个设备构建应用程序时,我们必须实现几种布局。 在Android中,我们有不同的目录,可以在其中实现布局。 默认布局是res/layout下的res/layout 。 我们可以提供一些附加到布局的大小限定符:
- 小
- 大
- 超大
此外,我们甚至可以提供屏幕方向:
- 土地
- 肖像
因此,例如,如果要为超大屏幕创建布局,则在res下创建一个名为layout-xlarge的目录,然后在此处实现布局。
如果要为横向模式提供布局,则在res下创建另一个目录,称为layout-land land等。 在Android 3.2中,引入了其他尺寸限定符,以更好地使布局适应屏幕尺寸。 如果您想了解更多信息,可以在这里查看。
3.碎片
到目前为止,我们已经看到了如何使用布局和组件来构建UI。 在这种情况下,我们有一个Activity及其布局和组件。 我们知道如何调整布局以适应多个屏幕,但是这种技术有时是不够的,尤其是当我们要支持平板电脑和智能手机时。 我们已经讨论过这一点,并且我们知道智能手机的屏幕尺寸与平板电脑的屏幕非常不同。 此外,有必要使大屏幕平板电脑中的UI更加动态和灵活。 由于这些原因,Android 3.0(API级别11)引入了片段概念。
什么是碎片? 片段是Activity的一部分用户界面。 我们可以组合多个片段来创建复杂的UI。 每个片段都有自己的生命周期,我们可以独立管理每个片段的生命周期。 片段仅存在于充当其容器的Activity内。 当我们在布局中添加片段时,它位于代表该布局的ViewGroup中。 片段是一个非常强大的组件,可帮助开发人员创建动态UI并同时支持多个屏幕尺寸。
片段可以被视为具有自己接口的可重用代码段。 区分何时需要使用片段和何时仅可以使用“简单”布局至关重要。 好吧,如前所述,在某些情况下,即使简单的布局也适合屏幕尺寸,仍然不够。
一个经典的示例是一个具有联系人列表的应用程序,当用户单击某个联系人时,该应用程序将显示该联系人的详细信息。 在智能手机中,我们可以从一项活动转移到另一项活动,以显示不同的布局,列表和详细信息。 但是,在平板电脑中,此行为将导致吸引力不佳的应用程序无法使用所有可用的屏幕尺寸。 在平板电脑中,我们希望同时在屏幕上显示列表和详细信息。
例如,在智能手机中,我们将:
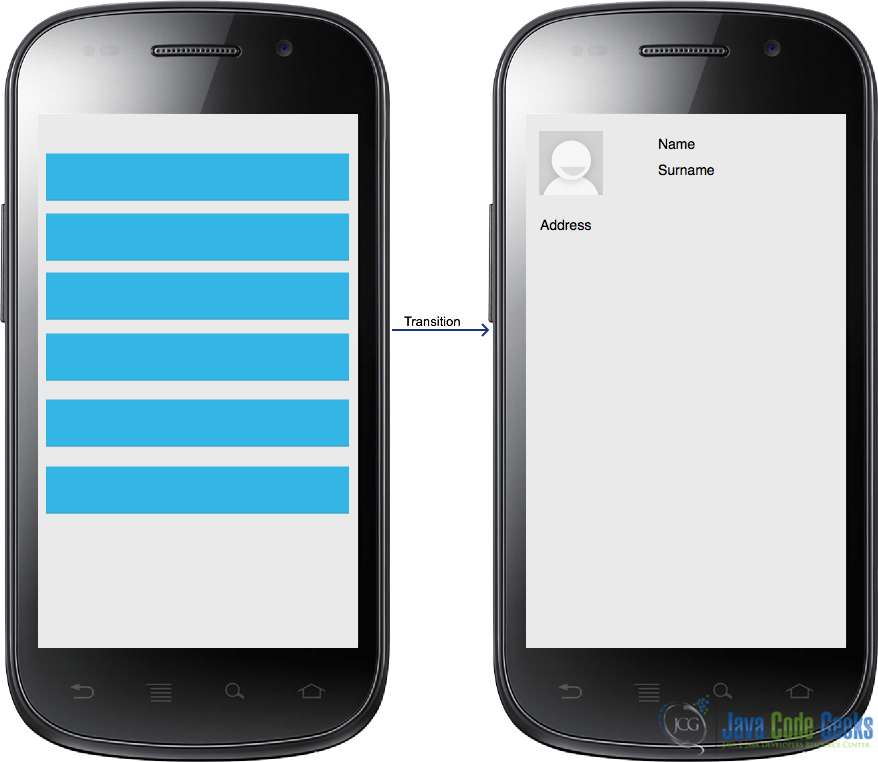

图8
而在平板电脑中,我们将拥有:
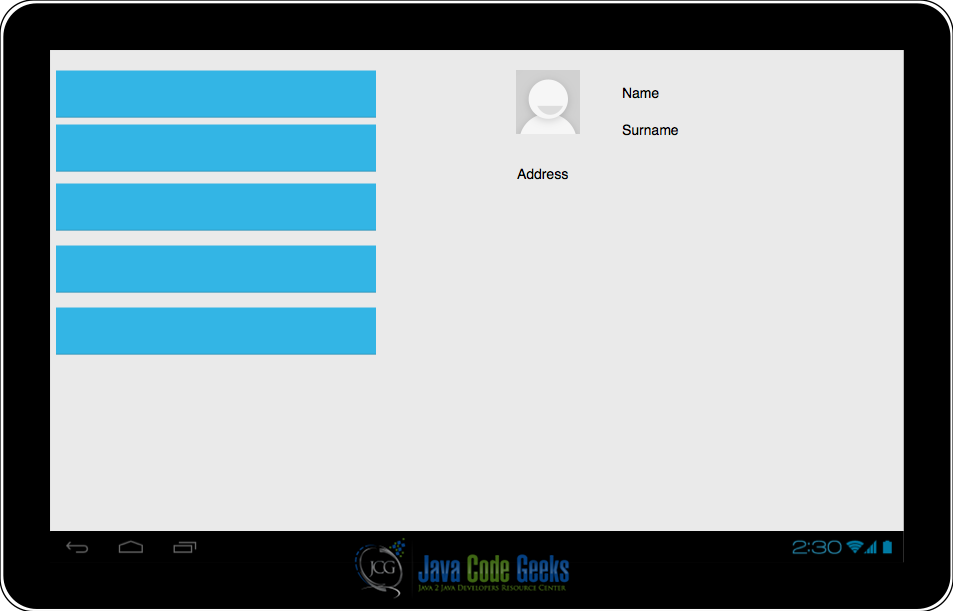

图9
在这种情况下,碎片会帮助我们。 我们可以创建两个片段:一个片段处理联系人列表,另一个片段处理联系人详细信息。 因此,我们有:
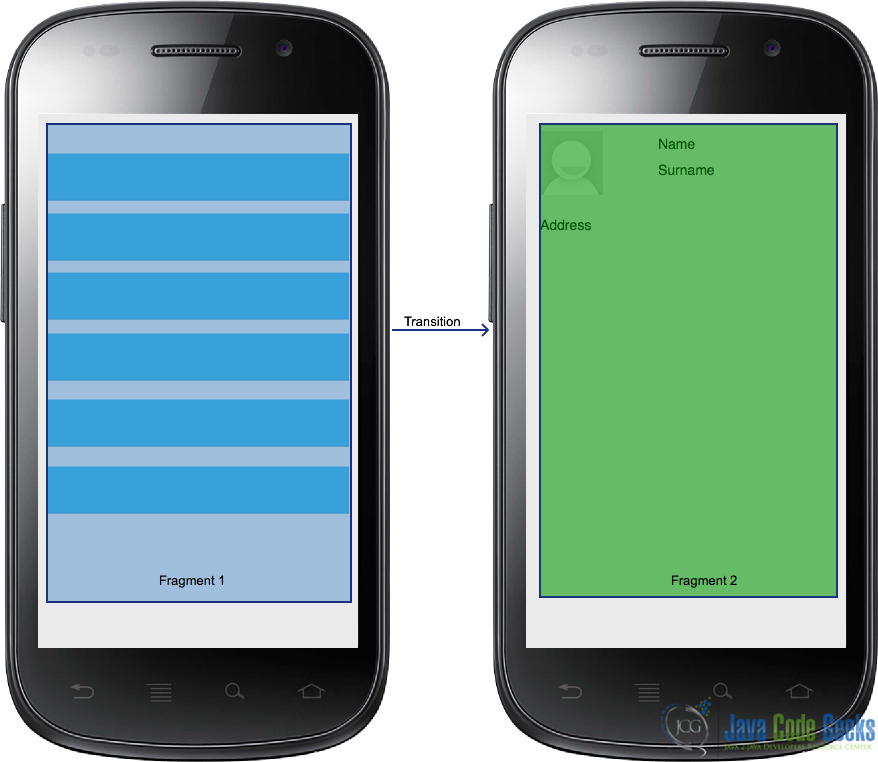

图10
在平板电脑上:
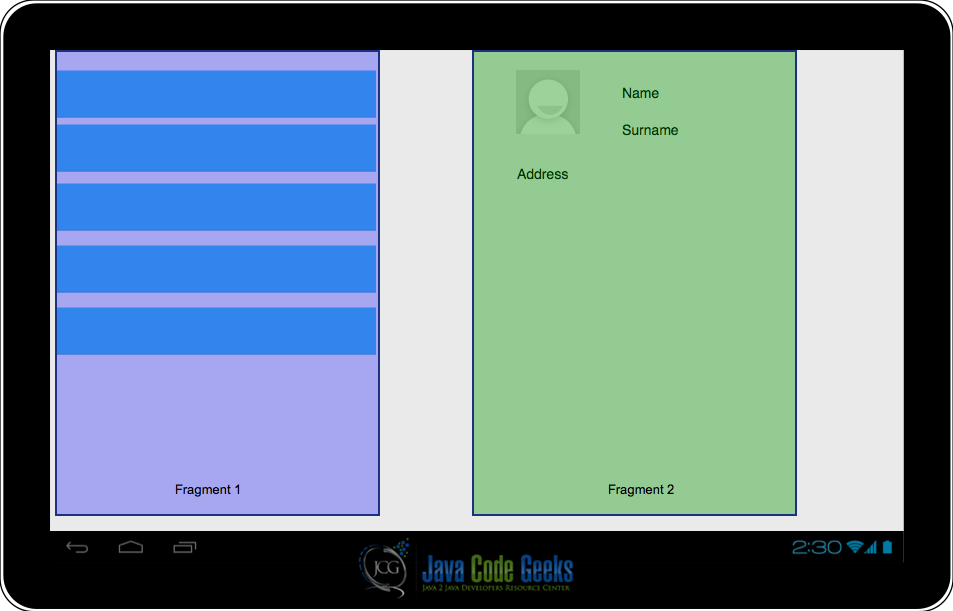

图11
片段生命周期
既然我们知道何时应该使用片段,我们需要在使用片段之前先了解它们的工作原理。 片段具有与Activity的生命周期,但是与活动生命周期相比,它更加复杂。 此外,片段仅存在于充当其容器的Activity内部。 下面显示了片段的生命周期:
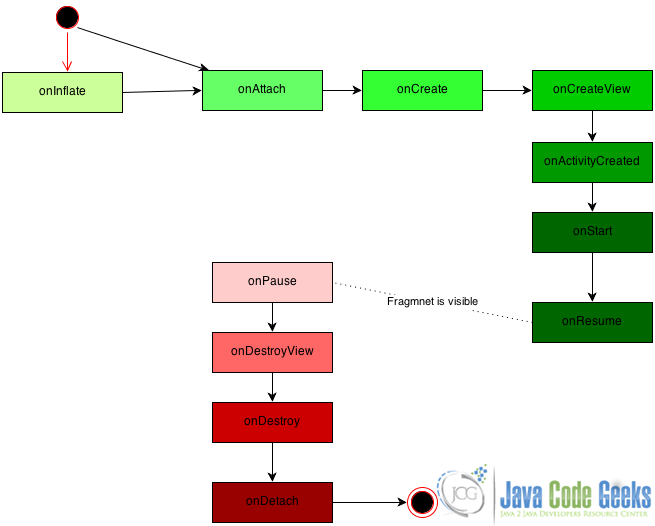

图12
我们可以看到,与活动生命周期相比,该生命周期具有更多状态。 从上到下,我们有:
-
onInflate:仅当我们使用标记在布局中直接定义片段时,才调用此方法。 在这种方法中,我们可以在XML布局文件中保存一些配置参数和一些属性。 -
onAttach:将片段“附加”到“父亲”活动后,将立即调用此方法,并且我们可以使用此方法存储有关活动的引用。 -
onCreate:这是最重要的步骤之一,我们的片段在创建过程中。 此方法可用于启动某个线程以从远程服务器中检索数据信息。 -
onCreateView:这是片段必须创建其视图层次结构时调用的方法。 在此方法期间,我们将在片段内扩大布局。 在此阶段,我们无法确定仍创建活动,因此无法依靠它进行某些操作。 -
OnActivityCreated:在此方法中,当“父亲”活动创建并准备使用时,我们会收到通知。 从现在开始,我们的活动处于活动状态并已创建,我们可以在需要时使用它。 -
onStart:在这里我们执行活动onStart的常见操作,在此阶段,我们的片段可见,但仍未与用户交互。 -
onResume:当片段准备好与用户交互时,将调用此方法。 在此阶段结束时,我们的片段已启动并运行!
然后,活动可能会暂停,因此调用了活动的onPause 。 好吧,在这种情况下,也会调用onPause片段方法。 之后,操作系统可能决定销毁我们的片段视图,因此将调用onDestroyView 。 之后,如果系统决定解散我们的片段,它将调用onDestroy方法。 在这里,我们应该释放所有活动的连接,因为我们的片段即将关闭。 即使在销毁阶段,它仍然与父活动相关。 最后一步是将片段与活动分离,它会在调用onDetach时发生。
如何使用片段
一旦了解了片段的生命周期,就需要知道如何创建片段以及如何将其附加到Activity 。 创建片段非常简单,我们只需扩展一个名为android.app.Fragment的Android类。 我们可以假设,我们想要创建一个名为Fragment1 。 在这种情况下,我们有:
public class Fragment1 extends Fragment {
}
这样,我们创建了一个片段。 在此类中,我们可以重写回调方法,以便我们处理片段生命周期中的不同状态。 现在,我们可以假设此片段的布局非常简单:
<LinearLayout xmlns:android="http://schemas.android.com/apk/res/android"
    android:layout_width="match_parent"
    android:layout_height="match_parent" >

    <TextView
        android:layout_width="wrap_content"
        android:layout_height="wrap_content"
        android:text="Test Fragment1" />

</LinearLayout>在这种情况下,此布局仅具有一个TextView组件,该组件可在屏幕上写入文本。 如果我们想将此布局“附加”到片段上,则可以使用onCreateView方法来实现,因为根据片段的生命周期,当片段创建其视图层次结构时会调用此方法。 因此,在我们的Fragment1类中,我们可以重写onCreateView方法并实现我们的逻辑:
@Override
public View onCreateView(LayoutInflater inflater, ViewGroup container,
	Bundle savedInstanceState) {
	View v = inflater.inflate(R.layout.text_frag, container, false);
	return v;
}在这种方法中,我们将我们的片段布局膨胀为text_frag (如上所示)。 现在,我们已经创建了片段,并且需要将其附加到保存它的Activity上,因为我们知道片段仅存在于Activity 。 我们可以通过两种方式执行此操作:
- 声明活动布局内的片段
- 在活动布局内声明一个占位符,并将片段附加到活动内
在第一种情况下,此操作是静态的,这意味着我们会将片段永久地附加到活动。 在第二种情况下,我们可以在运行时管理片段,因此可以用另一个片段替换。
如果我们在布局内声明片段,则必须使用fragment标签。
此外,我们必须指定完整的合格类名称。 例如,如果Fragment1类位于com.swa包下,则对于活动布局,我们将具有:
<LinearLayout xmlns:android="http://schemas.android.com/apk/res/android"
    xmlns:tools="http://schemas.android.com/tools"
    android:layout_width="match_parent"
    android:layout_height="match_parent" >

    <fragment
        android:id="@+id/f1"
        android:layout_width="match_parent"
        android:layout_height="match_parent"
        class="com.sswa.Fragment1" />

</LinearLayout>
运行上面的示例,我们将获得:
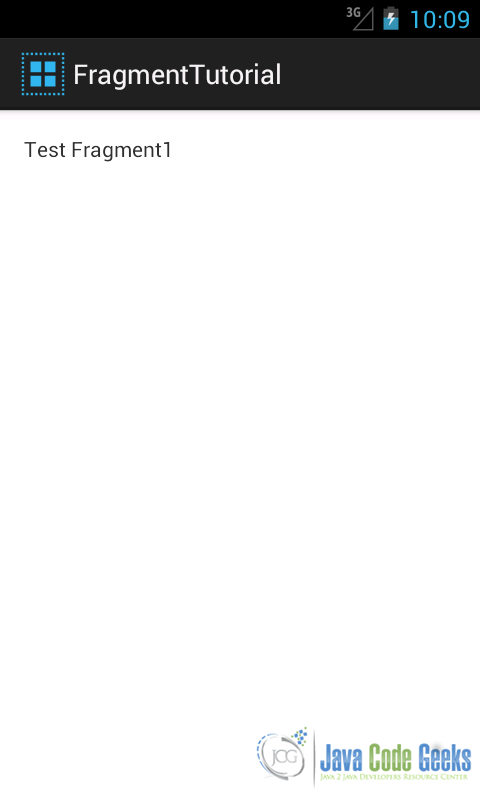

图13
我们要动态管理片段的第二种选择是稍微复杂一点。
FrameLayout和FragmentManager
当我们想在Activity动态处理片段时,我们不能在活动布局中使用fragment标签,而必须使用一个占位符,以“填充” fragment UI。 在这种情况下,活动布局变为:
<LinearLayout xmlns:android="http://schemas.android.com/apk/res/android"
    xmlns:tools="http://schemas.android.com/tools"
    android:layout_width="match_parent"
    android:layout_height="match_parent" >

    <FrameLayout
        android:id="@+id/fl1"
        android:layout_width="wrap_content"
        android:layout_height="wrap_content" />

</LinearLayout>在Activity ,我们必须使用有助于处理片段的组件。 该组件称为FragmentManager 。 使用此组件,我们可以在运行时添加,删除,替换片段,也可以查找片段。
请注意,在对片段执行任何类型的操作之前,我们需要激活事务。 使用FragmentManager我们可以创建事务,启动事务并在片段操作完成时在最后提交。 因此,在Activity我们有:
public class MainActivity extends Activity {

	@Override
	protected void onCreate(Bundle savedInstanceState) {
		super.onCreate(savedInstanceState);
		setContentView(R.layout.activity_main_din);

		// Create fragment
		Fragment1 f1 = new Fragment1();
		FragmentManager fm = getFragmentManager();
		FragmentTransaction ft = fm.beginTransaction();
		ft.add(R.id.fl1, f1);
		ft.commit();
	}

}
片段活动交流
通常,我们需要在片段和保存该片段的活动之间交换信息。 我们需要考虑到我们可以重复使用具有不同活动的片段,因此我们无法将片段绑定到特定活动。
在片段内部,我们可以使用getActivity()方法检索活动实例。 如果我们要交换数据,则最好在片段内创建一个回调接口,并要求活动实现它。
例如,我们可以假设将一个按钮添加到fragment1 UI,并且当用户单击该按钮时,我们希望将此信息传递给活动。 我们需要做的第一件事是修改片段布局:
<LinearLayout xmlns:android="http://schemas.android.com/apk/res/android"
    android:layout_width="match_parent"
    android:layout_height="match_parent" >

    <TextView
        android:layout_width="wrap_content"
        android:layout_height="wrap_content"
        android:text="Test Fragment Dynamic" />

    <Button
        android:id="@+id/btn1"
        android:layout_width="wrap_content"
        android:layout_height="wrap_content"
        android:text="Click me" />

</LinearLayout>
第二步是创建这样的接口:
public class Fragment1 extends Fragment {
	public static interface FragmentListener {
		public void onClickButton() ;
	}
}
现在我们有了接口,我们的活动必须实现它:
public class MainActivity extends Activity implements
		Fragment1.FragmentListener {
	@Override
	public void onClickButton() {
		// Handle here the event
	}
}
现在,我们必须在片段类中检查活动是否实现了接口,以便我们可以在事件发生时通知事件。 记住片段生命周期的onAttach方法是在onAttach方法中,因此我们有:
public class Fragment1 extends Fragment {

	@Override
	public void onAttach(Activity activity) {
		super.onAttach(activity);
		if (!(activity instanceof FragmentListener))
			throw new ClassCastException();

	}
}最后,我们准备在用户单击按钮时通知事件,我们可以在onCreateView方法中进行操作:
public class Fragment1 extends Fragment {

	@Override
	public View onCreateView(LayoutInflater inflater, ViewGroup container,
			Bundle savedInstanceState) {
		View v = inflater.inflate(R.layout.text_frag, container, false);
		Button b = (Button) v.findViewById(R.id.btn1);
		b.setOnClickListener(new View.OnClickListener() {
			@Override
			public void onClick(View v) {
				((FragmentListener) getActivity()).onClickButton();
			}
		});
		return v;
	}
}
片段间通讯
在使用片段开发Android应用程序时,我们不仅需要在片段和包含片段的活动之间交换数据,而且还需要在两个片段之间交换信息。 在这种情况下,最佳实践是避免片段与片段之间的通信,以便我们可以保证片段是分离的。
如果要以这种方式交换数据,可以使用前面介绍的方法将其从第一个片段传递到活动,然后再从活动传递到目标片段。 通过这种方式,我们可以确保可以在不同情况下重复使用我们的片段。
使用片段的多屏支持
在本文开头,我们解释了何时应使用片段。 我们指定它们在我们希望支持不同的屏幕尺寸时非常有用,例如,当我们构建同时在智能手机和平板电脑上运行的应用程序时。 在这种情况下,仅使用布局是不够的。
现在该探讨如何创建可在平板电脑和智能手机上使用的UI了。 为了实现这一点,我们可以回顾前面描述的示例。 在这种情况下,我们可以假设当用户单击按钮时,应用程序会显示一条消息。 如果我们有智能手机,则当用户单击按钮时,我们将转到另一个显示消息的活动,而如果我们使用平板电脑,则希望在同一屏幕上显示此消息。
首先,我们用一个非常简单的布局编写第二个片段,该片段仅显示一条消息,我们将此片段称为Fragment2 :
public class Fragment2 extends Fragment {
	@Override
	public View onCreateView(LayoutInflater inflater, ViewGroup container,
			Bundle savedInstanceState) {
		View v = inflater.inflate(R.layout.frag_message, container, false);
		return v;
	}
}
布局为:
<LinearLayout xmlns:android="http://schemas.android.com/apk/res/android"
    android:layout_width="match_parent"
    android:layout_height="match_parent" >

    <TextView
        android:layout_width="wrap_content"
        android:layout_height="wrap_content"
        android:text="Hello world" />

</LinearLayout>如果该应用程序在智能手机上运行,则其布局与前面所述的布局相似,而在平板电脑上则需要进行一些特殊考虑。 为了简单起见,我们可以假设平板电脑具有横向布局,因此我们可以在res目录下创建一个名为layout-land的新目录:
<LinearLayout xmlns:android="http://schemas.android.com/apk/res/android"
    xmlns:tools="http://schemas.android.com/tools"
    android:layout_width="match_parent"
    android:layout_height="match_parent"
    android:orientation="horizontal" >

    <FrameLayout
        android:id="@+id/fl1"
        android:layout_width="wrap_content"
        android:layout_height="wrap_content" />

    <FrameLayout
        android:id="@+id/fl2"
        android:layout_width="wrap_content"
        android:layout_height="wrap_content" />

</LinearLayout>注意,在这种情况下,我们有两个FrameLayout 。 “繁重”的工作由Activity完成。 如果在当前附加的布局中没有id为f2 FrameLayout ,则我们只有一个片段布局,这意味着我们使用的是智能手机,否则我们使用的是片段。
在活动的回调方法中,我们有:
import wkkwc.com;

@Override
	public void onClickButton() {
		// Handle here the event
		if (findViewById(R.id.fl2) != null) {
			// We have dual fragment layout

			Fragment2 f2 = (Fragment2) getFragmentManager().findFragmentById(R.id.fl2);

			if (f2 == null) {
				// Fragment2 is not inizialized
				f2 = new Fragment2();
				FragmentTransaction ft = getFragmentManager().beginTransaction();
				ft.replace(R.id.fl2, f2);
				ft.commit();
			}

		}
		else {
			// Single fragment layout
			Fragment2 f2 = new Fragment2();
			FragmentTransaction ft = getFragmentManager().beginTransaction();
			ft.replace(R.id.fl1, f2);
			ft.commit();
		}
	}
运行该应用程序,我们已经在智能手机中:
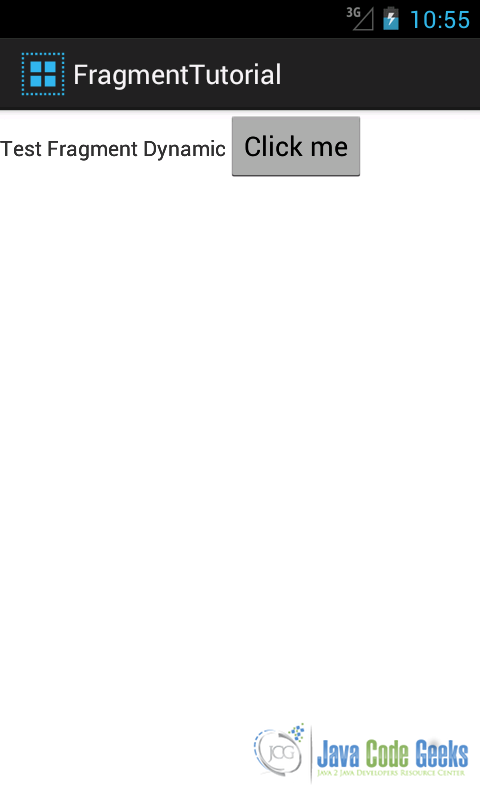

图14
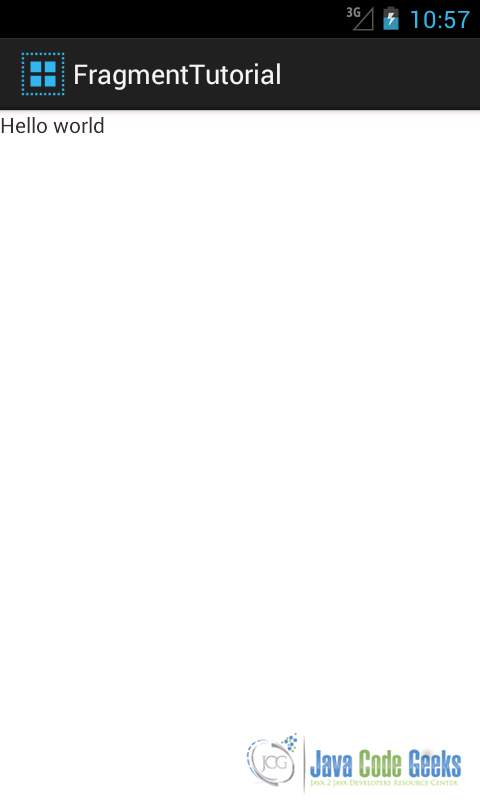

图15
同时,如果我们在平板电脑上运行该应用程序,则可以:
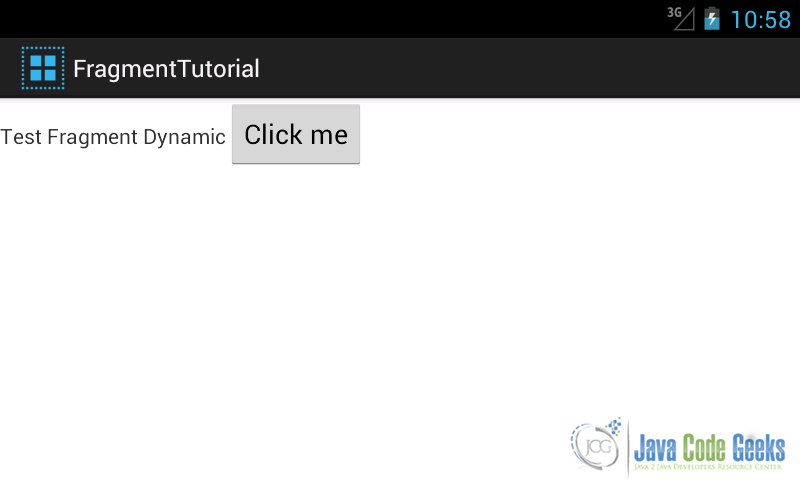

图16


图17
4.下载源代码
这是关于如何使用ViewGroups和Fragments创建Android布局的课程。 您可以在此处下载源代码: AndroidLayout.zip
翻译自: https://www.javacodegeeks.com/2015/09/android-ui-layouts-with-view-groups-and-fragments.html
element-ui


 3267
3267

 被折叠的 条评论
为什么被折叠?
被折叠的 条评论
为什么被折叠?
 到【灌水乐园】发言


