


面向对象
1.引言
面向方面的编程的主要目标是将跨领域的关注点分离。 当我们谈论跨领域的关注时,我们指的是在我们的系统或应用程序中的多个地方使用的通用功能。 这些概念包括:
- 记录中
- 交易管理
- 错误处理
- 监控方式
- 安全
实现这种分离的方法是将这些概念模块化。 这将使我们保持业务逻辑类整洁,仅包含设计该类的代码。 如果我们不对这些问题进行模块化,则将导致代码纠结(类包含不同的问题)和代码分散(相同的问题将散布在整个系统中)。
在此示例中,我们有一个Spring MVC应用程序,该应用程序访问所请求的数据(客户和订单),并显示一个包含其信息的页面。 我们可以看一下不同的层:
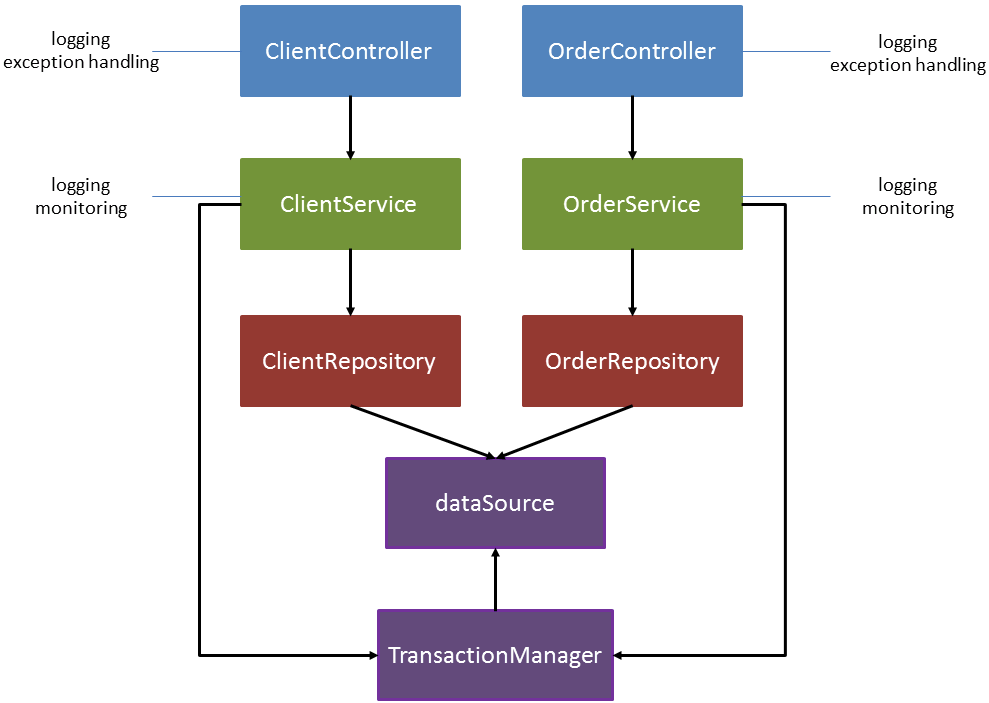

在上图中,我们可以理解,功能分散在不同的类中(在每个服务中实现监视),并且某些类包含不同的关注点(例如,ClientController类包含日志记录和异常处理)。 为了解决这个问题,我们将编写一些方面来实现我们的跨领域关注点。 目标是实现以下模型:
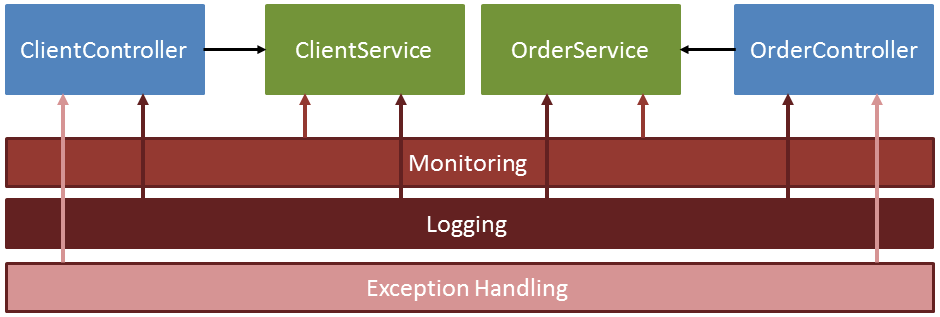

每个类仅包含与业务逻辑相关的代码,而各方面将负责拦截代码以注入跨领域的关注点。
让我们来看一个例子。
- 源代码可以在github上找到。
2.检查控制器代码
ClientController:
@Controller
public class ClientController {
    @Autowired
    private ClientService clientService;
    private static Logger mainLogger = LoggerFactory.getLogger("generic");
    private static Logger errorLogger = LoggerFactory.getLogger("errors");

    @RequestMapping("/getClients")
    public String getClients(Model model, @RequestParam("id") int id) {
        mainLogger.debug("Executing getClients request");

        try {
            Client client = clientService.getClient(id);
            model.addAttribute("client", client);
        } catch (DataAccessException e) {
            errorLogger.error("error in ClientController", e);
            NotificationUtils.sendNotification(e);
            return "errorPage";
        }

        return "showClient";
    }
}
该控制器的目的在于检索客户端并返回一个显示其信息的视图,但是,正如您所看到的,此代码包含其他逻辑。 一方面,它处理服务可能引发的异常,并将其重定向到错误页面。 另一方面,如果发生错误,它会生成日志记录信息和通知发送。 所有这些代码对于该应用程序中的所有控制器(可能还有其他类)都是通用的。
的确,我们本可以使用@ControllerAdvice批注来集中处理异常,但是本文的目标是了解如何使用Spring AOP完成它。
订单控制器也会发生同样的情况。 我不会在这里包括它,因为我不想让帖子过长。 如果您想检查一下,可以获取上一个链接中包含的源代码。
3.检查服务代码
客户服务:
@Service("clientService")
public class ClientServiceImpl implements ClientService {
    @Autowired
    private ClientRepository clientRepository;
    private static Logger mainLogger = LoggerFactory.getLogger("generic");
    private static Logger monitorLogger = LoggerFactory.getLogger("monitoring");

    @Override
    @Transactional(readOnly = true)
    public Client getClient(int id) {
        mainLogger.debug("Accessing client service");
        long startTime = System.currentTimeMillis();
        Client client = clientRepository.getClient(id);
        long totalTime = System.currentTimeMillis() - startTime;
        monitorLogger.info("Invocation time {}ms ", totalTime);

        return client;
    }
}
除了服务调用之外,它还包含日志记录的生成和每个调用中执行时间的监视。
如果需要使用程序化事务管理,我们还可以使用方面来模块化事务管理,但是在本示例中并非如此。
4.数据访问层
ClientRepositoryImpl:
@Repository
public class ClientRepositoryImpl implements ClientRepository {
    private JdbcTemplate template;
    private RowMapper<Client> rowMapper = new ClientRowMapper();
    private static final String SEARCH = "select * from clients where clientId = ?";
    private static final String COLUMN_ID = "clientId";
    private static final String COLUMN_NAME = "name";

    public ClientRepositoryImpl() {}

    public ClientRepositoryImpl(DataSource dataSource) {
        this.template = new JdbcTemplate(dataSource);
    }

    public Client getClient(int id) {
        return template.queryForObject(SEARCH, rowMapper, id);
    }

    private class ClientRowMapper implements RowMapper<Client> {
        public Client mapRow(ResultSet rs, int i) throws SQLException {
            Client client = new Client();
            client.setClientId(rs.getInt(COLUMN_ID));
            client.setName(rs.getString(COLUMN_NAME));

            return client;
        }
    }
}
该代码不包含任何横切关注点,但我将其包括在内以显示所有示例应用程序层。
5,激活AOP
要配置AOP,必须导入以下依赖项:
<dependency>
    <groupId>org.springframework</groupId>
    <artifactId>spring-aop</artifactId>
    <version>3.2.1.RELEASE</version>
</dependency>
<dependency>
    <groupId>org.aspectj</groupId>
    <artifactId>aspectjweaver</artifactId>
    <version>1.6.8</version>
</dependency>
在Spring配置文件中,我们需要添加以下标签:
<context:component-scan base-package="xpadro.spring.mvc.aop"/>
<aop:aspectj-autoproxy/>
component-scan标签将在基本软件包中搜索,以找到我们的方面。 要使用自动扫描,您不仅需要使用@Aspect注释定义方面类,而且还需要包括@Component注释。 如果不包括@Component,则需要在xml配置文件中定义方面。
6,集中错误处理
我们将使用@Around建议来编写方面。 该建议将截获所有使用@RequestMapping注释进行注释的方法,并将负责调用该方法,并捕获服务引发的异常。
@Component
@Aspect
public class CentralExceptionHandler {
    private static Logger errorLogger = LoggerFactory.getLogger("errors");

    @Around("@annotation(org.springframework.web.bind.annotation.RequestMapping) && target(controller)")
    public String handleException(ProceedingJoinPoint jp, Object controller) throws Throwable {
        String view = null;

        try {
            view = (String) jp.proceed();
        } catch (DataAccessException e) {
            errorLogger.error("error in {}", controller.getClass().getSimpleName(), e);
            NotificationUtils.sendNotification(e);
            return "errorPage";
        }

        return view;
    }
}
@Target批注允许我们引用被拦截的类。 现在我们有了方面处理的异常处理,因此我们可以在控制器中摆脱这种逻辑。
@Controller
public class ClientController {
    @Autowired
    private ClientService clientService;
    private static Logger mainLogger = LoggerFactory.getLogger("generic");
    //private static Logger errorLogger = LoggerFactory.getLogger("errors");

    @RequestMapping("/getClients")
    public String getClients(Model model, @RequestParam("id") int id) {
        mainLogger.debug("Executing getClients request");

        //try {
            Client client = clientService.getClient(id);
            model.addAttribute("client", client);
        //} catch (DataAccessException e) {
            //errorLogger.error("error in ClientController", e);
            //NotificationUtils.sendNotification(e);
            //return "errorPage";
        //}

        return "showClient";
    }
}
仅需注意,您可能会通过以下建议截获控制器抛出的异常:
@AfterThrowing(pointcut="@annotation(org.springframework.web.bind.annotation.RequestMapping)", throwing="e")但是请注意,此建议不会阻止异常的传播。
7,集中日志
日志记录方面有两个建议,一个关于控制器日志,另一个关于服务日志:
@Aspect
@Component
public class CentralLoggingHandler {
    private static Logger mainLogger = LoggerFactory.getLogger("generic");

    @Before("@annotation(org.springframework.web.bind.annotation.RequestMapping) && @annotation(mapping)")
    public void logControllerAccess(RequestMapping mapping) {
        mainLogger.debug("Executing {} request", mapping.value()[0]);
    }

    @Before("execution(* xpadro.spring.mvc.*..*Service+.*(..)) && target(service)")
    public void logServiceAccess(Object service) {
        mainLogger.debug("Accessing {}", service.getClass().getSimpleName());
    }
}
8.最后,监控问题
我们将写另一个方面来监视关注。 建议如下:
@Aspect
@Component
public class CentralMonitoringHandler {
    private static Logger monitorLogger = LoggerFactory.getLogger("monitoring");

    @Around("execution(* xpadro.spring.mvc.*..*Service+.*(..)) && target(service)")
    public Object logServiceAccess(ProceedingJoinPoint jp, Object service) throws Throwable {
        long startTime = System.currentTimeMillis();
        Object result = jp.proceed();
        long totalTime = System.currentTimeMillis() - startTime;
        monitorLogger.info("{}|Invocation time {}ms ", service.getClass().getSimpleName(), totalTime);

        return result;
    }
}
9,检查最终代码
在将所有交叉问题模块化之后,我们的控制器和服务仅包含业务逻辑:
@Controller
public class ClientController {
    @Autowired
    private ClientService clientService;

    @RequestMapping("/getClients")
    public String getClients(Model model, @RequestParam("id") int id) {
    	Client client = clientService.getClient(id);
    	model.addAttribute("client", client);

    	return "showClient";
    }
}


@Service("clientService")
public class ClientServiceImpl implements ClientService {
    @Autowired
    private ClientRepository clientRepository;

    @Override
    @Transactional(readOnly = true)
    public Client getClient(int id) {
        return clientRepository.getClient(id);
    }
}
10,结论
我们已经看到了如何应用面向方面的编程来保持我们的代码整洁,并专注于针对其设计的逻辑。 在使用AOP之前,只需考虑其已知的限制。
翻译自: https://www.javacodegeeks.com/2014/02/applying-aspect-oriented-programming.html
面向对象


 301
301

 被折叠的 条评论
为什么被折叠?
被折叠的 条评论
为什么被折叠?
 到【灌水乐园】发言


