


payara.micro
抽象
在研究如何创建高可用性(HA)时,我发现了会话复制的多机Payara / GlassFish群集,无法在一个参考中找到所需的一切。 我认为这将是一个普遍的需求并且很容易找到。 不幸的是,我的假设是错误的。 因此,本文的目的是给出高可用性(HA),会话复制,多机Payara群集的完整的端到端示例。 但我也要说(几乎),因为与任何技术一样,我敢肯定还有其他方法可以做到这一点。 这篇文章中描述的方式来自我的研究。
要求
我使用以下主要技术完成了本文的所有工作。 您可能可以使用不同的技术或版本来做相同的事情,但不能保证。
- Java SE 8 – OpenJDK 1.8.0_91
- Java EE 7 – Payara 4.1.1.163
- VirtualBox 5.1.6
- 鲁本图16.04
- Nginx 1.10.0
- NetBeans 8.2
- Maven 3.0.5(与NetBeans捆绑在一起)
定义
在整个帖子中,以下词语将具有这些特定含义。 这里不需要律师,但是最好确定一下定义。
机器:机器一词指的是正在运行其自己的操作系统的东西。 它可以是真正的硬件,例如笔记本电脑,台式机,服务器或树莓派。 也可以是运行在VirtualBox或VMWare之类的VM。 也可以是看起来像Docker容器之类的机器的东西。
群集:群集是GlassFish Server实例的集合,这些实例作为一个逻辑实体一起工作。 群集为一个或多个Java平台企业版(Java EE)应用程序提供了运行时环境(管理GlassFish Server群集,nd)
群集节点:群集节点代表安装了GlassFish Server软件的主机。 GlassFish Server实例所在的每个主机必须存在一个节点(管理GlassFish Server节点,nd)
群集节点实例:GlassFish Server实例是运行GlassFish Server的单个节点上Java平台(Java虚拟机或JVM机器)的单个虚拟机。 JVM计算机必须与Java平台企业版(Java EE)兼容。 (管理GlassFish服务器实例,nd)
建筑
由于这篇文章描述了跨多台计算机的Payara群集,因此了解每台计算机在群集中扮演的角色非常重要。 没有计划就开始在多台计算机上安装软件是不明智的。 本节将概述:
- 架构图
- 机器角色
- 机器网络配置
- 机器用户配置
- 机器软件安装
这篇文章不会介绍机器的实际启动和运行方式。 这是您的任务。 一些选项是:真实硬件(Raspberry Pi),虚拟机(Virtual Box),容器(Docker)或云(AWS)。 如果您已经有启动,运行,配置并准备就绪的计算机,则可以跳过本节,直接跳至“集群创建” 。
架构图
图1显示了为本文构建的简单示例应用程序的简单架构图。 但是,即使很简单,拥有它也很重要。 它可以防止在机器上随机安装软件,直到您“正确安装”为止。 另外,这里使用的重要单词很简单。 该体系结构包含此示例所需的最少内容。 它绝不是全面的或生产就绪的。 因此,考虑到这一点,下一步是更详细地研究此体系结构的各个部分。
图1 –“ Z区”图
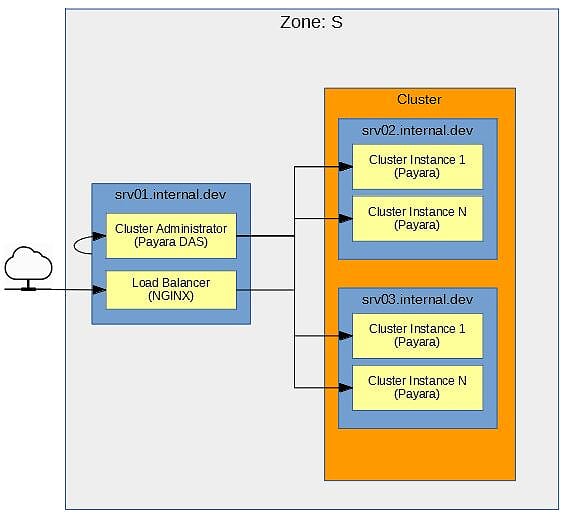

区域:S应该为网络中的所有计算机分配一个区域。 区域将执行相似功能的计算机组合在一起,并且还定义了区域之间的计算机如何相互通信。 此示例显示了Zone S 该区域将用于支持应用程序服务的机器。
srv [N] .internal.dev蓝色框表示该区域中的计算机。 区域中的每台计算机都应明确定义角色,并且最好不要让计算机承担过多的角色。 该区域的计算机名为srv[N].internal.dev 。 srv表示该机器是Zone S的服务机器部分。 [N]唯一标识机器。 最后,域.internal.dev表示这是在开发环境中内部访问的计算机。 每台机器的角色在“机器角色”部分中介绍。
群集橙色框代表区域内的群集。 该集群将使用Payara构建。 框中应包含所有参与群集的计算机。
群集管理器,群集实例,负载平衡器黄色框代表计算机上正在运行的内容。 机器的角色决定了机器上运行的东西。 接下来,您可以查看计算机的角色。
机器角色
那么, Zone S每台计算机上正在运行什么? 再次参考图1,机器角色如下:
-
srv01.internal.dev此计算机有两个角色。 第一个角色是用于管理集群的Payara DAS。 DAS仅限开发人员使用,仅供内部使用。 在区域外不应访问它。 另外,作为DAS,不应将Java EE应用程序部署到DAS。 第二个角色是NGINX负载平衡器。 当应用程序需要访问在该区域中部署到群集的服务时,负载平衡器是进入Zone S的入口点。 -
srv02.internal.dev此计算机是Payara群集中的节点。 如图所示,该节点包含2个实例。 -
srv03.internal.dev此计算机是Payara群集中的节点。 如图所示,该节点包含2个实例。
现在已经清楚了每台机器的作用,接下来要看的是机器之间的通信。
机器网络配置
名称srv01 , srv02和srv03将是计算机的简短主机名。 每台计算机上/etc/hostname的内容将具有此名称。 这是srv01的主机名:
$ cat /etc/hostname
srv01 .internal.dev是这些计算机的域。 机器应该能够通过短主机名或完全合格的主机名相互通信。
注意此域–
.internal.dev–稍后对于在群集中正确配置WAR以实现高可用性会话复制至关重要。
最简单的方法是通过/etc/hosts 。 (在区域中的所有计算机上)将/etc/hosts配置为包含短主机名和标准主机名。
$ cat /etc/hosts
127.0.0.1  localhost
10.0.2.16  srv01.internal.dev srv01
10.0.2.17  srv02.internal.dev srv02
10.0.2.18 srv03.internal.dev srv03 应该使用简单的ssh测试来验证所有计算机之间的通信。 不要跳过此验证。 Payara将使用SSH进行通信,因此最好在Payara尝试使用之前先对其进行验证和故障排除。 我将把进行此测试的详细信息留给您。
现在所有机器都可以相互通信,接下来要看的是机器上Linux用户帐户。 不太令人兴奋,但非常重要。
机器用户配置
每台机器都需要一个payara用户,该用户的主目录位于/home/payara 。 payara用户用于运行Payara。 没有任何内容应以root身份运行。 很简单。
现在,您已经掌握了机器配置的基础知识,现在该开始创建Payara集群了。
集群创建
使用Payara可以轻松创建集群。 当使用单独的机器时(相反,典型的示例将同一台机器用于所有事物)有一些其他步骤。 本节将概述:
- Payara安装
- Payara域名启动
- Payara DAS安全配置
- Payara网络验证
- 集群创建
- 集群节点创建
- 集群节点实例创建
- 集群启动
- 集群多播验证
本节严格专注于创建和配置集群。 这意味着在阅读本节后,您将拥有一个群集,但这并不意味着您的应用程序已准备就绪,可以进行高可用性和会话复制。 下一节将讨论WAR配置。 现在该开始构建集群了。
Payara安装
Payara的安装无非就是下载ZIP文件并将其解压缩。 当然,请转到Payara并找到下载页面。 这篇文章使用了Payara 4.1.1.163。 现在该在该区域中的所有计算机上安装Payara了。
- 下载Payara 4.1.1.163
- 将Payara解压缩到
/home/payara。 这将创建/home/payara/payara41。 - 创建一个符号链接
$ln -s payara41 active - 将Payara
bin目录放在payaraLinux用户的$PATH。/home/payara/.bashrc添加到/home/payara/.bashrc:
export PATH=/home/payara/active/bin:/home/payara/active/glassfish/bin:$PATH做完了! 很简单。 接下来查看Payara域是否可以启动。
Payara域名启动
使用asadmin工具启动Payara域。 在srv01.internal.dev上执行以下命令。
payara$ asadmin start-domain domain1如果一切顺利,该域将启动。 通过浏览到http:// localhost:4848验证它是否已启动并正在运行。 Payara的默认配置没有保护DAS的用户名/密码,因此您应该立即登录。现在DAS正在运行,接下来要做的就是一些安全性配置。
Payara DAS安全配置
现在是时候配置集群中机器之间通信所需的一些安全性了。 所有这些命令都在srv01.internal.dev上执行。
注意所有这些配置也可以通过Payara GUI管理员应用程序http:// localhost:4848来完成,但这很无聊! 命令行很有趣,希望可以实现自动化。
asadmin密码更改默认的Payara asadmin密码。 首次执行此命令时,请记住Payara没有默认的用户名/密码,因此在提示您输入密码时,请将其留空。 在srv01.internal.dev上执行以下命令:
payara@srv01$ asadmin change-admin-password
Enter admin user name [default: admin]>admin
Enter the admin password>        // Keep this blank when executing this for the first time
Enter the new admin password>        // Create a new password
Enter the new admin password again>  // Enter new password again
重新启动域,以确保所做的更改。 在srv01.internal.dev上执行以下命令:
payara@srv01$ asadmin restart-domain domain1 现在,通过使用asadmin登录到DAS来验证用户名/密码。 以下命令将登录DAS,并且在登录后可以执行asadmin命令,而无需每次都输入用户名/密码。 这是一种便利,但当然会带来安全风险。 要登录,请在srv01.internal.dev上执行以下命令:
payara@srv01$ asadmin login
Enter admin user name [Enter to accept default]> admin
Enter admin password> *******

Login information relevant to admin user name [admin] for host [localhost] and admin port [4848] stored at [/home/payara/.gfclient/pass] successfully. Make sure that this file remains protected. Information stored in this file will be used by administration commands to manage associated domain.

Command login executed successfully. 安全管理员现在,您要在集群中启用安全通信。 这基本上意味着Payara DAS将安全地与群集实例通信。 此步骤不是必需的,但是几乎总是很高兴。 在srv01.internal.dev上执行以下命令:
payara@srv01$ asadmin enable-secure-admin 重新启动域,以确保所做的更改。 在srv01.internal.dev上执行以下命令:
payara@srv01$ asadmin restart-domain domain1安全配置就是这样。 下一步是在尝试开始创建集群之前,验证从区域中的计算机到DAS的通信。
Payara DAS通信验证
尝试不跳过此步骤。 大多数人希望正确地建立集群并跳过验证步骤。 这样可以节省一些时间,但是,如果某些操作不正常,则在验证步骤中更容易解决问题。 到目前为止,启动和配置DAS的所有工作都在srv01 。 现在验证机srv02和srv03能够与在DAS沟通srv01 。
在srv02.internal.dev上执行以下操作,并验证结果,如图所示。
payara@srv02$ asadmin --host srv01 --port 4848 list-configs
Enter admin user name>  admin
Enter admin password for user "admin">
server-config
default-config
Command list-configs executed successfully. 在srv03.internal.dev上执行以下操作,并验证结果,如图所示。
payara@srv03$ asadmin --host srv01 --port 4848 list-configs
Enter admin user name>  admin
Enter admin password for user "admin">
server-config
default-config
Command list-configs executed successfully. 在srv02和srv03上成功执行将验证那些机器可以与srv01上的DAS成功通信。 现在已经验证了这一点,是时候创建集群了。
集群创建
现在将要创建集群。 对于此示例,该群集将被巧妙地命名为c1 。 通常,应该适当地命名集群,但是,对于此示例, c1会很好地工作。 在srv01.internal.dev上执行以下srv01.internal.dev 。
payara@srv01$ asadmin create-cluster c1
Command create-cluster executed successfully.
而已! 很抗气候吧? 集群在那里,但是里面什么也没有。 现在是时候用节点填充集群了。 没有节点,集群不是很有用。
集群节点创建
群集节点将位于机器srv02和srv03 。 但是,创建节点的命令在srv01上执行。 在srv01执行时, asadmin工具将使用ssh将必要的文件传输到srv02和srv03 。 为了方便起见,首先创建一个临时密码文件以使SSH更容易。
临时密码文件回想一下,在每台计算机上都创建了一个payara Linux用户。 这是正常Linux用户,运行Payara以避免以root身份运行Payara。 临时密码文件持有的未加密的口令payara上Linux用户srv02和srv03 。 假定payara用户Linux密码在所有计算机上都相同。 如果不是这种情况,则在尝试在srv[N]上创建节点之前,将需要使用机器srv[N]上的payara用户的正确密码来更新临时密码文件。
注意也可以使用RSA / DSA密钥文件。 有关更多信息,请参考
create-node-ssh文档。 http://docs.oracle.com/cd/E18930_01/html/821-2433/create-node-ssh-1.html#scrolltoc
上创建集群节点srv02要在创建节点srv02 ,上执行以下命令srv01.internal.dev 。
payara@srv01$ echo "AS_ADMIN_SSHPASSWORD=[clear_text_password_of_payara_usr_on_srv02]" > /home/payara/password

payara@srv01$ asadmin create-node-ssh --nodehost **srv02.internal.dev** --sshuser payara --passwordfile /home/payara/password srv02-node 上创建集群节点srv03要在创建节点srv03 ,上执行以下命令srv01.internal.dev 。
payara@srv01$ echo "AS_ADMIN_SSHPASSWORD=[clear_text_password_of_payara_usr_on_srv03]" > /home/payara/password

payara@srv01$ asadmin create-node-ssh --nodehost **srv03.internal.dev** --sshuser payara --passwordfile /home/payara/password srv03-node删除临时密码文件创建所有节点后,不再需要临时密码文件。 此时可以将其删除。 当然,如果将更多计算机添加到群集中,并且需要更多节点,则可以轻松创建另一个临时密码文件。
Payara@srv01$ rm /home/payara/password因此,现在您有了一个集群和节点。 节点很棒。 但是,没有实例,节点无法做任何事情。 能够运行应用程序的是节点上的实例。 这是实际的Payara实例。 因此,现在该制作一些集群节点实例了。
集群节点实例创建
创建节点实例基本上是在节点上创建Payara实例。 一个节点上可以有许多实例。 这完全取决于机器的资源。 节点实例将在srv02和srv03的节点中创建。 但是,用于创建节点实例的命令在srv01上执行。 在srv01执行时, asadmin工具将在srv02和srv03上创建节点实例。
创建节点实例srv02上创建2个节点实例srv02 。 节点实例将称为srv02-instance-01和srv02-instance-02 。 在srv01.internal.dev上执行以下命令:
payara@srv01&$ asadmin create-instance --cluster c1 --node srv02-node srv02-instance-01

Command _create-instance-filesystem executed successfully.
Port Assignments for server instance srv02-instance-01:
.....
The instance, srv02-instance-01, was created on host srv02
Command create-instance executed successfully.
payara@srv01$ asadmin create-instance --cluster c1 --node srv02-node srv02-instance-02
Command _create-instance-filesystem executed successfully.
Port Assignments for server instance srv02-instance-02:
.....
The instance, srv02-instance-02, was created on host srv02
Command create-instance executed successfully. 如果在执行完这些命令后,将消息“成功执行命令创建实例”打印到控制台,则可以肯定一切正常。 但是,您应该验证以确保。 验证过程在srv02和srv03 。 成功的验证意味着找到/nodes目录。 在srv02.internal.dev上执行以下srv02.internal.dev 。
payara@srv02$ cd /home/payara/active/glassfish
payara@srv02$ ls
bin common config domains legal lib modules nodes osgi 创建节点实例srv03上创建2个节点实例srv03 。 进行与上一个标题完全相同的所有操作,但使用srv03而不是srv02 。
现在有4个Payara实例…
-
srv02-instance-01 -
srv02-instance-02 -
srv03-instance-01 -
srv03-instance-02
分布在2个节点上...
-
srv02-node -
srv03-node
在2台不同的机器上…
-
srv02 -
srv03
在1个逻辑Payara群集上
c1
现在,开始一切!
集群启动
启动集群c1确实非常容易。 这是通过srv01计算机完成的,当DAS启动所有群集实例时,请注意控制台以确保所有4个实例均已启动。 在srv01.internal.dev上执行以下命令。
payara@srv01$ asadmin start-cluster c1
0%: start-cluster: Executing start-instance on 4 instances.
Command start-cluster executed successfully.
集群运行后,通过在DAS中列出正在运行的集群来验证集群是否正在运行。 通过在DAS中列出实例来验证节点实例是否正在运行。在srv01.internal.dev上执行以下命令。
payara@srv01$ asadmin list-clusters
c1 running
Command list-clusters executed successfully.
payara@srv01$ asadmin list-instances
srv02-instance-01 running
srv02-instance-02 running
srv03-instance-01 running
srv03-instance-02 running
Command list-instances executed successfully. 恭喜你! 您现在有了一个不错的4实例集群。 现在是时候部署应用程序了吗? 错误! 在部署应用程序之前,重要的是要验证节点之间的多播网络通信是否正常工作,以允许HttpSession在整个集群中复制。 接下来验证多播网络通信。
集群多播验证
拥有集群的全部目的是拥有一个高可用性,会话复制的应用程序。 如果一个实例有问题,群集中的另一个实例(可能在另一个节点上)将无缝接管。 但是,为了使这种情况真正发生,群集实例必须能够彼此成功通信。 Payara有validate-multicast工具对此进行了测试。 但是,诀窍在于如何运行validate-multicast 。 为了成功运行, validate-multicast ,必须在两个运行srv02和srv03 AT同一时间! 执行以下的srv02.internal.dev和srv03.internal.dev在同一时间(哈夫纳,2011)!
srv02.internal.dev在srv02.internal.dev上执行以下srv02.internal.dev :
payara@srv02$ asadmin validate-multicast
Will use port 2048
Will use address 228.9.3.1
Will use bind interface null
Will use wait period 2,000 (in milliseconds)

Listening for data...
Sending message with content "srv02" every 2,000 milliseconds
Received data from srv02 (loopback)
Received data from srv03
Exiting after 20 seconds. To change this timeout, use the --timeout command line option.
Command validate-multicast executed successfully. srv03.internal.dev同时为srv02.internal.dev ,还执行以下srv03.internal.dev :
payara@srv03$ asadmin validate-multicast
Will use port 2048
Will use address 228.9.3.1
Will use bind interface null
Will use wait period 2,000 (in milliseconds)

Listening for data...
Sending message with content "srv03" every 2,000 milliseconds
Received data from srv03 (loopback)
Received data from srv02
Exiting after 20 seconds. To change this timeout, use the --timeout command line option.
Command validate-multicast executed successfully. 在同一时间运行这两个命令时,实例之间的通信应该成功。 在srv02机器上,您应该看到“从srv03接收到的数据”,而在srv03机器上,您应该看到“从srv02接收到的数据”。 这验证了用于HttpSession复制的节点实例之间使用的多播网络通信是否正常运行。
就是这样! 现在,群集已完全配置,并且可以在多台计算机上运行。 我确定您急于将应用程序部署到集群中。 因此,请深入了解如何为高可用性(HA),会话复制的环境配置WAR。
WAR配置
一旦配置了Payara集群并使其正常运行,大多数人认为部署到该集群的任何应用程序都将利用该集群的高可用性(HA)和会话复制。 不幸的是,这种情况并非如此。 您的应用程序必须针对集群进行开发和配置。 本节将概述:
- HttpSession序列化
- web.xml <distributable />
- glassfish-web.xml cookieDomain
注意所有这些配置都是必需的。 如果仅跳过1,则跨群集的会话复制将无法进行。
应用程序所需的第一件事是会话序列化。 接下来将非常简短地介绍这一点。
会话序列化
HttpSession序列化是一件简单的事情,但是大多数开发团队对此却很少关注。 通常,应用程序服务器使用序列化在整个群集中复制会话。 如果HttpSession中的对象无法序列化,则会话复制将失败。 因此,请确保放入HttpSession所有对象都可以序列化。
会话序列化是关键配置。 如果跳过它,则跨群集的会话复制将无法进行。
注意在开发环境中,请使用
javax.servlet.Filter运行您的应用程序,该程序尝试序列化HttpSession所有对象。 如果您进行了适当的测试,则应该可以解决任何序列化问题。
现在HttpSession中的所有对象都可以序列化了,接下来要看的是web.xml配置。
web.xml <distributable />
Servlet 3.1规范的第157页将web.xml的<distributable />元素定义为“ <distributable />表示已对该Web应用程序进行适当编程以部署到分布式Servlet容器中。” 这意味着必须将<distributable />添加到web.xml以便Payara知道该应用程序将在集群中运行,并且应照此处理。 清单1显示了一个示例。
清单1 –可分发
<?xml version="1.0" encoding="UTF-8"?>
<web-app xmlns="http://xmlns.jcp.org/xml/ns/javaee"
         xmlns:xsi="http://www.w3.org/2001/XMLSchema-instance"
         xsi:schemaLocation="http://xmlns.jcp.org/xml/ns/javaee http://xmlns.jcp.org/xml/ns/javaee/web-app_3_1.xsd"
         version="3.1">
  <display-name>clusterjsp</display-name>
  <distributable/>
  <servlet>
    <display-name>HaJsp</display-name>
    <servlet-name>HaJsp</servlet-name>
    <jsp-file>/HaJsp.jsp</jsp-file>
  </servlet>
  <servlet>
    <display-name>ClearSession</display-name>
    <servlet-name>ClearSession</servlet-name>
    <jsp-file>/ClearSession.jsp</jsp-file>
  </servlet>
  <session-config>
    <session-timeout>30</session-timeout>
  </session-config>
  <welcome-file-list>
    <welcome-file>HaJsp.jsp</welcome-file>
  </welcome-file-list>
</web-app>
<distributable />元素是关键配置。 如果丢失,则跨群集的会话复制将无法进行。
<distributable />元素是所有Java EE服务器所需的配置。 Payara也有一些自己的自定义配置。 接下来要看的是此服务器特定的配置。
glassfish-web.xml cookieDomain
glassfish-web.xml文件是Web应用程序特定于Payara的配置文件。 不同web.xml这是适用于所有的Java EE服务器, glassfish-web.xml仅适用于GlassFish的或似鲭水狼牙鱼EE服务器。 这意味着,如果要部署到其他EE服务器,则可能需要找到该服务器的等效配置,也可能不需要。
对于Payara,必须更新glassfish-web.xml以添加cookieDomain属性。 清单2显示了正确设置cookieDomain值的标记层次结构。 如清单2所示,该值设置为.internal.dev (Hafner,2011年)。 您还记得吗,这是您用于群集体系结构的域。
清单2 – cookieDomain
<?xml version="1.0" encoding="UTF-8"?>
<!DOCTYPE glassfish-web-app PUBLIC "-//GlassFish.org//DTD GlassFish Application Server 3.1 Servlet 3.0//EN" "http://glassfish.org/dtds/glassfish-web-app_3_0-1.dtd">
<glassfish-web-app error-url="">
  <session-config>
    **<cookie-properties>
      <property name="cookieDomain" value=".internal.dev"/>
    </cookie-properties>**
  </session-config>
</glassfish-web-app>cookieDomain属性配置非常重要,因为它允许JSESSIONID cookie(用于跟踪群集节点实例之间的用户会话)在每个Web浏览器请求中传递给任何群集节点实例。 了解此处发生情况的最简单方法是解释缺少cookieDomain属性配置时会发生什么情况。
注意这是即将发生的事情的预览,但这没关系。
假设缺少cookieDomain属性配置。 然后,Web浏览器使用URL http://srv02.internal.dev:28080/ferris-clusterjsp向在一个群集节点实例上运行的应用程序发出请求。 当应用程序处理请求时,它将创建一个JSESSIONID cookie,并且该cookie的域值将(默认情况下)为用于访问应用程序的主机名,在本例中为srv02.internal.dev 。 现在,另一个请求发送到URL http://srv03.internal.dev:28080/ferris-clusterjsp 。 它是集群的一个实例,因此您希望该实例找到已经创建的会话。 但这不会发生。 因为JSESSIONID cookie是使用域值**srv02**.internal.dev创建的,所以不会发生,因此Web浏览器不会根据对http://**srv03**.internal.dev的请求发送此cookie。因为cookie属于srv02而不是srv03 。
现在假设如清单2所示配置cookieDomain属性配置。现在会发生什么? 嗯,Web浏览器使用URL http://srv02.internal.dev:28080/ferris-clusterjsp向在一个集群节点实例上运行的应用程序发出请求。 但是,这一次,当应用程序处理请求时,它将创建一个JSESSIONID cookie,并且该cookie的域值将是您在清单2中将其配置为.internal.dev 。 现在,另一个请求发送到URL http://srv03.internal.dev:28080/ferris-clusterjsp 。 Web浏览器将随该请求一起发送JSESSIONID,因为cookie属于.internal.dev并且该请求将发送到http://srv03**.internal.dev** 。
cookieDomain属性是关键配置。 如果缺少该域,或者所使用的域与cookieDomain值不匹配,则跨群集的会话复制将无法进行。
恭喜你您的Web应用程序已配置完毕,可以部署到群集中。 部署很容易完成,接下来您将要做。
战争部署
至此,您终于准备好部署WAR。 好吧,不完全是。 你有战争吗? 没有? 好吧,你很幸运。 clusterjsp应用程序在测试集群和会话复制方面很受欢迎。 我在GitHub帐户上拥有自己的clusterjsp分支,该帐户已经配置好并可以部署到此示例集群。 您可以在https://github.com/mjremijan/ferris-clusterjsp/releases下载我的clusterjsp分支。 在本节中,您将查看:
- Payara
asadmin deploy命令 - 验证应用程序是否在整个群集中正确部署。
部署命令
首先,您必须从我的GitHub帐户下载ferris-clusterjsp-1.1.0.0.war 。 接下来,使用asadmin命令将其部署到集群。 在srv01.internal.dev上执行以下srv01.internal.dev :
$ asadmin deploy --force true --precompilejsp=true --enabled=true --availabilityenabled=true --asyncreplication=true --target c1 --contextroot=ferris-clusterjsp --name=ferris-clusterjsp:1.1.0.0 ferris-clusterjsp-1.1.0.0.war

Application deployed with name ferris-clusterjsp:1.1.0.0.
Command deploy executed successfully.
–force true强制重新部署该Web应用程序(即使已部署)。
–precompilejsp = true ferris-clusterjsp应用程序使用一些简单的JSP文件,因此请在部署时对其进行预编译。
–enabled = true允许在应用程序部署后对其进行访问。
–availabilityenabled = true允许通过会话复制和钝化实现高可用性。 该方法也适用于有状态会话Bean,尽管通常不再使用它们了。
–asyncreplication = true与处理用户请求的线程相比,在单独的异步线程中跨群集执行会话复制。
–target c1将应用程序部署到群集c1
–contextroot = ferris-clusterjsp将应用程序的上下文根设置为ferris-clusterjsp 。 这也可以在glassfish-web.xml定义。
–name = ferris-clusterjsp:1.1.0.0设置应用程序在Payara管理控制台中显示的显示名称。 通常,最好在显示名称中包含版本号。
ferris-clusterjsp–1.1.0.0.war要部署的WAR文件的名称。
现在已经部署了WAR,接下来要做的是验证应用程序是否已成功部署并在所有群集节点实例上运行。
部署验证
当您执行上面的asadmin deploy命令时,短时间后,您应该会看到“命令部署成功执行”消息。 如果是这样,那就太好了! 该应用程序已成功部署到群集。 要验证它是否已成功部署,请在srv01.internal.dev上执行以下srv01.internal.dev :
$ asadmin list-applications --long true --type web c1

NAME                       TYPE   STATUS
ferris-clusterjsp:1.1.0.0  <web>  enabled
Command list-applications executed successfully. 此asadmin命令要求Payara列出群集c1上所有类型为web的应用程序。 应有1个结果,即ferris-clusterjsp:1.1.0.0应用程序,其状态应为enable 。 为了确保一切正常,请通过在srv01.internal.dev上执行以下操作来srv01.internal.dev节点实例的状态。
$ asadmin list-instances c1

srv02-instance-01   running
srv02-instance-02   running
srv03-instance-01   running
srv03-instance-02 running 此asadmin命令告诉您c1集群中有4个实例,并且所有4个实例都在运行。 ferris-clusterjsp应用程序已在集群上成功运行。 接下来要做的就是测试!
WAR会话复制测试
现在是时候查看集群中的会话复制是否正在运行。 这样做并不困难,但是,您将需要离开命令行世界,现在开始使用浏览器。 要测试会话复制是否正常工作,您需要:
- 确定到运行该应用程序的每个单独群集节点实例的链接URL。
- 使用网络浏览器访问每个链接。
链接到每个实例
您需要做的第一件事是找到URL,以访问每个集群节点实例上的ferris-clusterjsp应用程序。 这是您的操作方式。 ferris-clusterjsp应用程序在4个群集节点实例上运行,并且每个实例都有其自己的URL。 请按照以下步骤获取链接列表:
- 在
srv01.internal.dev上打开Web浏览器。 - 浏览到位于
http://localhost:4848的Payara管理控制台。 - 登录(请记住,您已在Payara DAS安全配置中更改了管理员密码)。
- 单击“应用程序”树节点。
单击“应用程序”树节点后,您将看到列出的ferris-clusterjsp:1.1.0.0应用程序。 图2显示在表的Action列中是一个名为Launch的超链接。 点击它!
图2 –


单击启动链接后,将出现一个新的浏览器窗口,其中包含指向群集中应用程序的所有链接。 图3显示了8个链接。 可以通过HTTP或HTTPS访问4个群集节点实例中的每一个。
图3 –所有链接
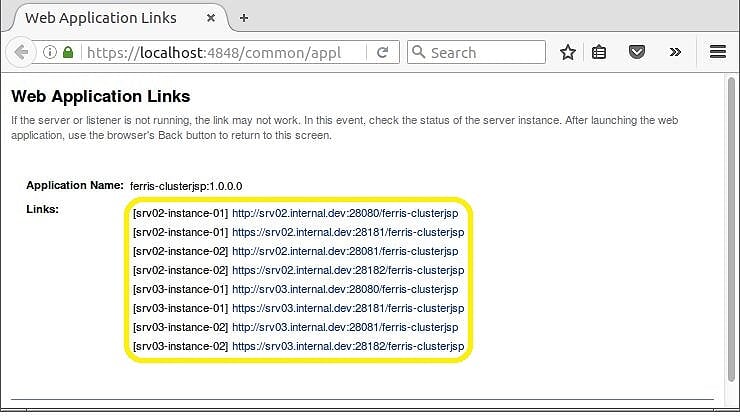

现在,您已经知道所有链接,您可以直接在4个实例中的每个实例上访问ferris-clusterjsp应用程序。 这将允许您测试会话复制是否正常。 如果您的第一个请求是实例srv02-instance–01 ,那么您将能够在其他3个实例中查看您的会话。 希望它会起作用!
测试复制
要测试会话复制是否正常工作,您需要做的就是访问一个群集节点实例上的应用程序,记下会话ID值,然后在另一个节点实例上访问该应用程序,然后查看会话是否已复制。 首先从srv02-instance–01开始。 打开Web浏览器,然后浏览至http://srv02.internal.dev:28080/ferris-clusterjsp 。 该应用程序将显示有关群集节点实例和您的会话的信息。 您的浏览器将类似于图4a。
图4a – srv02-instance-01上的ferris-custerjsp
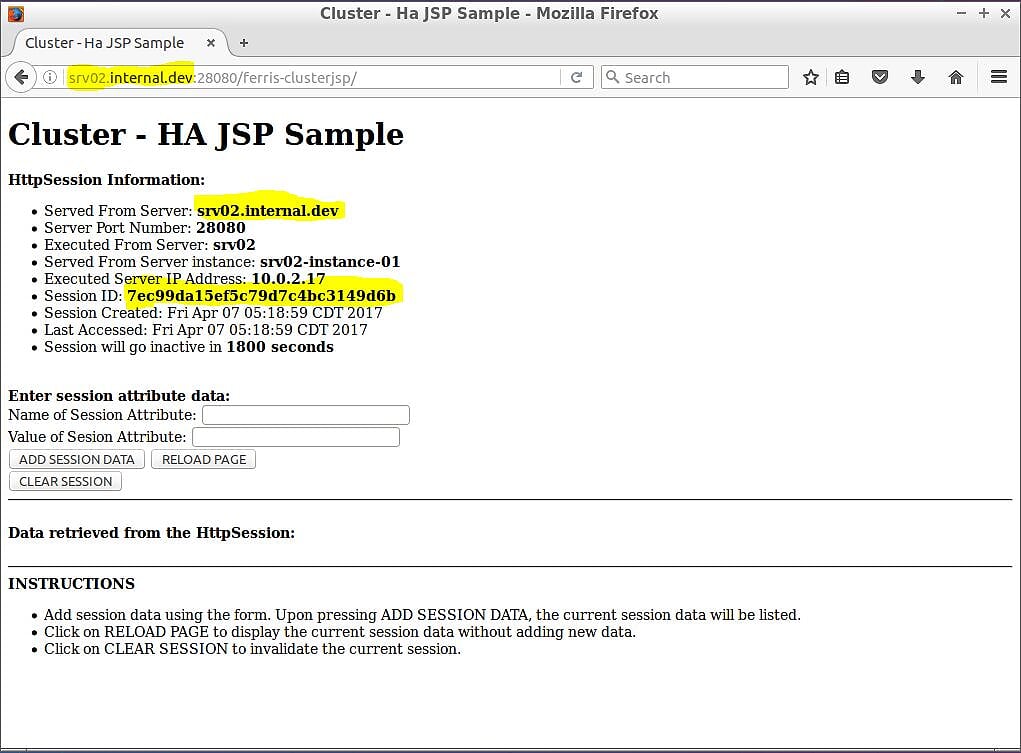

图4a突出显示了一些信息,您需要这些信息来确认会话复制正在工作。 首先,Web浏览器URL为http://srv02.internal.dev:28080/ferris-clusterjsp并且URL的主机名与页面上的“从服务器提供服务”信息匹配。 此外,页面还会显示为您创建的会话ID –在本例中为7ec99da15ef5c79d7c4bc3149d6b 。
现在,您在应用程序上有了一个会话,并且,如果一切正常,则应在整个集群中复制该会话。 要测试这一点,唯一要做的就是选择另一个集群节点实例,看看是否获得相同的会话。 选择srv03-instance–02进行下一步测试。 该群集节点实例不仅位于完全不同的物理计算机上,而且还将协议从HTTP切换到HTTPS。 打开Web浏览器并浏览至https://srv03.internal.dev:28182/ferris-clusterjsp 。 图4b显示了应该发生的情况。
图4b – srv03-instance-02上的ferris-custerjsp
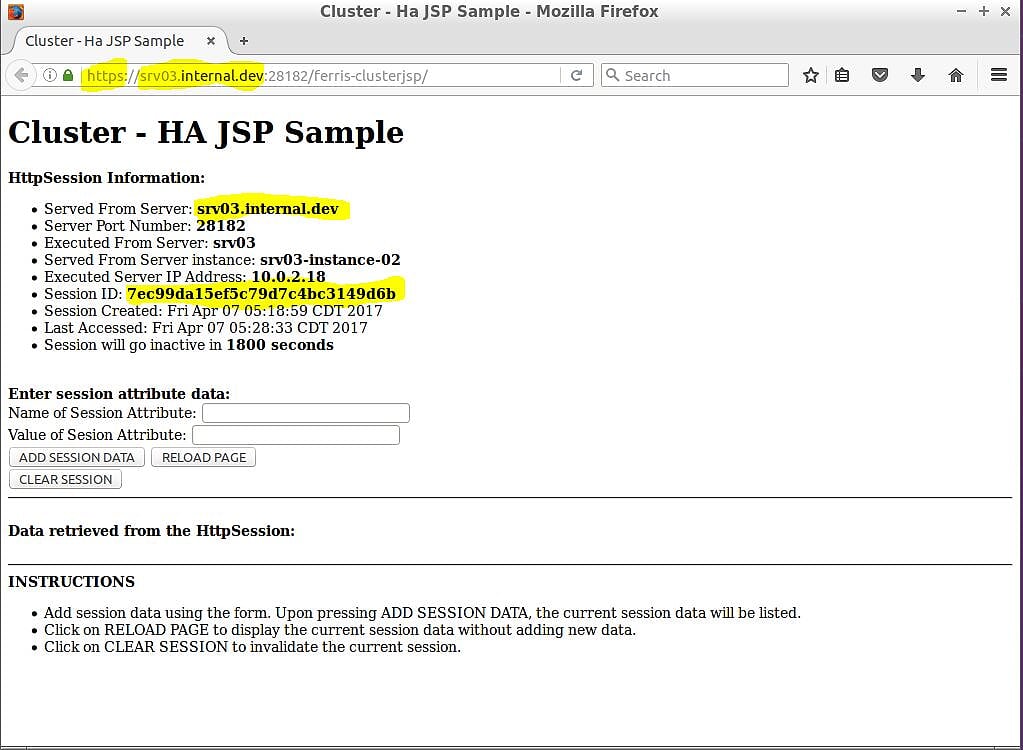

图4b显示了结果,它们看起来非常好! 突出显示,您可以看到从HTTP到HTTPS的切换(您的Web浏览器还应该强制您接受证书)。 Web浏览器URL为https://srv03.internal.dev:28182/ferris-clusterjsp的主机名与页面上的“从服务器提供服务”信息匹配。 但最重要的是,您获得了相同的会话ID –在本例中为7ec99da15ef5c79d7c4bc3149d6b 。
现在,您可以享受一些乐趣,并进行更多的复制测试。 使用该页面添加一些会话属性数据,并查看其是否在整个集群中复制。 您首先使用哪个群集节点实例都没有关系。 选一个。 然后转到页面的Enter session attribute data:部分,并添加会话数据,如图5所示。
图5 –添加会话属性数据
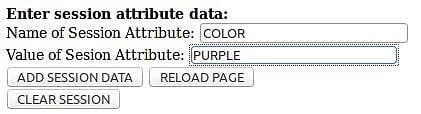

单击添加会话数据按钮。 图6显示页面将刷新,并且已添加会话属性数据。
图6 –添加的会话属性数据
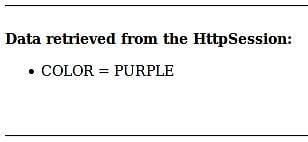

添加会话属性数据后,转到其他浏览器并刷新页面。 您会看到数据已被复制。 图7并排显示了具有相同的复制会话属性数据的Web浏览器。
图7 –浏览器并排使用相同的数据


恭喜你! 现在,您将拥有一个功能齐全的多VM会话复制群集。 但是仍然缺少一些东西:高可用性(HA)。 对于高可用性,您将需要一个负载均衡器。 因此,接下来要看的是负载均衡器配置。
负载均衡器配置
现在,您有一个很棒的多虚拟机,会话复制集群,但是它是无用的,因为它尚不可访问。 您具有访问每个单独的群集节点实例的链接,但是拥有1个实例的URL不会给您带来高可用性(HA)。 现在,您需要的是一个负载均衡器,它可以将请求发送到通用URL,例如http://srv.internal.dev然后将请求代理到集群中的任何活动实例。 And, thanks to successfully setting up session replication across the cluster, it doesn't matter which instance the load balancer proxies your request to because your session data will be the same across the cluster. For this post, you are going to use NGINX as the the load balancer. This section will look at:
- NGINX Installation
- NGINX Configuration
- NGINX Testing
NGINX Installation
Installing NGINX is simple. You should be able to use apt-get to do this. Execute the following command on srv01.internal.dev . Remember in the architecture diagram for the zone, srv01.internal.dev is the machine in the zone which will run the load balancer.
$ apt-get install nginx而已。 NGINX is now installed. To get it working with your cluster node instances you will need to do a little configuration, which is what you will do next.
NGINX Configuration
This NGINX configuration is very simple. There are 2 things you need to do. The first is you need to setup an upstream configuration that contains the host names and port numbers of all the cluster node instances. The second is to update the location to proxy requests to the upstream .
upsteam First, look at the upstream configuration. Assuming you installed NGINX on srv01.internal.dev , open the /etc/nginx/nginx.conf file for editing. Edit the file and add an upstream configuration as shown in the following example. The upstream configuration goes inside of the http configuration.
http {
  upstream cluster_c1 {
    server srv02.internal.dev:28080;
    server srv02.internal.dev:28081;
    server srv03.internal.dev:28080;
    server srv03.internal.dev:28081;
  }
}
Restart NGINX to pick up the changes.
$ /etc/init.d/nginx restart location Next, look at the location configuration. Assuming you installed NGINX on srv01.internal.dev , open the /etc/nginx/sites-available/default file for editing. Edit the file and update the location configuration to MATCH the following example. The location configuration goes inside of the server configuration.
server {
  listen  80;
  server_name  localhost;

  upstream cluster_c1 {
  location / {
    root  html;
    index index.html index.htm;
    proxy_connect_timeout   10;
    proxy_send_timeout  15;
    proxy_read_timeout  20;
    proxy_pass http://cluster_c1;
  }
}
Restart NGINX to pick up the changes.
$ /etc/init.d/nginx restartNGINX Testing
By default, NGINX is configured to listen on port 80. You saw this in the previous section when you did the location configuration. If both NGINX and the Payara are up and running, here's the easiest way to test.
- Open a web browser on
srv01.internal.dev. - Browse to
http://localhost
Because NGINX is configured as a proxy in front of Payara, the browser will show the Payara-is-now-running page as in Figure 8.
Figure 8 – Payara with localhost proxied through NGINX


而已。 NGINX is now configured and working. That means you have the High Availability (HA) piece of the architecture ready to test. You can do that next.
WAR High Availablity (HA) Testing
You're in the home stretch now. Here are all the pieces of the architecture so far:
- A Payara cluster able to support session replication.
- An application coded and configured to take advantage of session replication.
- A Payara cluster running multiple node instances.
- An NGINX load balancer configured to proxy requests to the cluster node instances.
Now it's time to see if all the pieces work together. For these final tests, you need to have a web browser capable of sending requests through the NGINX load balancer. Remember 2 very important things:
- The load balancer is running on
srv01.internal.devon port 80. - The URL you use must end with
.internal.dev.
The easiest way to do this is to edit your testing machine's hosts file and add a host to test the cluster. Assume the test hostname will be srv.internal.dev . Then add the following to your testing machine's hosts file:
$ cat /etc/hosts
127.0.0.1  localhost
10.0.2.16  srv01.internal.dev srv01
10.0.2.17  srv02.internal.dev srv02
10.0.2.18  srv03.internal.dev srv03
10.0.2.16  srv.internal.dev
The first test you should do is to repeat the simple NGINX test. Only this time use the hostname you just saved in the hosts file. Perform the test by doing the following:
- Open a web browser on the testing machine.
- Browse to
http://srv.internal.dev
Because NGINX is configured as a proxy in front of Payara, the browser will show the Payara-is-now-running page as in Figure 9. The difference this time is the URL uses the hostname saved in the hosts file.
Figure 9 – Payara with srv.internal.dev proxied through NGINX


Now here comes the final test to make sure everything is working. Open a web browse to the ferris-clusterjsp application and see what happens. Perform the test by doing the following:
- Open a web browser on the testing machine.
- Browse to
http://srv.internal.dev/ferris-clusterjsp.
If everything goes OK, you will see the HA JSP Sample page handled by one of the cluster node instances. Figure 10 shows that srv03-instance-01 handled the first request.
Figure 10 – Payara with ferris-clusterjsp proxied through NGINX


Now the exciting part. Keep testing! Keep reloading the page. As seen in Figure 11, you will see the Served From Server instance: and Executed Server IP Address: change as the NGINX load balancer proxies requests to different cluster node instances, but the Session ID will remain the same. 凉!
Figure 11 – Payara with ferris-clusterjsp proxied through NGINX
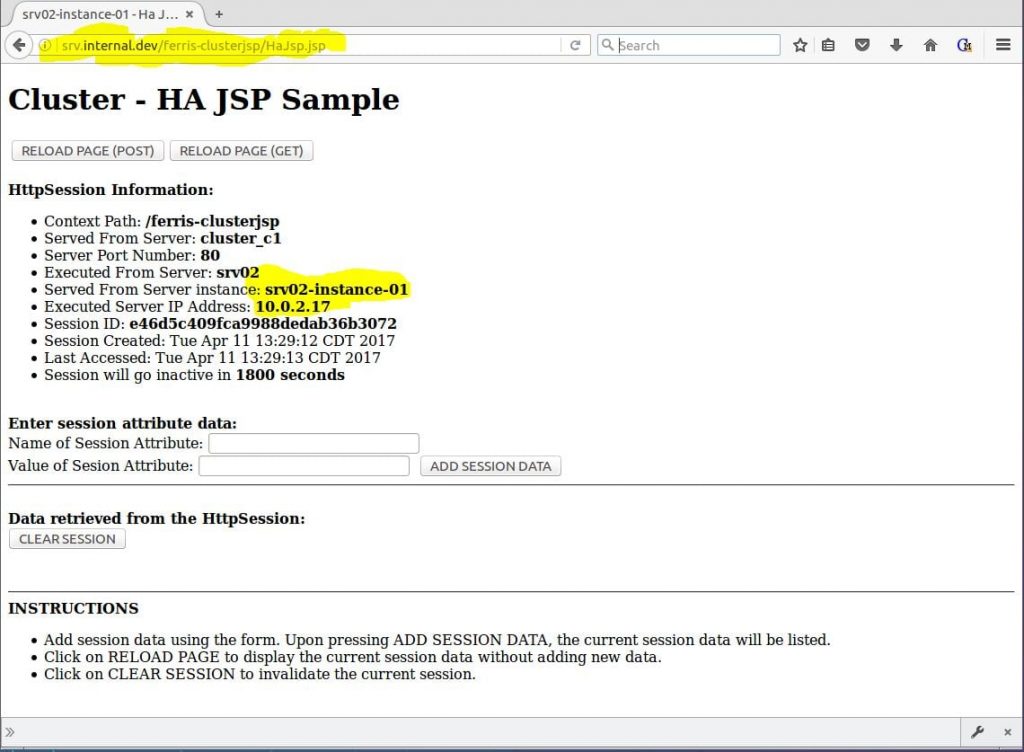 Figure 11 – Payara with ferris-clusterjsp proxied through NGINX

Now for an even more fun test. High Availability (HA) means if a cluster node instance goes down the application still keeps running and your users are not impacted. Try it! Shut down one of the cluster node instances and see what happens. Execute the following command on srv01.internal.dev :
bash $ asadmin stop-instance srv03-instance-01
This will stop the 1 instance of the cluster. Now go back to your browser and start reloading the page. While you are reloading, watch the Served From Server instance: value. Because srv03-instance-01 is now shut down, you'll notice this instance will be skipped as the load balancer round-robins through the cluster instances. One instance of your cluster is stopped, but your application is still working fine. If you want to start the instance again, Execute the following command on srv01.internal.dev :
$ asadmin start-instance srv03-instance-01 This will restart the instance. Now go back to your browser and start reloading the page again. While you are reloading, watch the Served From Server instance: value. You'll eventually notice srv03-instance-01 will come back! :)
概要
My goal for this post was to consolidate in one place the instructions to create a high availability (HA), session replicated, multi-machined Payara/GlassFish cluster. Hopefully I accomplished that goal by giving instructions for the following:
- Creating a multi-machine architecture for a cluster
- Installing Payara
- Configuring the DAS for cluster communication
- Creating the cluster
- Creating the cluster nodes
- Creating the cluster node instances
- Configuring a WAR to use session-replication
- Configuring NGINX for load balancing & proxying.
- Testing everything at every step of the way to make sure it's all working.
I hope you have found this post useful. And also please note the title of this post says “(almost)” for a good reason: this is not the only way to create a high availability (HA), session replicated, multi-machined Payara/GlassFish cluster. But it is A way.
参考文献
Java Servlet 3.1 Specification (2013, May 28). Java Servlet 3.1 Specification for Evaluation [PDF]. Retrieved from http://download.oracle.com/otndocs/jcp/servlet-3_1-fr-eval-spec/index.html
Hafner, S. (2011, May 12). Glassfish 3.1 – Clustering Tutorial Part2 (sessions) [Web log post]. Retrieved from https://javadude.wordpress.com/2011/05/12/glassfish-3-1-%E2%80%93-clustering-tutorial-part2-sessions/ .
Hafner, S. (2011, April 25). Glassfish 3.1 – Clustering Tutorial [Web log post]. Retrieved from https://javadude.wordpress.com/2011/04/25/glassfish-3-1-clustering-tutorial/
Mason, R. (2013, September 03). Load Balancing Apache Tomcat with Nginx [Web log post]. Retrieved from https://dzone.com/articles/load-balancing-apache-tomcat
Fasoli, U. (2013, August 17). Glassfish Cluster SSH – Tutorial : How to create and configure a glassfish cluster with SSH (Part 2) [Web log post]. Retrieved from http://ufasoli.blogspot.com/2013/08/
Fasoli, U. (2013, July 17). Glassfish asadmin without password [Web log post]. Retrieved from http://ufasoli.blogspot.fr/2013/07/glassfish-asadmin-without-password.html
Oracle GlassFish Server 3.1 Section 1: asadmin Utility Subcommands. (nd)。 Retrieved from https://docs.oracle.com/cd/E18930_01/html/821-2433/gentextid-110.html#scrolltoc
Camarero, RM (2012, January 21). clusterjsp.war [WAR]. Retrieved from http://blogs.nologin.es/rickyepoderi/uploads/SimplebutFullGlassfishHAUsingDebian/clusterjsp.war
Croft, M. (2016, June 30). Creating a Simple Cluster with Payara Server [Web log post]. Retrieved from http://blog.payara.fish/creating-a-simple-cluster-with-payara-server
Administering GlassFish Server Clusters. (nd) Retrieved from https://docs.oracle.com/cd/E26576_01/doc.312/e24934/clusters.htm#GSHAG00005
Administering GlassFish Server Nodes. (nd)。 Retrieved from https://docs.oracle.com/cd/E26576_01/doc.312/e24934/nodes.htm#GSHAG00004
Administering GlassFish Server Instances. (nd)。 Retrieved from https://docs.oracle.com/cd/E26576_01/doc.312/e24934/instances.htm#GSHAG00006
payara.micro


 1740
1740


 被折叠的 条评论
为什么被折叠?
被折叠的 条评论
为什么被折叠?
 到【灌水乐园】发言


