openmap_OpenMap教程4 –图层

openmap

openmap

1.简介

在第一个教程中,我们创建了一个基本的OpenMap GIS应用程序,该应用程序在JFrame内显示从文件系统加载的具有一个形状图层的地图。 该教程基于com.bbn.openmap.app.example.SimpleMap 。 在第二个教程中,我们扩展了基本应用程序以使用MapHandler ,在第三个教程中,我们看到了它如何利用openmap.properties将所有内容连接在一起。 在本教程中,我们将讨论地图图层。

2.地图图层概述

教程1中,我们看到了如何将ShapeLayer添加到MapBean 。 OpenMap支持大量的图层类型,可以将它们添加到MapBean中,如图1所示。

BufferedLayerMapBean是使用BufferedLayer (请参见图1 )为某些图层创建图像的MapBean 。 它使用“ Layer背景标志来确定应将哪些图层添加到此缓冲的图像。 任何不响应MouseEvent的层都应指定为背景层,以减少其paint()方法对应用程序的处理负担。

OMGraphicHandlerLayer是基础层类,实现了需要交互和共享OMGraphic的层的最常见功能。 GraticuleLayer在内部创建其OMGraphic ,而ShapeLayer从文件读取数据。 DTEDLayerRpfLayer具有图像缓存。 有一些特殊的层允许您访问空间数据库以创建OMGraphic 。 可以在层内使用任何管理图形的技术。

作为基类, OMGraphicHandlerLayer具有内置功能,可以更轻松地管理OMGraphic中的OMGraphic 。 扩展OMGraphicHandlerLayer ,请实现prepare()方法以返回OMGraphicList其中包含适用于当前在图层中设置的投影的OMGraphic 。 收集,准备和生成OMGraphic的所有工作都应在prepare()方法中执行。 OMGraphicHandlerLayer还具有内置的SwingWorker对象,可用于在单独的线程中调用prepare() 。 可以通过调用doPrepare()方法来启动SwingWorker线程。 如果在调用doPrepare()方法时SwingWorker已经很忙,则在原始线程完成后,将启动一个新线程来调用prepare() 。 在prepare()方法的默认实现中,当前列表只是使用当前投影生成并返回。
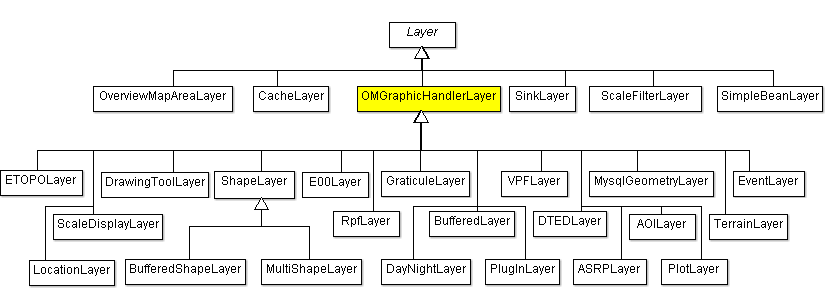
图1:OpenMap的图层类层次结构

图1:OpenMap的图层类层次结构

请参阅开发者指南,以获取有关如何使用这些层的更多信息。

OpenMap还提供了一些培训层( com.bbn.openmap.layer.learn ):

  • 基本层
  • 互动层
  • SimpleAnimationLayer
  • 投影响应层

以及测试图层( com.bbn.openmap.layer.test ):

  • BoundsTestLayer
  • GeoCrossDemoLayer
  • GeoIntersectionLayer
  • GeoTestLayer
  • HelloWorldLayer
  • 测试层

最后, com.bbn.openmap.layer.DemoLayer是一个图层如何使用OMDrawingTool编辑OMGraphic 。 它使用绘图工具在地图上创建区域,这些区域也用作过滤器,以控制哪些OMGraphic也是可见的。

图层派生自java.awt.Component ,它们是可以添加到MapBean的唯一组件。 因为Layer s为Component小号包含一个内MapBean容器,的呈现Layer小号到地图上由Java组件呈现机制控制。 该机制控制分层组件如何在彼此之上绘制。 为了确保按照正确的顺序将每个组件绘制到窗口中, Component类包括一个方法,该方法允许其告知渲染机制它想被绘制。 此功能允许Layers彼此独立工作,并让MapBean避免知道Layer上正在发生什么。

OpenMap应用程序中的图层可以使用来自许多来源的数据:

  • 通过计算
  • 从本地硬盘驱动器的数据文件
  • 来自URL的数据文件
  • 从jar文件中包含的数据文件
  • 使用从数据库(JDBC)检索的信息
  • 使用从地图服务器接收的信息(图像或地图对象)

2.1创建图层

让我们从最简单的层开始。 从教程1开始,我们已经看到了如何创建ShapeLayer并将其添加到MapBean 。 但是,自从教程3开始,我们就具备了openmap.propertiesMapHandler 。 这是您需要做的更改。

清单1 – openmap.properties

...
# These layers are turned on when the map is first started.  Order
# does not matter here...
openmap.startUpLayers=basic graticule shapePolitical
# Layers listed here appear on the Map in the order of their names.
openmap.layers=basic graticule shapePolitical

# Basic Layer
basic.class=com.bbn.openmap.layer.learn.BasicLayer
basic.prettyName=Basic
...

简短提醒openmap.layersopenmap.layers引用要加载的图层, openmap.startUpLayers引用在启动时需要加载的图层。 您会注意到已经添加了basic层。

结果可以在图2中看到。从BasicLayer的JavaDoc中我们了解到,它扩展了OMGraphicHandlerLayer ,它包含很多功能,但是仅公开了在地图上开始添加特征( OMGraphic )所需的方法。 这是一个对象永不更改的层,该层使用的地图对象也永不更改。 即使它们不在可见的地图上,也始终可以对其进行管理和绘制。 当投影改变时, OMGraphic被告知新的投影是什么,以便它们可以重新定位自己,然后重新绘制它们。 如果您想了解更多有关有效与OMGraphic交互的信息,请OMGraphic InteractionLayer

层实现ProjectionListener接口以侦听ProjectionEvent 。 当投影改变时,他们可能需要重新获取,重新生成其图形,然后将自己重新绘制为新视图。 我们将在以后的教程中谈论有关投影的更多内容。

BasicLayer将覆盖从两种方法OMGraphicHandlerLayer

  • prepare() :当将图层添加到地图或地图投影更改时,将调用此方法。 我们需要确保从此方法返回的OMGraphicList是我们要绘制在地图上的内容。 OMGraphic需要使用当前投影生成。 我们在图层中测试OMGraphicList是否为空,以查看是否需要创建OMGraphic 。 该图层不会针对不同的投影更改其OMGraphic ,如果您的图层做了更改,则需要清除OMGraphicList并添加当前投影所需的OMGraphics
  • init() :如果层发现其OMGraphicListnullOMGraphicList prepare()方法调用。
图2:基本层

图2:基本层

清单2 – prepare()方法

public synchronized OMGraphicList prepare() {
      OMGraphicList list = getList();
      if (list == null) {
         list = init();
      }
      list.generate(getProjection());
      return list;
   }

getList()返回上次调用prepare()时从此方法返回的内容。 在此示例中,我们始终返回OMGraphicList对象,因此,如果它为null ,则必须尚未调用prepare() 。 在这种情况下,将调用init()

返回地图对象列表之前,设置图层投影的调用至关重要! 需要告诉OMGraphic自己在哪里绘画,它们会在generate(Projection)调用中为他们提供当前的Projection 。 如果OMGraphic的位置发生了变化,则在呈现它之前需要重新生成它,否则它不会自己绘制。 当OMGraphic的投影更改(缩放和平移)出现但在OMGraphic更改后的任何其他时间都没有出现时,您可能会产生问题。 如果您想提高效率,可以将对列表的调用替换为上面(list == null)检查的else子句,并在下面的init()方法中对所有OMGraphics调用generate(Projection)创建它们。 这将防止OMGraphicList.generate(Projection)调用在返回所有OMGraphic之前对其进行OMGraphic

清单3 – init()方法

public OMGraphicList init() {
      OMGraphicList omList = new OMGraphicList();

      // Add an OMLine
      OMLine line = new OMLine(40f, -145f, 42f, -70f, OMGraphic.LINETYPE_GREATCIRCLE);
      // line.addArrowHead(true);
      line.setStroke(new BasicStroke(2));
      line.setLinePaint(Color.red);
      line.putAttribute(OMGraphicConstants.LABEL, new OMTextLabeler("Line Label"));

      omList.add(line);

      // Add a list of OMPoints.
      OMGraphicList pointList = new OMGraphicList();
      for (int i = 0; i < 100; i++) {
         OMPoint point = new OMPoint((float) (Math.random() * 89f), (float) (Math.random() * -179f), 3);
         point.setFillPaint(Color.yellow);
         point.setOval(true);
         pointList.add(point);
      }
      omList.add(pointList);
      return omList;   
  }

prepare()返回null时,将调用init()方法。 它创建要添加到图层的OMGraphic ( OMGraphic )。

作为一个简短的教程,一个典型的GIS应用由图(的MapBean在OpenMap),其由层(的Layer即由特征(对象) OMGraphic S)。 下图显示了OMGraphic的类层次结构。

图3:OMGraphics类层次结构

图3:OMGraphics类层次结构

清单3的代码创建了一个OMLine和100个OMPointOMGraphic是栅格和矢量图形对象,它们知道如何在给定的xy窗口或经纬度地图投影上定位和渲染自己。 您所要做的就是提供位置数据(x / y,纬度/经度)和工程图信息(颜色,线宽),其余部分由图形处理。

这应该是一个简单而良好的开始(在下面的教程中,我们将看到例如如何显示数据库中的数据),但是您可能已经注意到,没有交互性。 交互性由InteractionLayer演示。 您现在应该可以在openmap.properties中用InteractionLayer替换Basic层。

InteractionLayer演示如何与地图上的OMGraphic进行交互,使它们通过鼠标事件来更改外观并提供有关其自身的其他信息。 该层基于BasicLayer演示的BasicLayer

图4:交互层

图4:交互层

如果运行该应用程序,您会注意到将鼠标移到OMPoint上时,它会改变颜色。 您也可以右键单击它以显示弹出菜单。 我们将使用此功能来显示功能的属性。 您可以自己查看com.bbn.openmap.layer.learn.InteractionLayer 。 我只是在这里简单介绍了一些有关如何向OMGraphicHandlerLayer添加交互的OMGraphicHandlerLayer 。 不要忘记在构造函数中添加以下行:

清单4 – setMouseModeIDsForEvents()

// Making the setting so this layer receives events from the
// SelectMouseMode, which has a modeID of "Gestures". Other
// IDs can be added as needed. You need to tell the layer which
// MouseMode it should listen to, so it can tell the MouseModes to send
// events to it.
// Instead of "Gestures", you can also use SelectMouseMode.modeID or 
// OMMouseMode.modeID
setMouseModeIDsForEvents(new String[] { SelectMouseMode.modeID });  // "Gestures"

这实际上告诉您的图层,其功能应响应鼠标手势(例如,鼠标悬停)。 MouseEvent可以由某些OpenMap组件管理,将它们定向到图层和OMGraphicMouseMode描述如何解释和使用MouseEventMouseMotionEvent 。 该MouseDelegator是真正MouseListenerMouseMotionListenerMapBeanMouseDelegator管理MouseMode的列表,并知道在任何给定时间哪个是“活动的”。 MouseDelegator还向活动图层询问其MapMouseListener ,并将对活动MouseMode中的事件感兴趣的图层作为侦听器添加到该模式。

从MapBean触发MouseEvent时,它将通过MouseDelegator进入活动的MouseMode ,在此MouseMode开始向其MapMouseListener提供MouseEvent 。 每个侦听器都有机会使用该事件。 MapMouseListener可以自由地对事件进行操作而不使用事件,因此它可以继续传递给其他侦听器。

MapMouseListener提供了一个它希望从中接收事件的所有MouseMode ID字符串的String数组,并且还具有MouseEventMouseMotionEvent到达的自己的方法MapMouseListener可以将这些事件与OMGraphicList结合使用来查找如果事件发生在任何OMGraphic ,请发出OMGraphic ,并在必要时进行响应。

您的图层可以与许多MouseModes进行交互。 在源代码中或此处搜索modeID返回以下8种鼠标模式(重复两次):

  • DistanceMouseMode.modeID = "Distance"
  • DistQuickToolMouseMode.modeID = "Distance"
  • NavMouseMode.modeID = "Navigation"
  • NullMouseMode.modeID = "None"
  • OMDrawingToolMouseMode.modeID = "Drawing"
  • OMMouseMode.modeID = "Gestures"
  • PanMouseMode.modeID = "Pan"
  • RangeRighsMouseMode.modeID = "RangeRings"
  • SelectMouseMode.modeID = "Gestures"
  • ZoomMouseMode.modeID = "Zoom"

创建功能时,请不要忘记在功能上添加如下所示的内容,以便在鼠标悬停在功能上时进行视觉显示: point.setSelectPaint(Color.yellow);

您可以覆盖以下方法:

  • isSelectable() –查询OMGraphic是否可选。 您必须返回true以使其可选。
  • isHighlightable() –查询当鼠标移到OMGraphic上时可以突出显示它。
  • getInfoText() –当鼠标悬停在OMGraphic时在状态栏中显示文本
  • getToolTipTextFor() –当鼠标悬停在OMGraphic时显示工具提示

例如

清单5 –交互方法

/**
     * Query that an OMGraphic can be highlighted when the mouse moves over it.
     * If the answer is true, then highlight with this OMGraphics will be
     * called, and unhighlight will be called with the mouse is moved off of it.
     * 
     * @see com.bbn.openmap.layer.OMGraphicHandlerLayer#highlight
     * @see com.bbn.openmap.layer.OMGraphicHandlerLayer#unhighlight
     */
    public boolean isHighlightable(OMGraphic omg) {
        return true;
    }

    /**
     * Query that an OMGraphic is selectable. Examples of handing selection are
     * in the EditingLayer. The default OMGraphicHandlerLayer behavior is to add
     * the OMGraphic to an OMGraphicList called selectedList. If you aren't
     * going to be doing anything in particular with the selection, then return
     * false here to reduce the workload of the layer.
     * 
     * @see com.bbn.openmap.layer.OMGraphicHandlerLayer#select
     * @see com.bbn.openmap.layer.OMGraphicHandlerLayer#deselect
     */
    public boolean isSelectable(OMGraphic omg) {
        return true;
    }

如果要在右键单击OMGraphic时显示弹出菜单,请重写以下方法以返回菜单项列表。 在以后的教程中,我们将使用此方法显示数据库中要素的属性。

  • List getItemsForOMGraphicMenu(OMGraphic omg)

如果要在右键单击图层上的任何位置时显示弹出菜单,请重写以下方法以返回菜单项列表:

  • List getItemsForMapMenu(MapMouseEvent me)

我希望这很好,并不困难,但是您不能随意移动功能。 例如,我希望能够选择OMPoint并将其拖动到新位置。 为了能够添加此功能,我们需要研究上面列表中未列出的一些层:

  • com.bbn.openmap.layer.DemoLayer
  • com.bbn.openmap.layer.DrawingToolLayer
  • com.bbn.openmap.layer.editor.EditorLayer

尝试其中的每一个。 在上教程中,我们实际上已经看到了DemoLayer ,但是我们没有研究代码。 因此,为了能够拖动/修改功能,您需要:

  • 实现DrawingToolRequestor接口
  • findAndInit()定义并初始化DrawingTool的实例
  • 相应地修改isSelectable()getInfoText()getToolTipTextFor()
  • 覆盖select()drawingComplete()方法,如清单4所示。

清单6 –如何在地图上绘制

public class DemoLayer extends OMGraphicHandlerLayer implements DrawingToolRequestor {

   protected DrawingTool drawingTool;    

...

   public DrawingTool getDrawingTool() {
      // Usually set in the findAndInit() method.
      return drawingTool;
   }

   public void setDrawingTool(DrawingTool dt) {
      // Called by the findAndInit method.
      drawingTool = dt;
   }

   @Override 
   public void findAndInit(Object someObj) {
      if (someObj instanceof DrawingTool) {
         setDrawingTool((DrawingTool) someObj);
      }
   }

   @Override
   public void findAndUndo(Object someObj) {
      if (someObj instanceof DrawingTool) {
         if (getDrawingTool() == (DrawingTool) someObj) {
            setDrawingTool(null);
         }
      }
   }

   @Override
   public boolean isSelectable(OMGraphic omg) {
      DrawingTool dt = getDrawingTool();
      return (dt != null && dt.canEdit(omg.getClass()));
   }

   @Override
   public String getInfoText(OMGraphic omg) {
      DrawingTool dt = getDrawingTool();
      return (dt != null && dt.canEdit(omg.getClass())) ? "Click to edit graphic." : null;
   }

   @Override
   public String getToolTipTextFor(OMGraphic omg) {
      Object tt = omg.getAttribute(OMGraphic.TOOLTIP);
      if (tt instanceof String) {
         return (String) tt;
      }

      String classname = omg.getClass().getName();
      int lio = classname.lastIndexOf('.');
      if (lio != -1) {
         classname = classname.substring(lio + 1);
      }

      return "Your Layer Object: " + classname;
   }

   @Override
   public void select(OMGraphicList list) {
      if (list != null && !list.isEmpty()) {
         OMGraphic omg = list.getOMGraphicAt(0);
         DrawingTool dt = getDrawingTool();

         if (dt != null && dt.canEdit(omg.getClass())) {
            dt.setBehaviorMask(OMDrawingTool.QUICK_CHANGE_BEHAVIOR_MASK);
            if (dt.edit(omg, this) == null) {
               // Shouldn't see this because we checked, but ...
               fireRequestInfoLine("Can't figure out how to modify this object.");
            }
         }
      }
   }

   @Override
   public void drawingComplete(OMGraphic omg, OMAction action) {
      if (!doAction(omg, action)) {
         // null OMGraphicList on failure, should only occur if
         // OMGraphic is added to layer before it's ever been
         // on the map.
         setList(new OMGraphicList());
         doAction(omg, action);
      }
      repaint();
   }

...
}

现在,当您运行该应用程序时,便可以选择一个特征并将其拖动到新位置,或修改其几何形状(用于直线,圆等)。

单击“ Drawing Tool Launcher按钮时,您可以在图层上添加许多类型的图形,而这可能不是您想要的。 例如,您可能希望您的图层仅显示OMPoint并且您不希望用户能够使用“ Drawing Tool向其添加例如线或圆。 如果您修改openmap.components以仅omdrawingtoolompointloader (或仅保留应用程序中使用的OM加载程序的类型),则可以轻松完成此操作:

清单7 –不显示绘图工具(omdt)的openmap.components

openmap.components=menulist informationDelegator projFactory projectionstack toolBar zoompanel navpanel scalepanel projectionstacktool addlayer layersPanel overviewMapHandler layerHandler mouseDelegator projkeys coordFormatterHandler mouseModePanel mouseMode selectMouseMode navMouseMode distanceMouseMode panMouseMode omdrawingtool ompointloader

另一个问题是,当右键单击OMPoint ,将显示与通过getItemsForOMGraphicMenu()创建的弹出菜单不同的弹出菜单。

罪魁祸首是OMDrawingTool 。 由于OpenMap是一个开源项目,因此建议您阅读上述类的代码( com.bbn.openmap.tools.drawing.OMDrawingTool )。 实际上,在方法select()您将看到以下行:

dt.setBehaviorMask(OMDrawingTool.QUICK_CHANGE_BEHAVIOR_MASK);

OMDrawingTool定义了许多行为掩码:

  • SHOW_GUI_BEHAVIOR_MASK
  • GUI_VIA_POPUP_BEHAVIOR_MASK
  • USE_POPUP_BEHAVIOR_MASK
  • ALT_POPUP_BEHAVIOR_MASK
  • PASSIVE_MOUSE_EVENT_BEHAVIOR_MASK
  • DEACTIVATE_ASAP_BEHAVIOR_MASK
  • DEFAULT_BEHAVIOR_MASK
  • QUICK_CHANGE_BEHAVIOR_MASK

您可以尝试所有这些方法以查看图层的行为。 不幸的是,它们都不能满足我们的需求。 如果没有弹出窗口(或我们的弹出窗口)出现,则该功能无法拖动到其他位置; 如果出现弹出窗口, OMDrawingTool 。 所以,去黑客。 我们将创建自己的OMDrawingTool

清单8 – MyDrawingTool类

public class MyDrawingTool extends OMDrawingTool {

    public MyDrawingTool() {
        super();
        setBehaviorMask(OMDrawingTool.QUICK_CHANGE_BEHAVIOR_MASK);
    }
    
    @Override
    public JPopupMenu createPopupMenu() {
        JPopupMenu popup =  super.createPopupMenu(); 
        popup.removeAll();
        popup.add(new JMenuItem("Which"));
        popup.add(new JMenuItem("Why"));
        return popup;
    }
}

您甚至可以进一步添加set方法来设置由getItemsForOMGraphicMenu()方法创建的JMenuItem列表,但是我将其作为练习留给您。 我们需要再做一件事:

清单9 –显示我们的绘图工具的openmap.properties

omdrawingtool.class=openmap.MyDrawingTool
#omdrawingtool.class=com.bbn.openmap.tools.drawing.OMDrawingTool

通过此更改,您可以删除在图层的select()方法中设置行为掩码的行。

OpenMap图层也支持动画。 用openmap.properties SimpleAnimationLayer替换上一层。 当您再次重新运行该应用程序时,您会看到一个空的地图。 单击图层按钮,然后选择AnimationLayer的属性(请参见图5 )。 在出现的对话框中,通过单击相应的按钮来添加精灵,一旦满意,请选中“运行计时器”复选框以查看它们的移动。 您可以调整“计时器间隔”滑块以查看它们移动得更快或更慢。

图5:动画层

图5:动画层

前面所有提到的层都扩展了OMGraphicHandlerLayer 。 但是,您可以没有它。 例如,看一下HelloWorldLayer ,它直接覆盖Layer 。 它的createGraphics()方法创建功能并将其添加到传递的OMGraphicList

鼓励您检查本文开头提到的其他层,例如TestLayerGeoTestLayer等。

要在“层”对话框中启用“属性”按钮并能够显示某些内容,您需要重写getGUI()方法。 参见例如TestLayerSimpleAnimationLayer

3.结论

本教程专门介绍OpenMap的图层。 我们从简单的BasicLayer (显示静态数据)开始,然后添加了与InteractionLayer ,演示了如何使用鼠标将要素移动到新的地图位置或修改要素的几何,并继续使用AnimationLayer演示了如何为图层的要素设置动画。 我们没有涵盖所有内容。 即使看到了如何添加和操作功能,我们也没有谈论投影。 在下一个教程中,我们将构建第一个3层应用程序,在该应用程序中,我们将看到如何在地图上显示数据库中的数据。

翻译自: https://www.javacodegeeks.com/2016/01/openmap-tutorial-4-layers.html

openmap

  • 1
    点赞
  • 0
    收藏
    觉得还不错? 一键收藏
  • 0
    评论
As an AI language model, I don't have access to your local machine or the specific context of your question. However, I can provide you with general information about the Java OpenMap PbfWriter. The Java OpenMap PbfWriter is a library that provides a way to convert OpenStreetMap data from XML or PBF format to a binary format that can be used for faster processing and storage. The PbfWriter class is used to write data to a PBF file in version 0.6 format. To use the PbfWriter class, you would typically create an instance of the class and provide it with the output file name and other options such as compression and tile size. You would then use the various write methods of the PbfWriter to write the OpenStreetMap data to the PBF file. Here is an example code snippet that demonstrates how to use the PbfWriter class: ``` import java.io.File; import java.io.FileOutputStream; import java.io.IOException; import org.openstreetmap.osmosis.core.Osmosis; import org.openstreetmap.osmosis.core.domain.v0_6.Bound; import org.openstreetmap.osmosis.core.domain.v0_6.EntityContainer; import org.openstreetmap.osmosis.core.domain.v0_6.Node; import org.openstreetmap.osmosis.core.domain.v0_6.Way; import org.openstreetmap.osmosis.core.task.v0_6.Sink; import org.openstreetmap.osmosis.pbf2.v0_6.PbfWriter; public class Example { public static void main(String[] args) throws IOException { File outputFile = new File("output.pbf"); PbfWriter writer = new PbfWriter(new FileOutputStream(outputFile)); writer.setNodes(true); writer.setWays(true); writer.setDense(true); Sink sink = writer; sink.initialize(); sink.process(new Bound(0, 0, 0, 0, null)); // Process OpenStreetMap data Osmosis.run(args); sink.complete(); sink.release(); } } ``` This code creates a PbfWriter instance and sets the options to include nodes, ways, and dense format. It then creates a Sink instance from the PbfWriter and processes a Bound entity to initialize the sink. The code then uses Osmosis to process the OpenStreetMap data and pass it to the sink for writing to the PBF file. Finally, the sink is completed and released. Note that this is just an example and you would need to modify it to suit your specific use case. Additionally, you would need to include the appropriate dependencies for the OpenMap and Osmosis libraries.

“相关推荐”对你有帮助么?

  • 非常没帮助
  • 没帮助
  • 一般
  • 有帮助
  • 非常有帮助
提交
评论
添加红包

请填写红包祝福语或标题

红包个数最小为10个

红包金额最低5元

当前余额3.43前往充值 >
需支付:10.00
成就一亿技术人!
领取后你会自动成为博主和红包主的粉丝 规则
hope_wisdom
发出的红包
实付
使用余额支付
点击重新获取
扫码支付
钱包余额 0

抵扣说明:

1.余额是钱包充值的虚拟货币,按照1:1的比例进行支付金额的抵扣。
2.余额无法直接购买下载,可以购买VIP、付费专栏及课程。

余额充值