


这是“ Redux入门”系列的第三部分,在本教程中,我们将学习如何将Redux存储与React连接。 Redux是一个独立的库,可与所有流行的前端库和框架一起使用。 而且由于其功能性方法,它可以与React完美配合。
您无需遵循本系列的前几部分,即可使本教程有意义。 如果您想了解如何将React与Redux结合使用,可以使用下面的快速回顾,然后从上一部分中检出代码并从那里开始。
快速回顾
在第一篇文章中 ,我们了解了Redux工作流程并回答了“ 为什么要使用Redux?”这一问题。 我们创建了一个非常基本的演示应用程序,并向您展示了Redux的各个组件(动作,reduce和商店)是如何连接的。
在上一篇文章中 ,我们开始构建联系人列表应用程序,该应用程序使您可以添加联系人,然后将其显示为列表。 我们为联系人列表创建了一个Redux存储,并添加了一些reducer和action。 我们尝试使用store.dispatch()和store.getState()类的存储方法调度动作并检索新状态。
到本文结尾,您将学到:
- 容器组件和表示组件之间的区别
- 关于react-redux库
- 如何使用
connect()绑定React和Redux - 如何使用
mapDispatchToProps调度动作
- 如何使用
mapStateToProps检索状态
该教程的代码可在GitHub的react-redux-demo存储库中找到。 从v2分支中获取代码,并将其用作本教程的起点。 如果您想在本教程结束时知道应用程序的外观,请尝试使用v3分支。 让我们开始吧。
设计组件层次结构:智能与哑组件
这是您之前可能已经听说过的概念,但让我们快速了解一下智能组件和哑组件之间的区别。 回想一下,我们为组件创建了两个单独的目录,一个目录名为container / ,另一个名为component / 。 这种方法的好处是行为逻辑与视图分离。
表示组件很笨,因为它们关心事物的外观。 它们与应用程序的业务逻辑分离,仅通过props从父组件接收数据和回调。 他们不在乎您的应用程序是否连接到Redux存储,如果数据来自父组件的本地状态。
另一方面,容器组件处理行为部分,并且应包含非常有限的DOM标记和样式。 它们将需要呈现的数据作为道具传递给哑组件。
继续,让我们看看我们将如何组织我们的组件。
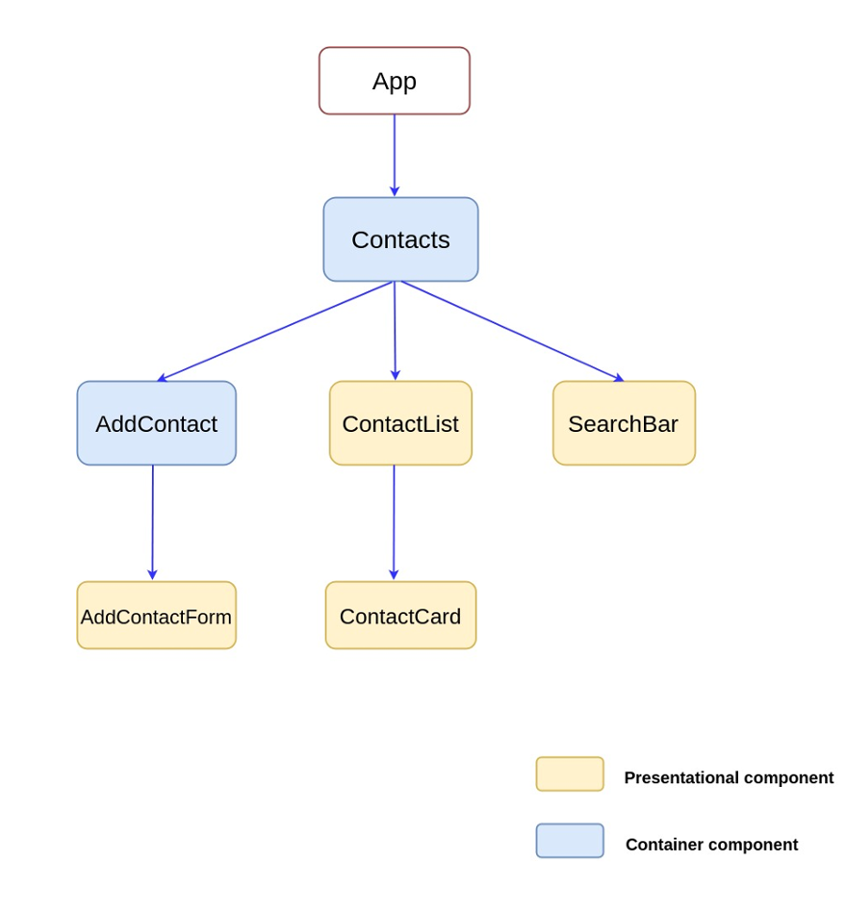
表现成分
以下是我们将在本教程中使用的演示性组件。
组件/AddContactForm.jsx
import React from 'react';

const AddContactForm = ({onInputChange, onFormSubmit}) =>
    (
		<form>
			<div className="form-group">
			    <label htmlFor="emailAddress">Email address</label>
			    <input type="email" class="form-control" name="email" onChange={onInputChange} placeholder="name@example.com" />
			</div>

		{/* Some code omitted for brevity */}

			<div className="form-group">
			    <label htmlFor="physicalAddress">Address</label>
			    <textarea className="form-control" name="address" onChange={onInputChange} rows="3"></textarea>
			</div>

			<button type="submit" onClick={onFormSubmit} class="btn btn-primary"> Submit </button>
		</form>
	)

export default AddContactForm;
这是用于添加新联系人HTML表单。 该组件接收onInputChange和onFormSubmit回调作为道具。 当输入值更改时,将触发onInputChange事件, onFormSubmit在提交表单时将触发onFormSubmit 。
组件/ContactList.jsx
const ContactList = (props) => {
    return(	<ul className="list-group" id="contact-list">
           		{props.contactList.map(
                  (contact) =>
                  <li key={contact.email} className="list-group-item">
                    <ContactCard contact = {contact}/>
                  </li>
              	)}
            </ul>)
}

export default ContactList; 该组件接收一系列的接触对象作为道具,因此命名为ContactList 。 我们使用Array.map()方法提取单个联系人详细信息,然后将该数据传递给<ContactCard /> 。
组件/ContactCard.jsx
const ContactCard = ({contact}) => {

	return(
        <div>
	        <div className="col-xs-4 col-sm-3">
	           {contact.photo !== undefined ?  <img src={contact.photo} alt={contact.name} className="img-fluid rounded-circle" /> :
	            						 <img src="img/profile_img.png" alt ={contact.name} className="img-fluid rounded-circle" />}
	        </div>
	        <div className="col-xs-8 col-sm-9">
	            <span className="name">{contact.name + ' ' + contact.surname}</span><br/>

	            {/* Some code omitted for brevity */}

	        </div>
	      </div>

    )
}

export default ContactCard;
该组件接收联系人对象,并显示联系人的姓名和图像。 对于实际应用,将JavaScript图像托管在云中可能是有意义的 。
容器组件
我们还将构造基本的容器组件。
container / Contacts.jsx
class Contacts extends Component {

  constructor(props) {
      super(props);
      this.returnContactList = this.returnContactList.bind(this);
  }
  returnContactList() {
    // Retrieve contactlist from the store
  }

  render() {

    return (
        <div>

         	<AddContact/>
         	<br />
          <ContactList contactList= {this.returnContactList()} />
        </div>
    );
  }
}


export default Contacts; returnContactList()函数检索联系人对象的数组,并将其传递给ContactList组件。 由于returnContactList()从存储中检索数据,因此我们暂时将逻辑保留为空白。
container / AddContacts.jsx
class AddContact extends Component {
    constructor(props) {
		super(props);

        /* Function binding goes here. Omitted for brevity */
	}

	showAddContactBox() {
	    /* Logic for toggling ContactForm */
    }

	handleInputChange(event) {
		const target = event.target;
    	const value = target.value;
    	const name = target.name;

        /* Logic for handling Input Change */

   	}

	handleSubmit(e) {
		e.preventDefault();

        /* Logic for hiding the form and update the state */
	}

    /* Renders the AddContactForm */
	renderForm() {
		return(
			<div className="col-sm-8 offset-sm-2">
				<AddContactForm onFormSubmit={this.handleSubmit} onInputChange={this.handleInputChange} />
 			</div>
 		)
	}
	render() {
		return(
			<div>

				{ /* A conditional statement goes here that checks whether the form
                    should be displayed or not */}
			</div>
			)
	}
}


export default AddContact;
我们创建了与这三个动作相对应的三个基本处理程序方法。 他们都调度动作以更新状态。 在render方法中,由于需要获取状态,因此省略了显示/隐藏表单的逻辑。
现在让我们看看如何将react和redux绑定在一起
react-redux库
默认情况下,React绑定在Redux中不可用。 您首先需要安装一个额外的库,称为react-redux。
npm install --save react-redux 该库仅导出您需要记住的两个API,一个<Provider />组件和一个称为connect()的高阶函数。
提供者组件
像Redux这样的库需要使存储数据从根组件开始就可以被整个React组件树访问。 Provider模式允许库从上到下传递数据。 下面的代码演示了Provider如何神奇地将状态添加到组件树中的所有组件。
示范代码
import { Provider } from 'react-redux'

ReactDOM.render(
  <Provider store={store}>
    <App />
  </Provider>,
  document.getElementById('root')
)
整个应用需要访问商店。 因此,我们将提供程序包装在应用程序组件周围,然后将所需的数据添加到树的上下文中。 然后,组件的后代可以访问数据。
connect()方法
现在我们已经将商店提供给我们的应用程序,我们需要将React连接到商店。 您与商店进行通信的唯一方法是调度动作并检索状态。 之前,我们使用store.dispatch()调度操作,并使用store.getState()检索状态的最新快照。 connect()使您可以执行此操作,但是要借助称为mapDispatchToProps和mapStateToProps的两个方法。 我在下面的示例中演示了此概念:
示范代码
import {connect} from 'react-redux'

const AddContact = ({newContact, addContact}) => {
  return (
    <div>
      {newContact.name} <br />
      {newContact.email} <br />
      {newContact.phone} <br />

      Are you sure you want to add this contact?
      <span onClick={addContact}> Yes </span>
    </div>
  )
}

const mapStateToProps = state => {
  return {
    newContact : state.contacts.newContact
  }
}

const mapDispatchToProps = dispatch => {
  return {
    addContact : () => dispatch(addContact())
  }
}

export default connect(
  mapStateToProps,
  mapDispatchToProps
)(AddContact) mapStateToProps和mapDispatchToProps都返回一个对象,并且该对象的键成为连接组件的支持。 例如, state.contacts.newContact映射到props.newContact 。 动作创建者addContact()映射到props.addContact 。
但这要起作用,您需要上面的代码片段中的最后一行。
export default connect(
  mapStateToProps,
  mapDispatchToProps
)(AddContact) 我们不是直接导出AddContact组件,而是导出连接的组件。 该连接将addContact和newContact作为道具提供给<AddContact/>组件。
如何连接React和Redux
接下来,我们将介绍连接React和Redux所需遵循的步骤。
安装react-redux库
如果尚未安装react-redux库,请安装它。 您可以使用NPM或Yarn进行安装。
npm install react-redux --save将商店提供给您的应用程序组件
首先创建商店。 然后,通过将存储对象作为道具传递给<Provider /> ,使存储对象可被组件树访问。
index.js
import React from 'react';
import {render}from 'react-dom';
import { Provider } from 'react-redux'
import App from './App';

import configureStore from './store'

const store = configureStore();
render(
  <Provider store={store}>
    <App />
  </Provider>,
  document.getElementById('root')
)
将React容器连接到Redux
connect函数用于将React容器绑定到Redux。 这意味着您可以使用连接功能执行以下操作:
- 订阅商店并将其状态映射到您的道具
- 调度动作并将调度回调映射到您的道具中
将应用程序连接到Redux之后,您可以使用this.props访问当前状态并调度操作。 我将在AddContact组件上演示该过程。 AddContact需要调度三个动作并从存储中获取两个属性的状态。 让我们看一下代码。
首先,将connect导入AddContact.jsx 。
import { connect } from 'react-redux'; 其次,创建两个方法: mapStateToProps和mapDispatchToProps 。
function mapStateToProps(state) {
    return {

        isHidden : state.ui.isAddContactFormHidden,
        newContact: state.contacts.newContact
    }
}

function mapDispatchToProps(dispatch) {
    return {
        onFormSubmit: (newContact) => {
           dispatch(addContact(newContact));
        },
        onInputChange: (name,value) => {

            dispatch(handleInputChange(name,value));
        },

        onToggle: () => {
            dispatch(toggleContactForm());
        }
    }
} mapStateToProps接收存储的状态作为参数。 它返回一个对象,该对象描述商店的状态如何映射到道具中。 mapDispatchToProps返回一个类似的对象,该对象描述调度动作如何映射到您的道具。
最后,我们使用connect将AddContact组件绑定到两个函数,如下所示:
export default connect(mapStateToProps, mapDispatchToProps) (AddContact)更新容器组件以使用道具
现在,该组件的道具可以读取存储状态和调度动作。 handeInputChange , handleSubmit和showAddContactBox的逻辑应更新如下:
showAddContactBox() {
        const { onToggle }  = this.props;
		onToggle();
	}

	handleInputChange(event) {
		const target = event.target;
    	const value = target.value;
    	const name = target.name;

   		const { onInputChange } = this.props;
		onInputChange(name,value);
   	}

	handleSubmit(e) {
		e.preventDefault();
		this.props.onToggle();
		this.props.onFormSubmit();
} 我们已经定义了处理程序方法,但是仍然缺少一部分render函数中的条件语句。
render() {
    return(
		<div>
			{ this.props.isHidden === false ? this.renderForm(): <button onClick={this.showAddContactBox} className="btn"> Add Contact </button>}
		</div>
	)
} 如果isHidden为false,则呈现表单。 否则,将渲染按钮。
显示联系人
我们已经完成了最具挑战性的部分。 现在,剩下的就是将这些联系人显示为列表。 Contacts容器是实现该逻辑的最佳位置。
import React, { Component } from 'react';
import { connect } from 'react-redux';
/* Component import omitted for brevity */

class Contact extends Component {

  constructor(props) {
    super(props);
    this.returnContactList = this.returnContactList.bind(this);
  }

   returnContactList() {
    return this.props.contactList;
  }


  render() {


    return (
        <div>
     		<br />
         	<AddContact/>
         	<br />
          <ContactList contactList= {this.returnContactList()} />
        </div>
    );
  }
}

function mapStateToProps(state) {
  return {
    contactList : state.contacts.contactList,

  }
}


export default connect(mapStateToProps, null) (Contact);
我们已经完成了与上述步骤相同的过程,以将Contacts组件与Redux存储连接。 mapStateToProps函数将商店对象映射到contactList道具。 然后,我们使用connect将props值绑定到Contact组件。 连接的第二个参数为null,因为我们没有要分派的任何动作。 这样就完成了我们的应用程序与Redux商店状态的集成。
接下来是什么?
在下一篇文章中,我们将深入研究中间件,并开始分派涉及从服务器获取数据的操作。 在评论区分享你的观点!


 1480
1480

 被折叠的 条评论
为什么被折叠?
被折叠的 条评论
为什么被折叠?
 到【灌水乐园】发言


