


Google已经发布了下一个Android版本的第一个开发人员预览版,目前的代号为Android O (也许是Oreo?)。 发布了一些令人兴奋的功能,其中之一是Notification Channels 。 在本教程中,我们将探索此功能并构建一个简单的应用程序,以演示其提供的功能。
什么是通知渠道?
通知渠道使我们的应用程序开发人员可以将我们的通知分组为渠道,用户可以一次修改整个渠道的通知设置。 例如,对于每个频道,用户可以完全阻止所有通知,覆盖重要性级别或允许显示通知标志。 这项新功能有助于极大改善应用程序的用户体验。
我们将通过构建一个名为“ TutsplusAlerts”的简单应用程序来学习此功能,该应用程序将提供两个通知通道:Android和iOS。 每当提交新文章时,用户都会从这些单独的渠道之一收到通知。
1.设置Android O SDK
在撰写本文时,要开始使用Android O API,您需要在计算机上安装最新的Android Studio 2.4 Canary 。
启动Android Studio 2.4并通过单击工具> Android> SDK Manager打开SDK Manager 。
然后,在“ SDK平台”选项卡中,选中“显示软件包详细信息”。 在Android O Preview下 ,检查以下各项: Android SDK Platform O和Google API Intel x86 Atom系统映像 (仅模拟器需要)。

然后切换到“ SDK工具”选项卡,然后选择以下内容:
- Android SDK Build-Tools 26.0.0 (rc1或更高版本)
- Android SDK平台工具26.0.0 (rc1或更高版本)
- Android模拟器26.0.0
- 支持资料库
单击确定按钮以下载所有这些组件。
2.创建一个Android Studio项目
在您的Android Studio中,创建一个名为TutsplusAlerts的新项目,其中包含一个名为MainActivity的空活动。

3.更新build.gradle
转到您的应用程序模块版本。 gradle文件并更新compileSdkVersion , buildToolsVersion和targetSdkVersion ,最后更新支持库版本。
android {
    compileSdkVersion "android-O"
    buildToolsVersion "26.0.0-rc1"

    defaultConfig {
        applicationId "com.chikeandroid.tutsplusalerts"
        minSdkVersion 'O'
        targetSdkVersion 'O'
        versionCode 1
        versionName "1.0"
        testInstrumentationRunner "android.support.test.runner.AndroidJUnitRunner"
  }
  ...
}

dependencies {
    ...
    compile 'com.android.support:appcompat-v7:26.0.0-alpha1'
    ...
}
进行这些更改后,请记住要同步您的项目。
4.创建通知渠道
创建一个新类,并将其命名为NotificationUtils ,以扩展ContextWrapper 。
import android.app.Notification;
import android.app.NotificationChannel;
import android.app.NotificationManager;
import android.content.Context;
import android.content.ContextWrapper;
import android.graphics.Color;

public class NotificationUtils extends ContextWrapper {

    private NotificationManager mManager;
    public static final String ANDROID_CHANNEL_ID = "com.chikeandroid.tutsplustalerts.ANDROID";
    public static final String IOS_CHANNEL_ID = "com.chikeandroid.tutsplustalerts.IOS";
    public static final String ANDROID_CHANNEL_NAME = "ANDROID CHANNEL";
    public static final String IOS_CHANNEL_NAME = "IOS CHANNEL";

    public NotificationUtils(Context base) {
        super(base);
        createChannels();
    }

    public void createChannels() {

        // create android channel
        NotificationChannel androidChannel = new NotificationChannel(ANDROID_CHANNEL_ID,
                ANDROID_CHANNEL_NAME, NotificationManager.IMPORTANCE_DEFAULT);
        // Sets whether notifications posted to this channel should display notification lights
        androidChannel.enableLights(true);
        // Sets whether notification posted to this channel should vibrate.
        androidChannel.enableVibration(true);
        // Sets the notification light color for notifications posted to this channel
        androidChannel.setLightColor(Color.GREEN);
        // Sets whether notifications posted to this channel appear on the lockscreen or not
        androidChannel.setLockscreenVisibility(Notification.VISIBILITY_PRIVATE);

        getManager().createNotificationChannel(androidChannel);

        // create ios channel
        NotificationChannel iosChannel = new NotificationChannel(IOS_CHANNEL_ID,
                IOS_CHANNEL_NAME, NotificationManager.IMPORTANCE_HIGH);
        iosChannel.enableLights(true);
        iosChannel.enableVibration(true);
        iosChannel.setLightColor(Color.GRAY);
        iosChannel.setLockscreenVisibility(Notification.VISIBILITY_PUBLIC);
        getManager().createNotificationChannel(iosChannel);
    }

    private NotificationManager getManager() {
        if (mManager == null) {
            mManager = (NotificationManager) getSystemService(Context.NOTIFICATION_SERVICE);
        }
        return mManager;
    }
} 在上面的代码中,我们创建了NotificationChannel两个实例,传递一个ID(在您的程序包中必须是唯一的),一个通道名称以及其构造函数中的重要性级别。 对于每个通知通道,我们应用了声音,灯光,振动和通知等特征,以在锁定屏幕上显示。 最后,我们从系统获取NotificationManager ,然后通过调用方法createNotificationChannel()传递已创建的通道来注册通道。
我们可以使用createNotificationChannels()一次创建多个通知通道,并传递一个NotificationChannel实例的Java列表。 你可以得到与应用程序的所有通知渠道getNotificationChannels()并获得与特定通道getNotificationChannel()只传递通道ID作为参数。
重要性等级
从Android O开始,不赞成为各个通知设置优先级。 而是在创建通知通道时设置重要性级别,范围从NotificationManager.IMPORTANCE_NONE到NotificationManager.IMPORTANCE_HIGH 。 我们将Android频道设置为IMPORTANCE_DEFAULT ,而iOS频道的设置为IMPORTANCE_HIGH 。
可用的重要选项的完整列表是:
-
IMPORTANCE_MAX:未使用 -
IMPORTANCE_HIGH:到处显示,发出声音和窥视
-
IMPORTANCE_DEFAULT:到处显示,产生噪音但不视觉干扰
-
IMPORTANCE_LOW:随处可见,但并不干扰 -
IMPORTANCE_MIN:仅在折叠下方的阴影中显示 -
IMPORTANCE_NONE:不重要的通知; 在阴影中不显示
频道的所有通知将被赋予相同的重要性级别。
5.创建通知并发布到频道
我们将在创建的NotificationUtils类中为每个频道创建两个Notifications 。 我们在Notification.Builder (Android API 25)构造函数中指定应将哪个通知发送到通道,在该通道中,将通道ID作为第二个参数传递给该通道。
// ...
public Notification.Builder getAndroidChannelNotification(String title, String body) {
    return new Notification.Builder(getApplicationContext(), ANDROID_CHANNEL_ID)
            .setContentTitle(title)
            .setContentText(body)
            .setSmallIcon(android.R.drawable.stat_notify_more)
            .setAutoCancel(true);
}

public Notification.Builder getIosChannelNotification(String title, String body) {
    return new Notification.Builder(getApplicationContext(), IOS_CHANNEL_ID)
            .setContentTitle(title)
            .setContentText(body)
            .setSmallIcon(android.R.drawable.stat_notify_more)
            .setAutoCancel(true);
}
//...
请注意, Notification.Builder()还有一个名为setChannel(String channelId)的通知通道ID设置器方法,因此您可以选择在构造函数中或使用setter方法设置通知通道ID。
6.创建XML布局
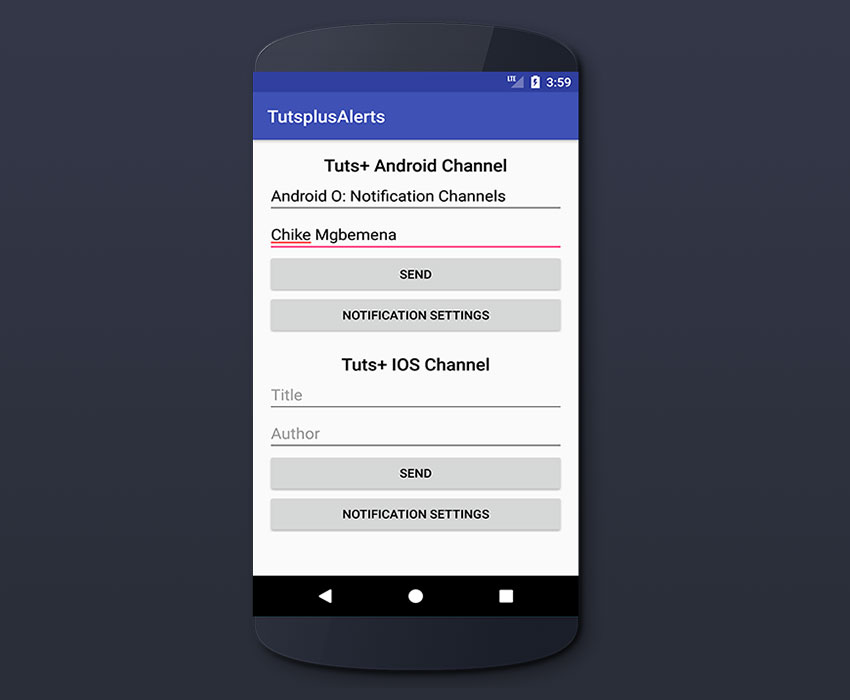
现在我们已经有了创建和发布到通知通道的设置,让我们创建XML布局接口以将消息发布到我们的activity_main中。 xml 。
<?xml version="1.0" encoding="utf-8"?>
<LinearLayout
        xmlns:android="http://schemas.android.com/apk/res/android"
        xmlns:app="http://schemas.android.com/apk/res-auto"
        xmlns:tools="http://schemas.android.com/tools"
        android:id="@+id/activity_main"
        android:layout_width="match_parent"
        android:layout_height="match_parent"
        android:orientation="vertical"
        android:layout_margin="16dp"
        tools:context="com.chikeandroid.tutsplusalerts.MainActivity">

    <LinearLayout
            android:layout_width="match_parent"
            android:layout_height="wrap_content"
            android:orientation="vertical">

        <TextView
                android:layout_width="wrap_content"
                android:layout_height="wrap_content"
                android:text="Tuts+ Android Channel"
                android:layout_gravity="center_horizontal"
                android:textAppearance="@style/TextAppearance.AppCompat.Title"/>

        <EditText
                android:id="@+id/et_android_title"
                android:layout_width="match_parent"
                android:layout_height="wrap_content"
                android:hint="Title"/>

        <EditText
                android:id="@+id/et_android_author"
                android:layout_width="match_parent"
                android:layout_height="wrap_content"
                android:hint="Author"/>

        <Button
                android:id="@+id/btn_send_android"
                android:layout_width="match_parent"
                android:layout_height="wrap_content"
                android:text="Send"/>
    </LinearLayout>

    <LinearLayout
            android:layout_width="match_parent"
            android:layout_height="wrap_content"
            android:orientation="vertical"
            android:layout_marginTop="20dp">

        <TextView
                android:layout_width="wrap_content"
                android:layout_height="wrap_content"
                android:text="Tuts+ IOS Channel"
                android:layout_gravity="center_horizontal"
                android:textAppearance="@style/TextAppearance.AppCompat.Title"/>

        <EditText
                android:id="@+id/et_ios_title"
                android:layout_width="match_parent"
                android:layout_height="wrap_content"
                android:hint="Title"
                />

        <EditText
                android:id="@+id/et_ios_author"
                android:layout_width="match_parent"
                android:layout_height="wrap_content"
                android:hint="Author"/>
        <Button
                android:id="@+id/btn_send_ios"
                android:layout_width="match_parent"
                android:layout_height="wrap_content"
                android:text="Send"/>
    </LinearLayout>

</LinearLayout>7.向频道发布通知
发布到Android频道
在本节中,我们将编辑MainActivity以便我们可以从EditText组件中获取标题和作者,然后将其发送到Android频道。 我们获得在Notification.Builder中创建的Android频道的NotificationUtils ,然后通知NotificationManager 。
import android.app.Notification;
import android.os.Bundle;
import android.support.v7.app.AppCompatActivity;
import android.text.TextUtils;
import android.view.View;
import android.widget.Button;
import android.widget.EditText;

public class MainActivity extends AppCompatActivity {

    private NotificationUtils mNotificationUtils;

    @Override
    protected void onCreate(Bundle savedInstanceState) {
        super.onCreate(savedInstanceState);
        setContentView(R.layout.activity_main);

        mNotificationUtils = new NotificationUtils(this);

        final EditText editTextTitleAndroid = (EditText) findViewById(R.id.et_android_title);
        final EditText editTextAuthorAndroid = (EditText) findViewById(R.id.et_android_author);
        Button buttonAndroid = (Button) findViewById(R.id.btn_send_android);

        buttonAndroid.setOnClickListener(new View.OnClickListener() {
            @Override
            public void onClick(View view) {
                String title = editTextTitleAndroid.getText().toString();
                String author = editTextAuthorAndroid.getText().toString();

                if(!TextUtils.isEmpty(title) && !TextUtils.isEmpty(author)) {
                    Notification.Builder nb = mNotificationUtils.
                            getAndroidChannelNotification(title, "By " + author);

                    mNotificationUtils.getManager().notify(101, nb.build());
                }
            }
        });
    }
}
此时,运行应用程序并输入标题和作者,然后单击“发送”按钮以立即接收通知。

发布到iOS频道
在这里,我们将发布到iOS频道。 我们得到的Notification.Builder为我们在创建iOS的通道NotificationUtils ,然后调用notify()的方法NotificationManager 。
@Override
protected void onCreate(Bundle savedInstanceState) {

    // ...

    final EditText editTextTitleIos = (EditText) findViewById(R.id.et_ios_title);
    final EditText editTextAuthorIos = (EditText) findViewById(R.id.et_ios_author);
    Button buttonIos = (Button) findViewById(R.id.btn_send_ios);
    buttonIos.setOnClickListener(new View.OnClickListener() {
        @Override
        public void onClick(View view) {
            String title = editTextTitleIos.getText().toString();
            String author = editTextAuthorIos.getText().toString();

            if(!TextUtils.isEmpty(title) && !TextUtils.isEmpty(author)) {
                Notification.Builder nb = mNotificationUtils
                        .getIosChannelNotification(title, "By " + author);

                mNotificationUtils.getManager().notify(102, nb.build());
            }
        }
    });
}
再次运行该应用程序,输入标题和作者,然后单击“发送”按钮立即接收通知。

8.通知渠道设置
在撰写本文时,您无法以编程方式更改特定通知渠道设置的配置。 相反,唯一可用的选项是让用户转到设备设置中应用程序的通知设置屏幕。 从那里,用户可以访问应用程序通知设置以修改设置,例如振动,声音等。用户可以通过以下两种方式导航到应用程序通知设置:
- 长按通知抽屉上的通知(下左图)。
- 设置 > 应用程序和通知 > 通知 >然后选择应用程序(下面的右图)。

您还可以将用户权限从您的应用发送到频道通知设置。 让我们看看如何为Android频道做到这一点。 建议您在应用设置中执行此操作,以使用户可以轻松访问这些通知选项。
编辑XML布局
包括另一个按钮,该按钮会将用户发送到频道通知设置。
<!--...-->
<Button
    android:id="@+id/btn_android_notif_settings"
    android:layout_width="match_parent"
    android:layout_height="wrap_content"
    android:text="Notification Settings"/>
<!--...-->
编写意图
在这里,我们创建一个意图并将其传递给设置动作 ACTION_CHANNEL_NOTIFICATION_SETTINGS (API 25),然后添加一些额外的值:应用程序包名称和通道ID。 最后,我们有意启动设置活动。
// ...
@Override
protected void onCreate(Bundle savedInstanceState) {
    //...
    Button buttonAndroidNotifSettings = (Button) findViewById(R.id.btn_android_notif_settings);
    buttonAndroidNotifSettings.setOnClickListener(new View.OnClickListener() {

        @Override
        public void onClick(View view) {
            Intent i = new Intent(Settings.ACTION_CHANNEL_NOTIFICATION_SETTINGS);
            i.putExtra(Settings.EXTRA_APP_PACKAGE, getPackageName());
            i.putExtra(Settings.EXTRA_CHANNEL_ID, NotificationUtils.ANDROID_CHANNEL_ID);
            startActivity(i);
        }
    });
}
//...
运行应用程序,然后单击Android频道的通知设置。

在通道通知设置中,用户可以编辑设置,例如启用振动,更改重要性或显示通道的徽标(如果支持)。
如果您想将用户带到您应用的常规通知设置,也可以使用Intent :
Intent i = new Intent(Settings.ACTION_APP_NOTIFICATION_SETTINGS);
i.putExtra(Settings.EXTRA_APP_PACKAGE, getPackageName());
startActivity(i);9.创建通知组
我们还可以将通知渠道分组,以便可以一起管理它们。 这对于支持多个用户帐户的应用程序很有用。 各个帐户都可以使用相同的通知渠道。 例如,社交网络应用可能包括对个人和企业用户帐户的支持。 以下代码显示了如何创建通知渠道组:
String groupId = "group_id_101";
CharSequence groupName = "Channel Name";
NotificationManager mNotificationManager =
        (NotificationManager) getSystemService(Context.NOTIFICATION_SERVICE);
mNotificationManager.createNotificationChannelGroup(new NotificationChannelGroup(groupId, groupName)); 我们使用了NotificationManager createNotificationChannelGroup()方法,向其传递了一个NotificationChannelGroup实例,该实例需要组ID和组名才能创建该实例。
完成此操作后,我们需要通过使用NotificationChannel.setGroup()方法并将其传递给组ID,将通知通道连接到组。 如果要一次创建多个通知组,请使用createNotificationChannelGroups() ,向其传递一个NotificationChannelGroup实例的Java列表。
10.删除通知频道
如果不再需要,则删除通知通道很容易。 只需使用通知管理器方法deleteNotificationChannel()并传递通道ID。
NotificationManager mNotificationManager =
        (NotificationManager) getSystemService(Context.NOTIFICATION_SERVICE);
mNotificationManager.deleteNotificationChannel(IOS_CHANNEL_ID);
但是,请注意,已删除的频道在通知设置中仍然可见,以防止垃圾邮件。
结论
在本教程中,您了解了Android O的通知频道:它们是什么以及如何创建通知频道,以及如何将通知发布到频道,如何访问频道的通知设置,如何对通知频道进行分组以及如何进行删除通知频道。
翻译自: https://code.tutsplus.com/tutorials/android-o-how-to-use-notification-channels--cms-28616


 1686
1686

 被折叠的 条评论
为什么被折叠?
被折叠的 条评论
为什么被折叠?
 到【灌水乐园】发言


