


您是否是一名混合应用程序开发人员,希望将面部检测纳入您的应用程序,但您不知道从哪里开始呢? 首先,您可以阅读Android上的人脸检测简介 ,向您展示如何在Android上本地实现人脸检测。 但是,如果您像我一样,并且不想编写Java代码来创建为您执行此操作的React Native模块,那么您来对地方了。
在本教程中,我们将研究人脸检测API ,它是Microsoft Cognitive Services的一部分。 该API使开发人员可以轻松地在应用程序中实现人脸检测功能。 在本教程中,我将假定这不是您的第一个React Native应用程序。 如果您不熟悉React Native,那么我建议您首先阅读React Native网站上的Facebook 入门教程。 该教程向您展示了如何设置环境并创建您的第一个React Native项目。
先决条件
即使我们在本教程中专注于Android平台,也可以通过一些工作来添加对其他平台的支持。 确保您已安装Android Studio。 您可以从Google的开发人员门户网站下载Android Studio 。
1.什么是人脸检测API?
在开始编写应用程序之前,我想花一点时间来谈论我们将用于面部检测的API。 微软的面部检测API通过基于云的API提供面部检测和面部识别功能。 这使我们可以发送包含图像或Web上现有图像URL的HTTP请求,并接收有关图像中检测到的任何面部的数据。
向API发送请求
您可以通过将POST请求发送到https://api.projectoxford.ai/face/v1.0/detect向Microsoft的面部检测API发出请求。 该请求应包含以下标头信息:
- Content-Type:此标头字段包含请求正文的数据类型。 如果要在网络上发送图像的URL,则此标头字段的值应为application / json 。 如果要发送图像,请将标头字段设置为application / octet-stream 。
- Ocp-Apim-Subscription-Key:此标头字段包含用于验证您的请求的API密钥。 在本教程的后面,我将向您展示如何获取API密钥。
默认情况下,API仅返回有关用于将检测到的面Kong包含在图像中的盒子的数据。 在本教程的其余部分中,我将这些框称为面框 。 可以通过将returnFaceRectangle查询参数设置为false来禁用此选项。 默认值为true ,这意味着除非您要禁用此选项,否则不必指定它。
您可以提供一些其他可选的查询参数来获取有关检测到的面部的其他信息:
-
returnFaceId:如果设置为true,则此选项为每个检测到的面部分配唯一的标识符。 -
returnFaceLandmarks:通过启用此选项,API返回检测到的脸部(包括眼睛,鼻子和嘴唇)的脸部界标数组。 默认情况下禁用此选项。 -
returnFaceAttributes:如果启用此选项,则API将为每个检测到的脸部查找并返回唯一的属性。 您需要提供一个逗号分隔的感兴趣属性列表,例如年龄,性别,微笑,面部毛发,头部姿势和眼镜。
以下是在给定以下请求URL的情况下从API获得的示例响应:
https://api.projectoxford.ai/face/v1.0/detect?faceId=true&faceLandmarks=true&faceAttributes=age,gender,smile,facialHair,headPose,glasses[
{
"faceId": "c5c24a82-6845-4031-9d5d-978df9175426",
"faceRectangle": {
"width": 78,
"height": 78,
"left": 394,
"top": 54
},
"faceLandmarks": {
"pupilLeft": {
"x": 412.7,
"y": 78.4
},
"pupilRight": {
"x": 446.8,
"y": 74.2
},
"noseTip": {
"x": 437.7,
"y": 92.4
},
"mouthLeft": {
"x": 417.8,
"y": 114.4
},
"mouthRight": {
"x": 451.3,
"y": 109.3
},
"eyebrowLeftOuter": {
"x": 397.9,
"y": 78.5
},
"eyebrowLeftInner": {
"x": 425.4,
"y": 70.5
},
"eyeLeftOuter": {
"x": 406.7,
"y": 80.6
},
"eyeLeftTop": {
"x": 412.2,
"y": 76.2
},
"eyeLeftBottom": {
"x": 413.0,
"y": 80.1
},
"eyeLeftInner": {
"x": 418.9,
"y": 78.0
},
"eyebrowRightInner": {
"x": 4.8,
"y": 69.7
},
"eyebrowRightOuter": {
"x": 5.5,
"y": 68.5
},
"eyeRightInner": {
"x": 441.5,
"y": 75.0
},
"eyeRightTop": {
"x": 446.4,
"y": 71.7
},
"eyeRightBottom": {
"x": 447.0,
"y": 75.3
},
"eyeRightOuter": {
"x": 451.7,
"y": 73.4
},
"noseRootLeft": {
"x": 428.0,
"y": 77.1
},
"noseRootRight": {
"x": 435.8,
"y": 75.6
},
"noseLeftAlarTop": {
"x": 428.3,
"y": 89.7
},
"noseRightAlarTop": {
"x": 442.2,
"y": 87.0
},
"noseLeftAlarOutTip": {
"x": 424.3,
"y": 96.4
},
"noseRightAlarOutTip": {
"x": 446.6,
"y": 92.5
},
"upperLipTop": {
"x": 437.6,
"y": 105.9
},
"upperLipBottom": {
"x": 437.6,
"y": 108.2
},
"underLipTop": {
"x": 436.8,
"y": 111.4
},
"underLipBottom": {
"x": 437.3,
"y": 114.5
}
},
"faceAttributes": {
"age": 71.0,
"gender": "male",
"smile": 0.88,
"facialHair": {
"mustache": 0.8,
"beard": 0.1,
"sideburns": 0.02
}
},
"glasses": "sunglasses",
"headPose": {
"roll": 2.1,
"yaw": 3,
"pitch": 0
}
}
]该示例响应是不言自明的,因此我将不深入探讨每个属性代表什么。 数据可用于显示检测到的面部,它们的不同属性以及如何向用户显示它们。 这可以通过解释x和y坐标或顶部和左侧位置来实现。
获取API密钥
要使用Microsoft的面部检测API,每个请求都需要使用API密钥进行身份验证。 这是获取此类密钥所需采取的步骤。
如果您还没有Microsoft Live帐户 ,请创建一个。 使用您的Microsoft Live帐户登录并注册一个Microsoft Azure帐户。 如果您还没有Microsoft Azure帐户,则可以注册免费试用版 ,使您可以使用30天的Microsoft服务。
对于人脸检测API,这允许您每分钟免费发送多达20个API调用。 如果您已经有一个Azure帐户,则可以订阅即用即付计划,因此您只需为使用的商品付费。
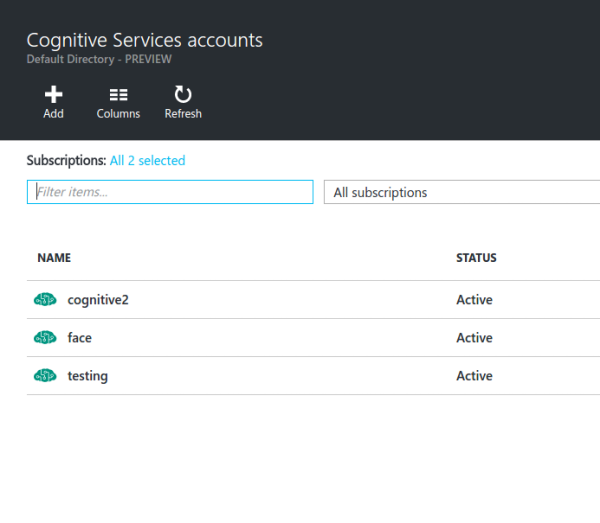
设置Microsoft Azure帐户后,您将被重定向到Microsoft Azure门户 。 在门户中,导航到搜索栏,然后在搜索字段中输入认知服务 。 单击显示“ 认知服务帐户”(预览)的结果 。 您应该看到类似于以下内容的界面:
单击添加按钮并填写显示的表单:
- 帐户名称:输入您要赋予资源的名称。
- API类型:选择面部检测API。
- 定价层:出于测试目的,请选择免费层(每分钟最多20个API调用)。 如果要在生产环境中使用该服务,请选择另一个适合您应用程序需求的选项。
- 订阅:如果您使用的是新的Microsoft Azure帐户,请选择免费试用版。 否则,请选择即用即付选项。
- 资源组:如果已有资源组,请选择一个。 否则,通过选择新选项来创建新资源组,然后输入资源组的名称。
- 位置:选择美国西部 。
在下一步中,您需要同意Microsoft的条款和条件才能继续。 单击创建按钮,然后等待资源完成部署。
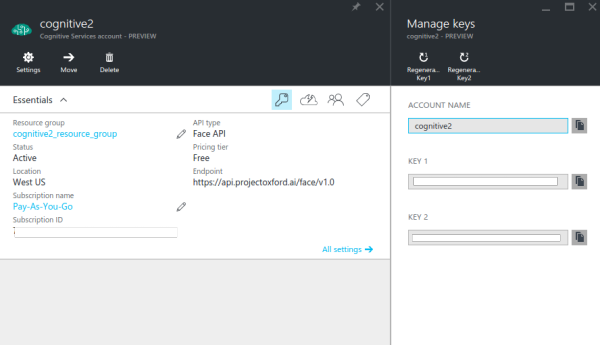
部署完成后,单击左侧栏中的“ 所有资源”链接以查看当前拥有的资源。 您刚刚创建的一个应在此处列出。 如果不是,请尝试刷新页面。
单击您创建的资源,然后单击键图标以查看与该资源关联的API密钥。 默认情况下,会生成两个密钥,您可以使用其中一个。
2.构建应用
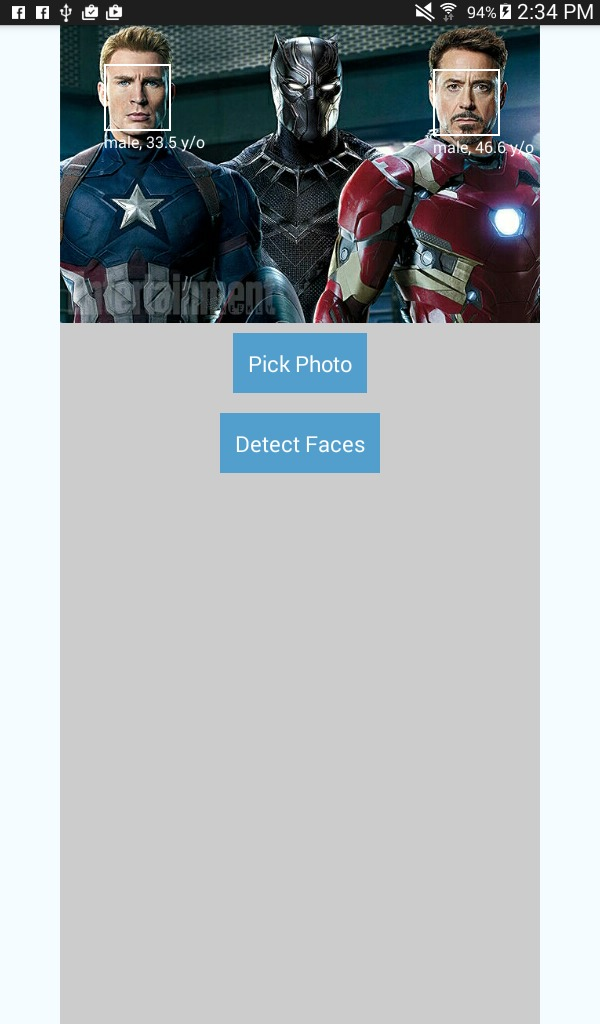
在开始构建应用程序之前,让我先简要介绍一下应用程序的用途。 如前所述,我们将构建一个面部检测应用程序。 该应用程序将具有两个按钮,一个用于拾取图像,另一个用于检测面部。 用于选择图像的按钮将要求用户选择来源,设备的相机或画廊。
如果选择了相机,则将启动默认相机应用程序。 如果选择了图库,则该应用将允许用户从图库中选择照片。 选择照片后,用于检测面部的按钮将变为可见。 点击此按钮会将请求发送到Microsoft的面部检测API,该API返回检测到的面部的数据。 使用API的响应,在检测到的脸部周围会画一些小方框,其中包括人的性别和年龄的标签。
这是应用程序的外观:
步骤1:安装依赖项
现在我们准备构建该应用程序。 让我们从安装依赖关系开始。 在工作目录中打开一个新的终端窗口,并执行以下命令:
react native init FaceDetector这将为我们创建一个新的React Native项目,在撰写本文时,该项目的版本为0.25。 设置过程完成后,导航到项目文件夹。
接下来,我们将安装三个将用于开发应用程序的库:
npm install lodash react-native-fetch-blob react-native-image-picker --save- lodash:我们仅将lodash用于其
map方法。 我们使用此方法将从API返回的结果转换为将要呈现的组件。 - react-native-image-picker :此库用于添加使用相机或库中图像选择图像的功能。
- react-native-fetch-blob :该库用于发送具有blob内容的网络请求。 人脸检测API特别需要照片的斑点,但是
fetchAPI并不支持它,这就是为什么我们使用此库为我们处理它的原因。
步骤2:配置项目
由于还不是所有的React Native模块都支持React Native Package Manager ,因此我们需要手动配置项目,以便模块可以正常工作。 具体来说,我们需要配置项目以使react-native-image-picker正常工作。
在工作目录中,打开android / settings.gradle文件,并在include ':app'之后立即添加以下代码段:
include ':react-native-image-picker'
project(':react-native-image-picker').projectDir = new File(settingsDir, '../node_modules/react-native-image-picker/android') 打开android / app / build.gradle文件并找到“ dependencies部分。 它看起来应该像这样:
dependencies
    compile fileTree(dir: "libs", include: ["*.jar"])
    compile "com.android.support:appcompat-v7:23.0.1"
    compile "com.facebook.react:react-native:+"  // From node_modules
}
将以下代码段添加到依赖项列表中:
compile project(':react-native-image-picker')打开android / app / src / main / AndroidManifest.xml并在React Native所需的默认系统权限下方添加以下代码段。
<uses-permission android:name="android.permission.CAMERA" />
<uses-permission android:name="android.permission.WRITE_EXTERNAL_STORAGE"/>
<uses-feature android:name="android.hardware.camera" android:required="false"/>
<uses-feature android:name="android.hardware.camera.autofocus" android:required="false"/>
供您参考,默认系统权限为:
<uses-permission android:name="android.permission.INTERNET" />
<uses-permission android:name="android.permission.SYSTEM_ALERT_WINDOW"/> 打开android / app / src / main / java / com / facedetector / MainActivity.java并将以下import语句添加到MainActivity类的顶部。
import com.imagepicker.ImagePickerPackage;我之前提到过rnpm的用法 。 如果您尚未在计算机上安装它,那么现在是进行该操作的好时机:
npm install rnpm -g 安装后,执行rnpm link命令以自动链接您在settings.gradle , build.gradle , AndroidManifest.xml和MainActivity.java中安装的模块。
rnpm link它照顾了我们为react-native-image-picker手动进行的所有操作。 我们已经完成了添加依赖项的手动过程,因此您知道rnpm的作用是什么。
步骤3:应用程序入口点组件
现在,我们准备编写一些代码。 首先,打开index.android.js并将此文件的内容替换为以下内容:
import React from 'react';

import {
  AppRegistry,
  Component,
  StyleSheet,
  Text,
  View
} from 'react-native';

import Detector from './components/Detector';

const image_picker_options = {
  title: 'Select Photo',
  takePhotoButtonTitle: 'Take Photo...',
  chooseFromLibraryButtonTitle: 'Choose from Library...',
  cameraType: 'back',
  mediaType: 'photo',
  maxWidth: 480,
  quality: 1,
  noData: false,
  path: 'images'
};

const api_key = 'YOUR FACE DETECTION API KEY';

class FaceDetector extends Component {
  render() {
    return (
      <View style={styles.container}>
        <Detector imagePickerOptions={image_picker_options} apiKey={api_key} />
      </View>
    );
  }
}

const styles = StyleSheet.create({
  container: {
    flex: 1,
    justifyContent: 'center',
    alignItems: 'center',
    backgroundColor: '#F5FCFF',
  }
});

AppRegistry.registerComponent('FaceDetector', () => FaceDetector);
上面是React Native入口点文件的样板代码。 首先,我们导入所需的组件。
import React from 'react';

import {
  AppRegistry,
  Component,
  StyleSheet,
  Text,
  View
} from 'react-native';

import Detector from './components/Detector'; 然后,我们声明Detector组件将需要的选项。 这包括图像选择器的选项和您早先从Microsoft Azure获得的API密钥。 不要忘记输入您的API密钥并将其分配给api_key 。
const image_picker_options = {
  title: 'Select Photo',
  takePhotoButtonTitle: 'Take Photo...',
  chooseFromLibraryButtonTitle: 'Choose from Library...',
  cameraType: 'back', //front or back camera?
  mediaType: 'photo', //the type of file that you want to pick
  maxWidth: 480, //the target width in which to resize the photo
  quality: 1, //0 to 1 for specifying the quality of the photo
  noData: false, //if set to true it disables the base64 of the file
};

//the API Key that you got from Microsoft Azure
const api_key = 'YOUR FACE Detection API KEY'; 接下来,我们创建入口点组件,并在主容器内使用Detector组件。 不要忘记传递必要的属性:
class FaceDetector extends Component {
  render() {
    return (
      <View style={styles.container}>
        <Detector imagePickerOptions={image_picker_options} apiKey={api_key} />
      </View>
    );
  }
}
我们还定义了样式:
const styles = StyleSheet.create({
  container: {
    flex: 1,
    justifyContent: 'center',
    alignItems: 'center',
    backgroundColor: '#F5FCFF',
  }
});
最后,我们注册组件:
AppRegistry.registerComponent('FaceDetector', () => FaceDetector);步骤4:按钮组件
在components目录中创建一个新文件,并将其命名为Button.js 。 这个组件将使我们能够轻松创建执行特定操作的按钮。 稍后,您将看到在Detector组件中如何使用它。 现在,知道您需要传入onpress , button_styles , button_text_styles和text作为属性,以自定义每个按钮的外观和功能。
import React from 'react';

import {
  AppRegistry,
  Component,
  Text,
  View,
  TouchableHighlight
} from 'react-native';

export default class Button extends Component {

  render(){
    return (
      <View>
        <TouchableHighlight underlayColor={"#E8E8E8"} onPress={this.props.onpress} style={this.props.button_styles}>
          <View>
              <Text style={this.props.button_text_styles}>{this.props.text}</Text>
          </View>
        </TouchableHighlight>
      </View>
    );
  }
}

AppRegistry.registerComponent('Button', () => Button);
步骤5:检测器组件
仍在components目录内,创建一个新文件,将其命名为Detector.js ,并向其中添加以下代码。 这就是魔术发生的地方。 花一点时间浏览实现。
import React from 'react';

import {
  AppRegistry,
  Component,
  StyleSheet,
  Text,
  View,
  Image
} from 'react-native';


import NativeModules, { ImagePickerManager } from 'NativeModules';

import Button from './Button';

import RNFetchBlob from 'react-native-fetch-blob';

import _ from 'lodash';

export default class Detector extends Component {
  constructor(props) {
      super(props);
  	this.state = {
  		photo_style: {
  			position: 'relative',
  			width: 480,
  			height: 480
  		},
  		has_photo: false,
  		photo: null,
  		face_data: null
  	};
  }

  render() {
    return (
      <View style={styles.container}>

		<Image
        	style={this.state.photo_style}
        	source={this.state.photo}
        	resizeMode={"contain"}
      	>
			{ this._renderFaceBoxes .call(this) }
      	</Image>

		<Button
            text="Pick Photo"
            onpress={this._pickImage.bind(this)}
            button_styles={styles.button}
            button_text_styles={styles.button_text} />

        { this._renderDetectFacesButton.call(this) }

      </View>
    );
  }


  _pickImage() {

	this.setState({
		face_data: null
	});

	ImagePickerManager.showImagePicker(this.props.imagePickerOptions, (response) => {

	  if(response.error){
	  	alert('Error getting the image. Please try again.');
	  }else{

	    let source = {uri: response.uri};

	    this.setState({
	      photo_style: {
			position: 'relative',
			width: response.width,
			height: response.height
	      },
	      has_photo: true,
	      photo: source,
	      photo_data: response.data
	    });

	  }
	});

  }

  _renderDetectFacesButton() {
  	if(this.state.has_photo){
	  	return  (
			<Button
	            text="Detect Faces"
	            onpress={this._detectFaces.bind(this)}
	            button_styles={styles.button}
	            button_text_styles={styles.button_text} />
	  	);
  	}
  }

  _detectFaces() {

	RNFetchBlob.fetch('POST', 'https://api.projectoxford.ai/face/v1.0/detect?returnFaceId=true&returnFaceAttributes=age,gender', {
		'Accept': 'application/json',
	    'Content-Type': 'application/octet-stream',
	    'Ocp-Apim-Subscription-Key': this.props.apiKey
	}, this.state.photo_data)
	.then((res) => {
		return res.json();
	})
	.then((json) => {

		if(json.length){
			this.setState({
				face_data: json
			});
		}else{
			alert("Sorry, I can't see any faces in there.");
		}

		return json;
	})
	.catch (function (error) {
		console.log(error);
    	alert('Sorry, the request failed. Please try again.' + JSON.stringify(error));
	});


  }

  _renderFaceBoxes () {

  	if(this.state.face_data){

	  	let views = _.map(this.state.face_data, (x) => {

	  		let box = {
	  			position: 'absolute',
	  			top: x.faceRectangle.top,
				left: x.faceRectangle.left
	  		};

			let style = {
				width: x.faceRectangle.width,
				height: x.faceRectangle.height,
				borderWidth: 2,
				borderColor: '#fff',
			};

			let attr = {
				color: '#fff',
			};

		  	return (
		  		<View key={x.faceId} style={box}>
					<View style={style}></View>
					<Text style={attr}>{x.faceAttributes.gender}, {x.faceAttributes.age} y/o</Text>
		  		</View>
		  	);
	  	});

	  	return <View>{views}</View>
  	}

  }

}

const styles = StyleSheet.create({
  container: {
    flex: 1,
   	alignItems: 'center',
   	alignSelf: 'center',
    backgroundColor: '#ccc'
  },
  button: {
	margin: 10,
	padding: 15,
	backgroundColor: '#529ecc'
  },
  button_text: {
  	color: '#FFF',
    fontSize: 20
  }
});

AppRegistry.registerComponent('Detector', () => Detector);
让我们对其进行分解,以便您确切地了解发生了什么。 我们首先导入所需的库。 这包括React及其默认组件,图像选择器,按钮组件, react-native-fetch-blob库和lodash。
import React from 'react';

import {
  AppRegistry,
  Component,
  StyleSheet,
  Text,
  View,
  Image
} from 'react-native';


import NativeModules, { ImagePickerManager } from 'NativeModules';

import Button from './Button';

import RNFetchBlob from 'react-native-fetch-blob';

import _ from 'lodash';
在类声明中,我们具有在装入组件之前执行的构造函数。 在这里,我们为所选照片设置默认样式,布尔值(用于作为是否显示用于检测脸部的按钮的基础),照片本身以及face_data (用作构造脸部框的数据源) 。
export default class Detector extends Component {
  constructor(props) {
    super(props);
    this.state = {
  		photo_style: {
  			position: 'relative',
  			width: 480,
  			height: 480
  		},
  		has_photo: false,
  		photo: null,
  		face_data: null
  	};
  }

  ...
} 接下来是render()方法,该方法将渲染选定的照片和两个按钮,拾取图像并检测面部。 请注意,我们在下面调用了其他三个方法, _renderFaceBoxes() , _pickImage()和_renderDetectedFacesButton() 。 我们将在短期内介绍这些方法,但现在知道它们用于简化render()方法的实现。
还要注意,我们使用的是call和bind而不是直接调用方法。 这是因为ES6类中的方法不会自动绑定到该类。 您需要使用bind或call将此方法绑定到this ,这是指向类本身的。 如果您不知道bind和call之间的区别,可以看看这个关于stack over call , apply和bind之间区别的问题 。
render() {
  return (
    <View style={styles.container}>

      	<Image
	        style={this.state.photo_style}
	        source={this.state.photo}
	        resizeMode={"contain"}
	      >
	    { this._renderFaceBoxes.call(this) }
	    </Image>

  		<Button
          text="Pick Photo"
          onpress={this._pickImage.bind(this)}
          button_styles={styles.button}
          button_text_styles={styles.button_text} />

      	{ this._renderDetectFacesButton.call(this) }

    </View>
  );
} 当按下用于拾取图像的按钮时,将调用_pickImage()方法。 这face_data设置为null以便删除现有的面部框(如果有)。 然后,它会打开一个对话框,用于选择从何处获取照片(相机或图库)。
该对话框使用从index.android.js传递的对象来自定义其设置。 拾取照片后,将返回一个响应,其中包含照片的本地URI和base64表示形式,其尺寸(宽度和高度)以及有关文件的其他重要信息。 我们使用这些数据来更新状态,从而更新应用程序的用户界面。
请注意,之前我们为图像选择器选项指定的maxWidth为480 。 这意味着将所选图像调整为该宽度,并自动调整高度以保持纵横比。 这就是为什么我们要在photo_style中更新宽度和高度以调整Image组件的大小,以使照片很好地适合它。
position设置为relative position ,以便将绝对定位的面框限制在Image组件内部。 photo用作Image组件的源,而photo_data是照片的base64表示。 我们需要将其置于状态,以便稍后在向API发出请求时可以使用它。
_pickImage() {

  this.setState({
    face_data: null
  });

  ImagePickerManager.showImagePicker(this.props.imagePickerOptions, (response) => {

    if(response.error){
      alert('Error getting the image. Please try again.');
    }else{

      let source = {uri: response.uri}; //the source of the photo to display

      this.setState({
        photo_style: {
          	position: 'relative',
      		width: response.width,
      		height: response.height
        },
        has_photo: true,
        photo: source,
        photo_data: response.data
      });

    }
  });

} _renderDetectFacesButton()方法负责呈现用于检测人脸的按钮。 如果has_photo in state设置为true ,则仅显示按钮。
_renderDetectFacesButton() {
  if(this.state.has_photo){
    return  (
    <Button
            text="Detect Faces"
            onpress={this._detectFaces.bind(this)}
            button_styles={styles.button}
            button_text_styles={styles.button_text} />
    );
  }
} 当按下检测面部按钮时,将执行_detectFaces()方法。 此方法向人脸检测API发出POST请求,并传递所选照片的base64表示形式以及一些选项作为查询参数。
请注意,我们正在传递照片的base64表示形式,但是文件blob是实际发送到服务器的文件,因为我们正在使用react-native-fetch-blob库。 收到响应后,将使用face_data更新状态以渲染脸框。
_detectFaces() {

  RNFetchBlob.fetch('POST', 'https://api.projectoxford.ai/face/v1.0/detect?returnFaceId=true&returnFaceAttributes=age,gender', {
      'Accept': 'application/json',
      'Content-Type': 'application/octet-stream',
      'Ocp-Apim-Subscription-Key': this.props.apiKey
  }, this.state.photo_data)
  .then((res) => {
    return res.json();
  })
  .then((json) => {

    if(json.length){
      this.setState({
        face_data: json
      });
    }else{
      //an empty array is returned if the API didn't detect any faces
      alert("Sorry, I can't see any faces in there.");
    }

    return json;
  })
  .catch (function (error) {
    console.log(error);
      alert('Sorry, the request failed. Please try again.' + JSON.stringify(error));
  });


}
请注意,在上面的代码中,我们处理了API无法通过提醒用户来检测照片中任何面Kong的情况。 发生这种情况的原因有两个:
- 该照片不包含任何面Kong。
- 面部检测算法无法识别照片中的面部,因为它们太大或太小,大的面部角度(头部姿势),光线不足或过多,或某些东西遮挡了面部的一部分。
所述_renderFaceBoxes()方法返回基于所述面部框face_data当前处于state 。 我们使用lodash的map()函数遍历人脸数据。 每个框的位置都绝对正确,以便一切都从Image组件的左上边缘开始。 每个框的top和left位置以及width和height均基于存储在faceRectangle对象中的值。
_renderFaceBoxes() {

  if(this.state.face_data){

    let views = _.map(this.state.face_data, (x) => {

      let box = {
        position: 'absolute',
        top: x.faceRectangle.top,
          left: x.faceRectangle.left
      };

      let style = {
        width: x.faceRectangle.width,
        height: x.faceRectangle.height,
        borderWidth: 2,
        borderColor: '#fff',
      };

      let attr = {
        color: '#fff',
      };

      return (
        <View key={x.faceId} style={box}>
        	<View style={style}></View>
        	<Text style={attr}>{x.faceAttributes.gender}, {x.faceAttributes.age} y/o</Text>
        </View>
      );
    });

    return <View>{views}</View>
  }

}
在注册组件之前,我们先添加样式。
const styles = StyleSheet.create({
  container: {
    flex: 1,
    alignItems: 'center',
    alignSelf: 'center',
    backgroundColor: '#ccc'
  },
  button: {
  margin: 10,
  padding: 15,
  backgroundColor: '#529ecc'
  },
  button_text: {
    color: '#FFF',
    fontSize: 20
  }
});
最后,我们注册该组件。
AppRegistry.registerComponent('Detector', () => Detector);3.构建并运行
生成并运行该应用程序,以查看是否一切正常。 不要忘记输入从Microsoft Azure门户获得的API密钥。 使用有效的API密钥,应用程序将无法检测到任何面Kong。
结论
而已。 在本教程中,您学习了如何使用Microsoft的面部检测API创建面部检测应用程序。 在这样做的同时,您学习了如何向Microsoft Azure添加服务以及如何向面部检测API发送请求。
如果您想了解有关面部检测API的更多信息,请查看其官方文档和Cognitive Services API Reference 。
翻译自: https://code.tutsplus.com/tutorials/how-to-create-a-face-detection-app-with-react-native--cms-26491


 3749
3749

 被折叠的 条评论
为什么被折叠?
被折叠的 条评论
为什么被折叠?
 到【灌水乐园】发言


