


 本文详细介绍如何在Yii2框架中集成Google账号API和OAuth2.0,实现用户注册和登录功能。通过更新Yii2-User库,配置Google项目及API,调整数据库迁移,以及配置AuthClient支持,读者将学会如何利用Google账号进行用户认证。
如果您问“ Yii是什么?” 查阅 Yii Framework简介 ,其中 介绍了Yii 的优点,并概述了Yii 2.0。
在本使用Yii2编程系列中 ,我指导读者使用PHP的Yii2框架。 在本教程中,我将继续指导您使用Google Accounts API和OAuth 2.0集成内置AuthClient 。
回顾使用Yii2进行编程:集成用户注册 ,它会介绍如何集成Yii2-User库以进行用户注册和身份验证,以及使用Yii2进行编程:AuthClient与Twitter,Google和其他网络的集成,这可能对您有所帮助。带有Twitter身份验证, 并且现已弃用对Google的OpenID的支持 。 本教程将向您展示如何从早期的Google OpenID集成过渡到使用Google Accounts API的OAuth 2.0集成。
对于这些示例,我们将继续构建该系列的框架,即我们的hello代码库。 使用此页面上的GitHub链接获取代码存储库的下载。
在开始之前,请记住,我确实会尝试参加以下讨论。 如果您有任何问题或建议,请在下面发表评论,或通过Twitter @reifman与我联系 。 您也可以直接给我发电子邮件 。
如果您注意到本系列中的内容有所延迟,那是因为我最近刚从脑外科手术回来。 感谢您的耐心配合和支持,很高兴能再次定期写信,我期待继续关注Yii2。
更新Yii2用户
自从我上一次写这些主题以来, Yii2 User有了很大的改进。 我们需要做的第一件事是更新其库。 您可以在命令行使用composer进行此操作:
composer require "dektrium/yii2-user:0.9.*@dev"这将自动更新composer.json:
"minimum-stability": "stable",
    "require": {
        "php": ">=5.4.0",
        "yiisoft/yii2": "*",
        "yiisoft/yii2-bootstrap": "*",
        "yiisoft/yii2-swiftmailer": "*",
        "dektrium/yii2-user": "0.9.*@dev",
        "stichoza/google-translate-php": "~2.0",
        "yiidoc/yii2-redactor": "2.0.0",
        "yiisoft/yii2-authclient": "*",
    },
然后,为Yii2 User运行最新的数据库迁移-这将使您的数据库与最新的库保持同步:
php yii migrate/up --migrationPath=@vendor/dektrium/yii2-user/migrations您可能会看到以下内容:
$ php yii migrate/up --migrationPath=@vendor/dektrium/yii2-user/migrations
Yii Migration Tool (based on Yii v2.0.6)

Total 4 new migrations to be applied:
    m141222_110026_update_ip_field
	m141222_135246_alter_username_length
	m150614_103145_update_social_account_table
	m150623_212711_fix_username_notnull

Apply the above migrations? (yes|no) [no]:yes
*** applying m141222_110026_update_ip_field
    > alter column registration_ip in table {{%user}} to string(45) ... done (time: 0.009s)
*** applied m141222_110026_update_ip_field (time: 0.030s)

*** applying m141222_135246_alter_username_length
    > alter column username in table {{%user}} to string(255) ... done (time: 0.010s)
*** applied m141222_135246_alter_username_length (time: 0.012s)

*** applying m150614_103145_update_social_account_table
    > add column code string(32) to table {{%social_account}} ... done (time: 0.008s)
    > add column created_at integer to table {{%social_account}} ... done (time: 0.009s)
    > add column email string to table {{%social_account}} ... done (time: 0.008s)
    > add column username string to table {{%social_account}} ... done (time: 0.009s)
    > create unique index account_unique_code on {{%social_account}} (code) ... done (time: 0.016s)
*** applied m150614_103145_update_social_account_table (time: 0.059s)

*** applying m150623_212711_fix_username_notnull
    > alter column username in table {{%user}} to string(255) NOT NULL ... done (time: 0.009s)
*** applied m150623_212711_fix_username_notnull (time: 0.011s)


Migrated up successfully.
您还必须将yii2-user的组件定义移动到\ hello \ config \ web.php中的模块:
'modules' => [
          'redactor' => 'yii\redactor\RedactorModule',
          'class' => 'yii\redactor\RedactorModule',
          'uploadDir' => '@webroot/uploads',
          'uploadUrl' => '/hello/uploads',
          'user' => [
                'class' => 'dektrium\user\Module',
                'enableUnconfirmedLogin' => TRUE,
                'confirmWithin' => 21600,
                'cost' => 12,
                'admins' => ['admin']
              ],
      ],
注册您的Google Project
为了让您的Yii2应用程序用户注册并使用他们的Google帐户登录,您需要在开发者控制台注册Google项目:
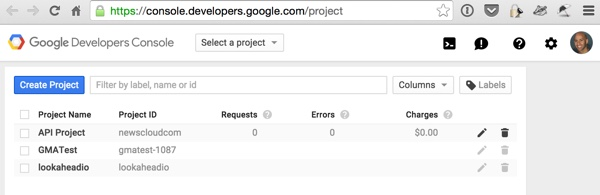
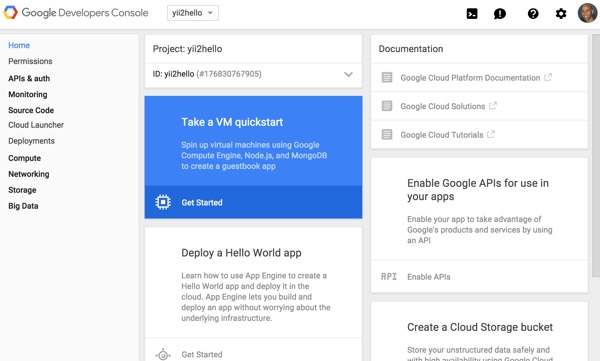
让我们创建一个名为yii2hello 的项目 :

您将使用左侧边栏菜单中的各种选项进入项目主页:
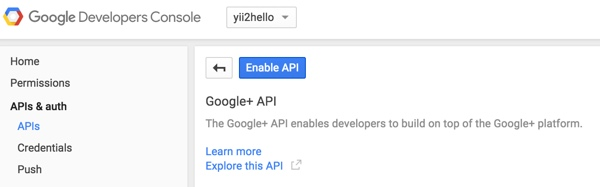
请务必与我们正在使用的Google请求访问任何API组的访问权限,这一点很重要。 对于Yii2用户,我们需要启用Google+ API。 点击API和身份验证> API,然后搜索google + :
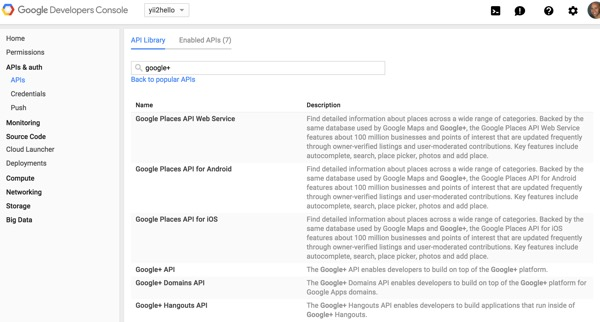
然后,点击启用API :
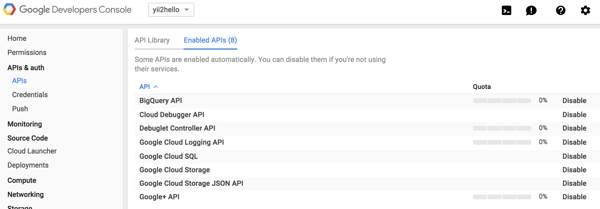
您会看到已启用的API列表,其中现在包括Google+ API :
接下来,我们需要添加凭据,以便我们可以向Google验证针对该项目活动的API请求。 点击凭据 :
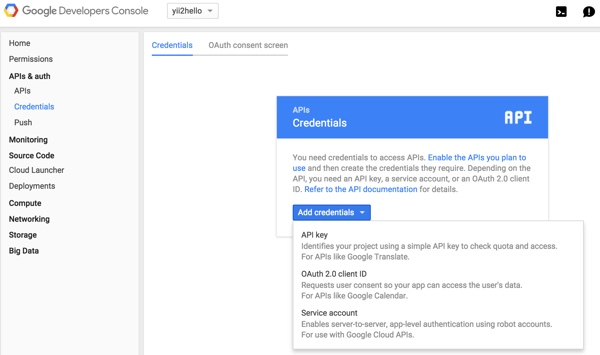
让我们使用上面的OAuth 2.0客户端ID选项。 然后,将要求您创建OAuth同意屏幕,并填写有关您的应用程序的信息,这些信息将呈现给尝试注册或登录您的应用程序的用户:

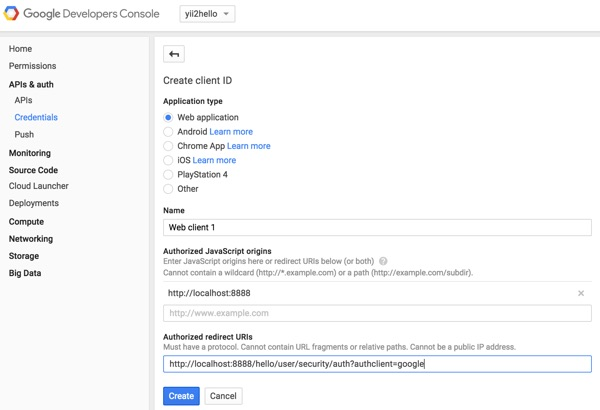
在“ 凭据”页面上,我们将选择Web application ,并且由于我们在本地进行测试,因此我们将为身份验证回调提供两个设置。 我将端口8888用于本地开发。 因此,我的授权JavaScript起源将为http:// localhost:8888 ,Yii2用户要求的授权重定向URI路径为http:// localhost:8888 / hello / user / security / auth?authclient = google 。
将为您提供API密钥,也称为客户端ID和客户端密钥 :
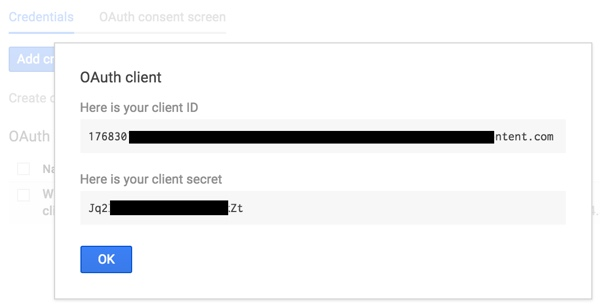
我将在下面查看将这些键放置在何处。
配置AuthClient支持
在“ 从GitHub保护您的密钥”中 ,我详细描述了如何使用配置文件存储我的所有密钥(与GitHub存储库分开)。 然后,将此文件包含在我的Yii配置文件的开头。 这样可以避免我不小心签入我的存储库密钥并破坏我的帐户。
在我的/var/secure/hello.ini文件中,我存储了应用程序的所有密钥-将Google API密钥也放在此处:
oauth_google_clientId="41xxxxxxxxxxxxxeusercontent.com"
oauth_google_clientSecret="LmxxxxxxxxxxxxxxxxxxxxxxFJ4"
oauth_twitter_key ="rxkxxxxxxxxxxxxxxxxxopjU"
oauth_twitter_secret="b7gU4twxxxxxxxxxxxxxxxxxxxxxxxxxxxxxxxxxxkLy0z2e"
smtp_host = "mailtrap.io"
smtp_username = "2xxxxxxxxxxxxxxxxx2"
smtp_password = "2xxxxxxxxxxxxxxxxx5"
mysql_host="localhost"
mysql_un="xxxxxxxxxxxx"
mysql_db="hello"
mysql_pwd="xxxxxxxxxxxx" 我们需要在\config\web.php中的Web配置文件的AuthClient配置设置中添加对这些键的引用。 为您希望支持的所有第三方服务添加数组元素:
<?php
$config = parse_ini_file('/var/secure/hello.ini', true);
$params = require(__DIR__ . '/params.php');
$config = [
    'id' => 'basic',
    'basePath' => dirname(__DIR__),
    'bootstrap' => ['log'],
    'language'=>'en', // back to English
    'components' => [
      'view' => [
              'theme' => [
                  'pathMap' => [
                      '@dektrium/user/views' => '@app/views/user'
                  ],
              ],
          ],
      'authClientCollection' => [
              'class' => 'yii\authclient\Collection',
              'clients' => [
                  'google' => [
                      'class'        => 'dektrium\user\clients\Google',
                      'clientId'     => $config['oauth_google_clientId'],
                      'clientSecret' => $config['oauth_google_clientSecret'],
                  ],
                  'twitter' => [
                                  'class' => 'yii\authclient\clients\Twitter',
                                  'consumerKey' => $config['oauth_twitter_key'] ,
                                  'consumerSecret' => $config['oauth_twitter_secret'] ,
                              ],
                ],
],另外,在MailTrap简介:用于应用程序电子邮件的生产前测试的伪SMTP服务器中 ,我开始将MailTrap的自定义SMTP设置集成到我的Yii SwiftMailer配置中以进行测试。 这将确保我们在本地开发平台上注册后会收到注册电子邮件。

对于本教程,我发现我必须将\config\web.php SwiftMailer的端口信息更新为2525:
'mailer' => [
                'class' => 'yii\swiftmailer\Mailer',
                'viewPath' => '@app/mailer',
                'useFileTransport' => false,
                'transport' => [
                    'class' => 'Swift_SmtpTransport',
                    'host' => $config['smtp_host'],
                    'username' => $config['smtp_username'],
                    'password' => $config['smtp_password'],
                    'port' => '2525',
                    'encryption' => 'tls',
                                ],
            ],
用您的Google帐户注册
现在,我们终于准备好使用Yii2 User的前端界面进行探索。 让我们从注册开始。 点击菜单中的注册选项,您将看到以下表格:
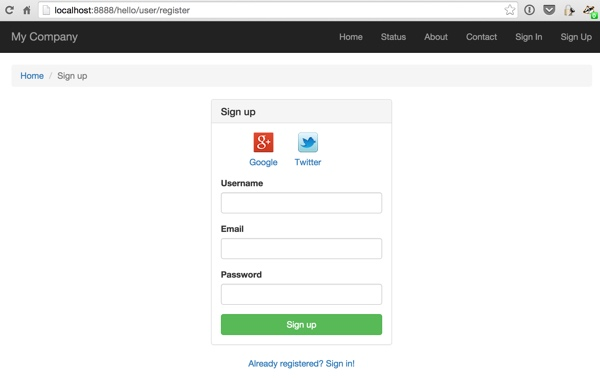
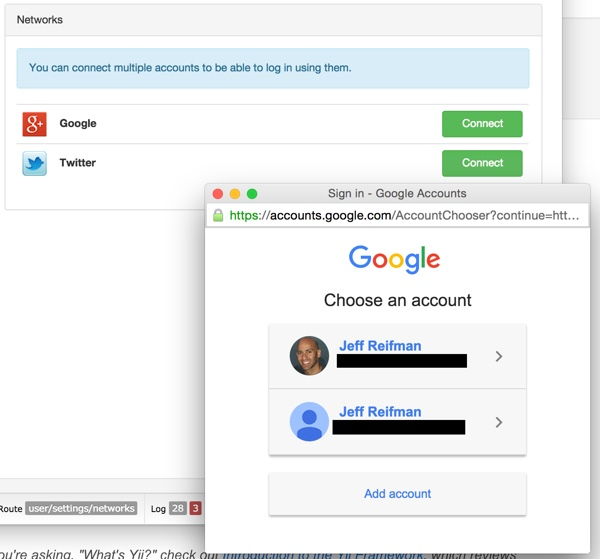
要注册我们今天创建的所有内容,请点击Google+图标。 由于我仅登录了一个Google帐户,因此将出现一个透明的弹出窗口并重定向到完成我的注册:
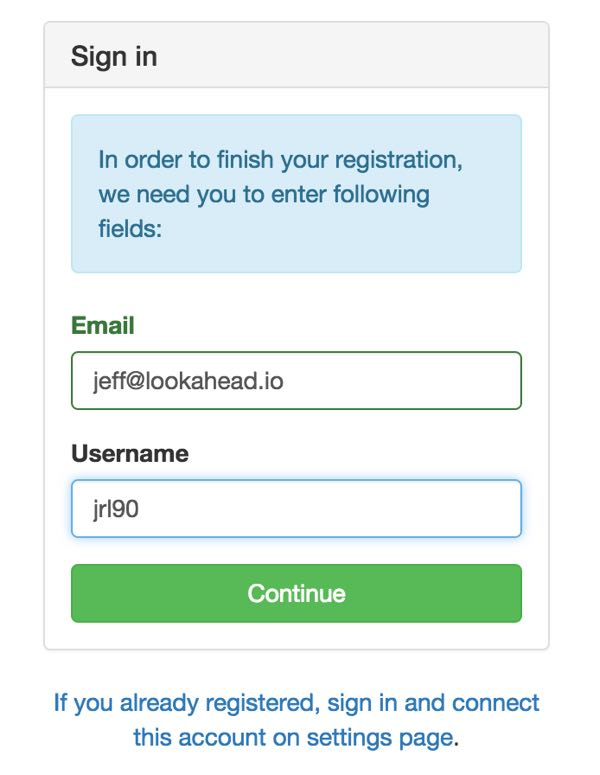
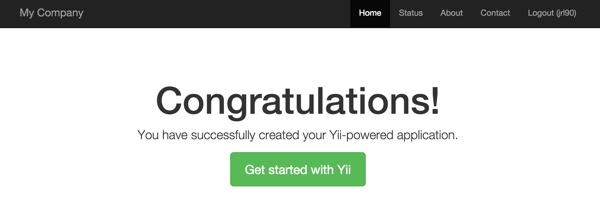
您应该在右上角看到显示已通过身份验证的主页:
使用您的Google帐户登录
点击注销 ,然后我们可以尝试使用Google+图标登录。 点击标题菜单中的登录 :

然后,再次单击Google+图标 。 您将直接进入主屏幕,显示您已再次登录。 太酷了吧? 但是,如果您登录了两个Google帐户怎么办?
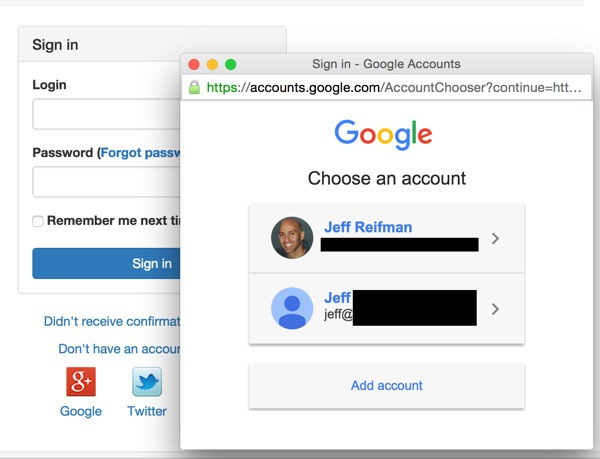
选择用于登录的Google帐户后,您将以身份验证模式返回首页。
用户配置文件和连接区域
尽管尚未在Bootstrap标题菜单中对其进行配置,但是如果您访问http://localhost:8888/hello/user/settings/networks ,则会在Yii2 User中看到第三方帐户的新连接界面:
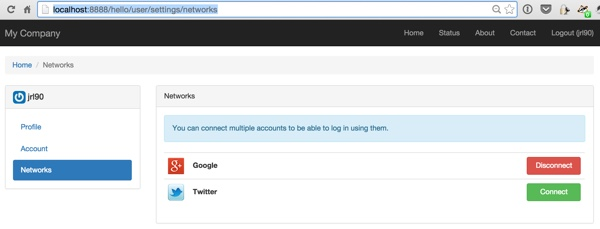
登录后,您的用户可以从此处连接和断开其社交帐户。 还有一个帐户管理和用户个人资料区域。 做得很好。
您可能需要查看我的“ 用PHP构建您的启动”系列 ,该系列使用Yii2的高级模板和第三方集成,目前没有Yii2 User。 但是,现在有了将Yii2 User与高级模板集成的指南 ,因此我可能会尽快进行更新。
下一步是什么?
当我继续深入研究框架的不同方面时,请观看“ 使用Yii2编程”系列中即将发布的教程。
我欢迎功能和主题要求。 您可以在下面的评论中发布它们,或在我的Lookahead Consulting网站上给我发送电子邮件 。
如果您想知道下一个Yii2教程何时到达, 请在Twitter上关注我@reifman或查看我的讲师页面 。 发布后,我的讲师页面将包含本系列中的所有文章。
- 使用Yii2编程:集成用户注册(Tuts +)
- 使用Yii2编程:与Twitter,Google和其他网络(Tuts +)的AuthClient集成
- Yii 2 AuthClient扩展指南
- Yii2 OAuth2库文档
- Yii2开发者交流 ,我的Yii2资源网站
翻译自: https://code.tutsplus.com/tutorials/how-to-program-with-yii2-google-authentication--cms-24987


 被折叠的 条评论
为什么被折叠?
被折叠的 条评论
为什么被折叠?
 到【灌水乐园】发言


