


Titan Framework提供了广泛的选项,您可以在插件或主题中添加这些选项,以便为最终用户提供动态设置。 今天,我将讨论最基本的两个选项: text类型选项和textarea选项。 让我们看看如何在管理面板,元框或主题定制器部分中创建文本类型选项。
Titan Framework中的文本类型选项
在Titan Framework中,有几种类型的选项,今天我们将回顾一下类型为text 。 看起来是这样的:

text Titan Framework中的type选项包含多种设置参数:
- name :这控制显示选项的名称。
- id :唯一名称,用于获取保存的值。
- desc :显示带有选项名称的简短描述。
- default :此参数指定选项的默认值。
- livepreview :(可选)仅当在主题定制器部分中使用
text类型选项时,才使用此参数。 它有助于显示主题更改的实时预览。 - css :(可选)在管理页面或主题定制器部分中添加文本字段时,此参数可帮助生成CSS。 怎么样?
- 占位符 :(可选)每当文本字段为空时,它将显示伪文本。
- is_password :(可选)附加标签,位于表单字段之后。 接受字母数字和符号。 潜在的应用包括单位指示,特别是如果该字段与数字一起使用时。 例如,如果您使用该字段作为像素数的输入,则应将值输入为“ px”。 或者,如果以百分比为单位,则输入“%”作为值。
所有这些参数都是is_password参数为boolean string类型。 如果不需要可选参数,则无需包含它们。
文本类型选项的可用容器
容器基本上是您的管理页面,选项卡,元框和主题定制器部分。 这些基本上就是您放置选项的区域。 并非所有选项类型都可以放置在这些容器中。 但是text type选项可以在任何容器中使用,即:
- 管理面板
- 管理员标签
- 元框
- 主题定制器
让我们修改一下如何在Titan Framework中创建选项:
- 通过
getInstance()函数调用唯一实例。 - 通过容器内的
createOption()函数创建选项。 - 通过
getOption()函数获取保存的选项的值。
因此,让我们回顾一下如何在这些容器中的每个容器中创建text类型选项。
在管理面板中创建文本类型选项
声明示例
添加text使用以下代码 管理面板中的选项:
<?php
/**
 * Create the options
 *
 * Create options for our panel that we just created called $aa_panel
 *
 */
$aa_panel->createOption( array(

    'id'   => 'aa_txt', // The ID which will be used to get the value of this option
    'type' => 'text', // Type of option we are creating
    'name' => 'My Text Option', // Name of the option which will be displayed in the admin panel
    'desc' => 'This is our option' // Description of the option which will be displayed in the admin panel

) ); 此代码将添加一个text 在管理面板$aa_panel输入type选项。 createOption()函数占用text选项支持的参数数组。
在这种情况下,我使用了id,type,name和desc之 类的参数。 除此之外,ID是最重要的参数,并且应始终唯一。 稍后将使用它来获取保存的值。
所以,用ID 文本选项aa_txt和名称“ 我的文本选项 ”的管理面板中创建$aa_panel 。

上面的屏幕截图在管理面板“ 整洁的选项”中显示了“ 我的文本 选项” 。
这是一个自定义管理面板,并已使用Titan Framework创建。 如果您想知道如何使用,请参考本系列的前几篇文章。
用法示例
使用以下代码从此文本选项中检索保存的值。
<?php

// 1. Get the titan framework instance and save it to a variable
$titan = TitanFramework::getInstance( 'neat' );

/**
 *
 * Getting option value
 *
 */
$aa_txt_val = $titan->getOption( 'aa_txt' );

/**
 *
 * Print the option value
 *
 */
echo $aa_txt_val; // Print the value saved in aa_txt option 我将text选项的ID用作getOption()函数中的参数,并将该值保存在变量$aa_txt_val 。 瞧! 剩下要做的就是使用这个值,这是我通过使用echo命令完成的。
在前端显示结果
假设我输入了演示值“ AA Text Settings”并保存了它。 因此,这是上面代码输出的屏幕截图。

在管理标签内创建文本类型选项
声明示例
让我们看一下“管理”标签中“ 文本”选项的代码。
<?php

    // Create options for $aa_panel2 inside the $aa_tab1
    $aa_tab1->createOption( array(

		'id'   => 'aa_txt_in_tab1_panel2', // IDs should always be unique. The ID which will be used to get the value of this option
		'type' => 'text', // Type of option we are creating
		'name' => 'My Text Option', // Name of the option which will be displayed in the admin panel
		'desc' => 'This is our option' // Description of the option which will be displayed in the admin panel

) ); 这次,我在$aa_tab1创建了一个ID为aa_txt_in_tab1_panel2的text类型选项。 $aa_tab1是一个管理选项卡,位于一个自定义管理面板$aa_panel2 。 我以前的文章中已经解释了创建管理标签的过程。 因此,您可以向他们寻求帮助。
请注意,我使用了相同的名称,这意味着名称可以相同,但是ID始终是唯一的 。
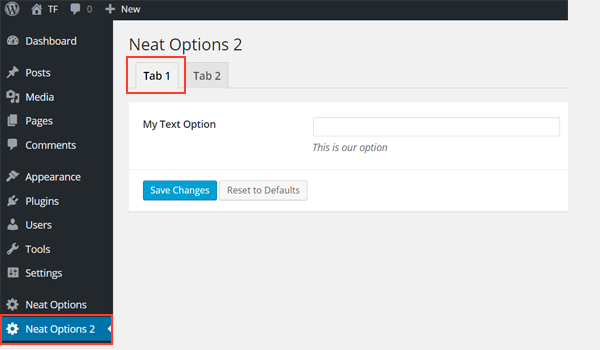
上面的屏幕截图显示了Neat Options 2面板的Tab 1内的My Text Option 。
用法示例
让我们从此文本选项中检索保存的值。
<?php
// 1. Get the titan framework instance and save it to a variable
$titan = TitanFramework::getInstance( 'neat' );
// Value of first tab text box.
$aa_txt_in_tab1_panel2_val = $titan->getOption( 'aa_txt_in_tab1_panel2' );
/**
*
* Print the option value
*
*/
?>
<div>
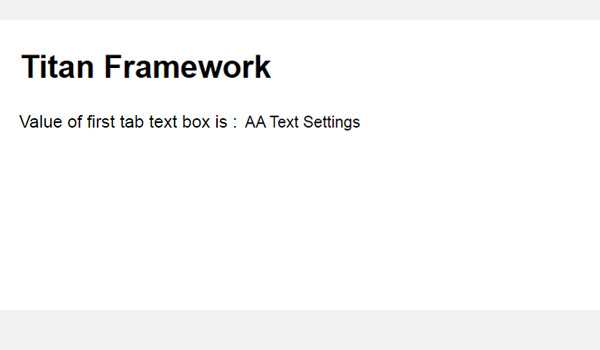
Value of first tab text box is : <?php echo $aa_txt_in_tab1_panel2_val; ?>
</div> getOption()函数通过ID aa_txt_in_tab1_panel2检索保存的值,然后通过echo命令将其打印出来。
在前端显示结果
我输入的值是“ AA文本设置” ,其在前端的输出如下所示:
在元框内创建文本类型选项
声明示例
您可以添加text 通过以下代码在metabox内输入type选项:
<?php

    /**
     * Create the options for metabox
     *
     * Create options for our metabox that we just created called $aa_metbox
     *
     */
    $aa_metbox->createOption( array(

        'id'   => 'aa_mb_txt', // The ID which will be used to get the value of this option
        'type' => 'text', // Type of option we are creating
        'name' => 'My Text Option', // Name of the option which will be displayed in the admin panel
        'desc' => 'This is our option' // Description of the option which will be displayed in the admin panel

    ) );
同样, createOption()函数在名为$aa_metbox添加了一个文本选项。 这里使用相同的参数,ID为aa_mb_txt 。
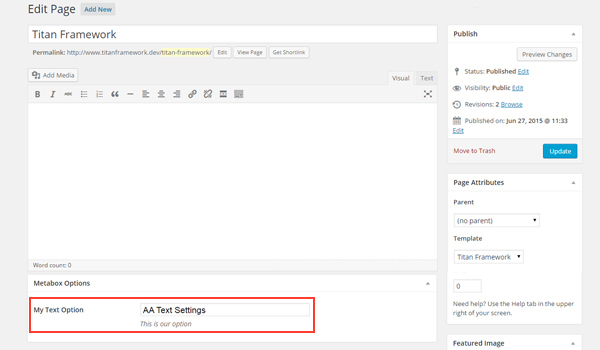
上面的屏幕截图显示了一个页面编辑屏幕,您可以在其中找到一个带有“ 我的文本选项”的新元框。 我们在本系列的上一篇文章中创建了元框,因此如果您需要修改概念,请参考它。
用法示例
因此,这是获取保存值的代码。
<?php
// 1. Get the titan framework instance and save it to a variable
$titan = TitanFramework::getInstance( 'neat' );
/**
* Value of metabox.
*
* Notice the use of get_the_ID(). It is because metabox is created for all
* the post types we defined. To get the value of a metabox option for a specific page/post
* we need to give getOptions() function the ID of our post/page. Which is done like this.
*
*/
$aa_mb_txt_val = $titan->getOption( 'aa_mb_txt', get_the_ID() );
/**
*
* Print the option value
*
*/
?>
<div>
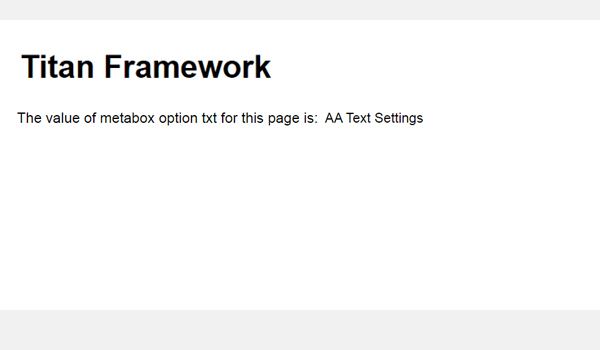
The value of metabox option txt for this page is: <?php echo $aa_mb_txt_val; ?>
</div> 除了第15行的getOption()函数具有两个参数外,其他内容几乎相同。
-
aa_mb_txt,这是我们创建的文本类型选项的ID
-
get_the_ID()函数,它将返回当前帖子/页面/帖子类型的ID。
之后,我只使用了echo命令并打印了该值。
在前端显示结果
我将“ AA文本设置”保存为该选项的值,并发布了该页面。 上面的代码用于在前端显示该值。
在主题定制程序中创建文本类型选项
声明示例
最后,让我们编写用于创建text的代码 主题定制器部分中的type选项。
<?php

// Header text
$aa_section1->createOption( array(

    'id'   => 'aa_sec_head_txt', // The ID which will be used to get the value of this option
    'type' => 'text', // Type of option we are creating
    'name' => 'Site Header Text',// Name of the option which will be displayed in the admin panel
    'desc' => 'This is the site header' // Default value of our option

) ); 一条text 在主题定制器部分$aa_section1创建ID为aa_sec_head_txt type选项。 如果您想了解如何在Titan框架中添加定制程序部分,请参阅我以前的文章。

上面的屏幕截图显示了一个名为“ 我的部分”的主题定制器部分,其中正在显示“ 网站标题文本”选项。
用法示例
这是获取保存值的代码。
<?php

// 1. Get the titan framework instance and save it to a variable
$titan = TitanFramework::getInstance( 'neat' );

// Header text
$aa_sec_head_txt_val = $titan->getOption( 'aa_sec_head_txt' );

/**
 *
 * Print the option value
 *
 */
?>


    <h1><?php echo  $aa_sec_head_txt_val; ?></h1>
<!-- / Prints the value saved in aa_sec_head_txt option --> aa_sec_head_txt是text 类型选项,然后使用getOption()函数再次检索其值。 这里没有火箭科学。
在前端显示结果
我输入了“ 我的文本 选项 标题” ,您可以在下面看到实时预览结果:

接下来,让我们介绍Titan框架中的textarea类型选项。 让我们回顾一下如何利用Titan框架仅需几行代码即可在管理面板,元框和定制程序部分中创建textarea类型选项。
Titan框架中的Textarea类型选项
您一定已经在几个WordPress插件和主题中看到了textarea类型选项。 使用Titan Framework,您可以使用createOption()函数添加这种类型的选项。 此选项的一些参数是:
- name :此参数决定
textarea的显示名称。 - id :这是一个唯一名称,用于检索保存的选项值。
- desc :显示带有选项名称的单行描述。
- default :(可选)它代表
textarea的默认设置 选项。 - livepreview :(可选)此参数仅与主题定制器部分配合使用,并显示您所做更改的实时预览。
- css :(可选)每当一个
textarea生成CSS 选项是在管理页面和/或主题定制器部分内创建的。 - 占位符 :(可选)如果要在文
textarea显示一些虚拟文本 选项,然后使用此参数。 - is_code :(可选)此参数执行检查以查看外观更好的代码输入,如果为true,则代码字体变为等宽。
除is_code为boolean以外,所有参数均为string类型。
Textarea类型选项的可用容器
此选项的类型为textarea ,可以在以下位置添加:
- 管理员页面
- 管理员标签
- 元框
- 主题定制器
但是在解释如何在所有这些容器中添加此选项之前,让我总结一下应该遵循的基本步骤:
- 使用Titan框架时,在每个新文件的开头调用
getInstance()函数。 - 使用
createOption()函数添加任何新选项。 - 通过调用
getOption()函数获取保存的选项值。
讲究要点,我只会解释如何在这些容器中添加此选项。 如果您想知道如何创建这些容器,请阅读本系列以前的文章。
在管理面板中创建Textarea类型选项
声明示例
我将创建一个textarea 管理面板中的以下选项。
<?php
    /**
     *
     * Create the Textarea option
     *
     */
    $aa_panel->createOption( array(

        'id'   => 'aa_txtarea', // The ID which will be used to get the value of this option
        'type' => 'textarea', // Type of option we are creating
        'name' => 'My Textarea Option', // Name of the option which will be displayed in the admin panel
        'desc' => 'This is our option' // Description of the option which will be displayed in the admin panel

) ); 一个textarea 是通过createOption()函数在管理面板$aa_panel创建的。 该函数占用一个参数数组,我将仅使用该选项支持的参数。 我用过id , type , name和desc 。 参数type决定了它是哪种类型的选项。
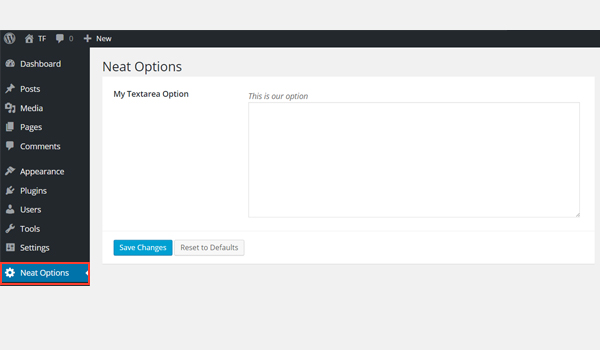
一个textarea 上面创建的截图中显示了ID为aa_txtarea且名称为My Textarea Option的选项 。
用法示例
现在,我将检索最终用户在此文本区域内输入的内容的保存值。
<?php
// 1. Get the titan framework instance and save it to a variable

$titan = TitanFramework::getInstance( 'neat' );

// 2. Get the value via ID using getOption function
$aa_txtarea_val = $titan->getOption( 'aa_txtarea' );

/**
 *
 * Print the option value
 *
 */
echo $aa_txtarea_val; // Print the value saved in aa_txt option 要检索保存的值,请首先通过getInstance()函数获取一个唯一实例,然后再通过getOption()函数获取一个唯一实例,在该实例中,我们使用textarea的ID 作为参数。
然后,通过echo命令在前端打印保存的值。
在前端显示结果
让我们在文textarea输入任何虚拟文本并保存。

这是前端输出的屏幕截图。
现在,让我们在管理标签中创建此选项。
在管理标签内创建Textarea类型选项
声明示例
这是代码:
<?php

    // Create textarea option
    $aa_tab1->createOption( array(

        'id'   => 'aa_txtarea_in_tab1_panel2', // IDs should always be unique. The ID which will be used to get the value of this option
        'type' => 'textarea', // Type of option we are creating
        'name' => 'My Textarea Option', // Name of the option which will be displayed in the admin panel
        'desc' => 'This is our option' // Description of the option which will be displayed in the admin panel

) ); 我在管理标签$aa_panel2内创建了一个ID为aa_txtarea_in_tab1_panel2的textarea选项。 它与名称My Textarea Option相对 。

上面的屏幕截图在我的第二个管理面板中显示了该选项,即Neat Options 2 。
用法示例
让我们获取保存的值。
<?php

// 1. Get the titan framework instance and save it to a variable
$titan = TitanFramework::getInstance( 'neat' );
// Value of first tab text box.
$aa_txtarea_in_tab1_panel2_val = $titan->getOption( 'aa_txtarea_in_tab1_panel2' );

    /**
     *
     * Print the option value
     *
     */
     <div>
        <h2> Value of first tab textarea box is : </h2>
        <br/>
         <?php echo $aa_txtarea_in_tab1_panel2_val; ?>
</div> 再次获取一个实例,然后使用getOption()函数并输入ID作为其参数。 接下来,我将在div标签内使用echo命令在前端打印输出。
在前端显示结果
我再次使用相同的伪文本作为示例。

最终结果如上所示。
在元框内创建Textarea类型选项
声明示例
现在,我将创建一个textarea 元框内的选项。
<?php
    /**
     *
     * Create the options for metabox
     *
     */
    $aa_metbox->createOption( array(

        'id'   => 'aa_mb_txtarea', // The ID which will be used to get the value of this option
        'type' => 'textarea', // Type of option we are creating
        'name' => 'My Textarea Option', // Name of the option which will be displayed
        'desc' => 'This is our option' // Description of the option which will be displayed

) ); createOption()函数在$aa_metbox添加一个ID为aa_mb_txtarea的文本区域 。 此选项出现在所有页面/帖子编辑屏幕上。
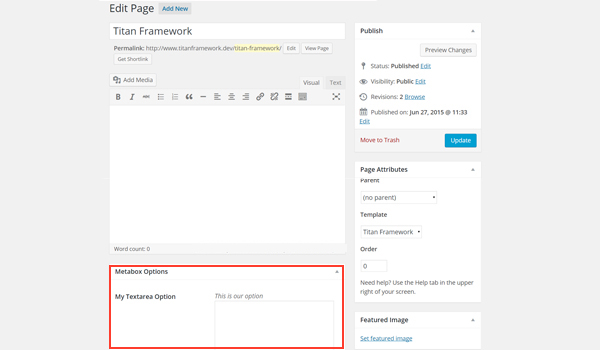
上面的屏幕截图在页面编辑屏幕的末尾显示了一个名为“ 我的textarea 选项”的textarea 。 “ 添加新帖子”部分中也会出现相同的内容。
用法示例
现在,我将编写用于检索其保存的选项值的代码。
<?php
// 1. Get the titan framework instance and save it to a variable
$titan = TitanFramework::getInstance( 'neat' );
/**
 *
 * Notice the use of get_the_ID(). It is because metabox is created for all
 * the post types we defined. TO get the value of a metabox option for a specific page/post
 * we need to give getOptions() function the ID of our post/page. Which is done like this.
 *
 */
$aa_mb_txtarea_val = $titan->getOption( 'aa_mb_txtarea', get_the_ID() );

/**
 * Print the option value
 */

    <div>
        <h2>The value of metabox option textarea for this page is:</h2>
        <br/>
        <?php echo $aa_mb_txtarea_val; ?>
</div> 再次重复该过程,即先获取一个实例,然后使用getOption()函数并使用我们的post_type的ID提交textarea的ID。 结果保存在名为$aa_mb_txtarea_val的变量中。 最后,我在div标签中回显了输出。
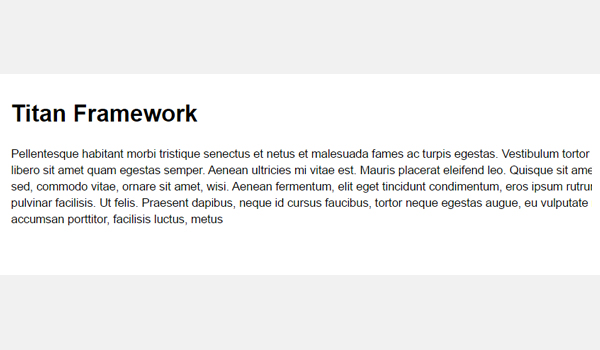
在前端显示结果
让我们将最终输出上传到前端。

让我们转到最后的部分,我将创建一个textarea 主题定制器部分中的选项。
在主题定制器部分中创建Textarea类型选项
声明示例
使用以下代码。
<?php
    /**
     *
     * Create the options for $aa_section1
     *
     */
    $aa_section1->createOption( array(

        'id'   => 'aa_sec_desc_txtarea', // The ID which will be used to get the value of this option
        'type' => 'textarea', // Type of option we are creating
        'name' => 'Site Description Textarea',// Name of the option which will be displayed
        'desc' => 'This is the site description' // Default value of our option
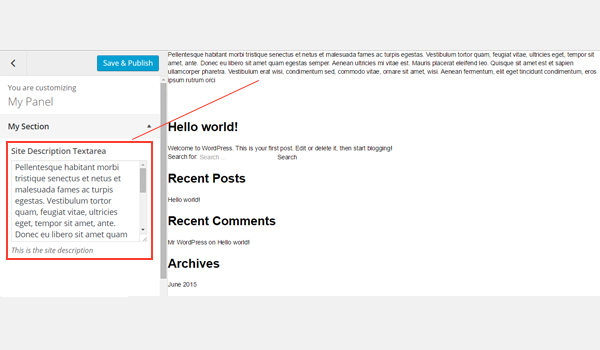
) ); 一个textarea ID为aa_sec_desc_txtarea ID存在于主题定制器部分$aa_section1 。

一个 上图中的textarea类型选项与My Section主题定制器部分中的名称Site Description Textarea相对显示。
用法示例
让我们获取保存的选项值。
<?php
// 1. Get the titan framework instance and save it to a variable
$titan = TitanFramework::getInstance( 'neat' );

// Getting values
$aa_sec_desc_txtarea_val = $titan->getOption( 'aa_sec_desc_txtarea' );

    /**
     *
     * Print the option value
     *
     */
    <p> <?php echo  $aa_sec_head_txt_val; ?> </p>
    <!-- / Print the value saved in aa_sec_desc_txtarea option -->
该代码以与上面讨论的几乎相同的方式检索和打印值。
在前端显示结果
这是我的输入的实时预览。
例如,您可以使用此选项在目标网页上添加简短说明。
结论
就是这样 现在您知道了text位置和方式 类型选项和textarea类型选项可以随Titan框架一起添加。
我见过一些制造产品的人在最终用户可能希望添加更多数据而不仅仅是几个单词的地方滥用text type选项。 在这种情况下,应始终使用textarea类型选项。
整个过程非常简单容易。 希望您喜欢阅读本文。 如果您有任何疑问,可以在下面评论或在Twitter上与我联系。


 1959
1959

 被折叠的 条评论
为什么被折叠?
被折叠的 条评论
为什么被折叠?
 到【灌水乐园】发言


