


 本文深入探讨Framer的高级功能,包括嵌套层、图层效果、可滚动层及动画控制,助您创建复杂交互原型。
介绍
在我以前关于Framer的教程中 ,您学习了如何使用图层,状态和事件为iOS和Android应用程序创建简单的模型。 虽然Framer还有很多其他功能。 在本教程中,我将重点介绍框架的一些高级功能,这些功能使您可以向模型中添加更复杂的交互和效果。
1.嵌套层
由于可以将图层嵌入到另一个图层中,因此可以使用Framer创建复杂的图层层次结构。 嵌入层称为子层,嵌入该层的层称为其上层。 以下代码段显示了如何使用superLayer属性将层嵌入另一个层中。
var layer1 = new Layer({
	width:200,
	height:200
});

var layer2 = new Layer({
	width:100,
	height:100,
	superLayer: layer1 // makes this layer a child of layer1
});
您可以使用图层层次结构来模拟实体模型中的多个屏幕。 让我通过一个示例向您展示如何做到这一点。 考虑具有两个屏幕,登录屏幕和欢迎屏幕的实体模型。
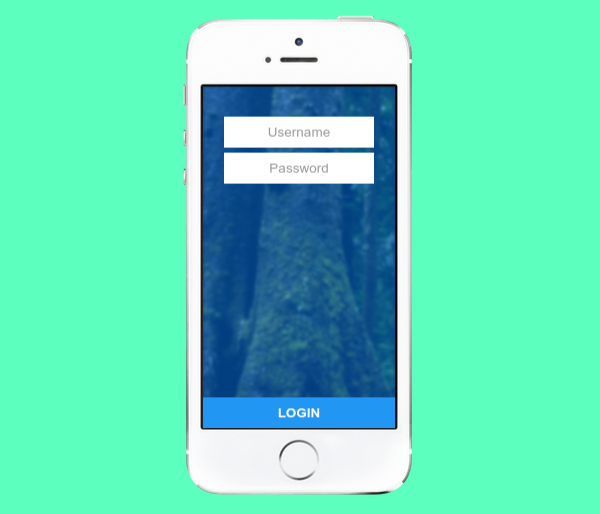
登录屏幕包含用户名和密码的输入字段,以及一个提交按钮。 欢迎屏幕包含图像和几行文字。
要创建这样的模型,您可以将登录和欢迎屏幕视为超层,并将其包含的用户界面元素视为子层。 首先创建超级层。
var loginScreen = new Layer({
	width: Screen.width,
	height: Screen.height,
});

var welcomeScreen = new Layer({
	width: Screen.width,
	height: Screen.height,
});
如您所见, loginScreen和welcomeScreen现在是空白的Layer对象。 让我们向loginScreen层添加一些子层。
// The CSS styles to be applied to the layers
var style = {
    paddingTop: "25px",
    color: "#999",
    background: "#FFF"
};

//Create the username field
var usernameField = new Layer({
    width: 500,
    height: 100,
    y: 100,
    html: "Username",
    style: style,
    superLayer: loginScreen // child of loginScreen
});
usernameField.centerX();

// Create the password field
var passwordField = new Layer({
    width: 500,
    height: 100,
    y: 220,
    html: "Password",
    style: style,
    superLayer: loginScreen // child of loginScreen
});
passwordField.centerX();

// Create the submit button
var submitButton = new Layer({
    width: Screen.width,
    height: 100,
    y: Screen.height - 100,
    html: "LOGIN",
    style: {
        paddingTop: "25px",
        color: "#FFFFFF",
        fontWeight: "bold"
    },
    backgroundColor: "#2196F3",
    superLayer: loginScreen // child of loginScreen
}); 同样,让我们现在将一些子层添加到welcomeScreen层中。
// Create a layer to show a profile pic
var profilePic = new Layer({
    width:400,
    height: 400,
    borderRadius: 200,
    image: 'profile.jpg',
    y:100,
    superLayer: welcomeScreen // child of welcomeScreen
});
profilePic.centerX();

// Create a layer for the welcome text
var text = new Layer({
    width: 400,
    height:100,
    y:600,
    html: "Welcome Jenny",
    backgroundColor: "",
    style: {
        color: "#FFFFFF"
    },
    superLayer: welcomeScreen // child of welcomeScreen
});
text.centerX();
在这一点上,如果您尝试在浏览器中查看原型,则看起来会有些混乱。 这两个超级层( loginScreen和welcomeScreen )都同时可见。
要隐藏图层,请将其visible属性设置为false 。 在welcomeScreen开始时,如何将welcomeScreen层保持隐藏状态:
welcomeScreen.visible = false; 要改变从登录屏幕视图到欢迎屏幕,你可以简单地隐藏loginScreen层和打开的知名度welcomeScreen层。 以下代码段向您展示了如何在submitButton的click处理程序中submitButton :
submitButton.on("click", function(){
	loginScreen.visible = false;
	welcomeScreen.visible = true;
});
返回浏览器并刷新页面,现在可以看到您的模型更有意义。 请记住,用于查看模型的浏览器应基于WebKit,例如Chrome或Safari。

如果您不喜欢即时开关,则可以通过使用animate函数来动画化过渡(例如图层的opacity来动画化过渡。
submitButton.on("click", function(){

	welcomeScreen.opacity = 0;
	welcomeScreen.visible = true; // welcomeScreen is still invisible
								  // because its opacity is zero

	loginScreen.animate({
		properties: {
			opacity: 0
		}
	});
	welcomeScreen.animate({
		properties: {
			opacity: 1
		},
        time: 2 // Duration of animation is 2 seconds
	});
});
现在是这样的过渡:

2.使用图层效果
使用Framer,您可以将各种图像效果(例如高斯模糊,色相旋转,亮度/对比度调整,颜色反转,棕褐色调添加等)应用到Layer对象。
以下代码段显示了如何使用blur效果创建模糊的背景:
// Create a background layer
var bg = new BackgroundLayer({
	image: "bg.jpg"
});

bg.blur = 5; // Set the gaussian blur to 5 pixels
结果如下所示:
其余效果以类似方式使用。 例如,要降低bg层的对比度,您需要修改contrast属性:
bg.contrast = 50;3.创建可滚动层
要使图层可滚动,您需要将其嵌入ScrollComponent对象的内容层。 创建ScrollComponent类似于创建Layer对象:
var scroll1 = new ScrollComponent({
    width: Screen.width,
    height: Screen.height,
}); 以下代码块向您展示了如何将Layer对象嵌入到scroll1的content中:
var layer3 = new Layer({
    width: 2000,
    height: 2000,
    image: "pattern.jpg",
    superLayer: scroll1.content // Embed inside content of scroll1
}); 这是ScrollComponent实际效果:
请注意,只有当图层的尺寸大于其所嵌入的ScrollComponent的尺寸时,才可以进行滚动。
4.显示分页数据
有时,您可能希望将数据显示为一组页面,而不是连续滚动。 例如,您可能想要创建一个界面,用户可以在其中滑动一组图像。 这可以使用PageComponent完成。 PageComponent类是从ScrollComponent类派生的,并且具有相同的构造函数。
要将Layer添加到PageComponent ,您需要使用addPage函数。 以下代码显示了如何创建PageComponent并向其中添加一些图像层:
// Create a PageComponent that fills up the screen
var pageComponent = new PageComponent({
	width: Screen.width,
	height: Screen.height
});

// Create three images layers
var image1 = new Layer({
    width: Screen.width,
    height: Screen.height,
    image: "pink.jpg"
});

var image2 = new Layer({
    width: Screen.width,
    height: Screen.height,
    image: "grey.jpg"
});

var image3 = new Layer({
    width: Screen.width,
    height: Screen.height,
    image: "blue.jpg"
});

// Add all the image layers to pageComponent
pageComponent.addPage(image1);
pageComponent.addPage(image2);
pageComponent.addPage(image3);
结果看起来像这样:
5.管理动画
您已经知道可以使用animate函数为Layer对象的属性设置动画。 但是,调用animate立即启动动画。 如果要控制动画的开始或停止时间,则可以改用“ Animation对象。
创建Animation对象的方法如下:
var animation1 = new Animation({
	layer: mylayer, // name of the layer that should
				    // be animated

	// Properties that should change
	properties: {
		x: 400
	}
}); 然后,您可以使用直观命名的start , stop和reverse函数来管理动画。 例如,要启动动画,请调用start函数:
animation1.start(); 您还可以使用on函数将事件处理程序添加到Animation对象。 此功能可用于创建链接的动画。 例如,下面的代码段逆转animation1动画结束时:
animation1.on(Events.AnimationEnd, function(){

	// Create a reversed copy of animation1 and play it
	animation1.reverse().start();
});
动画看起来像这样:
6.更改设备方向
到目前为止,我向您展示的所有示例均以纵向方式呈现了移动设备。 如果你想使用横向,您需要将值90分配到orientation的财产DeviceComponent 。
device.orientation = 90;在浏览器中,设备现在将如下所示:
要设置方向变化的动画,请使用setOrientation方法,将true作为其第二个参数传递。
device.setOrientation(90, true);结论
在本教程中,您学习了如何利用Framer的更高级功能,例如嵌套或嵌入的图层,图层效果,滚动容器和动画事件。 只需一点点创意和努力,您现在就可以使用Framer框架创建出色的原型。 这里有一些美丽的模型可以激发您的灵感。
请参阅Framer的文档以了解有关此功能强大的原型框架的更多信息。
翻译自: https://code.tutsplus.com/tutorials/beyond-the-basics-with-framer--cms-24294


 被折叠的 条评论
为什么被折叠?
被折叠的 条评论
为什么被折叠?
 到【灌水乐园】发言


