


作为一个成功的电子商务框架,Magento本身提供了许多付款方式。 但是,如果尚不可用,您还可以创建一个自定义付款方式扩展插件来插入您选择的付款网关。
在本系列中,我们将研究创建自定义付款方式扩展的过程。 在本文中,我们将从后端部分开始,为我们的自定义付款方式设置配置。
我假设您熟悉Magento中的基本模块创建过程。 如果没有,您可以参考有关自定义模块开发的本文 。
文件设置概览
我们将创建一个自定义模块“ Custompaymentmethod”,因此让我们看一下后端配置设置所需的文件列表。
-
app/etc/modules/Envato_All.xml:这是用于启用我们的自定义模块的文件。 -
app/code/local/Envato/Custompaymentmethod/etc/config.xml:这是一个模块配置文件,我们将在其中声明自定义付款方式。 -
app/code/local/Envato/Custompaymentmethod/etc/system.xml:这是一个系统配置文件,我们将在其中为自定义付款方式设置配置选项。 -
app/code/local/Envato/Custompaymentmethod/sql/custompaymentmethod_setup/install-1.0.0.0.php:这是一个SQL文件,我们将使用它创建自定义付款方式的自定义字段。
创建文件和文件夹
首先,我们需要创建一个模块启动器文件。 创建一个文件“ app / etc / modules / Envato_All.xml”,并将以下内容粘贴到该文件中。 我们使用“ Envato”作为我们的模块名称空间,使用“ Custompaymentmethod”作为我们的模块名称。 默认情况下,它将启用我们的“ Custompaymentmethod”模块。
<?xml version="1.0"?>
<config>
  <modules>
    <Envato_Custompaymentmethod>
      <active>true</active>
      <codePool>local</codePool>

      <depends>
        <Mage_Payment />
      </depends>
    </Envato_Custompaymentmethod>
  </modules>
</config>
这里没什么好想的,我们只是在“本地”代码池下声明了我们的模块。 但是,这里要注意的重要一点是,我们已经声明我们的扩展名取决于核心的“ Mage_Payment”扩展名。
继续,创建一个包含以下内容的“ app / code / local / Envato / Custompaymentmethod / sql / custompaymentmethod_setup / install-1.0.0.0.php”文件。
<?php
$installer = $this;
$installer->startSetup();
$installer->run("
ALTER TABLE `{$installer->getTable('sales/quote_payment')}`
ADD `custom_field_one` VARCHAR( 255 ) NOT NULL,
ADD `custom_field_two` VARCHAR( 255 ) NOT NULL;

ALTER TABLE `{$installer->getTable('sales/order_payment')}`
ADD `custom_field_one` VARCHAR( 255 ) NOT NULL,
ADD `custom_field_two` VARCHAR( 255 ) NOT NULL;
");
$installer->endSetup();
这是我们模块的安装文件,它将在与付款相关的表格中创建“ custom_field_one”和“ custom_field_two”字段。
接下来,我们需要创建一个模块配置文件。 创建“ app / code / local / Envato / Custompaymentmethod / etc / config.xml”,并将以下内容粘贴到该文件中。
<?xml version="1.0"?>
<config>
  <modules>
    <Envato_Custompaymentmethod>
      <version>1.0.0.0</version>
    </Envato_Custompaymentmethod>
  </modules>

  <global>
    <fieldsets>
      <sales_convert_quote_payment>
        <custom_field_one>
          <to_order_payment>*</to_order_payment>
        </custom_field_one>
        <custom_field_two>
          <to_order_payment>*</to_order_payment>
        </custom_field_two>
      </sales_convert_quote_payment>
    </fieldsets>

    <helpers>
      <custompaymentmethod>
        <class>Envato_Custompaymentmethod_Helper</class>
      </custompaymentmethod>
    </helpers>

    <blocks>
      <custompaymentmethod>
        <class>Envato_Custompaymentmethod_Block</class>
      </custompaymentmethod>
    </blocks>

    <models>
      <custompaymentmethod>
        <class>Envato_Custompaymentmethod_Model</class>
      </custompaymentmethod>
    </models>

    <resources>
      <custompaymentmethod_setup>
        <setup>
          <module>Envato_Custompaymentmethod</module>
        </setup>
      </custompaymentmethod_setup>
    </resources>
  </global>

  <default>
    <payment>
      <custompaymentmethod>
        <active>1</active>
        <model>custompaymentmethod/paymentmethod</model>
        <order_status>pending</order_status>
        <title>CustomPaymentMethod</title>
        <allowspecific>0</allowspecific>
        <payment_action>sale</payment_action>
      </custompaymentmethod>
    </payment>
  </default>

  <frontend>
    <routers>
      <custompaymentmethod>
        <use>standard</use>
        <args>
          <module>Envato_Custompaymentmethod</module>
          <frontName>custompaymentmethod</frontName>
        </args>
      </custompaymentmethod>
    </routers>
  </frontend>
</config>
让我们看一下“ config.xml”文件中的一些重要元素。 在前端结帐过程中,当用户选择我们的自定义付款方式时,我们将显示两个用于输入信息的文本框。 这些仅是为了演示在前端付款方式中使用自定义字段。
稍后我们将详细介绍,但现在仅假设我们需要在创建订单期间保存与自定义付款方式相关的自定义字段。 <fieldsets>和<sales_convert_quote_payment>标签正是用于此目的的-它们将告诉Magento保存这些字段以及订单信息。
接下来,我们声明了通常的帮助器,块和模型相关的标签,这些标签将在本系列的其他部分中实现。 此外,我们已经使用<custompaymentmethod_setup>标记声明了自定义模块的资源。 回顾我们前面提到的“ install-1.0.0.0.php”文件。 是的,它与该安装文件完全相关。 Magento将检测到此文件,并为我们的模块运行必要的SQL安装脚本。
最后,我们使用<payment>标签下的<payment> <custompaymentmethod>标签插入自定义付款方式。 在该标签下,我们为付款方式设置了默认配置,例如“活动”,“ order_status”,“ payment_action”等。在文件末尾,我们为模块声明了一个前端路由器。 ,这将在本系列的其他部分中实现。
让我们继续下一个重要的文件“ system.xml”文件。 创建一个文件“ app / code / local / Envato / Custompaymentmethod / etc / system.xml”,并将以下内容粘贴到该文件中。
<?xml version="1.0"?>
<config>
<sections>
<payment>
<groups>
<custompaymentmethod translate="label" module="custompaymentmethod">
<label>CustomPaymentMethod Module</label>
<sort_order>1000</sort_order>
<show_in_default>1</show_in_default>
<show_in_website>1</show_in_website>
<show_in_store>0</show_in_store>
<fields>
<title translate="label">
<label>Title</label>
<frontend_type>text</frontend_type>
<show_in_default>1</show_in_default>
<show_in_website>1</show_in_website>
<show_in_store>0</show_in_store>
<sort_order>1</sort_order>
</title>
<active translate="label">
<label>Enabled</label>
<frontend_type>select</frontend_type>
<source_model>adminhtml/system_config_source_yesno</source_model>
<show_in_default>1</show_in_default>
<show_in_website>1</show_in_website>
<show_in_store>0</show_in_store>
<sort_order>2</sort_order>
</active>
<order_status translate="label">
<label>New order status</label>
<frontend_type>select</frontend_type>
<source_model>adminhtml/system_config_source_order_status</source_model>
<show_in_default>1</show_in_default>
<show_in_website>1</show_in_website>
<show_in_store>0</show_in_store>
<sort_order>3</sort_order>
</order_status>
<allowspecific translate="label">
<label>Payment from applicable countries</label>
<frontend_type>allowspecific</frontend_type>
<source_model>adminhtml/system_config_source_payment_allspecificcountries</source_model>
<show_in_default>1</show_in_default>
<show_in_website>1</show_in_website>
<show_in_store>1</show_in_store>
<sort_order>4</sort_order>
</allowspecific>
<specificcountry translate="label">
<label>Payment from Specific countries</label>
<frontend_type>multiselect</frontend_type>
<source_model>adminhtml/system_config_source_country</source_model>
<show_in_default>1</show_in_default>
<show_in_website>1</show_in_website>
<show_in_store>1</show_in_store>
<sort_order>5</sort_order>
</specificcountry>
</fields>
</custompaymentmethod>
</groups>
</payment>
</sections>
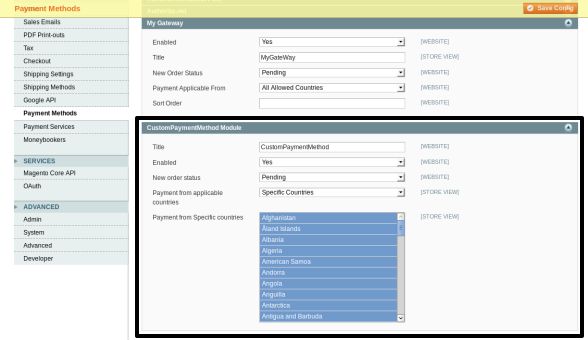
</config>在此文件中,我们只需声明自定义付款方式的可配置字段即可。 继续并从后端启用模块。 进入系统>配置>销售>付款方式 ,它将列出所有付款方式。 您应该会看到“ CustomPaymentMethod模块”列为付款方式之一!
结论
今天,我们已经研究了自定义付款方式的初始后端配置设置。 在本系列的后续文章中,我们将看到其前端版本。 不要忘记使用下面的提要来分享您的想法。


 343
343

 被折叠的 条评论
为什么被折叠?
被折叠的 条评论
为什么被折叠?
 到【灌水乐园】发言


