


tcpdump教程
Tcpdump is a packet sniffer for everyday use. There is a lot of packet sniffers but tcpdump differs with his general availability and ease of use. Tcpdump use libcap library which is the core library used for packet sniffing. Here we will look at general usage examples of packet sniffing. Be aware that to use tcpdump, tcpdump should have enough privilege and security mechanisms like SELinux, AppArmor should give permission. Captured data is generally written into a file with pcap extension. Pcap files can be read and parsed with popular GUI based network tool Wireshark.
Tcpdump是日常使用的数据包嗅探器。 数据包嗅探器很多,但是tcpdump的可用性和易用性有所不同。 Tcpdump使用libcap库,该库是用于数据包嗅探的核心库。 在这里,我们将看一下数据包嗅探的一般用法示例。 请注意,要使用tcpdump,tcpdump应该具有足够的特权和安全机制,例如SELinux,AppArmor应该给予许可。 通常将捕获的数据写入具有pcap扩展名的文件中。 可以使用流行的基于GUI的网络工具Wireshark读取和解析Pcap文件。
Tcpdump命令人 (Tcpdump Command Man)
More detailed information can be get from tcpdump man page like below.
可以从tcpdump手册页获取更多详细信息,如下所示。
$ man tcpdump
列出具有Tcpdump的网络接口 (List Network Interfaces with Tcpdump)
On a standard Linux system, there is a lot of interfaces. I mean not just network interface also USB interfaces exists. Tcpdump can listen to USB protocol from USB interfaces and other special Kernel devices. Tcpdump numbers interfaces as optional usage. First to select interface list interfaces tcpdump can sniff and capture.
在标准Linux系统上,有很多接口。 我的意思是不仅存在网络接口,而且存在USB接口。 Tcpdump可以从USB接口和其他特殊的内核设备监听USB协议。 Tcpdump数字接口作为可选用法。 首先选择接口列表tcpdump可以嗅探和捕获接口。
$ tcpdump -D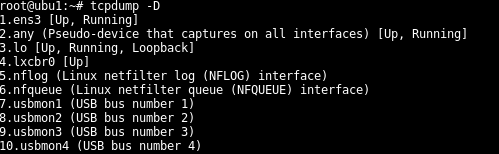
As we see from screenshot tcpdump can sniff 10 interfaces on this Ubuntu system. Tcpdump also gives some information about interface status like up/down and connection type. There is a special interfaces type numbered 2 which named any where all interfaces traffic can be sniffed from these interfaces
正如我们从屏幕截图中看到的,tcpdump可以嗅探该Ubuntu系统上的10个接口。 Tcpdump还提供了有关接口状态的一些信息,例如启动/关闭和连接类型。 有一个特殊的接口类型,编号为2,可以命名为其中可以从这些接口监听所有接口流量的任何接口
选择网络接口进行数据包捕获(Select Network Interface For Packet Capture)
To use one of the listed interfaces interface name or index can be used. Here is a special interface named any which captures all interfaces.
要使用列出的接口之一,可以使用接口名称或索引。 这是一个名为any的特殊接口,可捕获所有接口。
$ tcpdump -i 2OR
要么
$ tcpdump -i ens3使用Tcpdump捕获指定的端口 (Capturing Specified Port with Tcpdump)
By default all network traffic is captured with the tcpdump . This may create enormous output. If we want to only capture specific port we can use port option. In this example we will only listen HTTP port with the port http.
默认情况下,所有网络流量都使用tcpdump捕获。 这可能会产生巨大的输出。 如果我们只想捕获特定端口,则可以使用port选项。 在此示例中,我们将仅使用port http监听HTTP端口。
$ sudo tcpdump -i 2 "port http"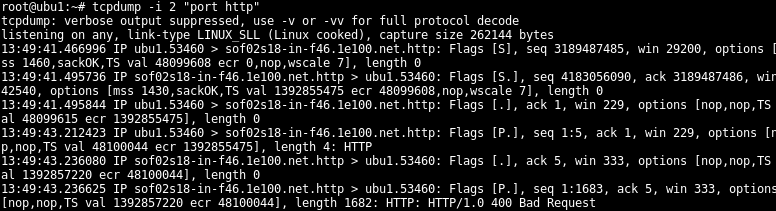
使用Tcpdump捕获数据包的详细输出(Verbose Output For Packet Capture with Tcpdump)
While capturing packets only IP header information is shown. To get more details about packets verbose option should be specified.
在捕获数据包时,仅显示IP标头信息。 要获取有关数据包的更多详细信息,应指定详细选项。
$ tcpdump -i 2 port http -v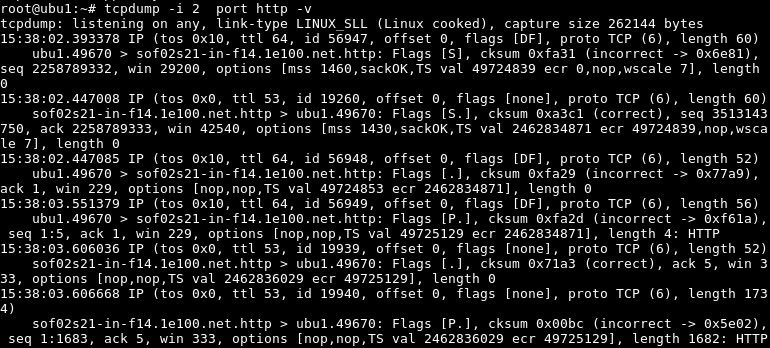
增加细节(Increase Verbosity)
To see more details than current details verbosity level can be increased with the -vvv by adding new v to the option like below.
要查看比当前详细信息更多的详细信息,可以使用-vvv通过向以下选项中添加新的v来增加详细级别。
$ tcpdump -i 2 port http -vvv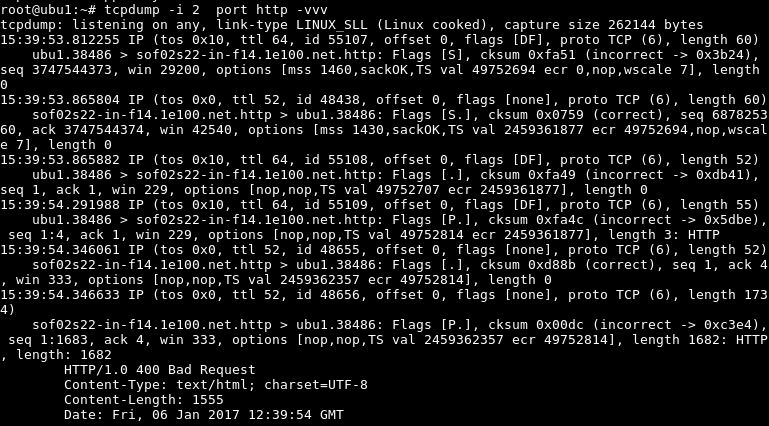
递减精度(Decrement Verbosity)
It can be decreased the default verbosity to get more elegant output for the packet sniffing with option -q .
可以降低默认的详细程度,以使用-q选项获得更优雅的数据包嗅探输出。
$ tcpdump -i 2 port http -q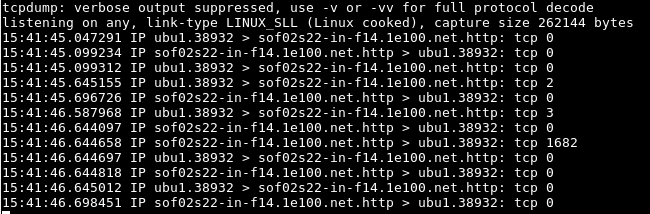
以ASCII或文本格式显示捕获的数据包(Display Captured Packets in ASCII or Text Format)
While capturing packets we may want to show them as ASCII or text. For example in HTTP traffic we can ouput HTTP headers directly to the console.
在捕获数据包时,我们可能希望将其显示为ASCII或文本。 例如,在HTTP通信中,我们可以将HTTP标头直接输出到控制台。
$ tcpdump -i 2 "port http" -A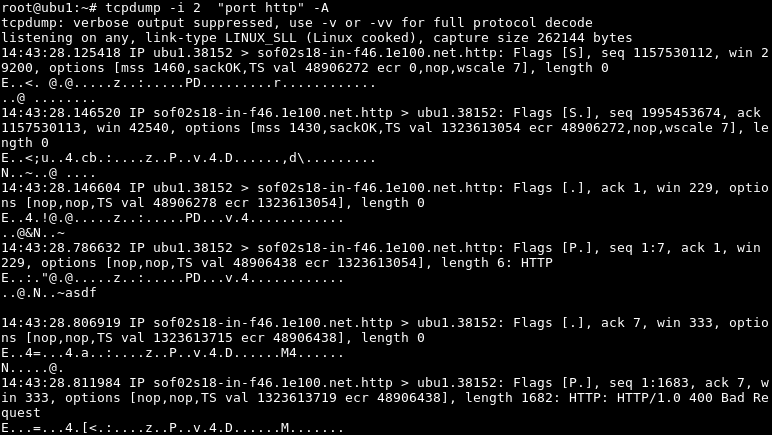
以十六进制格式显示捕获的数据包(Display Captured Packets In Hex Format)
Another way to display captured files is Hex format.
显示捕获文件的另一种方法是十六进制格式。
$ tcpdump -i 2 "port http" -X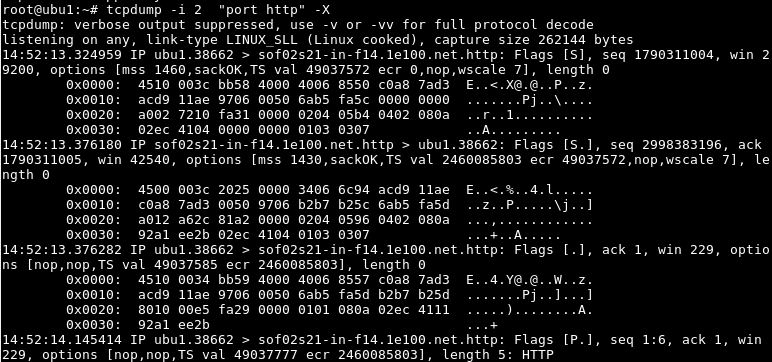
显示端口,数字格式的主机信息(Display Port, Hosts Information In Numeric Format)
By default port and ip numbers are displayed as text for example port 80 will shown as http or an ip address will shown as host name if it can be resolved. These information can be shown as numeric like below.
默认情况下,端口和IP地址以文本显示,例如,如果可以解析,则端口80将显示为http或IP地址将显示为主机名。 这些信息可以显示为数字,如下所示。
$ tcpdump -i 2 port http -q -n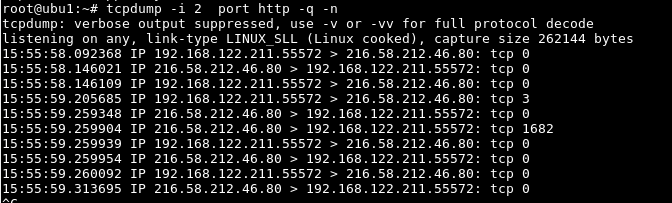
将数据包计数设置为捕获(Set Packet Count To Capture)
In some situations, we want to limit captured packet count for example to identify network traffic we generally need the start of the TCP session. Specify count for captured packets here we set it to 5.
在某些情况下,我们希望限制捕获的数据包数量,例如,以识别我们通常需要启动TCP会话的网络流量。 指定捕获数据包的计数,此处将其设置为5。
$ tcpdump -i 2 "port http" -c 5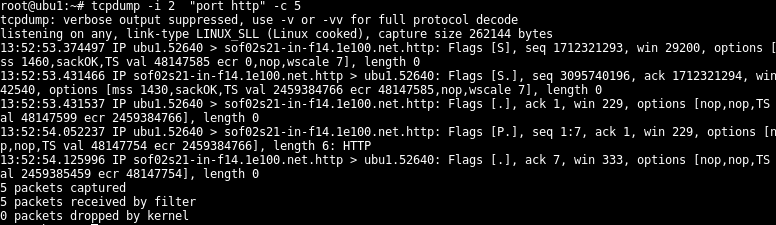
设置要捕获的数据包大小(Set Packet Size To Capture)
Another similar option to limiting capture is setting total capture size for each packet. Each packet can have different sizes these options will set standard size for each packet captured. Set size for the captured packet, we set here 100 bytes this is useful when redirecting captures to the file.
限制捕获的另一个类似选项是为每个数据包设置总捕获大小。 每个数据包可以具有不同的大小,这些选项将为捕获的每个数据包设置标准大小。 设置捕获数据包的大小,我们在此处设置100字节,这在将捕获重定向到文件时很有用。
$ tcpdump -i 2 "port http" -C 100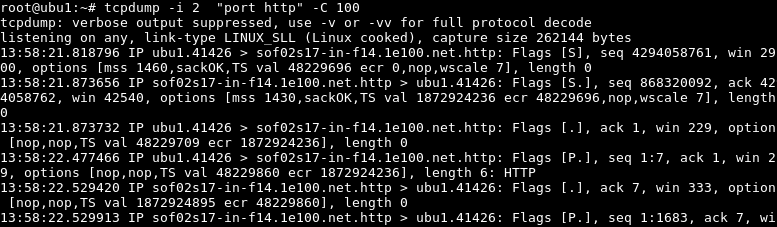
仅捕获TCP数据包(Capture Only TCP Packets)
Normally all network layers protocols are saved from the Ethernet protocol to Application protocol. But only a specific layer can be captured by specifying a protocol like TCP like below.
通常,所有网络层协议都从以太网协议保存到应用程序协议。 但是通过指定如下所示的TCP之类的协议,只能捕获特定的层。
$ tcpdump -i 2 tcp仅捕获Udp数据包 (Capture Only Udp Packets)
Like Tcp packet only Udp packets can be captured like below.
像Tcp数据包一样,仅Udp数据包可以按以下方式捕获。
$ tcpdump -i 2 udp仅捕获Icmp数据包 (Capture Only Icmp Packets)
This command will capture and sniff only ICMP packets.
此命令将仅捕获和嗅探ICMP数据包。
$ tcpdump -i 2 icmp仅捕获Arp数据包 (Capture Only Arp Packets)
Tcpdump have the ability to only capture Arp packets like below.
Tcpdump只能捕获如下所示的Arp数据包。
$ tcpdump -i 2 arp仅捕获IP数据包 (Capture Only IP Packets)
As shown previous example we can capture specific protocols. In this example, we will capture only IP packets.
如前面的示例所示,我们可以捕获特定的协议。 在此示例中,我们将仅捕获IP数据包。
$ tcpdump -i 2 ip仅捕获指定的目标IP流量 (Capture Only Specified Destination IP Traffic)
Another useful filter for network traffic while using tcpdump is filtering according to the destination IP address. The destination IP address can be specified with dst like below.
使用tcpdump时,另一个针对网络流量的有用过滤器是根据目标IP地址进行过滤。 可以使用dst来指定目标IP地址,如下所示。
$ tcpdump -i 2 dst google.com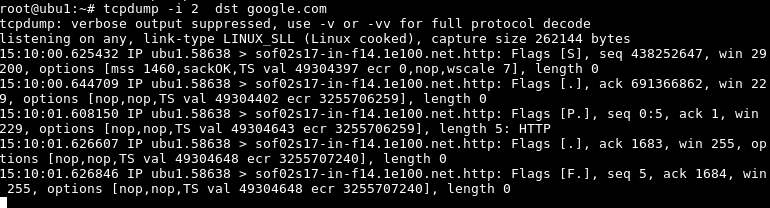
仅捕获指定的网络流量(Capture Only Specified Network Traffic)
We have previously filtered captured packets according to hostname. We can also use network filters to filter according to specified networks.
我们先前已根据主机名过滤捕获的数据包。 我们还可以使用网络过滤器根据指定的网络进行过滤。
$ tcpdump -i 2 net 172.217.17.0/24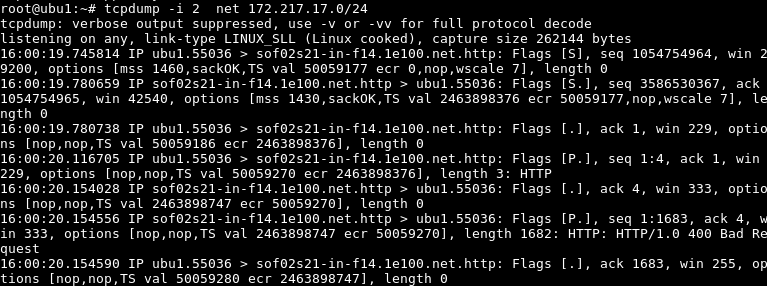
仅捕获指定的端口范围(Capture Only Specified Port Range)
Specifying multiple ports for filtering is not a practical solution. Tcpdump provides options to easily define port ranges with portrange option.
指定多个端口进行过滤不是实际的解决方案。 Tcpdump提供了一些选项,可使用portrange选项轻松定义端口范围。
$ tcpdump -i 2 portrange 70-90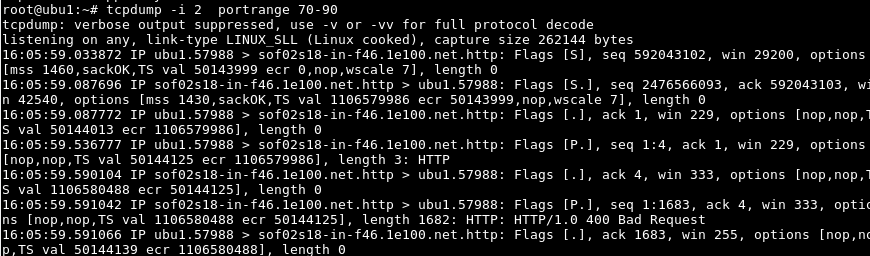
将捕获的数据包保存到Pcap文件(Saving Captured Packets To Pcap File)
Captured packets information is printed to the console which is by default command line. If we want to save the to a file following command.Save captured files to the file named deneme.pcap . Actually there is a lot of supported capture file format but pcap is common usage. File
捕获的数据包信息将打印到控制台,默认情况下是命令行。 如果要使用以下命令将文件保存到文件,请将捕获的文件保存到名为deneme.pcap的文件中。 实际上,有很多受支持的捕获文件格式,但是pcap是常见用法。 文件
$ tcpdump -i 2 "port http" -w deneme.pcap
读取Pcap捕获文件(Reading Pcap Capture File)
After saving capture file tcpdump can read the file and show output to the terminal with the following command.
保存捕获文件后,tcpdump可以读取文件,并使用以下命令将输出显示到终端。
$ tcpdump -i 2 -r deneme.pcap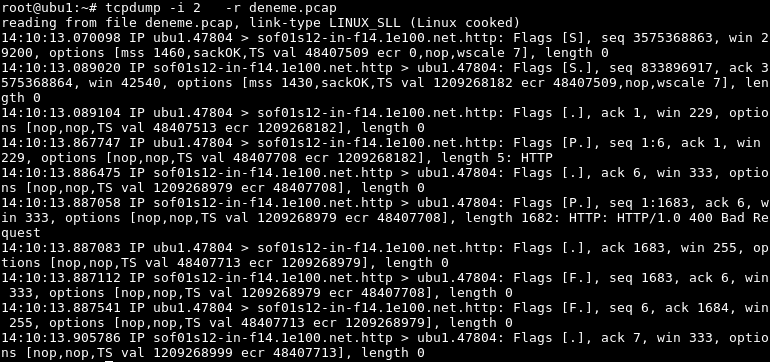
tcpdump教程


 6004
6004


 被折叠的 条评论
为什么被折叠?
被折叠的 条评论
为什么被折叠?
 到【灌水乐园】发言


