


Windows firewall is a useful mechanism which is used to control network traffic and ports. There are different ways to manage Windows firewall like GUI, Powershell and MS-DOS. Today we will look in detail how to manage windows firewall from command line with a popular tool named netsh . Netsh is a built-in tool which exists all Windows versions like Windows Server 2008, Windows Server 2012, windows Server 2016, Windows 7, Windows 8 and Windows 10.
Windows防火墙是一种有用的机制,用于控制网络流量和端口。 有多种管理Windows防火墙的方法,例如GUI,Powershell和MS-DOS。 今天,我们将详细介绍如何使用流行的工具netsh从命令行管理Windows防火墙。 Netsh是一个内置工具,存在所有Windows版本,例如Windows Server 2008,Windows Server 2012,Windows Server 2016,Windows 7,Windows 8和Windows 10。
帮帮我 (Help)
Help about netsh command can be printed with /? option.
可以使用/?打印有关netsh命令的帮助/? 选项。
$ netsh /?
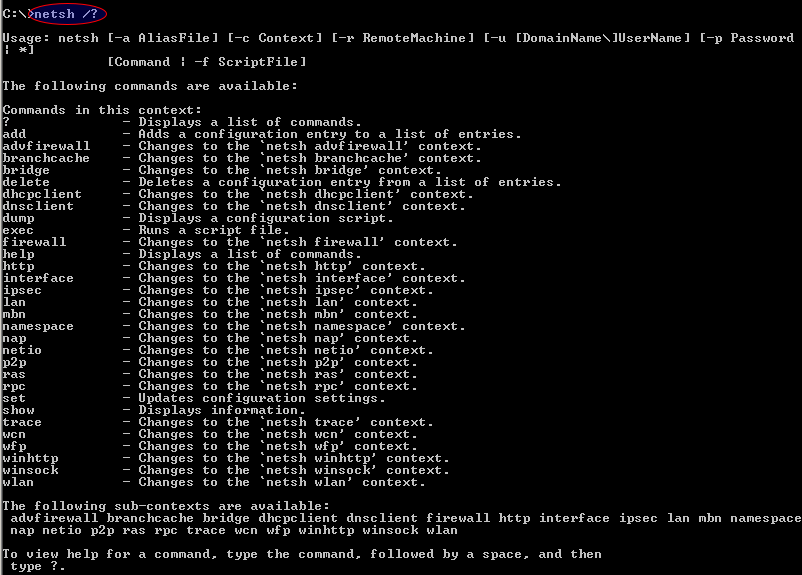
As we can see from the output netsh command provides a lot of network management features like Wlan, Bridge, Dhcp, Ras etc.
从输出netsh命令可以看到,该命令提供了许多网络管理功能,例如Wlan,Bridge,Dhcp,Ras等。
互动壳 (Interactive Shell)
Netsh command can be used from command line just issuing commands. But there is also an interactive shell where the same commands can be used to manage network. While using interactive shell netsh command is eliminated. Interactive shell can be started just using netsh command like below.
可以从仅发出命令的命令行中使用Netsh命令。 但是,还有一个交互式外壳,可以使用相同的命令来管理网络。 使用交互式shell时,可以消除netsh命令。 只需使用如下的netsh命令即可启动交互式shell。
$ neths

There is also sub shells or modules where they can be used issuing command like advfirewall
还有子外壳程序或模块,可在其中使用诸如advfirewall发布命令
$ advfirewall

网络资料 (Network Profiles)
As we know Windows operating systems comes with built-in profiles where different network security settings are application according to these profiles. After the network connection is established Windows ask us what type of network is the connected network. We select one of the following profiles.
我们知道Windows操作系统带有内置的配置文件,其中根据这些配置文件应用了不同的网络安全设置。 建立网络连接后,Windows将询问我们所连接的网络是哪种类型的网络。 我们选择以下配置文件之一。
- Domain Profile 域配置文件
- Private Profile私人简介
- Public Profile公开个人资料
列出所有网络配置文件(List All Network Profiles)
All existing network profiles can be listed with advfirewall show allprofiles command like below.
可以使用advfirewall show allprofiles命令列出所有现有的网络配置文件,如下所示。
$ advfirewall show allprofiles

As we can see from command output following information about network profiles are provided.
从命令输出中可以看到,下面提供了有关网络配置文件的信息。
Stateshow whether this profiles is available and useableState显示此配置文件是否可用Firewall Policyshow Inbound and Outbound connection policy whether inbound or outbound connection can be made in this profile by default.Firewall Policy默认显示可以在此配置文件中进行入站或出站连接的入站和出站连接策略。Local Firewall Rulesshows whether local firewall rules exists or Group Policy inherited.Local Firewall Rules显示是否存在本地防火墙规则或继承了组策略。Local Con Sec RulesLocal Con Sec RulesInbound User Notificationshow if an inbound connection is established whether a notification will be shown users desktopInbound User Notification显示是否建立了入站连接,是否将通知显示给用户桌面Remote Managementspecifies whether remote management ports and mechanisms can be used.Remote Management指定是否可以使用远程管理端口和机制。Loggingis partition about creating logs.Logging是有关创建日志的分区。Log Allowed Connectionsshows the configuration whether allowed connections will be loggedLog Allowed Connections显示配置是否记录允许的连接Log Dropped Connectionsshows the configuration whether dropped connections will be loggedLog Dropped Connections显示配置是否将记录掉线连接File Namespecifies the path and name of the firewall log.File Name指定防火墙日志的路径和名称。Max File Sizeshows the size of a log file which can be the maximumMax File Size显示日志文件的大小,可以是最大
域配置文件(Domain Profile)
Domain profile is designed Windows systems those are in the Windows Domain.
域配置文件是Windows域中设计的Windows系统。
私人简介 (Private Profile)
Private profile is designed to be used in private life areas like home or at friend where we can semi trust to the network and not controlled by domain controller.
专用配置文件旨在用于家庭或朋友等私人生活区域,在这些区域中我们可以半信任网络,而不受域控制器的控制。
公开个人资料 (Public Profile)
Public profile is designed to be used in public areas where real security threads exists. These areas are libraries, cafe etc.
公共配置文件旨在用于存在真实安全性线程的公共区域。 这些区域是图书馆,咖啡厅等。
关闭防火墙 (Turn Off Firewall)
Windows firewall is by default enabled. Firewall rules are strict and generally do not give ability to run 3. party applications on different ports. Another scenario is we have all ready installed an end point security solution and we do not need Windows built-in firewall. We can simply turn off Firewall. This will disable firewall for currently active network profile.
默认情况下启用Windows防火墙。 防火墙规则很严格,通常不具备在不同端口上运行第三方应用程序的能力。 另一种情况是我们已经准备好安装端点安全解决方案,并且我们不需要Windows内置防火墙。 我们可以简单地关闭防火墙。 这将禁用当前活动的网络配置文件的防火墙。
$ advfirewall set currentprofile state off

开启防火墙(Turn On Firewall)
As we stated previous step firewall of Windows operating systems are enabled by default. But we may need to enable and start firewall in some situations. This will enable firewall for currently active network profile.
如前所述,Windows操作系统的防火墙默认情况下处于启用状态。 但是在某些情况下,我们可能需要启用并启动防火墙。 这将为当前活动的网络配置文件启用防火墙。
$ advfirewall set currentprofile state on

打开所有网络配置文件的防火墙(Turn On Firewall For All Network Profiles)
Previous steps turn on and off firewall for the current provide. We can also turn on firewall for all existing profile with the following command. This will turn on firewall for Domain, Private and Public Profiles for the default configuration.
前面的步骤打开和关闭当前提供的防火墙。 我们还可以使用以下命令为所有现有配置文件打开防火墙。 这将为默认配置打开域,专用和公用配置文件的防火墙。
$ advfirewall set allprofiles state on

列出当前的防火墙配置(List Current Firewall Configuration)
We have previously listed all existing profiles configurations. We can also list only current profile configuration.
我们之前已经列出了所有现有的配置文件配置。 我们还可以仅列出当前的配置文件配置。
$ advfirewall show currentprofile

开放港口(Open Port)
Now we can start the real firewall management operations. One of the most used command and feature is opening firewall port. We will specify the Layer 4 protocol type like TCP or UDP and the port number with related name for identifier. In this example we will enable the port number 443 and name it MyHttps.
现在我们可以开始真正的防火墙管理操作了。 最常用的命令和功能之一是打开防火墙端口。 我们将指定第4层协议类型(例如TCP或UDP以及带有相关名称的端口号作为标识符。 在此示例中,我们将启用端口号443并将其命名为MyHttps 。
$ advfirewall firewall add portopening tcp 443 MyHttps
关闭端口 (Close Port)
We may need to close a port to make our system more secure and fortify our system. We will use delete command to remove existing open ports or exceptions. In this example we remote the port number TCP 443 with the name of MyHttps .
我们可能需要关闭端口以使我们的系统更安全并加强我们的系统。 我们将使用delete命令删除现有的打开端口或异常。 在此示例中,我们使用MyHttps的名称远程控制端口号TCP 443 。
$ firewall delete portopening tcp 443
丢弃ICMP或Ping数据包 (Drop ICMP or Ping Packets)
One of the most used technique to troubleshoot the network connectivity in IT environment is using ICMP packets in Ping mechanism. We generally ping remote system to decide whether the network is running and remote system is up. But this may create some security hole in critical environments. So disabling ping is the more secure way.
解决IT环境中网络连接问题最常用的技术之一是在Ping机制中使用ICMP数据包。 我们通常对远程系统执行ping操作,以确定网络是否正在运行以及远程系统是否已启动。 但这可能会在关键环境中造成一些安全漏洞。 因此,禁用ping是更安全的方法。
We can disable the ping and drop ICMP packets with the following command.
我们可以使用以下命令禁用ping并丢弃ICMP数据包。
$ firewall set icmpsetting type=all mode=disable
启用日志 (Enable Log)
Logging creates structural information about the events occurred in the Windows firewall. These logs may provide information about users, remote IP addresses, ports and actions. Logs can be used for security related mechanisms like Log Collection and SIEM. We can enable logs with set logging command like below.
日志记录会创建有关Windows防火墙中发生的事件的结构信息。 这些日志可能提供有关用户,远程IP地址,端口和操作的信息。 日志可用于与安全相关的机制,例如日志收集和SIEM。 我们可以使用如下所示的set logging命令启用日志。
$ firewall set logging %systemroot%\system32\LogFiles\Firewall\pfirewall.log 4096 ENABLE
In this example we enable logging by specifying log file path, the maximum line count of log file and status. After the maximum line count is reached the old logs will be deleted.
在此示例中,我们通过指定日志文件路径,日志文件的最大行数和状态来启用日志记录。 达到最大行数后,旧日志将被删除。
翻译自: https://www.poftut.com/manage-windows-firewall-command-line-netsh-command/


 5296
5296

 被折叠的 条评论
为什么被折叠?
被折叠的 条评论
为什么被折叠?
 到【灌水乐园】发言


