


Linux provides tool named grep for filter text data or output according to given string or regular expression. This tool is popular amongst Linux system administrators. On the other side Windows operating systems generally lacks this tool and its functionality up to Powershell. Powershell provides Select-String commandlet to provide similar features and options the Linux grep tool provides. In this tutorial we will look different use cases with examples of Select-String tool.
Linux提供了名为grep的工具,用于根据给定的字符串或正则表达式过滤文本数据或输出。 该工具在Linux系统管理员中很流行。 另一方面,Windows操作系统通常缺少此工具及其功能,直到Powershell为止。 Powershell提供了Select-String Commandlet,以提供Linux grep工具提供的类似功能和选项。 在本教程中,我们将通过Select-String工具的示例查看不同的用例。
帮帮我 (Help)
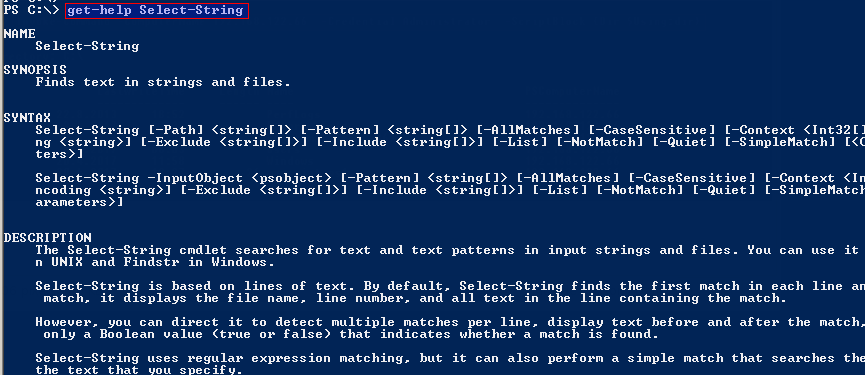
Help about Select-String can be get with the following command.
可以通过以下命令获取有关Select-String帮助。
PS> get-help Select-String
在文件中搜索字符串(Search String In A File)
One of the simplest usage and most used feature is simply searching given string in a file. We will provide following options
最简单和最常用的功能之一就是简单地搜索文件中的给定字符串。 我们将提供以下选项
-Patternspecifies the string we are searching for-Pattern指定我们要搜索的字符串
poet.txt is the file we search in.
poet.txt是我们搜索的文件。
PS> Select-String -Pattern EX .\poet.txt

在多个文件中搜索字符串(Search String In Multiple Files)
In previous example we have searched given string in a single file but real world problems are more than that. We can search string in multiple files by providing file name or extension with the help asterisk. In this example we will search in all text files by specifying *.txt file name.
在前面的示例中,我们已经在单个文件中搜索了给定的字符串,但是现实世界中的问题不止于此。 我们可以通过提供带有帮助星号的文件名或扩展名来搜索多个文件中的字符串。 在此示例中,我们将通过指定*.txt文件名来搜索所有文本文件。
PS> Select-String -Pattern EX *.txt

递归搜索文件(Search Files Recursively)
Now the most advanced file specification is searching files recursively. Recursively searching will look given string in all current folder and al subfolders. We will provide Get-ChildItem command to provide files recursively to the Select-String command like below.
现在,最高级的文件规范是递归搜索文件。 递归搜索将在所有当前文件夹和al子文件夹中查找给定的字符串。 我们将提供Get-ChildItem命令,以递归方式将文件提供给Select-String命令,如下所示。
PS> Get-ChildItem c:\*.txt -Recurse | Select-String -Pattern EX

区分大小写的搜索(Case Sensitive Search)
By default given strings are searched case insensitive. We can change this behaviour by using -CaseSensitve option like below.
默认情况下,给定的字符串不区分大小写。 我们可以通过使用-CaseSensitve选项更改此行为,如下所示。
PS> Select-String -Pattern EX -CaseSensitive *.txt

匹配正则表达式(Match Regular Expression)
Regular expression provides to define more rich and structured string expressions. Select-String command also supports regular expressions. We can provide regular expressions into pattern too. In this example we will use regular expression E.*E to match string.
正则表达式提供了定义更丰富和结构化的字符串表达式的功能。 Select-String命令还支持正则表达式。 我们也可以提供正则表达式到模式中。 在此示例中,我们将使用正则表达式E.*E来匹配字符串。
PS> Select-String -Pattern "EX.*E" poet.txt

匹配整个单词(Match Whole Word)
By default given search term or string is looked partially or on whole words. If we need to match whole word which is surrounded by white spaces we should put white spaces around the search term. We will search case search term as a whole word.
默认情况下,给定的搜索词或字符串会部分或全部显示。 如果我们需要匹配被空格包围的整个单词,则应在搜索词前后加上空格。 我们将把case搜索词作为一个整体进行搜索。
PS> Select-String -Pattern " case " poet.txt

比赛前显示N行(Display N Lines Before Match)
If we are looking some part of the text and need to see previous lines of the matches we can provide -Context option whit the number of lines we want to print.
如果我们正在查找文本的某些部分,并且需要查看匹配项的前几行,我们可以提供-Context选项,其中包含我们要打印的行数。
PS> Select-String -Pattern "case" -Context 2,0 poet.txt

比赛结束后显示N行(Display N Lines After Match)
We will use -Context options again but we will provide after part of the line numbers. In this example we will print 3 lines after the match.
我们将再次使用-Context选项,但将在部分行号之后提供。 在本例中,我们将在比赛后打印3行。
PS> Select-String -Pattern "case" -Context 0,3 poet.txt

比赛前后显示N行(Display N Line Before and After Match)
Now we will provide both parameters to the -Context where before and after line numbers will be provided. In this example we will print 1 lines before match and 2 lines after match in a single shot.
现在,我们将两个参数都提供给-Context ,在此之前和之后将提供行号。 在此示例中,我们将在单张照片中打印比赛前1行和比赛后2行。
PS> Select-String -Pattern "case" -Context 1,2 poet.txt

突出显示比赛(Highlighting Matches)
In a result where there are a lot of match and text seeking the match specifically very hard. Highlighting the match will make the job easier.
结果是存在很多匹配项,并且文本很难找到匹配项。 突出显示匹配项将使工作更加轻松。
反转匹配或不匹配(Invert Match or Not Match)
Another useful feature is printing not matched lines or invert match. This is like logic NOT operation. We will use -NotMatch option tho show non matched lines.
另一个有用的功能是打印不匹配的行或反转匹配。 这就像逻辑NOT操作。 我们将使用-NotMatch选项,以显示不匹配的行。
PS> Select-String -Pattern "case" -NotMatch poet.txt

比赛数(Count Of Matches)
We may need to count the matches. If there are a lot of match counting them one by one is very trivial task. We can use returned matches count property to print count of matched lines.
我们可能需要计算比赛次数。 如果有很多比赛,一一统计,这是非常琐碎的任务。 我们可以使用返回的匹配count属性来打印匹配行的计数。
PS> $Result = Select-String -Pattern "case" -NotMatch poet.txt
PS> $Result.count

翻译自: https://www.poftut.com/grep-text-files-powershell-grep-select-string-cmdlet-windows/


 2771
2771

 被折叠的 条评论
为什么被折叠?
被折叠的 条评论
为什么被折叠?
 到【灌水乐园】发言


