


dism命令使用教程
Deployment Image Servicing and Management (DISM) is a tool that is used to scan and fix the WIM store issues which can affect Windows system files. DISM is a command-line tool and used with the Administrative privileges which means normal users can not use it. It can run currently running Windows operating system files as well as .vim , .vhd .vhdx files. Dism can be run in MS-DOS or PowerShell without a problem.
Deployment Image Servicing and Management (DISM)是一种工具,用于扫描和修复可能影响Windows系统文件的WIM存储问题。 DISM是一种命令行工具,具有“管理”权限,这意味着普通用户无法使用它。 它可以运行当前正在运行的Windows操作系统文件以及.vim , .vhd .vhdx文件。 Dism可以在MS-DOS或PowerShell中运行而不会出现问题。
Dism命令需要提升的权限(管理员模式) (Dism Command Requires Elevated Permissions (Administrator Mode))
Before using Dism we need to know that Dism requires Administrative privileges. For example, when we try to get help information with the /? we will get Error: 740 Elevated permissions are required to run DISM.. So we will start the MS-DOS terminal with Administrative privileges in normal user desktop.
在使用Dism之前,我们需要知道Dism需要管理特权。 例如,当我们尝试使用/?获得帮助信息时/? 我们将得到Error: 740 Elevated permissions are required to run DISM. 。 因此,我们将在普通用户桌面中以“管理”权限启动MS-DOS终端。

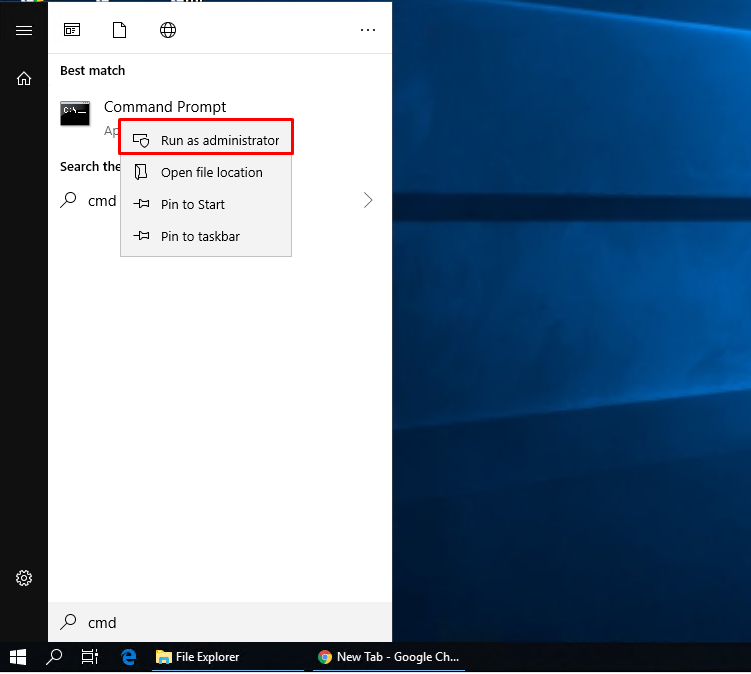
First, we will write the cmd command to the Start Menu like below and then right-click to the Command Prompt which will open a menu. Then click to the Run as administrator which will open the MS-DOS in Administrator mode.
首先,如下所示,我们将cmd命令写入“ Start Menu ,然后右键单击“ Command Prompt ,这将打开一个菜单。 然后单击以Run as administrator身份Run as administrator ,它将以管理员模式打开MS-DOS。
Dism帮助 (Dism Help)
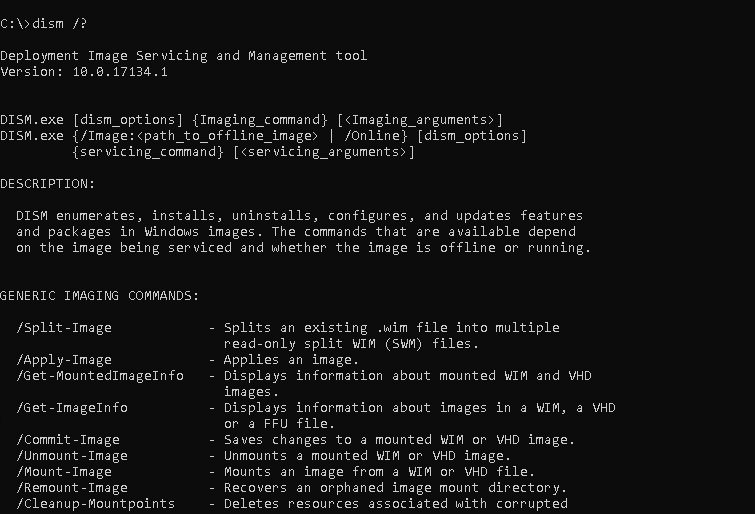
Dism provides different imaging commands to enumerate, install, uninstall, configure, update. We can list these commands and get information about them with the /? option like below.
Dism提供了不同的映像命令来枚举,安装,卸载,配置,更新。 我们可以列出这些命令并使用/?获得有关它们的信息/? 如下所示的选项。
扫描图像以更快地发现问题(Scan Image For Problems Faster)
Windows operating system components can be scanned with the following command. /CheckHealth option will scan faster way with fewer details.
可以使用以下命令扫描Windows操作系统组件。 /CheckHealth选项将以更少的详细信息更快地进行扫描。
> dism /Online /Cleanup-Image /CheckHealth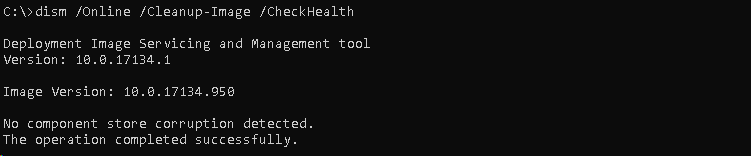
扫描图像以查看速度较慢和详细的问题(Scan Image For Problems Slower and Detailed)
If we want to scan a more detailed way the Windows files or Image we can use /ScanHealth option. This option process will take some time to complete but will provide a more detailed scan result.
如果我们想以更详细的方式扫描Windows文件或图像,可以使用/ScanHealth选项。 此选项过程将花费一些时间,但会提供更详细的扫描结果。
> dism /Online /Cleanup-Image /ScanHealth
自动扫描和修复(Scan and Repair Automatically)
If there are problems we can repair them automatically with the /RestoreHealth option.
如果有问题,我们可以使用/RestoreHealth选项自动修复。
> dism /Online /Cleanup-Image /RestoreHealth
指定Windows分区(Specify Windows Partition)
While using dism the current partition will be used to scan Windows operating system files. We can also specify different partitions for Windows operating system files. We will specify the partition with the /Image: option by providing a partition letter. In this example, we will scan the Windows operating system files in partition D:.
使用dism时,当前分区将用于扫描Windows操作系统文件。 我们还可以为Windows操作系统文件指定不同的分区。 我们将通过提供分区字母来使用/Image:选项指定分区。 在此示例中,我们将扫描分区D:的Windows操作系统文件。
> dism /Online /Image:D /Cleanup-Image /ScanHealth从指定的WIM文件修复 (Repair From Specified WIM File)
While repairing we can use a drive or path in order to specify WIM file. We can specify the WIM file location with the /Source: option and provide the path. In this example, we will use D:\install.wim as WIM file to repair.
修复时,我们可以使用驱动器或路径来指定WIM文件。 我们可以使用/Source:选项指定WIM文件的位置并提供路径。 在此示例中,我们将使用D:\install.wim作为WIM文件进行修复。
> dism /Online /Cleanup-Image /RestoreHealth /Source:D:\install.wim翻译自: https://www.poftut.com/dism-command-tutorial-to-repair-windows/
dism命令使用教程


 被折叠的 条评论
为什么被折叠?
被折叠的 条评论
为什么被折叠?
 到【灌水乐园】发言


